


 Loading...
TM-U325D/U325PD
User’s Manual
EPSON
FEED
R |
|
|
|
ELEASE |
RE |
|
|
ER |
OUT CE |
IPT |
|
|
ROR |
VAL |
|
|
PO |
IDAT |
ION |
|
|
WER |
400665708

Printer Parts and Labels
Printer cover
EPSON
F
EED
REL |
|
|
|
EASE |
R |
|
|
ER |
OUTECEIPT |
|
|
|
ROR |
VALI |
|
|
PO |
WER |
DATI |
|
|
ON |
|
Serial interface connector
14 |
25 |
|
|
|
1 |
6 |
2 |
1 |
13 |
3 |
1 |
|
|
||
|
1 |
6 |
2 |
|
|
3 |
1 |
Parallel interface connector
Control panel |
Control panel |
|
On/Off switch |
|
RECEIPT |
VALIDATION |
|
|
FEED RELEASE |
OUT |
|
|||
|
|
|
|
||
|
|
|
ERROR |
POWER |
|
|
|
|
|
EPSON/U325 Printer - File: PRNTR_8. |
|
|
|
|
|
W. Swanlund |
REV> 14Octobe |
Labels |
|
|
|
|
|
1 |
|
3 |
|
|
|
2 |
|
|
|
|
|
|
5 CUT |
|
|
|
|
|
|
|
4 |
|
|
2 SET |
|
|
|
|
|
1 |
3 |
|
|
|
|
|
6 |
CLOSE THE |
|
|
|
|
|
PRINTER COVER |
|
|
|

 CAUTION/ VORSICHT:
Print head cover and print head are hot.
Druckkopfabdeckung und Druckkopf sind heiß.
 CAUTION/ VORSICHT:
Caution label for drawer kick-out connector.
Vorsichtsetikett für Schnappsteckerbuchse.

All rights reserved. No part of this publication may be reproduced, stored in a retrieval system, or transmitted in any form or by any means, electronic, mechanical, photocopying, recording, or otherwise, without the prior written permission of Seiko Epson Corporation. No patent liability is assumed with respect to the use of the information contained herein. While every precaution has been taken in the preparation of this book, Seiko Epson Corporation assumes no responsibility for errors or omissions. Neither is any liability assumed for damages resulting from the use of the information contained herein.
Neither Seiko Epson Corporation nor its affiliates shall be liable to the purchaser of this product or third parties for damages, losses, costs, or expenses incurred by purchaser or third parties as a result of: accident, misuse, or abuse of this product or unauthorized modifications, repairs, or alterations to this product, or (excluding the U.S.) failure to strictly comply with Seiko Epson Corporation’s operating and maintenance instructions.
Seiko Epson Corporation shall not be liable against any damages or problems arising from the use of any options or any consumable products other than those designated as Original Epson Products or Epson Approved Products by Seiko Epson Corporation.
EPSON is a registered trademark of Seiko Epson Corporation in Japan and other countries/ regions.
Depending on the area, the interface cable may be included with the product. If so, use that cable.
Seiko Epson Corporation shall not be held liable for any damage resulting from electromagnetic interference that occurs from the use of any interface cables other than those designated as Epson approved products by Seiko Epson Corporation.
NOTICE: The contents of this manual are subject to change without notice.
Copyright © 1996, 1999 by Seiko Epson Corporation, Nagano, Japan.
i

Standards and Approvals
The following standards are applied only to the printers that are so labeled. (EMC is tested using the Epson power supplies.)
Europe: |
CE marking |
North America: |
FCC/ICES-003 Class A |
Oceania: |
AS/NZS CISPR22 Class A |
WARNING
This is a Class A product. In a domestic environment this product may cause radio interference in which case the user may be required to take adequate measures.
The connection of a non-shielded printer interface cable to this printer will invalidate the EMC standards of this device.
You are cautioned that changes or modifications not expressly approved by Seiko Epson Corporation could void your authority to operate the equipment.
CE marking
The printer conforms to the following Directives and Norms:
Directive 2004/108/EC
EN 55022 Class A EN 55024
IEC 61000-4-2
IEC 61000-4-3
IEC 61000-4-4
IEC 61000-4-5
IEC 61000-4-6
IEC 61000-4-11
Operation of this equipment in a residential area is likely to cause harmful interference, in which case the user will be required to correct the interference at his own expense.
For Canadian Users
This Class A digital apparatus complies with Canadian ICES-003.
À l'intention des utilisateurs canadiens
Cet appareil numérique de classe A est conforme à la norme canadienne NMB-003.
Indication of the manufacturer and the importer in accordance with requirements of directive 2011/65/EU (RoHS)
Manufacturer: SEIKO EPSON CORPORATION Address: 3-5, Owa 3-chome, Suwa-shi, Naganoken 392-8502, Japan
Telephone: 81-266-52-3131 Fax: 81-266-52-8409
Importer: EPSON EUROPE B.V. Address: Azië building, Atlas ArenA,
Hoogoorddreef 5, 1101 BA Amsterdam Zuidoost, The Netherlands
Telephone: 31-20-314-5000
FCC Compliance Statement for American Users
This equipment has been tested and found to comply with the limits for a Class A digital device, pursuant to Part 15 of the FCC Rules. These limits are designed to provide reasonable protection against harmful interference when the equipment is operated in a commercial environment.
This equipment generates, uses, and can radiate radio frequency energy and, if not installed and used in accordance with the instruction manual, may cause harmful interference to radio communications.
ii

About This Manual
Setting Up and Using
Chapter 1 contains information on unpacking the printer, setting it up, attaching theroll paper near-end sensor, and setting the DIP switches.
Chapter 2 contains information on using the printer.
Chapter 3 contains troubleshooting information.
Reference
Chapter 4 contains specifications and character code tables.
Warnings, Cautions, and Notes
 WARNING / WARNUNG:
Warnings must be followed carefully to avoid serious bodily injury.
Warnhinweise müssen sorgfältig befolgt werden, um Unfälle mit möglicherweise schweren Verletzungen zu vermeiden.
 CAUTION / VORSICHT:
Cautions must be observed to avoid minor injury to yourself or damage to your equipment.
Vorsichtshinweise müssen sorgfältig befolgt werden, um Unfälle mit der Gefahr leichter Verletzungen oder Schäden am Gerät zu vermeiden.
Note:
Notes have important information and useful tips on the operation of your printer.
Downloading Drivers, Utilities, and Manuals
Drivers, utilities, and manuals can be downloaded from one of the following URLs.
For customers in North America, go to the following web site: http://www.epsonexpert.com/ and follow the on-screen instructions.
For customers in other countries, go to the following web site: http://download.epson-biz.com/?service=pos
iii

Introduction
Features
The TM-U325D and TM-U325PD are high-quality POS printers that can print a multiple-line validation and on receipt paper (roll paper). The printer has the following features:
Easily changeable interface specifications for serial or parallel by exchanging the interface board.
Excellent reliability (long life) and good operability (drop-in paper loading).
Multiple-line validation printing (possible to print a maximum of 9 lines).
Compact and light in weight.
High-speed printing through logic-seeking control.
Excellent reliability and long life due to adoption of stepping motor, both for moving the carriage and for paper feeding.
Flexible line space setting permits printing in accordance with any user-defined format.
Conforms with ESC/POS; excellent universality of control.
Built-in drawer kick-out interface provides capability to drive two drawers.
Selectable character fonts (7 9 and 9 9).
Semi-automatic paper loading capability.
AC adapter provides compact power supply.
Automatic status back (ASB) function that automatically transmits changes in printer status.
Accessories
AC adapter
EPSON ribbon cassette, ERC-38
Options
EPSON power supply unit, PS-180
Printer fastening tape (Model No. DF-10)
Restriction of Use
When this product is used for applications requiring high reliability/safety, such as transportation devices related to aviation, rail, marine, automotive, etc.; disaster prevention devices; various safety devices, etc.; or functional/precision devices, etc.; you should use this product only after giving consideration to including fail-safes and redundancies into your design to maintain safety and total system reliability. Because this product was not intended for use in applications requiring extremely high reliability/safety, such as aerospace equipment, main communication equipment, nuclear power control equipment, or medical equipment related to direct medical care, etc., please make your own judgment on this product’s suitability after a full evaluation.
iv
Chapter 1
Setting Up the Printer
Unpacking
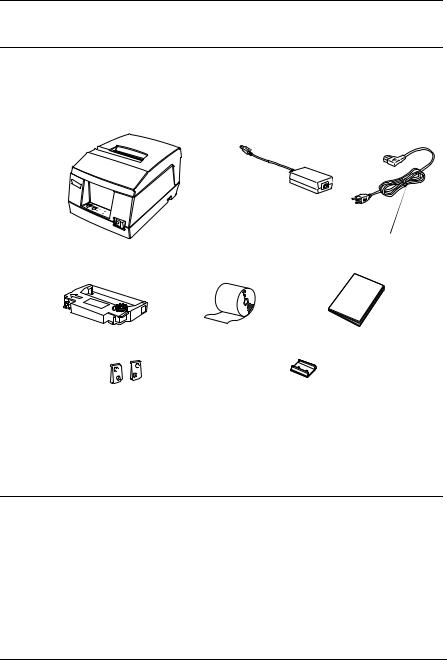
The illustration below shows the items included for the standard specification printer.
EPSON
Power supply
*1
Printer
Ribbon cassette Roll paper Manual
Spacers for the roll paper |
Power switch cover |
|
|
near-end sensor 2 pcs |
|
(*1) The AC cable may not be included in the package. If it is not, make sure to use a AC cable that complies with the safety standards.
If any item is damaged, please contact your dealer for assistance.
Selecting a Location
Place the printer on a surface that is as horizontal as possible. Make sure that the printer does not tilt more than 15 degrees.
The printer should be installed so that it does not move or vibrate during paper cutting or the drawer kick-out operation.
Fastening tape is available as an option.
Setting Up the Printer 1–1
Adjusting the Roll Paper Near-End Sensor
Notes:
Use rolls of paper with an inner core diameter of 10.5 to 12.5 mm so that the sensor detects the remaining paper correctly.
When the last portion of a roll paper bears red markings, the marking is sometimes an adhesive that pulls the entire roll paper up. In this case, the sensor may not detect the remaining paper correctly.
If the roll paper easily becomes loose because of the quality of the paper or other factors, incorrect detection of the paper end may result.
1.Make sure that the power supply is disconnected from the printer.
2.Two spacers are included. See the illustration below and decide whether or not you want to use them. Use them if you want the near-end sensor to be triggered when distance A is 3 to 4 mm; otherwise it will be triggered when distance A is approximately 6 mm.

 Distance A
3.Secure the roll paper near-end sensor (and spacers) with two screws. When you insert the spacers, be sure you set the spacers in the direction shown in the illustration.
1–2 Setting Up the Printer
Spacers
Roll paper 

 near-end sensor
4. Check to be sure that the detecting lever moves freely.
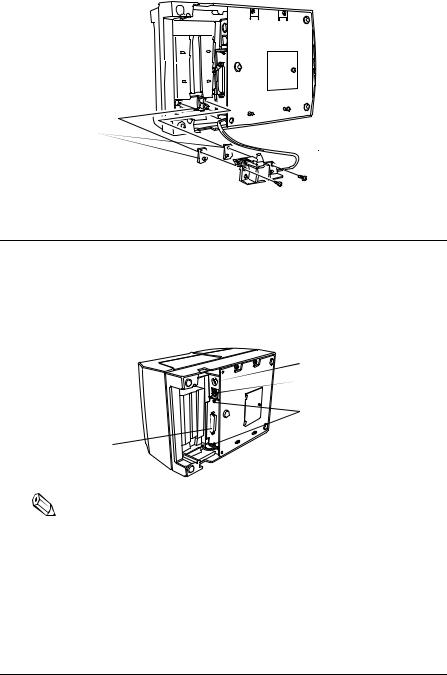
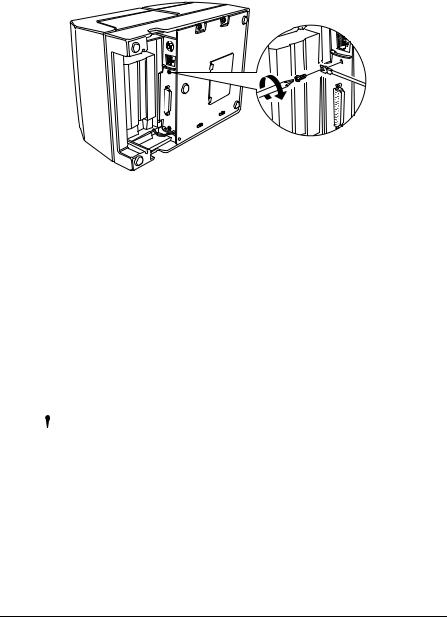
Connecting the Cables and Grounding the Printer
You can connect up to three cables and a grounding wire to the printer. They all connect to the connector panel on the bottom of the printer, which is shown below:
 Power supply
 Drawer kick-out
 Grounding screws
Interface |
Notes:
There is a caution label beside the drawer kick-out connector.
Depending on the interface installed, the interface connector on your printer may look different from the one illustrated.
Before connecting any of the cables, make sure that both the printer and the computer are turned off.
Setting Up the Printer 1–3
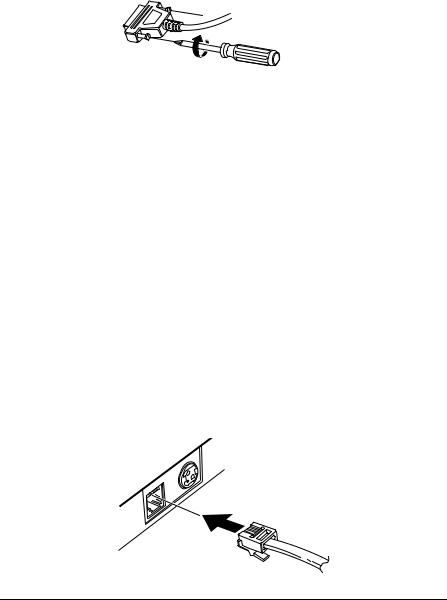
Connecting the Computer
1.Plug the cable into the connector on the printer and tighten the screws on both sides of the cable connector, as shown.
2.Connect the other end of the cable to the connector on your computer.
Connecting the Drawer
 WARNING:
Use a drawer that matches the printer specification. Using an improper drawer may damage the drawer as well as the printer.
 CAUTION:
Do not connect a telephone line to the drawer kick-out connector; otherwise the printer and the telephone line may be damaged.
Plug the drawer cable into the drawer kick-out connector on the bottom of the printer next to the power supply connector.
1–4 Setting Up the Printer
Anschließen der Lade
 WARNUNG:
Eine für den Drucker geeignete Lade verwenden. Bei Verwendung einer falschen Lade kann diese oder der Drucker beschädigt werden.
 ACHTUNG:
Kein Telefonkabel an die Schnappsteckerbuchse anschließen, da sonst der Drucker und die Telefonkabel beschädigt werden können.
Das Kabel der Lade an die Schnappsteckerbuchse unten am Drucker neben dem Netßzanschluß anschließen.
Grounding the Printer
You need a ground wire to ground your printer. Make sure that the wire meets the specifications below.
Thickness of wire: |
AWG 18 or equivalent |
Diameter of terminal to be attached: |
3.2 |
1. Make sure that the printer is turned off.
Setting Up the Printer 1–5
2.Connect the ground wire to the printer using the FG screw on the bottom of the printer, as shown.
Connecting the Power Supply
This printer requires an external power supply. Be sure to use a power supply that matches the specifications.
 WARNING / WARNUNG:
Using an incorrect power supply may cause fire or electrical shock.
Bei Verwendung der falschen Stromversorgung besteht Brandoder Stromschlaggefahr.
 CAUTION / VORSICHT:
When connecting or disconnecting the power supply from the printer, make sure that the power supply is not plugged into an electrical outlet; otherwise you may damage the power supply or the printer.
If the power supply’s rated voltage and your outlet’s voltage do not match, contact your dealer for assistance. Do not plug in the AC cable. Otherwise you may damage the power supply or the printer.
1–6 Setting Up the Printer
Beim Anschließen der Stromversorgung an den Drucker und beim Herausziehen der Stromversorgung aus dem Drucker darf die Stromversorgung nicht in eine Steckdose eingesteckt sein. Andernfalls kann die Stromversorgung oder der Drucker beschädigt werden.
Wenn die Nennspannung der Stromversorgung und die Spannung der Steckdose nicht übereinstimmen, den Händler um Hilfe bitten. Das Netzkabel nicht einstecken. Andernfalls kann die Stromversorgung oder der Drucker beschädigt werden.
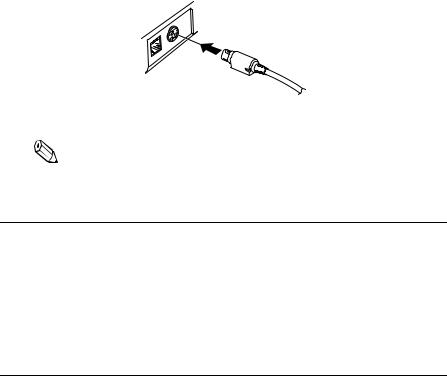
1.Make sure that the printer’s power switch is turned off, and the power supply’s AC cable is unplugged from the electrical outlet.
2.Plug in the power supply’s cord as shown below. Notice that the flat side of the connector faces down.
3. Plug the power supply’s AC cable into an outlet.
Note:
If you ever need to remove the cable, unplug the power supply’s AC cable from the outlet and then grasp the connector firmly at the arrow mark and pull it straight out.
Installing the Ribbon Cassette
Use the EPSON ERC-38 ribbon cassette for your printer.
Note the label inside the printer cover that can assist you in installing the ribbon.
Setting Up the Printer 1–7
 CAUTION / VORSICHT:
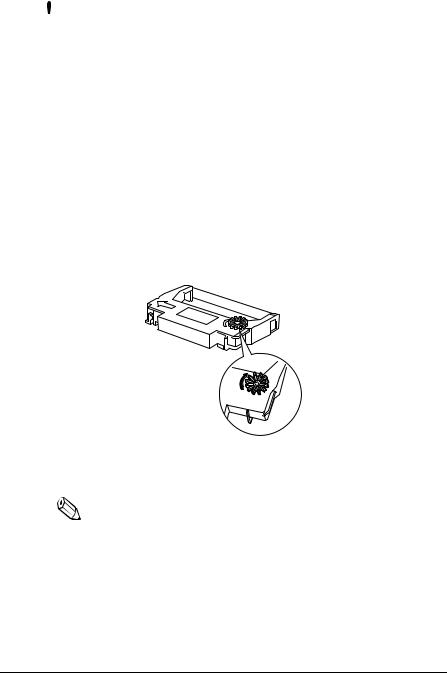
Never turn the ribbon cassette’s feed knob in the opposite direction of the arrow marked on the cassette; otherwise the ribbon cassette may be damaged.
Den Transportknopf an der Farbbandkassette nur in die durch den Pfeil gekennzeichnete Richtung drehen. Andernfalls kann die Farbbandkassette beschädigt werden.
1.Be sure the printer is not receiving data when you replace a ribbon cassette; otherwise data may be lost.
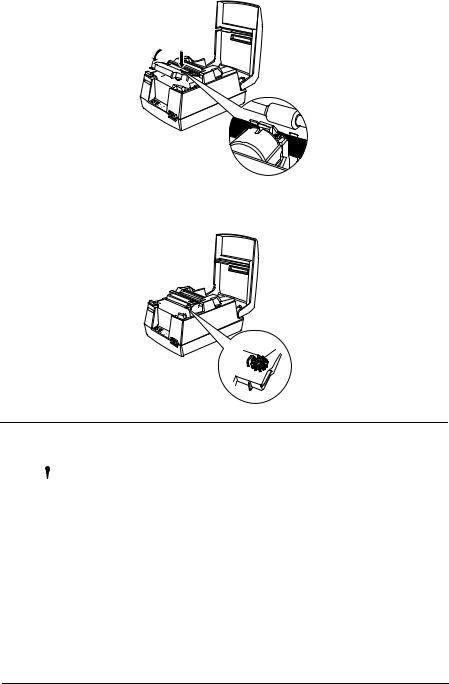
2.Open the printer cover.
3.Turn the ribbon cassette’s knob in the direction of the arrow, to take up any slack in the ribbon.
4.Insert the ribbon in the position shown in the illustration below and push the ribbon cassette until it clicks.
Note:
Make sure that the ribbon is installed between the print head and the platen without wrinkles or creases.
1–8 Setting Up the Printer
EPSON

5.Turn the ribbon cassette’s knob 5 or 6 times in the direction of the arrow again, to take up any slack in the ribbon.
EPSON


Installing Roll Paper
 CAUTION / VORSICHT:
Take care not to injure your fingers on the manual cutter
•When you remove printed paper
•When you perform other operations such as loading/ replacing roll paper
Darauf achten, dass Sie sich bei den folgenden Arbeiten keine Handverletzungen durch die manuelle Schneidvorrichtung zuziehen:
•Beim Herausnehmen des bedruckten Dokuments
•Bei der Durchführung von anderen Arbeiten, wie zum Beispiel beim Einlegen/Herausnehmen der Papierrolle.
Setting Up the Printer 1–9

 Notes:
Be sure to use roll paper that meets the specifications.
Do not use rolls of paper that have the paper glued to the core because the printer cannot detect the paper end correctly. However, if you will stop the printing using the roll paper near-end sensor, you can use glued roll paper.
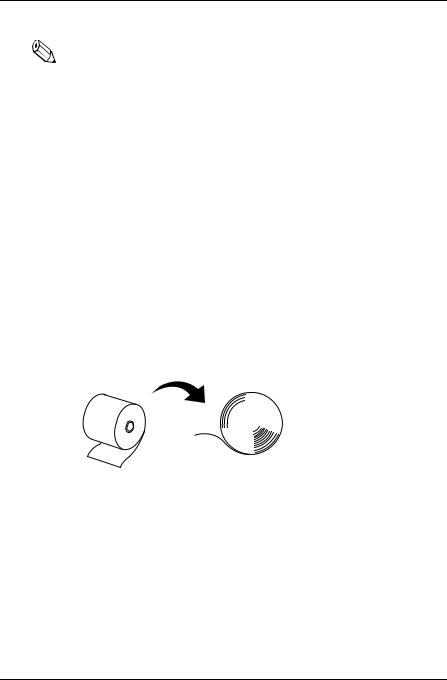
1.Using scissors, cut the leading edge of the roll paper as shown below.
2.Turn on the printer and open the printer cover.
3.Insert the roll paper.
EPSON


Note:
Be sure to note the correct direction that the paper comes off the roll as shown below.
1–10 Setting Up the Printer
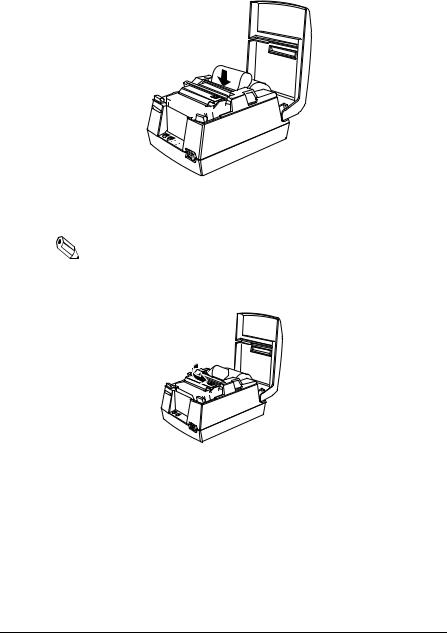
4.Hold both edges of the paper and insert it straight into the paper slot. The printer feeds the paper automatically.
EPSON


5. Tear off the paper; then close the cover.
Note:
Before closing the cover, make sure that the roll paper has no slack.
EPSON


To remove the roll of paper, follow the steps below. 1. Open the printer cover.
Setting Up the Printer 1–11
Loading...