


Anleitung_BG-PH_2652_SPK1__ 12.06.12 08:20 Seite 1
Originalbetriebsanleitung
Benzin-Heckenschere
Original operating instructions
Petrol Hedge Trimmer
Mode d’emploi d’origine taille-haies à essence
Istruzioni per l’uso originali
Cesoie per siepi a benzina
Original betjeningsvejledning
Benzindrevet hækkeklipper
Original-bruksanvisning Bensindriven häcksax
Bf Originalne upute za uporabu
Škare za živicu s benzinskim motorom
4Originalna uputstva za upotrebu
Benzinske makaze za rezanje živice
jOriginální návod k obsluze
Benzínové plotové nůžky
WOriginálny návod na obsluhu Benzínové záhradnícke nožnice
Art.-Nr.: 34.038.25 |
I.-Nr.: 11032 BG-PH 2652 |
|||
|
|
|
|
|
|
|
|
|
|
|
|
|
|
|

Anleitung_BG-PH_2652_SPK1__ 12.06.12 08:20 Seite 2
Vor Inbetriebnahme Bedienungsanleitung und Sicherheitshinweise lesen und beachten.
Read and follow the operating instructions and safety information before using for the first time.
Avant la mise en service, lisez le mode dʼemploi et les consignes de sécurité et respectez-les.
Prima della messa in esercizio leggete e osservate le istruzioni per lʼuso e le avvertenze di sicurezza.
Betjeningsvejledningen og sikkerhedsanvisningerne skal læses, inden maskinen tages i brug. Alle anvisninger skal følges.
Läs igenom och beakta bruksanvisningen och säkerhetsanvisningarna före användning.
Bf Prije puštanja u rad pročitajte i pridržavajte se ovih uputa za uporabu
i sigurnosnih napomena.
4Prije puštanja u pogon pročitajte i uvažite uputstva za upotrebu i napomene bezbednosti.
jPřed uvedením do provozu si přečíst návod k obsluze a bezpečnostní předpisy a oboje dodržovat.
WPred uvedením do prevádzky si prečítajte a dodržiavajte návod na obsluhu a bezpečnostné pokyny.
2
Anleitung_BG-PH_2652_SPK1__ 12.06.12 08:20 Seite 3
1 |
3 |
4 |
11 |
16 |
|
|
|
|
|
12
17 |
5 |
10 |
9 |
12 |
13 6
7
14 8 15
2 |
|
20 |
3 |
13 |
6 |
|
|
|
|||
|
|
|
|
|
|
|
18 |
|
|
|
|
14
21
19
8 7
3
Anleitung_BG-PH_2652_SPK1__ 12.06.12 08:20 Seite 4
4
6
5 |
5 |
A |
|
|
|
|
|
45° |
90° |
|
|
|
|
|
|
9 |
|
|
|
|
|
45° |
|
|
|
|
90° |
B |
|
|
7 |
|
|
|
8 |
|
|
9 |
|
|
|
|
|
|
|
|
|
|
|
4

Anleitung_BG-PH_2652_SPK1__ 12.06.12 08:20 Seite 5 |
10 |
12 |
11 |
13 |
14 |
15 |
A
5

Anleitung_BG-PH_2652_SPK1__ 12.06.12 08:20 Seite 6
16 |
|
17 |
|
|
|
1 |
2 |
3 |
|
|
|
|
|
|
18 |
|
19 |
|
|
|
4
5
20
1 |
2 |
3 |
4 |
5 |
6 |
|
|
|
|
|
|
|
|
|
|
|
|
|
|
|
|
|
|
7 |
8 |
9 |
10 |
11 |
6

Anleitung_BG-PH_2652_SPK1__ 12.06.12 08:20 Seite 7
D
Achtung!
Beim Benutzen von Geräten müssen einige
Sicherheitsvorkehrungen eingehalten werden, um Verletzungen und Schäden zu verhindern. Lesen Sie diese Bedienungsanleitung / Sicherheitshinweise deshalb sorgfältig durch. Bewahren Sie diese gut auf, damit Ihnen die Informationen jederzeit zur
Verfügung stehen. Falls Sie das Gerät an andere Personen übergeben sollten, händigen Sie diese Bedienungsanleitung / Sicherheitshinweise bitte mit aus. Wir übernehmen keine Haftung für Unfälle oder
Schäden, die durch Nichtbeachten dieser Anleitung und den Sicherheitshinweisen entstehen.
1. Sicherheitshinweise
Die entsprechenden Sicherheitshinweise finden Sie im beiliegenden Heftchen!
WARNUNG
Lesen Sie alle Sicherheitshinweise und Anweisungen. Versäumnisse bei der Einhaltung der
Sicherheitshinweise und Anweisungen können elektrischen Schlag, Brand und/oder schwere Verletzungen verursachen.
Bewahren Sie alle Sicherheitshinweise und Anweisungen für die Zukunft auf.
Erklärung des Hinweisschildes auf dem Gerät (siehe Bild 20)
1.Warnung!
2.Vor Inbetriebnahme Gebrauchsanleitung lesen!
3.Vor Regen und Nässe schützen!
4.Augenschutz und Gehörschutz tragen!
5.Schutzhandschuhe tragen!
6.Festes Schuhwerk tragen!
7.Scharfe Messer! Hände und Füße immer von Messern fernhalten.
8.Betreiben und starten Sie das Gerät nur im
Freien in gut belüfteten Gebieten um die Gefahr von Verletzungen durch giftige Gase zu reduzieren.
9.Explosives Material.
10.Sehr heiße Oberfläche. Nicht den heißen
Auspufftopf, Getriebegehäuse oder Zylinder berühren. Sie könnten sich verbrennen. Diese
Teile werden durch den Betrieb sehr heiß und bleiben, auch nachdem das gerät ausgeschaltet ist, lange heiß.
11.Abstand von mind. 15m zu anderen Presonen einhalten.
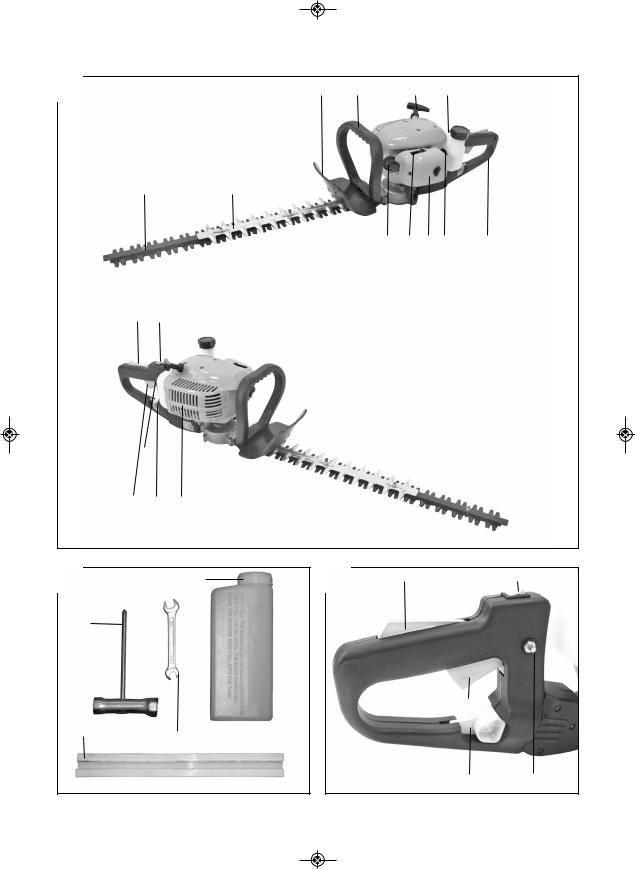
2.Aufbauübersicht und Lieferumfang (Abb. 1-2)
11. Schneideblatt
12. Schutzabdeckung Schneideblatt
13. Schutzschild
14. Vorderer Handgriff
15. Choke Hebel
16. Ein-/ AusSchalter
17. Feststellknopf für Gashebel
18. Arretierhebel für Drehgriff
19. Kraftstoffpumpe (Primer)
10.Luftfilterabdeckung
11.Startergriff
12.Hinterer Handgriff
13.„Freigabe“ Gashebel
14.Gashebel
15.Schalldämpferabdeckung
16.Tank für Kraftstoffgemisch
17.Zündkerzenstecker
18.Zündkerzenschlüssel
19.Gabelschlüssel SW8/SW10
20.Öl/Benzin Mischflasche
21.Schwertabdeckung
3. Bestimmungsgemäße Verwendung
Achtung! Diese Heckenschere ist zum Schneiden von Hecken, Büschen und Sträuchern geeignet.
Die Maschine darf nur nach ihrer Bestimmung verwendet werden. Jede weitere darüber hinausgehende Verwendung ist nicht bestimmungsgemäß. Für daraus hervorgerufene
Schäden oder Verletzungen aller Art haftet der Benutzer/Bediener und nicht der Hersteller.
7

Anleitung_BG-PH_2652_SPK1__ 12.06.12 08:20 Seite 8
D
4. Technische Daten
Motortyp: 2-Takt-Motor; Luftgekühlt; Chromzylinder
Motorleistung max.: |
0,75 kW/1 PS |
Hubraum: |
26 ccm |
|
|
Leerlaufdrehzahl Motor: |
2960 min-1 |
|
|
Drehzahl Motor max.: |
8800 min-1 |
|
|
Gewicht (leerer Tank): |
5,5 kg |
|
|
Schwertlänge: |
65 cm |
|
|
Schnittlänge: |
52 cm |
|
|
Zahnabstand: |
28 mm |
|
|
Schnittleistung max.: |
19 mm |
|
|
Zündkerze: |
NGK BPMR7A |
|
|
Schnittgeschwindigkeit max.: |
|
2300 ± 100 Schnitte/min |
|
|
|
Vibration (vorderer Handgriff) ahv |
13,33 m/s2 |
|
|
Unsicherheit K |
1,5 m/s2 |
|
|
Vibration (hinterer Handgriff) ahv |
7,69 m/s2 |
|
|
Unsicherheit K |
1,5 m/s2 |
|
|
Schalldruckpegel LpA |
97 dB |
|
|
Unsicherheit K |
3 dB |
|
|
Schallleistungspegel LWA |
107 dB |
|
|
Unsicherheit K |
3 dB |
Geräusch und Vibration wurde nach EN ISO 10517 gemessen.
5. Vor Inbetriebnahme
5.1 Montage
Die Heckenschere ist fertig montiert. Es sind keine Montagearbeiten notwendig.
Zum besseren Führen ist das Gerät mit einem Drehgriff ausgestattet, der sich je nach Anforderung in die Positionen -90°/-45°/0°/+45°/+90° einstellen lässt. Ziehen Sie hierzu den Hebel (Abb. 5/Pos. B) nach hinten, drehen Sie den Drehgriff in die gewünschte Position und lassen Sie den Hebel wieder nach vorne einrasten. Durch die verschiedenen einstellbaren Positionen werden Arbeiten über Kopfhöhe oder an anderen schwer zugänglichen Stellen erleichtert.
Achtung: Die Einstellung des Drehgriffes darf nur bei abgestelltem Motor durchgeführt werden.
8
5.2 Treibstoff und Öl Empfohlene Treibstoffe
Benutzen Sie nur ein Gemisch aus normalem bleifreiem Benzin und speziellem 2-Takt-Motoröl. Mischen Sie das Treibstoffgemisch nach der Treibstoff-Mischtabelle an.
Achtung: Verwenden Sie kein Treibstoffgemisch, das mehr als 90 Tage lang aufbewahrt wurde.
Achtung: Verwenden Sie kein 2-Takt-Öl mit einem empfohlenen Mischverhältnis von 100:1. Verursacht ungenügende Schmierung einen Motorenschaden entfällt die Motorgarantie des Herstellers.
Achtung: Verwenden Sie zum Transport und zur
Lagerung von Kraftstoff nur dafür vorgesehene und zugelassene Behälter.
Geben Sie jeweils die richtige Menge Benzin und 2- Takt-Öl in die beiliegende Mischflasche (Siehe aufgedruckte Skala). Schütteln Sie anschließend den
Behälter gut durch.
5.3 Treibstoff-Misch-Tabelle:
Mischverfahren: 40 Teile Benzin auf 1 Teil Öl
Benzin |
2-Takt-Öl |
|
|
1 Liter |
25 ml |
|
|
5 Liter |
125 ml |
|
|
6. Betrieb
Beachten Sie bitte die gesetzlichen Bestimmungen zur Lärmschutzverordnung, die örtlich unterschiedlich sein können.
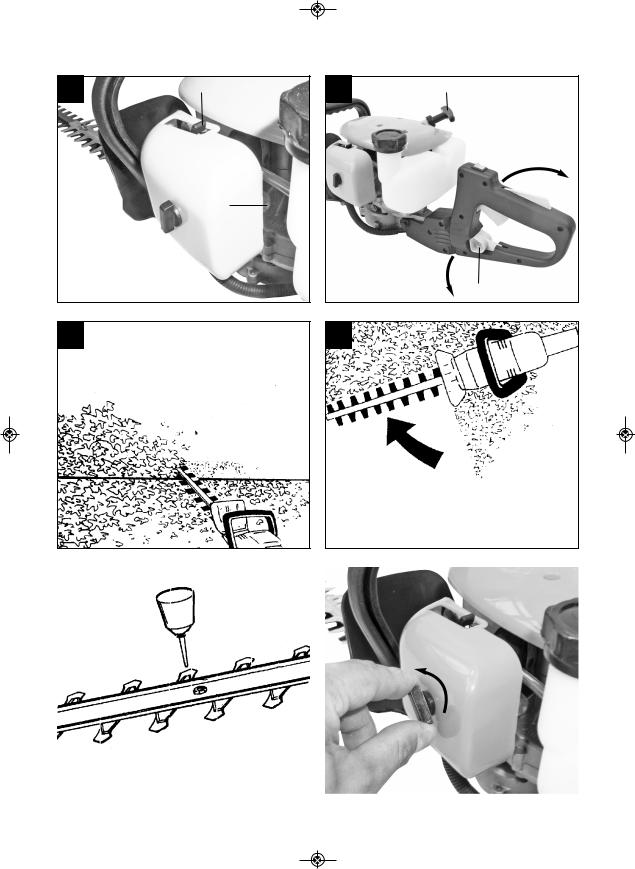
6.1 Kalten Motor starten (Abb. 3-5)
Füllen Sie den Tank mit einer angemessenen Menge
Benzin/Öl-Gemisch.
1.Gerät auf eine harte, ebene Fläche stellen.
2.Choke-Hebel (Abb. 4/Pos. 5) auf „  “ stellen.
3.Kraftstoffpumpe (Primer) (Abb. 4/Pos. 9) 10x drücken.
4.Ein-/ Aus-Schalter (Abb. 3/Pos. 6) auf „I“ schalten
5.Gashebel feststellen. Hierzu Gashebelsperre
(Abb. 3/Pos 13) und anschließend Gashebel (Abb. 3/Pos. 14) betätigen und durch gleichzeitiges Drücken des Feststellknopfes (Abb. 3/Pos. 7) den Gashebel feststellen.
6.Das Gerät am vorderen Handgriff mit der rechten
Hand gut festhalten und mit der linken Hand die
Starterleine (Abb. 5/Pos. A) bis zum ersten

Anleitung_BG-PH_2652_SPK1__ 12.06.12 08:20 Seite 9
D
Widerstand (ca. 10cm) herausziehen. Jetzt die Starterleine 4x rasch anziehen. Das Gerät sollte starten.
Achtung: Die Starterleine nicht zurückschleudern lassen. Dies kann zu Beschädigungen führen.
7.Ist der Motor gestartet, Choke Hebel sofort auf
“  ” stellen und das Gerät ca. 10 sek. warmlaufen lassen.
Achtung: Durch den festgestellten Gashebel beginnt das Schneidwerkzeug bei startendem Motor zu arbeiten.
Anschließend Gashebel durch einfaches
Betätigen entriegeln (Der Motor kehrt in den Leerlauf zurück).
8.Sollte der Motor nicht starten wiederholen Sie die Schritte 6-7.
Zur Beachtung: Springt der Motor auch nach mehreren Versuchen nicht an, lesen Sie den Abschnitt „Fehlerbehebung am Motor“.
Zur Beachtung: Ziehen Sie die Anlasserschnur stets gerade heraus. Wird sie in einem Winkel herausgezogen, entsteht Reibung an der Öse. Durch diese Reibung wird die Schnur durchgescheuert und nutzt sich schneller ab.
6.4 Arbeitshinweise
Lassen Sie die Maschine während des Starts oder beim Schneiden nicht mit niedriger Drehzahl laufen.
Schneiden für dichteres Wachstum: Am effektivsten ist eine breite, durchgezogene Bewegung, dabei führen Sie die Messer der Schneide direkt durch die Zweige. Eine leichte Neigung der Schneide nach unten, in der Richtung der Bewegung ergibt den besten Schnitt.
Um eine gleichmäßige Heckenhöhe zu erreichen, wird das Spannen eines Fadens als Richtschnur entlang der Heckenkante empfohlen. Die überstehenden Zweige werden abgeschnitten. (Abb. 6)
Seitliches Zuschneiden einer Hecke: Die Seitenflächen einer Hecke werden mit bogenförmigen Bewegungen von unten nach oben geschnitten. (Abb. 7)
Achtung: Bauartbedingt kann es bei längeren seitlichen Arbeiten mit nicht vollständig gefülltem
Tank vorkommen, dass der Motor abstirbt.
6.2Warmen Motor Starten (Das Gerät stand für nicht mehr als 15-20min still)
1.Gerät auf harte, ebene Fläche stellen.
2.Ein-/Aus-Schalter auf „I“ schalten.
3.Gashebel feststellen (analog wie bei „Kalten Motor starten“).
4.Gerät am vorderen Handgriff mit der rechten Hand gut festhalten und mit der linken Hand die
Starterleine bis zum ersten Widerstand (ca. 10cm) herausziehen. Jetzt die Starterleine rasch anziehen. Das Gerät sollte nach 1-2 Zügen starten. Falls die Maschine nach 6 Zügen immer noch nicht startet wiederholen Sie die Schritte 1-
7 unter kalten Motor starten.
6.3 Motor abstellen
Not-Aus Schrittfolge:
Falls es notwendig ist, die Maschine sofort anzuhalten, stellen Sie hierzu den Ein-/Aus-Schalter auf „Stop“ bzw. „0“
Normale Schrittfolge:
Lassen Sie den Gashebel los und warten Sie bis der
Motor in Leerlaufgeschwindigkeit übergegangen ist. Stellen Sie dann den Ein-/ Aus-Schalter auf „Stop“ bzw. „0“.
7.Reinigung, Wartung, Lagerung und Ersatzteilbestellung
7.1 Reinigung
nHalten Sie Schutzvorrichtungen, Luftschlitze und
Motorengehäuse so staubund schmutzfrei wie möglich. Reiben Sie das Gerät mit einem sauberen Tuch ab oder blasen Sie es mit
Druckluft bei niedrigem Druck aus.
nWir empfehlen, dass Sie das Gerät direkt nach jeder Benutzung reinigen.
nReinigen Sie das Gerät regelmäßig mit einem feuchten Tuch und etwas Schmierseife. Verwenden Sie keine Reinigungsoder
Lösungsmittel; diese könnten die Kunststoffteile des Gerätes angreifen. Achten Sie darauf, dass kein Wasser in das Geräteinnere gelangen kann.
7.2 Wartung
Schalten Sie die Heckenschere vor Wartungsarbeiten immer aus und ziehen Sie den Zündkerzenstecker ab.
1.Die Schneidemesser sind von hoher Qualität, aus gehärtetem Stahl und bei normaler
Handhabung wird ein Schärfen der Messer nicht notwendig sein. Falls Sie aus Versehen gegen einen Draht, Stein, Glas oder andere harte
Objekte stoßen, könnte dies eine Kerbe in der
9

Anleitung_BG-PH_2652_SPK1__ 12.06.12 08:20 Seite 10
D
Schneide verursachen. Es ist nicht notwendig die Kerbe zu entfernen, solange sie die Bewegung der Messer nicht beeinträchtigt. Falls sie die
Bewegung beeinträchtigen sollte, schalten Sie die Maschine aus und nehmen Sie eine feine Feile oder einen feinen Schleifstein um die Kerbe zu entfernen. Achten Sie darauf, dass das
Schneidmesser immer gut geölt ist
(Siehe Abb. 8).
2.Falls Sie die Heckenschere fallen lassen sollten kontrollieren Sie ob Beschädigungen aufgetreten sind. Bei Beschädigungen nehmen Sie Kontakt zu einem autorisierten Kundendienst auf oder senden Sie das Gerät an die ISC-GmbH um es reparieren zu lassen.
3.Reinigen Sie die Maschine nur in ausgeschaltetem Zustand. Benutzen Sie nur milde Seife und einen feuchten Lappen um sie zu säubern. Lassen Sie niemals Flüssigkeit ins innere der Maschine gelangen. Verwenden Sie keine ätzenden Reiniger.
7.2.1 Wartung des Luftfilters (Abb. 9-11)
Verschmutzte Luftfilter verringern die Motorleistung durch zu geringe Luftzufuhr zum Vergaser. Regelmäßige Kontrolle ist daher unerlässlich. Der Luftfilter sollte alle 25 Betriebsstunden kontrolliert und bei Bedarf gereinigt werden. Bei sehr staubiger
Luft ist der Luftfilter öfters zu überprüfen.
1.Entfernen Sie den Luftfilterdeckel (Abb. 9-10)
2.Entnehmen Sie das Filterelement (Abb. 11)
3.Reinigen Sie das Filterelement durch ausklopfen oder ausblasen.
4.Der Zusammenbau erfolgt in umgekehrter
Reihenfolge.
Achtung: Luftfilter nie mit Benzin oder brennbaren Lösungsmitteln reinigen. Luftfilter mit Druckluft oder durch Ausklopfen reinigen.
7.2.2 Wartung der Zündkerze (Abb. 12-14)
Zündkerzenfunkenstrecke = 0,025 Inch (0,635 mm) Ziehen Sie die Zündkerze mit 12-15Nm an.
Überprüfen Sie die Zündkerze erstmals nach 10 Betriebsstunden auf Verschmutzung und reinigen
Sie diese gegebenenfalls mit einer Kupferdrahtbürste. Danach die Zündkerze alle 50 Betriebsstunden warten.
1.Ziehen Sie den Zündkerzenstecker (Abb. 13) mit einer Drehbewegung ab.
2.Entfernen Sie die Zündkerze (Abb. 14) mit dem beiliegenden Zündkerzenschlüssel.
3.Der Zusammenbau erfolgt in umgekehrter
Reihenfolge.
10
7.2.3 Wartung des Getriebes (Abb. 15)
Das Getriebe muss jährlich vor Saisonbeginn am Schmiernippel (Abb. 15/Pos. A) geschmiert werden. Stecken Sie hierzu eine handelsübliche Fettpresse auf den Schmiernippel und pressen Sie ca. 3 Hübe handelsübliches Maschinenfett in das Getriebe. Bei übermäßigem Gebrauch sollte das Getriebe öfters gefettet werden.
7.2.4 Vergaser Einstellungen
Achtung! Einstellungen am Vergaser dürfen nur durch autorisierten Kundendienst vorgenommen werden.
Zu allen Arbeiten am Vergaser muss zuerst die
Luftfilterabdeckung wie in Abbildung 9 - 10 gezeigt demontiert werden.
Einstellen des Gasseilzuges:
Sollte die Maximaldrehzahl des Geräts mit der Zeit nicht mehr erreicht werden und sämtliche anderen
Ursachen nach Abschnitt 9 Fehlerbehebung ausgeschlossen sein, könnte eine Einstellung des Gasseilzuges erforderlich sein.
Überprüfen Sie hierfür zunächst ob der Vergaser bei voll durchgedrücktem Gasgriff ganz öffnet. Dies ist der Fall wenn der Vergaserschieber (Abb. 16/Pos. 1) bei voll betätigtem Gas am Anschlag (Abb. 16/Pos. 2) anliegt. Abbildung 16 zeigt die korrekte
Einstellung. Sollte der Vergaserschieber den
Anschlag nicht berühren ist eine Nachjustierung notwendig.
Um den Gasseilzug nachzustellen sind folgende
Schritte erforderlich:
nLösen Sie die Kontermutter (Abb. 17/Pos. 3) einige Umdrehungen.
nDrehen Sie die Verstellschraube (Abb. 18/Pos. 4) heraus, bis der Vergaserschieber bei voll betätigtem Gas, wie in Abbildung 16 gezeigt, am
Anschlag anliegt.
nZiehen Sie die Kontermutter wieder fest.
Einstellen des Standgases:
Achtung! Standgas in warmem Betriebszustand einstellen.
Sollte das Gerät bei nicht betätigtem Gashebel ausgehen und sämtliche anderen Ursachen nach
Abschnitt 9 Fehlerbehebung ausgeschlossen sein, ist ein Nachjustieren des Standgases notwendig.
Drehen Sie hierzu die Standgasschraube (Abb. 19/Pos. 5) im Uhrzeigersinn bis das Gerät im Leerlauf sicher läuft.
Anleitung_BG-PH_2652_SPK1__ 12.06.12 08:20 Seite 11
D
Sollte das Standgas so hoch sein, dass die Schneidmesser nicht stillstehen, muss das Standgas durch Linksdrehen der Standgasschraube (Abb. 19/
Pos. 5) soweit verringert werden bis die Schneidmesser stillstehen.
7.3 Lagerung
Achtung: Ein Fehler bei der Befolgung dieser Schritte kann zur Folge haben, dass sich Ablagerungen an der Vergaserinnenwand bilden, was ein erschwertes Anlassen oder einen dauerhaften Schaden an der Maschine zu Folge haben kann.
1.Führen Sie alle Wartungsarbeiten durch.
2.Lassen Sie den Treibstoff aus dem Tank ab (Benutzen Sie hierzu eine handelsübliche
Kunststoff-Benzinpumpe aus dem Baumarkt).
3.Nachdem der Treibstoff abgelassen ist, starten Sie die Maschine.
4.Lassen Sie die Maschine im Leerlauf weiterlaufen bis sie stoppt. Das reinigt den
Vergaser vom restlichen Treibstoff.
5.Lassen Sie die Maschine abkühlen.(ca. 5 Minuten)
6.Entfernen Sie die Zündkerze (siehe Punkt 7.2.2).
7.Füllen Sie eine Teelöffel große Menge 2-Takt
Motoröl in den Brennraum. Ziehen Sie einige male vorsichtig die Anlasserleine heraus, um die inneren Bauteile mit dem Öl zu benetzen. Setzen Sie die Zündkerze wieder ein.
8.Säubern Sie das äußere Gehäuse der Maschine.
9.Bewahren Sie die Maschine an einem kalten, trockenen Platz außerhalb der Reichweite von
Zündquellen und brennbaren Substanzen auf.
10.Beim Transportieren oder bei der Lagerung der
Heckenschere ist die Schneideinrichtung immer mit dem Schutz für die Schneideinrichtung abzudecken.
Düngemittel oder andere chemische Gartenprodukte beinhalten häufig Substanzen, welche die Korrosion von Metallen beschleunigen. Lagern Sie die Maschine nicht auf oder in der Nähe von Düngemitteln oder anderen Chemikalien.
Wiederinbetriebnahme
1.Entfernen Sie die Zündkerze.
2.Ziehen Sie die Starterleine mehrmals heraus um den Brennraum von Ölrückständen zu reinigen.
3.Säubern Sie die Zündkerzenkontakte oder setzen Sie eine neue Zündkerze ein.
4.Füllen Sie den Tank. Siehe Abschnitt Treibstoff und Öl.
5.Führen Sie die Schritte 1-7 unter Punkt „Kalten
Motor starten“ durch.
7.4 Ersatzteilbestellung:
Bei der Ersatzteilbestellung sollten folgende Angaben gemacht werden;
nTyp des Gerätes
nArtikelnummer des Gerätes
nIdent-Nummer des Gerätes
nErsatzteilnummer des erforderlichen Ersatzteils
Aktuelle Preise und Infos finden Sie unter www.isc-gmbh.info
8. Entsorgung und Wiederverwertung
Das Gerät befindet sich in einer Verpackung um Transportschäden zu verhindern. Diese Verpackung ist Rohstoff und ist somit wieder verwendbar oder kann dem Rohstoffkreislauf zurückgeführt werden. Das Gerät und dessen Zubehör bestehen aus verschiedenen Materialien, wie z.B. Metall und Kunststoffe. Führen Sie defekte Bauteile der
Sondermüllentsorgung zu. Fragen Sie im
Fachgeschäft oder in der Gemeindeverwaltung nach!
11

Anleitung_BG-PH_2652_SPK1__ 12.06.12 08:20 Seite 12
D
9. Fehlerbehebung
Störung |
Mögliche Ursache |
Störungsbehebung |
||||
|
|
|
||||
Das Gerät springt nicht an. |
Fehlerhaftes Vorgehen beim |
Folgen Sie den Anweisungen zum |
||||
|
Starten. |
Starten. |
||||
|
|
|
||||
|
Verrußte oder feuchte Zündkerze. |
Zündkerze reinigen oder durch |
||||
|
|
neue ersetzen. |
||||
|
|
|
||||
|
Falsche Vergasereinstellung. |
Autorisierten Kundendienst |
||||
|
|
aufsuchen, oder das Gerät an die |
||||
|
|
ISC-GmbH senden. |
||||
|
|
|
|
|
|
|
Das Gerät springt an, hat aber |
Falsche Einstellung des |
Chokehebel auf „ |
|
|
|
“ stellen. |
|
|
|||||
|
|
|||||
nicht die volle Leistung. |
Chokehebels. |
|
|
|
|
|
|
|
|
||||
|
Verschmutzter Luftfilter. |
Luffilter reinigen. |
||||
|
|
|
||||
|
Falsche Vergasereinstellung. |
Autorisierten Kundendienst |
||||
|
|
aufsuchen, oder das Gerät an die |
||||
|
|
ISC-GmbH senden. |
||||
|
|
|
||||
Der Motor läuft unregelmäßig |
Falscher Elektrodenabstand der |
Zündkerze reinigen und |
||||
|
Zündkerze. |
Elektrodenabstand einstellen oder |
||||
|
|
neue Zündkerze einsetzen. |
||||
|
|
|
||||
|
Falsche Vergasereinstellung. |
Autorisierten Kundendienst |
||||
|
|
aufsuchen, oder das Gerät an die |
||||
|
|
ISC-GmbH senden. |
||||
|
|
|
||||
Motor raucht übermäßig |
Falsche Treibstoffmischung. |
Richtige Treibstoffmischung |
||||
|
|
verwenden (siehe Treibstoff- |
||||
|
|
Mischtabelle) |
||||
|
|
|
||||
|
Falsche Vergasereinstellung. |
Autorisierten Kundendienst |
||||
|
|
aufsuchen, oder das Gerät an die |
||||
|
|
ISC-GmbH senden. |
||||
|
|
|
|
|
|
|
12

Anleitung_BG-PH_2652_SPK1__ 12.06.12 08:20 Seite 13
GB
Important!
When using the equipment, a few safety precautions must be observed to avoid injuries and damage.
Please read the complete operating instructions and safety regulations with due care. Keep this manual in a safe place, so that the information is available at all times. If you give the equipment to any other person, hand over these operating instructions and safety regulations as well. We cannot accept any liability for damage or accidents which arise due to a failure to follow these instructions and the safety instructions.
1. Safety regulations
The corresponding safety information can be found in the enclosed booklet.
CAUTION!
Read all safety regulations and instructions.
Any errors made in following the safety regulations and instructions may result in an electric shock, fire and/or serious injury.
Keep all safety regulations and instructions in a safe place for future use.
2. Layout and items supplied (Fig. 1-2)
1.Cutting blade
2.Cutting blade safety cover
3.Safety plate
4.Front handle
5.Choke lever
6.ON/OFF switch
7.Locking knob for throttle lever
8.Locking knob for rotary handle
9.Fuel pump (primer)
10.Air filter cover
11.Starter handle
12.Rear handle
13.Throttle lever “release”
14.Throttle lever
15.Silencer cover
16.Tank for fuel mixture
17.Spark plug boot
18.Spark plug wrench
19.8 mm / 10 mm open-ended spanner
20.Combined oil/petrol cylinder
21.Cutter rail cover
Explanation of the warning signs on the equipment (see Fig. 20)
1.Warning!
2.Read the directions for use before operating the equipment.
3.Do not expose the hedge trimmer to rain or wet conditions.
4.Wear eye protection and ear plugs.
5.Wear safety gloves.
6.Wear sturdy, non-slip footwear.
7.Caution: Sharp blades! Always keep hands and feet away from the blades.
8.Operate and start the equipment only outdoors in well ventilated areas to reduce the danger of injury from toxic gases.
9.Explosive material.
10.Very hot surface. Do not touch the hot exhaust silencer, gearbox or cylinder. You may burn yourself. These parts have become very hot during operation and remain very hot over a long period even after the equipment has been switched off.
11.Maintain a distance of at least 15 m from other persons.
3. Proper use
Important. This hedge trimmer is suitable for cutting hedges, bushes and shrubs.
Please note that our equipment has not been designed for use in commercial, trade or industrial applications. Our warranty will be voided if the equipment is used in commercial, trade or industrial businesses or for equivalent purposes.
13

Anleitung_BG-PH_2652_SPK1__ 12.06.12 08:20 Seite 14
GB
4. Technical data
Engine type:
2-stroke engine, air-cooled, chrome cylinder
Engine output (max.): |
0.75 kW / 1.0 hp |
Displacement: |
26 ccm |
|
|
Idle speed of engine: |
2960 min-1 |
|
|
Max. engine speed |
8800 min-1 |
|
|
Weight (with empty tank): |
5.5 kg |
|
|
Cutter rail length: |
65 cm |
|
|
Cutting length: |
52 cm |
|
|
Tooth spacing: |
28 mm |
|
|
Cutting capacity (max.) |
19 mm |
|
|
Tank capacity: |
0.5 l |
5.2 Fuel and oil Recommended fuels
Use only a mixture of normal unleaded petrol and special 2-stroke engine oil. Mix the fuel mixture as indicated on the fuel mixing table.
Please note: Do not use a fuel mixture which has been kept for longer than 90 days.
Please note: Do not use 2-stroke oil with a recommended mixing ration of 100:1. If inadequate lubrication causes engine damage, the manufacturerʼs engine warranty will be voided.
Please note: Only use containers designed and approved for the purpose to transport and store fuel.
Pour the correct quantities of petrol and 2-stroke oil into the mixing bottle (see scale printed on the bottle). Then shake the bottle well.
Spark plug: |
NGK BPMR7A |
Max. cutting speed |
2300 ± 100 cuts/min |
|
|
Vibration (front handle) ahv |
13.33 m/s2 |
|
|
K uncertainty |
1,5 m/s2 |
Vibration (rear handle) ahv |
7.69 m/s2 |
|
|
K uncertainty |
1,5 m/s2 |
|
|
Sound pressure level LpA |
97 dB |
|
|
K uncertainty |
3 dB |
|
|
Sound power level LWA |
107 dB |
|
|
K uncertainty |
3 dB |
|
|
5.3 Fuel mixture table
Mixing procedure: 40 parts petrol to 1 part oil
Petrol |
2-stroke oil |
|
|
1 liters |
25 ml |
|
|
5 liters |
125 ml |
|
|
6. Operation
Please note that the statutory regulations governing noise abatement may differ from town to town.
Sound and vibration were measured in accordance with DIN EN 10517.
5. Before starting the machine
5.1 Installation
The hedge trimmer is supplied fully assembled. No assembly work is required.
To make it easier to control, the machine is fitted with a rotary handle that can be adjusted as required into positions at angles of -90°/-45°/0°/+45°/+90°. To do this, pull the lever (Fig. 5/Item B) backwards, turn the rotary handle into the required position and then allow the lever to lock at the front again. The various adjustable positions facilitate working above head height or in other places with different access. Please note: The rotary handle may only be adjusted when the engine is switched off.
14
6.1 Starting the engine from cold (Fig. 3-5)
Fill the tank with the required amount of oil/petrol mix.
1.Set the machine down on a hard, level surface.
2.Set the choke lever (Fig. 4/Item 5) to “


 ”.
”.
3.Press the fuel pump (primer) (Fig. 4/Item 9) 10 times.
4.Move the ON/OFF switch (Fig. 3/Item 6) to “I”
5.Secure the throttle lever. To do this, press the throttle lever lock (Fig. 3/Item 13) and then press the throttle lever (Fig. 3/Item 14) and lock the throttle lever by pressing the locking knob (Fig. 3/Item 7) at the same time.
6.Hold the machine by the front handle in your right hand and pull the starter cable (Fig. 5/Item A) up to the first resistance point (approx. 10 cm). Then tug sharply on the starter cable 4 times. The machine should start.
Please note: Never allow the starter cable to snap back. This may damage the machine.
7.If the engine has started, set the choke lever immediately to “ 

 ” and allow the machine to

Anleitung_BG-PH_2652_SPK1__ 12.06.12 08:20 Seite 15
GB
warm up for approx. 10 seconds.
Then release the throttle lever by simply actuating it (the engine then returns to running in idle mode).
8.If the engine does not start up, repeat steps 6-7 above.
Please note: If the engine does not start up even after several attempts, read the section “Engine Troubleshooting”.
Please note: Always pull the starter cable out in a straight line. If it is pulled out at an angle, then friction will occur on the eyelet. As a result of this friction, the cable will become frayed and will wear away faster.
6.2Starting the engine when warm (if the machine has not been switched off for more than 15 – 20 minutes)
1. Set the machine down on a hard, level surface. 2. Switch the ON/OFF switch to “I”.
3. Secure the throttle lever (in the same way as described in “Starting the engine when cold”).
4. Hold the machine by the front handle in your right hand and pull the starter cable up to the first resistance point (approx. 10 cm). Then tug sharply on the starter cable. The machine should start after 1-2 tugs. If the machine does not start after 6 pulls, repeat steps 1 – 7 of the procedure for starting the engine from cold.
6.3Switching off the engine
Emergency Stop procedure:
If it becomes necessary to stop the machine immediately, set the ON/OFF switch to “Stop” or “0”
Normal procedure:
Let go of the throttle lever and wait until the engine has changed to idling speed. Then set the ON/OFF switch to “Stop” or “0”.
6.4 Practical tips
Never allow the machine to run at low speed for starting or for cutting.
Cutting for dense growth: The most effective method is to use wide, sweeping movements, guiding the cutting edge of the blade straight through the branches. A slight incline of the blade downwards towards the movement will produce best cutting results.
It is recommended to tie a guide line of string or the like along the hedge so that you cut the hedge to a level height. The branches above it will be cut off.
(Fig. 6)
Cutting the side of a hedge: Cut the sides of the hedge with curve-shaped movements from the bottom up. (Fig. 7)
Please note: As a result of its design, if you work with the machine on its side for a lengthy period and the tank not completely filled, the motor may stall.
7.Cleaning, maintenance, storage and ordering of spare parts
7.1 Cleaning
nKeep all safety devices, air vents and the motor housing free of dirt and dust as far as possible. Wipe the equipment with a clean cloth or blow it with compressed air at low pressure.
nWe recommend that you clean the device immediately each time you have finished using it.
nClean the equipment regularly with a moist cloth and some soft soap. Do not use cleaning agents or solvents; these could attack the plastic parts of the equipment. Ensure that no water can seep into the device.
7.2 Maintenance
Always switch off the head trimmer and remove the spark plug boot before carrying out any maintenance work.
1.The cutter blades are high quality, made of tempered steel and in normal use there is no need to sharpen the blades. If you accidentally strike a wire, stone, glass or other hard object, this may cause a notch in the blade. There is no need to remove the notch as long as it does not adversely affect the movement of the cutting edges. If it does adversely affect this movement, switch off the machine and use a fine file or a fine grinding stone to remove the notch. Ensure that the bladeʼs cutting edge is always well oiled (see Fig. 8).
2.If you drop the hedge trimmer, check whether it has suffered any damage. If it is damaged contact an authorized customer service outlet or send the machine to ISC GmbH to have it repaired.
3.Only clean the machine after it has been switched off. Use only mild soap and a damp cloth to clean it. Never allow fluid to get into the machine. Do not use caustic cleaning products.
15

Anleitung_BG-PH_2652_SPK1__ 12.06.12 08:20 Seite 16
GB
7.2.1 Maintenance of the air filter (Fig. 9-11)
Soiled air filters reduce the engine output by supply too little air to the carburetor.
Regular checks are therefore essential. The air filter should be checked after every 25 hours of use and cleaned if necessary. If the air contains a lot of dust, the air filter should be checked more frequently.
1.Remove the air filter cover (Fig. 9-10)
2.Remove the filter element (Fig. 11)
3.Clean the filter element by tapping it or blowing it.
4.Assemble in reverse order.
Please note: Never clean the air filter with petrol or inflammable solvents. Clean the air filter with compressed air or by tapping it.
7.2.2 Maintenance of the spark plug (Fig. 12-14)
Spark plug gap = 0.025 inch (0.635 mm). Tighten the spark plug with a torque of 12-15 Nm.
Check the spark plug for dirt and grime after 10 hours of operation and if necessary clean it with a copper wire brush. Thereafter service the spark plug after every 50 hours of operation.
1.Pull off the spark plug boot (Fig. 13) by twisting.
2.Remove the spark plug (Fig. 14) with the supplied spark plug wrench.
3.Assemble in reverse order.
7.2.3Maintenance of the gearbox (Fig. 15)
The gearbox must be lubricated every year before the start of the season at the lubrication nipple (Fig. 15/Item A). Place a conventional grease gun on the nipple and press approx. 3 strokes of conventional machine grease into the gearbox. If you use the trimmer frequently, grease the gearbox more often.
7.2.4Carburetor settings
Important. Settings on the carburetor may only be made by authorized customer service personnel.
The air filter cover must be removed before any work on the carburetor, as shown in Figures 9 – 10.
Setting the throttle cable:
If the maximum speed of the machine falls over time and you have ruled our all the other causes listed in section 9 Troubleshooting, it may be necessary to adjust the throttle cable.
First of all check whether the carburetor opens fully when the throttle handle is pressed fully. This is the case if the carburetor slide (Fig. 16/Item 1) rests against the stop (Fig. 16/Item 2) when the throttle is fully open. Figure 16 shows the correct setting. If the carburetor slide does not touch the stop, it must be adjusted.
16
The following work is required to adjust the throttle cable:
nUndo the lock nut (Fig. 17/Item 3) a few turns.
nUndo the adjusting screw (Fig. 18/Item 4) until the carburetor slide rests against the stop when the throttle is fully open, as shown in Figure 16.
nRetighten the lock nut.
Setting the idling speed:
Important. Set the idling speed when the machine is warm.
If the engine stalls when the throttle is not pressed and you have ruled out all the other causes listed in section 9 Troubleshooting, the idling speed must be adjusted. To do this turn the idling speed screw (Fig.
19/Item 5) clockwise until the machine runs smoothly at idling speed.
If the idling speed is so fast that the cutting blades do not reach a standstill, the idling speed must be reduced by turning the idling speed screw (Fig.
19/Item 5) counterclockwise until the cutting blades stop.
7.3 Storage
Please note: If you fail to follow these instructions correctly, deposits may form on the interior of the carburetor which may result in the engine being more difficult to start or the machine suffering permanent damage.
1.Carry out all the maintenance work.
2.Drain the fuel out of the tank (use a conventional plastic petrol pump from a DIY store for this purpose).
3.When the fuel has been drained, start the engine.
4.Allow the engine to run at idling speed until it stops. This will clean the remainder of the fuel out of the carburetor.
5.Leave the machine to cool (approx. 5 minutes).
6.Remove the spark plug (see point 7.2.2).
7.Place a teaspoon full of 2-stroke engine oil into the combustion chamber. Pull the starter cable several times carefully to wet the internal components with the oil. Fit the spark plug again.
8.Clean the exterior housing of the machine.
9.Store the machine in a cold, dry place where it is out of the reach of ignition sources and inflammable substances.
10.Always place the cover over the cutter when transporting or storing the equipment.

Anleitung_BG-PH_2652_SPK1__ 12.06.12 08:20 Seite 17
GB
Fertilizers and other chemical garden products often contain substances that accelerate the rate of corrosion of metals. Do not store the machine on or near fertilizers or other chemicals.
Restarting
1.Remove the spark plug.
2.Pull the starter cable several times to clean the oil residue out of the combustion chamber.
3.Clean the spark plug contacts or fit a new spark plug.
4.Fill the tank. See the section entitled Fuel and oil.
5.Complete steps 1-7 described under the point entitled “Starting the engine from cold”.
7.4 Ordering replacement parts
Please quote the following data when ordering replacement parts:
Type of machine
Article number of the machine
Identification number of the machine
Replacement part number of the part required For our latest prices and information please go to www.isc-gmbh.info
8. Disposal and recycling
The unit is supplied in packaging to prevent its being damaged in transit. This packaging is raw material and can therefore be reused or can be returned to the raw material system.
The unit and its accessories are made of various types of material, such as metal and plastic.
Defective components must be disposed of as special waste. Ask your dealer or your local council.
17

Anleitung_BG-PH_2652_SPK1__ 12.06.12 08:20 Seite 18
GB
9. Troubleshooting
Fault |
Possible cause |
Troubleshooting |
||||||
|
|
|
|
|
|
|
|
|
The machine does not start. |
Correct starting procedure not |
Follow the instructions for starting. |
||||||
|
followed. |
|
|
|
|
|
|
|
|
|
|
|
|
|
|
|
|
|
Sooted or damp spark plug |
Clean the spark plug or replace it |
||||||
|
|
with a new one. |
||||||
|
|
|
|
|
|
|
|
|
|
Incorrect carburetor setting |
Contact an authorized customer |
||||||
|
|
service outlet or send the machine |
||||||
|
|
to ISC-GmbH. |
||||||
|
|
|
|
|
|
|
|
|
The machine starts but does not |
Incorrect choke lever setting |
Set choke lever to |
|
|
|
|
|
|
|
|
|
|
|||||
develop its full output. |
|
|
|
|
|
|
|
|
Soiled air filter |
Clean the air filter |
|||||||
|
||||||||
|
|
|
|
|
|
|
|
|
|
Incorrect carburetor setting |
Contact an authorized customer |
||||||
|
|
service outlet or send the machine |
||||||
|
|
to ISC-GmbH. |
||||||
|
|
|
|
|
|
|
|
|
The engine does not run smoothly |
Incorrect electrode gap on the |
Clean the spark plug and adjust |
||||||
|
spark plug |
the electrode gap or fit a new spark |
||||||
|
|
plug. |
||||||
|
|
|
|
|
|
|
|
|
|
Incorrect carburetor setting |
Contact an authorized customer |
||||||
|
|
service outlet or send the machine |
||||||
|
|
to ISC-GmbH. |
||||||
|
|
|
|
|
|
|
|
|
Engine smokes excessively |
Incorrect fuel mix |
Use the correct fuel mix (see fuel |
||||||
|
|
mixing table) |
||||||
|
|
|
|
|
|
|
|
|
|
Incorrect carburetor setting |
Contact an authorized customer |
||||||
|
|
service outlet or send the machine |
||||||
|
|
to ISC-GmbH. |
||||||
|
|
|
|
|
|
|
|
|
18

Anleitung_BG-PH_2652_SPK1__ 12.06.12 08:20 Seite 19
F
Attention !
Lors de lʼutilisation dʼappareils, il faut respecter certaines mesures de sécurité afin dʼéviter des blessures et dommages. Veuillez donc lire attentivement ce mode dʼemploi/ces consignes de sécurité. Veillez à le conserver en bon état pour pouvoir accéder aux informations à tout moment. Si lʼappareil doit être remis à dʼautres personnes, veillez à leur remettre aussi ce mode dʼemploi/ces consignes de sécurité. Nous déclinons toute responsabilité pour les accidents et dommages dus au non-respect de ce mode dʼemploi et des consignes de sécurité.
1. Consignes de sécurité:
Vous trouverez les consignes de sécurité correspondantes dans le cahier en annexe.
AVERTISSEMENT !
Veuillez lire toutes les consignes de sécurité et instructions.
Tout non-respect des consignes de sécurité et instructions peut provoquer une décharge électrique, un incendie et/ou des blessures graves.
Conservez toutes les consignes de sécurité et instructions pour une consultation ultérieure.
Explication de la plaque indicatrice sur l’appareil (voir figure 20)
1.Avertissement !
2.Avant la mise en service, lisez le mode d’emploi !
3.Protégez de la pluie et de l’humidité !
4.Portez des protections pour les yeux et l’ouïe !
5.Portez des gants de protection !
6.Portez des chaussures rigides !
7.Lame aiguisée ! Tenez toujours vos mains et pieds éloignés des lames.
8.N’exploitez et ne démarrez l’appareil qu’à l’air libre, dans des zones bien aérées afin de réduire le risque de blessures par gaz toxiques.
9.Matière explosive.
10.Surface brûlante. Ne touchez pas les pièces d’échappement, le carter d’engrenages ou le cylindre qui sont brûlants. Vous pourriez vous brûler. Ces pièces deviennent extrêmement chaudes lorsqu’elles fonctionnent et restent brûlantes même lorsque l’appareil a été mis hors service.
11.Gardez une distance minimale de 15 m par rapport aux autres personnes.
2.Conception et étendue de la livraison (fig. 1-2)
1.Lame de coupe
2.Recouvrement de protection de la lame de coupe
3.Ecran protecteur
4.Poignée avant
5.Levier étrangleur
6.Interrupteur Marche/Arrêt
7.Bouton de blocage pour accélérateur
8.Levier dʼarrêt pour poignée tournante
9.Pompe à carburant (Primer)
10.Couvercle du filtre à air
11.Poignée de démarrage
12.Poignée arrière
13.“Libération” de lʼaccélérateur
14.Accélérateur
15.Recouvrement du silencieux
16.Réservoir à mélange de carburants
17.Cosse de bougie dʼallumage
18.Clé à bougie
19.Clé à fourche ouverture 8/10
20.Flacon dʼhuile/essence
21.Recouvrement de lame
3. Utilisation conforme à lʼaffectation
Attention ! Ce taille-haies convient à tailler des haies, des buissons et des broussailles.
Veillez au fait que nos appareils, conformément à leur affectation, nʼont pas été construits, pour être utilisés dans un environnement professionnel, industriel ou artisanal. Nous déclinons toute responsabilité si lʼappareil est utilisé professionnellement, artisanalement ou dans des sociétés industrielles, tout comme pour toute activité équivalente.
19

Anleitung_BG-PH_2652_SPK1__ 12.06.12 08:20 Seite 20
F
4. Caractéristiques techniques
Type de moteur : |
Moteur deux temps ; |
|
refroidi par air ; cylindre chromé |
||
|
|
|
Puissance du moteur (maxi.) : |
0,75 kW/ 1,0 CV |
|
|
|
|
Cylindrée : |
|
26 ccm |
|
|
|
Vitesse de rotation à vide du moteur : |
2960 tr/min |
|
|
|
|
Vitesse moteur maxi. : |
|
8800 tr/min |
|
|
|
Poids (réservoir vide) : |
|
5,5 kg |
|
|
|
Longueur de lame : |
|
65 cm |
|
|
|
Longueur de coupe : |
|
52 cm |
|
|
|
Ecart des dents : |
|
28 mm |
|
|
|
Puissance de coupe (maxi.) : |
|
19 mm |
|
|
|
Contenance du réservoir : |
|
0,5 l |
|
|
|
Bougie dʼallumage : |
|
NGK BPMR7A |
Vitesse de découpage maxi. : 2300 ± 100 coupes/mn
5.2 Carburant et huile Carburants recommandés
Utilisez uniquement un mélange fait dʼessence normale sans plomb et dʼune huile spéciale moteur à
2 temps. Mélangez le carburant comme indiqué dans le tableau de mélange de carburant.
Attention : Nʻutilisez jamais de mélange de carburant ayant été stocké plus de 90 jours.
Attention : Nʼutilisez aucune huile 2 temps dans le rapport de mélange recommandé de 100:1. Le producteur décline toute responsabilité en cas de lubrification insuffisante qui entraînerait un dommage du moteur.
Attention : Pour le transport et le stockage de carburant, utilisé exclusivement les réservoirs prévus et homologués à cet effet.
Vibration (poignée avant) ahv |
13,33 m/s2 |
|
Insécurité K |
1,5 m/s2 |
|
Vibration (poignée arrière) ahv |
7,69 m/s2 |
|
Insécurité K |
1,5 m/s2 |
|
Niveau de pression acoustique LpA |
97 dB |
|
|
|
|
Insécurité K |
3 dB |
|
Niveau acoustique LWA |
107 dB |
|
|
|
|
Insécurité K |
3 dB |
|
Le bruit et les vibrations ont été mesurées conformément à la norme EN ISO 10517.
Remplacez respectivement de la bonne quantité dʼessence et dʼhuile deux temps dans la bouteille de mélange ci-jointe (voir lʼéchelle imprimée). Secouez ensuite bien la bouteille.
5.3 Tableau de mélange du carburant :
Mélanger : 40 parts dʼessence pour une part dʼhuile
Essence |
Huile deux temps |
|
|
1 litre |
25 ml |
|
|
5 litres |
125 ml |
|
|
5. Avant la mise en service
5.1 Montage
Le taille-haies est entièrement monté. Aucun travail de montage nʼest nécessaire.
Pour un meilleur guidage, lʼappareil est équipé dʼune poignée tournante qui peut être réglée, en fonction des exigences, dans les positions -90°/45°/0°/+45°/
+90°. Tirez pour ce faire le levier (fig. 5/pos. B) en arrière, faites tourner la poignée tournante dans la position désirée et faites engager à nouveau le levier vers lʼavant. Grâce aux différentes positions réglables, les travaux au-dessus du niveau à hauteur de la tête ou dans des endroits difficiles dʼaccès sont facilités.
Attention : Le réglage de la poignée tournante peut uniquement être réalisé lorsque le moteur est à lʼarrêt.
20
6. Fonctionnement
Veuillez respecter les directives légales relatives à lʼordonnance de la protection contre le bruit. Elles peuvent différer dʼun endroit à lʼautre.
6.1 Faire démarrer le moteur froid (fig. 3-5)
Remplissez le réservoir de la quantité correcte de mélange essence/huile.
1.Placez lʼappareil sur une surface solide et plane.
2.Mettez le levier étrangleur (fig. 4/pos. 5) en position ““


 ”.
”.
3.Poussez 10x sur la pompe à carburant (primer)
(fig. 4/pos. 9).
4.Connecter lʼinterupteur Marche / Arrêt (fig. 3/pos. 6) sur “I”
5.Fixez lʼaccélérateur. Pour y arriver, actionnez le blocage de lʼaccélérateur (fig. 3/pos. 13), puis lʼaccélérateur (fig. 3/pos. 14) et appuyez simultanément sur le bouton de blocage (fig.
3/pos. 7), ce qui fixe lʼaccélérateur.
Anleitung_BG-PH_2652_SPK1__ 12.06.12 08:20 Seite 21
F
6.Tenez bien lʼappareil de la main droite sur la poignée avant et tirez le cordon de démarrage avec la main gauche (fig. 5/pos. A) jusquʼà la première résistance (environ. 10cm). Tirez ensuite dʼun coup 4 fois le cordon de démarrage. Lʼappareil doit démarrer.
Attention : Ne laissez pas le cordon de démarrage rentrer trop rapidement. Ceci peut entraîner des dommages.
7.Lorsque le moteur a démarré, mettez immédiatement le levier étrangleur sur “ 

 ” et laissez lʼappareil atteindre sa température de service pendant environ. 10 sec.
Attention : Comme lʼaccélérateur est fixé dans sa position, lʼoutil de découpage se met en route dès que le moteur démarre.
Actionnez ensuite lʼaccélérateur pour le déverrouiller (le moteur se remet en marche à vide).
8.Si le moteur ne démarre pas, recommencez les étapes 6-7.
Observations : Si le moteur ne démarre toujours pas au bout de plusieurs essais, veuillez lire le paragraphe “élimination des erreurs“.
Observations : Tirez toujours la corde de démarrage toute droite. Si vous la tirez en lui faisant faire un angle, une friction aura lieu au niveau de lʼoeillet. Ce frottement écorche la corde qui sʼuse plus vite.
6.2Faire démarrer le moteur chaud (lʼappareil nʼest pas resté plus de 15-20 mn à lʼarrêt)
1.Placez lʼappareil sur une surface solide et plane.
2.Mettez lʼinterrupteur Marche/arrêt sur „I“.
3.Bloquez lʼaccélérateur (comme pour „Lancer le moteur froid“).
4.Tenez bien lʼappareil de la main droite sur la poignée avant et tirez le cordon de démarrage avec la main gauche jusquʼà la première résistance (environ. 10 cm). Maintenant, tirez fortement sur le cordon de démarrage. Lʼappareil doit démarrer au bout de 1 à 2 essais. Si la machine ne démarre toujours pas au bout de 6 essais, recommencez les étape 1 à 7 “Lancer le moteur froid”.
6.3 Mettre le moteur hors circuit
Suite des étapes pour un arrêt dʼurgence : Sʼil est nécessaire de mettre la machine
immédiatement hors circuit, mettez lʼinterrupteur Marche/arrêt sur “Stop” ou “0”.
Suite dʼétapes normale :
Relâchez lʼaccélérateur et attendez jusquʼà ce que le moteur passe en vitesse de marche à vide. Mettez ensuite lʼinterupteur Marche / Arrêt sur „Stop“ ou encore „0“.
6.4 Consignes de travail
Ne laissez pas la machine tourner à petite vitesse pendant le démarrage ou pendant la coupe.
Couper une végétation dense : Le plus effectif est un mouvement large et étendu en guidant les lames du couteau directement à travers les branches. Une légère inclinaison de la lame vers le bas, dans le sens du mouvement donne la meilleure coupe.
Pour obtenir une hauteur de haie régulière, il est recommandé de tendre un fil comme repère le long de lʼarête de la haie. Les branches le dépassant sont alors coupées. (fig. 6)
Découper une haie latéralement : Les surfaces latérales dʼune haie doivent être coupées en effectuant des mouvements en forme dʼarc de bas en haut. (fig. 7)
Attention : En fonction du type de taille-haies avec lequel vous travaillez, il est possible que le moteur sʼarrête pendant une coup latérale prolongée si le réservoir nʼest pas complètement plein.
7.Nettoyage, maintenance, entreposage et commande de pièces de rechange
7.1 Nettoyage
nMaintenez les dispositifs de protection, les fentes
à air et le carter de moteur aussi propres (sans poussière) que possible. Frottez lʼappareil avec un chiffon propre ou soufflez dessus avec de lʼair comprimé à basse pression.
nNous recommandons de nettoyer lʼappareil directement après chaque utilisation.
nNettoyez lʼappareil régulièrement à lʼaide dʼun chiffon humide et un peu de savon. Nʼutilisez aucun produit de nettoyage ni détergeant ; ils pourraient endommager les pièces en matières plastiques de lʼappareil. Veillez à ce quʼaucune eau nʼentre à lʼintérieur de lʼappareil.
21

Anleitung_BG-PH_2652_SPK1__ 12.06.12 08:20 Seite 22
F
7.2 Maintenance
Mettez toujours le taille-haies hors circuit avant tout travail dʼentretien et retirez la cosse de la bougie dʼallumage.
1.Les lames sont de grande qualité, en acier trempé. Lorsque le taille-haie est utilisé normalement, il nʼest pas besoin de les aiguiser.
Si par mégarde, vous rencontrez un fil métallique, du verre ou dʼautres objets solides, il est possible que cela occasionne une encoche sur la lame. Il nʼest pas nécessaire dʼéliminer lʼencoche tant quʼelle nʼaltère pas au mouvement de la lame. Si toutefois, cela devait altérer le mouvement, mettez la machine hors circuit et prenez une lime ou une pierre à limer pour éliminer lʼencoche. Veillez à ce que la lame de coupe soit toujours bien huilée (voir fig. 8).
2.Si vous faites tomber le taille-haies, contrôlez sʼil a été détérioré. En cas dʼendommagement, veuillez contacter un service après vente dûment autorisé au envoyez lʼappareil à la société iSC-
GmbH pour le faire réparer.
3.Nettoyez la machine uniquement lorsquʼelle est hors circuit. Utilisé exclusivement du savon doux et un chiffon humide pour la nettoyer. Ne laissez jamais de liquide sʼimmiscer dans la machine.
Nʼutilisez jamais de nettoyant corrodant.
7.2.1 Maintenance du filtre à air (fig. 9-11)
Les filtres à air encrassés réduisent la puissance motrice en raison dʼune amenée dʼair au carburateur trop réduite.
Des contrôles réguliers sont par conséquent indispensables. Il faut contrôler le filtre à air toutes les 25 heures de service et le nettoyer le cas
échéant. Si lʼai est très chargé de poussière, contrôlez plus souvent le filtre à air.
1.Retirez le couvercle du filtre à air (fig. 9-10)
2.Sortez lʼélément filtrant (fig. 11)
3.Nettoyez lʼélément filtrant en tapotant dessus ou en soufflant dessus.
4.Le montage est effectué dans lʼordre inverse des étapes.
Attention : Ne nettoyez jamais le filtre avec de sence ni avec des solvants inflammables. Nettoyez le filtre à air avec de lʼair comprimé ou en tapotant dessus.
7.2.2 Maintenance des bougies dʼallumage (fig. 12-14)
Distance explosive des bougies dʼallumage = 0,025 pouces (0,635 mm). Serrez la bougie dʼallumage avec 12-15 Nm.
Contrôlez la bougie dʼallumage pour la première fois
22
au but de 10 heures de service. Repérez les encrassements et nettoyez-les le cas échéant à lʼaide dʼune brosse à fils de cuivre. Effectuez ensuite une maintenance de la bougie dʼallumage toutes les
50 heures de service.
1.Retirez la cosse de bougie dʼallumage (fig. 13) avec un mouvement rotatif.
2.Retirez la bougie dʼallumage (fig. 14) avec la clé à bougie ci-jointe.
3.Le montage est effectué dans lʼordre inverse des
étapes.
7.2.3 Maintenance du filtre à air (fig. 15)
Il faut effectuer un graissage de lʼengrenage chaque année avant le début de la saison par le raccord fileté de graissage (fig. 15/pos. A). Pour ce faire, placez une presse à graisse sur le raccord fileté de graissage et effectuer environ trois pressions pour faire entrer dans lʼengrenage une graisse à machine courante dans le commerce. Si vous utilisez lʼappareil très souvent, il faut effectuer plus souvent un graissage.
7.2.4 Réglages du carburateur
Attention ! Les réglages du carburateur doivent uniquement être entrepris par un service après-vente dûment autorisés.
Pour tous les travaux effectués sur le carburateur, il faut tout dʼabord démonter le recouvrement du filtre à air comme indiqué en figure 9 - 10.
Réglage du tirant à câble:
Si la vitesse maximale de lʼappareil ne peut plus être atteinte au bout dʼun moment et que toutes les causes indiquées au chapitre 9 « Elimination des erreurs » ont été exclues, un réglage du tirant à câble peut-être requis.
Contrôlez tout dʼabord si le carburateur sʼouvre bien complètement lorsque lʼon appuie complètement sur la poignée de gaz. Ceci arrive lorsque que le coulisseau du carburateur (fig. 16/pos. 1) se trouve sur la butée alors que lʼaccélérateur est complètement actionné (fig. 16/pos. 2). La figure 16 montre le réglage correct. Si le coulisseau du carburateur ne touche pas la butée, cʼest quʼun rajustage est nécessaire.
Pour rajuster le tirant à câble, les étapes suivantes sont à respecter :
nDesserrez le contre-écrou (fig. 17/pos. 3) de quelques tours.
nTournez la vis de réglage (fig. 18/pos. 4) pour la retirer jusquʼà ce que le coulisseau du carburateur se trouve sur la butée, comme montré en figure 16.
nResserrez le contre-écrou à nouveau à fond.

Anleitung_BG-PH_2652_SPK1__ 12.06.12 08:20 Seite 23
F
Réglage de la vitesse à lʼarrêt :
Attention ! Réglez la vitesse à lʼarrêt lorsque lʼappareil est encore chaud.
Si lʼappareil se met hors circuit lorsque le levier de lʼaccélérateur nʼest pas actionné et que toutes les causes ont été exclues conformément au chapitre 9
« Elimination des erreurs », cʼest quʼil est nécessaire de réajuster la vitesse à lʼarrêt. Tournez la vis de vitesse à lʼarrêt (fig. 19/pos. 5) dans le sens des aiguilles dʼune montre jusquʼà ce que lʼappareil fonctionne correctement à vide.
Si la vitesse à lʼarrêt est si élevée que les lames ne sʼarrêtent pas, il faut alors diminuer la vitesse à lʼarrêt en tournant la vis de vitesse à lʼarrêt vers la gauche (fig. 19/pos. 5) jusquʼà ce que les lames sʼarrêtent.
7.3 Stockage
Attention : Une erreur pendant que vous suivez ces étapespeut entraîner des dépôts sur la paroi intérieure de lʼaccélérateur, ce qui à son tour entraîne un démarrage difficile ou un dommage durable sur la machine.
1.Effectuez tous les travaux dʼentretien.
2.Faites couler le carburant du réservoir (utilisez à ce propos une pompe à essence en plastique courante achetée dans un magasin dʼaccessoires de construction).
3.Une fois le combustible sorti, faites démarrer la machine.
4.Laissez la machine fonctionner à vide jusquʼà ce quʼelle sʼarrête. Cela nettoie le carburateur de tout reste de combustible.
5.Faites refroidir la machine. (env. 5 minutes)
6.Retirez la bougie dʼallumage (voir point 7.2.2).
7.Remplissez une cuiller à café dʼhuile à moteur 2 temps dans la chambre dʼexplosion. Tirez quelques fois précautionneusement le cordon de démarrage pour humidifier les composants intérieurs dʼhuile. Remontez la bougie dʼallumage.
8.Nettoyez le boîtier externe de la machine.
9.Conservez la machine dans un endroit frais et sec hors de portée de sources dʼinflammation et de substances inflammables.
10.Lors du transport ou de l’entreposage, le dispositif de découpage du taille-haies doit toujours être recouvert de la protection du dispositif de découpage.
Les engrais ou autres produits chimiques pour jardins comprennent fréquemment des substances qui accélèrent la corrosion des métaux. Nʼentreposez pas la machine à proximité dʼengrais ou dʼautre agents chimiques.
Remise en service
1.Retirez la bougie dʼallumage.
2.Tirez plusieurs fois le cordon de démarrage pour nettoyer la chambre dʼexplosion de tout résidu dʼhuile.
3.Nettoyez les contacts de la bougie dʼallumage ou montez une nouvelle bougie dʼallumage.
4.Remplissez le bac. Voir chapitre Combustible et huile.
5.Effectuez les étapes 1 à 7 du point “Lancer le moteur froid”.
7.4 Commande de pièces de rechange
Pour les commandes de pièces de rechange, veuillez indiquer les références suivantes:
nType de lʼappareil
nNo. dʼarticle de lʼappareil
nNo. dʼidentification de lʼappareil
nNo. de pièce de rechange de la pièce requise
Vous trouverez les prix et informations actuelles à lʼadresse www.isc-gmbh.info
8. Mise au rebut et recyclage
Lʼappareil se trouve dans un emballage permettant dʼéviter les dommages dus au transport. Cet emballage est une matière première et peut donc être réutilisé ultérieurement ou être réintroduit dans le circuit des matières premières.
Lʼappareil et ses accessoires sont en matériaux divers, comme par ex. des métaux et matières plastiques. Eliminez les composants défectueux dans les systèmes dʼélimination des déchets spéciaux. Renseignez-vous dans un commerce spécialisé ou auprès de lʼadministration de votre commune !
23

Anleitung_BG-PH_2652_SPK1__ 12.06.12 08:20 Seite 24
F
9. Elimination des erreurs
Dérangement |
Cause probable |
Elimination du dérangement |
|||||
|
|
|
|
|
|
|
|
Lʼappareil ne démarre pas. |
Manière de procéder incorrecte |
Respectez les instructions de |
|||||
|
pendant le démarrage. |
démarrage |
|||||
|
|
|
|
|
|
|
|
|
Bougie dʼallumage encrassée ou |
Nettoyez la bougie dʼallumage ou |
|||||
|
humide |
la remplacer par une nouvelle. |
|||||
|
|
|
|
|
|
|
|
|
Mauvaise régulation du |
Demandez au service après vente |
|||||
|
carburateur |
autorisé ou envoyez lʼappareil à la |
|||||
|
|
société iSC-GmbH. |
|||||
|
|
|
|
|
|
|
|
Lʼappareil démarre mais nʼatteint |
Mauvais réglage du levier |
Mettez le levier étrangleur sur „ |
|
|
|
|
“. |
|
|
|
|||||
pas sa pleine puissance. |
étrangleur |
|
|
|
|
|
|
|
|
|
|
|
|
|
|
|
Encrassement du filtre à air |
Nettoyez le filtre à air |
|||||
|
|
|
|
|
|
|
|
|
Mauvaise régulation du |
Demandez au service après vente |
|||||
|
carburateur |
autorisé ou envoyez lʼappareil à la |
|||||
|
|
société iSC-GmbH. |
|||||
|
|
|
|
|
|
|
|
Le moteur ne fonctionne pas |
Mauvaise distance entre les |
Nettoyez la bougie dʼallumage et |
|||||
régulièrement |
électrodes de la bougie dʼallumage |
réglez la distance entre les |
|||||
|
|
électrodes ou montez une nouvelle |
|||||
|
|
bougie dʼallumage. |
|||||
|
|
|
|
|
|
|
|
|
Mauvaise régulation du |
Demandez au service après vente |
|||||
|
carburateur |
autorisé ou envoyez lʼappareil à la |
|||||
|
|
société iSC-GmbH. |
|||||
|
|
|
|
|
|
|
|
Le moteur fume trop |
Mauvais mélange de carburant |
Utilisez un mélange correct de |
|||||
|
|
carburant (voir le tableau de |
|||||
|
|
mélange de carburant) |
|||||
|
|
|
|
|
|
|
|
|
Mauvaise régulation du |
Demandez au service après vente |
|||||
|
carburateur |
autorisé ou envoyez lʼappareil à la |
|||||
|
|
société iSC-GmbH. |
|||||
|
|
|
|
|
|
|
|
24
 Loading...