


k
Bedienungsanleitung
Elektro-Vertikutierer
t
Operating Instructions
Electric Scarifier
p
Mode dʼemploi
Scarificateur électrique
C
Istruzioni per lʼuso
Scarificatore elettrico
lL
Betjeningsvejledning
El-dreven kultivator
U
Bruksanvisning
Elektrisk vertikalskärare
Bf
Upute za rukovanje
Elektrokultivator
4
Uputstva za rukovanje
Elektro kultivator
Art.-Nr.: 34.205.12 I.-Nr.: 01018
BG-ES
1231
Anleitung_BG_ES_1231_SPK1:_ 10.12.2008 12:58 Uhr Seite 1

2
Vor Inbetriebnahme Bedienungsanleitung und Sicherheitshinweise
lesen und beachten.
Read and follow the operating instructions and safety information
before using for the first time.
Avant la mise en service, lisez le mode dʼemploi et les consignes
de sécurité et respectez-les.
Prima della messa in esercizio leggete e osservate le istruzioni
per lʼuso e le avvertenze di sicurezza.
Betjeningsvejledningen og sikkerhedsanvisningerne skal læses,
inden maskinen tages i brug. Alle anvisninger skal følges.
Läs igenom och beakta bruksanvisningen och
säkerhetsanvisningarna före användning.
Bf Prije puštanja u rad pročitajte i pridržavajte se ovih uputa za uporabu
i sigurnosnih napomena.
4 Prije puštanja u pogon pročitajte i uvažite uputstva za upotrebu i
napomene bezbednosti.
Anleitung_BG_ES_1231_SPK1:_ 10.12.2008 12:58 Uhr Seite 2
3
1
3
9
13
13
7
2
4
8
7
10
6
5
1
2
14
7
11
13
12
4
5
11
6
7
9
Anleitung_BG_ES_1231_SPK1:_ 10.12.2008 12:58 Uhr Seite 3
4
5
3
4
6 7
ABCDE
7
14
6
4
13
14
Anleitung_BG_ES_1231_SPK1:_ 10.12.2008 12:58 Uhr Seite 4
5
8
10
9
11
12
12
12
12 13
10
Anleitung_BG_ES_1231_SPK1:_ 10.12.2008 12:58 Uhr Seite 5
6
14
16
15
2
3
1
1
2
2
1
Anleitung_BG_ES_1231_SPK1:_ 10.12.2008 12:58 Uhr Seite 6

7
D
Achtung!
Beim Benutzen von Geräten müssen einige
Sicherheitsvorkehrungen eingehalten werden, um
Verletzungen und Schäden zu verhindern. Lesen Sie
diese Bedienungsanleitung / Sicherheitshinweise
deshalb sorgfältig durch. Bewahren Sie diese gut auf,
damit Ihnen die Informationen jederzeit zur
Verfügung stehen. Falls Sie das Gerät an andere
Personen übergeben sollten, händigen Sie diese
Bedienungsanleitung / Sicherheitshinweise bitte mit
aus. Wir übernehmen keine Haftung für Unfälle oder
Schäden, die durch Nichtbeachten dieser Anleitung
und den Sicherheitshinweisen entstehen.
1. Sicherheitshinweise
Die entsprechenden Sicherheitshinweise finden Sie
im beiliegenden Heftchen!
WARNUNG
Lesen Sie alle Sicherheitshinweise und
Anweisungen. Versäumnisse bei der Einhaltung der
Sicherheitshinweise und Anweisungen können
elektrischen Schlag, Brand und/oder schwere
Verletzungen verursachen.
Bewahren Sie alle Sicherheitshinweise und
Anweisungen für die Zukunft auf.
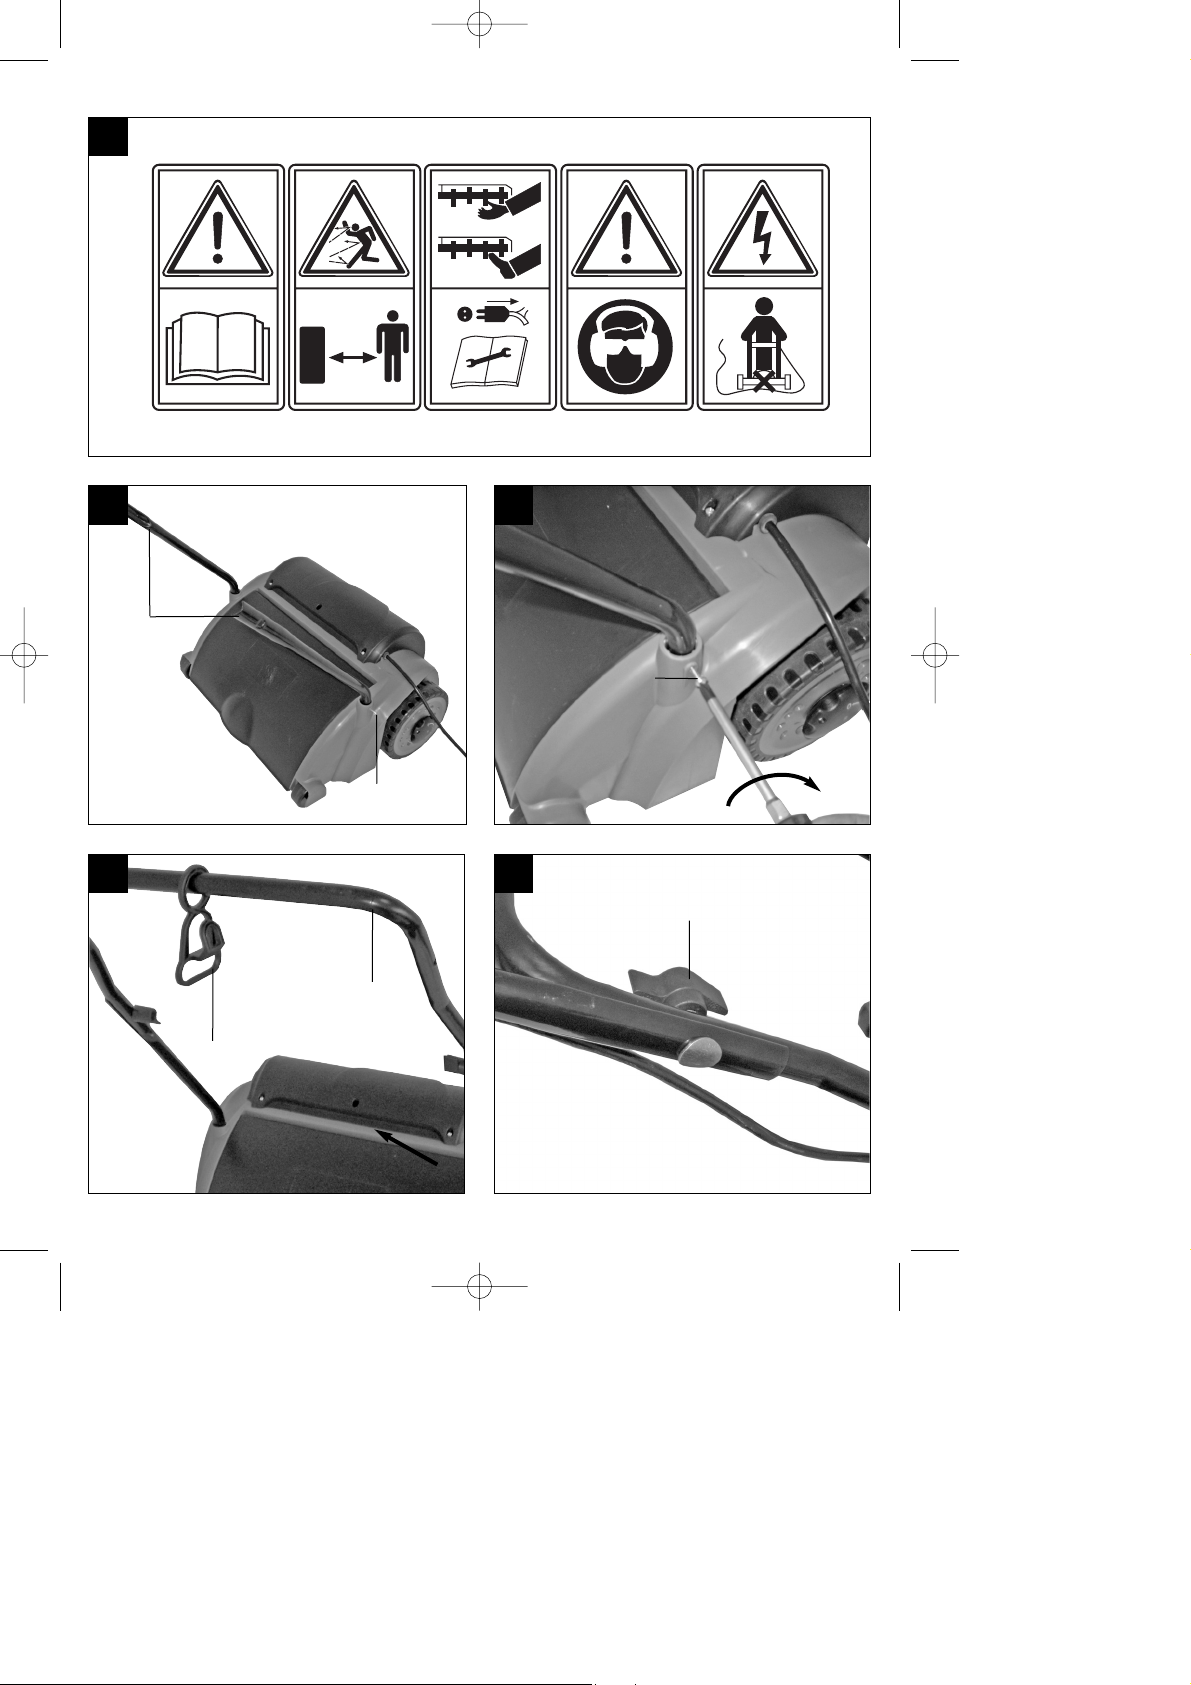
Erklärung des Hinweisschildes auf dem Gerät
(siehe Bild 3)
A = Achtung!
Vor Inbetriebnahme Gebrauchsanweisung
lesen.
B = Dritte (Personen und Tiere) aus dem Ge-
fahrenbereich fernhalten.
C = Scharfe Arbeitswerkzeuge - Schneiden Sie
sich nicht die Finger oder Zehen. Schalten
Sie das Gerät aus und ziehen Sie den
Netzstecker vor Wartungsarbeiten,
Reinigung oder wenn das Kabel verwickelt
oder beschädigt ist. Halten Sie das Netzkabel
von der Messerwalze fern.
D = Gehör- und Augenschutz tragen.
E = Halten Sie das Netzkabel von der Walze fern.
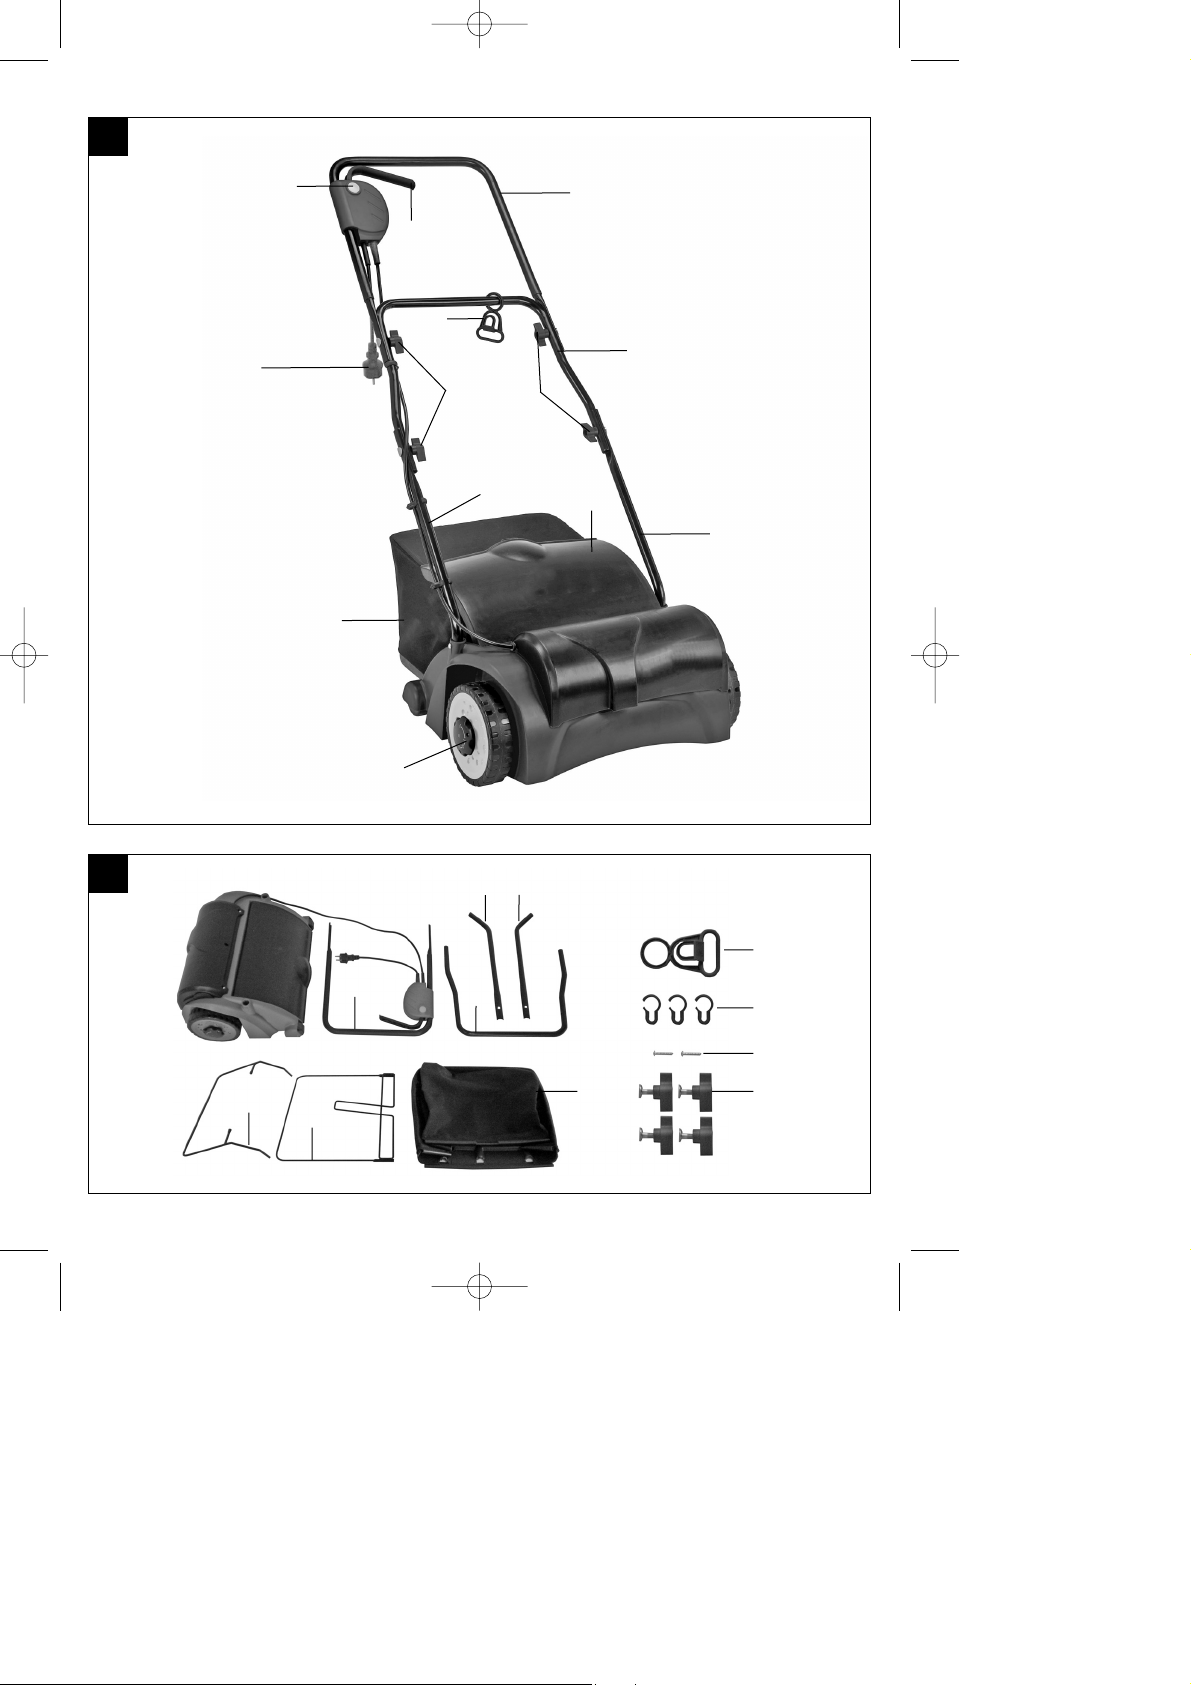
2. Gerätebeschreibung (Bild 1/2)
1. Ein/Aus-Schalttaste
2. Einschaltsperre
3. Netzleitung
4. Kabelzugentlastung
5. Oberer Schubbügel
6. Unterer Schubbügel
7. Schubbügelhalter
8. Tiefenverstellung
9. Fangkorb
10. Auswurfklappe
11. Gestellteile für Fangkorb
12. Kabelbefestigungsklammern
13. Befestigungsschrauben für Schubbügel
14. Sicherungsschrauben für Schubbügel
3. Bestimmungsgemäße Verwendung
Der Vertikutierer ist für die private Benutzung im
Haus- und Hobbygarten geeignet.
Als Vertikutierer für den privaten Haus- und
Hobbygarten werden solche angesehen, deren
jährliche Benutzung in der Regel 10 Stunden nicht
übersteigen und die vorwiegend für die Pflege von
Gras- oder Rasenflächen verwendet werden, nicht
jedoch in öffentlichen Anlagen, Parks, Sportstätten
sowie nicht in der Land- und Forstwirtschaft.
Die Einhaltung der vom Hersteller beigefügten
Gebrauchsanweisung ist Voraussetzung für
den ordnungsgemäßen Gebrauch des Vertikutieres.
Die Gebrauchsanweisung enthält auch die Betriebs-,
Wartungs- und Instandhaltungsbedingungen.
Achtung! Wegen körperlicher Gefährdung des
Benutzers darf der Vertikutierer nicht eingesetzt werden als Häcksler zum Zerkleinern von Astund Heckenabschnitten. Ferner darf der
Vertikutierer nicht verwendet werden als Motorhacke
und zum Einebnen von Bodenerhebungen, wie z.B. Maulwurfshügel.
Aus Sicherheitsgründen darf der Vertikutierer nicht
verwendet werden als Antriebsaggregat für andere
Arbeitswerkzeuge und Werkzeugsätze jeglicher Art
es sei denn, diese sind vom Hersteller ausdrücklich
zugelassen.
Anleitung_BG_ES_1231_SPK1:_ 10.12.2008 12:58 Uhr Seite 7

8
D
Die Maschine darf nur nach ihrer Bestimmung
verwendet werden. Jede weitere darüber
hinausgehende Verwendung ist nicht
bestimmungsgemäß. Für daraus hervorgerufene
Schäden oder Verletzungen aller Art haftet der
Benutzer/Bediener und nicht der Hersteller.
Bitte beachten Sie, dass unsere Geräte
bestimmungsgemäß nicht für den gewerblichen,
handwerklichen oder industriellen Einsatz konstruiert
wurden. Wir übernehmen keine Gewährleistung,
wenn das Gerät in Gewerbe-, Handwerks- oder
Industriebetrieben sowie bei gleichzusetzenden
Tätigkeiten eingesetzt wird.
4. Technische Daten
Netzspannung: 230 V ~ 50Hz
Leistungsaufnahme: 1200 W
Arbeitsbreite: 31 cm
Anzahl der Messer: 8 Doppelmesser
Tiefenverstellung: -3 / 3 / 7 / 9 mm
Schalldruckpegel LpA: 85 dB(A)
Schallleistungspegel LWA: 99 dB(A)
Vibration am Holm: 2,71 m/s
2
Unsicherheit K 1,5 m/s
2
Schutzklasse: II / 쓑
Schutzart: IPX4
Gewicht 11 kg
5. Vor Inbetriebnahme
Der Vertikutierer ist bei Auslieferung demontiert. Der
Fangkorb und der komplette Schubbügel müssen vor
dem Gebrauch des Vertikutierers montiert werden.
Folgen Sie der Gebrauchsanweisung Schritt für
Schritt und orientieren Sie sich an den Bildern, damit
der Zusammenbau für Sie einfach wird.
Montage der Schubbügelhalter
(siehe Bilder 4 und 5)
Schieben Sie die Schubügelhalter (Abb. 4/Pos. 7) in
die dafür vorgesehenen Öffnungen (Abb. 4). und
befestigen Sie sie mit den Sicherungsschrauben
(Abb. 5/Pos. 14)
Montage des unteren Schubbügels (siehe Bild 6)
Der untere Schubbügel (Abb. 6/Pos. 6) muss
über die Schubbügelhalter geschoben werden.
Vergessen Sie hierbei nicht, die Zugentlastung
(Abb. 6/Pos. 4) vorher auf das Rohr zu schieben.
앬 Mit den beiliegenden Schrauben (Abb. 7/Pos.13)
die Rohre miteinander verschrauben.
Montage des oberen Schubbügels
(siehe Bild 7-9)
Oberen Schubbügel (Abb. 1/Pos. 5) so
positionieren, dass die Löcher des oberen
Schubbügels mit den Löchern des unteren
Schubbügels übereinstimmen.
앬 Mit den beiliegenden Schrauben (Abb. 2/Pos. 13)
die Rohre miteinander verschrauben.
Mit beiliegenden Kabelhaltern (Bild 8) das
Netzkabel an den Rohren der Schubbügel
befestigen, so dass das Öffnen und Schließen
der Auswurfklappe gewährleistet ist
(Bild 9/Pos. 12).
Achtung!
Bitte achten Sie darauf, dass sich die Auswurfklappe
leicht öffnen und schließen lässt!
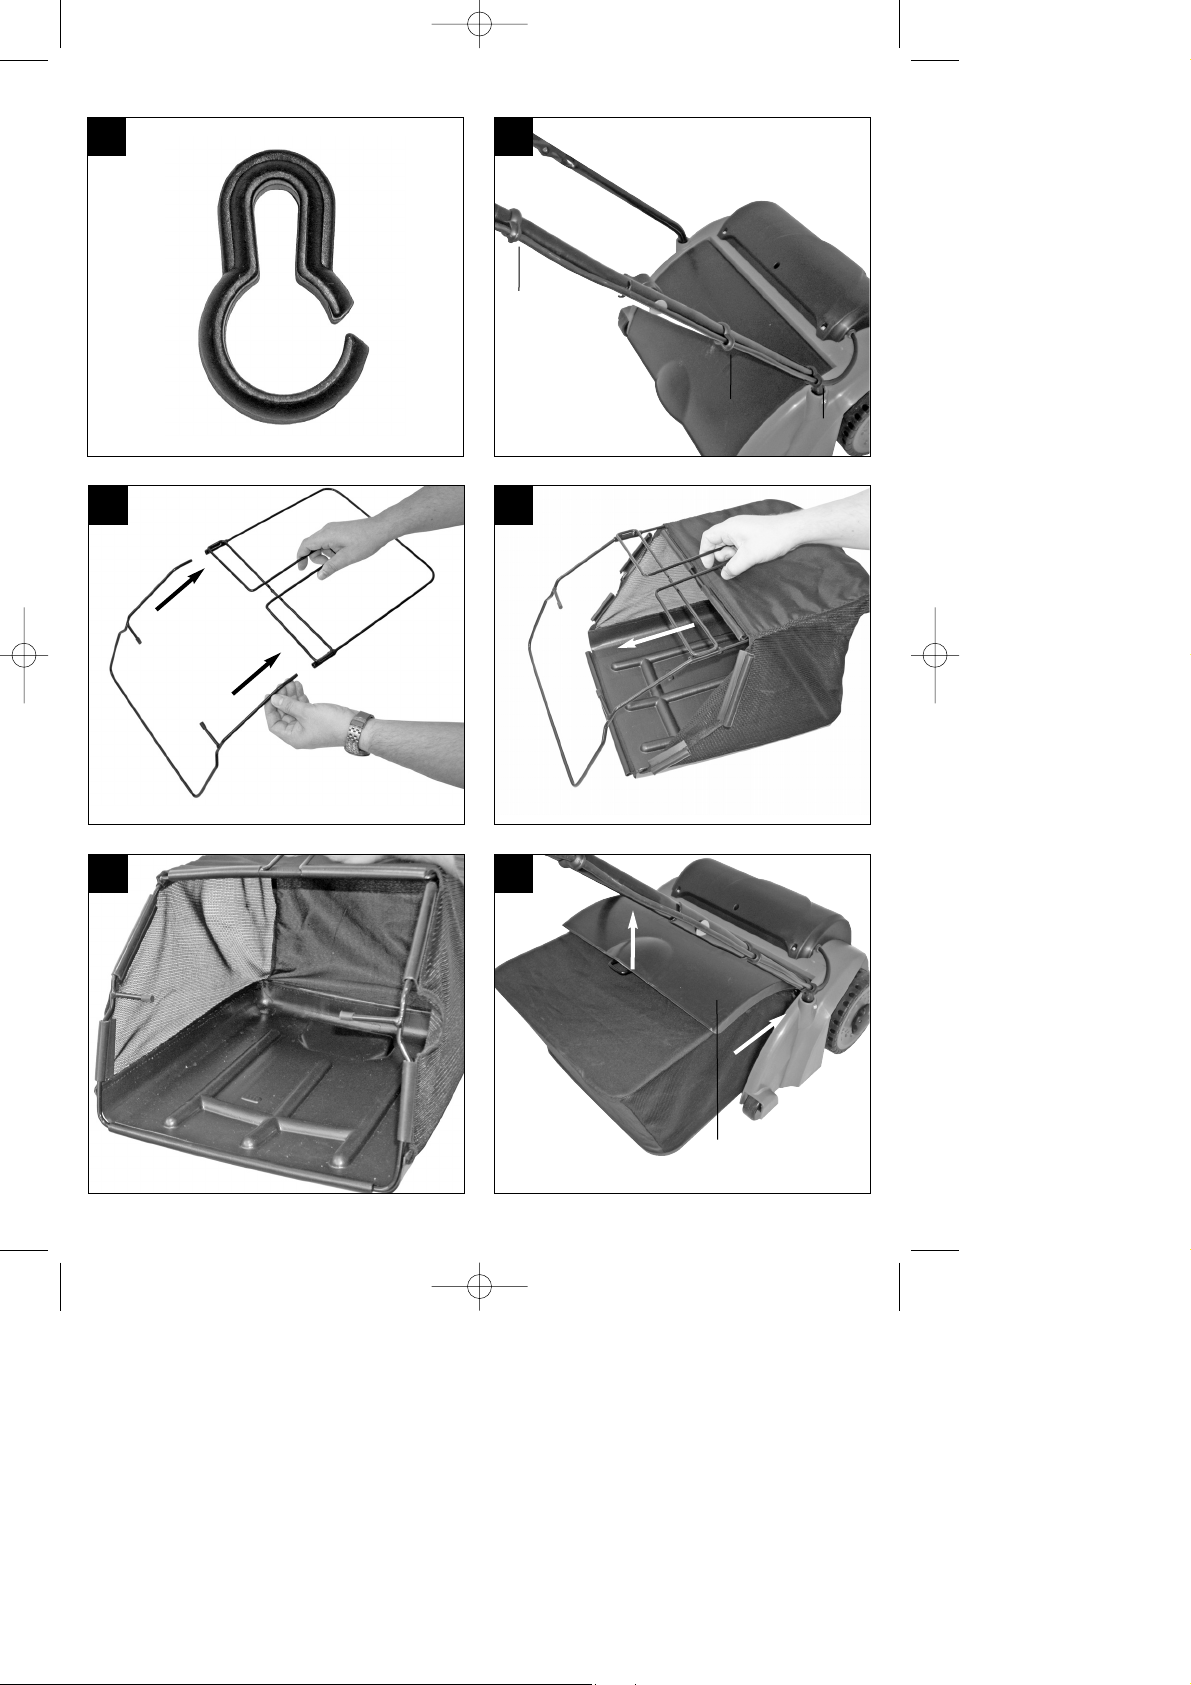
Montage des Fangkorbes (siehe Bilder 10-13)
Die beiden Gestellteile ineinander schieben (Abb.
10)
Den Fangkorb über das Metallgestell ziehen
(Abb. 11)
Die Gummilaschen über das Metallgestell
stülpen (Abb. 12)
Um den Fangkorb am Vertikutierer einzuhängen
müssen Sie die Auswurfklappe (Abb. 13/Pos. 10)
mit einer Hand anheben und den Fangsack mit
der anderen Hand am Handgriff nehmen und von
oben einhängen (Bild 13).
Achtung!
Zum Einhängen des Fangkorbes muss der Motor
abgeschaltet sein und die Messerwalze darf sich
nicht drehen!
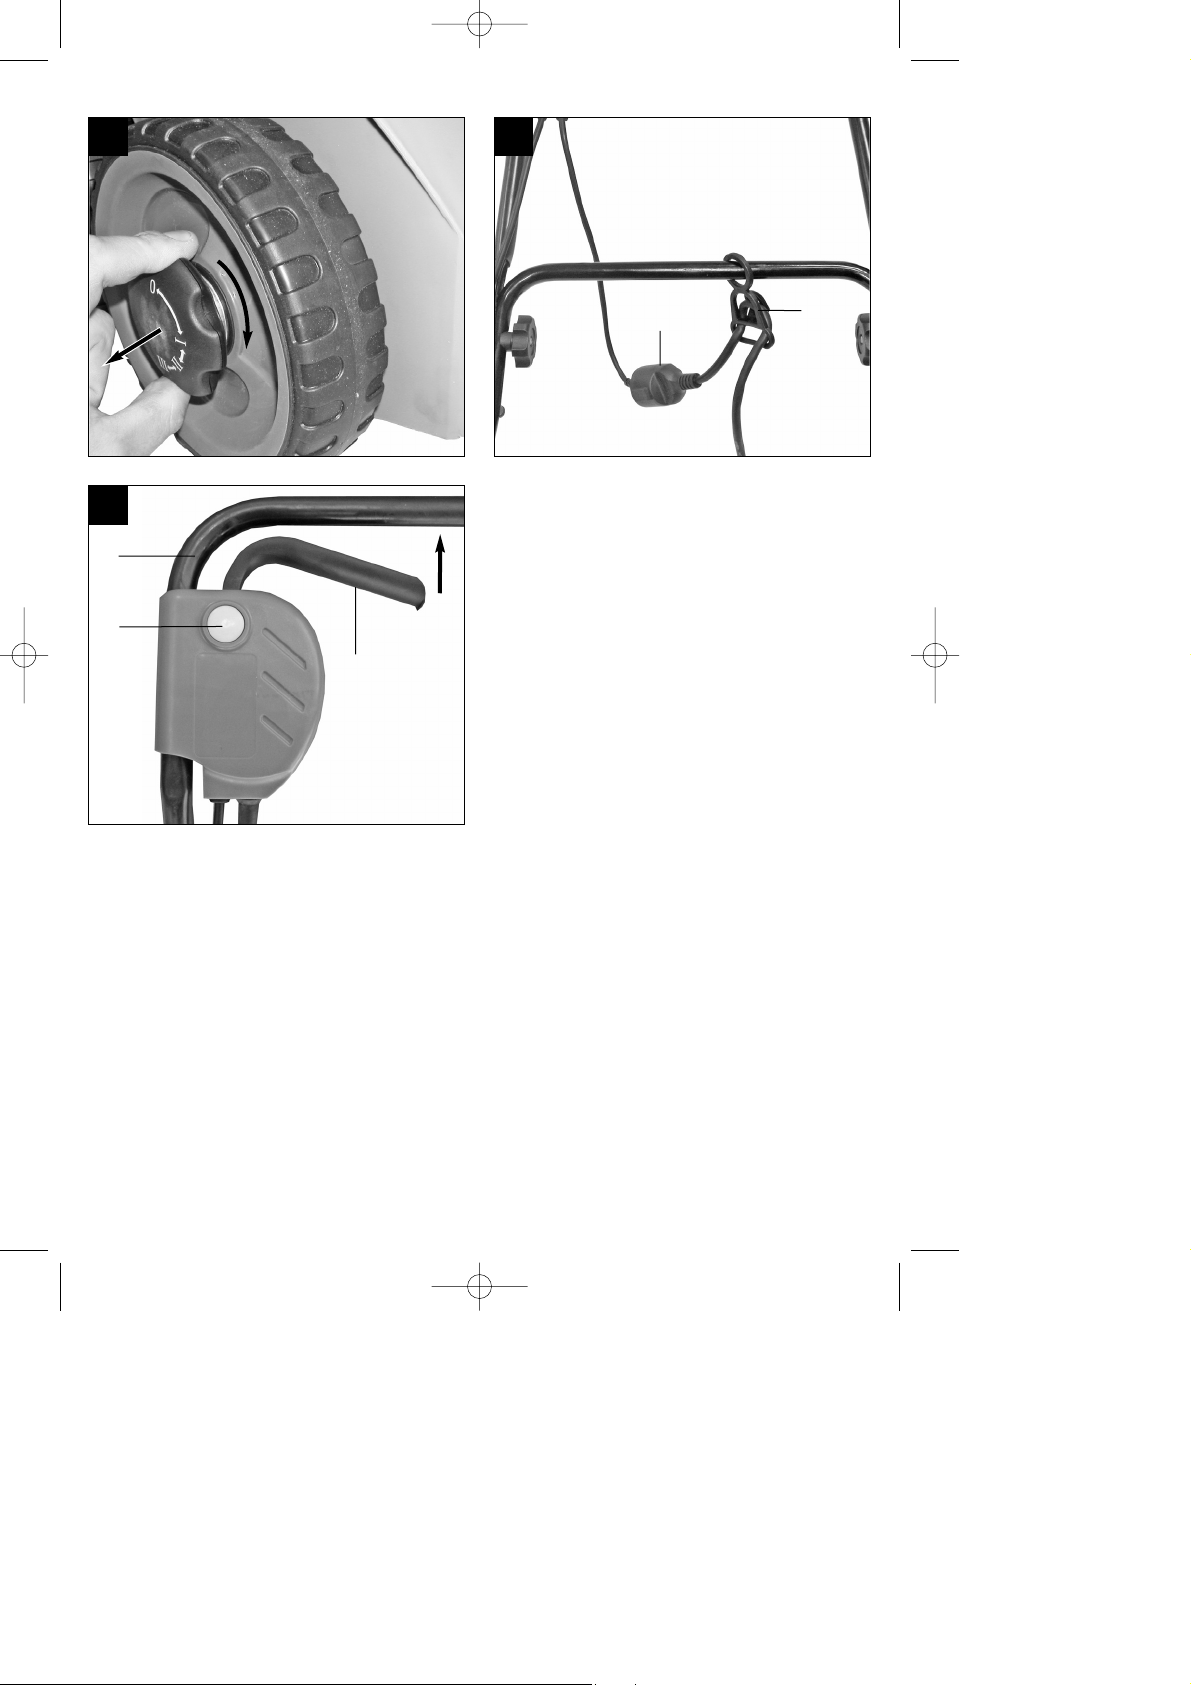
Einstellung der Vertikutiertiefe (siehe Bild 14)
Die Vertikutiertiefe wird mit dem Verstellmechanismus an den beiden Vorderrädern eingestellt.
Hierzu die Verstellschraube herausziehen und nach
links oder rechts in eine der Stellungen =0/ I / II / III
bringen.
Achtung!
Es muss immer auf beiden Seiten die gleiche
Vertikutiertiefe eingestellt werden!
Anleitung_BG_ES_1231_SPK1:_ 10.12.2008 12:58 Uhr Seite 8

9
D
0 = Fahr- / oder Transportstellung
I = Vertikutiertiefe 3 mm
II = Vertikutiertiefe 7 mm
III = Vertikutiertiefe 9 mm
Stromanschluss
Das Gerät kann an jede Lichtsteckdose mit 230 Volt
Wechselstrom angeschlossen
werden. Es ist jedoch nur eine Schuko-Steckdose
zulässig, zu deren Absicherung ein
Leitungs-Schutzschalter für 16A vorzusehen ist.
Außerdem muss ein Fehlerstromschutzschalter
(RCD) mit max. 30 mA vorgeschaltet sein!
Geräteanschlussleitung
Verwenden Sie bitte nur Geräteanschlussleitungen,
welche nicht beschädigt sind. Die
Geräteanschlussleitung darf nicht beliebig lang sein
(max. 50m), da sonst die Leistung des
Elektromotors vermindert wird. Die
Geräteanschlussleitung muss einen Querschnitt von
3 x 1,5mm haben. An Geräteanschlussleitungen von
Rasenmähern entstehen besonders häufig
Isolationsschäden.
Ursachen hierfür sind u.a.:
Schnittstellen durch Überfahren der Leitung
Quetschstellen, wenn die Geräteanschlussleitung
unter Türen und Fenster geführt wird
Risse durch Alterung der Isolation
Knickstellen durch unsachgemäße Befestigung
oder Führung der Geräteanschlussleitung
Die Geräteanschlussleitungen müssen mindestens
vom Typ H05RN-F und 3-adrig sein. Ein Aufdruck
der Typenbezeichnung auf der Geräteanschlussleitung ist vorgeschrieben. Kaufen Sie nur Geräteanschlussleitungen mit Kennzeichnung! Die Stecker
und Kupplungsdosen an Geräteanschlussleitungen
müssen aus Gummi bestehen und
spritzwassergeschützt sein. Die Geräteanschlussleitungen dürfen nicht beliebig lang sein. Längere
Geräteanschlussleitungen erfordern größere
Leiterquerschnitte. Geräteanschlussleitungen und
Verbindungsleitungen müssen regelmäßig auf
Schäden geprüft werden. Achten Sie darauf, dass die
Leitungen bei der Prüfung abgeschaltet sind. Wickeln
Sie die Geräteanschlussleitung ganz ab. Überprüfen
Sie auch die Geräteanschlussleitungseinführungen,
an Steckern und Kupplungsdosen, auf Knickstellen.
6. Bedienung
Schließen Sie die Geräteanschlussleitung an den
Stecker (Bild15 / Pos.1) an und sichern Sie
die Anschlussleitung mit der Zugentlastung (Bild
15/Pos. 2).
Achtung! Um ein ungewolltes Einschalten des
Vertikutierers zu verhindern, ist der Schubbügel
(Bild 16/Pos. 1) mit einem Zweipunktschalter (Bild 16
/ Pos. 2) ausgestattet, welcher gedrückt werden
muss, bevor der Schalthebel (Bild 16 / Pos. 3)
gedrückt werden kann. Wird der Schalthebel
losgelassen schaltet sich der Vertikutierer ab. Führen
Sie diesen Vorgang einige Male durch, damit Sie
sicher sind, dass Ihr Gerät korrekt funktioniert. Bevor
Sie Reparatur- oder Wartungsarbeiten am Gerät
vornehmen, müssen Sie sich vergewissern, dass
sich die Messerwalze nicht dreht und das Gerät vom
Netz getrennt ist.
Achtung!
Öffnen Sie die Auswurfklappe nie, wenn der Motor
noch läuft. Die umlaufende Messerwalze kann zu
Verletzungen führen. Befestigen Sie die
Auswurfklappe immer sorgfältig. Sie wird durch die
Zugfeder in die „Zu“- Position zurückgeklappt!
Der durch die Führungsholme gegebene
Sicherheitsabstand zwischen Gehäuse und Benutzer
ist stets einzuhalten. Beim Vertikutieren und
Fahrtrichtungsänderungen an Böschungen und
Hängen ist besondere Vorsicht geboten. Achten Sie
auf einen sicheren Stand, tragen Sie Schuhe mit
rutschfesten, griffigen Sohlen und lange Hosen.
Vertikutieren Sie immer quer zum Hang. Hänge über
15 Grad Schräge dürfen mit dem Vertikutierer aus
Sicherheitsgründen nicht vertikutiert werden.
Üben Sie besondere Vorsicht beim
Rückwärtsbewegen und beim Ziehen des
Vertikutierers, Stolpergefahr!
Hinweise zum richtigen Vertikutieren
Beim Vertikutieren wird eine überlappende
Arbeitsweise empfohlen.
Zur Erzielung eines sauberen Vertikutierbildes den
Vertikutierer in möglichst geraden Bahnen führen.
Dabei sollten sich diese Bahnen immer um einige
Zentimeter überlappen, damit keine Streifen übrig
bleiben.
Sobald während des Vertikutierens Grasreste
liegenbleiben, muss der Fangsack entleert werden.
Achtung! Vor dem Abnehmen des Fangsackes
den Motor abschalten und den Stillstand der
Messerwalze abwarten!
Anleitung_BG_ES_1231_SPK1:_ 10.12.2008 12:58 Uhr Seite 9

10
D
Zum Aushängen des Fangsackes, Auswurfklappe mit
einer Hand anheben, und mit der anderen Hand
Fangsack entnehmen!
Wie oft vertikutiert werden soll, hängt grundsätzlich
vom Graswuchs des Rasens und der Härte des
Bodens ab. Die Unterseite des Vertikutierergehäuses
sauber halten und Erd- und Grasablagerungen
unbedingt entfernen. Ablagerungen erschweren den
Startvorgang und beeinträchtigen die
Vertikutierqualität. An Hängen ist die Vertikutierbahn
quer zum Hang zu legen. Bevor irgendwelche
Kontrollen der Messerwalze durchgeführt werden,
Motor abstellen.
Achtung!
Die Messerwalze dreht nach dem Ausschalten des
Motors noch einige Sekunden weiter. Versuchen Sie
nie, die Messerwalze zu stoppen. Falls die in
Bewegung befindliche Messerwalze auf einen
Gegenstand schlägt, den Vertikutierer abschalten
und warten bis die Messerwalze vollkommen still
steht. Kontrollieren Sie anschließend den Zustand
der Messerwalze. Falls diese beschädigt ist muss sie
ausgewechselt werden (siehe 8.4). Legen Sie die
verwendete Geräteanschlussleitung schleifenförmig
vor der verwendeten Steckdose auf die Erde.
Vertikutieren Sie von der Steckdose bzw. vom Kabel
weg und achten Sie darauf, dass die
Geräteanschlussleitung immer im vertikutierten
Rasen liegt, damit die Geräteanschlussleitung nicht
vom Vertikutierer überfahren wird.
7. Austausch der Netzanschlussleitung
Wenn die Netzanschlussleitung dieses Gerätes
beschädigt wird, muss sie durch den Hersteller oder
seinen Kundendienst oder eine ähnlich qualifizierte
Person ersetzt werden, um Gefährdungen zu
vermeiden.
8. Reinigung, Wartung und
Ersatzteilbestellung
Ziehen Sie vor allen Reinigungsarbeiten den
Netzstecker.
8.1 Reinigung
Halten Sie Schutzvorrichtungen, Luftschlitze und
Motorengehäuse so staub- und schmutzfrei wie
möglich. Reiben Sie das Gerät mit einem
sauberen Tuch ab oder blasen Sie es mit
Druckluft bei niedrigem Druck aus.
Wir empfehlen, dass Sie das Gerät direkt nach
jeder Benutzung reinigen.
Reinigen Sie das Gerät regelmäßig mit einem
feuchten Tuch und etwas Schmierseife.
Verwenden Sie keine Reinigungs- oder
Lösungsmittel; diese könnten die Kunststoffteile
des Gerätes angreifen. Achten Sie darauf, dass
kein Wasser in das Geräteinnere gelangen kann.
8.2 Kohlebürsten
Bei übermäßiger Funkenbildung lassen Sie die
Kohlebürsten durch eine Elektrofachkraft überprüfen.
Achtung! Die Kohlebürsten dürfen nur von einer
Elektrofachkraft ausgewechselt werden.
8.3 Wartung
Eine abgenutzte oder beschädigte Messerwalze
sollte man vom autorisierten Fachmann
austauschen lassen (siehe Adresse auf der
Garantieurkunde).
Sorgen Sie dafür, dass alle
Befestigungselemente (Schrauben, Mutter usw.)
stets fest angezogen sind, so dass Sie mit dem
Vertikutierer sicher arbeiten können.
Lagern Sie Ihren Vertikutierer in einem trockenen
Raum.
Für eine lange Lebensdauer sollten alle
Schraubteile sowie die Räder und Achsen
gereinigt und anschließend geölt werden.
Die regelmäßige Pflege des Vertikutierers sichert
nicht nur seine Haltbarkeit und
Leistungsfähigkeit, sondern trägt auch zu einem
sorgfältigen und einfachen Vertikutieren Ihres
Rasens bei.
Zum Saisonende führen Sie eine allgemeine
Kontrolle des Vertikutierers durch und entfernen
alle angesammelten Rückstände. Vor jedem
Saisonstart den Zustand des Vertikutierers
unbedingt überprüfen. Wenden Sie sich bei
Reparaturen an unsere Kundendienststelle
(siehe Adresse auf der Garantieurkunde).
Anleitung_BG_ES_1231_SPK1:_ 10.12.2008 12:58 Uhr Seite 10
11
D
8.4 Austausch der Messerwalze
Aus Sicherheitsgründen empfehlen wir, den
Austausch der Messerwalze von einem autorisierten
Fachmann vornehmen zu lassen (siehe Adresse auf
der Garantieurkunde).
Achtung!
Arbeits - Handschuhe tragen!
Verwenden Sie nur eine Original Messerwalze, da
andernfalls Funktionen und Sicherheit unter
Umständen nicht gewährleistet sind.
8.5 Ersatzteilbestellung:
Bei der Ersatzteilbestellung sollten folgende
Angaben gemacht werden;
Typ des Gerätes
Artikelnummer des Gerätes
Ident-Nummer des Gerätes
Ersatzteilnummer des erforderlichen Ersatzteils
Aktuelle Preise und Infos finden Sie unter
www.isc-gmbh.info
Ersatzmesserwalze Art.-Nr.: 34.055.80
9. Entsorgung und Wiederverwertung
Das Gerät befindet sich in einer Verpackung um
Transportschäden zu verhindern. Diese Verpackung
ist Rohstoff und ist somit wieder verwendbar oder
kann dem Rohstoffkreislauf zurückgeführt werden.
Das Gerät und dessen Zubehör bestehen aus
verschiedenen Materialien, wie z.B. Metall und
Kunststoffe. Führen Sie defekte Bauteile der
Sondermüllentsorgung zu. Fragen Sie im
Fachgeschäft oder in der Gemeindeverwaltung nach!
Anleitung_BG_ES_1231_SPK1:_ 10.12.2008 12:58 Uhr Seite 11
12
D
Fehler Mögliche Ursachen Beseitigung
Motor läuft nicht an a) Kein Strom im Stecker
b) Kabel defekt
c) Schalter Stecker
Kombination defekt
d) Anschlüsse am Motor oder
Kondensator gelöst
e) Vertikutierergehäuse verstopft
a) Leitung und Sicherung überprüfen
b) überprüfen
c) durch Kundendienstwerkstatt
d) durch Kundendienstwerkstatt
e) Eventuell Vertikutiertiefe ändern
Gehäuse reinigen, damit die
Messerwalze frei läuft
Motorleistung läßt nach a) Zu harter Boden
b) Vertikutierergehäuse verstopft
c) Messer stark abgenutzt
a) Vertikutiertiefe korrigieren
b) Gehäuse reinigen
c) Messer auswechseln
Unsauber Vertikutiert a) Messer abgenutzt
b) Falsche Vertikutiertiefe
a) Messer auswechseln
b) Vertikutiertiefe korrigieren
Motor läuft,
Messerwalze dreht sich nicht
a) Zahriemen gerissen a) durch Kundendienstwerkstatt
10. Fehlersuchplan
Achtung! Um den Motor zu schützen, ist dieser mit einem Thermoschalter ausgestattet, der bei
Überlastung abschaltet und nach einer kurzen Abkühlphase wieder automatisch einschaltet!
Anleitung_BG_ES_1231_SPK1:_ 10.12.2008 12:58 Uhr Seite 12

13
GB
Important!
When using equipment, a few safety precautions
must be observed to avoid injuries and damage.
Please read the complete operating manual with due
care. Keep this manual in a safe place, so that the
information is available at all times. If you give the
equipment to any other person, give them these
operating instructions as well.
We accept no liability for damage or accidents which
arise due to non-observance of these instructions
and the safety information.
1. Safety regulations
The corresponding safety information can be found
in the enclosed booklet.
CAUTION!
Read all safety regulations and instructions.
Any errors made in following the safety regulations
and instructions may result in an electric shock, fire
and/or serious injury.
Keep all safety regulations and instructions in a
safe place for future use.
Description of the warning logos (see Fig. 3)
A = Important!
Read the directions for use before operating the
tool.
B = Keep other persons (and animals) away from
the danger zone.
C = Wear hearing and eye protection.
D = Sharp work tools - Do not cut your fingers or
toes! Switch off the device and pull the power
plug before engaging in any maintenance/
cleaning work or if the cable is tangled or
damaged. Keep the power cable away from the
cutting unit.
E = Keep the power cable away from the roller.
2. Layout (Fig. 1/2)
1. ON/OFF switch
2. Safety lock-off
3. Power cable
4. Cable grip
5. Top push bar
6. Lower push bar
7. Push bar bracket
8. Scarifying depth
9. Grass basket
10. Ejector flap
11. Frame parts for grass basket
12. Cable clips
13. Fastening screws for push bar
14. Retaining screws for push bar
3. Proper use
The equipment is intended for private use i.e. for use
in home and gardening environments.
Scarifiers for private use are machines whose annual
operating time generally does not exceed 10 hours,
during which the machine is primarily used to
maintain small-scale, residential lawns and
home/hobby gardens. Public facilities, sporting halls,
and agricultural/forestry applications are excluded.
The operating instructions as supplied by the
manufacturer must be kept and referred to in order to
ensure that the equipment is properly used and
maintained. The instructions contain valuable
information on operating, maintenance and servicing
conditions.
Anleitung_BG_ES_1231_SPK1:_ 10.12.2008 12:58 Uhr Seite 13

14
GB
Important! Due to the high risk of bodily injury to the
user, the equipment may not be used to grind up
branch or hedge clippings. Moreover, the equipment
may not be used as a power cultivator to level out
high areas such as mole hills.
For safety reasons, the scarifier may not be used as
a drive unit for other equipment or toolkits of any
kind, unless specifically advised to do so by the
manufacturer.
The equipment is to be used only for its prescribed
purpose. Any other use is deemed to be a case of
misuse. The user / operator and not the
manufacturer will be liable for any damage or injuries
of any kind caused as a result of this.
Please note that our equipment has not been
designed for use in commercial, trade or industrial
applications. Our warranty will be voided if the
machine is used in commercial, trade or industrial
businesses or for equivalent purposes.
4. Technical data
Mains voltage: 230 V ~ 50Hz
Power input: 1200 W
Working width: 31 cm
Number of blades: 8 double blades
Scarifying depth: -3 / 3 / 7 / 9 mm
L
pA
sound pressure level: 85 dB(A)
LWAsound power level: 99 dB(A)
Vibration at the handlebars: 2.71 m/s²
K uncertainty: 1.5 m/s²
Protection class: II / 쓑
Protection type: IPX4
Weight: 11 kg
5. Before starting the equipment
The scarifier is delivered unassembled. The grass
basket and the complete push bar must be
assembled and mounted before using the scarifier.
Follow the operating instructions step-by-step and
use the pictures provided as a visual guide to easily
assemble the machine.
Fitting the push bar brackets (see Figs. 4 and 5)
Insert the push bar brackets (Fig. 4/Item 7) into the
provided openings (Fig. 4). Then fasten the brackets
with the retaining screws (Fig. 5/Item 14).
Fitting the lower push bar (see Fig. 6)
Slide the lower push bar (Fig. 6/Item 6) over the
push bar brackets. Do not forget to slide the
stress-relief clip (Fig. 6/Item 4) onto the tube
beforehand.
Screw the tubes together, using the screws
supplied (Fig. 7/Item 13).
Fitting the upper push bar (see Figs. 7-9)
Position the upper push bar (Fig. 1/Item 5) such
that its holes line up with the holes of the lower
bar.
Screw the tubes together, using the screws
supplied (Fig. 2/Item 13).
Using the cable clips supplied (Fig. 8), attach the
power cable to the tubes of the push bars so that
it is possible to open and shut the ejector flap
(Fig. 9/Item 12).
Important.
Please ensure that the ejector flap can be opened
and closed easily!
Assembling the grass basket
(see Figs. 10 and -13)
Push both frame parts into each other (Fig. 10).
Pull the grass basket over the metal frame (Fig.
11).
Pull the rubber clips over the metal frame (Fig.
12).
To hang the grass basket on the scarifier you
must lift the ejector flap (Fig. 13/Item 10) with
one hand and with the other hand take hold of
the grass bag by the handle and hook it onto the
scarifier from above (Fig. 13).
Important!
Before you ever hook the grass basket to the
scarifier you must ensure that the motor is switched
off and the cutting unit is not rotating.
Anleitung_BG_ES_1231_SPK1:_ 10.12.2008 12:58 Uhr Seite 14

15
GB
Adjusting the scarifier depth (see Fig. 14)
The scarifier depth is adjusted at both front wheels
via the adjustment mechanism. For this, pull out the
adjusting screw and turn the wheel to the left or right
into one of the available positions (0/I/II/III).
Important!
The scarifier depth must always be identically set on
both sides!
0 = drive/transport position
I = scarifier depth 3 mm
II = scarifier depth 7 mm
III = scarifier depth 9 mm
Electrical connection
The equipment can be connected to any normal
socket with 230V AC. It is only acceptable to connect
it to a shockproof socket with a 16A circuit breaker.
Furthermore, a residual-current-operated protective
device with max. 30 mA should be connected
upstream.
Power cable
Please only use power cables that are not damaged.
The total length of the power cable should not
exceed 50 meters; going beyond this distance will
reduce the power output of the electric motor. The
power cable must have a cross-section of
3 x 1.5 mm
2
. The insulating sheath of scarifier power
cables is frequently damaged.
Some of the causes for this are:
Cracking from running over the cable
Pinching when the power cable is dragging
under doors and pulled through windows
Cracking due to old age of the insulation
Kinking by improperly fastening or guiding the
power cable
The power cables must, at the very minimum, be of
type HO5RN-F and 3-stranded. The cable type must
be printed somewhere on the power cable. Only
purchase power cables that are marked as such!
Plugs and socket couplers for the power cables must
be made from rubber and be splash-proof. There is a
limit to how long power cables can be. Longer power
cables require larger conductor cross-sections.
Power cables and connecting lines must be regularly
checked for damage. Ensure that the lines are deenergized before checking them. Completely unwind
the power cable. Also check power cable entry
points, plugs and socket couplers for kinks.
6. Operation
Connect the machineʼs power supply cable to the
plug (Fig. 15/Item 1) and secure the power cable with
the stress-relief clip (Fig 15/Item 2).
Important! To prevent accidental start-up of the
equipment, the push-bar (Fig. 16 / Item 1) is
equipped with a safety lock-off (Fig. 16 / Item 2)
which must be pressed before the lever switch (Fig.
16 / Item 3) can be pressed. If the lever switch is
released, the equipment switches off.
Repeat this process several times so that you are
sure that the machine functions properly. Before you
perform any repair or maintenance work on the
machine, ensure that the cutting unit is not rotating
and that the power supply is disconnected.
Important! Never open the ejector flap when the
motor is running. A rotating cutting unit can cause
injuries.
Always fasten the ejector flap carefully. The flap flips
back to the “Closed” position by the tension springs!
Always ensure that a safe distance (provided by the
long handles) is maintained between the user and
the housing. Be especially careful when scarifying
and changing direction on slopes and inclines.
Maintain a solid footing and wear sturdy, non-slip
footwear and long trousers. Always scarify along the
incline (not up and down).
For safety reasons, the scarifier may not be used to
scarify inclines whose gradient exceeds 15 degrees.
Use special caution when backing up and pulling the
scarifier (tripping hazard)!
Tips for proper working
It is recommended that you overlap scarifying paths
a little.
Try to scarify in straight lines for a nice, clean look.
Insodoing, the aeration swaths should always
overlap each other by a few centimeters in order to
avoid bare strips.
As soon as grass clippings start to trail the scarifier, it
is time to empty the grass basket.
Important! Before taking off the grass basket,
switch off the motor and wait until the roller has
come to a stop.
To remove the grass basket, lift up the ejector flap
with one hand, while unhooking the basket with the
other.
Anleitung_BG_ES_1231_SPK1:_ 10.12.2008 12:58 Uhr Seite 15

How frequently you should scarify your lawn is
determined primarily by the speed at which the grass
grows and the hardness of the soil.
Keep the underside of the equipment clean and
remove soil and grass build-up. Deposits make it
more difficult to start the aerator and decrease the
quality of the scarifying.
Always scarify along inclines (not up and down).
Switch off the motor before doing any checks on the
roller.
Important!
The roller rotates for a few seconds after the motor is
switched off. Never attempt to stop the roller. In the
event that the rotating roller strikes an object,
immediately switch off the equipment and wait for the
roller to come to a complete stop. Then inspect the
condition of the roller. Replace any parts that are
damaged (see section 8.4).
Lay the power cable on the ground in loops in front of
the power outlet. Scarify away from the power outlet
and cable, making sure that the power cable always
trails in the already scarified grass so that the
equipment does not travel over the cable.
7. Replacing the power cable
If the power cable for this equipment is damaged, it
must be replaced by the manufacturer or its aftersales service or similarly trained personnel to avoid
danger.
8. Cleaning, maintenance and
ordering of spare parts
Always pull out the mains power plug before starting
any cleaning work.
8.1 Cleaning
Keep all safety devices, air vents and the motor
housing free of dirt and dust as far as possible.
Wipe the equipment with a clean cloth or blow it
with compressed air at low pressure.
We recommend that you clean the device
immediately each time you have finished using it.
Clean the equipment regularly with a moist cloth
and some soft soap. Do not use cleaning agents
or solvents; these could attack the plastic parts of
the equipment. Ensure that no water can seep
into the device.
8.2 Carbon brushe
In case of excessive sparking, have the carbon
brushes checked only by a qualified electrician.
Important! The carbon brushes should not be rep
laced by anyone but a qualified electrician.
8.3 Maintenance
A worn out or damaged cutting unit should be
replaced by an authorised expert (see adress on
the warranty certificate).
Take care that all fastening elements (screws,
nuts, etc.) are firmly tightened, so that you can
work safely with the scarifier.
Store the scarifier in a dry place.
For longer life, all screw-fastened parts, such as
wheels and axles should be cleaned and
subsequently oiled.
Regular servicing of the scarifier not only
secures longer endurance and performance, but
also contributes to an accurate and simple
scarification of your lawn.
At the end of the season, carry out a general
check of the scarifier, and remove all residue
collected. Before the start of every season, it is
absolutely necessary to check the state of the
scarifier. Contact our Customer Service (see
address on the warranty certificate) if repair work
is necessary.
16
GB
Anleitung_BG_ES_1231_SPK1:_ 10.12.2008 12:58 Uhr Seite 16

17
GB
8.4 Replacing the spike drum
For safety reasons, we recommend having the spike
drum replaced by an authorized professional (see
address on warranty certificate).
Important!
Wear work gloves!
Only replace the unit with a genuine Einhell spike
drum , as this will ensure top performance and safety
under all conditions.
8.5 Ordering replacement parts:
Please quote the following data when ordering
replacement parts:
Type of machine
Article number of the machine
Identification number of the machine
Replacement part number of the part required
For our latest prices and information please go to
www.isc-gmbh.info
Replacement cutting unit, Art. No.: 34.055.80
9. Disposal and recycling
The unit is supplied in packaging to prevent its being
damaged in transit. This packaging is raw material
and can therefore be reused or can be returned to
the raw material system.
The unit and its accessories are made of various
types of material, such as metal and plastic.
Defective components must be disposed of as
special waste. Ask your dealer or your local council.
Anleitung_BG_ES_1231_SPK1:_ 10.12.2008 12:58 Uhr Seite 17
18
GB
Fault
Possible causes
Rectification
Motor does not start a) No electricity in plug
b) Cable defective
c) Switch, switch/plug block
defective
d) Connections to motor or
capacitor disconnected
e) Housing clogged
a) Check line and fuse
b) Check
c) Have machine checked by a
customer service center
d) Have machine checked by a
customer service center
e) If necessary adjust working depth.
Clean housing so that the roller can
run freely
Engine performance drops a) Soil is too firm
b) Housing clogged
c) Roller badly worn
a) Change working depth
b) Clean housing
c) Replace roller
Imprecise scarifying result a) roller worn
b) Wrong working depth
a) Replace roller
b) Correct working depth
Motor is running, roller is not
rotating
a) Toothed belt is torn a) By customer service workshop
10. Troubleshooting guide
Important notice! To protect the motor itis equipped with a thermal overload switch which cuts out
when overloaded and starts again automatically after a short cooling-down period.
Anleitung_BG_ES_1231_SPK1:_ 10.12.2008 12:58 Uhr Seite 18

19
F
Attention !
Lors de lʼutilisation dʼappareils, il faut respecter
certaines mesures de sécurité afin dʼéviter des
blessures et dommages. Veuillez donc lire
attentivement ce mode dʼemploi. Conservez-le bien
de façon à pouvoir disposer à tout moment de ces
informations. Si lʼappareil doit être remis à dʼautres
personnes, remettez-leur aussi ce mode dʼemploi.
Nous déclinons toute responsabilité pour les
accidents et dommages dus au non-respect de ce
mode dʼemploi et des consignes de sécurité.
1. Consignes de sécurité:
Vous trouverez les consignes de sécurité
correspondantes dans le cahier en annexe.
AVERTISSEMENT !
Veuillez lire toutes les consignes de sécurité et
instructions.
Tout non-respect des consignes de sécurité et
instructions peut provoquer une décharge électrique,
un incendie et/ou des blessures graves.
Conservez toutes les consignes de sécurité et
instructions pour une consultation ultérieure.
Description des icônes de remarque (cf. fig. 3)
A = Attention !
Avant la mise en service, lisez le mode
dʼemploi.
B = tenir les autres (personnes et animaux) hors de
la zone dangereuse.
C = Porter une protection des oreilles et des yeux.
D = Outils coupants - Ne vous coupez pas les doigts
ni les doigts de pieds. Mettez lʼappareil hors
circuit et retirez la fiche de contact avant les
travaux dʼentretien, le nettoyage ou lorsque le
câble est emmêlé ou abîmé.
Maintenez le câble secteur à lʼécart des
rouleaux à couteaux.
E = Maintenez le câble secteur à lʼécart des
rouleaux à couteaux.
2. Description de lʼappareil (figure 1/2)
1. Touche de commutation marche/arrêt
2. Verrouillage de démarrage
3. Conduite réseau
4. Déchargeur pour câble
5. Guidon supérieur
6. Guidon de pousse inférieur
7. Maintien du guidon
8. Réglage de la profondeur
9. Panier collecteur
10. Clapet dʼéjection
11. Parties du châssis pour panier collecteur
12. Brides de fixation de câble
13. Vis de fixation pour guidon
14. Vis de fixation pour le guidon
3. Utilisation conforme à lʼaffectation
Lʼappareil convient à lʼutilisation privée dans des
jardins domestiques et de loisirs.
Sont considérés comme scarificateurs pour les
jardins domestiques et de loisirs ceux dont
lʼutilisation annuelle ne dépasse pas 10 heures et qui
sont utilisés surtout pour lʼentretien de surfaces
dʼherbe ou de gazon, ne le sont pas cependant ceux
utilisés dans les installations publiques, les parcs, les
terrains de sports ainsi que dans lʼagriculture et les
exploitations forestières.
Le respect du mode dʼemploi joint par le producteur
est la condition primordiale prélable à une utilisation
conforme de lʼappareil. Le mode dʼemploi comprend
aussi les conditions de service, de maintenance et
dʼentretien.
Attention ! En raison du risque encouru par
lʼutilisateur (lʼutilisatrice), lʼappareil ne doit pas être
employé comme hacheuse pour hacher des bouts de
branches et de haies. De plus, lʼappareil ne doit pas
être utilisé comme motobêche ni pour aplanir des
irrégularités du sol, comme par ex. des taupinières.
Pour des raisons de sécurité, le scarificateur ne doit
pas être utilisé comme groupe dʼentraînement pour
dʼautres types outils, à moins que ce ne soit permis
par le fabricant.
Anleitung_BG_ES_1231_SPK1:_ 10.12.2008 12:58 Uhr Seite 19

20
F
La machine doit exclusivement être employée
conformément à son affectation. Chaque utilisation
allant au-delà de cette affectation est considérée
comme non conforme. Pour les dommages en
résultant ou les blessures de tout genre, le
producteur décline toute responsabilité et
lʼopérateur/lʼexploitant est responsable.
Veillez au fait que nos appareils, conformément à
leur affectation, nʼont pas été construits, pour être
utilisés dans un environnement professionnel,
industriel ou artisanal. Nous déclinons toute
responsabilité si lʼappareil est utilisé
professionnellement, artisanalement ou dans des
sociétés industrielles, tout comme pour toute activité
équivalente.
4. Données techniques
Tension du réseau : 230 V ~ 50 Hz
Puissance absorbée : 1200 W
Largeur de travail : 31 cm
Nombre de lames : 8 lame double
Réglage de la profondeur : -3 / 3 / 7 / 9 mm
Niveau de pression acoustique LpA: 85 dB(A)
Niveau acoustique LWA: 99 dB(A)
Vibration au longeron : 2,71 m/s
2
Insécurité K 1,5m/s
2
Catégorie de protection : II / 쓑
Type de protection : IPX4
Poids 11 kg
5. Avant la mise en service
Le scarificateur est livré démonté. Il faut monter le
panier collecteur et le guidon complet avant dʼutiliser
le scarificateur. Suivez le mode dʼemploi, étape par
étape, et orientez-vous sur les illustrations pour que
le montage vous soit simplifié.
Montage du support de guidon (voir figures 4 et
5)
Pousser le support du guidon (fig. 4/pos. 7) dans les
ouvertures prévues à cet effet (fig. 4). Et fixez-le avec
les vis de fixation (fig. 5/pos. 14)
Montage du bas du guidon (voir figure 6)
Le guidon inférieur (fig. 6/pos. 6) doit être poussé
au-dessus du support de guidon. N’oubliez pas
de pousser auparavant le collier de décharge de
traction (fig. 6/pos. 4) sur le tube.
Vissez les tubes les uns aux autres avec les vis
jointes (fig. 7/pos. 13).
Montage du bas du guidon (voir figure 7-9)
Positionnez le guidon supérieur (fig. 1/pos. 5) de
telle manière que les trous du guidon supérieur
correspondent aux trous du guidon inférieur.
Vissez les tubes les uns aux autres avec les vis
jointes (fig. 2/pos. 13).
A l’aide des porte-câbles (figure 8), fixez le câble
secteur à l’intérieur aux tubes du guidon de
manière que l’on puisse ouvrir le clapet d’éjection
et le fermer (figure 9/pos. 12).
Attention!
Veillez à ce que clapet d’éjection s’ouvre et se ferme
facilement!
Montage du panier (cf. images 10-13)
Poussez les deux parties du châssis lʼun à
lʼintérieur de lʼautre (fig. 10)
Tirez le panier collecteur au-dessus du châssis
métallique (fig. 11)
Retroussez les colliers en caoutchouc au-dessus
du châssis métallique (fig. 12)
Pour accrocher le panier collecteur au
scarificateur, il faut soulever dʼune main le clapet
dʼéjection (figure 13/rep. 10) et prendre de lʼautre
main le sac collecteur par la poignée et
lʼaccrocher dʼen haut (figure 13).
Attention !
Pour accrocher le panier, éteignez le moteur et
assurez-vous que le rouleau à lame ne tourne pas !
Anleitung_BG_ES_1231_SPK1:_ 10.12.2008 12:58 Uhr Seite 20

21
F
Réglage de la profondeur du scarificateur
(voir figure 14)
On règle la profondeur du scarificateur avec le
mécanisme de réglage sur les deux roues avant.
Tirez pour ce faire sur la vis de réglage et tournez-la
vers la gauche ou la droite pour la mettre en position
= 0/ I / II / ou III.
Attention !
Il faut toujours régler la même profondeur des deux
côtés du scarificateur !
0 = position de route ou de transport
I = profondeur du scarificateur 3 mm
II = profondeur du scarificateur 7 mm
III = profondeur du scarificateur 9 mm
Branchement électrique
Lʼappareil peut être raccordé à chaque prise de
courant dʼéclairage de 230 Volt courant alternatif.
Seules cependant des prises à contact de protection
sont admises, il faut prévoir pour leur protection par
fusibles un disjoncteur automatique de protection
pour 16A. En outre, il faut placer en amont un
interrupteur de protection contre les courants de
courts-circuits (RCD) avec 30 mA maxi !
Ligne de raccordement de lʼappareil
Nʼutilisez que des lignes de raccordement pour
lʼappareil nʼétant pas endommagées. Le câble de
raccordement de lʼappareil ne doit pas être trop long
(max. 50 m), car autrement cela réduit la puissance
du moteur électrique. Le câble de raccordement de
lʼappareil doit avoir une section transversale de 3 x
1,5mm2. Les lignes de raccordement des
scarificateurs sont particulièrement souvent
endommagées du point de vue de leur isolation.
Les causes en sont entre autres:
des déchirures en passant par dessus la ligne
des endroits écrasés lorsque le câble de
raccordement de lʼappareil passe sous des
portes ou fenêtres.
des fissures par vieillissement de lʼisolation
des pliures en raison de fixation non conforme
aux règles de lʼart ou par guidage de le câble de
raccordement de lʼappareil.
Les câbles de raccordement de lʼappareil doivent
être au moins de type H05RN-F et avoir trois brins.
Une impression de la désignation de type sur le
câble de raccordement est obligatoire. Nʼachetez
que des lignes de raccordement dûment marquées!
Les fiches et prises dʼaccouplement aux lignes de
raccordement doivent être en caoutchouc et être
protégées contre les éclaboussures dʼeau. Les
câbles de raccordement de lʼappareil ne doivent pas
être trop longs. Des câbles de raccordement à
lʼappareil longs doivent avoir des sections
transversales plus importantes.
Les câbles de raccordement et conduites de
raccordement doivent être contrôlés régulièrement
quant à dʼéventuels dommages. Veillez à ce que les
câbles soient déconnectés pendant le contrôle.
Déroulez complètement le câble de raccordement de
lʼappareil. Contrôlez aussi les introductions des
câbles de raccordement, au niveau des fiches et des
prises dʼaccouplement, quant à dʼéventuels plis.
6. Commande
Fermer le câble de raccordement de lʼappareil à la
fiche (figure 15/ rep. 1) et assurez le câble de
raccordement avec la décharge de traction (figure
15/ rep. 2).
Attention ! Afin dʼéviter une mise en service non
intentionnée de lʼappareil, le guidon (figure 16/pos. 1)
est doté dʼun interrupteur à deux positions (figure 16
/ pos. 2), quʼil faut appuyer avant de pouvoir appuyer
sur le levier de commande (figure 16 / pos. 3).
Lʼappareil se met hors circuit dès quʼon lâche le
levier de commande. Lorsque lʼon relâche le levier
de commande, le scarificateur se met hors circuit.
Effectuez ce processus plusieurs fois de suite pour
être sûr que vote appareil fonctionne correctement.
Avant dʼentreprendre des réparations ou des travaux
de maintenance sur lʼappareil, il faut vous assurer
que le rouleau à lame ne tourne pas et que lʼappareil
est déconnecté.
Attention ! Nʼouvrez jamais le clapet dʼéjection
lorsque le moteur est encore en marche. Le rouleau
à lame en rotation peut entraîner des blessures.
Fixez toujours le clapet dʼéjection avec précaution. Il
est refermé par les ressorts de traction en position
„fermée“ !
La distance de sécurité donnée par les longerons de
guidage entre le boîtier et lʼutilisateur (utilisatrice)
doit toujours être maintenue. Il faut faire
particulièrement attention pendant la scarification et
les modifications de direction sur des talus et des
pentes. Veillez à vous tenir de façon sûre, portez des
chaussures à semelles anti-dérapantes et
agrippantes et des pantalons longs. Faites la
scarification toujours transversalement par rapport à
la pente.
Il ne faut pas se servir du scarificateur sur les pentes
inclinées de plus de 15 degrés pour des raisons de
sécurité.
Anleitung_BG_ES_1231_SPK1:_ 10.12.2008 12:58 Uhr Seite 21

22
F
Faites particulièrement attention dans vos
mouvements en arrière et lorsque vous tirez le
scarificateur, risque de trébuchement !
Indications pour une bonne utilisation
Pour le travail, il est conseillé de travailler par
chevauchement.
Pour obtenir une image correcte, il faut faire suivre à
lʼappareil des pistes droites dans la mesure du
possible. Les bords de ces pistes doivent alors se
chevaucher de quelques centimètres pour quʼaucune
bande ne reste sans aération.
Dès que de lʼherbe coupée reste pendant le travail,
cʼest quʼil faut vider le sac collecteur.
Attention ! Avant de retirer le sac collecteur,
coupez le moteur et attendez que le rouleau
sʼarrête complètement !
Pour décrocher le sac collecteur, soulevez dʼune
main le clapet dʼéjection et retirez de lʼautre main le
sac collecteur !
La fréquence de traitement du gazon dépend
fondamentalement de la vitesse à laquelle il pousse
et de la dureté du sol.
Veillez à toujours garder propre le dessous de
lʼappareil et à retirer absolument tous les dépôts de
terre et dʼherbe. Les dépôts de terre rendent le
processus de démarrage plus difficile et altèrent la
qualité.
Sur les pentes, il faut suivre une ligne transversale
par rapport à la pente. Avant dʼeffectuer tout contrôle
du rouleau, mettez le moteur hors circuit.
Attention !
Le rouleau tourne encore quelques secondes après
la mise hors circuit du moteur. Nʼessayez jamais
dʼarrêter le rouleau. Si le rouleau en mouvement
cogne un objet, mettez lʼappareil hors service et
attendez jusquʼà ce que le rouleau soit
complètement arrêté. Contrôlez ensuite lʼétat du
rouleau. Sʼil est abîmé, il faut le remplacer (voir 8.4).
Posez le câble de raccordement de lʼappareil en
forme de boucle devant la prise utilisée, sur la terre.
Travaillez loin de la prise, cʼest-à-dire aussi du câble
et veillez à ce que le câble de raccordement soit
toujours sur le gazon déjà traité, afin de ne pas être
écrasé par lʼappareil.
7. Remplacement de la ligne de
raccordement réseau
Si la ligne de raccordement réseau de cet appareil
est endommagée, il faut la faire remplacer par le
producteur ou son service après-vente ou par une
personne de qualification semblable afin dʼéviter tout
risque.
8. Nettoyage, maintenance et
commande de pièces de rechange
Retirez la fiche de contact avant tous travaux de
nettoyage.
8.1 Nettoyage
Maintenez les dispositifs de protection, les fentes
à air et le carter de moteur aussi propres (sans
poussière) que possible. Frottez lʼappareil avec
un chiffon propre ou soufflez dessus avec de lʼair
comprimé à basse pression.
Nous recommandons de nettoyer lʼappareil
directement après chaque utilisation.
Nettoyez lʼappareil régulièrement à lʼaide dʼun
chiffon humide et un peu de savon. Nʼutilisez
aucun produit de nettoyage ni détergeant ; ils
pourraient endommager les pièces en matières
plastiques de lʼappareil. Veillez à ce quʼaucune
eau nʼentre à lʼintérieur de lʼappareil.
8.2 Brosses à charbon
Si les brosses à charbon font trop dʼétincelles,
faites-les contrôler par des spécialistes en
électricité.
Attention ! Seul un(e) spécialiste électricien(ne) est
autorisé à remplacer les brosses à charbon.
8.3 Maintenance
Un rouleau à lames usé ou endommagé doit être
échangé par une personne spécialiste dûment
autorisée (cf. adresse sur le bulletin de garantie).
Faites en sorte que tous les éléments de fixation
(vis, écrous etc.) soient bien serrés de telle façon
que vous puissiez travailler avec le scarificateur
en toute sécurité.
Stockez votre scarificateur dans une salle sèche.
Pour obtenir une longue durée de vie, toutes les
pièces vissées et les roues et essieux doivent
être nettoyés et ensuite huilés.
Seulement un soin régulier du scarificateur lui
assure solidité et performance, mais surtout vous
assure une scarification facile et sans souci de
votre gazon.
Anleitung_BG_ES_1231_SPK1:_ 10.12.2008 12:58 Uhr Seite 22

23
F
A la fin de la saison, effectuez un contrôle
général du scarificateur et retirez tous les dépôts
accumulés. Avant tout début de saison, contrôlez
absolument le scarificateur. Pour vos
réparations, adressez-vous à notre service
après-vente (voir adresse sur le certificat de
garantie).
8.4 Echange du rouleau à dents
Pour des raisons de sécurité, nous recommandons
de faire effectuer lʼéchange du rouleau à couteaux
par une entreprise spécialisée dûment autorisée. (cf.
adresse sur le bulletin de garantie)
Attention!
Portez des gants de travail!
Nʼutilisez que des rouleaux à dents dʼorigine, dans le
cas contraire, le fonctionnement et la sécurité ne
peuvent être garantis si le cas sʼy prête.
8.5 Commande de pièces de rechange :
Pour les commandes de pièces de rechange,
veuillez indiquer les références suivantes:
Type de lʼappareil
No. dʼarticle de lʼappareil
No. dʼidentification de lʼappareil
No. de pièce de rechange de la pièce requise
Vous trouverez les prix et informations actuelles à
lʼadresse www.isc-gmbh.info
Rouleaux à lames de rechange réf. : 34.055.80
9. Mise au rebut et recyclage
Lʼappareil se trouve dans un emballage permettant
dʼéviter les dommages dus au transport. Cet
emballage est une matière première et peut donc
être réutilisé ultérieurement ou être réintroduit dans
le circuit des matières premières.
Lʼappareil et ses accessoires sont en matériaux
divers, comme par ex. des métaux et matières
plastiques. Eliminez les composants défectueux
dans les systèmes dʼélimination des déchets
spéciaux. Renseignez-vous dans un commerce
spécialisé ou auprès de lʼadministration de votre
commune !
Anleitung_BG_ES_1231_SPK1:_ 10.12.2008 12:58 Uhr Seite 23

24
F
Erreur Causes probables Elimination
Le moteur ne démarre pas a) Pas de courant dans la fiche
b) Câble défectueux
c) Combinaison interrupteur-fiche
défectueuse
d) Raccordements sur le moteur
ou condensateur détachés
e) Boîtier bouché
a) Contrôler la ligne et le fusible
b) Contrôler
c) par atelier de service clientèle
d) par atelier de service clientèle
e) modifier éventuellement la
profondeur de travail.
Nettoyer le boîtier pour que le
rouleau à dents puisse tourner
librement
La puissance du moteur
diminue
a) Sol trop dur
b) Boîtier bouché
c) Rouleau trés détérioré par
lʼusage
a) Corriger la profondeur de travail
b) Nettoyer le boîtier
c) Remplacer le rouleau
Mal scarifié a) Rouleau détérioré par lʼusage
b) Mauvaise profondeur de travail
a) Remplacer le rouleau
b) Corriger la profondeur de
travail
Le moteur tourne, le rouleau
ne tourne pas
a) Courroie dentée déchirée a) Par lʼatelier du service clientèle
10. Plan de recherche des erreurs
Notice Importante! Afin de le protéger, le moteur est équipé dʼun interrupteur thermique. Ce dernier
arrête le moteur sʼil est surchargé et le met en marche automatiquement après une phase de
refroidissement!
Anleitung_BG_ES_1231_SPK1:_ 10.12.2008 12:58 Uhr Seite 24

25
I
Attenzione!
Nellʼusare gli apparecchi si devono rispettare diverse
avvertenze di sicurezza per evitare lesioni e danni.
Quindi leggete attentamente queste istruzioni per
lʼuso. Conservatele bene per avere a disposizione le
informazioni in qualsiasi momento. Se date
lʼapparecchio ad altre persone consegnate loro
queste istruzioni per lʼuso insieme allʼapparecchio!
Non ci assumiamo alcuna responsabilità per incidenti
o danni causati dal mancato rispetto di queste
istruzioni e delle avvertenze di sicurezza.
1. Avvertenze sulla sicurezza
Le relative avvertenze di sicurezza si trovano
nellʼopuscolo allegato.
AVVERTIMENTO!
Leggete tutte le avvertenze di sicurezza e le
istruzioni.
Dimenticanze nel rispetto delle avvertenze di
sicurezza e delle istruzioni possono causare scosse
elettriche, incendi e/o gravi lesioni.
Conservate tutte le avvertenze e le istruzioni per
eventuali necessità future.
Descrizione dei simboli delle avvertenze
(vedi fig. 3)
A = Attenzione!
Leggere le istruzioni per lʼuso prima della messa
in esercizio.
B = Tenere lontani terzi (persone e animali) dalla
zona di pericolo.
C = Portare occhiali protettivi e cuffie antirumore.
D = Utensili da lavoro affilati - non tagliatevi le dita
della mano o del piede. Spegnete lʼapparecchio
e staccate la spina dalla presa di corrente prima
di lavori di manutenzione, pulizia o se il cavo è
aggrovigliato o danneggiato. Tenete il cavo di
alimentazione fuori dalla portata del cilindro con
le lame.
E = Tenete il cavo di alimentazione fuori dal rullo.
2. Descrizione dellʼapparecchio
(Fig. 1/2)
1. Interruttore ON/OFF
2. Sicura
3. Cavo di alimentazione
4. Dispositivo di eliminazione della trazione dal
cavo
5. Impugnatura superiore
6. Impugnatura inferiore
7. Supporto dellʼimpugnatura
8. Regolazione della profondità
9. Cestello di raccolta
10. Portello di scarico
11. Parti del telaio per il cestello di raccolta
12. Clip di fissaggio per cavi
13. Viti di fissaggio per impugnatura
14. Viti di fissaggio per impugnatura
3. Utilizzo proprio
Lʼapparecchio è adatto allʼuso privato nei giardini di
piccole dimensioni.
Sono considerati scarificatori per lʼuso privato in
giardini di piccole dimensioni quegli attrezzi che di
regola non sono usati per oltre 10 ore lʼanno e che
sono utilizzati principalmente per la cura di superfici
erbose, ma non in giardini e parchi pubblici, in
impianti sportivi o in attività agricole o forestali.
Il rispetto delle istruzioni per lʼuso fornite dal
produttore è una condizione per lʼuso corretto
dellʼapparecchio. Le istruzioni per lʼuso contengono
anche condizioni per lʼesercizio, la manutenzione e la
riparazione.
Attenzione! Visti i rischi per lʼutilizzatore,
lʼapparecchio non deve venire usato come trituratore
per sminuzzare rami tagliati da alberi ed arbusti.
Lʼapparecchio non deve inoltre venire usato come
motozappa e per livellare irregolarità del suolo, come
per es. i mucchi di terra sollevati dalle talpe.
Per motivi di sicurezza lo scarificatore non deve
venire usato come azionamento per altri apparecchi
o set di utensili di qualsiasi tipo, a meno che ciò non
sia espressamente permesso dal costruttore.
Anleitung_BG_ES_1231_SPK1:_ 10.12.2008 12:58 Uhr Seite 25

Lʼapparecchio deve venire usato solamente per lo
scopo a cui è destinato. Ogni altro tipo di uso che
esuli da quello previsto non è un uso conforme.
Lʼutilizzatore/lʼoperatore, e non il costruttore, è
responsabile dei danni e delle lesioni di ogni tipo che
ne risultino.
Tenete presente che i nostri apparecchi non sono
stati costruiti per lʼimpiego professionale, artigianale
o industriale. Non ci assumiamo alcuna garanzia
quando lʼapparecchio viene usato in imprese
commerciali, artigianali o industriali, o in attività
equivalenti.
4. Caratteristiche tecniche
Tensione di rete: 230 V ~ 50Hz
Potenza assorbita: 1200 W
Larghezza di lavoro: 31 cm
Numero delle lame: 8 lame doppie
Regolazione della profondità: -3 / 3 / 7 / 9 mm
Livello di pressione acustica LpA: 85 dB (A)
Livello di potenza acustica LWA: 99 dB (A)
Vibrazioni sull’impugnatura: 2,71 m/s
2
Incertezza K 1,5 m/s
2
Grado di protezione: II / 쓑
Tipo di protezione: IPX4
Peso 11 kg
5. Prima della messa in esercizio
Lo scarificatore viene fornito smontato. Prima di
usare lo scarificatore si devono montare il cestello di
raccolta ed il manico di spinta completo. Seguite
passo a passo le istruzioni per lʼuso e orientatevi alle
figure per facilitare lʼassemblaggio.
Montaggio dei supporti dell’impugnatura (vedi
Fig. 4 e 5)
Spingete i supporti dell’impugnatura (Fig. 4/Pos. 7)
nei fori prestabiliti (Fig. 4). E fissateli con le viti di
fissaggio (Fig. 5/Pos. 14)
Montaggio dell’impugnatura inferiore (vedi Fig.
6)
L’impugnatura inferiore (Fig. 6/Pos. 6) deve
essere spinta sul supporto dell’impugnatura. Non
dimenticate di inserire prima il dispositivo di
eliminazione della trazione (Fig. 6/Pos. 4) sul
tubo.
Con le viti fornite (Fig. 7/Pos.13) avvitate insieme
i tubi.
Montaggio dell’impugnatura superiore (vedi Fig.
7-9)
Posizionate il manico di spinta superiore (Fig.
1/Pos. 5) in modo tale che i fori del manico
superiore coincidano con i fori del manico
inferiore.
Con le viti accluse (Fig. 2/Pos. 13) avvitate
insieme i tubi.
Fissate il cavo di alimentazione ai tubi delle
impugnature mediante i portacavo (Fig. 8) acclusi
in modo che rimanga possibile aprire e chiudere il
portello di scarico (Fig. 9/Pos. 12).
Attenzione!
Fate attenzione che il portello di scarico si possa
aprire e chiudere facilmente!
Montaggio del cestello di raccolta
(vedi Fig. 10-13)
Spingete entrambe le parti del telaio una verso
lʼaltra (Fig. 10).
Tirate il cestello di raccolta sul telaio in metallo
(Fig. 11)
Tirate le linguette di gomma sul telaio in metallo
(Fig. 12)
Per agganciare il cestello di raccolta allo
scarificatore dovete sollevare con una mano il
portello di scarico (Fig. 13/Pos. 10) e tenere il
cestello di raccolta con lʼaltra mano
sullʼimpugnatura ed agganciarlo dallʼalto (Fig.
13).
26
I
Anleitung_BG_ES_1231_SPK1:_ 10.12.2008 12:58 Uhr Seite 26

27
I
Attenzione!
Per agganciare il cestello di raccolta il motore deve
essere spento ed il cilindro con le lame non deve
ruotare!
Impostazione della profondità di scarificamento
(vedi Fig. 14)
La profondità di scarificazione viene impostata
tramite il meccanismo di regolazione su entrambe le
ruote anteriori. A tal fine tirate fuori la vite di
regolazione e posizionatela verso sinistra o destra in
una delle posizioni = 0/ I / II / III.
Attenzione!
Deve essere sempre impostata la stessa profondità
di scarificazione su entrambi i lati.
0 = Posizione di marcia / o di trasporto
I = Profondità di scarificazione 3 mm
II = Profondità di scarificazione 7 mm
III = Profondità di scarificazione 9 mm
Collegamento di corrente
Lʼapparecchio può venire collegato ad ogni presa di
corrente di 230 Volt di corrente alternata. È
consentita però solo una presa con contatto di terra,
dotata di un interruttore di sicurezza per cavi da 16
A. Inoltre deve essere installato a monte un
interruttore di sicurezza per correnti di guasto (RCD)
di max. 30mA.
Cavo di alimentazione dellʼapparecchio
Usate solo cavi di alimentazione dellʼapparecchio
che non siano danneggiati. Il cavo di alimentazione
dellʼapparecchio non può essere lungo a piacimento
(max. 50 m), altrimenti si ridurrà la potenza del
motore elettrico. Il cavo di alimentazione
dellʼapparecchio deve avere una sezione di 3 x 1,5
mm
2
. Sui cavi di alimentazione degli scarificatori si
verificano molto spesso danni allʼisolamento.
Eventuali cause per questo fenomeno sono:
graffi a causa di un passaggio dellʼapparecchio
sul cavo
schiacciamenti perché il cavo di alimentazione è
stato fatto passare sotto a porte e finestre
fessure a causa dellʼinvecchiamento
dellʼisolamento
pieghe a causa di fissaggio o posizionamento
I cavi di alimentazione dellʼapparecchio devono
essere minimo del tipo H05RN-F a 3 fili. La
denominazione del tipo deve essere riportata sul
cavo di alimentazione. Comprate soltanto dei cavi di
alimentazione contrassegnati! Le spine e le prese di
accoppiamento su cavi di alimentazione
dellʼapparecchio devono essere di gomma e protette
dagli spruzzi dʼacqua. I cavi di alimentazione dellʼ
apparecchio non possono essere di qualsiasi
lunghezza. I cavi di alimentazione più lunghi
richiedono sezioni maggiori dei conduttori.
Si deve controllare regolarmente che i cavi di
alimentazione dellʼapparecchio e di prolunga non
presentino danni.
Fate attenzione che durante il controllo i cavi non
conducano corrente. Svolgete completamente il cavo
di alimentazione dellʼapparecchio. Controllate anche
che le entrate dei cavi di alimentazione
dellʼapparecchio su spine e prese di accoppiamento
non presentino pieghe.
6. Uso
Collegate il cavo di collegamento dellʼapparecchio al
connettore (Figura 15 / pos. 1) e assicurate il cavo di
collegamento con il dispositivo di eliminazione della
trazione (Fig. 15 / pos. 2).
Attenzione! Per evitare unʼaccensione inavvertita
dellʼapparecchio, lʼimpugnatura (Fig. 16/Pos. 1) è
dotata di un blocco dellʼavviamento (Fig. 16/Pos. 2)
che deve essere premuto prima di poter attivare la
leva di commutazione (Fig. 16 /Pos 3). Mollando la
leva di commutazione lʼapparecchio si spegne.
Eseguite questʼoperazione più volte per assicurarvi
che lʼapparecchio funzioni correttamente. Prima di
eseguire riparazioni o lavori di manutenzione
sullʼapparecchio dovete assicurarvi che il cilindro con
le lame sia fermo e che lʼapparecchio sia scollegato
dalla rete elettrica.
Attenzione!
Non aprite mai il portello di scarico mentre il motore
è ancora acceso. Il cilindro rotante con le lame può
causare lesioni.
Fissate sempre bene il portello di scarico. Mediante
la molla di trazione esso ritorna nella posizione
“chiusa”.
Anleitung_BG_ES_1231_SPK1:_ 10.12.2008 12:58 Uhr Seite 27

Deve venire sempre mantenuta la distanza di
sicurezza, data dallʼimpugnatura di guida, tra il
rivestimento esterno e lʼutilizzatore. Nello scarificare
il manto erboso e cambiare il senso di direzione su
pendio si deve essere particolarmente attenti.
Accertatevi di essere in posizione sicura, portate
scarpe con suole antisdrucciolevoli e pantaloni
lunghi. Scarificate sempre in senso trasversale
rispetto al pendio.
Per motivi di sicurezza non usate lo scarificatore per
pendii con unʼinclinazione superiore ai 15 gradi.
Siate particolarmente attenti muovendovi allʼindietro
e tirando lo scarificatore, pericolo di inciampare!
Avvertenze per lavorare in modo corretto
Nel lavorare si consiglia di ripassare i margini della
fascia già eseguita, quindi con una sovrapposizione.
Per ottenere un taglio preciso si deve muovere
lʼapparecchio in fasce possibilmente diritte. Le corsie
formate eseguendo lʼoperazione si devono quindi
sovrapporre sempre di alcuni centimetri al fine di
evitare strisce di prato non lavorate.
Non appena rimangono dei resti di erba sul prato
mentre si sta lavorando, si deve svuotare il cestello
di raccolta.
Attenzione! Prima di togliere il cestello di
raccolta spegnete il motore e attendete fino a che
il rullo non si sia fermato.
Per sganciare il cestello di raccolta sollevate con una
mano il portello di scarico e togliete il cestello di
raccolta con lʼaltra mano!
La frequenza con la quale si deve lavorare il manto
erboso dipende fondamentalmente dalla crescita
dellʼerba e dalla durezza del terreno.
Tenete pulita la parte inferiore dellʼapparecchio e
togliete assolutamente i depositi di terra e erba. I
depositi di erba rendono più difficile lʼoperazione di
avvio e influiscono negativamente sulla qualità.
Sui pendii le corsie devono essere trasversali
rispetto alla pendenza. Prima di eseguire qualsiasi
controllo del rullo bisogna spegnere il motore.
Attenzione!
Dopo lo spegnimento del motore il rullo continua a
muoversi per qualche secondo. Non cercate mai di
fermarlo. Se il rullo in movimento va a battere contro
un oggetto, fermate lʼapparecchio e attendete fino a
quando il rullo sia completamente fermo. Controllate
quindi lo stato del rullo. Se è danneggiato deve
venire sostituito (vedi 8.4).
Posate il cavo di alimentazione usato avvolto a spire
per terra davanti alla presa utilizzata. Lavorate
allontanandovi dalla presa o dal cavo e fate
attenzione che il cavo di alimentazione si trovi
sempre sullʼerba già lavorata, in modo che
lʼapparecchio non ci passi sopra.
7. Sostituzione del cavo di
alimentazione
Se il cavo di alimentazione di questo apparecchio
viene danneggiato deve essere sostituito dal
produttore, dal suo servizio di assistenza clienti o da
una persona al pari qualificata al fine di evitare
pericoli.
8. Pulizia, manutenzione e
ordinazione dei pezzi di ricambio
Prima di qualsiasi lavoro di pulizia staccate la spina
dalla presa di corrente.
8.1 Pulizia
Tenete il più possibile i dispositivi di protezione, le
fessure di aerazione e la carcassa del motore
liberi da polvere e sporco. Strofinate
lʼapparecchio con un panno pulito o soffiatelo con
lʼaria compressa a pressione bassa.
Consigliamo di pulire lʼapparecchio subito dopo
averlo usato.
Pulite lʼapparecchio regolarmente con un panno
asciutto ed un poʼ di sapone. Non usate
detergenti o solventi perché questi ultimi
potrebbero danneggiare le parti in plastica
dellʼapparecchio. Fate attenzione che non possa
penetrare dellʼacqua nellʼinterno dellʼapparecchio.
28
I
Anleitung_BG_ES_1231_SPK1:_ 10.12.2008 12:58 Uhr Seite 28

29
I
8.2 Spazzole al carbone
In caso di uno sviluppo eccessivo di scintille fate
controllare le spazzole al carbone da un elettricista.
Attenzione! Le spazzole al carbone devono essere
sostituite solo da un elettricista.
8.3 Manutenzione
Un cilindro con le lame consumato o
danneggiato deve venire sostituito da un
specialista autorizzato (vedi indirizzo sul
certificato di garanzia).
Fate in modo che gli elementi di fissaggio (viti,
bulloni ecc.) siano sempre avvitati saldamente in
modo da poter lavorare con lo scarificatore in
maniera sicura.
Conservate lo scarificatore in un luogo asciutto.
Per una lunga durata, tutte le parti a vite, le ruote
e gli assi devono venire puliti ed infine oliati.
La cura regolare dello scarificatore non soltanto
lo conserva a lungo in buono stato e ben
efficiente, ma contribuisce anche a scarificarare
il prato in modo più semplice ed accurato.
Alla fine della stagione eseguite un controllo
generale dello scarificatore e togliete tutti i
depositi e le incrostazioni. Allʼinizio della stagione
controllatene assolutamente le condizioni. In
caso di riparazioni rivolgetevi al nostro servizio
assistenza clienti (vedi indirizzo sul certificato di
garanzia).
8.4 Sostituzione del cilindro delle lame
Per motivi di sicurezza consigliamo di affidare la
sostituzione del cilindro delle lame a uno specialista
autorizzato (vedi indirizzo sul certificato di garanzia).
Attenzione!
Portare guanti da lavoro.
Usate solamente cilindri delle lame originali dato che
altrimenti possono non essere garantiti il
funzionamento e la sicurezza.
8.5 Ordinazione di pezzi di ricambio:
Volendo commissionare dei pezzi di ricambio, si
dovrebbe dichiarare quanto segue:
modello dellʼapparecchio
numero dellʼarticolo dellʼapparecchio
numero dʼident. dellʼapparecchio
numero del pezzo di ricambio del ricambio
necessitato.
Per i prezzi e le informazioni attuali si veda
www.isc-gmbh.info
Cilindro con lame di ricambio n. art.: 34.055.80
9. Smaltimento e riciclaggio
Lʼapparecchio si trova in una confezione per evitare i
danni dovuti al trasporto. Questo imballaggio
rappresenta una materia prima e può perciò essere
utilizzato di nuovo o riciclato.
Lʼapparecchio e i suoi accessori sono fatti di
materiali diversi, per es. metallo e plastica.
Consegnate i pezzi difettosi allo smaltimento di rifiuti
speciali. Per informazioni rivolgetevi ad un negozio
specializzato o allʼamministrazione comunale!
Anleitung_BG_ES_1231_SPK1:_ 10.12.2008 12:58 Uhr Seite 29

30
I
Anomalia Possibili cause Eliminazione
Il motore non si avvia a) non cʼè corrente sulla presa
b) cavo difettoso
c) gruppo interruttore connettore
difettoso
d) attacchi al motore o
condensatore allentati
e) Scocca ostruita
a) controllare il cavo ed il dispositivo di
protezione
b) fare controllare
c) da unʼofficina del servizio assistenza
clienti
d) da unʼofficina del servizio assistenza
clienti
e) Eventualmente cambiare la
profondità di lavoro,
Pulire la scocca affinché il cilindro
delle lame giri liberamente
La potenza del motore
diminuisce
a) Suolo troppo duro
b) Scocca ostruita
c) Rullo molto consumato
a) Correggete la profondità di lavoro
b) Pulite la scocca
c) Sostituite il rullo
Scarificatura imprecisa a) Rullo consumato
b) Profondità di lavoro sbagliata
a) Sostituite il rullo
b) Correggere la profondità di lavoro
Il motore è in moto, il rullo
non gira
a) Rottura della cinghia dentata a) Da unʼofficina del servizio assistenza
clienti
10. Tabella per lʼeliminazione delle anomalie
Importante! Il motore è dotato di interruttore termico di sicurezza, il quale, in caso di surriscaldamento,
farà spegnere la macchina e si riaccenderà in automatico dopo un breve periodo di raffreddamento.
Anleitung_BG_ES_1231_SPK1:_ 10.12.2008 12:58 Uhr Seite 30

31
DK/N
Vigtigt!
Ved brug af el-værktøj er der visse
sikkerhedsforanstaltninger, der skal respekteres for
at undgå skader på personer og materiel. Læs derfor
betjeningsvejledningen grundigt igennem. Opbevar
vejledningen et praktisk sted, så du altid kan tage
den frem efter behov. Husk at lade
betjeningsvejledningen følge med maskinen, hvis du
overdrager den til andre!
Vi fraskriver os ethvert ansvar for skader på personer
eller materiel, som måtte opstå som følge af, at
anvisningerne i denne betjeningsvejledning, navnlig
vedrørende sikkerhed, tilsidesættes.
1. Sikkerhedsanvisninger
Relevante sikkerhedsanvisninger finder du i det
medfølgende hæfte.
ADVARSEL!
Læs alle sikkerhedsanvisninger og øvrige
anvisninger.
Følges anvisningerne, navnlig
sikkerhedsanvisningerne, ikke nøje som beskrevet,
kan elektrisk stød, brand og/eller svære kvæstelser
være følgen.
Alle sikkerhedsanvisninger og øvrige
anvisninger skal gemmes.
Forklaring på skiltning (se fig. 3)1
A = Vigtigt!
Læs betjeningsvejledningen før ibrugtagning.
B = Hold tredjeperson (personer og dyr) borte fra
farezonen.
C = Bær høre- og øjenværn.
D = Skarpt arbejdsværktøj - pas på ikke at skære
fingre eller tæer. Sluk for maskinen, og træk
stikket ud af stikkontakten inden
vedligeholdelsesarbejder, rengøring, eller hvis
ledningen er blivet viklet ind eller beskadiget.
Hold netledningen væk fra knivvalsen.
E = Hold netledningen væk fra valsen.
2. Oversigt over maskinen (fig. 1/2)
1. Tænd/Sluk-knap
2. Indkoblingsspærring
3. Netledning
4. Aflastningsbøjle til ledning
5. Øverste del af føreskaft
6. Nederste del af føreskaft
7. Holdere til føreskaft
8. Dybdeindstilling
9. Opsamlingsboks
10. Dækplade
11. Steldele til opsamlingsboks
12. Kabelklemmer
13. Fastspændingsskruer til føreskaft
14. Sikringsskruer til føreskaft
3. Formålsbestemt anvendelse
Maskinen er beregnet til brug i private haver.
En kultivator anses som hjælpemiddel i privat
havebrug, hvis det årlige antal brugstimer som
hovedregel ikke overstiger 10 timer, og hvis
anvendelsesformålet hovedsageligt omfatter pleje af
græs eller plænearealer, dog undtaget offentlige
anlæg, parker og sportspladser. Endvidere hører
skovbrug ikke under privat havebrug.
Forudsætning for korrekt anvendelse af maskinen er,
at indholdet i den medfølgende betjeningsvejledning
fra producenten læses og respekteres.
Betjeningsvejledningen indeholder tillige nødvendige
oplysninger om drift, vedligeholdelse og reparation.
Vigtigt! På grund af fare for kvæstelse af brugeren
må maskinen ikke anvendes som kompostkværn til
findeling af gren- og hækmateriale. Endvidere må
maskinen ikke anvendes som motorfræser eller til
planering af jordhævninger, som f.eks.
muldvarpeskud.
Af sikkerhedsgrunde må kultivatoren ikke benyttes
som drivaggregat for andet arbejdsværktøj eller
værktøjssæt, med mindre producenten har givet
udtrykkeligt tilladelse hertil.
Anleitung_BG_ES_1231_SPK1:_ 10.12.2008 12:58 Uhr Seite 31

32
DK/N
Saven må kun anvendes i overensstemmelse med
dens tiltænkte formål. Enhver anden form for
anvendelse er ikke tilladt. Vi fraskriver os ethvert
ansvar for skader, det være sig på personer eller
materiel, som måtte opstå som følge af, at maskinen
ikke er blevet anvendt korrekt. Ansvaret bæres alene
af brugeren/ejeren.
Bemærk, at vore produkter ikke er konstrueret til
erhvervsmæssig, håndværksmæssig eller industriel
brug. Vi fraskriver os ethvert ansvar, såfremt
produktet anvendes i erhvervsmæssigt,
håndværksmæssigt, industrielt eller lignende
øjemed.
4. Tekniske data
Netspænding: 230 V ~ 50Hz
Optagen effekt: 1200 W
Arbejdsbredde: 31 cm
Antal knive: 8 dobbeltknive
Dybdeindstilling: -3 / 3 / 7 / 9 mm
Lydtryksniveau LpA: 85 dB(A)
Lydeffektniveau LWA: 99 dB(A)
Vibration på styrestang: 2,71 m/s
2
Usikkerhed K: 1,5 m/s
2
Kapslingsklasse: II / 쓑
Beskyttelsesgrad: IPX4
Vægt: 11 kg
5. Inden ibrugtagning
Kultivatoren leveres adskilt. Opsamlingsboksen og
hele førehåndtaget skal monteres komplet, inden
kultivatoren kan tages i anvendelse. Følg
betjeningsvejledningen trin for trin, og gør brug af
illustrationerne – det vil lette arbejdet med at samle
kultivatoren.
Påsætning af holdere til føreskaft (se figur 4 og
5)
Pres holderne til føreskaftet (fig. 4/pos. 7) ned i
åbningerne (fig. 4). Fastgør holderne med
sikringsskruer (fig. 5/pos. 14)
Påsætning af nederste del af føreskaft (se figur
6)
Den nederste del af føreskaftet (fig. 6/pos. 6)
presses hen over holderne til føreskaftet. Husk at
sætte aflastningsbøjlen (fig. 6/pos. 4) på røret
først.
Skru rørene sammen med de medfølgende
skruer (fig. 7/pos.13).
Påsætning af øverste del af føreskaft (se figur 7-
9)
Placer den øverste del af føreskaftet (fig. 1/pos.
5) således, at hullerne i den øverste del af
føreskaftet passer med hullerne i den nederste
del af føreskaftet.
Skru rørene sammen med de medfølgende
skruer (fig. 2/pos.13).
Med de medfølgende kabelclips (fig. 8) fastgøres
netkablet til førehåndtagets rør - skærmpladen
skal stadig kunne åbnes og lukkes (fig. 9/pos.
12).
Vigtigt!
Vær opmærksom på, at skærmpladen skal kunne
lukkes op og i uden problemer!
Montering af opsamlingsboks (se figur 10-13)
Skub de to steldele ind i hinanden (fig. 10)
Træk opsamlingsposen hen over metalstellet
(fig. 11)
Træk gummilaskerne hen over metalstellet (fig.
12)
Opsamlingsboksen sættes på kultivatoren ved at
løfte op i skærmpladen (fig. 13/pos. 10) med den
ene hånd og tage fat i håndtaget til
opsamlingsboksen med den anden og sætte
boksen på ovenfra (fig. 13).
Vigtigt!
Motoren skal være slukket, og knivvalsen må ikke
dreje rundt, når opsamlingsboksen sættes på!
Anleitung_BG_ES_1231_SPK1:_ 10.12.2008 12:58 Uhr Seite 32

33
DK/N
Indstilling af arbejdsdybde (se fig. 14)
Kultivatorens arbejdsdybde indstilles med
justeringsmekanismen på de to forhjul: Træk
justerskruen ud, og bringe den i den ene af
stillingerne = 0/ I / II / III.
Vigtigt!
Kultivatorens arbejdsdybde skal altid være indstillet
ens i begge sider!
0 = køre- / eller transportstilling
I = arbejdsdybde 3 mm
II = arbejdsdybde 7 mm
III = arbejdsdybde 9 mm
Strømtilslutning
Maskinen kan tilsluttes enhver jordet lysnet-stikdåse
med 230 volt vekselstrøm. Krævet afbrydersikring:
16 A. Derudover skal der være forkoblet et
fejlstrømsrelæ (RCD) med maks. 30 mA!
Apparatledning
Apparatledninger skal være ubeskadigede.
Apparatledningen må ikke være for lang (højst 50m);
dette for at undgå, at elektromotorens ydelse
reduceres. Apparatledningen skal have et tværsnit
på 3 x 1,5 mm
2
. Apparatledninger til kultivatorer er
særligt ofte udsat for skader på isoleringen.
Det skyldes bl.a.:
revner p.g.a. overkørt ledning
stødpunkter, når apparatledningen føres ind
under døre og vinduer
revner p.g.a. forældet isolering
knækpunkter, fordi apparatledningen er blevet
fastgjort eller trukket forkert.
Apparatledningerne skal som mindstekrav være af
typen H05RN-F og have 3 ledere. Apparatledningen
skal have typebetegnelsen påtrykt. Køb kun
apparatledninger, som er mærkede! Stikkontakter og
stikdåser til apparatledninger skal være af gummi og
være stænkvandsbeskyttede. Apparatledningerne
må ikke være for lange. Lange apparatledninger
kræver større ledertværsnit. Apparatledninger og
forbindelsesledninger skal jævnligt efterses for
skader. Kontroller, at ledningerne er uden strøm, før
du efterser dem. Apparatledningen skal vikles helt
ud. Kontroller også apparatledningernes indføringer
på stikkontakter og stikdåser for knækpunkter.
6. Betjening
Sæt maskinens tilslutningsledning i stikket (fig.15 /
pos.1), og hæng tilslutningsledningen på
aflastningsbøjlen (fig. 15/pos. 2).
Vigtigt! For at forhindre at kultivatoren startes ved
en fejltagelse, er føreskaftet (fig. 16/pos. 1) udstyret
med indkoblingsspærre (fig. 16 / pos. 2), som skal
være trykket ned, før kontaktarmen (fig. 16 / pos. 3)
kan trykkes ind. Når kontaktarmen slippes, slukker
maskinen.
Udfør denne handling nogle gange for at sikre, at
maskinen fungerer korrekt. Kontroller, at
skærevalsen ikke roterer, og at strømforsyningen til
maskinen er afbrudt, inden du foretager reparationseller vedligeholdelsesarbejde på maskinen.
Vigtigt! Dækpladen må aldrig åbnes, mens motoren
kører. Den roterende skærevalse kan forårsage
svære kvæstelser.
Dækpladen skal altid fastgøres omhyggeligt. Den
klappes tilbage til ”luk”-position ved hjælp af
trækfjederen!
Den sikkerhedsafstand mellem brugeren og
kabinettet, som naturligt gives af manøvreskaftet,
skal altid overholdes. Vær særlig forsigtig, når du
arbejder og ændrer retning på skrænter og
skråninger. Sørg for at stå godt fast på underlaget,
brug sko med skridfaste såler samt lange bukser.
Skrånende overflader skal altid bearbejdes på tværs.
Skrånende overflader med en hældning, som
overstiger 15 grader, må af sikkerhedsgrunde ikke
bearbejdes med kultivatoren.
Ved baglæns kørsel og når kultivatoren trækkes, skal
der udvises særlig forsigtighed - pas på ikke at falde!
Korrekt brug af maskinen
Det anbefales at lade banerne overlappe hinanden,
når du kultiverer.
For at opnå et rent mønster skal maskinen føres i
lige baner. Banerne bør overlappe hinanden nogle
centimeter for at undgå ubearbejdede striber.
Hvis der bliver græsrester liggende under arbejdet,
skal opsamlingsboksen tømmes med det samme.
Vigtigt! Sluk motoren, og vent til valsen står helt
stille, inden du tager opsamlingsboksen af!
Opsamlingsboksen tages af ved at løfte op i
dækpladen med den ene hånd og så fjerne
opsamlingsboksen med den anden!
Anleitung_BG_ES_1231_SPK1:_ 10.12.2008 12:58 Uhr Seite 33

Hvor ofte kultiveringen skal udføres afhænger af
græsvæksten og jordbundens hårdhed.
Undersiden af kultivatoren skal holdes ren; det er
meget vigtigt at, jord- og græsaflejringer fjernes.
Aflejringer besværliggør startprocessen og
nedsætter arbejdets kvalitet.
På skrånende overflader skal banen gå på tværs af
skråningen. Sluk motoren, inden du efterser valsen.
Vigtigt!
Valsen roterer videre i nogle sekunder, efter at
motoren er blevet slukket. Prøv aldrig at stoppe
valsen selv. Hvis valsen støder mod en genstand,
skal du slukke maskinen og vente, indtil valsen står
helt stille. Kontroller, om valsen er intakt. Hvis den er
beskadiget, skal den skiftes ud (se 8.4).
Læg maskinens ledning i en sløjfe på jorden foran
stikdåsen. Kultiveringen udføres i retning væk fra
stikdåsen/kablet – sørg for, at maskinens ledning
altid ligger på den bearbejdede del af plænen, så
den ikke køres over af kultivatoren.
7. Udskiftning af nettilslutningsledning
Hvis produktets nettilslutningsledning beskadiges,
skal den skiftes ud af producenten eller dennes
kundeservice eller af person med lignende
kvalifikationer for at undgå fare for personskade.
8. Rengøring, vedligeholdelse og
reservedelsbestilling
Træk stikket ud af stikkontakten inden
vedligeholdelsesarbejde.
8.1 Rengøring
Hold så vidt muligt beskyttelsesanordninger,
luftsprækker og motorhuset fri for støv og snavs.
Gnid maskinen ren med en ren klud, eller foretag
trykluftudblæsning med lavt tryk.
Vi anbefaler, at maskinen rengøres hver gang
efter brug.
Rengør af og til maskinen med en fugtig klud og
lidt blød sæbe. Undgå brug af rengørings- eller
opløsningsmiddel, da det vil kunne ødelægge
maskinens kunststofdele. Pas på, at der ikke kan
trænge vand ind i maskinens indvendige dele.
8.2 Kontaktkul
Ved for megen gnistdannelse skal kontaktkullet
efterses af en fagmand.
Vigtigt! Udskiftning af kontaktkul skal foretages af
en fagmand.
8.3 Vedligeholdelse
En nedslidt eller beskadiget knivaksel skal skiftes
ud af autoriseret fagmand (se adresse på
garantibeviset).
Sørg for, at alle befæstelseselementer (skruer,
møtrikker osv.) altid er spændt godt til, så du kan
arbejde sikkert med maskinen.
Kultivatoren skal opbevares i et tørt rum.
For at sikre en lang levetid skal alle skruedele
samt hjul og aksler rengøres og smøres med
olie.
Regelmæssig pleje af maskinen sikrer ikke bare,
at den holder sig i god stand og bevarer en høj
ydeevne over lang tid; det bevirker også, at
resultatet bliver bedre og arbejdet lettere at
udføre.
Når sæsonen er slut, skal kultivatoren efterses;
restophobninger skal fjernes. Husk også at
efterse kultivatoren, inden den tages i brug igen
første gang i den nye sæson. I tilfælde af behov
for reparation skal du henvende dig til vores
kundeservice (se adresse på garantibevis).
8.4 Udskiftning af skærevalse
Af sikkerhedsgrunde anbefales udskiftning af
skærevalse foretaget af autoriseret fagmand (se
adresse på garantibevis).
Vigtigt!
Bær arbejdshandsker!
Benyt kun originale skærevalser, da funktion og
sikkerhed ellers ikke er
garanteret.
8.5 Reservedelsbestilling:
Ved bestilling af reservedele skal følgende oplyses:
Savens type.
Savens artikelnummer.
Savens identifikationsnummer.
Nummeret på den nødvendige reservedel.
Aktuelle priser og øvrige oplysninger finder du på
internetadressen www.isc-gmbh.info
Reserveknivaksel varenr.: 34.055.80
34
DK/N
Anleitung_BG_ES_1231_SPK1:_ 10.12.2008 12:58 Uhr Seite 34

35
DK/N
9. Bortskaffelse og genanvendelse
Maskinen er pakket ind for at undgå transportskader.
Emballagen består af råmaterialer og kan således
genanvendes eller indleveres på genbrugsstation.
Maskinen og dens tilbehør består af forskellige
materialer, f.eks. metal og plast. Defekte
komponenter skal kasseres ifølge miljøforskrifterne
og må ikke smides ud som almindeligt
husholdningsaffald. Hvis du er i tvivl: Spørg din
forhandler, eller forhør dig hos din kommune!
Anleitung_BG_ES_1231_SPK1:_ 10.12.2008 12:58 Uhr Seite 35

36
DK/N
Fejl Mulige årsager Afhjælpning
Motor starter ikke a) Ingen strøm i stikket
b) Kabel defekt
c) Kombinationsenhed kontakt-
stik defekt
d) Tilslutninger på motor eller
kondensator løse
e) Kabinet tilstoppet
a) Kontroller ledning og sikring
b) Kontroller kabel
c) Kontakt kundeserviceværksted
d) Kontakt kundeserviceværksted
e) Indstil evt. arbejdsdybde
Rengør kabinet, så valsen løber frit
Motorydelse aftager a) For hård jordbund
b) Kabinet tilstoppet
c) Valse slidt ned
a) Omjuster arbejdsdybden
b) Rengør kabinettet
c) Udskift valsen
Uordentlig kultivering a) Valse slidt ned
b) Forkert arbejdsdybde
a) Udskift valse
b) Omjuster arbejdsdybde
Motor kører, valse drejer ikke
rundt
a) Tandrem revnet a) Undersøges af
kundeserviceværksted
10. Fejlsøgningsskema
Vigtigt oplysning! Til beskyttelse af motoren er denne udstyret med en termoafbryder, som slår fra ved
overbelastning, og efter en kort nedkølingsfase slår til igen automatisk!
Anleitung_BG_ES_1231_SPK1:_ 10.12.2008 12:58 Uhr Seite 36

37
S
Obs!
Innan produkten kan användas måste särskilda
säkerhetsanvisningar beaktas för att förhindra
olyckor och skador. Läs därför noggrant igenom
denna bruksanvisning. Förvara den på ett säkert
ställe så att du alltid kan hitta önskad information.
Om produkten ska överlåtas till andra personer
måste även denna bruksanvisning medfölja.
Vi övertar inget ansvar för olyckor eller skador som
har uppstått om denna bruksanvisning eller
säkerhetsanvisningarna åsidosätts.
1. Säkerhetsanvisningar
Gällande säkerhetsanvisningar finns i det bifogade
häftet.
VARNING!
Läs alla säkerhetsanvisningar och instruktioner.
Försummelser vid iakttagandet av
säkerhetsanvisningarna och instruktionerna kan
förorsaka elstöt, brand och/eller svåra skador.
Förvara alla säkerhetsanvisningar och
instruktioner för framtiden.
Beskrivning av informationssymbolerna
(se bild 3)
A = Obs!
Läs igenom bruksanvisningen före driftstart.
B = Se till att andra personer (eller djur) inte
befinner sig inom farozonen.
C = Bär hörsel- och ögonskydd.
D = Vassa arbetsverktyg - Var försiktig så att du inte
skär dig i fingrar eller tår. Slå ifrån maskinen och
dra ut stickkontakten inför underhåll och
rengöring, eller om kabeln har trasslats samman
eller skadats. Se till att nätkabeln inte ligger i
närheten av knivvalsen.
E = Se till att nätkabeln inte ligger i närheten av
valsen.
2. Beskrivning av maskinen (bild 1/2)
1. Strömbrytare
2. Brytarspärr
3. Nätkabel
4. Kabeldragavlastning
5. Övre skjutbygel
6. Undre skjutbygel
7. Bygelfäste
8. Djupinställning
9. Gräsuppsamlare
10. Utkastningslucka
11. Stativdelar för gräsuppsamlare
12. Kabelklämmor
13. Fästskruvar för bygel
14. Säkringsskruvar för bygel
3. Ändamålsenlig användning
Maskinen är lämplig för privat bruk i hemma- eller
koloniträdgårdar.
Sådana vertikalskärare som är avsedda för privata
hemma- och koloniträdgårdar definieras som
utrustning vars årliga användning i regel inte
överstiger 10 timmar och som till övervägande del
används till gräsvård, dock ej till allmänna grönytor,
parker, sportanläggningar eller till lant- och
skogsbruk.
En förutsättning för ändamålsenlig användning av
maskinen är att tillverkarens bruksanvisning beaktas.
Bruksanvisningen innehåller även gällande drifts-,
underhålls- och reparationsvillkor.
Obs! Eftersom användaren kan utsättas för fara, får
maskinen inte användas som kompostkvarn för
sönderskärning av kvistar och grenar från träd och
häckar. Dessutom får maskinen inte användas som
motorhacka eller för att plana ut ojämnheter i
marken, t ex mullvadshögar.
Av säkerhetsskäl får vertikalskäraren inte användas
som drivanordning för alla sorters andra
arbetsredskap och verktygssatser förutom om dessa
uttryckligen är tillåtna av tillverkaren.
Anleitung_BG_ES_1231_SPK1:_ 10.12.2008 12:58 Uhr Seite 37

Maskinen får endast användas till sitt avsedda
ändamål. Användningar som sträcker sig utöver detta
användningsområde är ej ändamålsenliga. För
materialskador eller personskador som resulterar av
sådan användning ansvarar användaren/operatören
själv. Tillverkaren påtar sig inget ansvar.
Tänk på att våra produkter endast får användas till
ändamålsenligt syfte och inte har konstruerats för
yrkesmässig, hantverksmässig eller industriell
användning. Vi ger därför ingen garanti om
produkten ska användas inom yrkesmässiga,
hantverksmässiga eller industriella verksamheter
eller vid liknande aktiviteter.
4. Tekniska data
Nätspänning 230 V ~ 50 Hz
Effektförbrukning 1200 W
Arbetsbredd 31 cm
Antal knivar 8 dubbelknivar
Djupinställning -3 / 3 / 7 / 9 mm
Ljudtrycksnivå L
pA
85 dB(A)
Ljudeffektnivå L
WA
99 dB(A)
Vibration i stången 2,71 m/s²
Osäkerhet K 1,5 m/s²
Skyddsklass II / 쓑
Kapslingsklass IPX4
Vikt 11 kg
5. Före användning
Vertikalskäraren levereras i demonterat skick. Innan
vertikalskäraren får användas måste
gräsuppsamlaren och den kompletta skjutbygeln
monteras fast. Följ bruksanvisningen steg för steg
och orientera dig efter bilderna så att du gör rätt när
du monterar samman maskinen.
Montera bygelfästet (se bild 4 och 5)
Skjut in bygelfästena (bild 4/pos. 7) i de härför
avsedda öppningarna (bild 4). Fixera bygelfästena
med säkringsskruvarna (bild 5/pos. 14)
Montera den undre skjutbygeln (se bild 6)
Skjut den undre skjutbygeln (bild 6/pos. 6) över
bygelfästet. Glöm inte bort att först skjuta
dragavlastningen (bild 6/pos. 4) på röret.
Skruva samman rören med de bifogade
skruvarna (bild 7/pos. 13).
Montera den övre skjutbygeln (se bild 7-9)
Positionera den övre skjutbygeln (bild 1/pos. 5)
så att hålen i den övre skjutbygeln stämmer
överens med hålen i den undre skjutbygeln.
Skruva samman rören med de bifogade
skruvarna (bild 2/pos. 13).
Fäst nätkabeln på skjutbyglarna med de bifogade
kabelklämmorna (bild 8) så att utkastningsluckan
kan öppnas och stängas utan svårigheter (bild
9/pos. 12).
Obs!
Kontrollera att utkastningsluckan går lätt att öppna
och stänga!
Montera gräsuppsamlaren (se bild 10 -13)
Skjut samman de båda stativdelarna (bild 10).
Dra gräsuppsamlaren över metallstativet (bild
11).
Skjut gummitungorna på metallstativet (bild 12).
För att gräsuppsamlaren ska kunna hängas in i
vertikalskäraren måste du lyfta på
utkastningsluckan (bild 13, pos. 10) med den ena
handen och fatta tag i gräsuppsamlarens
handtag med den andra. Häng därefter in
gräsuppsamlaren uppifrån (bild 13).
Obs!
Slå ifrån motorn och kontrollera att knivvalsen inte
längre roterar innan du hänger in gräsuppsamlaren.
38
S
Anleitung_BG_ES_1231_SPK1:_ 10.12.2008 12:58 Uhr Seite 38

39
S
Ställa in vertikalskärningsdjupet (se bild 14)
Vertikalskärningsdjupet kan ställas in med
inställningsreglaget på de båda framhjulen. Dra ut
reglaget och vrid åt vänster eller höger till ett av
lägena 0/ I / II / III.
Obs!
Se alltid till att samma vertikalskärningsdjup har
ställts in på båda sidorna.
0 = Kör- eller transportläge
I = Vertikalskärningsdjup 3 mm
II = Vertikalskärningsdjup 7 mm
III = Vertikalskärningsdjup 9 mm
Strömanslutning
Maskinen kan anslutas till varje stickkontaktdosa för
lampor med 230 volts växelström. Emellertid är bara
en skyddskontakt-stickkontaktdosa tillåten, som
måste vara utrustad med en ledningsskyddskoppling
för 16A som säkring. Dessutom måste en
läckströmsskyddskoppling (RCD) med max. 30 mA
vara prekoordinerad!
Maskinens anslutningskabel
Använd endast anslutningskablar som inte är
skadade. Anslutningskabeln får inte vara hur lång
som helst (max. 50 m) eftersom det annars finns risk
för att elmotorns effekt reduceras. Maskinens
anslutningskabel måste uppvisa en ledningsarea på
3 x 1,5 mm
2
. Isoleringen på maskinkablar till
vertikalskärare skadas ofta.
Orsakerna kan bl a vara:
Sprickor pga. av man har kört över ledningen
Klämställen om kabeln har lagts under dörrar
och fönster
Sprickor pga. åldrad isolering
Vikningar pga. olämplig montering eller dragning
av kabeln
Maskinkablarna måste åtminstone vara av typ Typ
H05RN-F och uppvisa tre ledare. Typbeteckningen
måste vara tryckt på maskinkabeln. Köp endast
märkta maskinkablar! Stickkontakterna och uttag på
maskinkablar måste bestå av gummi och vara
sköljtäta. Maskinkablarna får inte vara hur långa som
helst. Längre maskinkablar kräver större ledningsarea. Kontrollera regelbundet om maskinkablarna
och skarvsladdarna har skadats. Se till att kablarna
är strömlösa när du genomför denna kontroll. Linda
av hela maskinkabeln. Kontrollera även om maskinkabeln har vikts vid införingsöppningar till stickkontaker och skarvuttag.
6. Användning
Anslut nätkabeln till brytaren (bild 15, pos. 1) och
säkra kabeln med dragavlastningen (bild 15, pos. 2).
Obs! För att förhindra att maskinen startar
oavsiktligt, är skjutbygeln (bild 16/pos. 1) utrustad
med en inkopplingsspärr (bild 16/pos. 2) som måste
tryckas in innan reglaget (bild 16/pos. 3) kan tryckas
in. Maskinen slås ifrån om du släpper reglaget.
Slå till och ifrån maskinen på detta sätt ett par
gånger för att kontrollera att din maskin fungerar rätt.
Innan du utför reparation eller underhåll på
maskinen, måste du kontrollera att knivvalsen inte
roterar och att maskinen har skilts åt från elnätet.
Obs! Öppna aldrig utkastningsluckan medan motorn
kör. Den roterande knivvalsen kan förorsaka
personskador. Fäst alltid utkastningsluckan
noggrant. Luckan fälls tillbaka till stängt läge med en
dragfjäder.
Beakta alltid avståndet mellan maskinens kåpa och
dig själv som bestäms av styrstängernas längd. Var
särskilt försiktig när du använder vertikalskäraren
och ändrar körriktning på sluttningar och slänter. Se
till att du alltid står stadigt, bär skor med halkfria och
profilerade sulor samt långa byxor. Använd alltid
vertikalskäraren i rät vinkel mot lutningen, gå alltså
inte uppför eller nedför slänten.
Av säkerhetsskäl får du inte använda
vertikalskäraren på slänter vars lutning överstiger 15
grader. Var särskilt försiktig när du går baklänges
och när du drar vertikalskäraren. Risk för att du
snavar!
Instruktioner för korrekt användning
Vi rekommenderar att du kör överlappande banor
med maskinen.
För att du ska få ett fint arbetsresultat på gräsmattan
måste du gå i så raka banor som möjligt. Se till att
banorna där du har bearbetat gräsmattan överlappar
varandra med ett par centimeter så att inga remsor
står kvar.
Om du ser att gräsrester ligger kvar på gräsmattan
efter att du kört med maskinen är detta ett tecken på
att gräsuppsamlaren måste tömmas.
Obs! Slå ifrån motorn och vänta tills valsen har
stannat helt innan du tar av gräsuppsamlaren.
Anleitung_BG_ES_1231_SPK1:_ 10.12.2008 12:58 Uhr Seite 39

Om gräsuppsamlaren ska tas av måste du hålla upp
utkastningsluckan med den ena handen och ta ut
gräsuppsamlaren med den andra.
Hur ofta gräsmattan behöver bearbetas avgörs av
hur snabbt gräsmattan växer och hur pass hård
jorden är.
Håll maskinens undersida ren och ta alltid bort jordoch gräsrester som har fastnat. Avlagringar som har
fastnat gör det svårare att starta maskinen och
försämrar arbetsresultatets kvalitet.
På sluttningar måste du använda maskinen endast
på tvären mot sluttningen. Slå alltid ifrån motorn
innan du kontrollerar valsen.
Obs!
Valsen fortsätter att rotera ett par sekunder efter att
motorn har slagits ifrån. Försök aldrig att stoppa
valsen. Om den roterande valsen slår emot ett
föremål medan du kör med maskinen, måste du slå
ifrån maskinen och vänta till valsen har stannat helt.
Kontrollera därefter valsens skick. Byt ut valsen om
den har skadats (se punkt 8.4).
Lägg nätkabeln i slingor på marken framför
stickuttaget. När du använder maskinen måste du
utgå från stickuttaget eller kabeln och se till att
maskinkabeln alltid ligger inom det område som du
redan har bearbetat. I annat fall finns det risk för att
du kör över kabeln med maskinen.
7. Byta ut nätkabeln
Om nätkabeln till denna produkt har skadats måste
den bytas ut av tillverkaren, kundtjänst eller av en
annan person med liknande behörighet eftersom det
annars finns risk för personskador.
8. Rengöring, Underhåll och
reservdelsbeställning
Dra alltid ut stickkontakten inför alla
rengöringsarbeten.
8.1 Rengöra maskinen
앬 Håll skyddsanordningarna,
ventilationsöppningarna och motorkåpan i så
damm- och smutsfritt skick som möjligt. Torka av
maskinen med en ren duk eller blås av den med
tryckluft med svagt tryck.
앬 Vi rekommenderar att du rengör maskinen efter
varje användningstillfälle.
앬 Rengör maskinen med jämna mellanrum med en
fuktig duk och en aning såpa. Använd inga
rengörings- eller lösningsmedel. Dessa kan skada
maskinens plastdelar. Se till att inga vätskor
tränger in i maskinens inre.
8.2 Kolborstar
Vid överdrivning gnistbildning måste du låta en
behörig elinstallatör kontrollera kolborstarna.
Obs! Kolborstarna får endast bytas ut av en behörig
elinstallatör.
8.3 Underhåll
En sliten eller skadad skärvals borde man låta
bytas ut hos en auktoriserad fackman (se
adressen på garantibeviset).
Se till att alla fästdetaljer (skruvar, muttrar osv.)
alltid är spänt åtdragna, så att du kan arbeta
tryggt med vertikalskäraren.
Förvara din vertikalskärare i ett torrt utrymme.
För en lång livslängd bör alla skruvdelar samt
hjulen och bultarna rengöras och därefter
smörjas.
Den regelbundna skötseln av vertikalskäraren
säkrar inte bara dess hållbarhet och effektivitet,
utan bidrar också till att din gräsmatta blir
omsorgsfullt och enkelt vertikalskuren.
I slutet av säsongen bör du utföra en allmän
kontroll av vertikalskäraren och avlägsna alla
rester som samlat sig på och i apparaten. Före
varje säsongstart bör vertikalskärarens skick
absolut kontrolleras. Vänd dig till vår
auktoriserade serviceverkstad för reparationer av
maskinen (se adressen på garantibeviset).
40
S
Anleitung_BG_ES_1231_SPK1:_ 10.12.2008 12:58 Uhr Seite 40

41
S
8.4 Byta ut knivvalsen
Av säkerhetsskäl rekommenderar vi att du låter en
behörig fackman byta ut knivvalsen. (se adress i
garantibeviset)
Obs!
Bär arbetshandskar!
Använd endast en original-knivvals eftersom det
annars finns risk för att vissa funktioner inte fungerar
och att säkerheten inte kan garanteras.
8.5 Reservdelsbeställning
Lämna följande uppgifter vid beställning av
reservdelar:
Maskintyp
Maskinens artikel-nr.
Maskinens ident-nr.
Reservdelsnummer för erforderlig reservdel
Aktuella priser och ytterligare information finns på
www.isc-gmbh.info
Reservknivvals art.-nr.: 34.055.80
9. Skrotning och återvinning
Produkten ligger i en förpackning som fungerar som
skydd mot transportskador. Denna förpackning
består av olika material som kan återvinnas. Lämna
in förpackningen till ett insamlingsställe för
återvinning.
Produkten och tillbehören består av olika material
som t ex metaller och plaster. Lämna in defekta
komponenter till ett godkänt insamlingsställe i din
kommun. Hör efter med din kommun eller med
försäljaren i din specialbutik.
Anleitung_BG_ES_1231_SPK1:_ 10.12.2008 12:58 Uhr Seite 41

42
S
Viktig information! Motorn skyddas av en termobrytare som slår ifrån vid överbelastning och som
automatiskt kopplas in på nytt efter en kort avkylningspaus!
10. Felsökning
Störning Möjliga orsaker Åtgärder
Motorn startar ej a) Ingen ström i stickkontakten
b) Kabel defekt
c) Brytar- och kontatktenhet
defekt
d) Anslutningarna vid motorn eller
kondensatorn har lossnat
e) Kåpan tilltäppt
a) Kontrollera kabeln och
säkringen
b) kontrollera
c) av kundtjänstverkstad
d) av kundtjänstverkstad
e) Ändra ev. på arbetsdjupet
Rengör kåpan så att valsen
kan rotera fritt
Motorns prestanda avtar a) Alltför hård jord
b) Kåpan tilltäppt
c) Valsen kraftigt sliten
a) Korrigera arbetsdjupet
b) Rengör kåpan
c) Byt ut valsen
Dåligt vertikalskärningsresultat a) Valsen är sliten
b) Felaktigt arbetsdjup
a) Byt ut valsen
b) Korrigera arbetsdjupet
Motorn kör, valsen roterar inte a) Kuggremmen har gått av a) av kundtjänstverkstad
Anleitung_BG_ES_1231_SPK1:_ 10.12.2008 12:58 Uhr Seite 42

43
HR/
BIH
Pažnja!
Da bi se spriječila ozljedjivanja i nastanak šteta
prilikom korištenja uredjaja, treba se pridržavati
sigurnosnih mjera opreza. Zbog toga pažljivo
pročitajte ove upute za uporabu. Dobro ih sačuvajte
tako da Vam informacije u svako doba budu na
raspolaganju. U slučaju da uredjaj trebate predati
drugoj osobi, uručite joj s njime i ove upute za
uporabu.
Ne preuzimamo jamstvo za nesreće ili štete nastale
zbog nepridržavanja ovih uputa i njihovih sigurnosnih
napomena.
1. Sigurnosne napomene
Odgovarajuće sigurnosne napomene pronaći ćete u
priloženoj knjižici.
UPOZORENJE!
Pročitajte sve sigurnosne napomene i upute.
Propusti kod pridržavanja sigurnosnih napomena i
uputa mogu uzrokovati el. udar, požar i/ili teška
ozljeđivanja.
Sačuvajte sve sigurnosne napomene i upute za
buduće korištenje.
Tumačenje napomena na pločici uređaja (vidi
sliku 3)
A = Pozor!
Prije puštanja u rad pročitajte upute za uporabu.
B = Druge osobe (osobe i životinje) udaljite iz
opasnog područja.
C = Oštri radni alati – pazite da ne odrežete prste ili
palce. Prije radova održavanja i čišćenja ili u
slučaju da je kabel zapetljan ili oštećen, isključite
uređaj i izvucite mrežni utikač. Mrežni kabel držite
podalje od valjka s noževima.
D = Nosite zaštitu za sluh i oči.
E = Mrežni kabel držite podalje od valjka s noževima.
2. Opis uređaja (slika 1/2)
1. Tipka za uključivanje/isključivanje
2. Blokada uključivanja
3. Mrežni kabel
4. Mehanizam za otpuštanje kabela
5. Gornja drška za guranje
6. Donja drška za guranje
7. Držač drške za guranje
8. Podešavanje dubine
9. Košara za sakupljanje
10. Zaklopka za izbacivanje
11. Dijelovi šasije za košaru za sakupljanje
12. Stezaljke za fiksiranje kabela
13. Vijci za pričvršćivanje drške za guranje
14. Vijci za osiguranje drške za guranje
3. Namjenska uporaba
Kultivator je prikladan za privatno korištenje u kućnim
i hobi vrtovima.
Kultivatorima za privatne i hobi vrtove smatraju se
uređaji čija godišnja uporaba u pravilu ne prelazi 10
sati i koji se pretežno koriste za njegu trave ili
travnjaka, ali ne na javnim površinama, parkovima,
sportskim terenima, kao niti na poljoprivrednim i
šumskim dobrima.
Pretpostavka za pravilnu uporabu kultivatora za travu
je pridržavanje priloženih proizvođačevih uputa za
uporabu. Upute za uporabu sadrže i uvjete rada,
uvjete održavanja i popravaka.
Pozor! Zbog opasnosti od tjelesnog ozljeđivanja
korisnika, kultivator se ne smije koristiti kao uređaj za
rezanje grana i živice. Nadalje, kultivator se ne smije
koristiti kao motorni kultivator za izravnavanje
povišenog tla, kao što su npr. krtičnjaci.
Zbog sigurnosnih razloga kultivator se ne smije
koristiti kao pogonski agregat za druge radne alate i
komplete alata svake vrste, osim ako to izrijekom ne
dopusti proizvođač.
Stroj se smije koristiti samo u skladu s namjenom.
Svaka drukčija uporaba izvan ovih okvira nije
namjenska. Za štete ili ozljeđivanja bilo koje vrste
koje bi iz toga proizašle ne odgovara proizvođač
nego korisnik.
Anleitung_BG_ES_1231_SPK1:_ 10.12.2008 12:58 Uhr Seite 43

44
HR/
BIH
Molimo da obratite pažnju na to da naši uređaji nisu
konstruirani za korištenje u komercijalne svrhe kao ni
u obrtu i industriji. Ne preuzimamo jamstvo ako se
uređaj koristi u obrtničkim ili industrijskim pogonima
i sličnim djelatnostima.
4. Tehnički podaci
Mrežni napon: 230 V ~ 50 Hz
Snaga: 1200 W
Radna širina: 31 cm
Broj noževa: 8, dvostruki nož
Korekcija dubine: -3 / 3 / 7 / 9 mm
Razina zvučnog tlaka LpA: 85 dB (A)
Intenzitet buke LWA: 99 dB (A)
Vibracija na prečki: 2,71 m/s
2
Nesigurnost K 1,5 m/s
2
Klasa zaštite: II / 쓑
Vrsta zaštite: IPX4
Težina 11 kg
5. Prije puštanja u pogon
Kultivator je isporučen u demontiranom stanju. Prije
uporabe kultivatora morate montirati sabirnu košaru i
kompletnu potisnu petlju. Postupno slijedite upute za
uporabu i orijentirajte se prema slikama tako da si
pojednostavite montažu.
Montaža držača drške za guranje (vidi slike 4 i 5)
Umetnite držač drške za guranje (sl. 4/poz. 7) u za to
predviđene otvore (sl. 4). I pričvrstite ga sigurnosnim
vijcima (sl. 5/poz. 14).
Montaža donje drške za guranje (vidi sliku 6)
Donja drška za guranje (sl. 6/poz. 6) mora se
povući preko svog držača. Pri tome ne zaboravite
prethodno staviti mehanizam protiv zatezanja (sl.
6/poz. 4) na cijev.
Pomoću priloženih vijaka (sl. 7/poz. 13)
međusobno pričvrstite cijevi.
Montaža gornje drške za guranje (vidi slike 7-9)
Gornju dršku za guranje (slika 1/poz. 5) smjestite
tako da se rupice gornje drške podudaraju s
rupicama donje.
Pomoću priloženih vijaka (sl. 2/poz. 13)
međusobno pričvrstite cijevi.
Priloženim držačima (slika 8) pričvrstite mrežni
kabel na cijevi potisne petlje tako da se zajamči
otvaranje i zatvaranje poklopca na otvoru za
izbacivanje (slika 9/poz. 12).
Pozor!
Obratite pažnju na to da se poklopac na otvoru za
izbacivanje može lako otvoriti i zatvoriti!
Montaža sabirne košare (vidi slike 10-13)
Ugurajte dijelove postolja jedan u drugi (sl. 10)
Navucite sabirnu košaru preko metalnog postolja
(sl. 11)
Navucite gumene spojnice preko metalnog
postolja (sl. 12)
Da biste sabirnu košaru mogli objesiti na
kultivator, jednom rukom podignite poklopac na
otvoru za izbacivanje (sl. 13/poz. 10) a drugom
primite sabirnu vreću za ručku i objesite je
odozgo (slika 13).
Pozor!
Da biste objesili sabirnu košaru, motor mora biti
isključen a valjak s noževima ne smije se okretati!
Podešavanje dubine kultiviranja (vidi sliku 14)
Dubina kultiviranja podešava se mehanizmom za
podešavanje koji se nalazi na oba prednja kotača. U
tu svrhu izvucite vijke za podešavanje i okrenite ih
ulijevo ili udesno na položaj =0/ I / II / III.
Pozor!
S obje strane mora uvijek biti podešena ista dubina
kultiviranja!
0 = Položaj za vožnju / ili prijevoz
I = Dubina kultiviranja 3 mm
II = Dubina kultiviranja 7 mm
III = Dubina kultiviranja 9 mm
Anleitung_BG_ES_1231_SPK1:_ 10.12.2008 12:58 Uhr Seite 44

45
HR/
BIH
Priključak struje
Uređaj se može priključiti na svaku standardnu
utičnicu od 230 volti izmjenične struje. Dopuštena je
međutim, samo jedna utičnica sa zaštitnim kontaktom
za čije osiguranje treba predvidjeti zaštitnu sklopku
voda od 16 A. Osim toga, ispred mora biti uključena
zaštitna strujna sklopka (RCD) maks. vrijednosti od
30 mA!
Priključni kabel uređaja
Molimo da koristite samo priključne kablove koji nisu
oštećeni. Duljina priključnog kabela uređaja ne smije
biti nasumce određena (maks. 50 m) jer se u
suprotnom smanjuje učinak elektromotora. Presjek
priključnog kabela uređaja mora biti 3 x 1,5 mm. Na
priključnim kablovima kosilica često nastaju
oštećenja izolacije.
Uzroci tomu su između ostalog:
Urezana mjesta zbog prelaženja preko voda
Mjesta prignječenja nastaju kad se priključni
kabel uređaja provede ispod vrata ili prozora.
Pukotine zbog starenja izolacije
Presavinuta mjesta zbog nestručnog rukovanja ili
vođenja priključnog kabela uređaja
Priključni kabeli uređaja moraju biti barem tip H05RNF i trožilni. Na priključnom kabelu uređaja obvezno je
otisnuta oznaka tipa. Kupujte samo priključne kabele
uređaja s oznakom! Utikači i utičnice na priključnim
kabelima uređaja moraju biti od gume i zaštićeni od
prskanja vode. Duljina priključnih kabela uređaja ne
smije se određivati po volji. Duži priključni kabeli
uređaja zahtijevaju veći poprečni presjek vodiča.
Priključni kabeli uređaja i spojni vodovi moraju se
redovito provjeravati zbog mogućih oštećenja. Pritom
treba voditi računa o tome da se prije provjere vodovi
isključe. Priključni kabel odmotajte do kraja. Provjerite
također uvodnice priključnih kabela, prelomljena
mjesta na utikačima i utičnicama.
6. Rukovanje
Priključni kabel uređaja priključite na utikač (slika 15 /
poz. 1) i osigurajte ga pomoću mehanizma za
otpuštanje kabela (slika 15/poz. 2).
Pozor! Da biste spriječili neželjeno uključivanje
kultivatora, drška za vođenje (slika 16/poz. 1) ima
dvopoložajni prekidač (slika 16/ poz. 2) koji se mora
pritisnuti prije nego se pritisne poluga za uključivanje
(slika 16 / poz. 3). Pustite li polugu za uključivanje,
kultivator će se isključiti. Provedite ovaj postupak
nekoliko puta da biste bili sigurni da uređaj pravilno
funkcionira. Prije nego na uređaju počnete s
popravcima ili radovima održavanja, morate provjeriti
ne okreće li se valjak s noževima i je li uređaj
iskopčan iz mreže.
Pozor!
Nikad ne otvarajte poklopac za izbacivanje ako motor
još radi. Rotirajući valjak s noževima može uzrokovati
ozljede. Uvijek pažljivo pričvrstite poklopac otvora za
izbacivanje. On se zbog vlačne opruge povratno
preklapa u položaj “zatvoreno”!
Između kućišta i korisnika uvijek treba održavati
sigurnosni razmak koji je određen prečkom za
vođenje. Poseban oprez potreban je kod rada i
promjena smjera vožnje na strminama i kosinama.
Pripazite na stabilnost, nosite cipele s đonovima koji
dobro prianjaju i ne kližu se, te duge hlače. Uvijek
radite poprečno na kosinu. Zbog sigurnosnih razloga
ovim uređajem ne smiju se kultivirati kosine od preko
15 stupnjeva. Zbog opasnosti od spoticanja posebno
budite oprezni kad izvodite kretnje stroja unatrag ili
kad ga vučete!
Napomene za pravilan rad
Kod rada preporučujemo način preklapanja.
Za postizanje lijepog izgleda vodite stroj što ravnijim
linijama. Pritom bi se staze trebale preklapati za
nekoliko centimetara, tako da ne ostanu pruge.
Ako tijekom rada na tlu ostaju ostaci trave, trebate
isprazniti sabirnu košaru.
Pozor! Prije skidanja sabirne košare isključite
motor i pričekajte da se valjak s noževima
zaustavi!
Za skidanje sabirne vreće jednom rukom podignite
poklopac na otvoru za izbacivanje, a drugom skinite
sabirnu vreću!
Anleitung_BG_ES_1231_SPK1:_ 10.12.2008 12:58 Uhr Seite 45

46
HR/
BIH
Koliko često treba obrađivati travnjak ovisi uglavnom
o brzini rasta trave i tvrdoći tla. Održavajte čistoću
donje strane kućišta kultivatora i obvezno uklonite
naslage zemlje i trave. Naslage otežavaju postupak
pokretanja i umanjuju kvalitetu kultiviranja. Stazu
rezanja potrebno je postaviti poprečno na kosinu.
Kad obavljate bilo kakvu kontrolu valjka s noževima,
isključite motor.
Pozor!
Valjak s noževima okreće se još nekoliko sekundi
nakon isključivanja motora. Nikada ne pokušavajte
zaustaviti valjak s noževima. Ako tijekom rada valjak
s noževima udari o nešto, isključite kultivator i
pričekajte da se valjak u potpunosti umiri. Zatim
provjerite stanje valjka s noževima. Ako je oštećen,
treba ga zamijeniti (vidi 8.4). Položite korišteni
priključni kabel u obliku petlje ispred korištene
utičnice na zemlju. Kultivirajte udaljavajući se od
utičnice odn. kabela i pripazite na to da priključni
kabel uređaja bude uvijek položen u ošišanoj travi,
tako da kultivatorom ne prijeđete preko njega.
7. Zamjena mrežnog priključka
Ako se ošteti mrežni priključni vod ovog uređaja,
zamijeniti ga mora proizvođač ili njegova servisna
služba ili slična kvalificirana osoba, kako bi se
izbjegle opasnosti.
8. Čišćenje, održavanje i narudžba
rezervnih dijelova
Prije svih radova čišćenja izvucite mrežni utikač.
8.1 Čišćenje
Zaštitne naprave, otvore za zrak i kućište motora
držite što čišćima od prašine i prljavštine. Istrl
jajte uredjaj čistom krpom ili ga ispušite
komprimiranim zrakom pod niskim tlakom.
Preporučujemo da uredjaj očistite nakon svake
uporabe.
Redovito čistite uredjaj vlažnom krpom i s malo
sapunice. Ne koristite sredstva za čišćenje ni
otapala; ona mogu oštetiti plastične dijelove
uredjaja. Pripazite na to da u unutrašnjost
uredjaja ne dospije voda.
8.2 Ugljene četkice
Kod prekomjernog iskrenja potrebno je da
električar provjeri ugljene četkice.
Pažnja! Ugljene četkice smije zamijeniti samo
električar.
8.3 Održavanje
Istrošen ili oštećen valjak s noževima treba zamijeniti
ovlašteni stručnjak (vidi adresu na jamstvenom listu).
Pobrinite se da svi pričvrsni elementi (vijci, matice
itd.) budu uvijek čvrsto pritegnuti tako da sigurno
možete raditi s kultivatorom.
Uređaj skladištite u suhoj prostoriji.
Za dug životni vijek trebali biste sve pričvrsne
elemente kao i kotače i osovine očistiti i zatim nauljiti.
Redovita njega kultivatora osigurava ne samo njegov
dug vijek trajanja i učinkovitost, nego pridonosi
pažljivom i jednostavnom kultiviranju Vašeg
travnjaka.
Na kraju sezone provedite opću kontrolu kultivatora i
uklonite sve nakupljene ostatke. Prije svakog početka
sezone obvezno provjerite stanje kultivatora. Za
popravke se obratite našoj servisnoj službi (vidi
adresu na jamstvenom listu).
8.4 Zamjena valjka s noževima
Zbog sigurnosnih razloga preporučujemo da zamjenu
valjka s noževima obavi ovlašteni serviser (adresu
vidi na jamstvenom listu).
Pozor!
Nosite radne rukavice!
Koristite samo originalni valjak s noževima jer u
suprotnom nije zajamčena funkcionalnost i sigurnost.
8.5 Narudžba rezervnih dijelova:
Prilikom naručivanja rezervnih dijelova su potrebni
slijedeći podaci:
Tip uredjaja
Broj artikla uredjaja
Ident. broj uredjaja
Broj potrebnog rezervnog dijela
Aktualne cijene i informacije potražite na web-adresi
www.isc-gmbh.info
Rezervni valjak s noževima, br. art.: 34.055.80
Anleitung_BG_ES_1231_SPK1:_ 10.12.2008 12:58 Uhr Seite 46

47
HR/
BIH
9. Zbrinjavanje i recikliranje
Uredjaj se nalazi u pakovanju koje ga štiti od
oštećenja prilikom transporta. Ovo pakovanje je
sirovina i zato se može ponovno upotrijebiti ili poslati
na reciklažu.
Uredjaj i njegov pribor izradjeni su od različitih
materijala kao npr. metala i plastike. Neispravne
sastavne dijelove otpremite na mjesta za
zbrinjavanje posebnog otpada. Informacije potražite
u specijaliziranoj trgovini ili nadležnoj općinskoj
upravi.
Anleitung_BG_ES_1231_SPK1:_ 10.12.2008 12:58 Uhr Seite 47

48
HR/
BIH
Greška Mogući uzroci Uklanjanje
Motor ne pali. a) Nema struje u utikaču.
b) Neispravan kabel
c) Kvar na kombinaciji sklopka-
utikač
d) Labavi priključci na motoru ili
kondenzatoru
e) Začepljeno kućište
a) Provjeriti vod i osigurač
b) Provjeriti
c) Kvar uklanja servisna radionica.
d) Kvar uklanja servisna radionica.
e) Eventualno promijenite dubinu
kultiviranja Očistite kućište da bi se
valjak s noževima slobodno okretao.
Slabi snaga motora a) Pretvrdo tlo
b) Začepljeno kućište
c) Jako istrošen nož
a) Korigirajte dubinu kultiviranja.
b) Očistite kućište.
c) Zamijenite nož.
Loše kultivirano a) Istrošen nož
b) Pogrešna dubina kultiviranja
a) Zamijenite nož.
b) Korigirajte dubinu kultiviranja.
Motor radi, ali se valjak ne
okreće.
a) Ispucan zupčasti remen a) Kvar uklanja servisna radionica.
10. Plan traženja grešaka
Pozor! U svrhu zaštite motor je opremljen termičkom sklopkom koja kod preopterećenja isključuje
uređaj i nakon kratke faze hlađenja automatski ga ponovno uključuje!
Anleitung_BG_ES_1231_SPK1:_ 10.12.2008 12:58 Uhr Seite 48

49
RS
Pažnja!
Kod korišćenja uređaja morate se pridržavati propisa
o bezbednosti kako biste sprečili povrede i štete.
Stoga pažljivo pročitajte ova uputstva za
upotrebu/bezbednosne napomene. Dobro ih
sačuvajte tako da Vam informacije u svako doba
budu na raspolaganju. Ako biste ovaj uređaj trebali
da predate drugim licima, prosledite im i ova
uputstva za upotrebu / bezbednosne napomene. Ne
preuzimamo garanciju za štete koje bi nastale zbog
nepridržavanja ovih uputstava za upotrebu i
bezbednosnih napomena.
1. Sigurnosna uputstva:
Odgovarajuća sigurnosna uputstva pronaći ćete u
priloženoj knjižici.
UPOZORENJE!
Pročitajte sve bezbednosne napomene i
uputstva.
Propusti kod pridržavanja bezbednosnih napomena i
uputstava mogu da prouzroče el.udar, požar i/ili teške
povrede.
Sačuvajte sve bezbednosne napomene i
uputstva za buduće korišćenje.
Objašnjenje napomena na pločici uređaja (vidi
sliku 3)
A = Pažnja!
Pre puštanja u rad pročitajte uputstva za
upotrebu.
B = Druga lica (kao i životinje) udaljite iz opasnog
područja.
C = Oštri radni alati – pazite da ne odrežete prste ili
palčeve. Pre radova održavanja i čišćenja ili u
slučaju da je kabl zapetljan ili oštećen, isključite
uređaj i izvucite mrežni utikač. Mrežni kabl držite
podalje od valjka s noževima.
D = Nosite zaštitu za uši i oči.
E = Mrežni kabl držite podalje od valjka.
2. Opis uređaja (slika 1/2)
1. Prekidač za uključivanje/isključivanje
2. Blokada uključivanja
3. Mrežni kabl
4. Mehanizam za otpuštanje kabla
5. Gornja drška za guranje
6. Donja drška za guranje
7. Držač drške za guranje
8. Podešavanje dubine
9. Korpa za sakupljanje
10. Poklopac na otvoru za izbacivanje
11. Delovi šasije za korpu za sakupljanje
12. Stezaljke za fiksiranje kabla
13. Zavrtnji za pričvršćenje drške za guranje
14. Zavrtnji za osiguranje drške za guranje
3. Namenska upotreba
Kultivator je podesan za ličnu upotrebu u kućnim i
hobi baštama.
Kultivatorima za privatne i hobi bašte smatraju se
uređaji čija godišnja upotreba u pravilu ne prelazi 10
časova i koji se uglavnom koriste za negu trave ili
travnjaka, ali ne na javnim površinama, parkovima,
sportskim terenima, kao ni na poljoprivrednim i
šumskim dobrima.
Pretpostavka za pravilnu upotrebu kultivatora za travu
je poštovanje priloženih proizvođačevih uputstava za
upotrebu. Uputstva za upotrebu sadrže i uslove rada,
uslove održavanja i popravki.
Pažnja! Zbog opasnosti od fizičkih povreda korisnika,
kultivator ne sme se koristiti kao uređaj za rezanje
granja i živice. Nadalje, kultivator ne sme se koristiti
kao motorni kultivator za poravnavanje povišenog tla,
kao što su npr. krtičnjaci.
Zbog bezbednosnih razloga kultivator se ne sme
koristiti kao pogonski agregat za druge radne alate i
komplete alata svake vrste, osim ako proizvođač to
izričito ne dozvoli.
Mašina sme da se koristi samo prema svojoj nameni.
Svako drugačije korišćenje nije u skladu s namenom.
Za štete ili povrede bilo koje vrste koje iz toga
proizlaze odgovoran je korisnik, a ne proizvođač.
Anleitung_BG_ES_1231_SPK1:_ 10.12.2008 12:58 Uhr Seite 49

Molimo da obratite pažnju na to da naši uređaji nisu
konstruisani za korišćenje u komercijalne svrhe kao
ni u zanatu i industriji. Ne preuzimamo garanciju ako
se uređaj koristi u zanatskim ili industrijskim
pogonima i sličnim delatnostima.
4. Tehnički podaci
Mrežni napon: 230 V ~ 50Hz
Snaga: 1200 W
Radna širina: 31 cm
Broj noževa: 8 dvostrukih noževa
Korekcija dubine: -3 / 3 / 7 / 9 mm
Nivo zvučnog tlaka LpA: 85 dB (A)
Intenzitet buke LWA: 99 dB (A)
Vibracija na prečki: 2,71 m/s
2
Nesigurnost K 1,5 m/s
2
Klasa zaštite: II / 쓑
Vrst zaštite: IPX4
Težina 11 kg
5. Pre puštanja u rad
Kultivator je isporučen u demontiranom stanju. Pre
upotrebe kultivatora morate montirati sabirnu korpu i
kompletnu dršku za guranje. Postepeno sledite
uputstva za upotrebu i orijentišite se prema slikama
radi jednostavnije montaže.
Montaža držača drške za guranje (vidi slike 4 i 5)
Postavite držač drške za guranje (sl. 4/poz. 7) u za to
predviđene otvore (sl. 4). Pričvrstite ga sigurnosnim
zavrtnjima (sl. 5/poz. 14).
Montaža donje drške za guranje (vidi sliku 6)
Donja drška za guranje (sl. 6/poz. 6) mora se
navući preko držača. Pri tome ne zaboravite
prethodno postaviti mehanizam za otpuštanje
kabla (sl. 6/poz. 4) na cev.
Pomoću priloženih zavrtanja (sl. 7/poz. 13)
međusobno pričvrstite cevi.
Montaža gornje drške za guranje (vidi slike 7-9)
Gornju dršku za guranje (sl. 1/poz. 5) postavite
tako da se rupice gornje drške podudaraju s
rupicama donje.
Pomoću priloženih zavrtanja (sl. 2/poz. 13)
međusobno pričvrstite cevi.
Priloženim držačima (slika 8) pričvrstite mrežni
kabel na cevi drške za guranje tako da se
garantuje otvaranje i zatvaranje poklopca na
otvoru za izbacivanje (slika 9/poz. 12).
Pažnja!
Obratite pažnju na to da poklopac na otvoru za
izbacivanje može da se lako otvori i zatvori!
Montaža sabirne korpe (vidi slike 10-13)
Ugurajte delove postolja jedan u drugi (sl. 10)
Navucite sabirnu korpu preko metalnog postolja
(sl. 11)
Navucite gumene spojnice preko metalnog
postolja (sl. 12)
Da biste sabirnu korpu mogli okačiti na kultivator,
jednom rukom podignite poklopac na otvoru za
izbacivanje (sl. 13/poz. 10), a drugom primite
sabirnu kesu za ručku i okačite je odozgo (slika
13).
Pažnja!
Da biste okačili sabirnu korpu, motor treba da bude
isključen, a valjak s noževima ne sme da se obrće!
Podešavanje dubine kultiviranja (vidi sliku 14)
Dubina kultiviranja podešava se mehanizmom za
podešavanje koji se nalazi na oba prednja točka. U tu
svrhu izvucite zavrtnje za podešavanje i obrnite ih
ulevo ili udesno na položaj =0/ I / II / III.
Pažnja!
S obe strane mora uvek biti podešena ista dubina
kultiviranja!
0 = Položaj za vožnju / ili prevoz
I = Dubina kultiviranja 3 mm
II = Dubina kultiviranja 7 mm
III = Dubina kultiviranja 9 mm
50
RS
Anleitung_BG_ES_1231_SPK1:_ 10.12.2008 12:58 Uhr Seite 50

51
RS
Priključak struje
Uređaj se može priključiti na svaku standardnu
utičnicu od 230 volti naizmenične struje. Dozvoljena
je međutim, samo jedna utičnica sa zaštitnim
kontaktom za čije osiguranje treba predvideti zaštitni
prekidač voda od 16A. Sem toga, ispred mora biti
uključena zaštitni strujni prekidač (RCD) maks.
vrednosti od 30 mA!
Priključni kabl uređaja
Molimo da koristite samo priključne kablove koji nisu
oštećeni. Duljina priključnog kabla uređaja ne sme se
određivati nasumično (maks. 50 m) jer se u protivnom
smanjuje učinak elektromotora. Presek priključnog
kabela uređaja mora biti 3 x 1,5 mm. Na priključnim
kablovima kosilica često nastaju oštećenja izolacije.
Uzroci tome su među ostalim:
Urezana mesta zbog prelaženja preko voda
Mesta prignječenja nastaju kad se priključni kabl
uređaja provede ispod vrata ili prozora.
Pukotine zbog starenja izolacije
Savinuta mesta zbog nestručnog rukovanja ili
vođenja priključnog kabla uređaja
Priključni kablovi uređaja moraju biti barem tip
H05RN-F i trožilni. Na priključnom kablu uređaja
obavezno je utisnuta oznaka tipa. Kupujte samo
priključne kablove uređaja s oznakom! Utikači i
utičnice na priključnim kablovima uređaja moraju biti
od gume i zaštićeni od prskanja vode. Duljina
priključnih kablova uređaja ne sme se određivati po
volji. Duži priključni kablovi uređaja zahtevaju veći
poprečni presek vodiča. Priključni kablovi uređaja i
spojni vodovi moraju se redovno proveravati zbog
mogućih oštećenja. Pri tom treba voditi računa o
tome da se pre provere vodovi isključe. Priključni kabl
odmotajte do kraja. Proverite takođe uvodnice
priključnih kablova, prelomljena mesta na utikačima i
utičnicama.
6. Rukovanje
Priključni kabl uređaja priključite na utikač (slika 15 /
poz.1) i osigurajte ga pomoću mehanizma za
otpuštanje kabla (slika 15/poz. 2).
Pažnja! Da biste sprečili neželjeno uključivanje
kultivatora, drška za vođenje (slika 16/poz. 1) ima
dvostepeni prekidač (slika 16/ poz. 2) koji se mora
pritisnuti pre nego se pritisne poluga za uključivanje
(slika 16 / poz. 3). Ako pustite polugu za uključivanje,
uređaj će se isključiti. Provedite ovaj postupak
nekoliko puta da biste se uverili u pravilan rad
uređaja. Pre nego na uređaju počnete s popravkama
ili radovima održavanja, morate proveriti da li se
valjak s noževima obrće i je li uređaj iskopčan iz
mreže.
Pažnja!
Nikad ne otvarajte poklopac na otvoru za izbacivanje
ako motor još radi. Rotirajući valjak s noževima može
prouzročiti ozlede. Uvek pažljivo pričvrstite poklopac
otvora za izbacivanje. On se zbog vučne opruge
povratno preklapa u položaj “zatvoreno”!
Između kućišta i korisnika uvek držite bezbednosni
razmak koji je određen prečkom za vođenje. Poseban
oprez potreban je kod rada i promena smera vožnje
na strminama i kosinama. Pripazite na stabilnost,
nosite cipele s đonovima koji dobro prianjaju i ne kližu
se, te duge pantalone. Uvek radite poprečno na
kosinu. Zbog bezbednosnih razloga ovim uređajem
ne smeju da se kultiviraju kosine od preko 15 stepeni.
Zbog opasnosti od spoticanja potreban je poseban
oprez za vreme izvođenja kretnji mašine unazad ili
kad je vučete!
Napomene za pravilan rad
Kod rada preporučamo način preklapanja.
Za postizanje lepog izgleda vodite mašinu što
ravnijim linijama. Pri tom bi se staze trebale preklapati
za nekoliko santimetara, tako da ne ostanu pruge.
Ako za vreme rada na tlu ostanu ostaci trave,
ispraznite sabirnu korpu.
Pažnja! Pre skidanja sabirne korpe isključite
motor i sačekajte da se valjak s noževima
zaustavi!
Za skidanje sabirne kese jednom rukom podignite
poklopac na otvoru za izbacivanje, a drugom skinite
sabirnu kesu!
Anleitung_BG_ES_1231_SPK1:_ 10.12.2008 12:58 Uhr Seite 51

Učestanost obrađivanja travnjaka uglavnom zavisi od
brzine rasta trave i tvrdoće tla. Održavajte čistoću
donje strane kućišta kultivatora i obavezno uklonite
naslage zemlje i trave. Naslage otežavaju postupak
pokretanja i umanjuju kvalitet kultiviranja. Stazu
rezanja potrebno je postaviti poprečno na kosinu.
Kad obavljate bilo kakvu kontrolu valjka s noževima,
isključite motor.
Pažnja!
Valjak s noževima obrće se još nekoliko sekundi
nakon isključivanja motora. Nikada ne pokušavajte da
zaustavite valjak s noževima. Ako za vreme rada
valjak s noževima udari o nešto, isključite kultivator i
sačekajte da se valjak u potpunosti umiri. Zatim
proverite stanje valjka s noževima. Ako je oštećen,
treba da ga zamenite (vidi 8.4). Polegnite korišćen
priključni kabl u obliku petlje ispred korišćene utičnice
na zemlju. Kultivirajte udaljavajući se od utičnice odn.
kabla i pripazite na to da priključni kabl uređaja bude
uvek položen u ošišanoj travi, tako da kultivatorom ne
pređete preko njega.
7. Zamena mrežnog priključnog voda
Ako se ošteti mrežni priključni vod ovog uređaja,
mora da ga zameni proizvođač ili njegova servisna
služba ili kvalifikovano lice, kako bi se izbegle
opasnosti.
8. Čišćenje, održavanje i narudžba
rezervnih dijelova
Prije svih radova čišćenja izvucite mrežni utikač.
8.1 Čišćenje
Zaštitne naprave, otvore za zrak i kućište motora
držite što čišćima od prašine i prljavštine.
Istrljajte uredjaj čistom krpom ili ga ispušite
komprimiranim zrakom pod niskim tlakom.
Preporučujemo da uredjaj očistite nakon svake
uporabe.
Redovito čistite uredjaj vlažnom krpom i s malo
masnog sapuna. Ne koristite sredstva za
čišćenje ni otapala; ona mogu oštetiti plastične
dijelove uredjaja. Pripazite na to da u
unutrašnjost uredjaja ne dospije voda.
8.2 Ugljene četkice
Kod prekomjernog iskrenja potrebno je da
električar provjeri ugljene četkice.
Pažnja! Ugljene četkice smije zamijeniti samo
električar.
8.3 Održavanje
Istrošen ili oštećen valjak s noževima treba da zameni
ovlašćeni stručnjak (vidi adresu na garantnom listu).
Pobrinite se da svi pričvrsni elementi (zavrtnji, navrtke
itd.) budu uvek čvrsto pritegnuti tako da se omogući
bezbedan rad s kultivatorom.
Uređaj čuvajte u suvoj prostoriji.
Za dug životni vek treba očistiti i zatim nauljiti sve
pričvrsne elemente kao i točkove i osovine.
Redovita nega kultivatora osigurava ne samo njegov
dug vek trajanja i efikasnost, nego pridonosi
pažljivom i jednostavnom kultiviranju Vašeg
travnjaka.
Na kraju sezone provedite opštu kontrolu kultivatora i
uklonite sve nakupljene ostatke. Pre svakog početka
sezone obavezno proverite stanje kultivatora. Za
popravke se obratite našem servisu (vidi adresu na
garantnom listu).
8.4 Zamena valjka s noževima
Zbog bezbednosnih razloga preporučamo da zamenu
valjka s noževima izvrši ovlašćeni serviser (adresu
vidi na garantnom listu).
Pažnja!
Nosite radne rukavice!
Koristite samo originalni valjak s noževima jer u
protivnom ne može da se garantuje funkcionalnost i
bezbednost.
8.5 Naručivanje rezervnih dijelova
Prilikom naručivanja rezervnih dijelova treba navesti
sljedeće podatke:
tip uredjaja
broj artikla uredjaja
identifikacijski broj uredjaja
kataloški broj potrebnog rezervnog dijela
Aktuelne cene i informacije potražite na sajtu
www.isc-gmbh.info
Rezervni valjak s noževima, br. art.: 34.055.80
52
RS
Anleitung_BG_ES_1231_SPK1:_ 10.12.2008 12:58 Uhr Seite 52

53
RS
9. Zbrinjavanje i reciklovanje
Uredjaj se nalazi u pakovanju koje ga štiti od
oštećenja tokom transporta. Ovo pakovanje je
sirovina i zato može ponovno da se upotrebi ili
pošalje na reciklovanje. Uredjaj i njegov pribor
izradjeni su od različitih materijala kao npr. metala i
plastike. Neispravne sastavne delove otpremite na
mesta za zbrinjavanje posebnog otpada. Informacije
potražite u specijalizovanoj trgovini ili nadležnoj
opštinskoj upravi.
Anleitung_BG_ES_1231_SPK1:_ 10.12.2008 12:58 Uhr Seite 53

54
RS
Greška Mogući uzroci Uklanjanje
Motor ne pali a) Nema struje u utikaču
b) Neispravan kabl
c) Kvar na kombinaciji prekidačutikač
d) Labavi priključci na motoru ili
kondenzatoru
e) Začepljeno kućište
a) Proveriti vod i osigurač
b) Proveriti
c) Kvar uklanja servisna radionica
d) Kvar uklanja servisna radionica.
e) Eventuelno promenite dubinu
kultiviranja Očistite kućište da se
omogući slobodno obrtanje valjka s
noževima.
Slabi snaga motora a) Pretvrdo tlo
b) Začepljeno kućište
c) Jako istrošen nož
a) Korigujte dubinu kultiviranja
b) Očistite kućište
c) Zamenite nož.
Loše kultivirano a) Istrošen nož
b) Pogrešna dubina kultiviranja
a) Zamenite nož.
b) Korigujte dubinu kultiviranja.
Motor radi, ali se valjak ne
obrće.
a) Ispucan zupčasti remen a) Kvar uklanja servisna radionica.
10. Plan traženja grešaka
Pažnja! U svrhu zaštite motor ima termički prekidač koji u slučaju preopterećenja isključuje uređaj i
nakon kratke faze hlađenja automatski ga ponovo uključuje!
Anleitung_BG_ES_1231_SPK1:_ 10.12.2008 12:58 Uhr Seite 54

55
k
erklärt folgende Konformität gemäß EU-Richtlinie
und Normen für Artikel
t
declares conformity with the EU Directive
and standards marked below for the article
p
déclare la conformité suivante selon la
directive CE et les normes concernant lʼarticle
verklaart de volgende conformiteit in overeenstemming met de EU-richtlijn en normen voor
het artikel
m
declara la siguiente conformidad a tenor de la
directiva y normas de la UE para el artículo
O
declara a seguinte conformidade de acordo
com a directiva CE e normas para o artigo
U
förklarar följande överensstämmelse enl. EUdirektiv och standarder för artikeln
q
ilmoittaa seuraavaa Euroopan unionin direktiivien ja normien mukaista yhdenmukaisuutta
tuotteelle
erklærer herved følgende samsvar med EUdirektiv og standarder for artikkel
T
заявляет о соответствии товара
следующим директивам и нормам EC
B
izjavljuje sljedeću uskladjenost s odredbama i
normama EU za artikl.
Q
declarå urmåtoarea conformitate cu linia directoare CE μi normele valabile pentru articolul.
Z
ürün ile ilgili olarak AB Yönetmelikleri ve
Normlar∂ gere©ince aμa©∂daki uygunluk aç∂kla
mas∂n∂ sunar.
z
‰ЛПТУВИ ЩЛУ ·ОfiПФ˘ıЛ Ы˘МКˆУ›· Ы‡МКˆУ· МВ
ЩЛУ √‰ЛБ›· ∂∂ О·И Щ· ЪfiЩ˘Ф БИ· ЩФ ЪФ˚fiУ
C dichiara la seguente conformità secondo la
direttiva UE e le norme per lʼarticolo
l
attesterer følgende overensstemmelse i
henhold til EU-direktiv og standarder for produkt
j
prohlašuje následující shodu podle směrnice
EU a norem pro výrobek.
A
a következő konformitást jelenti ki a termékekre vonatkozó EU-irányvonalak és normák szerint
X
pojasnjuje sledečo skladnost po smernici EU
in normah za artikel.
deklaruje zgodność wymienionego poniżej
artykułu z następującymi normami na
podstawie dyrektywy WE.
W
vydáva nasledujúce prehlásenie o zhode podľa
smernice EÚ a noriem pre výrobok.
e
деклаpиpа следното съответствие съгласно
диpективите и ноpмите на ЕС за пpодукта.
1
заявляє про відповідність згідно з Директивою
ЄС та стандартами, чинними для даного товару
.
deklareerib vastavuse järgnevatele EL direktiivi
dele ja normidele
G
deklaruoja atitikti pagal ES direktyvas ir normas
straipsniui
4
izjavljuje sledeçi konformitet u skladu s odred
bom EZ i normama za artikl
H
Atbilstības sertifikāts apliecina zemāk minēto preču
atbilstību ES direktīvām un standartiem
E
Samræmisyfirl‡sing sta›festir eftirfarandi samræmi
samkvæmt reglum Evfrópubandalagsins og stö›lum
fyrir vörur
Konformitätserklärung
ISC-GmbH · Eschenstraße 6 · D-94405 Landau/Isar
Elektro-Vertikutierer BG-ES 1231
Art.-Nr.: 34.205.12 I.-Nr.: 01018 Archivierung: 3420510-31-4155050-07
Subject to change without notice
EN 60335-1; prEN 60335-1-92; EN 13684; EN 50366; EN 55014-1; EN 55014-2;
EN 61000-3-2; EN 61000-3-11; KBV V
Landau/Isar, den 30.10.2008
Hines
Product-Management
Weichselgartner
General-Manager
98/37/EC
2006/95/EC
97/23/EC
2004/108/EC
90/396/EEC
89/686/EEC
87/404/EEC
R&TTED 1999/5/EC
2000/14/EC_2005/88/EC:
95/54/EC:
97/68/EC:
X
X
X
X
LWM= 96 dB; LWA= 99 dB
Anleitung_BG_ES_1231_SPK1:_ 10.12.2008 12:58 Uhr Seite 55

56
k
Das Gerät kann bei ungünstigen Netzverhältnissen zu vorübergehenden Spannungsabsenkungen führen. Ist die Netzimpedanz
Z am Anschlusspunkt zum öffentlichen Netz größer als 0,436 Ω können weitere Maßnahmen erforderlich sein bevor das Gerät
an diesem Anschluss bestimmungsgemäß betrieben werden kann. Wenn nötig kann die Impedanz beim örtlichen
Energieversorgungsunternehmen erfragt werden.
t
Given unfavorable conditions in the power supply the equipment may cause the voltage to drop temporarily. If the supply
impedance “Z” at the connection point to the public power supply exceeds 0,436 Ω it may be necessary to take further
measures before the equipment can be used as intended from this power supply. If necessary, you can ask your local
electricity supply company for the impedance value.
p
L’appareil peut entraîner des baisses de tension provisoires lorsque le réseau n’est pas favorable. Si l’impédance de réseau Z
sur le point de raccordement au réseau public est supérieur à 0,436 Ω d’autres mesures peuvent être nécessaires avant que
l’appareil ne puisse être exploité sur ce raccord conformément à l’affectation. Si nécessaire, demandez l’impédance à
l’entreprise distributrice d’énergie électrique locale.
C
In caso di condizioni di rete sfavorevoli l’apparecchio può causare degli abbassamenti temporanei di tensione. Se l’impedenza
di rete Z nel punto di allacciamento alla rete pubblica supera 0,436 Ω possono rendersi necessarie altre misure prima che
l’apparecchio possa venire utilizzato in maniera conforme all’uso a partire da tale attacco. Se necessario, in materia di
impedenza si può consultare l’ente locale responsabile della fornitura di energia elettrica.
Ved ugunstige netforhold kan maskinen forårsage forbigående spændingsfald. Er netimpedansen Z på tilslutningsstedet til det
offentlige forsyningsnet større end 0,436 Ω kan yderligere foranstaltninger være påkrævet, inden maskinen kan tages i brug via
denne tilslutning. Du kan forhøre dig om impedans hos forsyningsselskabet.
U
Vid bristfälliga förhållanden i elnätet kan maskinen förorsaka temporära spänningssänkningar. Om nätimpedansen Z vid
anslutningspunkten till det allmänna elnätet är större än 0,436 Ω kan ytterligare åtgärder krävas innan maskinen kan anslutas
till detta uttag och användas på avsett vis. Vid behov kan ditt lokala elbolag informera dig om elnätets impedans.
Bf
Kod nepovoljnih odnosa u mreži ovaj uređaj može uzrokovati privremena kolebanja napona. Ako je impendancija mreže Z na
priključnoj točki prema gradskoj mreži veća od 0,436 Ω potrebno je poduzeti ostale mjere prije nego ćete početi raditi s
uređajem na tom priključku. Informaciju o impendanciji možete prema potrebi dobiti kod mjesnog poduzeća za opskrbu
energijom.
4
Kod nepovoljnih odnosa u mreži ovaj uređaj može da prouzroči privremena kolebanja napona. Ako je mrežna impedancija Z na
priključnoj tačci prema javnoj mreži veća od 0,436 Ω, mogu da budu potrebne ostale mere pre nego će uređaj namenski da radi
na tom priključku. Po potrebi možete da se o impendanciji raspitate kod lokalnog preduzeća za snabdevanje energijom.
Anleitung_BG_ES_1231_SPK1:_ 10.12.2008 12:58 Uhr Seite 56

57
k Nur für EU-Länder
Werfen Sie Elektrowerkzeuge nicht in den Hausmüll!
Gemäß europäischer Richtlinie 2002/96/EG über Elektro- und Elektronik-Altgeräte und Umsetzung in
nationales Recht müssen verbrauchte Elektrowerkzeuge getrennt gesammelt werden und einer
umweltgerechten Wiederverwertung zugeführt werden.
Recycling-Alternative zur Rücksendeaufforderung:
Der Eigentümer des Elektrogerätes ist alternativ anstelle Rücksendung zur Mitwirkung bei der sachgerechten Verwertung im Falle der Eigentumsaufgabe verpflichtet. Das Altgerät kann hierfür auch einer
Rücknahmestelle überlassen werden, die eine Beseitigung im Sinne der nationalen Kreislaufwirtschaftsund Abfallgesetze durchführt. Nicht betroffen sind den Altgeräten beigefügte Zubehörteile und Hilfsmittel
ohne Elektrobestandteile.
t For EU countries only
Never place any electric tools in your household refuse.
To comply with European Directive 2002/96/EC concerning old electric and electronic equipment and its
implementation in national laws, old electric tools have to be separated from other waste and disposed of
in an environment-friendly fashion, e.g. by taking to a recycling depot.
Recycling alternative to the demand to return electrical devices:
As an alternative to returning the electrical device, the owner is obliged to cooperate in ensuring that the
device is properly recycled if ownership is relinquished. This can also be done by handing over the used
device to a returns center, which will dispose of it in accordance with national commercial and industrial
waste management legislation. This does not apply to the accessories and auxiliary equipment without
any electrical components which are included with the used device.
p Uniquement pour les pays de l'Union Européenne
Ne jetez pas les outils électriques dans les ordures ménagères.
Selon la norme européenne 2002/96/CE relative aux appareils électriques et systèmes électroniques
usés et selon son application dans le droit national, les outils électriques usés doivent être récoltés à
part et apportés à un recyclage respectueux de l'environnement.
Possibilité de recyclage en alternative à la demande de renvoi :
Le propriétaire de lʼappareil électrique est obligé, en guise dʼalternative à un envoi en retour, à contribuer
à un recyclage effectué dans les règles de lʼart en cas de cessation de la propriété. Lʼancien appareil
peut être remis à un point de collecte dans ce but. Cet organisme devra lʼéliminer dans le sens de la Loi
sur le cycle des matières et les déchets. Ne sont pas concernés les accessoires et ressources fournies
sans composants électroniques.
Anleitung_BG_ES_1231_SPK1:_ 10.12.2008 12:58 Uhr Seite 57

58
C Solo per paesi membri dell'UE
Non gettate gli utensili elettrici nei rifiuti domestici.
Secondo la Direttiva europea 2002/96/CE sui rifiuti di apparecchiature elettriche ed elettroniche e
l'applicazione nel diritto nazionale gli elettroutensili usati devono venire raccolti separatamente e smaltiti
in modo ecologico.
Alternativa di riciclaggio alla richiesta di restituzione
Il proprietario dellʼapparecchio elettrico è tenuto in alternativa, invece della restituzione, a collaborare in
modo che lo smaltimento venga eseguito correttamente in caso ceda lʼapparecchio. Lʼapparecchio
vecchio può anche venire consegnato ad un centro di raccolta che provvede poi allo smaltimento
secondo le norme nazionali sul riciclaggio e sui rifiuti. Non ne sono interessati gli accessori e i mezzi
ausiliari senza elementi elettrici forniti insieme ai vecchi apparecchi.
Gælder kun EU-lande
Smid ikke el-værktøj ud som almindeligt husholdningsaffald.
I henhold til EF-direktiv 2002/96 om elektroaffald og dets omsættelse til national lovgivning skal brugt
el-værktøj indsamles adskilt og indleveres på genbrugsstation.
Recycling-alternativ til tilbagesendelse af brugt vare:
Ejeren af det elektroniske apparat er forpligtet til – som et alternativ i stedet for tilbagesendelse – at
medvirke til, at relevante dele af apparatet genanvendes ifølge miljøforskrifterne i tilfælde af overdra
gelse af ejerskab til tredjeperson. Det brugte apparat kan også overdrages til et deponeringssted, som vil
varetage bortskaffelsen af apparatets dele i overensstemmelse med nationale bestemmelser vedrørende
skrotning og genbrug. Ikke omfattet heraf er tilbehørsdele og hjælpemidler, som ikke indeholder
elektroniske komponenter.
U Endast för EU-länder
Kasta inte elverktyg i hushållssoporna.
Enligt det europeiska direktivet 2002/96/EG om avfall som utgörs av eller innehåller elektriska eller
elektroniska produkter och dess tillämpning i den nationella lagstiftningen, måste förbrukade elverktyg
källsorteras och lämnas
Återvinnings-alternativ till begäran om återsändning:
Som ett alternativ till återsändning är ägaren av elutrustningen skyldig att bidraga till ändamålsenlig
avfallshantering för det fall att utrustningen ska skrotas. Efter att den förbrukade utrustningen har läm
nats in till en avfallsstation kan den omhändertas i enlighet med gällande nationella lagstiftning om återvinning och avfallshantering. Detta gäller inte för tillbehörsdelar och hjälpmedel utan elektriska komponenter vars syfte har varit att komplettera den förbrukade utrustningen.
B
Samo za zemlje Europske zajednice
f
Elektroalate ne bacajte u kućno smeće.
U skladu s europskom odredbom 2002/96/EG o starim električnim i elektroničkim uredjajima i njezinom
primjenom u okviru državnog prava, istrošeni elektroalati moraju se odvojeno sakupiti i zbrinuti na
ekološki način u svrhu recikliranja.
Alternativa s recikliranjem u odnosu na zahtjev za povrat uredjaja:
Vlasnik elektrouredjaja alternativno je obvezan da umjesto povrata robe u slučaju odricanja vlasništva
sudjeluje u stručnom zbrinjavanju elektrouredjaja. Stari uredjaj može se u tu svrhu prepustiti i stanici za
preuzimanje rabljenih uredjaja koja će provesti uklanjanje u smislu državnog zakona o recikliranju i
otpadu. Zakonom nisu obuhvaćeni dijelovi pribora ugradjeni u stare uredjaje i pomoćni materijali bez
električnih elemenata.
Anleitung_BG_ES_1231_SPK1:_ 10.12.2008 12:58 Uhr Seite 58

59
4 Samo za zemlje EU
Ne bacajte elektro-alate u kućno smeće!
Shodno evropskoj smernici 2002/96/EG o starim električnim i elektronskim uredjajima i primeni
državnog prava, istrošeni elektro-alati mora da se odvojeno sakupe i eliminišu na ekološki primeren
način u stanici za recikliranje.
Alternativa recikliranju prema zahtevima za povrat uredjaja:
Vlasnik elektro-uredjaja alternativno je obavezan da umesto povrata robe u slučaju predaje vlasništva
učestvuje u stručnom eliminisanju elektro-uredjaja. Stari uredjaj može da se u tu svrhu prepusti i stanici
za preuzimanje rabljenih uredjaja koja će provesti odstranjivanje u smislu državnog zakona o reciklaži i
otpadu. Zakonom nisu obuhvaćeni delovi pribora ugradjeni u stare uredjaje i pomoćni materijali bez
električnih elemenata.
Anleitung_BG_ES_1231_SPK1:_ 10.12.2008 12:58 Uhr Seite 59

60
Der Nachdruck oder sonstige Vervielfältigung von Dokumentation und
Begleitpapieren der Produkte, auch auszugsweise ist nur mit ausdrücklicher Zustimmung der ISC GmbH zulässig.
The reprinting or reproduction by any other means, in whole or in part,
of documentation and papers accompanying products is permitted only
with the express consent of ISC GmbH.
La réimpression ou une autre reproduction de la documentation et des
documents dʼaccompagnement des produits, même incomplète, nʼest
autorisée quʼavec lʼagrément exprès de lʼentreprise ISC GmbH.
La ristampa o lʼulteriore riproduzione, anche parziale, della
documentazione o dei documenti dʼaccompagnamento dei prodotti è
consentita solo con lʼesplicita autorizzazione da parte della ISC GmbH.
Eftertryk eller anden form for mangfoldiggørelse af skriftligt materiale,
ledsagepapirer indbefattet, som omhandler produkter, er kun tilladt
efter udtrykkelig tilladelse fra ISC GmbH.
Eftertryck eller annan duplicering av dokumentation och medföljande
underlag för produkter, även utdrag, är endast tillåtet med uttryckligt
tillstånd från ISC GmbH.
Bf
Naknadno tiskanje ili slična umnožavanja dokumentacije i pratećih
papira ovih proizvoda, čak i djelomično kopiranje, moguće je samo uz
izričito dopuštenje tvrtke ISC GmbH.
4
Potpuno ili delimično štampanje ili umnožavanje dokumentacije i
službenih papira koji su priloženi proizvodu dozvoljeno je samo uz
izričitu saglasnost firme ISC GmbH.
Anleitung_BG_ES_1231_SPK1:_ 10.12.2008 12:58 Uhr Seite 60

61
Technische Änderungen vorbehalten
Technical changes subject to change
Sous réserve de modifications
Con riserva di apportare modifiche tecniche
Der tages forbehold för tekniske ændringer
Förbehåll för tekniska förändringar
Bf Zadržavamo pravo na tehnične izmjene.
4 Zadržavamo pravo na tehničke promen
Anleitung_BG_ES_1231_SPK1:_ 10.12.2008 12:58 Uhr Seite 61

62
Anleitung_BG_ES_1231_SPK1:_ 10.12.2008 12:58 Uhr Seite 62

63
Anleitung_BG_ES_1231_SPK1:_ 10.12.2008 12:58 Uhr Seite 63

64
t
GUARANTEE CERTIFICATE
Dear Customer,
All of our products undergo strict quality checks to ensure that they reach you in perfect condition. In the unlikely
event that your device develops a fault, please contact our service department at the address shown on this
guarantee card. Of course, if you would prefer to call us then we are also happy to offer our assistance under
the service number printed below. Please note the following terms under which guarantee claims can be made:
1. These guarantee terms cover additional guarantee rights and do not affect your statutory warranty rights.
We do not charge you for this guarantee.
2. Our guarantee only covers problems caused by material or manufacturing defects, and it is restricted to the
rectification of these defects or replacement of the device. Please note that our devices have not been
designed for use in commercial, trade or industrial applications. Consequently, the guarantee is invalidated
if the equipment is used in commercial, trade or industrial applications or for other equivalent activities. The
following are also excluded from our guarantee: compensation for transport damage, damage caused by
failure to comply with the installation/assembly instructions or damage caused by unprofessional
installation, failure to comply with the operating instructions (e.g. connection to the wrong mains voltage or
current type), misuse or inappropriate use (such as overloading of the device or use of non-approved tools
or accessories), failure to comply with the maintenance and safety regulations, ingress of foreign bodies
into the device (e.g. sand, stones or dust), effects of force or external influences (e.g. damage caused by
the device being dropped) and normal wear resulting from proper operation of the device. This applies in
particular to rechargeable batteries for which we nevertheless issue a guarantee period of 12 months.
The guarantee is rendered null and void if any attempt is made to tamper with the device.
3. The guarantee is valid for a period of 2 years starting from the purchase date of the device. Guarantee
claims should be submitted before the end of the guarantee period within two weeks of the defect being
noticed. No guarantee claims will be accepted after the end of the guarantee period. The original guarantee
period remains applicable to the device even if repairs are carried out or parts are replaced. In such cases,
the work performed or parts fitted will not result in an extension of the guarantee period, and no new
guarantee will become active for the work performed or parts fitted. This also applies when an on-site
service is used.
4. In order to assert your guarantee claim, please send your defective device postage-free to the address
shown below. Please enclose either the original or a copy of your sales receipt or another dated proof of
purchase. Please keep your sales receipt in a safe place, as it is your proof of purchase. It would help us if
you could describe the nature of the problem in as much detail as possible. If the defect is covered by our
guarantee then your device will either be repaired immediately and returned to you, or we will send you a
new device.
Of course, we are also happy offer a chargeable repair service for any defects which are not covered by the
scope of this guarantee or for units which are no longer covered. To take advantage of this service, please send
the device to our service address.
Anleitung_BG_ES_1231_SPK1:_ 10.12.2008 12:58 Uhr Seite 64

65
p
BULLETIN DE GARANTIE
Chère Cliente, Cher Client,
Nos produits sont soumis à un contrôle de qualité très strict. Si cet appareil devait toutefois ne pas fonctionner
impeccablement, nous en serions désolés. Dans un tel cas, nous vous prions de bien vouloir prendre contact
avec notre service après-vente à l‘adresse indiquée sur le bulletin de garantie. Nous restons également
volontiers à votre disposition au numéro de téléphone de service indiqué plus bas. Pour faire valoir une
demande de garantie, ce qui suit est valable :
1. Les conditions de garantie règlent les prestations de garantie supplémentaires. Vos droits de garantie
légaux ne sont en rien altérés par la garantie présente. Notre prestation de garantie est gratuite.
2. La prestation de garantie s’applique exclusivement aux défauts occasionnés par des vices de fabrication ou
de matériau et est limitée à l’élimination de ces défauts ou encore au remplacement de l’appareil. Veillez au
fait que nos appareils, conformément à leur affectation, n’ont pas été construits pour être utilisés dans un
environnement professionnel, industriel ou artisanal. Un contrat de garantie ne peut avoir lieu dès lors que
l’appareil est utilisé à des activités dans des entreprises professionnelles, artisanales ou industrielles ou
toute autre activité du même genre. Sont également exclus de notre garantie : les prestations de
substitution de dommages dus aux transports, les dommages occasionnés par le non-respect des
instructions de montage ou en raison d’une installation non conforme, du non-respect du mode d’emploi
(comme par exemple le raccordement à une mauvaise tension réseau ou à un mauvais type de courant),
les applications abusives ou non conformes (comme par exemple une surcharge de l’appareil ou encore
l’emploi d’accessoires non homologués), le non-respect des prescriptions de maintenance et de sécurité,
l’infiltration de corps étrangers dans l’appareil (comme par exemple du sable, des pierres ou de la
poussière), l’emploi de la force ou l’influence extérieure (comme par exemple les dommages dus à une
chute), ainsi que l’usure normale conforme à l’utilisation. Ceci est particulièrement valable pour les
accumulateurs pour lesquels nous offrons toutefois une période de garantie de 12 mois.
Le droit à la garantie disparaît dès lors que des interventions ont lieu sur l’appareil.
3. Le délai de garantie s’élève à 2 ans et commence à la date de l’achat de l’appareil. Les demandes de
garanties doivent être présentées avant écoulement du délai de garantie, dans les deux semaines suivant
le moment auquel le défaut a été reconnu. Toute reconnaissance de demande de garantie après
écoulement du délai de garantie est exclue. La réparation ou l’échange de l’appareil n’entraîne nullement
une prolongation de la durée de garantie. Elle ne fait pas non plus commencer un nouveau délai de
garantie, en raison de cette prestation, pour l’appareil ou pour toute autre pièce de rechange intégrée. Ceci
est également valable lorsqu’un service après-vente sur place a été consulté.
4. Pour faire reconnaître votre demande de garantie, veuillez nous envoyer l’appareil défectueux franco de
port à l’adresse indiquée ci-dessous. Ajoutez à l’envoi l’original du bon d’achat ou de tout autre preuve de
l’achat datée. Veuillez donc toujours bien conserver le bon d’achat en guise de preuve ! Décrivez la raison
de la réclamation le plus précisément possible. Si le défaut de l’appareil est compris dans notre prestation
de garantie, nous vous retournerons sans délai un appareil réparé ou encore un nouveau.
Bien entendu, nous sommes prêts également à réparer les appareils défectueux contre remboursement des
frais, dès lors que l’appareil n’est plus ou pas garanti. Pour ce faire, veuillez envoyer l’appareil à notre adresse
de service après-vente.
Anleitung_BG_ES_1231_SPK1:_ 10.12.2008 12:58 Uhr Seite 65

66
C
CERTIFICATO DI GARANZIA
Gentili clienti,
i nostri prodotti sono soggetti ad un rigido controllo di qualità. Se l’apparecchio non dovesse tuttavia funzionare
correttamente, ci scusiamo e vi preghiamo di rivolgervi al nostro servizio di assistenza clienti all’indirizzo
indicato in questa scheda di garanzia. Siamo a vostra disposizione anche telefonicamente al numero del
servizio assistenza sotto indicato. Per la rivendicazione dei diritti di garanzia vale quanto segue:
1. Queste condizioni di garanzia regolano ulteriori prestazioni di garanzia. La presente garanzia non tocca i
vostri diritti al ricorso di garanzia previsti dalla legge. Le nostre prestazioni di garanzia sono per voi gratuite.
2. La prestazione di garanzia riguarda esclusivamente le anomalie riconducibili a difetti del materiale o di
produzione ed è limitata all’eliminazione di queste anomalie o alla sostituzione dell’apparecchio. Tenete
presente che i nostri apparecchi non sono stati costruiti per l’impiego professionale, artigianale o
industriale. Un contratto di garanzia non viene concluso quando l’apparecchio viene usato in imprese
commerciali, artigianali o industriali, o con attività equivalenti. Dalla nostra garanzia sono escluse inoltre le
prestazioni di risarcimento per danni dovuti al trasporto o danni causati dalla mancata osservanza delle
istruzioni per il montaggio o per installazione non corretta, dalla mancata osservanza delle istruzioni per
l’uso (come per es. collegamento a tensione di rete o tipo di corrente non corretto), dall’uso improprio o
illecito (come per es. sovraccarico dell’apparecchio o utilizzo di utensili o accessori non consentiti), dalla
mancata osservanza delle norme di sicurezza e di manutenzione, dalla penetrazione di corpi estranei
nell’apparecchio (come per es. sabbia, pietre o polvere), dall’impiego della forza o dall’influsso esterno
(come per es. danni dovuti a caduta) e dall’usura normale e dovuta all’impiego. Ciò vale particolarmente per
batterie, per esse concediamo tuttavia 12 mesi di garanzia
Il diritti di garanzia decadono quando sono già effettuati interventi sull’apparecchio.
3. Il periodo di garanzia è 2 anni e inizia alla data d’acquisto dell’apparecchio. I diritti di garanzia devono
essere fatti valere prima della scadenza del periodo di garanzia, entro due settimane dopo avere accertato
il difetto. È esclusa la rivendicazione di diritti di garanzia dopo la scadenza del relativo periodo. La
riparazione o la sostituzione dell’apparecchio non comporta una proroga del periodo di garanzia e con
questa prestazione per l’apparecchio o per pezzi di ricambio eventualmente installati non inizia un nuovo
periodo di garanzia. Questo vale anche nel caso si ricorra ad un servizio sul posto.
4. Per la rivendicazione dei vostri diritti di garanzia inviate l’apparecchio difettoso franco di porto all’indirizzo
sotto indicato. Allegate lo scontrino di cassa in originale o un’altra prova d’acquisto che riporti la data.
Conservate bene perciò lo scontrino di cassa come prova! Indicate il motivo di reclamo nel modo più
dettagliato possibile. Se il difetto dell’apparecchio rientra nella nostra prestazione di garanzia, ricevete
l’apparecchio riparato o un apparecchio nuovo a stretto giro di posta.
Naturalmente effettuiamo a pagamento anche riparazioni sull’apparecchio che non rientrano o non rientrano più
nella garanzia. A tale scopo inviate l’apparecchio all’indirizzo del servizio assistenza.
Anleitung_BG_ES_1231_SPK1:_ 10.12.2008 12:58 Uhr Seite 66

67
GARANTIBEVIS
Kære kunde!
Vore produkter er underlagt streng kvalitetskontrol. Hvis produktet alligevel på et tidspunkt skulle udvise fejl,
beklager vi naturligvis dette og beder dig kontakte vores kundeservice på adressen, som står angivet på dette
garantibevis. Du kan naturligvis også ringe til os på det nedenfor angivne servicenummer. For indfrielse af
garantikrav gælder følgende:
1. Nærværende garanti fastsætter betingelserne for udvidede garantiydelser. Garantibestemmelser fastsat
ved lov berøres ikke af nærværende garanti. Vores garantiydelse er gratis.
2. Garantiydelsen omfatter udelukkende mangler, som kan føres tilbage til materiale- eller produktionsfejl, og
begrænser sig til afhjælpning af disse resp. levering af erstatningsprodukt. Bemærk, at vore produkter ikke
er konstrueret til erhvervsmæssig, håndværksmæssig eller industriel brug. Garantiaftale kan derfor ikke
anses for indgået, såfremt produktet anvendes i erhvervsmæssigt, håndværksmæssigt, industrielt eller
lignende øjemed. Endvidere dækker garantien ikke erstatningsydelser for transportskader, skader som
følge af tilsidesættelse af montagevejledningens anvisninger eller som følge af usagkyndig installation,
tilsidesættelse af brugsanvisningen (f.eks. tilslutning til forkert netspænding eller strømtype), misbrug eller
usagkyndig anvendelse (f.eks. overbelastning eller brug af værktøj eller tilbehør, som ikke er godkendt),
tilsidesættelse af vedligeholdelses- og sikkerhedsforskrifter, indtrængen af fremmedlegemer i apparatet
(f.eks. sand, sten eller støv), brug af vold eller eksterne påvirkninger udefra (f.eks. fordi produktet tabes)
samt skader, der hidrører fra almindelig slitage. Dette gælder især batterier, som vi dog alligevel yder 12
måneders garanti på
Garantien mister sin gyldighed, hvis der allerede er blevet foretaget indgreb i apparatet.
3. Garantiperioden udgør 2 år at regne fra købsdatoen. Garantikrav skal gøres gældende inden for to uger,
efter at defekten er blevet konstateret. Garantikrav kan ikke gøres gældende efter garantiperiodens udløb.
Reparation eller udskiftning af apparatet medfører ikke forlængelse af garantiperioden, heller ikke for
eventuelt indbyggede reservedele. Dette gælder også servicearbejder, der foretages på stedet.
4. For at kunne gøre garantikrav gældende skal du sende det defekte produkt portofrit til nedenstående
adresse. Original købskvittering eller lignende dateret dokumentation skal vedsendes. Købskvitteringen
skal gemmes som dokumentation! Beskriv venligst så nøjagtigt som muligt grunden til din reklamation. Er
defekten omfattet af garantien, vil produktet omgående blive repareret og returneret, eller du vil modtage et
helt nyt.
Mod betaling udbedrer vi naturligvis også gerne defekter på produktet, som ikke/ikke længere er omfattet af
garantien. Du skal blot indsende produktet til vores serviceadresse.
Anleitung_BG_ES_1231_SPK1:_ 10.12.2008 12:58 Uhr Seite 67

68
U
GARANTIBEVIS
Bästa kund,
Våra produkter genomgår en sträng kvalitetskontroll. Om denna produkt mot förmodan inte fungerar på rätt sätt,
beklagar vi detta och ber dig att kontakta vår serviceavdelning under adressen som anges på garantikortet. Vi
står även gärna till tjänst på telefon under servicenumret som anges nedan. Följande punkter gäller för att du
ska kunna göra anspråk på garantin:
1. I dessa garantivillkor regleras extra garantitjänster. Garantianspråk som regleras enligt lag påverkas inte av
denna garanti. Våra garantitjänster är gratis för dig.
2. Garantitjänsterna täcker endast in sådana brister som kan härledas till material- eller fabrikationsfel och är
begränsade till arbetsuppgifter som syftar till att åtgärda dessa brister eller byta ut produkten. Tänk på att
våra produkter endast får användas till ändamålsenligt syfte och inte har konstruerats för yrkesmässig,
hantverksmässig eller industriell användning. Ett garantiavtal sluts därför ej om produkten ska användas
inom yrkesmässiga, hantverksmässiga eller industriella verksamheter eller vid liknande aktiviteter. Vår
garanti omfattar dessutom inte ersättning för transport skador, skador som kan härledas till missaktade
monterings anvisningar eller ej föreskriven installation, åsidosatt bruksanvisning (t ex anslutning till felaktig
nätspänning eller strömart), missbruk eller ej ändamålsenliga användningar (t ex överbelastning av
produkten eller användning av ej godkända insatsverktyg eller tillbehör), åsidosatta underhålls- och
säkerhetsbestämmelser, främmande partiklar som har trängt in i produkten (t ex sand, sten eller damm),
yttre våld eller yttre påverkan (t ex skador om produkten har fallit ned) samt normalt och användningsbundet
slitage. Detta gäller särskilt för batterier som täcks av en 12 månaders garanti.
Anspråk på garanti upphör att gälla om ingrepp redan har gjorts i produkten.
3. Garantitiden uppgår till 2 år och gäller från datumet när produkten köptes. Medan garantitiden fortfarande
gäller ska anspråk på garanti ställas inom två veckor efter att defekten fastställdes. Det är inte möjligt att
ställa anspråk på garanti efter att garantitiden har löpt ut. Garantitiden förlängs inte när produkten repareras
eller byts ut, dessutom medför sådana arbeten inte att en ny garantitid börjar gälla för produkten eller för ev.
reservdelar som har monterats in. Detta gäller även vid hembesök.
4. För att du ska kunna ställa anspråk på garantin ska den defekta produkten skickas in i tillräckligt frankerat
skick till adressen som anges nedan. Bifoga kvittot i original eller ett annat daterat köpebevis. Förvara därför
kassakvittot på en säker plats! Beskriv orsaken till reklamationen så noggrant som möjligt. Om defekten i
produkten täcks av våra garantitjänster, får du genast en reparerad eller ny apparat av oss.
Givetvis kan vi även, mot debitering, åtgärda skador som antingen inte täcks av garantin eller som har uppstått
efter garantitidens slut. Skicka in produkten till nedanstående serviceadress.
Anleitung_BG_ES_1231_SPK1:_ 10.12.2008 12:58 Uhr Seite 68

69
Bf
JAMSTVENI LIST
Poštovani kupče,
naši proizvodi podliježu strogoj kontroli kvalitete. Žao nam je ako bi ipak došlo do toga da uređaj ne funkcionira
besprijekorno i zamolili bismo Vas da se u tom slučaju obratite na adresu naše servisne službe navedenu ispod
ovog jamstva. Također smo Vam na raspolaganju na dolje navedenom telefonskom broju servisne službe. Za
traženje jamstvenog zahtjeva vrijedi sljedeće:
1. Ovi jamstveni uvjeti reguliraju dodatne jamstvene usluge. Ovo jamstvo ne zadire u Vaše zakonsko pravo
zahtjeva za ostvarenje jamstvenih usluga. Realizacija jamstvenih usluga je besplatna.
2. Jamstvena usluga obuhvaća isključivo nedostatke nastale zbog greške na materijalu ili tijekom proizvodnje i
ograničen je na uklanjanje tih nedostataka odnosno zamjenu uređaja. Molimo da obratite pažnju na to da
naši uređaji nisu konstruirani za korištenje u komercijalne svrhe niti u obrtu i industriji. Prema tome, ugovor o
jamstvu ne može se ostvariti ako se uređaj koristi u obrtničkim ili industrijskim pogonima kao i u sličnim
djelatnostima. Nadalje su iz jamstva isključene usluge zamjene proizvoda u slučaju transportnih oštećenja,
šteta zbog nepridržavanja uputa za montažu ili zbog nestručne instalacije, nepridržavanja uputa za uporabu
(kao npr. zbog priključka na pogrešni mrežni napon ili vrstu struje), zbog zloporaba ili nestručnih primjena
(kao npr. preopterećenje uređaja ili korištenje nedopuštenih alata ili pribora), u slučaju nepridržavanja uputa
za održavanje i sigurnosnih odredbi, zbog prodiranja stranih tijela u uređaj (npr. pijeska, kamenja ili
prašine), nasilne primjene ili vanjskih utjecaja (kao npr. oštećenja zbog pada) kao i zbog uobičajenog
trošenja tijekom korištenja. To naročito vrijedi za baterije za koje ipak dajemo jamstvo od 12 mjeseci.
Zahtjev za jamstvo prestaje biti valjan ako su na uređaju već izvršeni neki zahvati.
3. Jamstveni rok iznosi 2 godine a započinje s datumom kupnje uređaja. Jamstveni zahtjevi ostvaruju se prije
isteka jamstvenog roka unutar dvije godine nakon što ste uočili kvar. Ostvarenje jamstvenog zahtjeva nakon
isteka jamstvenog roka je isključeno. Popravkom ili zamjenom uređaja ne produljuje se jamstveni rok niti se
tom uslugom ostvarujenovi jamstveni rok za uređaj ili ostale ugrađene rezervne dijelove. To također vrijedi i
kod korištenja servisa na licu mjesta.
4. Da biste ostvarili svoj jamstveni zahtjev, molimo Vas da nam pošaljete neispravan uređaj bez plaćanja
poštarine na dolje navedenu adresu. Priložite originalni računa za kupnju uređaja ili neki drugi dokaz o
kupnji s datumom. Molimo Vas da zbog tog razloga dobro sačuvate račun kao dokaz! Što točnije opišite
razlog reklamacije. Ako naša jamstvena usluga obuhvaća kvar nastao na Vašem uređaju, odmah ćemo
Vam vratiti popravljeni ili novi uređaj.
Razumljivo je da ćemo za naknadu troškova ukloniti i kvarove koje jamstvena usluga ne obuhvaća. U tom
slučaju pošaljite uređaj na adresu našeg servisa.
Anleitung_BG_ES_1231_SPK1:_ 10.12.2008 12:58 Uhr Seite 69

70
4
GARANCIJSKI LIST
Poštovani kupče,
naši proizvodi podvrgavaju se strogoj kontroli kvalitete. Žao nam je ako bi se ipak desilo da uređaj ne
funkcioniše besprekorno i zamolili bismo Vas da se u tom slučaju obratite na adresu naše servisne službe
navedenu ispod ove garancije. Takođe smo Vam na raspolaganju na dole navedenom telefonskom broju
servisne službe. Kod zahteva za realizovanje garancije vredi sledeće:
1. Ovi garantni uslovi regulišu dodatne garancije. Ova garancija ne dotiče Vaše zakonsko pravo zahteva za
ostvarenje garancije. Realizacija garancije je besplatna.
2. Garancija obuhvata isključivo nedostatke koji nastanu zbog pogreške na materijalu ili tokom proizvodnje i
ograničen je na odstranjivanje tih nedostataka odnosno zamenu uređaja. Molimo da obratite pažnju na to
da naši uređaji nisu konstruisani za korišćenje u komercijalne svrhe, niti u obrtu i industriji. Prema tome
ugovor o garanciji ne može da se ostvari, ako se uređaj koristi u obrtničkim ili fabričkim pogonima, kao i u
sličnim delatnostima. Nadalje su iz garancije isključene usluge zamene proizvoda u slučaju transportnih
oštećenja, šteta zbog nepridržavanja uputstava za montažu ili zbog nestručne instalacije, nepridržavanja
uputstava za upotrebu (kao npr. zbog priključka na pogrešan mrežni napon ili vrstu struje), zbog
zloupotreba ili nestručnih primena (kao npr. preopterećenje uređaja ili korišćenje nedozvoljenih alata ili
pribora), u slučaju nepridržavanja uputstava za održavanje i bezbednosnih odredaba, zbog prodiranja
stranih tela u uređaj (npr. peska, kamenja ili prašine), nasilne primene ili spoljnih uticaja (kao npr. oštećenja
zbog pada) kao i zbog uobičajenog habanja tokom korišćenja. To naročito vredi za baterije za koje ipak
dajemo garanciju od 12 meseci.
Zahtev za garanciju prestaje važiti ako su na uređaju već izvršeni neki zahvati.
3. Garantni rok iznosi 2 godine a počinje sa datumom kupnje uređaja. Garantni zahtjevi ostvaruju se pre isteka
garantnog roka unutar dve godine nakon što ste uočili kvar. Realizacija garantnog zahteva nakon isteka
garantnog roka je isključeno. Popravkom ili zamenom uređaja ne produžava se garantni rok niti se tom
uslugom realizuje novi jamstveni rok za uređaj ili ostale ugrađene rezervne delove. To također važi i kod
korišćenja servisa na licu mesta.
4. Da biste ostvarili svoj garantni zahtev, molimo Vas da nam pošaljete neispravan uređaj bez plaćanja
poštarine na dole navedenu adresu. Priložite original računa za kupnju uređaja ili neki drugi dokaz o kupnji s
datumom. Molimo Vas da iz tog razloga dobro sačuvate račun kao dokaz! Što tačnije opišite razlog
reklamacije. Ako naša garancija obuhvata kvar koji je nastao na Vašem uređaju, odmah ćemo Vam vratiti
popravljen ili novi uređaj.
Podrazumeva se da ćemo za nadoknadu troškova ukloniti i one kvarove koje garancija ne obuhvata. U tom
slučaju pošaljite uređaj na adresu našeg servisa.
Anleitung_BG_ES_1231_SPK1:_ 10.12.2008 12:58 Uhr Seite 70

71
k
GARANTIEURKUNDE
Sehr geehrte Kundin, sehr geehrter Kunde,
unsere Produkte unterliegen einer strengen Qualitätskontrolle. Sollte dieses Gerät dennoch einmal nicht einwandfrei funktionieren, bedauern wir dies sehr und bitten Sie, sich an unseren Servicedienst unter der auf dieser Garantiekarte angegebenen Adresse zu wenden. Gern stehen wir Ihnen auch telefonisch über die unten
angegebene Servicerufnummer zur Verfügung. Für die Geltendmachung von Garantieansprüchen gilt Folgendes:
1. Diese Garantiebedingungen regeln zusätzliche Garantieleistungen. Ihre gesetzlichen Gewährleistungsansprüche werden von dieser Garantie nicht berührt. Unsere Garantieleistung ist für Sie kostenlos.
2. Die Garantieleistung erstreckt sich ausschließlich auf Mängel, die auf Material- oder Herstellungsfehler zurückzuführen sind und ist auf die Behebung dieser Mängel bzw. den Austausch des Gerätes beschränkt.
Bitte beachten Sie, dass unsere Geräte bestimmungsgemäß nicht für den gewerblichen, handwerklichen
oder industriellen Einsatz konstruiert wurden. Ein Garantievertrag kommt daher nicht zustande, wenn das
Gerät in Gewerbe-, Handwerks- oder Industriebetrieben sowie bei gleichzusetzenden Tätigkeiten eingesetzt wird.
Von unserer Garantie sind ferner Ersatzleistungen für Transportschäden, Schäden durch Nichtbeachtung
der Montageanleitung oder aufgrund nicht fachgerechter Installation, Nichtbeachtung der Gebrauchsanleitung (wie durch z.B. Anschluss an eine falsche Netzspannung oder Stromart), missbräuchliche oder unsachgemäße Anwendungen (wie z.B. Überlastung des Gerätes oder Verwendung von nicht zugelassenen
Einsatzwerkzeugen oder Zubehör), Nichtbeachtung der Wartungs- und Sicherheitsbestimmungen, Eindringen von Fremdkörpern in das Gerät (wie z.B. Sand, Steine oder Staub), Gewaltanwendung oder
Fremdeinwirkungen (wie z. B. Schäden durch Herunterfallen) sowie durch verwendungsgemäßen, üblichen
Verschleiß ausgeschlossen. Dies gilt insbesondere für Akkus, auf die wir dennoch eine Garantiezeit von
12 Monaten gewähren
Der Garantieanspruch erlischt, wenn an dem Gerät bereits Eingriffe vorgenommen wurden.
3. Die Garantiezeit beträgt 2 Jahre und beginnt mit dem Kaufdatum des Gerätes. Garantieansprüche sind vor
Ablauf der Garantiezeit innerhalb von zwei Wochen, nachdem Sie den Defekt erkannt haben, geltend zu
machen. Die Geltendmachung von Garantieansprüchen nach Ablauf der Garantiezeit ist ausgeschlossen.
Die Reparatur oder der Austausch des Gerätes führt weder zu einer Verlängerung der Garantiezeit noch
wird eine neue Garantiezeit durch diese Leistung für das Gerät oder für etwaige eingebaute Ersatzteile in
Gang gesetzt. Dies gilt auch bei Einsatz eines Vor-Ort-Services.
4. Für die Geltendmachung Ihres Garantieanspruches übersenden Sie bitte das defekte Gerät portofrei an die
unten angegebene Adresse. Fügen Sie den Verkaufsbeleg im Original oder einen sonstigen datierten Kaufnachweis bei. Bitte bewahren Sie deshalb den Kassenbon als Nachweis gut auf! Beschreiben Sie uns bitte
den Reklamationsgrund möglichst genau. Ist der Defekt des Gerätes von unserer Garantieleistung erfasst,
erhalten Sie umgehend ein repariertes oder neues Gerät zurück.
Selbstverständlich beheben wir gegen Erstattung der Kosten auch gerne Defekte am Gerät, die vom Garantieumfang nicht oder nicht mehr erfasst sind. Dazu senden Sie das Gerät bitte an unsere Serviceadresse.
iSC GmbH • Eschenstraße 6 • 94405 Landau/Isar (Deutschland)
Telefon: +49 [0] 180 5 120 509 • Telefax +49 [0] 180 5 835 830 (Anrufkosten: 0,14 Euro/Minute, Festnetz der T-Com)
E-Mail: info@isc-gmbh.info
• Internet: www.isc-gmbh.info
Anleitung_BG_ES_1231_SPK1:_ 10.12.2008 12:58 Uhr Seite 71

EH 12/2008 (01)
Anleitung_BG_ES_1231_SPK1:_ 10.12.2008 12:58 Uhr Seite 72
Service Hotline kontaktieren oder bei iSC-Webadresse anmelden - es wird Ihnen eine Retourennummer zugeteilt l Ihre Anschrift eintragen l Fehlerbeschreibung
und Art.-Nr. und I.-Nr. angeben l Garantiefall JA/NEIN ankreuzen sowie Kaufbeleg-Nr. und Datum angeben und eine Kopie des Kaufbeleges beilegen
Sehr geehrte Kundin, sehr geehrter Kunde,
bitte beschreiben Sie uns die von Ihnen festgestellte Fehlfunktion Ihres Gerätes als Grund Ihrer Beanstandung möglichst genau. Dadurch können wir
für Sie Ihre Reklamation schneller bearbeiten und Ihnen schneller helfen. Eine zu ungenaue Beschreibung mit Begriffen wie „Gerät funktioniert nicht“
oder „Gerät defekt“ verzögert hingegen die Bearbeitung erheblich.
Welcher Fehler ist aufgetreten (genaue Angabe): Art.-Nr.: I.-Nr.:
PLZ Ort
Straße / Nr.:
Garantie:
JA
NEIN
Kaufbeleg-Nr. / Datum:
Name:
Service Hotline: 01805 120 509 · www.isc-gmbh.info
(0,14 € / min. Festnetz T-Com) - Mo-Fr. 8:00-20:00 Uhr
Mobil:
Telefon:
Retouren-Nr. iSC:
 Loading...