


 Loading...
Version 1.00 | 08/15/2014
User Manual
4G LTE Router
DWR-922

Preface
D-Link reserves the right to revise this publication and to make changes in the content hereof without obligation to notify any person or organization of such revisions or changes.
Manual Revisions
Revision |
Date |
Description |
1.00 |
August 15, 2014 |
• Initial release |
|
|
|
Trademarks
D-Link and the D-Link logo are trademarks or registered trademarks of D-Link Corporation or its subsidiaries in the United States or other countries. All other company or product names mentioned herein are trademarks or registered trademarks of their respective companies.
Copyright © 2014 by D-Link Corporation.
All rights reserved. This publication may not be reproduced, in whole or in part, without prior expressed written permission from D-Link Corporation.
D-Link DWR-922 User Manual |
i |

Table of Contents
Table of Contents
Product Overview.............................................................. |
1 |
Package Contents......................................................................... |
1 |
System Requirements.................................................................. |
1 |
Introduction.................................................................................... |
2 |
Hardware Overview...................................................................... |
3 |
Front View................................................................................ |
3 |
Back View.................................................................................. |
4 |
Installation.......................................................................... |
5 |
Before You Begin........................................................................... |
5 |
Wireless Installation Considerations...................................... |
6 |
Configuration..................................................................... |
7 |
Getting Started.............................................................................. |
7 |
Internet............................................................................................. |
8 |
WAN Service............................................................................ |
8 |
LTE/3G................................................................................... |
8 |
Ethernet WAN.................................................................. |
10 |
PIN Configuration................................................................ |
15 |
Wi-Fi................................................................................................. |
16 |
Wireless Setup...................................................................... |
16 |
Wireless Security............................................................. |
17 |
Add Wireless Device with WPS.................................. |
18 |
WLAN MAC Filter................................................................. |
19 |
WLAN Performance............................................................ |
20 |
LAN................................................................................................... |
21 |
LAN Setup.............................................................................. |
21 |
DHCP........................................................................................ |
22 |
Advanced....................................................................................... |
23 |
DNS........................................................................................... |
23 |
Dynamic DNS........................................................................ |
24 |
Applications.......................................................................... |
25 |
DMZ (Exposed Host)........................................................... |
26 |
Virtual Server........................................................................ |
27 |
QoS........................................................................................... |
28 |
Parental Control................................................................... |
29 |
Security................................................................................... |
30 |
Firewall............................................................................... |
30 |
DDoS & SPI........................................................................ |
31 |
Mac Filter........................................................................... |
31 |
IGMP......................................................................................... |
32 |
SMS........................................................................................... |
33 |
Voice......................................................................................... |
34 |
Lines and Accounts........................................................ |
34 |
Phones and Devices...................................................... |
37 |
Incoming Call Rules....................................................... |
39 |
Country Code................................................................... |
40 |
Routing................................................................................... |
41 |
Samba...................................................................................... |
42 |
UPnP......................................................................................... |
43 |
TR069....................................................................................... |
44 |
System............................................................................................. |
46 |
Time Settings........................................................................ |
46 |
D-Link DWR-922 User Manual |
ii |

Table of Contents
Administration..................................................................... |
47 |
System Settings................................................................... |
48 |
Firmware Update................................................................. |
49 |
System Log............................................................................ |
50 |
Device Info............................................................................. |
51 |
Log Info................................................................................... |
52 |
Statistics.................................................................................. |
53 |
ARP Table Info....................................................................... |
54 |
Routing Table Info............................................................... |
55 |
Connect a Wireless Client to your Router....................... |
56 |
WPS Button................................................................................... |
56 |
Windows® 8................................................................................... |
57 |
WPA/WPA2............................................................................. |
57 |
Windows® 7................................................................................... |
59 |
WPA/WPA2............................................................................. |
59 |
WPS.......................................................................................... |
62 |
Windows Vista®............................................................................ |
66 |
WPA/WPA2............................................................................. |
67 |
Windows® XP................................................................................ |
69 |
WPA/WPA2............................................................................. |
70 |
Troubleshooting............................................................... |
72 |
Wireless Basics.................................................................. |
76 |
What is Wireless?......................................................................... |
77 |
Tips................................................................................................... |
79 |
Wireless Modes............................................................................ |
80 |
Networking Basics............................................................ |
81 |
Check your IP address................................................................ |
81 |
Statically Assign an IP address................................................ |
82 |
Wireless Security............................................................. |
83 |
What is WPA?.................................................................... |
83 |
Technical Specifications................................................... |
84 |
D-Link DWR-922 User Manual |
iii |

Section 1 - Product Overview
ProductPackageOverviewContents
DWR-922 4G LTE Router
Power Adapter
3G/4G Antennas
RJ-45 and RJ-11 Cables
If any of the above items are missing, please contact your reseller.
System Requirements
•A compatible (U)SIM card with service.*
•Computer with Windows, Mac OS, or Linux-based operating system with an installed Ethernet adapter
•Java-enabled browser such as Internet Explorer 6, Safari 4.0, Chrome 20.0, or Firefox 7 or above (for configuration)
*Subject to services and service terms available from your carrier.
D-Link DWR-922 User Manual |
1 |

Section 1 - Product Overview
Introduction
The D-Link 4G LTE Router allows users to access worldwide mobile broadband networks. Once connected, users can transfer data, stream media, and send SMS messages. Simply insert your 3G / 4G SIM card, and share your 3G / 4G Internet connection through a secure 802.11n wireless network or using any of the four 10/100/1000 Ethernet ports.
Keep your wireless network safe with WPA/WPA2 wireless encryption. The DWR-922 utilizes dual-active firewalls (SPI and NAT) to prevent potential attacks across the Internet, and includes MAC address filtering to control access to your network.
The 4G LTE Router can be installed quickly and easily almost anywhere. This router is great for situations where an impromptu wireless network must be set up, or wherever conventional network access is unavailable.
D-Link DWR-922 User Manual |
2 |
Section 1 - Product Overview
Hardware Overview
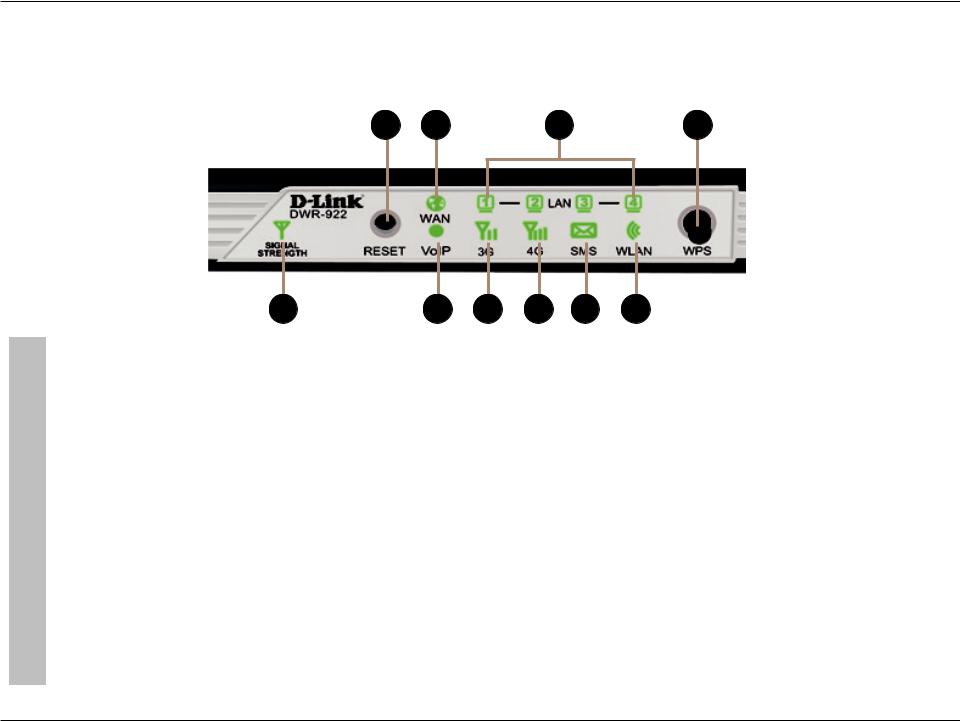
Front View
1 |
2 |
3 |
4 |
|
|
5 |
6 |
7 |
8 |
9 |
10 |
|
|
|
|
|
|
|
|
1 |
Reset Button |
Press this button with an unfolded paperclip and hold for ten seconds to reset the device. |
|||||
|
|
|
|
|
|
|
|
2 |
WAN LED |
Will be lit if an Internet connection is established, and will blink when data is being transferred. |
|||||
|
|
|
|
|
|
|
|
3 |
LAN LEDs 1-4 |
Will be lit if an Ethernet connection is established, and will blink when data is being transferred. |
|||||
|
|
|
|
|
|
|
|
4 |
WPS Button |
Press this button to initiate a newWPS connection. See AddWireless Device withWPS on page 18 for details. |
|||||
|
|
|
|
|
|
|
|
5 |
Signal Strength LED |
Will blink red if there is no SIM card / signal. Solid red/amber/green indicates the signal strength. |
|||||
|
|
|
|
|
|
|
|
6 |
VoIP LED |
Will be lit if a VoIP connection is active. |
|
|
|
||
|
|
|
|
|
|
|
|
7 |
3G LED |
Will be lit if a 3G connection is established, and will blink when data is being transferred. |
|||||
|
|
|
|
|
|
|
|
8 |
4G LED |
Will be lit if a 4G LTE connection is established, and will blink when data is being transferred. |
|||||
|
|
|
|
|
|
|
|
9 |
SMS LED |
Will be solid green if the SMS inbox is full, or blinking if there is an unread new SMS message. |
|||||
|
|
|
|
|
|
|
|
10 |
WLAN LED |
Will be lit if the wireless function is enabled, and will blink when wireless data is being transferred. |
|||||
|
|
|
|
|
|
|
|
D-Link DWR-922 User Manual |
3 |

Section 1 - Product Overview
Back View
1 |
2 |
3 |
4 |
5 |
6 |
1Ethernet LAN Ports For connection to a network-enabled desktop or notebook computer.
2Ethernet WAN Port For connection to a DSL/cable modem or router
3 |
SIM Card Slot |
Accepts a standard (U)SIM card for 3G/4G LTE connectivity. |
|
|
|
4 |
Power Connector |
Connects to the included power adapter. |
|
|
|
5 |
Power Button |
Turns the device on or off. |
|
|
|
6 |
Phone Port |
For connection to a phone handset. |
D-Link DWR-922 User Manual |
4 |

Section 2 - Installation
Installation
This section will guide you through the installation process. Placement of the router is very important. Do not place the router in an enclosed area such as a closet, cabinet, or in an attic or garage.
Before You Begin
1.Ensure that your DWR-922 4G LTE Router is disconnected and powered off.
2.Insert a standard (U)SIM card into the SIM card slot on the back of the router as indicated by the SIM card logo next to the slot. The gold contacts should face downwards.
Caution: Always unplug/power down the router before installing or removing the SIM card. Never insert or remove the SIM card while the router is in use.
3. Insert your Internet/WAN network cable into the WAN port on the back of the router.
Note: The 3G/4G connection can also be used as a backup WAN. Once a backup is configured, the router will automatically use 3G / 4G for the Internet connection if the Ethernet WAN is not available.
4.Insert the Ethernet cable into the LAN Port 1 on the back panel of the DWR-922 4G LTE Router and an available Ethernet port on the network adapter in the computer you will use to configure the router.
Note: The DWR-922 4G LTE Router LAN Ports are Auto-MDI/MDIX, so both patch and crossover Ethernet cables can be used.
5.If you have a telephone handset and wish to use the DWR-922 to make VoIP calls, connect one end of the RJ-11 cable to your handset and the other end to the phone port on the back panel of the DWR-922.
Note: Do not directly connect the DWR-922 to a telecommunication network or a building’s telephone socket.
6.Connect the power adapter to the socket on the back panel of your DWR-922 4G LTE Router. Plug the other end of the power adapter into a wall outlet or power strip and turn the device on.
a.The Status LED will light up to indicate that power has been supplied to the router.
b.The LEDs on the front panel will flash on and off as the DWR-922 4G LTE Router performs initialization and Internet connection processes.
c.After a few moments, if a connection has been established, the following LEDs will turn solid green: Power, Status, WAN, WLAN, and any LAN Port LEDs that are connected computers or other devices.
D-Link DWR-922 User Manual |
5 |

Section 2 - Installation
Wireless Installation Considerations
The DWR-922 can be accessed using a wireless connection from anywhere within the operating range of your wireless network. Keep in mind that the quantity, thickness, and location of walls, ceilings, or other objects that the wireless signals must pass through may limit the range of the wireless signal. Ranges vary depending on the types of materials and background RF (radio frequency) noise in your home or office. The key to maximizing the wireless range is to follow these basic guidelines:
1.Minimize the number of walls and ceilings between the D-Link router and other network devices. Each wall or ceiling can reduce your adapter’s range from 3 to 90 feet (1 to 30 meters).
2.Be aware of the direct line between network devices. A wall that is 1.5 feet thick (0.5 meters), at a 45-degree angle appears to be almost 3 feet (1 meter) thick. At a 2-degree angle it looks over 42 feet (14 meters) thick. Position devices so that the signal will travel straight through a wall or ceiling (instead of at an angle) for better reception.
3.Try to position access points, wireless routers, and computers so that the signal passes through open doorways and drywall. Materials such as glass, metal, brick, insulation, concrete, and water can affect wireless performance. Large objects such as fish tanks, mirrors, file cabinets, metal doors, and aluminum studs may also have a negative effect on range.
4.If you are using 2.4 GHz cordless phones, make sure that the 2.4 GHz phone base is as far away from your wireless device as possible. The base transmits a signal even if the phone is not in use. In some cases, cordless phones, X-10 wireless devices, and electronic equipment such as ceiling fans, fluorescent lights, and home security systems may dramatically degrade wireless connectivity.
D-Link DWR-922 User Manual |
6 |
Section 3 - Configuration
Configuration
Getting Started
To access the configuration utility, open a web-browser such as Internet Explorer and enter the address of the router (http://dlinkrouter.local./ or 192.168.1.1 by default).
To log in to the configuration utility, enter admin as the username, and then enter the password. By default, the password is admin.
If you get a Page Cannot be Displayed error, please refer to the Troubleshooting section for assistance.
Once you have successfully logged in, you will see the Home page. On this page you can view information about your Internet connection, the wireless/LAN status, and system information.
At the top of the page is a menu. Clicking on one of these icons will take you to the appropriate configuration section.
On each page, fill out the desired settings and click Apply when you are done or Reset to revert to the old settings.
D-Link DWR-922 User Manual |
7 |
Section 3 - Configuration
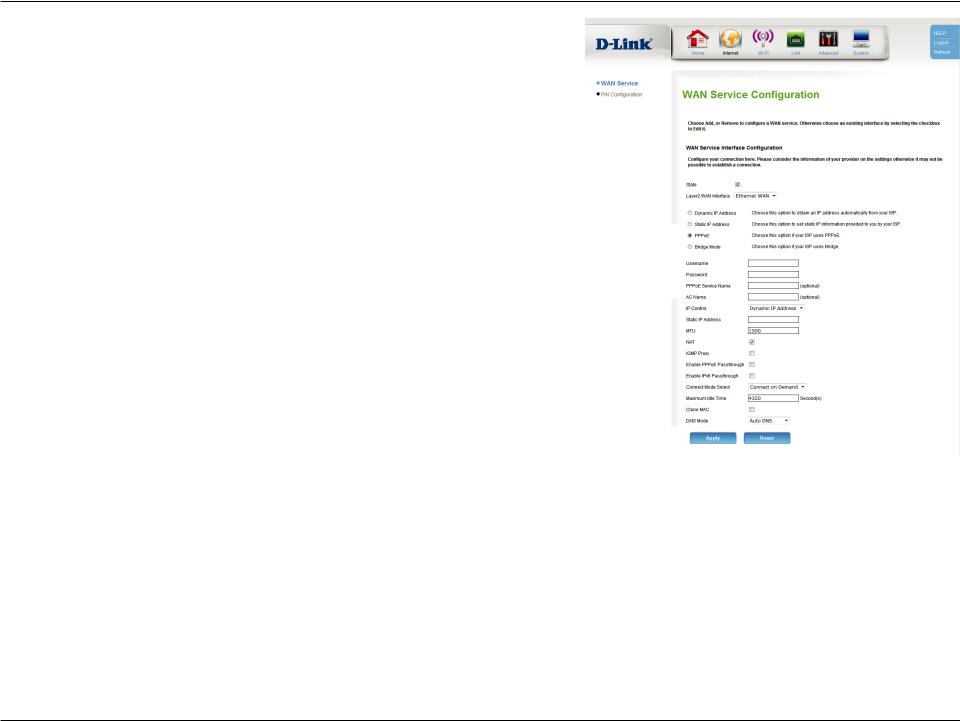
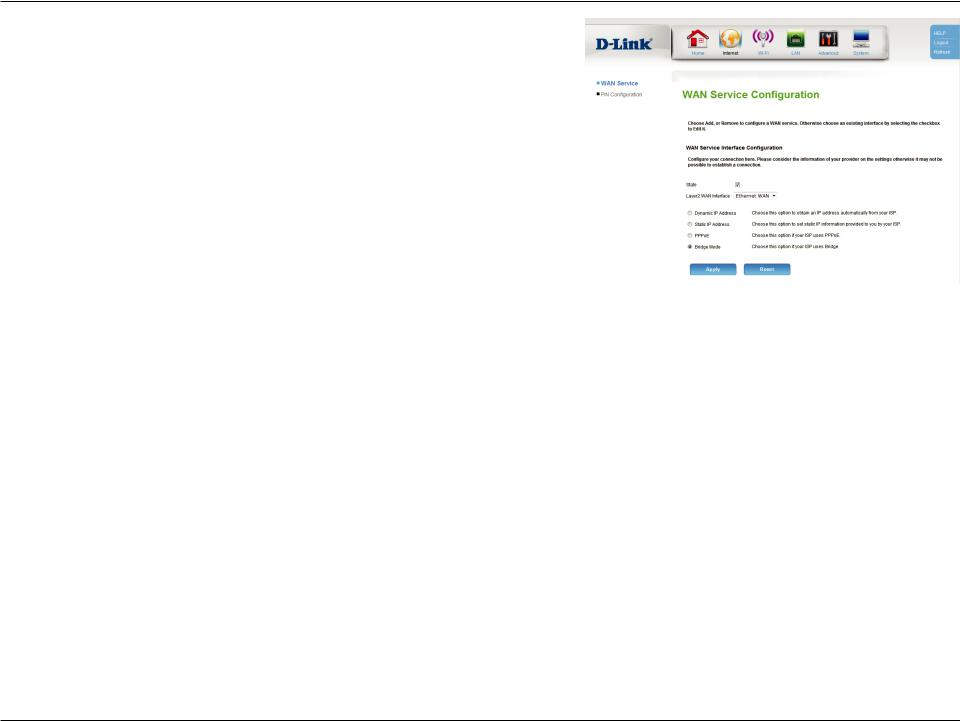
Internet
WAN Service
On this page you can configure your Internet connection. If you are not sure which settings to use, please contact your Internet Service Provider (ISP).
Layer2 WAN Select your Internet connection type: LTE/3G or Ethernet WAN.
Connection:
LTE/3G
Dial-Up Profile: If Auto-Detection does not work, then try selecting Manual and filling out the information (supplied by your LTE/3G ISP).
Authentication: Select PAP, CHAP, or AUTO detection. The default authentication method is AUTO.
Roaming: Check the box to enable international LTE / 3G roaming.
Reconnect Select either Always On, Connect on Demand, or Manual.
Mode:
Maximum Idle Enter a maximum idle time during which the Internet connection Time: is maintained during inactivity (if you selected Always On above,
this setting will have no effect).
Keep Alive: Select Disable or Use Ping depending on the settings required by your ISP. If you select Use Ping, set the ping interval and the IP address to ping.
D-Link DWR-922 User Manual |
8 |
Section 3 - Configuration
MTU: Maximum Transmission Unit - you may need to change the MTU for optimal performance with your ISP. The default value is 1500.
NAT: Check the box to enable Network Address Translation (NAT).
D-Link DWR-922 User Manual |
9 |
Section 3 - Configuration
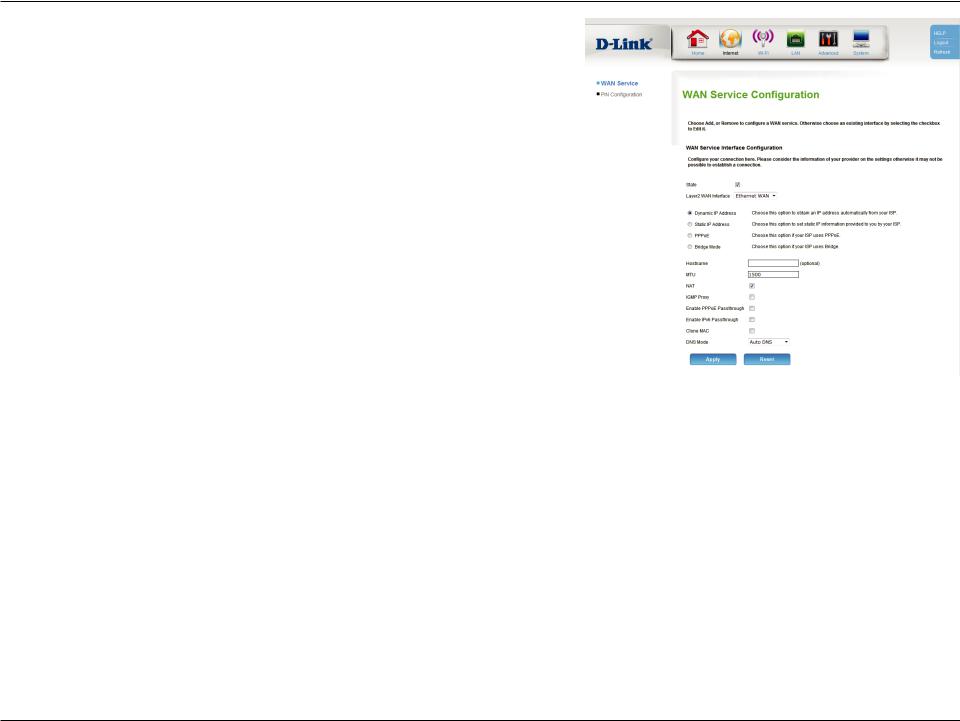
Ethernet WAN
Select your Internet connection type from the list of options. This information cab be obtained from your ISP. The page will update with the appropriate options for the selection connection type.
Dynamic IP Address
Hostname: The hostname is optional but may be required by some ISPs. Leave it blank if you are not sure.
MTU: Maximum Transmission Unit - you may need to change the MTU for optimal performance with your ISP. The default value is 1500.
NAT: Check the box to enable Network Address Translation (NAT).
IGMP Proxy: Check the box to enable IGMP proxy.
Enable PPPoE Check the box to enable PPPoE passthrough.
Passthrough:
Enable IPv6 Check the box to enable IPv6 passthrough.
Passthrough:
Clone MAC: Check the box to clone your client’s MAC address to the WAN port.
DNS Mode: If your ISP provided DNS server addresses to use, select Manual DNS and enter the primary and (if applicable) secondary addresses. Otherwise, select Auto DNS to automatically assign a
DNS server, or DNS Disabled to disable DNS.
D-Link DWR-922 User Manual |
10 |

Section 3 - Configuration
Static IP Address
IP Address: Enter the IP address provided by your ISP.
Subnet Mask: Enter the subnet mask provided by your ISP.
Gateway Enter the gateway address provided by your ISP.
Address:
MTU: Maximum Transmission Unit - you may need to change the MTU for optimal performance with your ISP. The default value is 1500.
NAT: Check the box to enable Network Address Translation (NAT).
IGMP Proxy: Check the box to enable IGMP proxy.
Enable PPPoE Check the box to enable PPPoE passthrough.
Passthrough:
Enable IPv6 Check the box to enable IPv6 passthrough.
Passthrough:
Clone MAC: Check the box to clone your client’s MAC address to the WAN port.
DNS Mode: If your ISP provided DNS server addresses to use, select Manual DNS and enter the primary and (if applicable) secondary addresses. Otherwise, select Auto DNS to automatically assign a DNS server, or DNS Disabled to disable DNS.
D-Link DWR-922 User Manual |
11 |
Section 3 - Configuration
PPPoE
Username: Enter the PPPoE username provided by your ISP.
Password: Enter the PPPoE password provided by your ISP.
PPPoE Service Enter the PPPoE service name provided by your ISP if applicable.
Name:
AC Name: Enter the PPPoE access concentrator (AC) name provided by your ISP if applicable.
IP Control: If your ISP provided a static IP address, select Static IP Address, otherwise leave this setting at the default, Dynamic IP Address.
Static IP If you selected Static IP Address above, enter the address Address: provided by your ISP here.
MTU: Maximum Transmission Unit - you may need to change the MTU for optimal performance with your ISP. The default value is 1500.
NAT: Check the box to enable Network Address Translation (NAT).
IGMP Proxy: Check the box to enable IGMP proxy.
Enable PPPoE Check the box to enable PPPoE passthrough.
Passthrough:
Enable IPv6 Check the box to enable IPv6 passthrough.
Passthrough:
Connect Mode Select either Always On, Connect on Demand, or Manual.
Select:
D-Link DWR-922 User Manual |
12 |

Section 3 - Configuration
Maximum Idle Enter a maximum idle time during which the Internet connection Time: is maintained during inactivity (if you selected Always On above,
this setting will have no effect).
Clone MAC: Check the box to clone your client’s MAC address to the WAN port.
DNS Mode: If your ISP provided DNS server addresses to use, select Manual DNS and enter the primary and (if applicable) secondary addresses. Otherwise, select Auto DNS to automatically assign a DNS server, or DNS Disabled to disable DNS.
D-Link DWR-922 User Manual |
13 |
Section 3 - Configuration
Bridge Mode
If you selected Bridge Mode, there are no further settings to configure.
D-Link DWR-922 User Manual |
14 |
Section 3 - Configuration
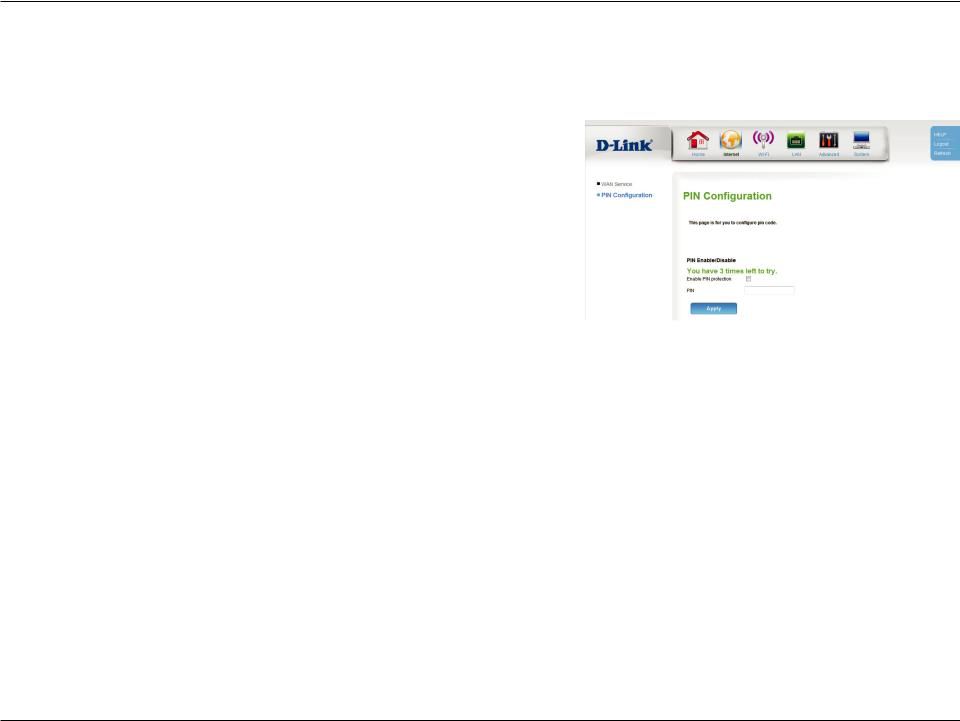
PIN Configuration
On this page you can configure your SIM card’s PIN.
To change your SIM’s PIN, enter the new PIN in the PIN text field. If you also wish to enable or disable PIN protection, check Enable PIN protection. This will mean that you have to input your PIN whenever a device using your SIM card is switched on.
Click Apply when you are done.
D-Link DWR-922 User Manual |
15 |
Section 3 - Configuration
Wi-Fi
Wireless Setup
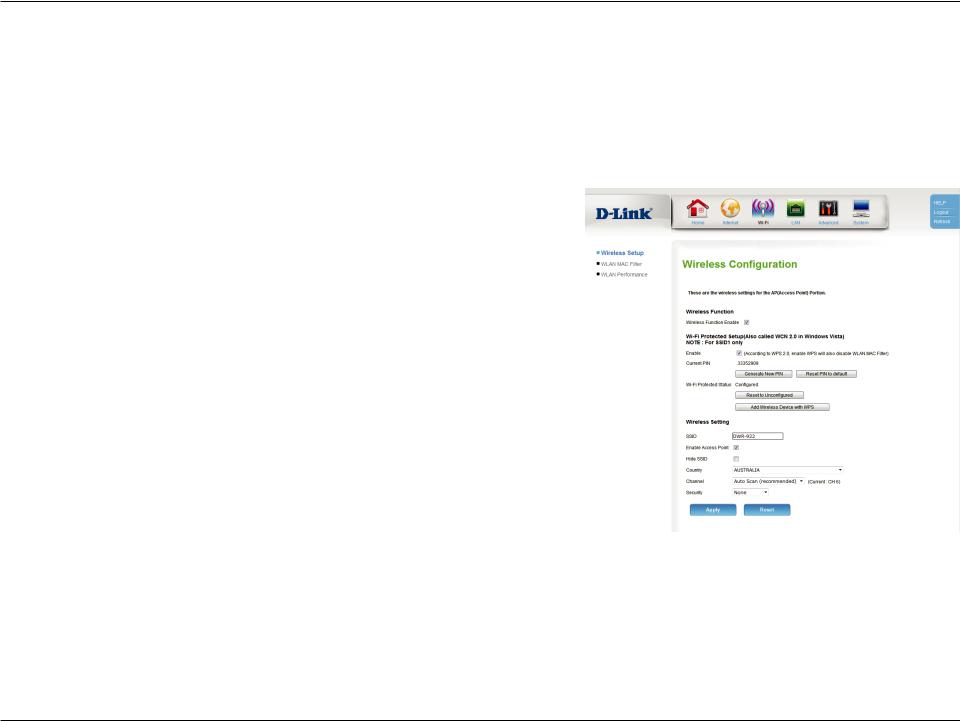
On this page you can configure your wireless settings.
Wireless Check the box to enable the router’s wireless functionality.
Function Enable:
Wi-Fi Protected Check Enable to enable Wi-Fi Protected Setup (WPS).
Setup:
Current PIN: Displays the current WPS PIN. Click Generate New PIN to generate a new WPS PIN, or Reset PIN to default to reset the WPS PIN to its default value.
Wi-Fi Protected Displays the configuration status of WPS. If you want to revert to Status: unconfigured status, select Reset to Unconfigured.
Add Wireless Click this button to connect a wireless device using WPS. See Device with below for details.
WPS:
SSID: Create a name for your wireless network using up to 32 characters.
Hide SSID: Check the box if you do not want to broadcast the SSID of your wireless network.
Country: Select your country from the drop-down menu.
D-Link DWR-922 User Manual |
16 |
Section 3 - Configuration
Channel: Select the wireless channel. The default is Auto Scan (recommended).
Security: Select the desired wireless encryption mode. WPA/WPA2 is recommended if your clients support it. See below for details.
Wireless Security
WEP
Authentication Select whether to use Open or Shared authentication.
Type:
WEP Key: For a 64-bit key, enter 10 hexadecimal (0-9, A-F) values or 5 ASCII values. For a 128-bit key, enter 26 hexadecimal values or 13 ASCII values.
WPA/WPA2
These settings apply to both WPA2 and WPA/WPA2 encryption types.
Cipher Type: Select AES or TKIP+AES. AES is the most secure, but TKIP+AES allows for compatibility with clients that don’t support AES.
Group Key Enter the group key interval, or leave it at the default value (3600).
Interval:
WPA Type: Select either 802.1x to use a RADIUS server for authentication, or PSK String to use a Pre-Shared Key (PSK).
PSK String: If you are using a Pre-Shared Key (PSK), choose a key (between 8 and 63 characters) here.
D-Link DWR-922 User Manual |
17 |
Section 3 - Configuration
Server IP If you are using a RADIUS server for authentication, enter the Address: server IP address here.
Port: Enter the port used by your RADIUS server.
Secret: Enter the shared secret/password for your RADIUS server.
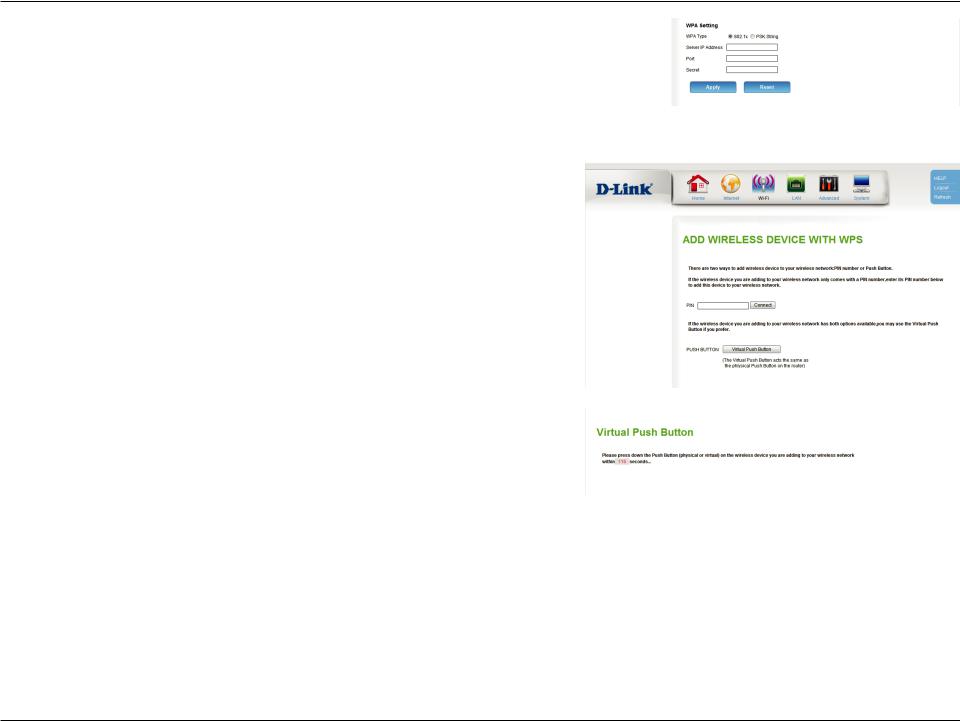
Add Wireless Device with WPS
PIN: If the device you are connecting has a PIN, enter it here and click
Connect.
PUSH BUTTON: If the device you are connecting has a Push Button, click Virtual Push Button. This has the same function as the physical WPS button in the front of the router.
If you clicked Virtual Push Button, you will be prompted to push the button on the device you are connecting within 120 seconds.
D-Link DWR-922 User Manual |
18 |
Section 3 - Configuration
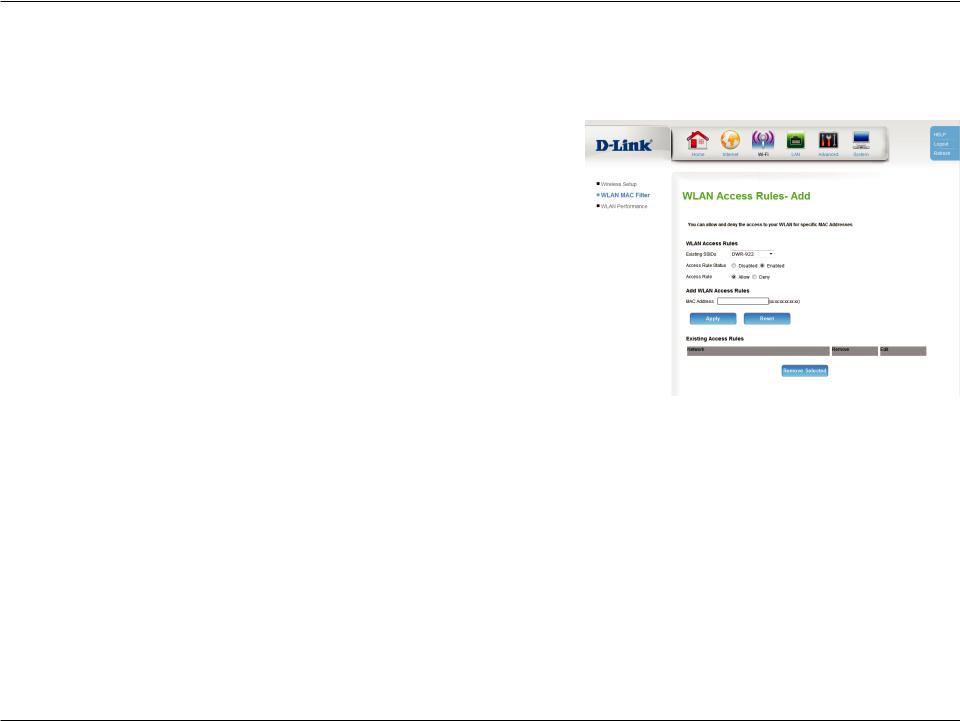
WLAN MAC Filter
On this page you can set access rules for the wireless function. You can choose to allow or deny specific MAC addresses.
Existing SSIDs: Select the SSID to apply the rule to.
Access Rule Select whether the rule is currently Enabled or Disabled.
Status:
Access Rule: Select whether to Allow or Deny the client.
MAC Address: Enter the MAC address of the client.
Existing Access Displays a list of the current rules. To remove a rule, select it and
Rules: click Remove Selected.
D-Link DWR-922 User Manual |
19 |

Section 3 - Configuration
WLAN Performance
On this page you can configure advanced wireless settings. In most cases, it is recommended that you leave these settings at their defaults, unless you intend to increase wireless performance in a specific way.
Beacon Interval: Specify a value for the beacon interval. Beacons are packets sent by an access point to synchronize a wireless network. 100 is the default and recommended setting.
DTIM: A Delivery Traffic Indication Message (DTIM) is a countdown informing clients of the next window for listening to broadcast and multicast messages. The default interval is 1.
Transmitting Set the transmitting power of the antennas.
Power:
Threshold for This value should remain at its default setting of 2346. If
RTS: inconsistent data flow is a problem, only a minor modification should be made.
Threshold for The fragmentation threshold determines whether packets will Fragmentation: be fragmented. Packets exceeding the specified value will be
fragmented before transmission. 2346 is the default setting.
WMM: WMM (Wi-Fi Multimedia) is a QoS (Quality of Service) system for your wireless network. Enable this option to improve the quality of video and voice applications for your wireless clients.
802.11 Mode: Select the desired wireless networking standards to use. The available options will depend on the wireless frequency band, as well as the currently selected security mode.
Channel Width: A higher channel width allows for faster data transmission, at the possible expense of wireless coverage and compatibility with older wireless clients. Select the optimum channel width for your wireless network from the drop-down menu.
D-Link DWR-922 User Manual |
20 |
Section 3 - Configuration
LAN
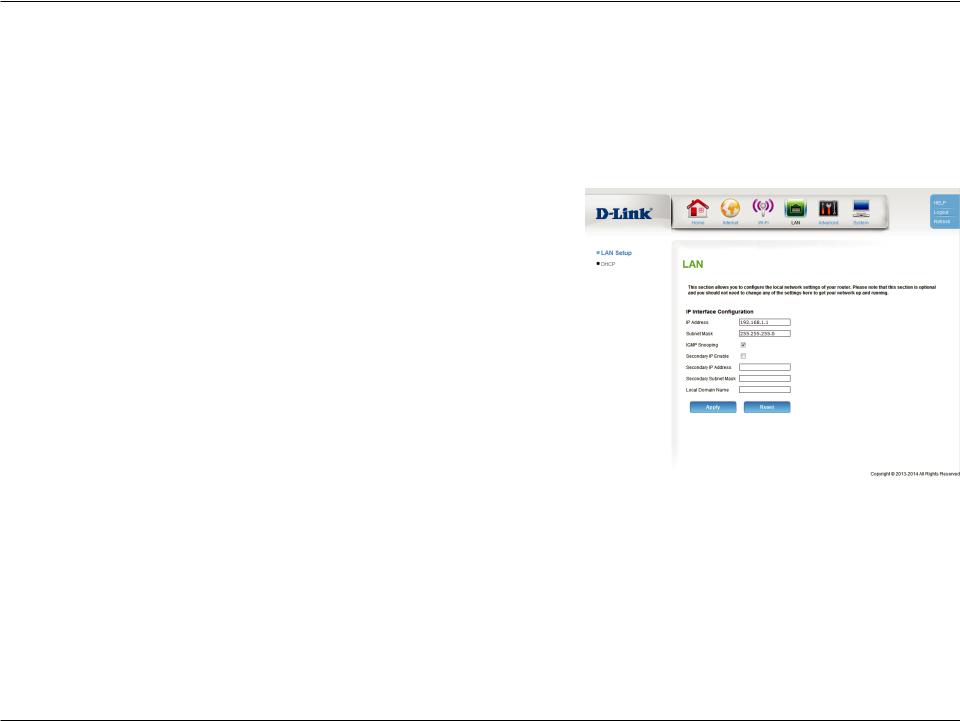
LAN Setup
On this page you can configure the local network settings of your router.
IP Address: Enter the IP address of the router. The default is 192.168.1.1. If you change the IP address, you will need to enter the new IP address in your browser to get into the configuration utility.
Subnet Mask: Enter the subnet mask of the router. The default subnet mask is
255.255.255.0.
IGMP Snooping: Check the box to enable IGMP snooping.
Secondary IP Check the box to assign a secondary IP address to the router.
Enable:
Secondary IP If a secondary IP address is enabled, enter the new IP address.
Address:
Secondary If a secondary IP address is enabled, enter the subnet mask.
Subnet Mask:
Local Domain Enter the local domain name for your network.
Name:
D-Link DWR-922 User Manual |
21 |
Section 3 - Configuration
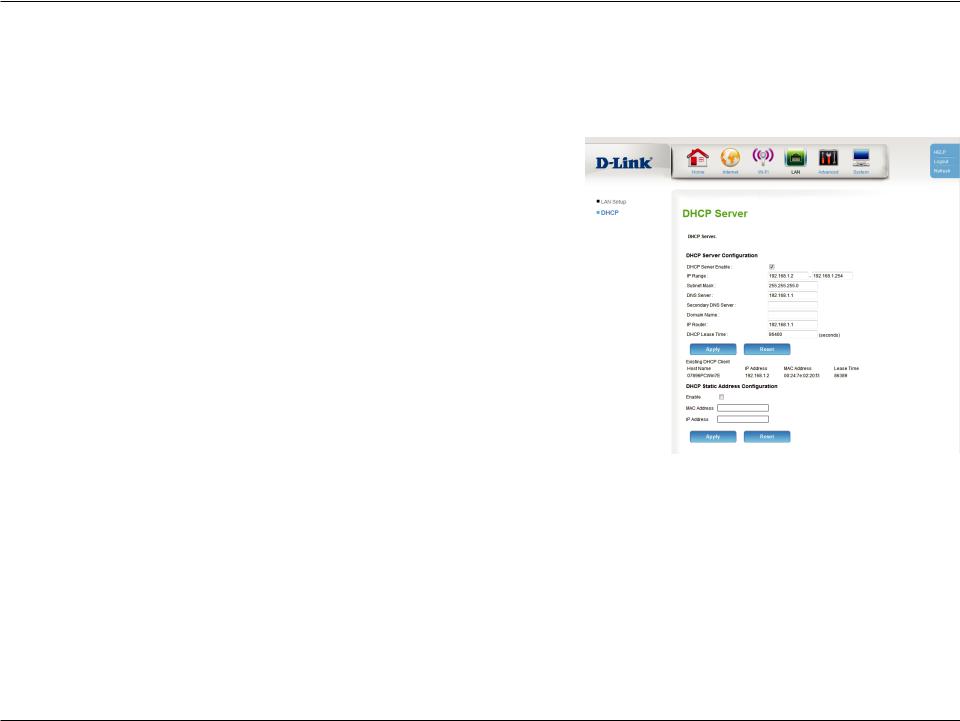
DHCP
On this page you can configure the Dynamic Host Configuration Protocol (DHCP) settings.
DHCP Server Check the box to enable the DHCP server on your router.
Enable:
IP Range: Enter the range of IPs for the DHCP server to use to assign IP addresses to devices on your network.
Subnet Mask: Enter the subnet mask for the DHCP server to use
DNS Server: Enter the IP address of the DHCP server (the default is the router’s IP address).
Secondary DNS Enter the IP address of a secondary DNS server, if applicable.
Server:
Domain Name: Enter the domain name.
IP Router: Enter the IP address of the IP router.
DHCP Lease Enter the lease time for DHCP assignments. The default is 86400.
Time:
DHCP Static Check Enable to assign a new static IP address. Enter the MAC Address address of the client to assign, and the IP address that you want to
Configuration: assign to it.
D-Link DWR-922 User Manual |
22 |
Section 3 - Configuration
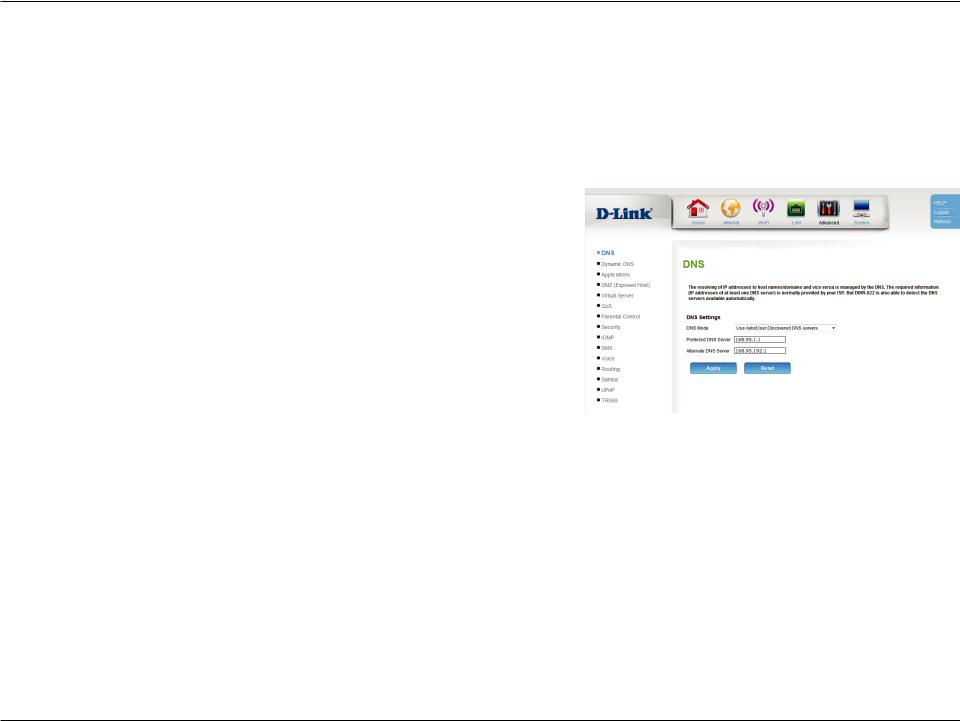
Advanced
DNS
On this page you can configure the Domain Name System (DNS) server, which manages the resolution of host/domain names to IP addresses.
DNS Mode: Select Use Auto/User Discovered DNS servers, Use only automatically detected DNS servers, or Use only manually specified DNS servers.
Preferred DNS Enter the primary DNS server address.
Server:
Alternate DNS Enter an alternate DNS server address.
Server:
D-Link DWR-922 User Manual |
23 |
Loading...