


 Loading...
Basic User’s Guide
MFC-J2720
MFC-J5620DW
MFC-J5720DW
Version 0
OCE/ASA/SAF/GLF

If you must contact Customer Service
Please complete this information for future reference:
Model Number: MFC-J2720, MFC-J5620DW and MFC-J5720DW
(Circle your model number) Serial Number: 1
Date of Purchase:
Place of Purchase:
1The serial number is on the back of the unit. Retain this User's Guide with your sales receipt as a permanent record of your purchase, in the event of theft, fire or warranty service.
Register your product on-line at
http://www.brother.com/registration
© 2014 Brother Industries, Ltd. All rights reserved.
You can use the following features!
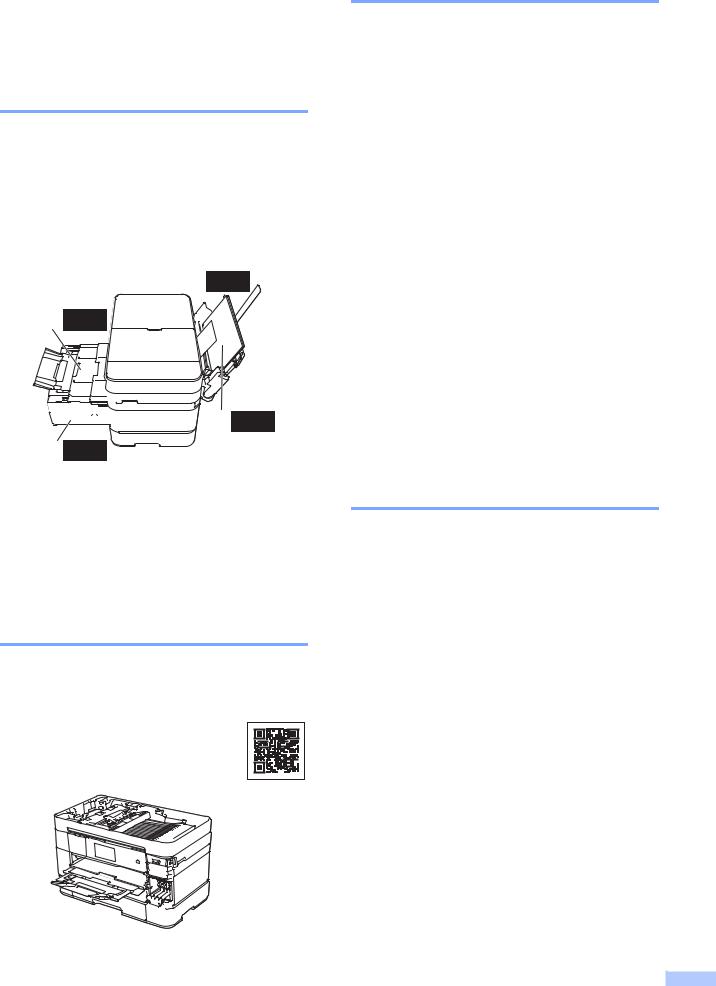
High capacity versatile paper handling
You can load a wide variety of paper types into the trays. Continuous A3 or Ledger printing is also possible. If you choose auto select in your printer driver, the tray containing the correct paper size will be selected automatically during printing. (See Loading paper on page 9.)
1 1
3 250 


 2 80 4 250

1Manual Feed Slot - - - - 1 sheet
2MP Tray - - - - - - - - - - - 80 sheets
3Tray 1
-- - - - - - - - 250 sheets / Up to A3 or Ledger
4Tray 2 (MFC-J2720/5720DW)
-- - - - - - - - 250 sheets / Up to A3 or Ledger
Mobile Connect
Use Brother iPrint&Scan to print and scan images and files from mobile devices.
(See Mobile Print/Scan Guide for Brother iPrint&Scan at solutions.brother.com/manuals.)
Web Connect / Brother Apps
Scan and upload images and files to popular web services directly from your machine. Capture and convert information directly from your machine without your computer.
(See Web Connect Guide at solutions.brother.com/manuals.)
Printing Scanning
Add Shortcuts
Save your most frequently-used settings as Shortcuts.
(See Online User’s Guide at solutions.brother.com/manuals.)
i |

User's Guides and where to find them
|
|
|
Which Guide? |
What's in it? |
Where is it? |
Product Safety Guide |
Read this Guide first. Please read the Safety |
Printed / In the box |
|
Instructions before you set up your machine. See |
|
|
this Guide for trademarks and legal limitations. |
|
|
|
|
Quick Setup Guide |
Follow the instructions for setting up your machine, |
Printed / In the box |
|
and installing the drivers and software for the |
|
|
operating system and connection type you are |
|
|
using. |
|
Basic User’s Guide |
Learn the basic Fax, Copy, Scan and PhotoCapture |
Printed / In the box |
|
Center operations and basic machine maintenance. |
|
|
See troubleshooting tips. |
|
Online User’s Guide |
This HTML (Web) guide includes the contents of the |
HTML / CD-ROM |
|
Basic User’s Guide, and additional information |
(Windows®) / |
|
about the machine’s settings and operations, |
Brother Solutions |
|
security features, troubleshooting tips, and |
Center 1 (Macintosh) |
|
maintenance instructions. |
|
|
In addition to information about the PC-Print, Scan, |
|
|
Copy, Fax (MFC models only), and PhotoCapture |
|
|
Center and Brother ControlCenter operations, useful |
|
|
information is included about using the machine on |
|
|
a network. |
|
|
|
|
Web Connect Guide |
This Guide provides useful information about |
PDF file / Brother |
|
accessing Internet services from the Brother |
Solutions Center 1 |
|
machine, as well as downloading images, printing |
|
|
data and uploading files directly to Internet services. |
|
AirPrint Guide |
This Guide provides information for using AirPrint to |
PDF file / Brother |
|
print from OS X v10.7.x or later and your iPhone, |
Solutions Center 1 |
|
iPod touch, iPad, or other iOS device to your Brother |
|
|
machine without installing a printer driver. |
|
Google Cloud Print |
This Guide provides details on how to use Google |
PDF file / Brother |
Guide |
Cloud Print™ services for printing over the Internet. |
Solutions Center 1 |
Mobile Print/Scan Guide |
This Guide provides useful information about |
PDF file / Brother |
for Brother iPrint&Scan |
printing from your mobile device and scanning from |
Solutions Center 1 |
|
your Brother machine to your mobile device when |
|
|
connected to a Wi-Fi® network. |
|
|
|
|
1 Visit solutions.brother.com/manuals.
 ii
ii
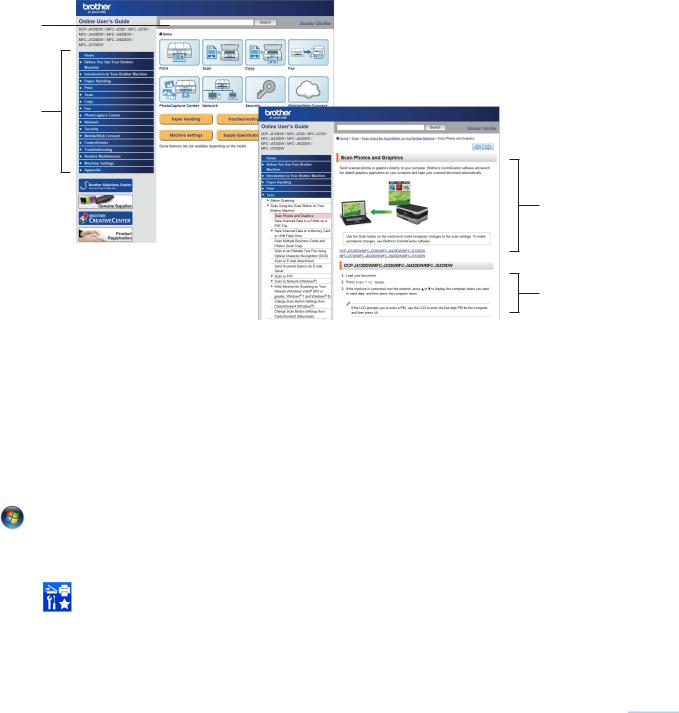
The Online User’s Guide helps you get the most out of your machine.
Quicker navigation!
•Search box
•Navigation index in a separate pane
Comprehensive!
•All topics in one guide
Simplified layout!
•Provides step-by-step instructions
•Summarizes the feature at the top of the page
1
2
3
4
1Search Box
2Navigation Index
3Feature Summary
4Step-by-Step Instructions
Where can I find the Online User’s Guide?
(Windows®) |
|
|
Click |
(Start) > All Programs > Brother > Brother Utilities > MFC-XXXX (Where XXXX is |
|
your model name.) > Support > User’s Guides. |
||
(Windows® 8) |
|
|
Tap or click |
(Brother Utilities) > MFC-XXXX (Where XXXX is your model name.) > Support |
|
> User’s Guides.
(Macintosh or other options)
Visit Brother Solutions Center: solutions.brother.com/manuals.
iii 

If you have questions or problems, please take a look at your model’s FAQs.
Provides several ways to search
Displays related questions for additional information
Receives regular updates based on customer feedback
*The FAQ home page will vary depending on your model.
Where can I find these FAQs?
Brother Solutions Center
http://support.brother.com
 iv
iv

Table of Contents
1 |
General information............ |
1 |
|
How to use the documentation ....... |
1 |
|
Symbols and conventions............ |
1 |
|
About Brother Utilities |
|
|
(Windows®)..................................... |
1 |
|
Control panel overview ................... |
2 |
|
3.7"(93.4 mm) Touchscreen |
|
|
LCD.............................................. |
4 |
|
Entering Text ............................... |
8 |
2 |
Loading paper ..................... |
9 |
|
Before loading paper....................... |
9 |
|
Loading paper in the paper |
|
|
tray #1............................................. |
9 |
|
Loading paper in paper tray #2 |
|
|
(MFC-J2720/J5720DW) ................ |
14 |
|
Loading paper in the |
|
|
multi-purpose tray (MP Tray) ........ |
18 |
|
Loading paper in the manual |
|
|
feed slot ........................................ |
20 |
|
Paper settings ............................... |
23 |
|
Set Paper Size and Type........... |
23 |
|
Check Paper setting...................... |
24 |
|
Recommended print media........ |
24 |
|
Handling and using print |
|
|
media ......................................... |
24 |
3 |
Loading documents.......... |
25 |
|
How to load documents ................ |
25 |
|
Using the ADF ........................... |
25 |
|
Using the scanner glass ............ |
26 |
4 |
Printing from a |
|
|
computer............................ |
28 |
|
How to print a document............... |
28 |
5 |
Copying.............................. |
29 |
|
How to copy .................................. |
29 |
|
Stop copying .............................. |
29 |
|
Copy options overview.................. |
29 |
|
Paper Type ................................ |
30 |
|
Paper Size ................................. |
30 |
|
Tray Select................................. |
30 |
6 Scanning to a computer ... 31
Before scanning............................ |
31 |
How to scan a document as a |
|
PDF file using ControlCenter4 |
|
(Windows®)................................... |
31 |
How to scan a document as a |
|
PDF file using the Touchscreen.... |
32 |
7Printing photos from a memory card or USB flash
|
drive.................................... |
33 |
|
PhotoCapture Center operations |
|
|
(PHOTO mode)............................. |
33 |
|
How to print images ...................... |
33 |
|
View Photos............................... |
33 |
|
PhotoCapture Center print settings |
|
|
overview........................................ |
34 |
8 |
Telephone services and |
|
|
external devices ................ |
35 |
|
Telephone services overview ....... |
35 |
|
Voicemail ................................... |
35 |
|
Distinctive Ring |
|
|
(For some countries).................. |
35 |
|
FaxAbility (For New Zealand) .... |
35 |
|
Voice over Internet Protocol |
|
|
(VoIP) ........................................ |
35 |
|
Connecting an external telephone |
|
|
answering device (TAD) ............ |
35 |
|
External and extension |
|
|
telephones ................................. |
35 |
9 |
Sending a fax..................... |
36 |
|
How to send a fax ......................... |
36 |
|
Stop faxing................................. |
37 |
|
How to store numbers................... |
38 |
|
Storing a pause.......................... |
38 |
|
Storing Address Book |
|
|
numbers..................................... |
38 |
|
How to set your Station ID ............ |
39 |
v |

10 |
Receiving a fax .................. |
40 |
|
Receive Modes ............................. |
40 |
|
Choose the Receive Mode............ |
40 |
|
Using Receive Modes................ |
41 |
|
Receive Mode settings.................. |
42 |
|
Ring Delay ................................. |
42 |
|
F/T Ring Time |
|
|
(Fax/Tel mode only)................... |
42 |
A |
Routine maintenance ........ |
43 |
|
How to clean and check the |
|
|
machine ........................................ |
43 |
|
Cleaning the scanner glass........ |
43 |
|
Checking the print quality........... |
44 |
|
Checking the print alignment ..... |
45 |
B |
Troubleshooting ................ |
47 |
|
Identifying the problem.................. |
47 |
|
Error and maintenance |
|
|
messages...................................... |
47 |
|
Error animations......................... |
57 |
|
Transferring your faxes or Fax |
|
|
Journal report............................. |
57 |
|
Document jam ........................... |
58 |
|
Printer jam or paper jam ............ |
60 |
|
Troubleshooting for Wireless LAN |
|
|
setup ............................................. |
66 |
|
Wireless LAN report................... |
66 |
|
If you are having difficulty with |
|
|
your machine ................................ |
67 |
|
Dial Tone detection.................... |
77 |
|
Telephone Line Interference or |
|
|
VoIP System .............................. |
77 |
|
Machine Information ..................... |
78 |
|
Checking the serial number ....... |
78 |
|
Checking the firmware |
|
|
version ....................................... |
78 |
|
Reset operations overview......... |
78 |
|
How to reset the machine .......... |
79 |
C |
Index ................................... |
80 |
|
Supplies ............................. |
83 |
 vi
vi
 1 General information
How to use the documentation
Thank you for buying a Brother product! Reading the documentation will help you make the most of your machine.
Symbols and conventions
The following symbols and conventions are used throughout the documentation.
Bold |
Bold typeface identifies |
|
buttons on your computer |
|
screen. |
Italics |
Italicized typeface emphasizes |
|
an important point or refers |
|
you to a related topic. |
Courier |
Text in the Courier New font |
New |
identifies messages displayed |
|
on the machine’s Touchscreen |
|
LCD. |
a (Windows® XP, Windows Vista® and |
1 |
Windows® 7) |
|
Click  (Start) > All Programs > Brother >
  (Brother Utilities). (Windows® 8)
Tap or click |
(Brother Utilities) |
either on the Start screen or the desktop.
(Windows® 8.1)
Move your mouse to the lower left
corner of the Start screen and click
(if you are using a touch-based device, swipe up from the bottom of the Start screen to bring up the Apps screen). When the Apps screen appears, tap or
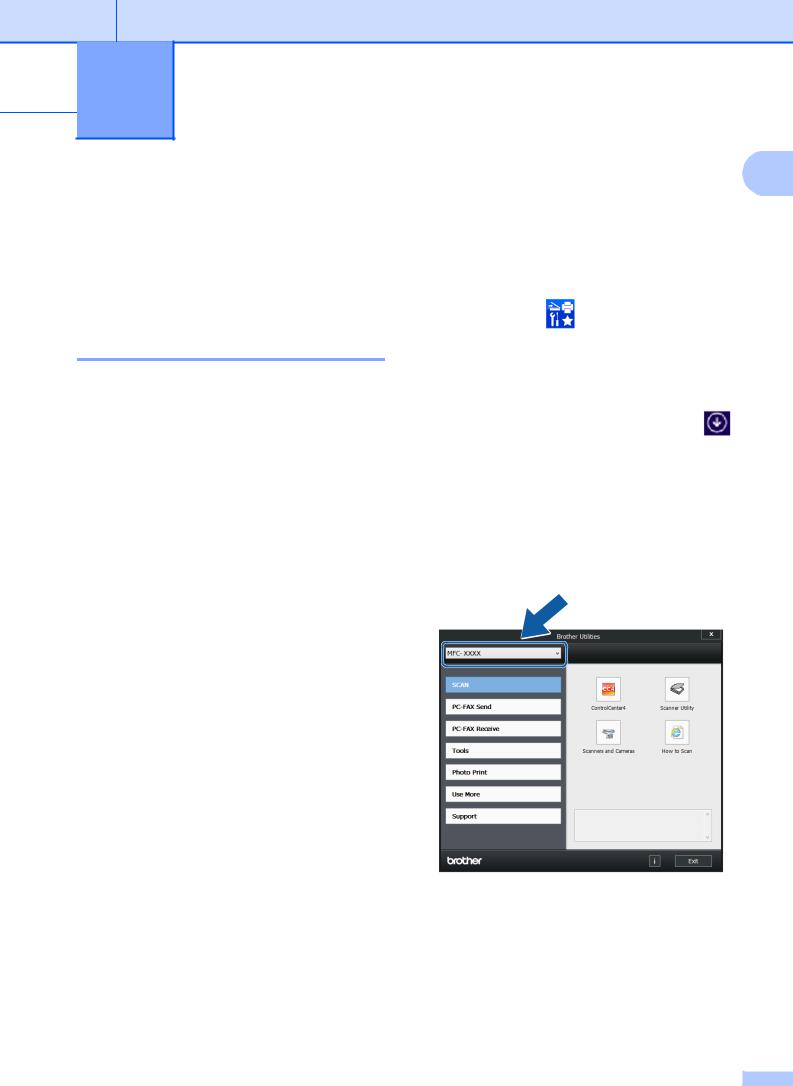
click  (Brother Utilities). b Select your machine.
IMPORTANT
IMPORTANT indicates a potentially hazardous situation which, if not avoided, may result in damage to property or loss of product functionality.
NOTE
NOTE specifies the operating environment, conditions for installation, or special conditions of use.
About Brother Utilities |
c Choose the operation you want. |
(Windows®) |
|
Brother Utilities is an application launcher that offers convenient access to all Brother applications installed on your device.
1 |
Chapter 1
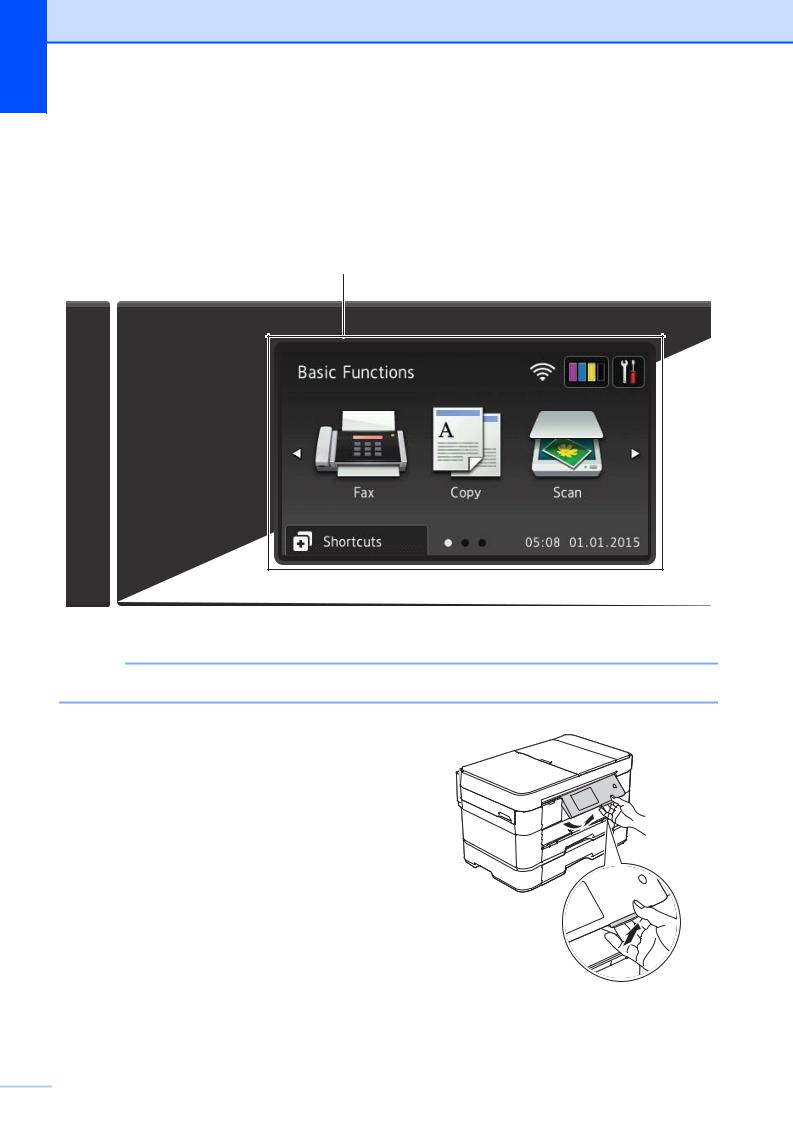
Control panel overview
The MFC-J2720, MFC-J5620DW and MFC-J5720DW have the same 3.7"(93.4 mm) Touchscreen LCD and Touchpanel.
1
NOTE
Most of the illustrations in this User’s Guide show the MFC-J5720DW.
1 3.7"(93.4 mm) Touchscreen LCD (Liquid Crystal Display)
Access the menus and options you want by pressing them as they are displayed on the Touchscreen LCD.
You can adjust the angle of the Touchscreen LCD and Touchpanel by lifting it. To lower this control panel, press the release button that is located behind it, as shown in the illustration.
 2
2
2
2Touchpanel:
 Back
Back
Press to go back to the previous menu level.
 Home
Home
Press to return to the Home screen. By default it displays the date and time, but you can change the default settings.
 Cancel
Press to cancel an operation when lit.
General information
1
3
3 Power On/Off
Press  to turn the machine on.
Press and hold down  to turn the machine off. The Touchscreen LCD displays Shutting Down and stays on for a few seconds before turning off.
If you have connected an external telephone or TAD, it is always available for use.
If you turn the machine off using  , it still periodically cleans the print head to maintain print quality. To prolong the life of the print head, provide better ink efficiency, and maintain print quality, keep your machine connected to the power at all times.
3 |
Chapter 1
3.7"(93.4 mm) Touchscreen LCD
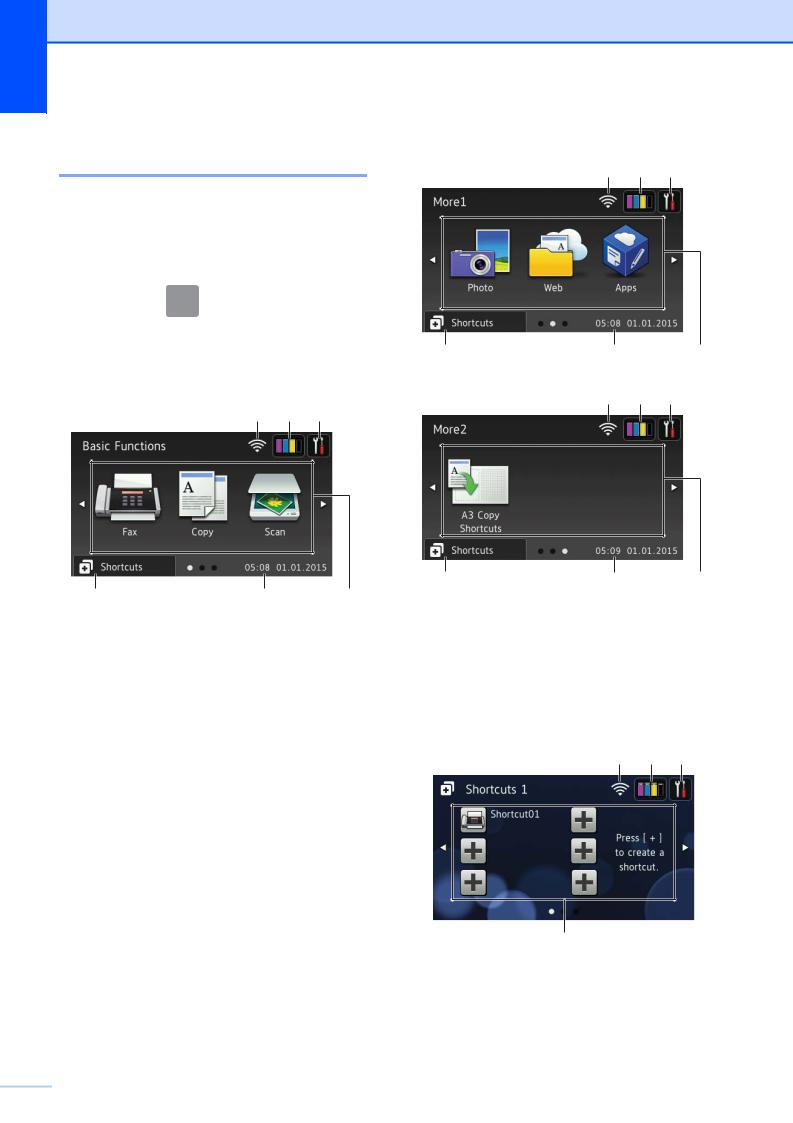
Select from three types of screens to set the Home screen: Basic Functions screen, More screens and Shortcuts screens. When the Basic Functions screen is displayed, swipe left or right or press d or c to display the More
screens. Press  to display the Shortcut screens.
Basic Functions screen
1 2 3
4 |
5 |
6 |
The Basic Functions screen displays the date and time and provides access to the Fax, Copy and Scan modes.
More screens
1 2 3
4 |
5 |
6 |
1 2 3
4 |
5 |
6 |
The More screens display the date and time and provides access to additional features, such as Photo, Web, Apps and A3 Copy Shortcuts.
Shortcut screens
1 2 3
7
You can save certain settings as a Shortcut so you can quickly send a fax, copy, scan and use Web Connect services. (See Online User’s Guide.)
 4
4

1Wireless Status
A four-level indicator on the Ready Mode screen displays the current wireless signal strength when using a wireless connection.
0 |
Max |
When 


 appears on the
Touchscreen, press it to configure your wireless settings. For more information, see Quick Setup Guide.
2 Ink
Ink
Displays the available ink volume. Press to access the Ink menu.
When the ink cartridge is near the end of its life or having a problem, an error icon is displayed on the ink colour.
(See Online User’s Guide.)
3 Settings
Press to access the settings. (See Settings screen on page 7.)
4 Shortcuts
Press to access the Shortcuts screens.
5Date & Time
Displays the date and time that has been set in the machine.
6Modes:
 Fax
Fax
Press to access Fax mode.
 Copy
Copy
Press to access Copy mode.
 Scan
Scan
Press to access Scan mode.
General information
|
Photo |
|
|
Press to access Photo mode. |
1 |
 Web
Web
Press to connect the Brother machine to an Internet service.
For details, see Web Connect Guide.
 Apps
Apps
Press to connect the Brother machine to the Brother Apps menu.
 A3 Copy Shortcuts
Use this preset copy shortcut to copy on A3 or Ledger size paper.
(See Online User’s Guide.)
7 Add Shortcut
Create Shortcuts for frequently-used operations, such as sending a fax, copying, scanning and using Web Connect.
Three Shortcuts screens are available with space for up to six Shortcuts on each screen.
For more information, see Online User’s Guide.
NOTE
When one of the Shortcuts screens is set as the Home screen, press


 , displayed at the bottom of
the screen to access the Basic Functions screen.
5 |
Chapter 1
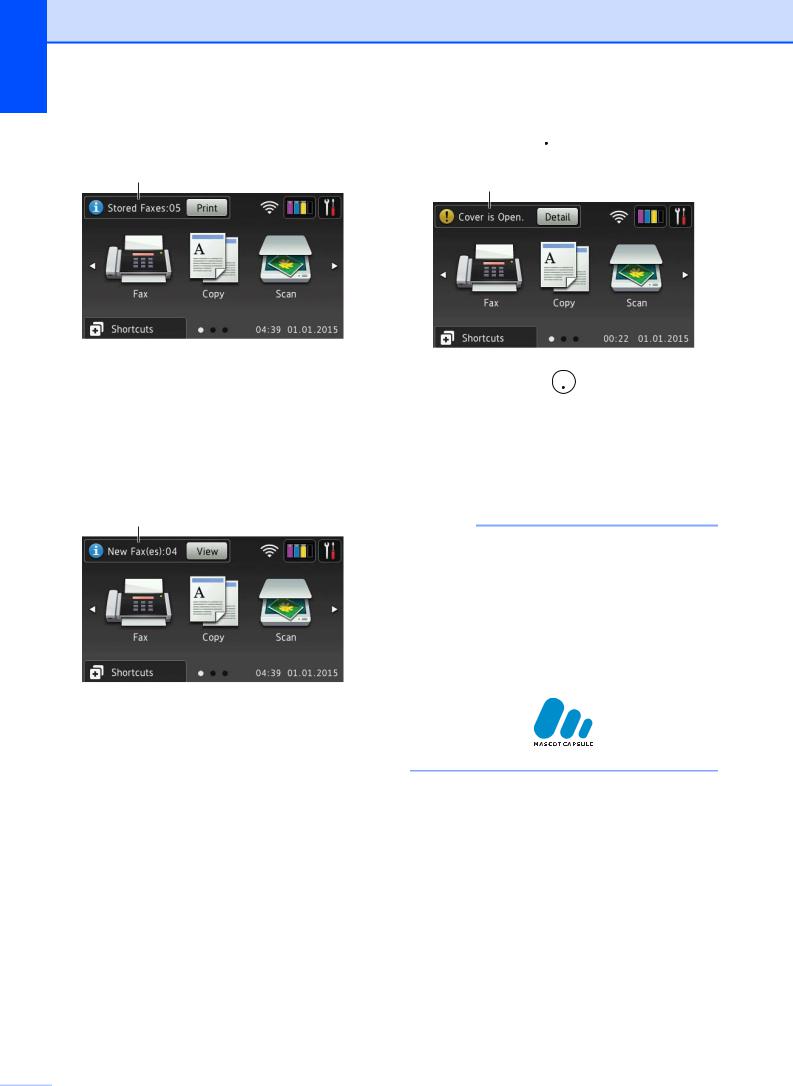
8 Stored Faxes:
8
When Fax Preview is set to Off,
Stored Faxes displays how many received faxes are in the machine’s memory.
Press Print to print the faxes. 9 New Fax(es):
9
When Fax Preview is set to On,
New Fax(es) displays how many new faxes you have received and stored in the machine’s memory.
Press View to view your faxes on the Touchscreen.
10 Warning icon 
10
The warning icon  appears when there
is an error or maintenance message; press Detail to view it, and then press
 to return to Ready mode.
(See Error and maintenance messages on page 47.)
NOTE
•This product adopts the font of ARPHIC TECHNOLOGY CO.,LTD.
•MascotCapsule UI Framework and MascotCapsule Tangiblet developed by HI CORPORATION are used. MascotCapsule is a registered trademark of HI CORPORATION in Japan.
 6
6
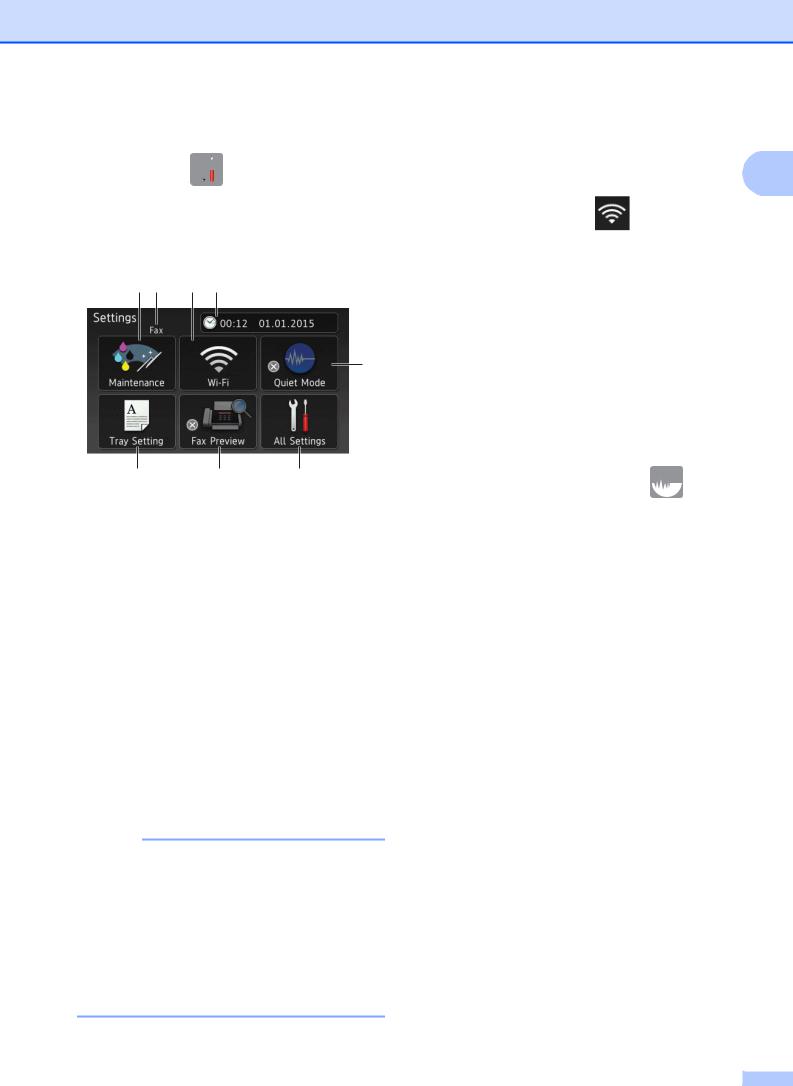
Settings screen
When you press 
 , the Touchscreen LCD displays the machine’s status.
This screen provides access to all the machine’s settings.
1 2 3 4
5
8 |
7 |
6 |
1Maintenance
Press to access the Maintenance menu.
Check and improve the print quality, clean the print head and check the available ink volume. You can also use the Maintenance solution menu to solve a recurring paper jam error.
2Receive Mode
Displays the current Receive Mode:
Fax (Fax Only)
Fax/Tel
External TAD
Manual
NOTE
(For some countries)
When the Distinctive Ring feature is turned on, the Touchscreen displays D/R. For details, see Online User’s Guide.
(For New Zealand)
When the FaxAbility feature is turned on, the Touchscreen displays D/R. For details, see Online User’s Guide.
General information
3 Wi-Fi |
|
|
Press to set up a wireless network |
1 |
|
connection. |
|
|
A four-level indicator |
on the screen |
|
displays the current wireless signal strength if you are using a wireless connection.
4 Date & Time
Displays the date and time that has been set in the machine.
Press to access the Date & Time menu.
5Quiet Mode
Displays the Quiet Mode setting. Press to access the Quiet Mode menu.
When this menu is set to On,  is
is
displayed on the Home screen. The machine’s printing noise has been reduced.
For more information, see Online User’s Guide.
6All Settings
Press to access the Settings menu.
7Fax Preview
Displays the Fax Preview setting.
Press to access the Fax Preview setting.
8Tray Setting
Press to access the Tray Setting menu to change the paper size and paper type for each tray.
7 |
Chapter 1
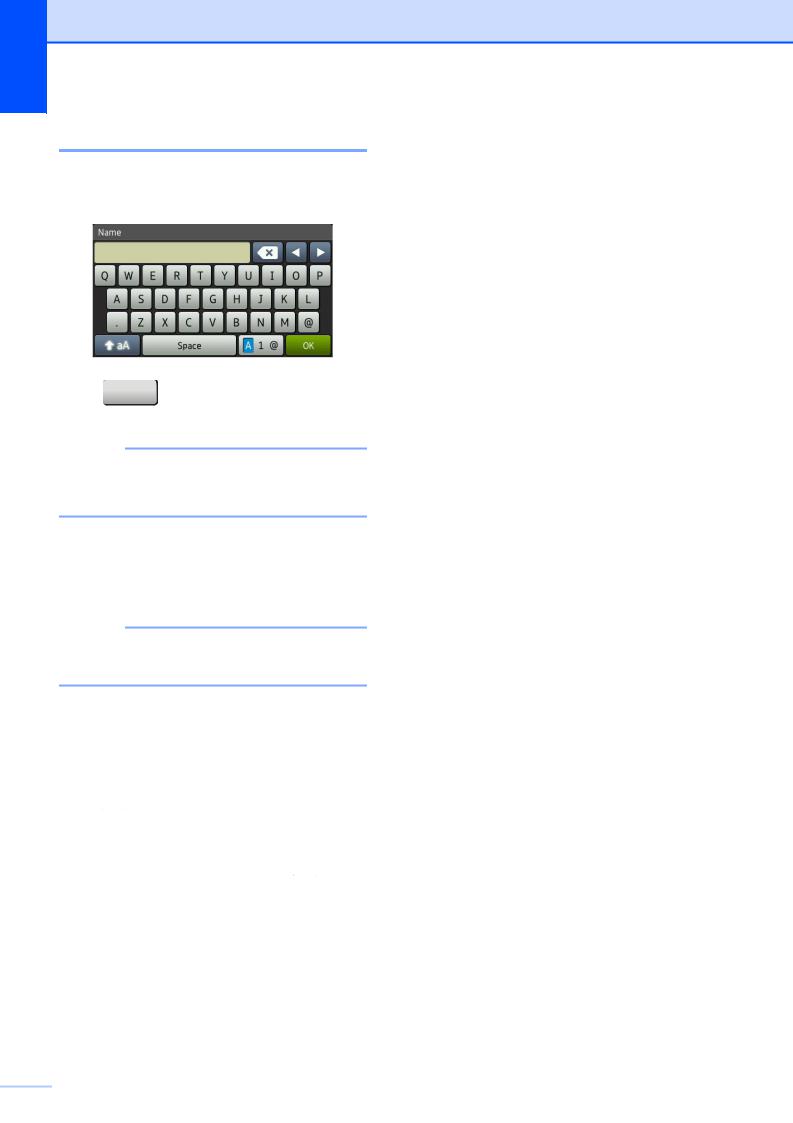
Entering Text
When you must enter text into the machine, a keyboard appears on the Touchscreen.
Press 

 to cycle between letters, numbers and special characters.
NOTE
To change between lowercase or uppercase, press  .
.
Inserting spaces
To enter a space, press Space or you can press c to move the cursor.
NOTE
The characters that are available may differ depending on your country.
Making corrections
If you entered an incorrect character and want to change it, press d to move the cursor to highlight the incorrect character, and then
press  . Enter the correct character. You can also use the cursor to go back and insert characters.
To erase all the characters, press  repeatedly.
 8
8
 2 Loading paper
Before loading paper |
Loading paper in the |
|
Load only one size of paper and one type of |
paper tray #1 |
2 |
paper in the paper tray at a time. |
|
|
When loading a different paper size in the tray, you must also change the paper size setting in the machine. Doing this enables the machine to automatically feed paper from the appropriate tray if auto tray select has been set in the machine or printer driver. (See Set Paper Size and Type
on page 23.)
If the Check Paper setting is On, the machine will display a message asking if you want to change the paper type and paper size when you pull Tray #1 or Tray #2 (MFC-J2720/5720DW) out of the machine or load paper in the MP Tray. Change the paper size and paper type settings if needed, according to the instructions on the Touchscreen.
(See Check Paper setting on page 24.)
We explain how to load paper for each tray: Tray #1 . . . . . . . . . . . . . . . . . . See page 9. Tray #2 . . . . . . . . . . . . . . . . . . See page 14. MP Tray . . . . . . . . . . . . . . . . . See page 18. Manual feed slot . . . . . . . . . . . See page 20.
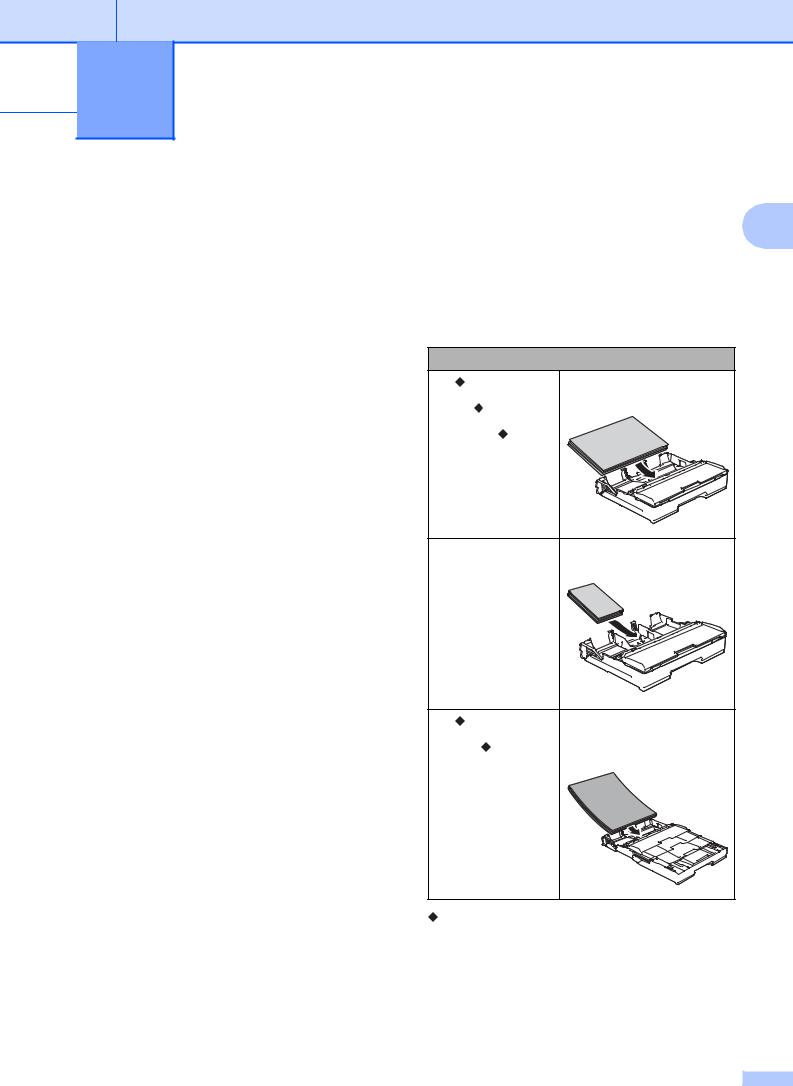
Paper size and loading orientation
The paper size determines the orientation when loading paper in Tray #1.
|
Tray #1 |
A4 |
Landscape orientation |
Letter |
|
Executive |
|
JIS B5* |
|
A5 |
Portrait orientation |
A6 |
|
Photo |
|
Photo L |
|
Photo 2L |
|
Index card |
|
Envelope |
|
A3 |
Portrait orientation |
Ledger |
(Tray #1 is extended.) |
|
|
JIS B4* |
|
Legal |
|
(Glossy photo |
|
paper is not |
|
available.) |
|
See the details in this chapter.
*Only available in some countries.
For information about other paper sizes, see Online User’s Guide.
9 |
Chapter 2
When using A4, Letter or Executive size paper:
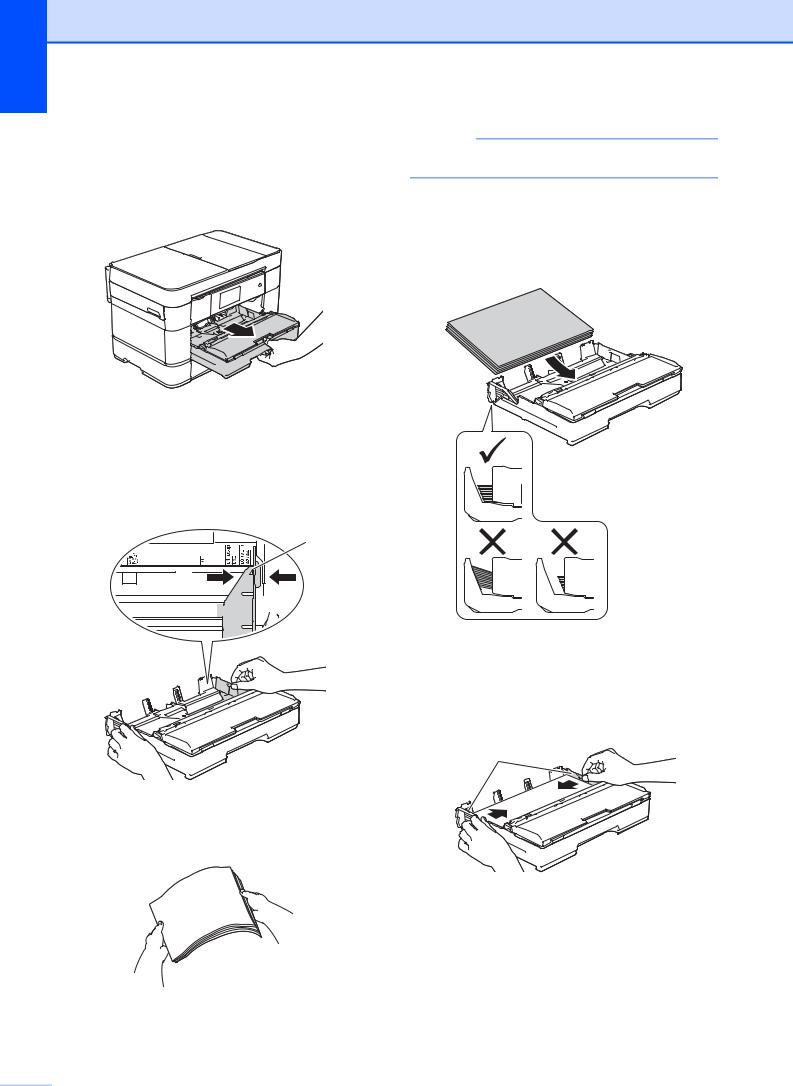
a Pull Tray #1 completely out of the machine.
b Gently press and slide the paper guides (1) to fit the paper size.
Make sure the triangular mark (2) on the paper guide (1) lines up with the mark for the paper size you are using.
2

 1
1
c Fan the stack of paper well to avoid paper jams and misfeeds.
NOTE
Always make sure the paper is not curled.
d Load paper in the paper tray with the printing surface face down.
Check that the paper is flat in the tray.
Landscape orientation
e Gently adjust the paper guides (1) to the paper.
Make sure the paper guides touch the sides of the paper.
1
 10
10

f Check that the paper is flat in the tray and below the maximum paper
mark (1).
Overfilling the paper tray may cause paper jams.
1
g Slowly push the paper tray completely into the machine.
h Pull out the paper support (1) until it locks into place, and then unfold the paper support flap (2).


 2
2

 1
1
i Change the paper size setting in the machine’s menu, if needed.
(See Set Paper Size and Type on page 23.)
Loading paper
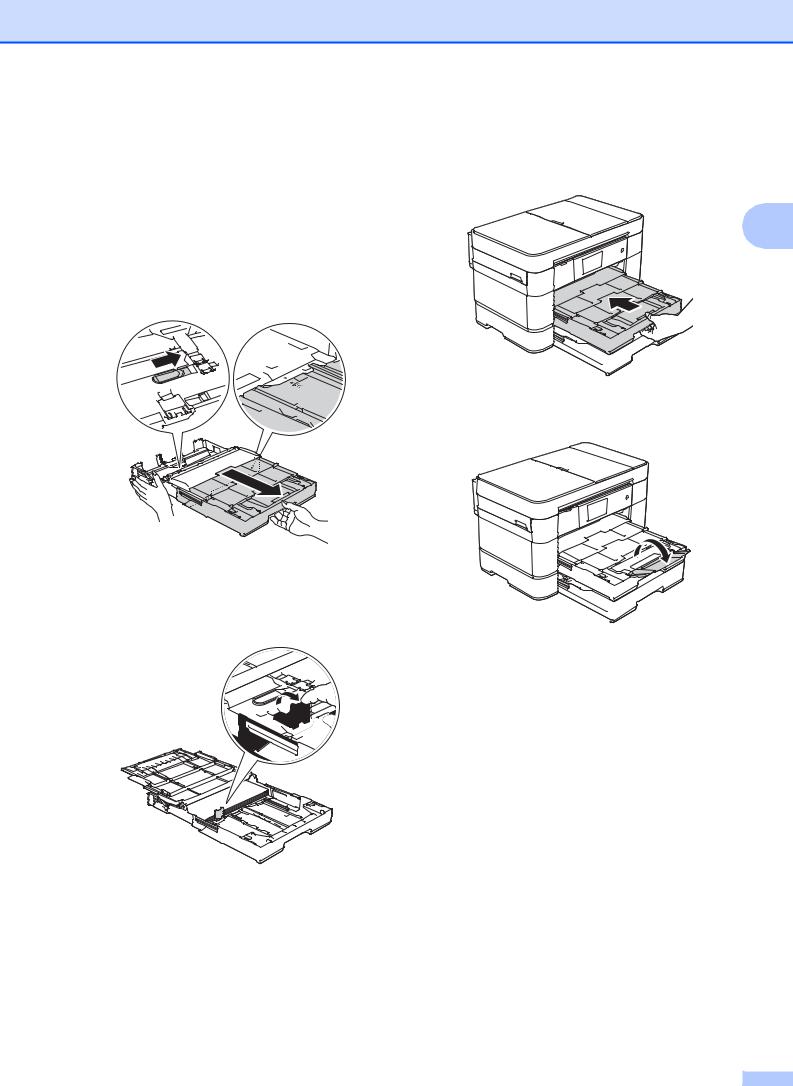
When using A3 or Ledger size paper:
a Pull Tray #1 completely out of the machine. Rest the tray on a flat surface.
b Push the blue slider until it locks in the |
2 |
|
release position, and then extend the |
||
|
||
tray until the blue slider returns to and |
|
|
locks in the default position. Open the |
|
|
tray cover and make sure the triangular |
|
|
mark inside the tray (1) lines up with the |
|
|
mark (2) for B4 JIS/LGL, as shown in |
|
|
the illustration. |
|
1
2
Push the blue slider a second time until it locks in the release position, and then extend the tray until the blue slider returns to and locks in the default position. Open the tray cover and make sure the triangular mark inside the tray (1) lines up with the mark (2) for A3/LGR, as shown in the illustration.
1
2
11
Chapter 2
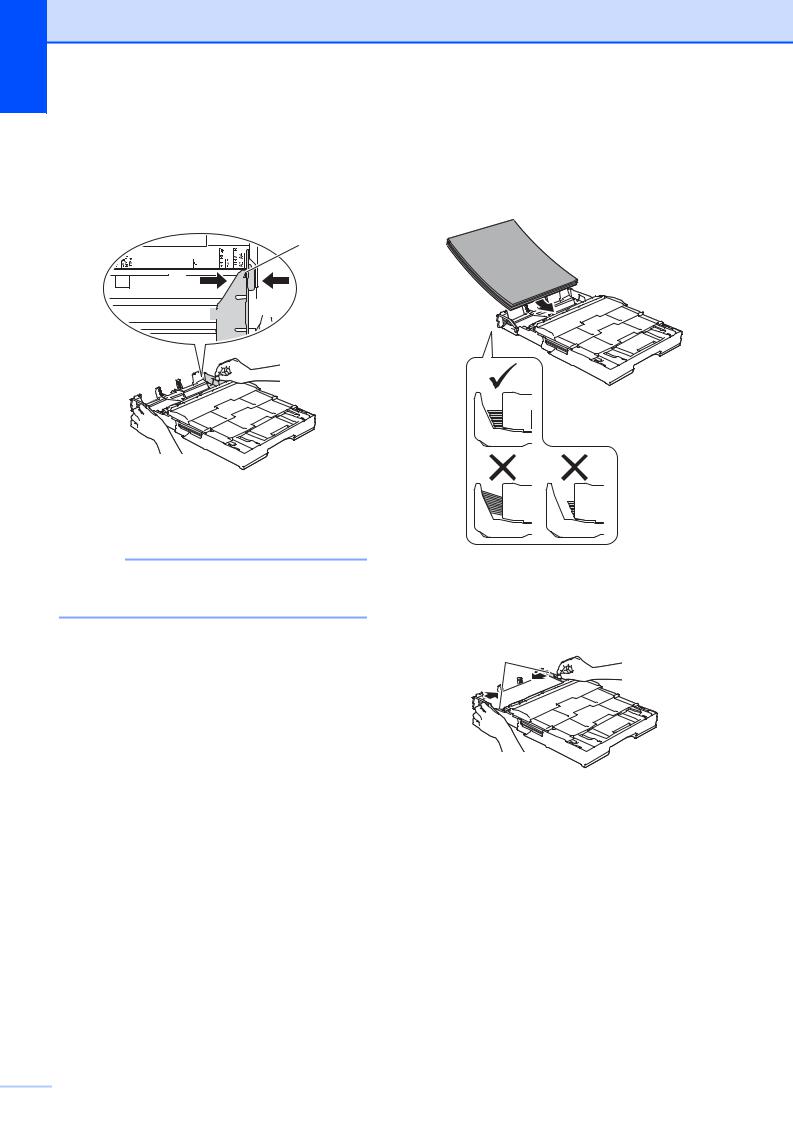
c Gently press and slide the paper guides (1) to fit the paper size. Make sure the triangular mark (2) on the paper guide (1) lines up with the mark for the paper size you are using.
2

 1
1
d Fan the stack of paper well to avoid paper jams and misfeeds.
NOTE
Always make sure the paper is not curled or wrinkled.
e Gently load paper in the paper tray with the printing surface face down. Check that the paper is flat in the tray.
Portrait orientation
f Gently adjust the paper guides (1) to fit the paper. Make sure the paper guides touch the sides of the paper.
1
 12
12
Loading paper
g Check that the paper is flat in the tray and below the maximum paper
mark (1). Overfilling the paper tray may cause paper jams.
3Lift the A4/LTR stopper (1) if A4 or Letter size paper is in Tray #2.
2
1 1
4 Slowly push Tray #2 completely into the machine.
(MFC-J5620DW)
Go to step i. (MFC-J2720/J5720DW)
Go to step h.
h Extend Tray #2 under Tray #1 to keep the machine stable.
1 Pull Tray #2 out of the machine.
2 In the same way you extended Tray #1, push the blue slider and extend Tray #2 to A3 or Ledger size, so it is even with Tray #1.
13

Chapter 2
i Slowly push Tray #1 completely into the machine.
(MFC-J5620DW)
(MFC-J2720/J5720DW)
j Unfold the paper support flap.
Loading paper in paper tray #2 (MFC-J2720/J5720DW)
Paper size and loading orientation
The paper size determines the orientation when loading paper in Tray #2.
|
Tray #2 |
A4 |
Landscape orientation |
Letter |
|
A3 |
Portrait orientation |
Ledger |
(Tray #2 is extended.) |
|
|
Legal |
|
JIS B4* |
|
See the details in this chapter.
* Only available in some countries.
For information about other paper sizes, see Online User’s Guide.
k Change the paper size setting in the machine’s menu, if needed.
(See Set Paper Size and Type on page 23.)
 14
14
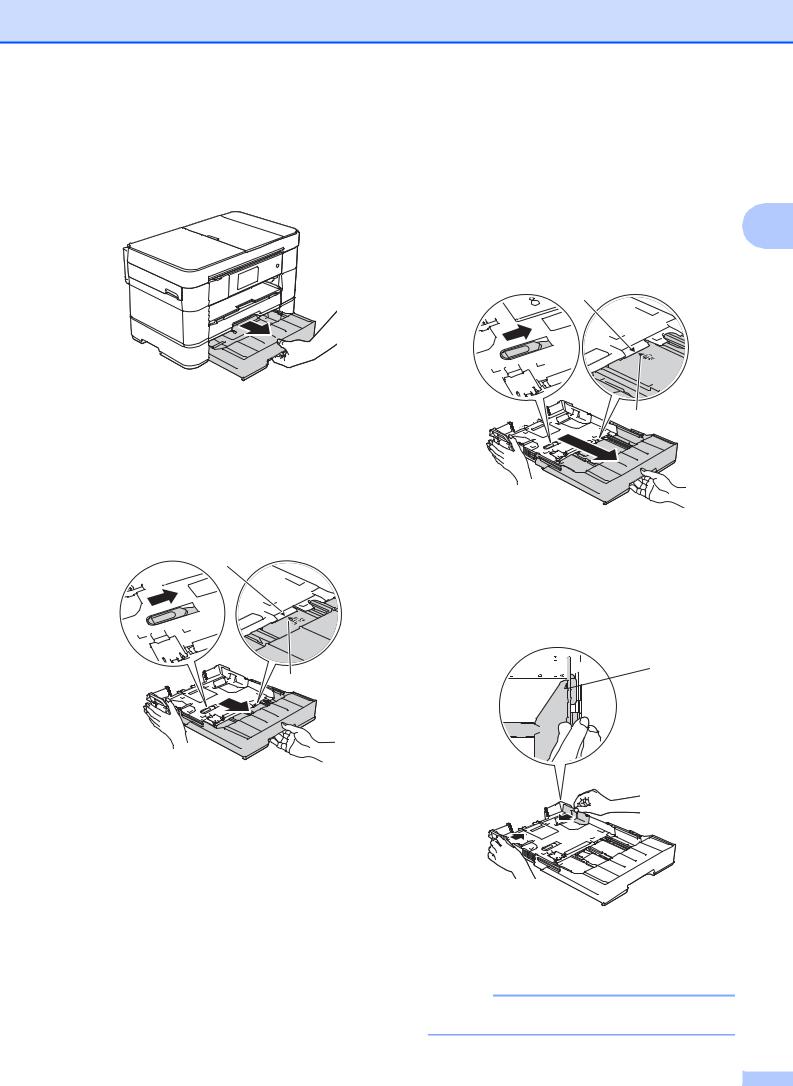
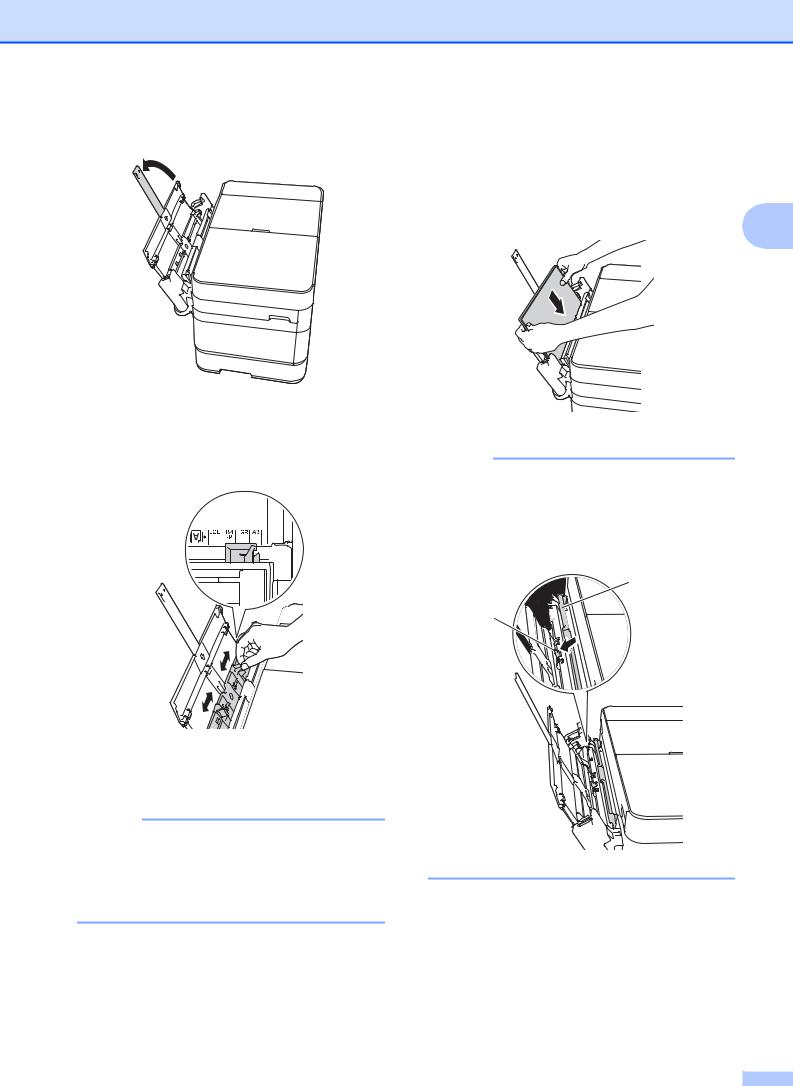
When using A3 or Ledger size paper:
a Pull Tray #2 completely out of the machine. Rest the tray on a flat surface.
Loading paper
Push the blue slider a second time until |
|
it locks in the release position, and then |
|
extend the tray until the blue slider |
|
returns to and locks in the default |
|
position. Make sure the triangular mark |
2 |
inside the tray (1) lines up with the |
|
mark (2) for A3/LGR, as shown in the |
|
illustration.
1
b Push the blue slider until it locks in the release position, and then extend the tray until the blue slider returns to and locks in the default position. Make sure the triangular mark inside the tray (1) lines up with the mark (2) for
B4 JIS/LGL, as shown in the illustration.
 1
1
2
2
c Gently press and slide the paper guides (1) to fit the paper size.
Make sure the triangular mark (2) on the paper guide (1) lines up with the mark for the paper size you are using.


 2
2 

 1
1
d Fan the stack of paper well to avoid paper jams and misfeeds.
NOTE
Always make sure the paper is not curled.
15

Chapter 2
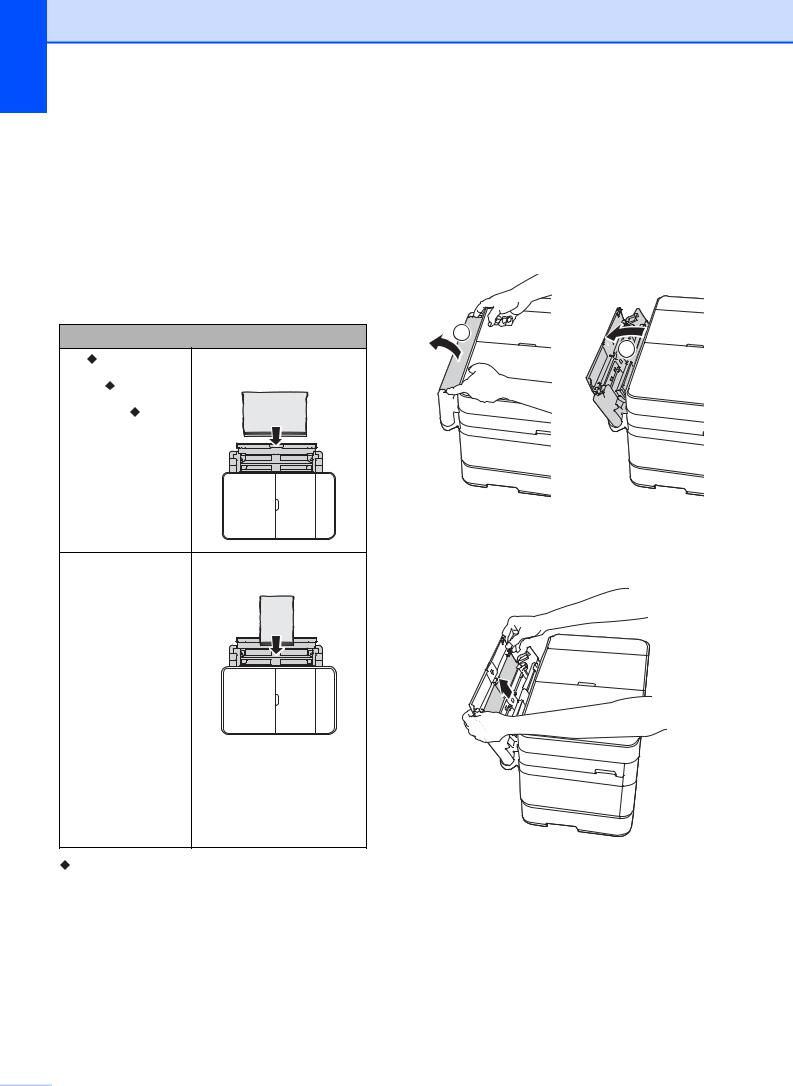
e Gently load the paper into the paper tray with the printing surface face down.
Portrait orientation
f Gently adjust the paper guides (1) to fit the paper.
Make sure the paper guides touch the sides of the paper.
1
g Check that the paper is flat in the tray and below the maximum paper
mark (1).
Overfilling the paper tray may cause paper jams.
1
h Slowly push Tray #2 completely into the machine.
 16
16
i Extend Tray #1 over Tray #2 to prevent printed pages from falling off the output tray.
1Pull Tray #1 out of the machine.
2In the same way you extended Tray #2, push the blue slider and extend Tray #1 to Ledger or A3 size, so it is even with Tray #2.
Loading paper
k Close the output paper tray cover and slowly push Tray #1 completely into the machine.
2
j Open the output paper tray and lift the A4/LTR stopper (1) if A4 or Letter size paper is in Tray #1.
1


l Unfold the paper support flap.
m Change the paper size setting in the machine’s menu, if needed.
(See Set Paper Size and Type on page 23.)
17
Chapter 2
Loading paper in the multi-purpose tray (MP Tray)
Paper size and loading orientation
The paper size determines the orientation when loading paper in the MP Tray.
|
MP Tray |
A4 |
Landscape orientation |
Letter |
|
Executive |
|
JIS B5* |
|
A3 |
Portrait orientation |
Ledger |
|
JIS B4* |
|
Legal |
|
Folio |
|
A5 |
|
A6 |
|
Photo |
|
Photo L |
|
Photo 2L |
|
Index card |
|
Envelope |
|
See the details in this chapter.
*Only available in some countries.
For information about other paper sizes, see Online User’s Guide.
When using A4, Letter or Executive size paper:
a With both hands, use the finger holds to open the upper cover (1) and MP
Tray (2).
1

 2
2
b With both hands, pull up the paper tray until it locks into place.
 18
18
c Lift up the paper support.
Loading paper
f Gently load the paper in the MP Tray with the printing surface face up. Make sure you load the paper in the MP Tray, and not the manual feed slot.
Landscape orientation |
2 |
|
d Gently press and slide the MP Tray paper guides to the width of the paper you are using.
e Fan the stack of paper well to avoid paper jams and misfeeds.
NOTE
•Always make sure the paper is not curled or wrinkled.
•You can load up to 80 sheets of plain paper.
NOTE
If you cannot load the paper in the MP Tray, lift the cover (1) forward and push the release lever (2) toward the back of the machine, and then load the paper.

 1 2
1 2 


19

Chapter 2
g With both hands, gently adjust the MP Tray paper guides to fit the paper.
h Pull out the paper support (1) until it locks into place, and then unfold the paper support flap (2).


 2
2


 1
1
i Change the paper size setting in the machine’s menu, if needed.
(See Set Paper Size and Type on page 23.)
Loading paper in the manual feed slot
Use the manual feed slot to load special print media, one sheet at a time.
The manual feed slot cannot be used for printing faxes.
Paper size and loading orientation
The paper size determines the orientation when loading paper in the manual feed slot.
|
Manual feed slot |
A4 |
Landscape orientation |
Letter |
|
Executive |
|
JIS B5* |
|
A3 |
Portrait orientation |
Ledger |
|
JIS B4* |
|
Legal |
|
Folio |
|
A5 |
|
A6 |
|
Photo |
|
Photo L |
|
Photo 2L |
|
Index card |
|
Envelope |
|
See the details in this chapter.
*Only available in some countries.
For information about other paper sizes, see Online User’s Guide.
 20
20
Loading...