


 Loading...
Basic User's Guide
HL-L2380DW
MFC-L2720DW
MFC-L2740DW
Online User's Guide
This Basic User's Guide does not contain all the information about the machine.
To learn detailed information, read the Online User's Guide at solutions.brother.com/manuals

If you need to call Customer Service
Please complete this information for future reference:
Model Number: HL-L2380DW/MFC-L2720DW/MFC-L2740DW
(Circle your model number)
Serial Number: 1
Date of Purchase:
Place of Purchase:
1The serial number is on the back of the machine. Retain this User’s Guide with your sales receipt as a permanent record of your purchase, in the event of theft, fire or warranty service.
Register your product on-line at
http://www.brother.com/html/registration
By registering your product with Brother, you will be recorded as the original owner of the product. Your registration with Brother:
•may serve as confirmation of the purchase date of your product should you lose your receipt;
•may support an insurance claim by you in the event of product loss covered by insurance; and,
•will help us notify you of enhancements to your product and special offers.
The most convenient and efficient way to register your new product is online at http://www.brother.com/html/registration.
© 2014 Brother Industries, Ltd. All rights reserved.
Brother Numbers
IMPORTANT
For technical help, you must call the country where you bought the machine. Calls must be made from within that country.
Register Your Product
By registering your product with Brother International Corporation, you will be recorded as the original owner of the product. Your registration with Brother:
•may serve as confirmation of the purchase date of your product if you lose your receipt;
•may support an insurance claim by you in the event of product loss covered by insurance; and,
•will help us notify you of enhancements to your product and special offers.
Complete and fax the Brother Warranty Registration and Test Sheet, or register on-line at
http://www.brother.com/registration
FAQs (Frequently Asked Questions)
The Brother Solutions Center is our one-stop resource for all your Fax Machine/Multi-Function Center needs. Download the latest software and utilities and read FAQs and troubleshooting tips to learn how to get the most from your Brother product.
http://support.brother.com
• Check here for Brother driver updates.
•To keep your machine’s performance up to date, check here for the latest firmware upgrade.
i

For Customer Service
In USA:
http://www.brother-usa.com/support (Self-Service/Email/Chat) 1-877-BROTHER (1-877-276-8437)
1-901-379-1215 (assistance via fax)
1-877-268-9575 (test your fax sending and fax receiving operations)
In Canada:
www.brother.ca/support (Self-Service Videos, Email, Chat, Facebook and Twitter Help)
Service Center Locator (USA only)
For the location of a Brother authorized service center, call 1-877-BROTHER (1-877-276-8437) or visit http://www.brother-usa.com/service.
Service Center Locations (Canada only)
For the location of a Brother authorized service center, visit www.brother.ca/support.
ii
Ordering Accessories and Supplies
For best quality results use only genuine Brother supplies, which are available at most Brother retailers. If you cannot find the supplies you need and have a Visa, MasterCard, Discover, American Express credit card, or PayPal account, you can order directly from Brother. Visit us online for a complete selection of the Brother accessories and supplies that are available for purchase.
NOTE
In Canada, only Visa and MasterCard are accepted.
In USA:
1-877-552-MALL (1-877-552-6255) 1-800-947-1445 (assistance via fax)
http://www.brothermall.com
In Canada:
http://www.brother.ca
iii
Order Information
Description |
Item |
|
Toner cartridge |
TN-630 (Approximately 1,200 pages) 1 2 3 |
|
|
TN-660 (Approximately 2,600 pages) 1 2 4 |
|
Drum Unit |
DR-630 (Approximately 12,000 pages) 5 6 |
|
Telephone Line Cord |
LG3077001 |
|
|
|
|
Basic User's Guide |
LEM603001-01 (English for USA and Canada) |
|
|
|
|
|
LEM603002-01 (French for Canada) |
|
|
|
|
Quick Setup Guide |
LEM592001-00 |
(English for USA and Canada) |
|
|
|
|
LEM592002-00 |
(French for Canada) |
|
|
|
1Letter or A4 size single-sided pages.
2Approximate cartridge yield is declared in accordance with ISO/IEC 19752.
3Standard toner cartridge
4High yield toner cartridge
51 page per job
6Drum life is approximate and may vary by type of use.
iv
Notice - Disclaimer of Warranties (USA and
Canada)
BROTHER’S LICENSOR(S), AND THEIR DIRECTORS, OFFICERS, EMPLOYEES OR AGENTS (COLLECTIVELY BROTHER’S LICENSOR) MAKE NO WARRANTIES, EXPRESS OR IMPLIED, INCLUDING WITHOUT LIMITATION THE IMPLIED WARRANTIES OF MERCHANTABILITY AND FITNESS FOR A PARTICULAR PURPOSE, REGARDING THE SOFTWARE. BROTHER’S LICENSOR(S) DOES NOT WARRANT, GUARANTEE OR MAKE ANY REPRESENTATIONS REGARDING THE USE OR THE RESULTS OF THE USE OF THE SOFTWARE IN TERMS OF ITS CORRECTNESS, ACCURACY, RELIABILITY, CURRENTNESS OR OTHERWISE. THE ENTIRE RISK AS TO THE RESULTS AND PERFORMANCE OF THE SOFTWARE IS ASSUMED BY YOU. THE EXCLUSION OF IMPLIED WARRANTIES IS NOT PERMITTED BY SOME STATES IN THE USA AND SOME PROVINCES IN CANADA. THE ABOVE EXCLUSION MAY NOT APPLY TO YOU.
IN NO EVENT WILL BROTHER’S LICENSOR(S) BE LIABLE TO YOU FOR ANY CONSEQUENTIAL, INCIDENTAL OR INDIRECT DAMAGES (INCLUDING DAMAGES FOR LOSS OF BUSINESS PROFITS, BUSINESS INTERRUPTION, LOSS OF BUSINESS INFORMATION, AND THE LIKE) ARISING OUT OF THE USE OR INABILITY TO USE THE SOFTWARE EVEN IF BROTHER’S LICENSOR HAS BEEN ADVISED OF THE POSSIBILITY OF SUCH DAMAGES. BECAUSE SOME STATES IN THE USA AND SOME PROVINCES IN CANADA DO NOT ALLOW THE EXCLUSION OR LIMITATION OF LIABILITY FOR CONSEQUENTIAL OR INCIDENTAL DAMAGES, THE ABOVE LIMITATIONS MAY NOT APPLY TO YOU. IN ANY EVENT BROTHER’S LICENSOR’S LIABILITY TO YOU FOR ACTUAL DAMAGES FROM ANY CAUSE WHATSOEVER, AND REGARDLESS OF THE FORM OF THE ACTION (WHETHER IN CONTRACT, TORT (INCLUDING NEGLIGENCE), PRODUCT LIABILITY OR OTHERWISE), WILL BE LIMITED TO $50.
For the Latest Driver Updates
Go to your model's Downloads page on the Brother Solutions Center at http://support.brother.com to download drivers.
To keep your machine’s performance up-to-date, check there for the latest firmware upgrades.
v
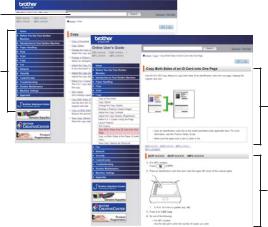
The Online User's Guide Helps You Get the Most Out of Your Machine
Quicker navigation!
 Search box
 Navigation index in a separate panel
Comprehensive!
 Every topic in one guide
Simplified Layout!
 Provides step-by-step instructions
 Feature summary at the top of the page
1
2
3
4
1. Search Box |
2. Navigation |
3. Summary |
4. Step-by-Step |
Where can I find this manual?
(Windows®)
Click  (Start) > All Programs > Brother > Brother Utilities > Brother MFC-XXXX series > Support > User’s Guides.
(Windows® 8)
Tap or click  (Brother Utilities) > Brother MFC-XXXX series > Support > User’s Guides.
(Select your model from the drop-down list if not already selected.) (Macintosh or other options)
Go to your model's Manuals page on the Brother Solutions Center at http://support.brother.com to download manuals.
vi
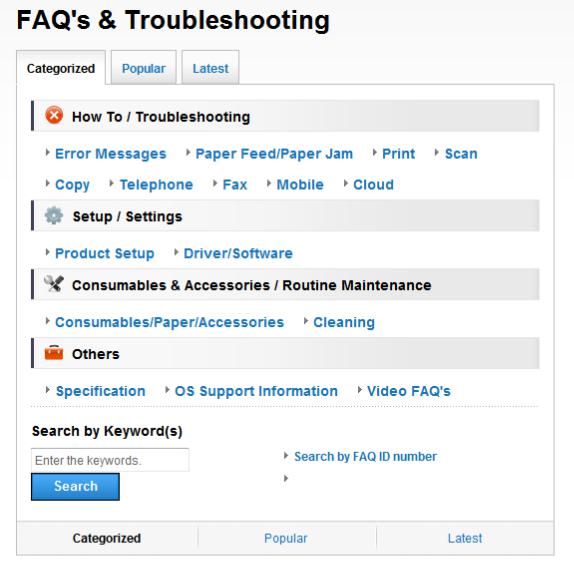
If you have questions or problems, please take a look at our FAQs.
Provides several ways to search!
Displays related questions for more information
Receives regular updates based on customer feedback
Since the Brother Solutions Center is updated regularly, this screen shot is subject to change without notice.
Where can I find these FAQs?
Brother Solutions Center
vii
http://support.brother.com
viii
Definitions of Notes
We use the following symbols and conventions throughout this User's Guide:
 WARNING
WARNING indicates a potentially hazardous situation which, if not avoided, could result in death or serious injuries.
 CAUTION
CAUTION indicates a potentially hazardous situation which, if not avoided, may result in minor or moderate injuries.
IMPORTANT
IMPORTANT indicates a potentially hazardous situation which, if not avoided, may result in damage to property or loss of product functionality.
NOTE
NOTE specifies the operating environment, conditions for installation, or special conditions of use.
Tips icons provide helpful hints and supplementary information.
Electrical Hazard icons alert you to possible electrical shock.
Fire Hazard icons alert you to the possibility of a fire.
Hot Surface icons warn you not to touch hot machine parts.
Prohibition icons indicate actions you must not perform.
Bold
Bold style identifies buttons on the machine's control panel or computer screen.
Italics
Italicized style emphasizes an important point or refers you to a related topic.
Courier New
Courier New font identifies messages shown on the machine's LCD.
ix
Compilation and Publication Notice
Under the supervision of Brother Industries, Ltd., this manual has been compiled and published, covering the latest product's descriptions and specifications.
The contents of this manual and the specifications of this product are subject to change without notice.
Brother reserves the right to make changes without notice in the specifications and materials contained herein and shall not be responsible for any damages (including consequential) caused by reliance on the materials presented, including but not limited to typographical and other errors relating to the publication.
x

Table of Contents
Basic User's Guide
1
2
3
4
General Information ............................................................................................ |
1 |
Control Panel Overview............................................................................................. |
1 |
Touchscreen LCD Overview ...................................................................................... |
3 |
How to Navigate the Touchscreen LCD..................................................................... |
4 |
Access Brother Utilities.............................................................................................. |
6 |
Initial Setup................................................................................................................ |
7 |
Set the Date and Time ..................................................................................... |
7 |
Adjust the Ring Volume ................................................................................... |
7 |
Adjust the Beeper Volume ............................................................................... |
7 |
Adjust the Speaker Volume ............................................................................. |
7 |
Paper Handling .................................................................................................... |
9 |
Load Paper ................................................................................................................ |
9 |
Load and Print using the Paper Tray ............................................................... |
9 |
Set the Check Size ........................................................................................ |
10 |
Change the Paper Size ........................................................................................... |
10 |
Change the Paper Type........................................................................................... |
11 |
Recommended Print Media .................................................................................... |
11 |
Using Special Paper ................................................................................................ |
12 |
Print .................................................................................................................... |
13 |
Print from Your Computer (Windows®).................................................................... |
13 |
Print a Document (Windows®) ....................................................................... |
13 |
Print on Both Sides of the Paper (Windows®) ............................................... |
13 |
Print More Than One Page on a Single Sheet of Paper (N in 1) |
|
(Windows®).................................................................................................... |
14 |
Printing on Envelopes, Thick Paper, or Labels .............................................. |
15 |
Printing on Plain Paper, Thin Paper, Recycled Paper, or Bond Paper |
|
using the Manual Feed Slot ........................................................................... |
17 |
Copy ................................................................................................................... |
19 |
Copy a Document.................................................................................................... |
19 |
Copy Settings .......................................................................................................... |
20 |
Copy Option................................................................................................... |
20 |
Copy Multiple Pages on Both Sides of the Paper.......................................... |
22 |
Copy a 2-sided Document Using the ADF..................................................... |
23 |
Copy a 2-sided Document Using the Scanner Glass .................................... |
24 |
Copy Both Sides of an ID Card onto One Page ............................................ |
25 |
xi
5
6
A
B
Scan.................................................................................................................... |
27 |
Scan from Your Computer (Windows®) ................................................................... |
27 |
Save Scanned Documents and Photos to a Folder as a PDF File Using |
|
ControlCenter4 Advanced Mode (Windows®) ............................................... |
27 |
Scan Using the Scan Button on Your Brother Machine........................................... |
28 |
Scan Using the Scan Button on the Machine ................................................ |
28 |
Fax ...................................................................................................................... |
30 |
Before Faxing .......................................................................................................... |
30 |
Set Your Station ID ........................................................................................ |
30 |
Set Telephone Line Compatibility for Interference and VoIP Systems .......... |
31 |
Receive Modes .............................................................................................. |
31 |
Choose the Correct Receive Mode................................................................ |
33 |
Set the F/T Ring Time (Pseudo/Double-ring)................................................. |
35 |
Set the Number of Rings Before the Machine Answers (Ring Delay) ........... |
35 |
Store Numbers ........................................................................................................ |
36 |
Store Address Book Numbers ....................................................................... |
36 |
Change or Delete Address Book Names or Numbers ................................... |
36 |
Telephone Services and External Devices .............................................................. |
38 |
Voice Mail ...................................................................................................... |
38 |
Distinctive Ring .............................................................................................. |
38 |
Voice Over Internet Protocol (VoIP)............................................................... |
38 |
Connection of an External Telephone Answering Device (TAD).................... |
38 |
External and Extension Telephones .............................................................. |
38 |
Send and Receive a Fax Using Your Machine ........................................................ |
40 |
Send a Fax .................................................................................................... |
40 |
Fax Using Your Computer (PC-FAX) ....................................................................... |
42 |
Send Faxes from Your Computer .................................................................. |
42 |
Receive Faxes on Your Computer (Windows® only) ..................................... |
42 |
Troubleshooting ................................................................................................ |
44 |
Identify the Problem................................................................................................. |
44 |
Error and Maintenance Messages........................................................................... |
45 |
Fax and Telephone Problems.................................................................................. |
49 |
Troubleshooting for Other Fax Problems....................................................... |
50 |
Print or Scan Problems............................................................................................ |
52 |
Document and Paper Jams ..................................................................................... |
54 |
Find the Jammed Document or Paper........................................................... |
54 |
Clear the Document Jam ............................................................................... |
54 |
Clear the Paper Jam...................................................................................... |
55 |
Appendix ............................................................................................................ |
62 |
How to Enter Text on Your Brother Machine ........................................................... |
62 |
Supplies................................................................................................................... |
63 |
xii
C Index ................................................................................................................... |
64 |
xiii
1General Information
Control Panel Overview
1 |
2 |
3 |
4 |
00:00 |
01.01.2014 |
|
|
Fax |
Copy |
Scan |
|
Shortcuts |
Settings |
|
|
|
|
|
|
1.Touchscreen Liquid Crystal Display (LCD)
Access menus and options by pressing them on this Touchscreen.
2.Touchpanel
 (Back)
Press to go back to the previous menu.
 (Home)
Press to return to the Home screen.
 (Cancel)
Press to cancel an operation (available when illuminated in red).
Dial Pad (Numerical buttons)
Press the numbers on the Touchpanel to dial telephone or fax numbers and to enter the number of copies.
3. Power On/Off
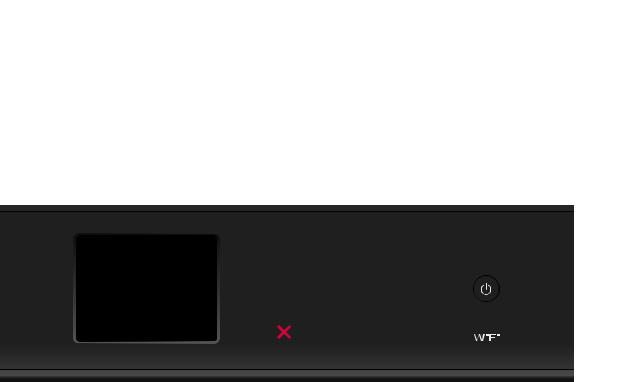
•Turn on the machine by pressing  .
.
•Turn off the machine by pressing and holding down  . The Touchscreen LCD displays Shutting Down and stays on for a few seconds before turning off. If you have an external telephone or TAD connected, it is always available.
Information General 1
1

4. (WiFi)
When the WiFi light is on, your Brother machine is connected to a wireless access point. When the WiFi light blinks, the wireless connection is down, or your machine is in the process of connecting to a wireless access point.
2
Touchscreen LCD
Overview
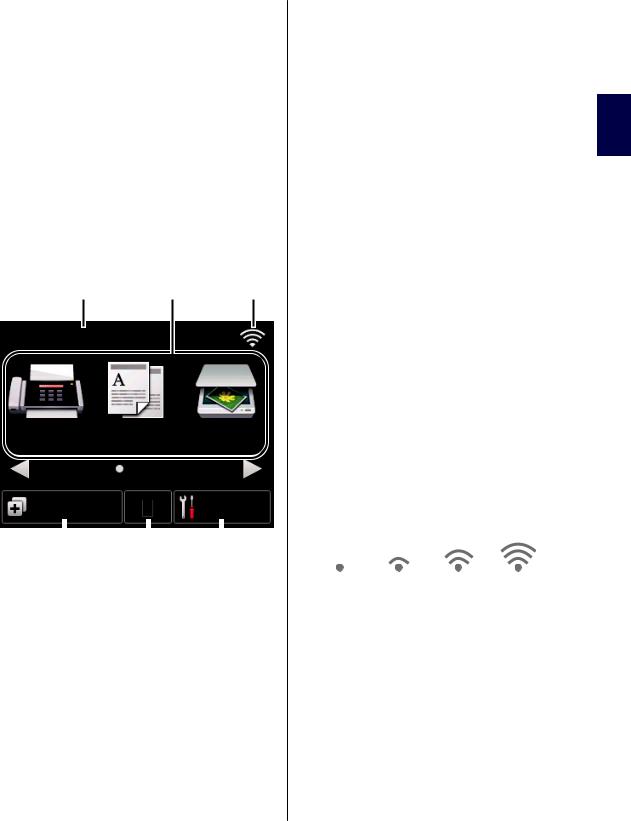
Access the mode button you want by pressing d or c.
From the Home screens, you can access WiFi setup, Shortcuts, Toner level and Settings screens.
This screen displays the machine’s status when the machine is idle. This Home screen is also called the Ready Mode screen. When displayed, this indicates that your machine is Ready for the next command.
The available features will vary depending on your model.
1 |
2 |
3 |
00:00 01.01.2014
Fax |
Copy |
Scan |
|||
Shortcuts |
|
|
Settings |
||
|
|
|
|
|
|
|
|
|
|
|
|
6 |
5 |
4 |
|||
1.Date & Time
Displays the date and time set on the machine.
2.Modes
• Fax
Fax
Press to access Fax mode.
• Copy
Copy
Press to access Copy mode.
• Scan
Scan
Press to access Scan mode.
• Web
Web
Press to connect the Brother machine to an Internet service. For more information, see the Web Connect Guide. Go to your model's Manuals page on the Brother Solutions Center at http://support.brother.com to download the guide.
• Apps
Apps
Press to connect the Brother machine to the Brother Apps service. For more information, see the Web Connect Guide. Go to your model's Manuals page on the Brother Solutions Center at http://support.brother.com to download the guide.
• Secure Print
Press to access the Secure Print option.
• 2in1(ID) Copy
Press to access 2in1(ID) Copy option.
3. Wireless Status
If you are using a wireless connection, a four-level indicator in each of the Home screens displays the current wireless signal strength.
0 |
Max |
•If you see  at the top on the screen, press it to configure wireless settings.
4. Settings
Press to access the Settings menu.
If Secure Function Lock or Setting Lock
has been turned on, a lock  icon appears on the LCD. You must unlock the machine to use Settings.
Information General 1
3
5. Toner
Toner
Displays the remaining toner life. Press to access the Toner menu.
When the Toner cartridge is near the end
of life or has a problem, an error icon  appears on the Toner icon.
6. Shortcuts
Press to create Shortcuts for frequentlyused operations such as sending a fax, making a copy, scanning and using Web Connect.
• Three Shortcuts screens are available with up to four Shortcuts on each Shortcuts screen. A total of 12 Shortcuts are available.
•To display the other Shortcuts screens, press d or c.
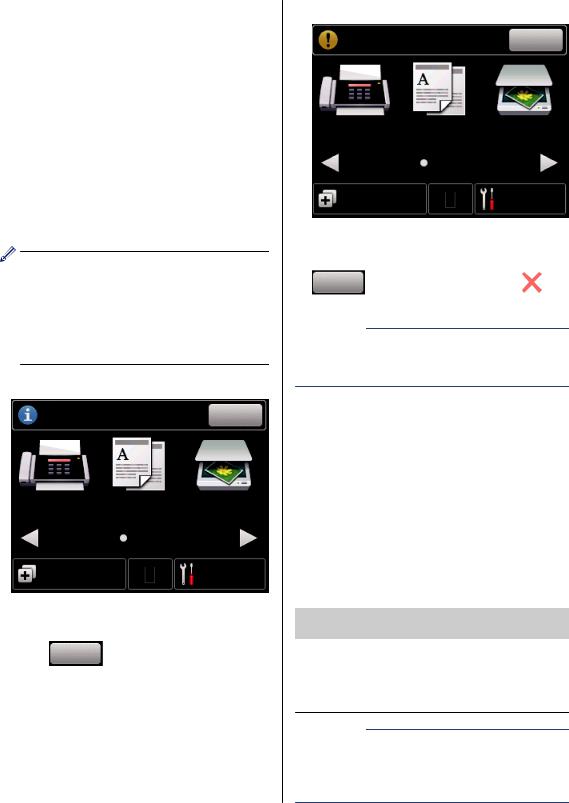
Stored Fax(es)
Stored Fax(es):01 |
Fax |
Copy |
Scan |
Shortcuts |
|
Settings |
The number of received faxes in memory appears at the top of the screen.
Press Print to print the faxes.
Warning icon
Cover is Open. |
Detail |
Fax |
Copy |
Scan |
Shortcuts Settings
The warning icon  appears when there is an error or maintenance message; press
Detail |
to view it, and then press |
|
to |
return to |
Ready Mode. |
|
|
NOTE
•This product adopts the font of ARPHIC TECHNOLOGY CO., LTD.
How to Navigate the Touchscreen LCD
Press your finger on the LCD to operate it. To display and access all the options, press d c or a b on the LCD to scroll through them.
The following steps explain how to navigate through changing a machine setting. In this example, the LCD Backlight setting is changed from Light to Med.
IMPORTANT
DO NOT press the LCD with a sharp object such as a pen or stylus. It may damage the machine.
NOTE
DO NOT touch the LCD immediately after plugging in the power cord or turning on the machine. Doing this may cause an error.
4

1 |
Press |
(Settings). |
6 |
2 |
Press All Settings. |
|
|
3Press a or b to display the General Setup option, and then press General Setup.
All Settings
General Setup
7
Shortcut Settings
Fax
4Press a or b to display the LCD Settings option, and then press LCD Settings.
General Setup
Tray Setting
Volume
LCD Settings
5Press Backlight.
LCD Settings Backlight
Light
Dim Timer
Off
Press Med.
Backlight
Light
Med
Dark
Press  .
.
Information General 1
5
Access Brother Utilities 3 Select the operation you want to use.
Brother Utilities is an application launcher that offers convenient access to all Brother applications installed on your device.
1Do one of the following:
•(Windows® XP, Windows Vista®, Windows® 7, Windows Server® 2003, Windows Server® 2008 and Windows Server® 2008 R2)
Click  Start > All Programs > Brother > Brother Utilities.
•(Windows® 8 and Windows Server® 2012)
Tap or Click  (Brother Utilities) either on the Start screen or the desktop.
•(Windows® 8.1 and Windows Server® 2012 R2)
Move your mouse to the lower left corner of the Start screen and click
 (if you are using a touch-based device, swipe up from the bottom of the Start screen to bring up the Apps screen). When the Apps screen
appears, tap or click  (Brother Utilities).
2Select Brother MFC-XXXX series
(where XXXX is the name of your model).
6

Initial Setup
Set the Date and Time
Related Models:
MFC-L2720DW/MFC-L2740DW
1Press  (Settings) > All
Settings > Initial Setup > Date & Time > Date.
2Enter the last two digits of the year using the LCD, and then press OK.
3Enter the two digits for the month using the LCD, and then press OK.
4Enter the two digits for the day using the LCD, and then press OK.
5 Press Clock Type.
6 Press 12h Clock or 24h Clock.
7 Press Time.
8To enter the time, do one of the following:
•If you selected 12h Clock as the format in the Clock Type setting, enter the time (in 12-hour format) using the LCD.
Press  to select the AM or PM. Press OK.
•If you selected 24h Clock as the format in the Clock Type setting, enter the time (in 24-hour format) using the LCD.
Press OK.
(For example: enter 19:45 for 7:45 PM.)
9 Press  .
.
Adjust the Ring Volume
Related Models:
MFC-L2720DW/MFC-L2740DW
1Press  (Settings) > All Settings > General Setup >
Volume > Ring.
2Press a or b to display the Off, Low, Med, or High option, and then press the option you want.
3 Press  .
.
Adjust the Beeper Volume
When the beeper is on, the machine will beep when you press a button, make a mistake, or after you send or receive a fax. You can choose from a range of volume levels.
1Press  (Settings) > All Settings > General Setup > Volume > Beep.
2Press a or b to display the Off, Low, Med, or High option, and then press the option you want.
3 Press  .
.
Adjust the Speaker Volume
Related Models:
MFC-L2720DW/MFC-L2740DW
1Press  (Settings) > All Settings > General Setup > Volume > Speaker.
Information General 1
7

2Press a or b to display the Off, Low, Med, or High option, and then press the option you want.
3 Press  .
.
8

2Paper Handling
Load Paper
Load and Print using the Paper Tray
•If the Check Size setting is set to On and you pull the paper tray out of the machine, a message appears on the LCD asking if you want to change the paper size. Change the paper size and paper type settings if needed, following the on-screen instructions.
•When you load a different paper size in the tray, you must change the paper size setting in the machine or on your computer at the same time.
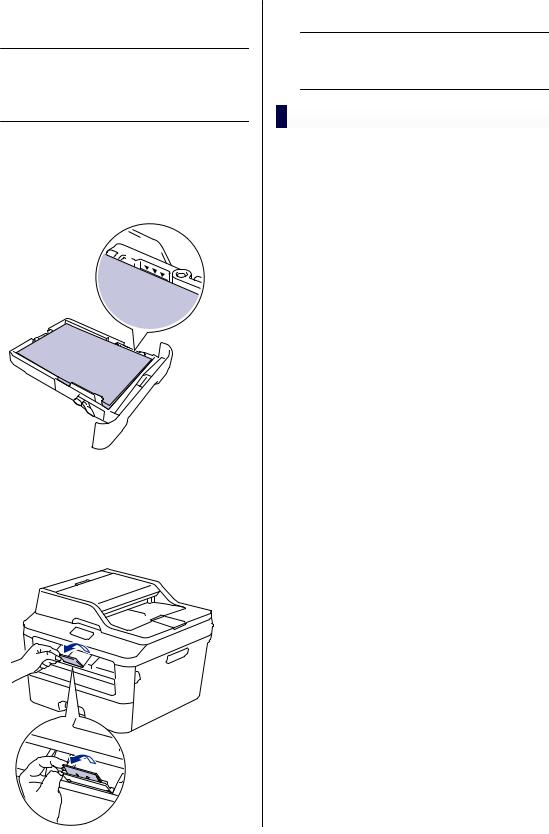
1Pull the paper tray completely out of the machine.
2Press and slide the paper guides to fit the paper.
Press the green release levers to slide the paper guides.
 For Legal or Folio size paper, press the release button (1) in the bottom of the paper tray and then pull out the back of the paper tray. (Legal and Folio size paper are not available in some regions.)
1 
3 Fan the stack of paper well.
Handling Paper 2
9
4Load paper with the printing surface face down in the paper tray.
 DO NOT load different types of paper in the paper tray at the same time. Doing this may cause the paper to jam or misfeed.
5Make sure the paper is below the maximum paper mark (b b b).
Overfilling the paper tray will cause paper jams.
6Slowly push the paper tray completely into the machine.
7Lift the support flap to prevent paper from sliding off the output tray.
8 Send your print job to the machine.
 Change your print preferences in the Print dialog box before sending the print job from your computer.
Set the Check Size
Your Brother machine's Check Size setting causes the machine to display a message when you remove the paper tray from the machine, asking if you changed the paper size.
The default setting is On.
1Press  (Settings) > All Settings > General Setup > Tray Setting > Check Size.
2 Press On or Off.
3 Press  .
.
Change the Paper Size
When you change the size of the paper you load in the tray, you must change the paper size setting on the LCD at the same time.
1Press  (Settings) > All Settings > General Setup > Tray
Setting > Paper Size.
2Press a or b to display the A4, Letter,
A5, A5 L, A6, Executive, Legal or
Folio option, and press the option you want.
3 Press  .
.
10
Loading...