


 Loading...
Online User's Guide
DCP-J562DW MFC-J480DW MFC-J680DW MFC-J880DW
© 2015 Brother Industries, Ltd. All rights reserved.

Home > Table of Contents |
|
Table of Contents |
|
Before You Use Your Brother Machine ............................................................................................... |
1 |
Applicable Models .......................................................................................................................................... |
2 |
Definitions of Notes ........................................................................................................................................ |
3 |
Trademarks .................................................................................................................................................... |
4 |
Important Note ............................................................................................................................................... |
5 |
Introduction to Your Brother Machine................................................................................................. |
6 |
Before Using Your Machine ........................................................................................................................... |
7 |
Control Panel Overview ................................................................................................................................. |
8 |
LCD Overview .............................................................................................................................................. |
12 |
Cloud Service Notifications ................................................................................................................ |
19 |
Settings Screen Overview ........................................................................................................................... |
20 |
Navigate the Touchscreen............................................................................................................................ |
24 |
Access Brother Utilities (Windows®) ............................................................................................................ |
25 |
Uninstall the Brother Software and Drivers (Windows®) .................................................................... |
26 |
Paper Handling.................................................................................................................................... |
27 |
Load Paper................................................................................................................................................... |
28 |
Load Paper in the Paper Tray ............................................................................................................ |
29 |
Load Photo or Photo L Paper in Photo Paper Tray ............................................................................ |
40 |
Load Paper in the Manual Feed Slot.................................................................................................. |
43 |
Unprintable Area ................................................................................................................................ |
47 |
Paper Settings .................................................................................................................................... |
48 |
Acceptable Paper and Other Print Media........................................................................................... |
52 |
Load Documents .......................................................................................................................................... |
61 |
Load Documents in the Automatic Document Feeder (ADF) ............................................................. |
62 |
Load Documents on the Scanner Glass ............................................................................................ |
64 |
Unscannable Area .............................................................................................................................. |
66 |
Print ...................................................................................................................................................... |
67 |
Print from Your Computer (Windows®) ........................................................................................................ |
68 |
Print a Photo (Windows®)................................................................................................................... |
69 |
Print a Document (Windows®)............................................................................................................ |
70 |
Cancel a Print Job (Windows®) .......................................................................................................... |
71 |
Print More Than One Page on a Single Sheet of Paper (N in 1) (Windows®).................................... |
72 |
Print as a Poster (Windows®)............................................................................................................. |
73 |
Print on Both Sides of the Paper Automatically (Automatic 2-sided Printing) (Windows®) ................ |
74 |
Print as a Booklet Automatically (Windows®)..................................................................................... |
77 |
Print a Colour Document in Greyscale (Windows®) ........................................................................... |
79 |
Prevent Smudged Printouts and Paper Jams When Printing on Both Sides of the Paper |
|
(Windows®) ........................................................................................................................................ |
80 |
Use a Preset Print Profile (Windows®) ............................................................................................... |
81 |
Change the Default Print Settings (Windows®) .................................................................................. |
84 |
Print Settings (Windows®) .................................................................................................................. |
85 |
Print from Your Computer (Macintosh)......................................................................................................... |
90 |
Print a Photo (Macintosh) ................................................................................................................... |
91 |
|
i |

Home > Table of Contents |
|
Print a Document (Macintosh) ............................................................................................................ |
92 |
Print on Both Sides of the Paper Automatically (Automatic 2-sided Printing) (Macintosh) ................ |
93 |
Print More Than One Page on a Single Sheet of Paper (N in 1) (Macintosh).................................... |
94 |
Print a Colour Document in Greyscale (Macintosh) ........................................................................... |
95 |
Prevent Smudged Printouts and Paper Jams When Printing on Both Sides of the Paper |
|
(Macintosh)......................................................................................................................................... |
96 |
Print Options (Macintosh) ................................................................................................................... |
97 |
Scan.................................................................................................................................................... |
103 |
Scan Using the Scan Button on Your Brother Machine ............................................................................. |
104 |
Scan Photos and Graphics............................................................................................................... |
105 |
Save Scanned Data to a Folder as a PDF File ................................................................................ |
107 |
Save Scanned Data to a Memory Card or USB Flash Drive............................................................ |
109 |
Scan Multiple Business Cards and Photos (Auto Crop)................................................................... |
114 |
Scan to an Editable Text File Using OCR......................................................................................... |
116 |
Scan to E-mail Attachment ............................................................................................................... |
118 |
Web Services for Scanning on Your Network (Windows Vista® SP2 or greater, Windows® 7 and |
|
Windows® 8)..................................................................................................................................... |
120 |
Change Scan Button Settings from ControlCenter4 (Windows®)..................................................... |
125 |
Change Scan Button Settings from ControlCenter2 (Macintosh)..................................................... |
129 |
Scan from Your Computer (Windows®)...................................................................................................... |
132 |
Scan Using ControlCenter4 Home Mode (Windows®) ..................................................................... |
133 |
Scan Using ControlCenter4 Advanced Mode (Windows®)............................................................... |
148 |
Scan Using Nuance™ PaperPort™ 14SE or Other Windows® Applications .................................... |
163 |
Scan Using Windows® Photo Gallery or Windows® Fax and Scan ................................................. |
167 |
Install BookScan Enhancer and Whiteboard Enhancer (Windows®) ............................................... |
171 |
Scan from Your Computer (Macintosh) ...................................................................................................... |
172 |
Scan Using ControlCenter2 (Macintosh) .......................................................................................... |
173 |
Scan Using Presto! PageManager or other TWAIN-Compliant Applications (Macintosh)................ |
188 |
Copy ................................................................................................................................................... |
194 |
Copy a Document ..................................................................................................................................... |
195 |
Enlarge or Reduce Copied Images ............................................................................................................ |
198 |
Sort Copies ................................................................................................................................................ |
200 |
Make Page Layout Copies ( N in 1 or Poster)............................................................................................ |
201 |
Page Layout Options for Copies ...................................................................................................... |
203 |
2-sided Copy .............................................................................................................................................. |
206 |
Copy on Both Sides of the Paper (1-sided to 2-sided/2-sided to 2-sided) ....................................... |
207 |
Copy an ID Card ........................................................................................................................................ |
210 |
Copy in Ink Save Mode ............................................................................................................................. |
212 |
Copy Options ............................................................................................................................................. |
213 |
Fax ...................................................................................................................................................... |
217 |
Send a Fax................................................................................................................................................. |
218 |
Send a Fax from Your Brother Machine ........................................................................................... |
219 |
Send a Fax Manually........................................................................................................................ |
222 |
Send a Fax at the End of a Conversation ........................................................................................ |
223 |
Send the Same Fax to More than One Recipient (Broadcasting) .................................................... |
224 |
Send a Fax in Real Time .................................................................................................................. |
227 |
|
ii |

Home > Table of Contents |
|
Send a Fax at a Specified Time (Delayed Fax)................................................................................ |
228 |
Cancel a Fax in Progress ................................................................................................................. |
229 |
Check and Cancel a Pending Fax.................................................................................................... |
230 |
Fax Polling........................................................................................................................................ |
231 |
Fax Options ...................................................................................................................................... |
235 |
Receive a Fax ............................................................................................................................................ |
237 |
Receive Mode Settings .................................................................................................................... |
238 |
Fax Preview...................................................................................................................................... |
245 |
Shrink Page Size of an Oversized Incoming Fax ............................................................................. |
249 |
Set the Fax Receive Stamp.............................................................................................................. |
250 |
Receive a Fax at the End of a Telephone Conversation .................................................................. |
251 |
Memory Receive Options ................................................................................................................. |
252 |
Remote Fax Retrieval....................................................................................................................... |
260 |
Fax Polling........................................................................................................................................ |
266 |
Voice Operations and Fax Numbers .......................................................................................................... |
274 |
Voice Operations .............................................................................................................................. |
275 |
Store Fax Numbers .......................................................................................................................... |
278 |
Set up Groups for Broadcasting ....................................................................................................... |
285 |
Telephone Services and External Devices................................................................................................. |
290 |
Distinctive Ring................................................................................................................................. |
291 |
Caller ID ........................................................................................................................................... |
295 |
FaxAbility .......................................................................................................................................... |
297 |
Voice Over Internet Protocol (VoIP/Telephone Line Interference).................................................... |
299 |
External TAD (Telephone Answering Device)................................................................................... |
300 |
External and Extension Telephones ................................................................................................. |
304 |
Fax Reports ............................................................................................................................................... |
310 |
Set the Transmission Verification Report's Style .............................................................................. |
311 |
Set the Fax Journal's Interval Period................................................................................................ |
312 |
PC-FAX ...................................................................................................................................................... |
314 |
PC-FAX for Windows®...................................................................................................................... |
315 |
PC-FAX for Macintosh ...................................................................................................................... |
339 |
PhotoCapture Center ........................................................................................................................ |
342 |
Print Photos Directly from Media................................................................................................................ |
343 |
Compatible Memory Cards and USB Flash Drives .......................................................................... |
344 |
Important Information about PhotoCapture Center .......................................................................... |
345 |
Print Photos from Media Using the Photo Button on the Brother Machine ...................................... |
346 |
Copy Photos from Media to a Computer.................................................................................................... |
360 |
Before Copying Photos .................................................................................................................... |
361 |
Copy Photos from Media Over a Local Connection ......................................................................... |
362 |
Copy Photos from Media Over a Network Connection..................................................................... |
363 |
Print Photos from ControlCenter4 (Windows®).......................................................................................... |
364 |
Edit Photos Using ControlCenter4 (Windows®) ............................................................................... |
366 |
Network .............................................................................................................................................. |
368 |
Get Started................................................................................................................................................. |
369 |
Supported Basic Network Features.................................................................................................. |
370 |
Network Management Software and Utilities ............................................................................................. |
371 |
Learn about Network Management Software and Utilities ............................................................... |
372 |
|
iii |

Home > Table of Contents |
|
Additional Methods of Configuring Your Brother Machine for a Wireless Network .................................... |
373 |
Before Configuring Your Brother Machine for a Wireless Network................................................... |
374 |
Configure Your Machine for a Wireless Network Using the One Push Method of Wi-Fi Protected |
|
Setup™ (WPS) or AOSS™................................................................................................................ |
375 |
Configure Your Machine for a Wireless Network Using the PIN Method of Wi-Fi Protected |
|
Setup™ (WPS).................................................................................................................................. |
377 |
Configure Your Machine for a Wireless Network in Ad-Hoc Mode Using a New SSID .................... |
380 |
Configure Your Machine for a Wireless Network Settings When the SSID is Not Broadcast........... |
382 |
Use Wi-Fi Direct® ............................................................................................................................. |
385 |
Advanced Network Features...................................................................................................................... |
398 |
Print the Network Configuration Report............................................................................................ |
399 |
Technical Information for Advanced Users................................................................................................. |
400 |
Reset the Network Settings to Factory Default ................................................................................ |
401 |
Print the WLAN Report ..................................................................................................................... |
402 |
Security .............................................................................................................................................. |
405 |
Lock the Machine Settings ......................................................................................................................... |
406 |
About Using Memory Security .......................................................................................................... |
407 |
About Using TX Lock........................................................................................................................ |
411 |
Mobile/Web Connect ......................................................................................................................... |
415 |
Use Web Services from Your Brother Machine.......................................................................................... |
416 |
Use Brother Web Services......................................................................................................................... |
417 |
Print with Google Cloud Print™ .................................................................................................................. |
419 |
Print with AirPrint........................................................................................................................................ |
420 |
Print with Mopria™...................................................................................................................................... |
421 |
Print and Scan from a Mobile Device......................................................................................................... |
422 |
Print and Scan Using Near-Field Communication (NFC)........................................................................... |
423 |
ControlCenter .................................................................................................................................... |
424 |
ControlCenter4 (Windows®)....................................................................................................................... |
425 |
Change the Operation Mode in ControlCenter4 (Windows®) .......................................................... |
426 |
Scan Using ControlCenter4 Home Mode (Windows®) ..................................................................... |
428 |
Scan Using ControlCenter4 Advanced Mode (Windows®)............................................................... |
429 |
Set Up the Brother Machine Using ControlCenter4 (Windows®) ..................................................... |
430 |
Create a Custom Tab Using ControlCenter4 Advanced Mode (Windows®)..................................... |
432 |
ControlCenter2 (Macintosh) ....................................................................................................................... |
434 |
Scan Using ControlCenter2 (Macintosh) .......................................................................................... |
435 |
Set Up the Brother Machine Using ControlCenter2 (Macintosh)...................................................... |
436 |
Turn the AutoLoad Feature On (Macintosh)..................................................................................... |
438 |
Troubleshooting ................................................................................................................................ |
439 |
Error and Maintenance Messages ............................................................................................................. |
440 |
Transfer Your Faxes or Fax Journal Report ..................................................................................... |
455 |
Document Jams ......................................................................................................................................... |
460 |
Document is Jammed in the Top of the ADF Unit ............................................................................ |
461 |
Document is Jammed inside the ADF Unit....................................................................................... |
462 |
Remove Paper Scraps Jammed in the ADF .................................................................................... |
463 |
Printer Jam or Paper Jam .......................................................................................................................... |
464 |
Paper is Jammed Inside and in the Front of the Machine (Jam A Inside/Front) .............................. |
465 |
|
iv |

Home > Table of Contents |
|
Paper is Jammed in the Front of the Machine (Jam B Front)........................................................... |
469 |
Paper is Jammed in the Back of the Machine (Jam C Rear) ........................................................... |
472 |
If You Are Having Difficulty with Your Machine .......................................................................................... |
474 |
Paper Handling and Printing Problems ............................................................................................ |
475 |
Telephone and Fax problems ........................................................................................................... |
481 |
Other Problems ................................................................................................................................ |
488 |
Network Problems ............................................................................................................................ |
490 |
Check the Machine Information ................................................................................................................. |
499 |
Reset Your Brother Machine ...................................................................................................................... |
500 |
Reset Functions ............................................................................................................................... |
501 |
Routine Maintenance ........................................................................................................................ |
502 |
Replace the Ink Cartridges......................................................................................................................... |
503 |
Clean Your Brother Machine ...................................................................................................................... |
506 |
Clean the Scanner............................................................................................................................ |
507 |
Clean the Print Head from Your Brother Machine ............................................................................ |
509 |
Clean the Print Head from Your Computer (Windows®)................................................................... |
511 |
Clean the Print Head from Your Computer (Macintosh) ................................................................... |
512 |
Clean the Machine's LCD................................................................................................................. |
513 |
Clean the Outside of the Machine .................................................................................................... |
514 |
Clean the Machine's Printer Platen .................................................................................................. |
516 |
Clean the Paper Feed Rollers .......................................................................................................... |
517 |
Clean the Paper Pick-up Rollers ...................................................................................................... |
519 |
Check Your Brother Machine ..................................................................................................................... |
520 |
Check the Print Quality..................................................................................................................... |
521 |
Check the Print Alignment from Your Brother Machine .................................................................... |
525 |
Check the Ink Volume ...................................................................................................................... |
527 |
Monitor Machine Status from Your Computer (Windows®) .............................................................. |
529 |
Monitor Machine Status from Your Computer (Macintosh)............................................................... |
534 |
Correct the Paper Feed to Clear Vertical Lines.......................................................................................... |
536 |
Pack and Ship Your Brother Machine ........................................................................................................ |
537 |
Machine Settings............................................................................................................................... |
540 |
Change Machine Settings from the Control Panel ..................................................................................... |
541 |
In the Event of Power Failure (Memory Storage) ............................................................................. |
542 |
General Settings............................................................................................................................... |
543 |
Save Your Favourite Settings as a Shortcut..................................................................................... |
559 |
Print Reports .................................................................................................................................... |
562 |
Settings and Features Tables........................................................................................................... |
565 |
Change Machine Settings from Your Computer......................................................................................... |
588 |
Change the Machine Settings Using Remote Setup ........................................................................ |
589 |
Appendix............................................................................................................................................ |
602 |
Specifications ............................................................................................................................................. |
603 |
Enter Text on Your Brother Machine .......................................................................................................... |
611 |
Supply Specifications ................................................................................................................................. |
613 |
Glossary............................................................................................................................................. |
614 |
v

 Home > Before You Use Your Brother Machine
Before You Use Your Brother Machine
•Applicable Models
•Definitions of Notes
•Trademarks
•Important Note
1

 Home > Before You Use Your Brother Machine > Applicable Models
Applicable Models
This User's Guide applies to the following models: 1.8 inch LCD models: MFC-J480DW
2.7 inch Touchscreen LCD models: DCP-J562DW/MFC-J680DW/MFC-J880DW
Related Information
• Before You Use Your Brother Machine
2

 Home > Before You Use Your Brother Machine > Definitions of Notes
Definitions of Notes
We use the following symbols and conventions throughout this User's Guide:
 WARNING
WARNING indicates a potentially hazardous situation which, if not avoided, could result in death or serious injuries.
 CAUTION
CAUTION indicates a potentially hazardous situation which, if not avoided, may result in minor or moderate injuries.
IMPORTANT
IMPORTANT indicates a potentially hazardous situation which, if not avoided, may result in damage to property or loss of product functionality.
NOTE
NOTE specifies the operating environment, conditions for installation, or special conditions of use.
Tips icons provide helpful hints and supplementary information.
Electrical Hazard icons alert you to possible electrical shock.
Bold
Bold style identifies buttons on the machine's control panel or computer screen.
Italics
Italicised style emphasises an important point or refers you to a related topic.
[Courier New]
Courier New font identifies messages shown on the machine's LCD.
Related Information
• Before You Use Your Brother Machine
3

 Home > Before You Use Your Brother Machine > Trademarks
Trademarks
Microsoft, Windows, Windows Vista, Windows Server, SharePoint, Internet Explorer, Word, Excel, PowerPoint, OneNote and Windows Phone are either registered trademarks or trademarks of Microsoft Corporation in the United States and/or other countries.
Apple, Macintosh, Safari, iPad, iPhone, iPod touch and OS X are trademarks of Apple Inc., registered in the United States and other countries.
AirPrint is a trademark of Apple Inc.
Nuance and PaperPort are trademarks or registered trademarks of Nuance Communications, Inc. or its affiliates in the United States and/or other countries.
Memory Stick PRO Duo, Memory Stick Duo, Memory Stick Micro and M2 are trademarks of Sony Corporation. The SDHC Logo is a trademark of SD-3C, LLC.
AOSS is a trademark of Buffalo Inc.
Wi-Fi, Wi-Fi Alliance, Wi-Fi Direct and Wi-Fi Protected Access are registered trademarks of Wi-Fi Alliance®. WPA, WPA2, Wi-Fi Protected Setup and Wi-Fi Protected Setup logo are trademarks of Wi-Fi Alliance®. Flickr is a trademark of Yahoo! Inc.
Android, Android Market, Google Cloud Print, Google Drive, Picasa Web Albums, Google Play and Google Chrome are trademarks of Google, Inc. Use of these trademarks are subject to Google Permissions.
Mozilla and Firefox are registered trademarks of the Mozilla Foundation.
UNIX is a registered trademark of The Open Group in the United States and other countries. Linux is the registered trademark of Linus Torvalds in the U.S. and other countries.
The Bluetooth word mark is owned by the Bluetooth SIG, Inc. and any use of such marks by Brother Industries, Ltd. is under license.
Intel is a trademark of Intel Corporation in the U.S. and/or other countries. Evernote is a trademark of Evernote Corporation and used under a license. Mopria is a trademark of Mopria Alliance, Inc.
WordPerfect is a registered trademark of Corel Corporation and/or its subsidiaries in Canada, the United States and/or other countries.
Each company whose software title is mentioned in this manual has a Software License Agreement specific to its proprietary programs.
Any trade names and product names of companies appearing on Brother products, related documents and any other materials are all trademarks or registered trademarks of those respective companies.
Related Information
• Before You Use Your Brother Machine
4
 Home > Before You Use Your Brother Machine > Important Note
Important Note
•Do not use this product outside the country of purchase as it may violate the wireless telecommunication and power regulations of that country.
•Not all models are available in all countries.
•Windows® XP in this document represents Windows® XP Professional, Windows® XP Professional x64 Edition and Windows® XP Home Edition.
•Windows Server® 2003 in this document represents Windows Server® 2003, Windows Server® 2003 x64 Edition, Windows Server® 2003 R2 and Windows Server® 2003 R2 x64 Edition.
•Windows Server® 2008 in this document represents Windows Server® 2008 and Windows Server® 2008 R2.
•In this User's Guide, the LCD messages of the MFC-J880DW are used unless otherwise specified.
•In this User's Guide, the illustrations of the MFC-J880DW are used unless otherwise specified.
•Unless otherwise specified, the screens in this manual are from Windows® 7 and OS X v10.9.x. Screens on your computer may vary depending on your operating system.
•This documentation is for both MFC and DCP models. Where it says 'MFC' in this User's Guide, read 'MFCxxxx' as 'DCP-xxxx'.
Related Information
• Before You Use Your Brother Machine
5

 Home > Introduction to Your Brother Machine
Introduction to Your Brother Machine
•Before Using Your Machine
•Control Panel Overview
•LCD Overview
•Settings Screen Overview
•Navigate the Touchscreen
•Access Brother Utilities (Windows®)
Brother Utilities is an application launcher that offers convenient access to all Brother applications installed on your computer.
6

 Home > Introduction to Your Brother Machine > Before Using Your Machine
Before Using Your Machine
Before attempting any printing operation, confirm the following:
•Make sure you have installed the Brother software and drivers.
•For USB or network cable users: Make sure the interface cable is physically secure.
Selecting the correct type of paper
For high quality printing, it is important to select the correct type of paper. Be sure to read the information about acceptable paper before buying paper, and to determine the printable area depending on the settings in the printer driver.
Simultaneous printing, scanning and faxing
Your machine can print from your computer while sending or receiving a fax into memory or while scanning a document into the computer. Fax sending will not be stopped during printing from your computer. However, when the machine is copying or receiving a fax on paper, it pauses the printing operation, and then continues printing when copying or fax receiving has finished.
 DCP models do not support the fax feature.
Firewall (Windows®)
If your computer is protected by a firewall and you are unable to network print, network scan, or PC-FAX, you
may need to configure the firewall settings. If you are using the Windows® Firewall and you installed the Brother software and drivers from the CD-ROM, the necessary firewall settings have already been set. If you are using any other personal firewall software, see the User's Guide for your software or contact the software manufacturer.
Related Information
• Introduction to Your Brother Machine
7
 Home > Introduction to Your Brother Machine > Control Panel Overview
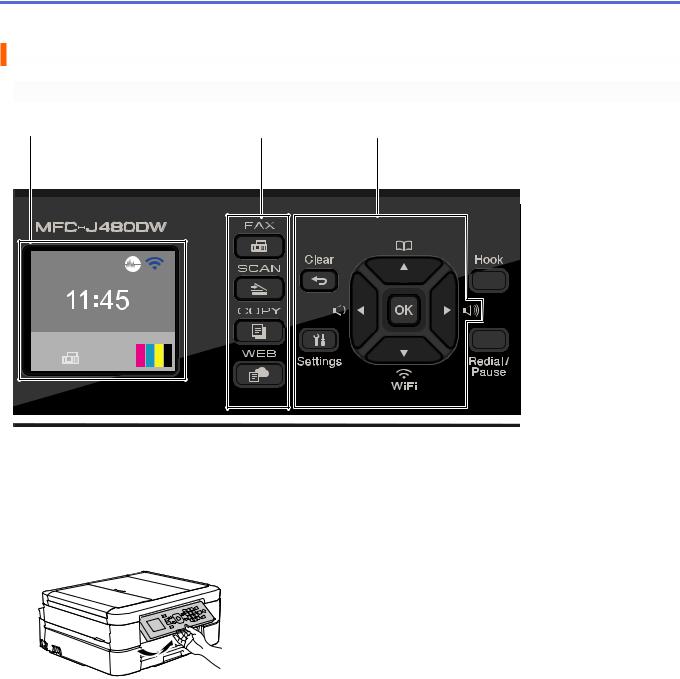
Control Panel Overview
MFC-J480DW
1 |
2 |
3 |
|
01. 01. 2016 |
FAX |
01 |
1.1.8"(44.9 mm) Liquid Crystal Display (LCD)
Displays messages to help you set up and use the machine. Adjust the angle of the control panel by lifting it.
2.Mode buttons
 FAX
FAX
Press to switch the machine to FAX Mode.
 SCAN
SCAN
Press to switch the machine to SCAN Mode.
 COPY
COPY
Press to switch the machine to COPY Mode.
 WEB
WEB
Press to switch the machine to WEB Mode.
3.Settings buttons
Clear
Press to delete characters or to go back to the previous menu level.
8
Settings
Press to access the main menu.
OK
Press to choose a setting.
 d or c

Press to adjust the ring volume while the machine is idle.
•Press to store Speed Dial and Group numbers in the machine's memory.
•Press to look up and dial numbers that are stored in the machine's memory.
Press to configure the wireless settings while the machine is idle.
a or b
Press to scroll through the menus and options.
d or c
Press to move the cursor left or right on the LCD.
4 |
5 |
6 |
7 |
||||
|
|
|
|
|
|
|
|
|
|
|
|
|
|
|
|
|
|
|
|
|
|
|
|
|
|
|
|
|
|
|
|
|
|
|
|
|
|
|
|
|
|
|
|
|
|
|
|
|
|
|
|
|
|
|
|
|
|
|
|
|
|
|
|
|
|
|
|
|
|
|
|
|
|
|
|
|
|
|
|
8
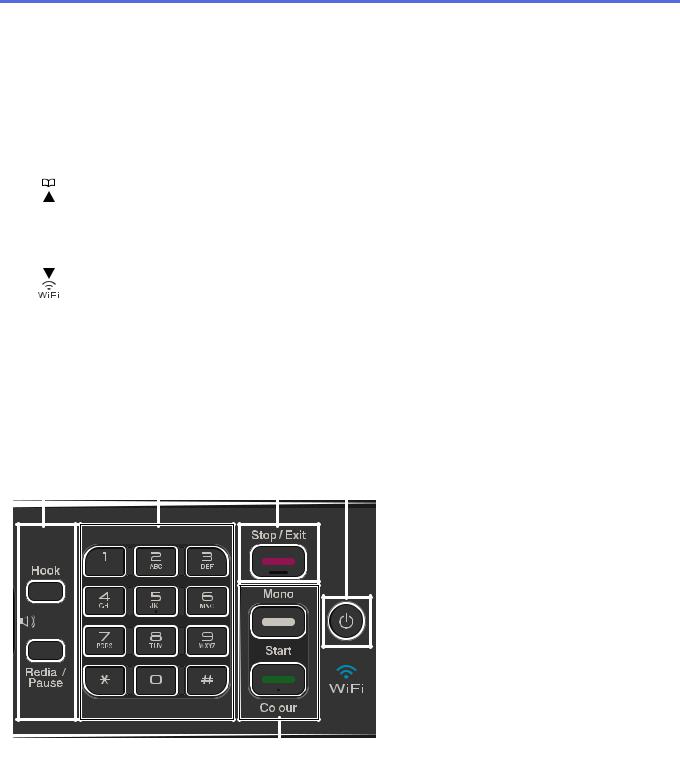
4. Telephone buttons
Hook
Press before dialing to ensure a fax machine answers, and then press Mono Start or Colour Start.
If the machine is in Fax/Tel (F/T) Mode and you pick up the handset of an external telephone during the F/T ring (pseudo/double-ring), press Hook to talk.
Redial/Pause
•Press to dial the last 30 numbers you called.
•Press to insert a pause when dialling numbers.
9

5.Dial Pad
•Use to dial fax and telephone numbers.
•Use as a keyboard to enter text or characters.
6. Stop/Exit
•Press to stop an operation.
•Press to exit from a menu.
7. Power On/Off
Press  to turn on the machine.
Press and hold down  to turn off the machine. The LCD will display [Shutting Down] and will stay on
for a few seconds before turning itself off. If you have connected an external telephone or TAD, it is always available.
If you turn off the machine using  , it will still clean the print head periodically to maintain print quality. To
prolong print head life, provide better ink efficiency, and maintain print quality, keep your machine connected to a power source at all times.
8.Start buttons  Mono Start
•Press to start sending faxes in monochrome.
•Press to start making copies in monochrome.
•Press to start scanning documents (in colour or monochrome depending on the scan setting).
 Colour Start
•Press to start sending faxes in full colour.
•Press to start making copies in full colour.
•Press to start scanning documents (in colour or monochrome depending on the scan setting).
DCP-J562DW/MFC-J680DW/MFC-J880DW
The control panel will vary depending on your model.
1 |
|
2 |
3 |
4 |
|
||||||||
|
|
|
|
|
|
|
|
|
|
|
|
|
|
|
|
|
|
|
|
|
|
|
|
|
|
|
|
|
|
|
|
|
|
|
|
|
|
|
|
|
|
|
|
|
|
|
|
|
|
|
|
|
|
|
|
|
|
|
|
|
|
|
|
|
|
|
|
|
|
|
|
|
|
|
|
|
|
|
|
|
|
|
|
|
|
|
|
|
|
|
|
|
|
|
|
|
|
|
|
|
|
|
|
|
|
|
|
|
|
|
|
1. NFC (Near Field Communication) logo (MFC-J880DW)
10

•If your Android™ device supports the NFC feature, you can print from your device or scan documents to your device by touching it to the NFC logo on the control panel. You must download and install Brother iPrint&Scan to your Android™ device to use this feature.
•Make sure the NFC settings of both your Brother machine and your Android™ device are set to On.
2.2.7"(67.5 mm) Touchscreen Liquid Crystal Display (LCD)
Access menus and options by pressing them on this Touchscreen. Adjust the angle of the Touchscreen LCD and Touchpanel by lifting it.
3.Touchpanel
 (Back)
Press to go back to the previous menu.
 (Home)
Press to return to the Home screen.
While the machine is in Sleep Mode, the Home icon blinks.
 (Cancel)
Press to cancel an operation (available when illuminated in red).
4.  Power On/Off
Press  to turn the machine on.
Press and hold down  to turn the machine off. The Touchscreen will display [Shutting Down] and will
stay on for a few seconds before turning itself off. If you have connected an external telephone or TAD, it is always available.
If you turn the machine off using  , it will still clean the print head periodically to maintain print quality. To
prolong print head life, provide better ink efficiency, and maintain print quality, keep your machine connected to a power source at all times.
Related Information
•Introduction to Your Brother Machine
•Print and Scan Using Near-Field Communication (NFC)
11
 Home > Introduction to Your Brother Machine > LCD Overview
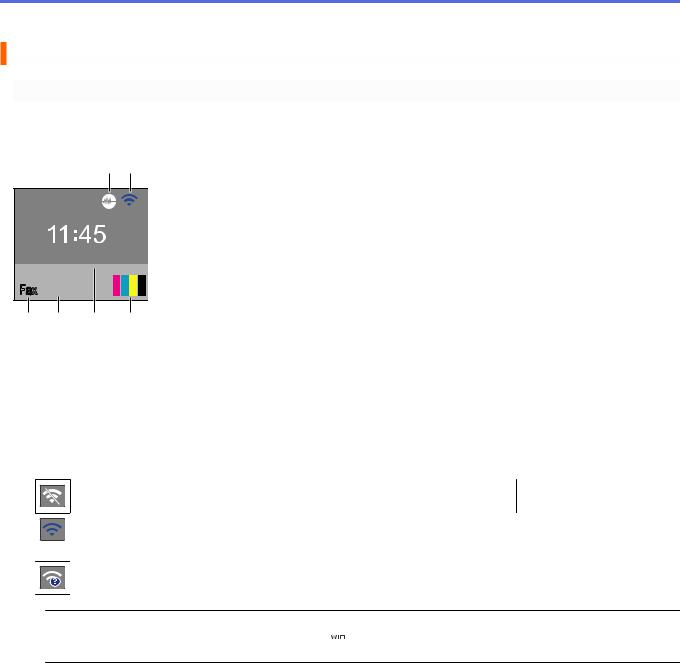
LCD Overview
MFC-J480DW
This screen shows the machine’s status when the machine is idle. This Home screen is also called the Ready Mode screen. When displayed, this indicates that your machine is Ready for the next command.
1 2
01. 01. 2016
FAX  01
01
6 5 4 3
1.Quiet Mode
The  (Quiet Mode) icon appears when the [Quiet Mode] setting is set to [On].
The Quiet Mode setting can reduce printing noise. When Quiet Mode is turned on, the print speed becomes slower.
2.Wireless Status
Each icon in the following table shows the wireless network status.
The wireless setting is disabled.
Wireless network is connected.
A three-level indicator in the LCD displays the current wireless signal strength.
The wireless access point cannot be detected.
 You can configure wireless settings by pressing
  on the control panel. For more information, see the
Quick Setup Guide.
3.Ink
Displays the available ink volume.
When an ink cartridge is near the end of its life or having a problem, an error icon is displayed on the ink colour.
4.Date & Time
Displays the date and time set on the machine.
5.Faxes in memory
Displays how many received faxes are in the machine's memory.
6.Receive Mode
Displays the current Receive Mode.
•[Fax] (Fax Only)
•[F/T] (Fax/Tel)
•[TAD] (External TAD)
•[Mnl] (Manual)
12
 (For some countries)
When the Distinctive Ring feature is turned on, the LCD displays [D/R]. (For New Zealand)
When the FaxAbility feature is turned on, the LCD displays [D/R].
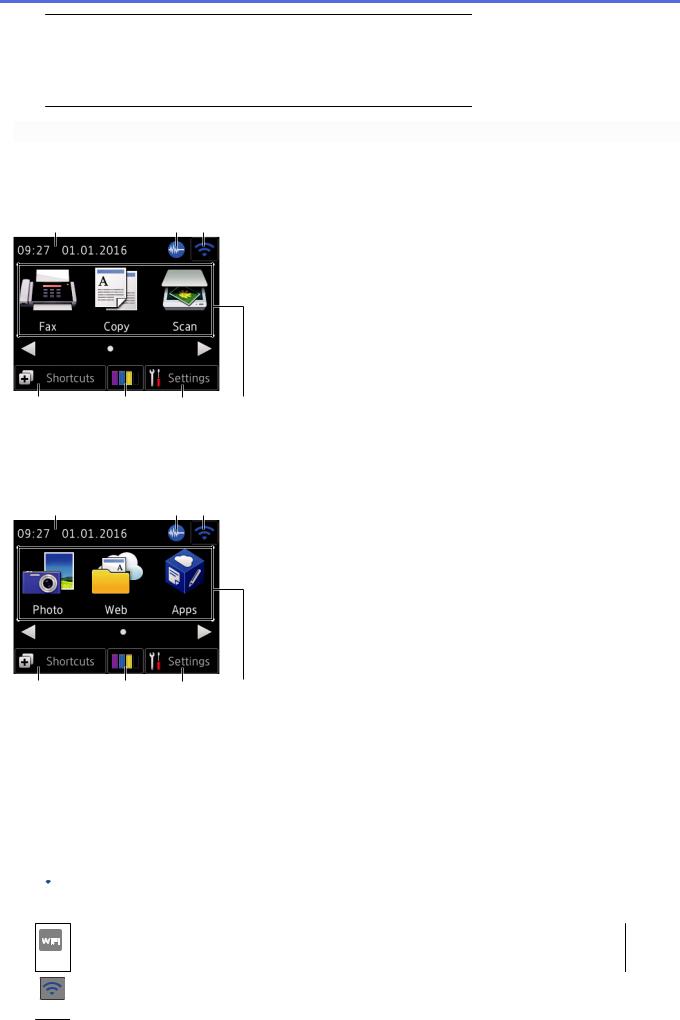
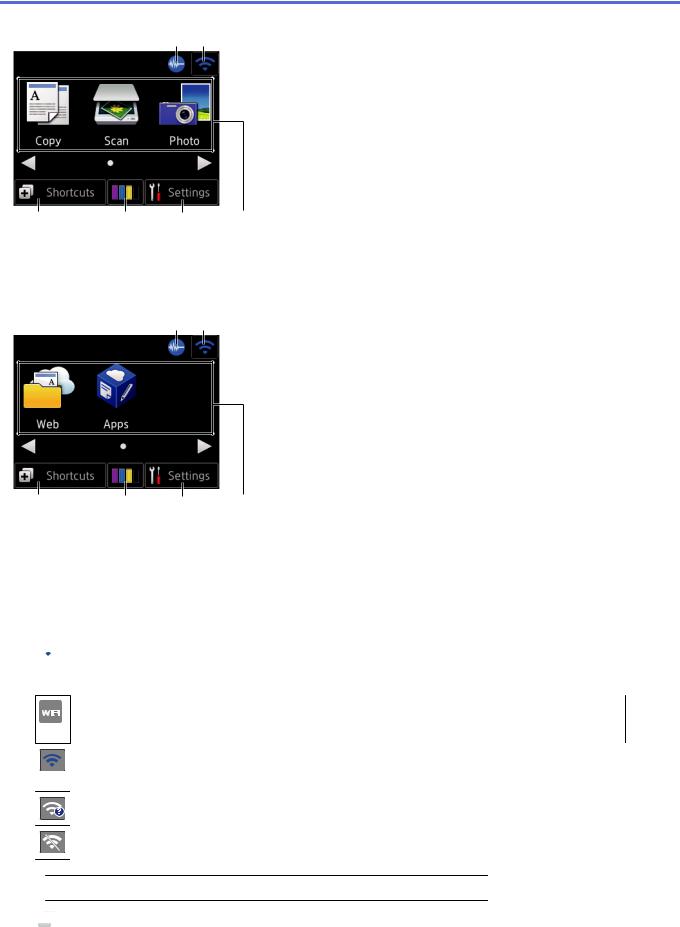
MFC-J680DW/MFC-J880DW
There are two Home screens that you can access by pressing d or c.
From the Home screens, you can access Wi-Fi setup, Shortcuts, Ink levels and Setup screens.
Home Screen 1 |
|
|
1 |
2 |
3 |
4 |
5 |
6 |
7 |
This screen shows the machine’s status when the machine is idle. This Home screen is also called the Ready Mode screen. When displayed, this indicates that your machine is Ready for the next command.
Home Screen 1 provides access to [Fax], [Copy] and [Scan] operations.
Home Screen 2 |
|
|
1 |
2 |
3 |
4 |
5 |
6 |
7 |
Home Screen 2 provides access to additional features, such as [Photo], [Web] and [Apps] operations.
1.Date & Time
Displays the date and time set on the machine.
2. Quiet Mode
This icon appears when the [Quiet Mode] setting is set to [On].
The Quiet Mode setting can reduce printing noise. When Quiet Mode is turned on, the print speed becomes slower.
3. Wireless Status
Each icon in the following table shows the wireless network status.
Your machine has not been connected to the wireless access point.
Press this button to configure wireless settings. For more information, see the Quick Setup Guide.
Wireless network is connected.
A three-level indicator in each of the Home screens displays the current wireless signal strength.
13
The wireless access point cannot be detected.
The wireless setting is disabled.
 You can configure wireless settings by pressing the Wireless Status button.
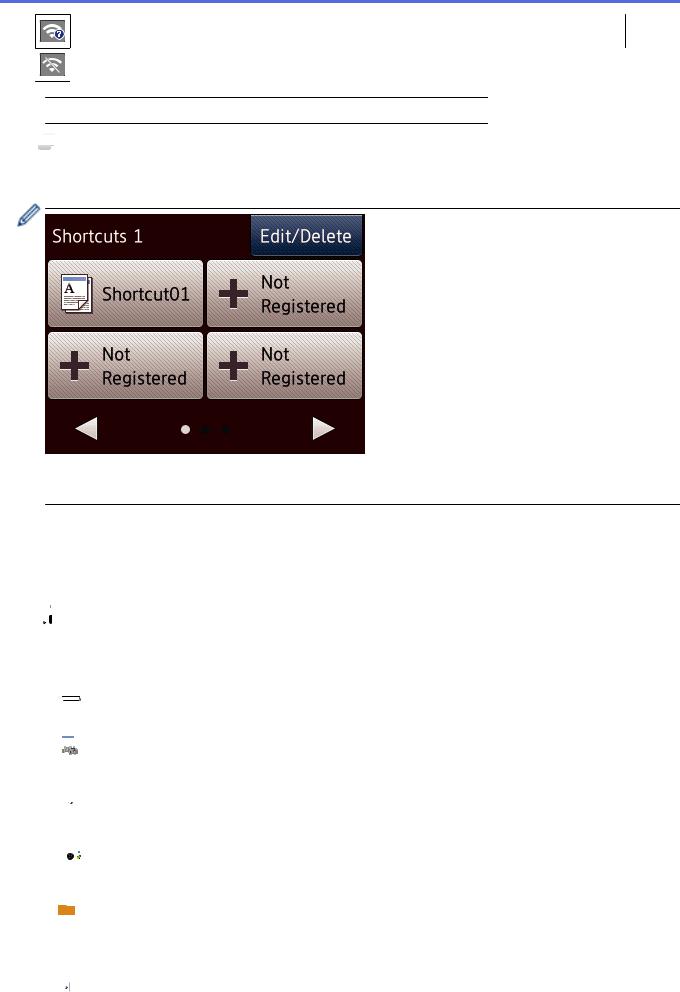
4. [Shortcuts]
Create Shortcuts for frequently-used operations such as sending a fax, copying, scanning and using Web Connect.
•There are three Shortcuts screens. You can program four shortcuts on each screen.
•To display the other Shortcuts screens, press d or c.
5. [Ink]
[Ink]
Displays the available ink volume. Press to access the [Ink] menu.
When an ink cartridge is near the end of its life or having a problem, an error icon is displayed on the ink colour.
6. [Settings]
Press to access the [Settings] menu.
7.Modes:
• [Fax]
[Fax]
Press to access Fax mode.
• [Copy]
Press to access Copy mode.
• [Scan]
Press to access Scan mode.
• [Photo]
Press to access Photo mode.
• [Web]
[Web]
Press to connect the Brother machine to an Internet service.
For more information, see the Web Connect Guide: solutions.brother.com/manuals
• [Apps]
Press to connect the Brother machine to the Brother Apps service.
14
For more information, see the Web Connect Guide: solutions.brother.com/manuals 8. [Stored Fax(es):]
8
When [Fax Preview] 1 is set to [Off], [Stored Fax(es)] displays how many received faxes are in the machine's memory.
Press [Print] to print the faxes.
9.[New Fax(es):]
(MFC-J880DW)
9
When [Fax Preview] is set to [On], [New Fax(es)] displays how many new faxes you have received and stored in the memory.
Press [View] to view the faxes on the Touchscreen. 10. Warning icon
10
The warning icon  appears when there is an error or maintenance message; press [Detail] to view it, and then press
  to return to Ready mode.
 • This product adopts the font of ARPHIC TECHNOLOGY CO.,LTD.
DCP-J562DW
There are two Home screens that you can access by pressing d or c.
From the Home screens, you can access Wi-Fi setup, Shortcuts, Ink levels and Setup screens.
1MFC-J880DW only
15
Home Screen 1
1 2
3 |
4 |
5 |
6 |
This screen shows the machine’s status when the machine is idle. This Home screen is also called the Ready Mode screen. When displayed, this indicates that your machine is Ready for the next command.
Home Screen 1 provides access to [Copy], [Scan] and [Photo] operations.
Home Screen 2
1 2
3 |
4 |
5 |
6 |
Home Screen 2 provides access to additional features, such as [Web] and [Apps] operations.
1. Quiet Mode
This icon appears when the [Quiet Mode] setting is set to [On].
The Quiet Mode setting can reduce printing noise. When Quiet Mode is turned on, the print speed becomes slower.
2. Wireless Status
Each icon in the following table shows the wireless network status.
Your machine has not been connected to the wireless access point.
Press this button to configure wireless settings. For more information, see the Quick Setup Guide.
Wireless network is connected.
A three-level indicator in each of the Home screens displays the current wireless signal strength.
The wireless access point cannot be detected.
The wireless setting is disabled.
 You can configure wireless settings by pressing the Wireless Status button.
3. [Shortcuts]
Create Shortcuts for frequently-used operations such as making a copy, scanning and using Web Connect.
16

•There are three Shortcuts screens. You can program four shortcuts on each screen.
•To display the other Shortcuts screens, press d or c.
4. [Ink]
[Ink]
Displays the available ink volume. Press to access the [Ink] menu.
When an ink cartridge is near the end of its life or having a problem, an error icon is displayed on the ink colour.
5. [Settings]
Press to access the [Settings] menu.
6.Modes:
• [Copy]
Press to access Copy mode.
• [Scan]
Press to access Scan mode.
• [Photo]
Press to access Photo mode.
• [Web]
[Web]
Press to connect the Brother machine to an Internet service.
For more information, see the Web Connect Guide: solutions.brother.com/manuals
• [Apps]
Press to connect the Brother machine to the Brother Apps service.
For more information, see the Web Connect Guide: solutions.brother.com/manuals
7.Warning icon
7
17

The warning icon  appears when there is an error or maintenance message; press [Detail] to view it, and then press
  to return to Ready mode.
 • This product adopts the font of ARPHIC TECHNOLOGY CO.,LTD.
Related Information
•Introduction to Your Brother Machine
•Cloud Service Notifications
•Reduce Printing Noise
•Reset Functions
•Reset Your Brother Machine
•Check the Ink Volume
•Settings Screen Overview
•Error and Maintenance Messages
18

 Home > Introduction to Your Brother Machine > LCD Overview > Cloud Service Notifications
Cloud Service Notifications
Related Models: DCP-J562DW/MFC-J680DW/MFC-J880DW
If you use Brother Web Connect and [New Function Notice] is set to [On], notifications about cloud services will appear on the Home screen.
Check for new notifications by pressing [Detail].
Related Information
• LCD Overview
19
 Home > Introduction to Your Brother Machine > Settings Screen Overview
Settings Screen Overview
Related Models: DCP-J562DW/MFC-J680DW/MFC-J880DW
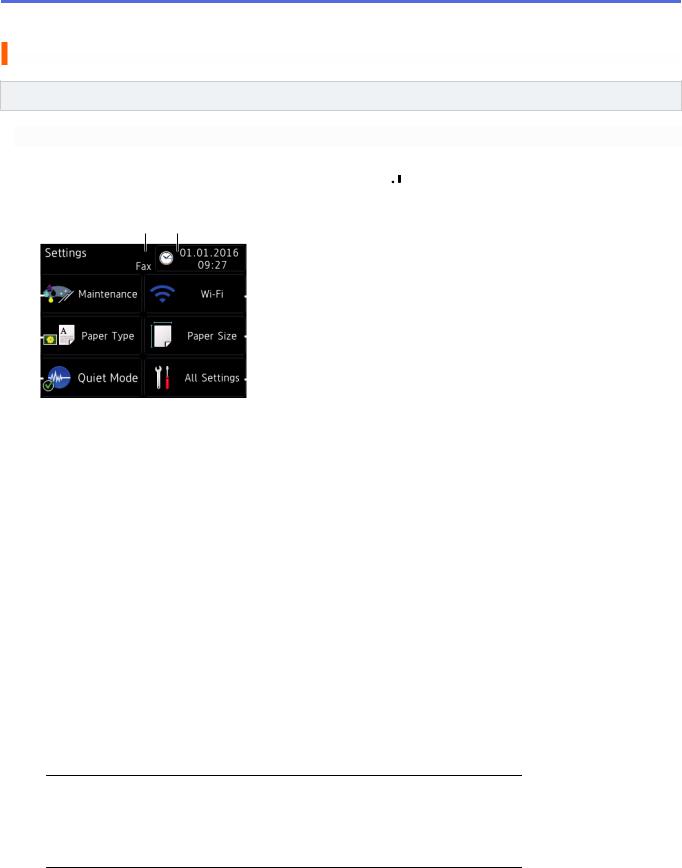
MFC-J680DW
The Touchscreen shows the machine's status when you press  [Settings].
Use the Settings menu to access all of your Brother machine's settings.
4 5
1 |
|
|
|
|
|
|
|
|
6 |
|
|
|
|
|
|
|
|
||||
2 |
|
|
|
|
|
|
7 |
|||
|
|
|
|
|
||||||
3 |
|
|
|
|
|
8 |
||||
|
|
|
|
|||||||
1.[Maintenance]
Press to access the [Maintenance] menu.
Use options in the Maintenance menu to check and improve print quality, clean the print head and check the ink volume.
2.[Paper Type]
Press to access the [Paper Type] menu.
3.[Quiet Mode]
Displays the Quiet Mode setting.
Press to access the [Quiet Mode] menu.
When this menu is set to [On],  is displayed on the Home screen.
4.Receive Mode
Displays the current Receive Mode.
•[Fax] (Fax Only)
•[Fax/Tel]
•[External TAD]
•[Manual]
 (For some countries)
When the Distinctive Ring feature is turned on, the Touchscreen displays [D/R]. (For New Zealand)
When the FaxAbility feature is turned on, the Touchscreen displays [D/R].
5.[Date & Time]
Displays the date and time.
Press to access the [Date & Time] menu.
6.[Wi-Fi]
Press to set up a wireless network connection.
20
If you are using a wireless connection, a three-level indicator  on the screen displays the current wireless signal strength.
7.[Paper Size]
Press to access the [Paper Size] menu.
8.[All Settings]
Press to access a menu of all of your machine's settings.
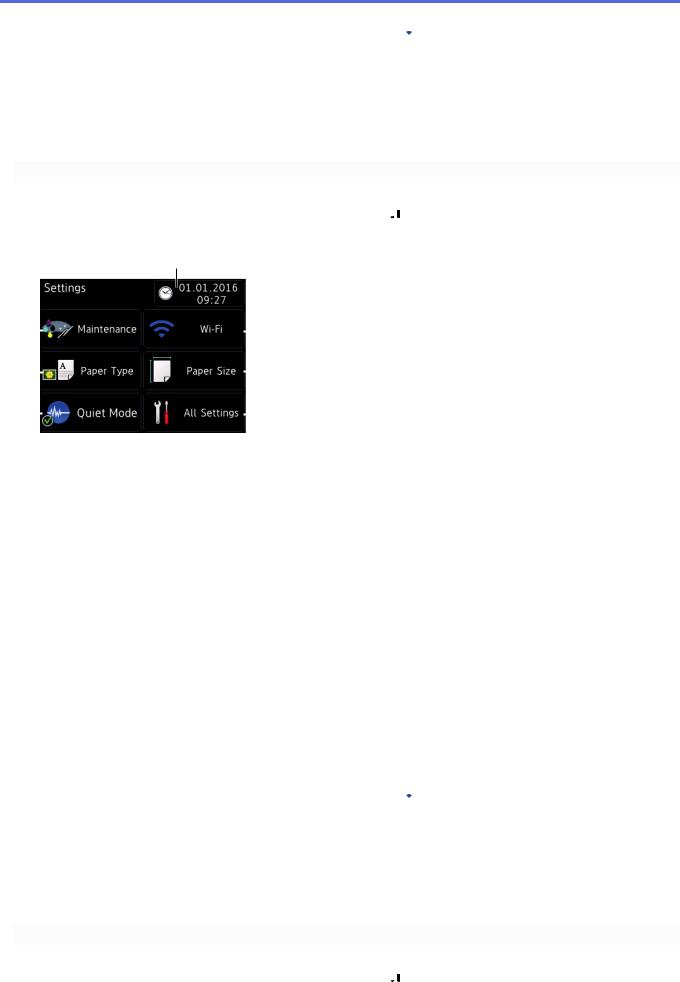
DCP-J562DW
The Touchscreen shows the machine's status when you press  [Settings].
Use the Settings menu to access all of your Brother machine's settings.
4
1 |
|
|
|
|
|
|
|
|
5 |
|
|
|
|
|
|
|
|
||||
2 |
|
|
|
|
|
|
6 |
|||
|
|
|
|
|
||||||
3 |
|
|
|
|
|
7 |
||||
|
|
|
|
|||||||
1.[Maintenance]
Press to access the [Maintenance] menu.
Use options in the Maintenance menu to check and improve print quality, clean the print head and check the ink volume.
2.[Paper Type]
Press to access the [Paper Type] menu.
3.[Quiet Mode]
Displays the Quiet Mode setting.
Press to access the [Quiet Mode] menu.
When this menu is set to [On],  is displayed on the Home screen.
4.[Date & Time]
Displays the date and time.
Press to access the [Date & Time] menu.
5.[Wi-Fi]
Press to set up a wireless network connection.
If you are using a wireless connection, a three-level indicator  on the screen displays the current wireless signal strength.
6.[Paper Size]
Press to access the [Paper Size] menu.
7.[All Settings]
Press to access a menu of all of your machine's settings.
MFC-J880DW
The Touchscreen shows the machine's status when you press  [Settings].
Use the Settings menu to access all of your Brother machine's settings.
21

4 5
1 |
|
|
|
|
|
|
|
|
6 |
|
|
|
|
|
|
|
|
||||
2 |
|
|
|
|
|
|
7 |
|||
|
|
|
|
|
||||||
3 |
|
|
|
|
|
8 |
||||
|
|
|
|
|||||||
1.[Maintenance]
Press to access the [Maintenance] menu.
Use options in the Maintenance menu to check and improve print quality, clean the print head and check the ink volume.
2.[Quiet Mode]
Displays the Quiet Mode setting.
Press to access the [Quiet Mode] menu.
When this menu is set to [On],  is displayed on the Home screen.
3.[Fax Preview]
Displays the Fax Preview setting.
Press to access the [Fax Preview] menu.
4.Receive Mode
Displays the current Receive Mode.
•[Fax] (Fax Only)
•[Fax/Tel]
•[External TAD]
•[Manual]
 (For some countries)
When the Distinctive Ring feature is turned on, the Touchscreen displays [D/R]. (For New Zealand)
When the FaxAbility feature is turned on, the Touchscreen displays [D/R].
5.[Date & Time]
Displays the date and time.
Press to access the [Date & Time] menu.
6.[Wi-Fi]
Press to set up a wireless network connection.
If you are using a wireless connection, a three-level indicator  on the screen displays the current wireless signal strength.
7.[Tray Setting]
Press to access the [Tray Setting] menu.
Use options in the Tray setting menu to change the paper size and type.
8.[All Settings]
Press to access a menu of all of your machine's settings.
22

Related Information
•Introduction to Your Brother Machine
•LCD Overview
•Check the Ink Volume
•Distinctive Ring
23
 Home > Introduction to Your Brother Machine > Navigate the Touchscreen
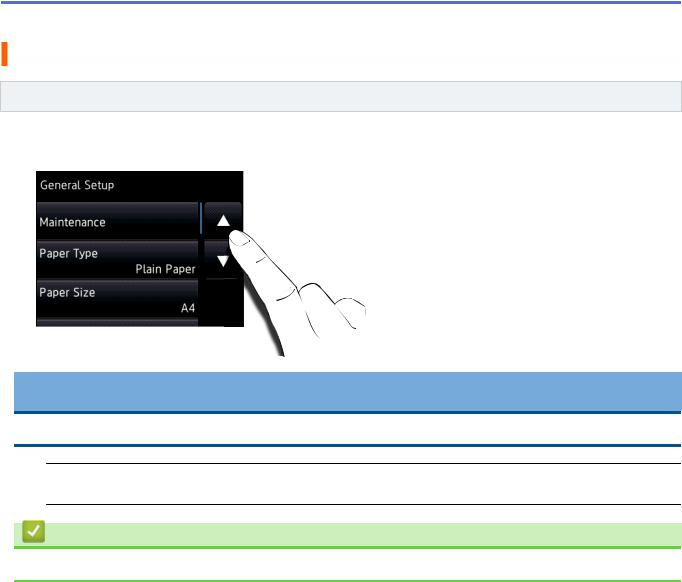
Navigate the Touchscreen
Related Models: DCP-J562DW/MFC-J680DW/MFC-J880DW
•Press your finger on the Touchscreen to display and access all the settings and features and their available options. Press d c or a b to scroll through them.
IMPORTANT
DO NOT press the Touchscreen with a sharp object such as a pen or stylus. It may damage the machine.
 DO NOT touch the Touchscreen immediately after plugging in the power cord or turning on the machine. Doing this may cause an error.
Related Information
• Introduction to Your Brother Machine
24
Loading...