


OWNER’S MANUAL
MFC 7150C MFC 7160C
®

If You Need to Call Customer Service
Please complete the following information for future reference:
Model Number: MFC 7150C MFC 7160C (Circle your model number)
Serial Number:*
Date of Purchase:
Place of Purchase:
*The serial number is on the back of the unit. Retain this Owner’s Manual with your sales receipt as a permanent record of your purchase, in the event of a theft, fire or warranty service.
Year 2000 Compliant
Brother is addressing the Year 2000 related issues for all Brother fax machines and multi-function centers. Our focus is to ensure that our bundled third party software will continue to properly process date/time data after January 1, 2000.
Brother fax machines and multi-function centers will function properly after January 1, 2000, provided that all non-Brother hardware, software and firmware used by our customers in connection or combination with Brother fax machines, MFCs and bundled software, accurately exchange date data with the Brother products.
Please continue to check our Web page for updates at http://www.brother.com . All remedies will be provided to individual customers via software patches through software download or from Brother Customer Service.
© 1996–1998 Brother Industries, Ltd.

i
BrotherNumbers
Fax-Back System
Brother Customer Service has installed an easy-to-use Fax-Back System, so you can get instant answers to common technical questions and product information for all Brother products. This system is available 24 hours a day, 7 days a week. You can use the system to send faxes to any fax machine, not just the one from which you are calling.
If you can’t resolve a difficulty with your MFC using this manual, call our Fax-Back System, and follow the voice prompts to receive faxed instructions about using the system and an index of Fax-Back subjects.
USA: |
1-800-521-2846 |
From within Canada: |
1-800-681-9838 |
The Brother Fax-Back System number (USA Only) has been preprogrammed on One Touch key 01 .
Brother on the World Wide Web
You can find more information about Brother products, from product specification sheets to Frequently Asked Questions (FAQs), on the World Wide Web. Visit us at
http://www.brother.com
Brother Bulletin Board
Brother’s Bulletin Board Numbers are
USA: 1-888-298-3616
From within Canada: 1-514-685-2040
For Customer Service
USA: |
1-800-284-4329 (voice) |
|
|
1-908-575-8790 |
(fax) |
From within Canada: |
1-800-853-6660 |
(voice) |
|
1-514-685-4898 |
(fax) |
From within Montreal: |
1-514-685-6464 |
(voice) |

ii
Ordering Accessories and Supplies
For best quality results use only genuine Brother accessories, available at most Brother retailers. If you cannot find the accessory you need and you have a Visa, MasterCard, Discover, or American Express credit card, you can order accessories directly from Brother. (In the USA, you can visit us online for a complete selection of Brother accessories and supplies available for purchase.
USA: 1-888-879-3232 (voice) From within Canada: 1-800-668-2768 (voice) 1-800-947-1445 (fax)
http://www.brothermall.com
Description |
Item |
|
|
Ink Cartridge <black> |
LC02BK |
|
|
Ink Cartridge <cyan>(blue) |
LC02C |
|
|
Ink Cartridge <magenta>(red) |
LC02M |
|
|
Ink Cartridge <yellow> |
LC02Y |
|
|
360 dpi High Quality Coated Paper |
BP36CL |
|
|
720 dpi High Quality Coated Paper |
BP72CL |
|
|
Glossy Paper |
BPGLL |
|
|
Transparancies |
BPTRL |
|
|
Print Head |
HD002 |
|
|
2MB Upgrade Memory Board (For MFC 7160C Only) |
ME2000 |
|
|
Power Protector |
QPD120 |
|
|
*Brother MFC-7100 Series Software on floppy disks |
DSK7131, (Floppy Disks Windows® 3.1 or 3.11) |
(Includes MFL Pro and Visioneer PaperPort LE Only) |
DSK7195, (Floppy Disks Windows® 95 or 98) |
Telephone Line Cord |
(For USA) UG1570001 |
|
(For Canada) UG3565001 |
|
|
Telephone Handset |
UF6857003 |
|
|
Handset Curled Cord |
UF7204009 |
|
|
Dust Cover |
UU1481001 |
|
|
Paper Wire Extension |
UU1309001 |
|
|
Document Wire Extension |
UU1309001 |
|
|
Document Tray |
UU1248001 |
|
|
Paper Tray |
UU1289001 |
|
|
IEEE-1284 Bi-directional Cable |
UG4558001 |
|
|
Remote Control Access Card |
UU1301001 |
|
|
Reference Guide |
UU1300001 |
|
|
Owner’s Manual |
(For USA) UU1298001 |
|
(For Canada) UU1401001 |
|
|
*Software on Floppy disks is not available for Windows NT® Workstation Version 4.0.
Brother Coated Paper is Ink Jet Paper.

iii
Table of Contents
1Introduction
2MFC Setup and
Connections
3Paper
Using This Manual ...................................................................................................... |
1 |
Finding Information .................................................................................................... |
1 |
Test sheet Procedures (For USA Only) ................................................................... |
2 |
About Fax Machines ................................................................................................... |
2 |
Fax Tones and Handshake .......................................................................................... |
2 |
ECM (Error Correction Mode) ................................................................................... |
3 |
MFC 7150C Control Panel Overview ..................................................................... |
4 |
MFC 7160C Control Panel Overview ..................................................................... |
5 |
Caution ........................................................................................................................... |
7 |
Packing List .................................................................................................................. |
8 |
Choosing a Location.................................................................................................... |
9 |
Assembly ...................................................................................................................... |
10 |
Installing the Ink Cartridges ..................................................................................... |
15 |
Special Line Considerations ..................................................................................... |
19 |
Roll Over Phone Lines ....................................................................................... |
19 |
Two-Line Phone System ..................................................................................... |
19 |
Converting Telephone Wall Outlets .................................................................... |
20 |
Installing MFC, External Two-Line TAD, and Two-Line Telephone ................. |
20 |
Multi-Line Connections (PBX) ................................................................................ |
21 |
If you are installing the MFC to work with a PBX: ....................................... |
21 |
Custom Features on a Single Line ............................................................................ |
22 |
Connecting an External Telephone Answering Device (TAD) ................................. |
22 |
Sequence ............................................................................................................. |
22 |
Connections ........................................................................................................ |
23 |
Outgoing Message (OGM) ................................................................................. |
23 |
Connecting an External Telephone ........................................................................... |
23 |
About Brother Paper ................................................................................................ |
25 |
Paper Specifications for Cassette and Manual Feed Slot ......................................... |
26 |
Print Area .................................................................................................................. |
27 |
iv |
T A B L E O F C O N T E N T S |
|
|
4On-Screen Programming
5Initial Setup
6Setup Receive
User-Friendly Programming ................................................................................... |
29 |
Function Mode .......................................................................................................... |
29 |
Alternating Displays ................................................................................................. |
30 |
Function Selection Table ........................................................................................... |
30 |
Getting Started ........................................................................................................... |
35 |
Setting Dialing Mode (Tone/Pulse) .......................................................................... |
35 |
Setting Date and Time ............................................................................................... |
36 |
Setting Station ID ...................................................................................................... |
36 |
Entering Text ...................................................................................................... |
37 |
Inserting spaces .............................................................................................. |
37 |
Making corrections ........................................................................................ |
37 |
Repeating letters ............................................................................................. |
38 |
Special characters and symbols ..................................................................... |
38 |
Setting Beeper Volume .............................................................................................. |
39 |
Setting the Handset Volume ...................................................................................... |
39 |
Setting the Speaker Volume (For MFC 7160C Only) ............................................... |
39 |
Setting the Ring Volume ........................................................................................... |
40 |
Memory Storage ....................................................................................................... |
40 |
Delayed Timer ........................................................................................................... |
40 |
Basic Receiving Operations ..................................................................................... |
41 |
Setting the Select Answer Mode ............................................................................... |
41 |
To select or change your Answer Mode ............................................................. |
42 |
Setting Ring Delay .................................................................................................... |
42 |
Setting F/T Ring Time (For FAX/TEL Mode Only) ................................................. |
43 |
Record F/T OGM (FAX/TEL Outgoing Message) |
|
(For MFC 7160C Only) ......................................................................................... |
44 |
Easy Receive ............................................................................................................. |
44 |
Printing a Reduced Incoming Document .................................................................. |
45 |
Recommended Reductions ................................................................................. |
45 |
Setting Paper Size ..................................................................................................... |
46 |
Advanced Receiving Operations ............................................................................ |
47 |
Operation from Extension Telephone ....................................................................... |
47 |
For FAX/TEL Mode Only .................................................................................. |
47 |
Changing Remote Codes .................................................................................... |
47 |
Printing a Fax in Memory (For MFC 7150C Only) .................................................. |
48 |
Polling ....................................................................................................................... |
48 |
Setting Up Polling Receive ................................................................................ |
49 |
Setting Up Sequential Polling Receive ............................................................... |
50 |
Canceling a Scheduled Job ....................................................................................... |
51 |
Distinctive Ringing ................................................................................................... |
51 |
Registering the Distinctive Ringing Pattern ....................................................... |
52 |
T A B L E O F C O N T E N T S |
v |
|
|
|
|
7Setup Send
8Setup Auto Dial
Numbers
9Telephone (Voice) Operation
Caller ID ................................................................................................................... |
53 |
Viewing Caller ID List ....................................................................................... |
53 |
Clearing a Caller ID Stored in Memory ............................................................. |
54 |
Printing Caller ID List ........................................................................................ |
54 |
Before You Begin ........................................................................................................ |
55 |
ADF (Automatic Document Feeder) ........................................................................ |
56 |
Resolution ................................................................................................................. |
56 |
Manual Transmission ................................................................................................ |
57 |
Automatic Transmission ........................................................................................... |
57 |
Manual and Automatic Fax Redial ........................................................................... |
57 |
Dual Access ............................................................................................................... |
57 |
Real Time Transmission............................................................................................ |
58 |
Checking Job Status .................................................................................................. |
58 |
Canceling Jobs in Memory ....................................................................................... |
58 |
Basic Sending Operations ........................................................................................ |
59 |
Composing Electronic Cover Page ........................................................................... |
59 |
Cover Page for Next Fax Only ........................................................................... |
60 |
Always Send Cover Page ................................................................................... |
61 |
Using a Printed Cover Page ................................................................................ |
62 |
Cover Page Message ................................................................................................. |
62 |
Composing Your Own Comments ...................................................................... |
62 |
Contrast ..................................................................................................................... |
63 |
Advanced Sending Operations ............................................................................... |
64 |
Overseas Mode ......................................................................................................... |
64 |
Call Reservation ........................................................................................................ |
65 |
Print Sample Call Back Message .............................................................................. |
66 |
Delayed FAX ............................................................................................................ |
66 |
Broadcasting ............................................................................................................. |
67 |
Multiple Resolution Transmission ............................................................................ |
68 |
Setting Up for Polling Transmit ................................................................................ |
69 |
Interrupting Delayed Fax and Polling Transmit Jobs ............................................... |
70 |
Storing Numbers for Easy Dialing ........................................................................ |
71 |
Storing One Touch Dial Numbers ............................................................................. |
71 |
Storing Speed Dial Numbers .................................................................................... |
73 |
Changing One Touch and |
|
Speed Dial Numbers .............................................................................................. |
74 |
Setting Up Groups for Broadcasting ......................................................................... |
75 |
Dialing Options .......................................................................................................... |
77 |
Manual Dialing ......................................................................................................... |
77 |
One Touch Dialing .................................................................................................... |
78 |
vi |
T A B L E O F C O N T E N T S |
|
|
|
|
Speed Dialing ............................................................................................................ |
78 |
|
|
Access Codes and Credit Card Numbers .................................................................. |
79 |
|
|
Hold .......................................................................................................................... |
79 |
|
|
Pause ......................................................................................................................... |
79 |
|
|
Tone/Pulse ................................................................................................................. |
80 |
|
|
Searching Telephone Index ....................................................................................... |
80 |
|
|
Answering Calls with the Speaker Phone (For MFC 7160C Only) ......................... |
80 |
Remote Fax |
|
|
|
Options |
|
Fax Forwarding/Paging ........................................................................................... |
81 |
10 |
|
Programming a Fax Forwarding Number ................................................................. |
81 |
(For MFC 7150C Only) |
|
|
|
|
|
Programming Paging Number .................................................................................. |
82 |
|
Setting Fax Storage ................................................................................................... |
83 |
|
|
Changing Remote Access Code .............................................................................. |
84 |
|
|
Remote Retrieval ....................................................................................................... |
85 |
|
|
|
Using Remote Access Code ...................................................................................... |
85 |
|
|
Remote Commands ................................................................................................... |
86 |
|
|
Retrieving Memory Status List ................................................................................. |
87 |
|
|
Retrieving Fax Messages .......................................................................................... |
87 |
|
|
Changing Fax Forwarding Number .......................................................................... |
88 |
Printing |
|
|
|
|
MFC Settings and Activity ...................................................................................... |
89 |
|
Reports |
|
|
|
11 |
|
To Print a Report ....................................................................................................... |
90 |
|
|
Transmission Verification (Xmit) Report .................................................................. |
90 |
|
|
Activity Report Interval ............................................................................................ |
90 |
Message Center |
|
|
|
(For MFC 7160C Only)Introduction ................................................................................................................ |
91 |
||
12 |
Message Center Mode .............................................................................................. |
91 |
|
|
|
Flexible Memory Settings (Message Storage) .......................................................... |
92 |
|
|
Setting Up Message Center ....................................................................................... |
92 |
|
|
Setting Message Storage ........................................................................................... |
93 |
|
|
Recording Message Center Outgoing Message (OGM) ........................................... |
93 |
|
|
Listening to Outgoing Message (OGM) ............................................................. |
94 |
|
|
Erasing Outgoing Message (OGM) .................................................................... |
94 |
|
|
Activating Message Center Mode ............................................................................. |
94 |
|
|
Message Indicators ................................................................................................... |
94 |
|
|
Playing Voice Messages and Memos ........................................................................ |
95 |
|
|
Printing a Fax Message ............................................................................................. |
95 |
|
|
Backup Printing Option ............................................................................................ |
96 |
|
|
Erasing Messages ...................................................................................................... |
96 |
|
|
To erase voice messages individually ............................................................ |
96 |
|
|
To erase messages all at once ......................................................................... |
97 |
|
|
Setting Maximum Time for Incoming Messages ...................................................... |
97 |
|
|
Setting Toll Saver ...................................................................................................... |
98 |
T A B L E O F C O N T E N T S |
vii |
|
|
|
|
13Copy Operations
1Walk4-Up Video Printing
ICM Recording Monitor ........................................................................................... |
98 |
Recording a Memo .................................................................................................... |
98 |
Recording a Conversation ......................................................................................... |
99 |
Fax Forwarding/Paging ............................................................................................. |
99 |
Programming a Fax Forwarding Number ........................................................... |
99 |
Programming Paging Number .......................................................................... |
100 |
Remote Retrieval ..................................................................................................... |
101 |
Using Remote Access Code .................................................................................... |
101 |
Changing Remote Access Code .............................................................................. |
101 |
Remote Control Commands .................................................................................... |
102 |
Retrieving Memory Status List ............................................................................... |
103 |
Retrieving Fax Messages ........................................................................................ |
103 |
Changing Fax Forwarding Number ........................................................................ |
104 |
Basic Copy Operations ........................................................................................... |
105 |
Copying One Page .................................................................................................. |
105 |
Making Multiple Copies ......................................................................................... |
106 |
Making Enlarged or Reduced Copies |
|
(Temporary Setting) ............................................................................................. |
106 |
Copy Quality – Temporary Settings.................................................................... |
108 |
Using the Copy Quality Key ................................................................................... |
108 |
Using the Paper Type Key ....................................................................................... |
109 |
Using the Brightness Key ....................................................................................... |
110 |
Copy Quality – Default Settings........................................................................... |
110 |
Changing Default Settings ...................................................................................... |
110 |
Select Paper Type .................................................................................................... |
112 |
Select Copy Quality ................................................................................................ |
113 |
Select Type of Original ........................................................................................... |
113 |
Color Adjustment .................................................................................................... |
114 |
Copy Brightness ...................................................................................................... |
114 |
Copy Contrast ......................................................................................................... |
114 |
Selecting a Single Color (One Color) ..................................................................... |
115 |
Memory Full Message ............................................................................................ |
116 |
Legal Limitations ..................................................................................................... |
117 |
Getting Started ......................................................................................................... |
119 |
Auto Switch ............................................................................................................ |
120 |
Color Video Printing ............................................................................................... |
120 |
Black & White Video Printing .............................................................................. |
121 |
Video Print Quality – Temporary Settings........................................................ |
121 |
Using the Copy Quality Key ................................................................................... |
121 |
Using the Paper Type Key ....................................................................................... |
122 |
viii |
T A B L E O F C O N T E N T S |
|
|
15Setting Up the MFC and Computer to
Work Together
16Using MFC
as Printer
Using the Brightness Key ....................................................................................... |
123 |
Changing Default Settings ..................................................................................... |
124 |
Setting Paper Type .................................................................................................. |
126 |
Setting Video Printing Quality ................................................................................ |
126 |
Setting Video Type .................................................................................................. |
126 |
Setting Print Size .................................................................................................... |
127 |
Video Printing Color Adjustment ........................................................................... |
128 |
Video Printing Brightness ....................................................................................... |
128 |
Video Capture to PC ............................................................................................... |
128 |
Before You Install Multi-Function Link Pro Software ................................... |
129 |
If You Don’t Have a CD-ROM Drive ..................................................................... |
130 |
Computer Requirements ......................................................................................... |
130 |
Connecting the MFC to the Computer ............................................................... |
131 |
Installing Multi-Function Link Pro Software (CD-ROM 1) ......................... |
132 |
Overview of Basic Steps ......................................................................................... |
132 |
Choosing the Software to Install ............................................................................. |
132 |
Install Multi-Function Link Pro Software ........................................................ |
132 |
Install NetCentric™ FaxStorm ......................................................................... |
132 |
Install Automatic E-Mail Printing .................................................................... |
133 |
Install 3D FaxSpeed ......................................................................................... |
133 |
Install MFC 7100 Series Drivers Only ............................................................. |
133 |
Other Options .......................................................................................................... |
133 |
View On-Line Documentation ......................................................................... |
133 |
View Product Support Information .................................................................. |
133 |
Brother Web Link ............................................................................................. |
133 |
Exit ................................................................................................................... |
133 |
Installing the Brother Software ............................................................................... |
134 |
Helpful Hints for Windows® 3.1, 3.11, 95 and 98 .................................................. |
137 |
Receiving Messages into the PC ........................................................................... |
137 |
Multi-Function Link Pro Mode ............................................................................... |
138 |
Features ...................................................................................................................... |
139 |
Printer Driver ........................................................................................................... |
140 |
Choosing the Right Kind of Paper....................................................................... |
140 |
Multi-purpose Sheet Feeder .................................................................................. |
141 |
Loading Paper ......................................................................................................... |
141 |
Manual Feed Slot .................................................................................................... |
142 |
Setup for Envelopes ................................................................................................ |
143 |
Simultaneous Printing/Fax .................................................................................... |
144 |
Printer Operation Keys .......................................................................................... |
144 |
On/OffLine Key ...................................................................................................... |
144 |
Reset Key ................................................................................................................ |
144 |
T A B L E O F C O N T E N T S |
ix |
|
|
|
|
|
Priority Key ............................................................................................................. |
144 |
|
Ink Management Key .............................................................................................. |
145 |
|
Turning off Bi-directional Printing ......................................................................... |
145 |
PC Printing |
|
|
|
Printer Emulation ........................................................................................... |
147 |
17 |
Using the Maintenance Utility Program for Printing from DOS ................. |
147 |
|
Maintenance ............................................................................................................ |
147 |
|
Data 1 ...................................................................................................................... |
148 |
|
Data 2 ...................................................................................................................... |
148 |
|
Installing the Brother MFC-7100 Series DOS Tools .............................................. |
148 |
|
Using the Brother MFC-7100 Series Printer Driver ....................................... |
149 |
|
The Paper Tab .......................................................................................................... |
149 |
|
Paper Size ............................................................................................................... |
150 |
|
User Defined Paper Size ......................................................................................... |
150 |
|
Paper Source ........................................................................................................... |
151 |
|
Feeder ............................................................................................................... |
151 |
|
Manual Feed ..................................................................................................... |
151 |
|
Orientation .............................................................................................................. |
151 |
|
Scaling .................................................................................................................... |
151 |
|
2 in 1 ................................................................................................................. |
151 |
|
Copies ..................................................................................................................... |
152 |
|
Collate ............................................................................................................... |
152 |
|
Reverse Order ................................................................................................... |
152 |
|
The Quality/Color Tab ........................................................................................... |
153 |
|
Quality .................................................................................................................... |
154 |
|
Media ...................................................................................................................... |
154 |
|
Color/Mono ............................................................................................................. |
155 |
|
Color ................................................................................................................. |
155 |
|
Mono................................................................................................................. |
155 |
|
Controlling the Color .............................................................................................. |
155 |
|
Document ................................................................................................................ |
156 |
|
Custom Setting ........................................................................................................ |
156 |
|
Color Matching ................................................................................................. |
156 |
|
Halftone Pattern ................................................................................................ |
157 |
|
Effect ................................................................................................................ |
157 |
|
The Control/Maintenance Tab ............................................................................. |
158 |
|
Monitor Calibration ................................................................................................ |
159 |
|
Bi-Directional Printing ........................................................................................... |
159 |
|
Maintenance ............................................................................................................ |
159 |
|
The Cleaning Tab .................................................................................................... |
159 |
|
Test Print ........................................................................................................... |
159 |
|
Cleaning ............................................................................................................ |
160 |
|
The Printer Adjustment Tab .................................................................................... |
160 |
|
Vertical Alignment ............................................................................................ |
160 |
x |
T A B L E O F C O N T E N T S |
|
|
18Using the Multi-Function Link Pro Software
19Using Internet
Faxing with
NetCentricTM
FaxStorm
Introduction .............................................................................................................. |
161 |
Multi-Function Link Pro ......................................................................................... |
162 |
Visioneer PaperPortTM LE ....................................................................................... |
163 |
Sending a Fax from Your PC ................................................................................ |
164 |
Sending a Quick Fax ............................................................................................... |
164 |
Sending a Fax from the Main Menu ....................................................................... |
165 |
Sending a Fax from a Windows® Application ........................................................ |
166 |
Receiving Faxes into the PC .................................................................................. |
166 |
Checklist for the MFC ...................................................................................... |
166 |
Checklist for Your PC ....................................................................................... |
167 |
Viewing Received Faxes ......................................................................................... |
167 |
Scanning a Document ............................................................................................. |
168 |
TWAIN COMPLIANT ..................................................................................... |
168 |
Accessing the Scanner ...................................................................................... |
168 |
Scanning a Document into the PC .................................................................... |
169 |
Settings in the Scanner Window ....................................................................... |
169 |
Resolution .................................................................................................... |
169 |
Color Type .................................................................................................... |
170 |
Size ............................................................................................................. |
170 |
Custom ....................................................................................................... |
171 |
Adjust ......................................................................................................... |
171 |
Paper .......................................................................................................... |
171 |
Video Capture ............................................................................................ |
171 |
PreScanning an Image ...................................................................................... |
171 |
How to use PreScan to adjust an Image ....................................................... |
172 |
Brother Resource Manager ............................................................................... |
173 |
Video Capture from the PC................................................................................... |
173 |
Connecting Your Video Equipment ................................................................ |
173 |
Capturing An Image ......................................................................................... |
174 |
NetCentric Internet Fax ......................................................................................... |
177 |
Before You Begin .................................................................................................... |
178 |
Compatible Operating Systems ........................................................................ |
178 |
Your Fax Service Account ................................................................................ |
178 |
Receiving Faxes ...................................................................................................... |
178 |
Creating An Inbound Account .......................................................................... |
179 |
Installing NetCentricTM FaxStorm ........................................................................... |
179 |
Overview of Utilities .............................................................................................. |
180 |
Contact Manager .............................................................................................. |
180 |
Cover Page Builder ........................................................................................... |
180 |
Print Driver ....................................................................................................... |
180 |
Status Manager ................................................................................................. |
180 |
Viewfax (A Fax File Viewing Application) ...................................................... |
181 |
T A B L E O F C O N T E N T S |
xi |
|
|
|
|
20Using Automatic
E-Mail Printing
Accessing NetCentricTM FaxStorm .......................................................................... |
181 |
Sending Faxes ......................................................................................................... |
181 |
General Tab ....................................................................................................... |
182 |
Addressing a Fax .......................................................................................... |
182 |
Adding Contacts One at a Time ................................................................... |
182 |
Selecting a Group (or a Contact from a Group) ........................................... |
182 |
Saving a New Contact from the Fax Send Window .................................... |
183 |
Specifying a Cover Page .............................................................................. |
183 |
About Sending a Fax as E-mail ................................................................... |
184 |
Attachments Tab ............................................................................................... |
184 |
Options/Sender Tab .......................................................................................... |
185 |
Sending a Fax from Other Windows® Applications ................................................ |
185 |
If You Are Using Windows® 95 or 98 .......................................................... |
185 |
If You Are Using Windows NT® Workstation Version 4.0 .......................... |
186 |
Setting Up Contacts in the Contact Manager .......................................................... |
187 |
To add a New Contact to the All Group ........................................................... |
187 |
To add a New Contact to Another Group ......................................................... |
188 |
Changing Contact Detail .................................................................................. |
188 |
Setting Up Multiple Addresses ......................................................................... |
189 |
Moving or Copying a Contact to Another Group ............................................. |
190 |
Creating a Group for Broadcasting ................................................................... |
190 |
Managing You Faxes in the Status Manager ........................................................... |
191 |
Accessing the Status Manager .......................................................................... |
191 |
Checking the Status of Sent Faxes (Outbox) .................................................... |
191 |
Viewing Faxes You Received (Inbox) .............................................................. |
192 |
Managing Faxes from Your Account Page ............................................................. |
192 |
Accessing Your Account Page .......................................................................... |
192 |
Viewing Received Faxes in Your Account Page Inbox .................................... |
193 |
Checking Sent Faxes in Your Account Page Outbox ....................................... |
193 |
Customer Support ................................................................................................... |
194 |
Contact NetCentric Corporation at ................................................................... |
194 |
Automatic E-mail Printing (For Windows® 95 and 98 Only) ....................... |
195 |
Main Features ......................................................................................................... |
196 |
Automatic E-Mail Printing is for Windows® 95 and 98 Only ................................ |
196 |
You Cannot Use a 16 bit TCP/IP Stack ............................................................ |
196 |
If You Are Using Korean Windows® 95 or 98 .................................................. |
196 |
Setting Up Automatic E-Mail Printing ................................................................... |
197 |
Setting Up the Server ........................................................................................ |
197 |
Setting the Check Time .................................................................................... |
198 |
Using Automatic E-Mail Printing ........................................................................... |
199 |
Uninstalling Automatic E-Mail Printing from Windows® 95 or 98 ........................ |
199 |
If the Uninstall Program Displays a Error Message ......................................... |
199 |
To Access the Add/Remove Programs Properties Window .............................. |
200 |
xii |
T A B L E O F C O N T E N T S |
|
|
21Color Faxing with
3D FaxSpeed (For Windows® 3.1,
3.11, 95 and 98 Only)
22Optional Accessories
(For MFC 7160C Only)
23Important Information
How 3D FaxSpeed Works....................................................................................... |
201 |
Special Coded Format (InfoImage) ........................................................................ |
201 |
Installing 3D FaxSpeed ................................................................................... |
202 |
Selecting Multi-Function Link Pro As Your Fax Application ................................ |
203 |
Creating 3D FaxSpeed Read Module Disks for Recipients .................................... |
204 |
Quick Start Procedures .......................................................................................... |
205 |
How to Send an InfoImage ..................................................................................... |
205 |
To Send an InfoImage with 3D FaxSpeed Standard Send: .............................. |
205 |
Using the 3D FaxSpeed Macro ............................................................................... |
206 |
To print the current document in your word processor directly to |
|
3D FaxSpeed: ................................................................................................ |
206 |
How to Read an InfoImage that Was Printed at Your MFC .................................... |
206 |
Follow these steps when a received InfoImage printed at the MFC: ............... |
206 |
How to Read an InfoImage that Was Received Into MFL Pro ............................... |
207 |
To read an InfoImage after viewing it in the MFL Pro Viewer/Editor: ............ |
207 |
If the Recipient Uses Another Fax Application ...................................................... |
208 |
3D FaxSpeed Read Module for Recipients ...................................................... |
208 |
For recipients of your InfoImage who are using another fax application: ... |
208 |
If the Recipient Uses a Fax Machine and Scanner ................................................. |
209 |
3D FaxSpeed Read Module for Recipients ...................................................... |
209 |
For recipients of your InfoImage who are using a fax machine |
|
and scanner: .............................................................................................. |
209 |
Memory Board .......................................................................................................... |
211 |
Optional Memory for the Fax Operations ................................................................ |
211 |
Installing the Optional Memory Board ................................................................... |
212 |
Standard Telephone and FCC Notices................................................................ |
215 |
These notices are in effect on models sold and used in the United States only. ..... |
215 |
Important—About the Interface Cable ............................................................. |
217 |
Federal Communications Commission (FCC) |
|
Declaration of Conformity (For USA Only) ........................................................ |
217 |
Industry Canada Compliance Statement (For Canada Only) ........................... |
218 |
International Energy Star Compliance Statement ........................................ |
218 |
Important Safety Instructions ........................................................................... |
219 |
Notice – Disclaimer of Warranties ................................................................... |
221 |
Compilation and Publication Notice ....................................................................... |
221 |
Trademarks ............................................................................................................. |
222 |
T A B L E O F C O N T E N T S |
xiii |
|
|
|
|
Specifications |
|
|
|
Product Description ................................................................................................ |
223 |
24 |
Fax Specifications .................................................................................................... |
223 |
|
Printer Specifications .............................................................................................. |
225 |
|
Printing .................................................................................................................... |
225 |
|
Controller ................................................................................................................ |
225 |
|
Print Media ............................................................................................................. |
226 |
Troubleshooting |
Troubleshooting ....................................................................................................... |
227 |
and Maintenance |
|
|
25 |
Fax-Back System .................................................................................................... |
227 |
|
Brother on the World Wide Web ............................................................................. |
227 |
|
Brother Bulletin Board ............................................................................................ |
227 |
|
Error Messages ....................................................................................................... |
228 |
|
Document Jam ........................................................................................................ |
229 |
|
Printer Jam or Paper Jam ........................................................................................ |
230 |
|
If You Are Having Difficulty with Your MFC ........................................................ |
234 |
|
How to Improve Print Quality ............................................................................. |
236 |
|
Test Print ................................................................................................................. |
236 |
|
Cleaning the Print Head .......................................................................................... |
236 |
|
Aligning Ink Cartridges .......................................................................................... |
237 |
|
Turning off Bi-directional Printing ......................................................................... |
238 |
|
Packing and Shipping the MFC ........................................................................... |
239 |
|
Regular Maintenance .............................................................................................. |
242 |
|
Cleaning the Scanner .............................................................................................. |
242 |
|
Cleaning the MFC Printer Platen ............................................................................ |
242 |
|
Cleaning the Pick-up Roller .................................................................................... |
243 |
|
Replacing the Ink Cartridges .................................................................................. |
243 |
|
For Customer Service ............................................................................................. |
246 |
|
Glossary ..................................................................................................................... |
247 |
|
Index ........................................................................................................................... |
253 |
C1H A P T E R O N E 1
Introduction
UsingThis Manual
Thank you for purchasing a Brother Multi-Function Center (MFC). This MFC has been designed to be simple to use, with LCD screen prompts to guide you through functions. However, you can use your MFC to its fullest potential by taking a few minutes to read this manual.
Additionally, your MFC has a Help Key. Press Help/Broadcast to print a list of basic operational steps and functions.
Finding Information
All chapter headings and subheadings are listed in the Table of Contents. You will be able to find information about a specific feature or function by checking the Index in the back of this manual. Also, throughout this manual, you’ll see special symbols alerting you to important information, crossreferences, and warnings. Illustrations of some screen displays also help you choose the correct key-presses.

2 |
C H A P T E R O N E |
|
|
Test Sheet Procedures (For USA Only)
See
Setting
Station ID
pp. 36–37
After programming your Station ID, please fill out the TEST SHEET included with your MFC and fax it to Brother’s Automated Fax Response System as your first transmission. This will verify that your MFC is properly installed.
When this document is received, a confirmation sheet will be sent back to your MFC. In order to receive a response, be sure to set up your Station ID.
USA 1-908-685-9283 (fax)
About Fax Machines
If you’re a first-time fax machine user, fax operation might seem a little mysterious. Soon, you’ll recognize the unusual fax tones on your phone line, and be able to send and receive faxes easily.
Fax Tones and Handshake
When someone is sending a fax, the MFC sends fax calling tones, (CNG tones)—soft, intermittent beeps at 4-second intervals. You’ll hear them when you dial and press Start , and they continue for about 40 seconds after dialing. During that time, the sending machine must begin the “handshake” with the receiving machine. Each time you use automatic procedures to send a fax, you are sending CNG tones over the phone line. You’ll soon learn to listen for these soft beeps each time you answer a phone on your MFC line, so you can know if you are receiving a fax message.
The receiving fax responds with fax receiving tones—loud, chirping sounds. A receiving fax chirps for about 40 seconds over the phone line, and the screen displays RECEIVING. If your MFC is set to the FAX mode,
it will answer every call automatically with fax receiving tones. Even if the other party hangs up, your MFC continues to send the “chirps” for about 40 seconds, and the screen continues to display RECEIVING.

I N T R O D U C T I O N |
3 |
|
|
|
|
When your MFC answers in FAX/TEL mode, the MFC listens for CNG tones and then responds with receiving tones.
The fax “handshake” is the time in which the sending machine’s CNG tones and the receiving machines “chirps” overlap. This must be for at least 2 to 4 seconds, so the fax machines can understand how each is sending and receiving the fax. The handshake cannot begin until the call is answered, and the CNG tones only last for about 40 seconds after the number is dialed. Therefore, it’s important for the receiving machine to answer the call in as few rings as possible.
When you have an external telephone answering device (TAD) on your MFC line, your TAD will determine the number of rings before the call is
answered. Pay special attention to the directions in the Installation chapter for connecting a TAD to your MFC.
ECM (Error Correction Mode)
The Error Correction Mode (ECM) is a way for the MFC to check the integrity of a fax transmission while it is in progress. ECM transmissions are possible only between machines that both have the ECM feature. If they do, you may send and receive fax messages that are continuously checked for their integrity.
Sufficient memory must be available in your MFC for this feature to work.

4 |
C H A P T E R O N E |
|
|
MFC 7150C Control Panel Overview
28 |
|
27 |
|
26 |
|
25 |
24 |
23 |
|
22 |
21 |
20 |
19 |
18 |
17 |
29 |
|
|
MFC 715OC |
|
|
|
|
|
|
|
|
|
|
|
|
status |
|
|
|
|
|
|
Fine |
FAX |
|
|
|
|
|
|
|
|
status |
|
|
|
|
|
|
Photo |
TAD |
|
|
|
6 IN 1 |
|
|
30 |
|
|
|
|
|
|
|
|
FAX PRINTER COPIER SCANNER PC FAX |
VIDEO CAPTURE |
|||||
|
|
|
|
|
|
|
S.Fine |
FAX/TEL |
|
|
|
|
|
||
|
|
|
|
|
|
|
|
|
|
Help/ |
|
|
|
|
|
|
Function |
|
Set |
|
Clear |
|
Tel-index Resolution |
Mode |
Broadcast |
On/Off Line |
Reset |
Priority |
Ink Management |
||
|
Hook |
|
A BC |
DE F |
High |
|
01 |
02 |
03 |
04 |
|
|
|
|
|
1 |
|
|
|
|
|
Enlarge/ |
|
|
|
||||||
|
1 |
2 |
3 |
|
|
|
|
|
|
||||||
|
|
|
13 |
14 |
15 |
16 |
|
Reduce |
Brightness |
Mono Copy Color Copy |
|||||
2 |
Hold |
GH I |
J KL |
MNO |
Low |
Volume |
|
|
|
|
|
|
|
|
|
|
|
|
|
|
|
|
|
|
|
|
|
|
|||
|
4 |
5 |
6 |
|
|
05 |
06 |
07 |
08 |
|
Paper Type |
Copy Quality |
|
|
|
|
Redial / Pause PQRS |
TUV |
WXYZ |
|
|
17 |
18 |
19 |
20 |
|
|
|
|
|
|
3 |
|
|
|
|
|
|
|
|
|
|
|
||||
|
7 |
8 |
9 |
|
|
09 |
10 |
11 |
12 |
|
Stop |
|
Start |
||
|
Speed Dial |
|
|
|
|
Shift |
|
|
|
|
|
||||
4 |
|
|
|
|
21 |
22 |
23 |
24 |
|
|
|
|
|
||
|
|
0 |
|
|
|
|
|
|
|
|
|||||
|
|
|
|
|
|
|
|
|
|
|
|
|
|
||
5 |
6 |
7 |
8 |
11 13 |
9 |
12 |
10 |
1 |
Hook |
9 |
Stop |
|
|
Lets you dial telephone and |
|
Stops a fax, cancels an |
|
|
fax numbers without lifting |
|
operation, or exits from |
|
|
the handset. |
|
function mode. |
|
2 |
Hold |
10 |
Start |
|
|
Lets you put calls on hold. |
|
Starts an operation, such as |
|
3 |
Redial / Pause |
|
sending a fax. |
|
|
|
|||
|
Redials the last number |
11 |
Enlarge/Reduce |
|
|
called. Also inserts a pause |
|
Lets you reduce or enlarge |
|
|
in autodial numbers. |
|
copies depending on the |
|
4 |
Speed Dial |
|
ratio you select. |
|
12 |
Brightness |
|||
|
Lets you dial stored phone |
|||
|
numbers by pressing a |
|
Lets you adjust the brightness |
|
|
two-digit number. |
|
of the whole image to be lighter |
|
5 |
Dial Pad |
|
or darker. |
|
13 |
|
|||
|
Dials phone and fax numbers, |
Paper Type |
||
|
and can be used as a keyboard |
|
Use this key to temporarily |
|
|
for entering information into the |
|
change the paper type setting |
|
|
MFC. # key lets you switch the |
|
for Copy and Video Printing |
|
|
dialling type during a telephone |
|
modes. |
|
|
call from “PULSE” to “TONE”. |
14 Copy Quality |
||
6 Volume High / Low |
||||
|
Use this key to temporarily |
|||
|
Adjusts speaker, ring and |
|
change the quality and type |
|
|
handset volume. |
|
of original for Copy and |
|
7 |
Shift |
|
Video Printing modes. |
|
15 Mono Copy |
||||
|
To access memory locations |
|||
|
13 through 24 in the One |
|
Makes a black-and-white or |
|
|
Touch keys hold down the |
|
single-color copy. |
|
|
Shift key. |
16 Color Copy |
||
8 |
One Touch Keys |
|||
|
|
|||
These 12 keys give you instant access to previously stored phone numbers.
Makes a full-color copy.
17Ink Management
Cleans the ink print heads and/or resets the ink dot counter after replacing an ink cartridge.
18Priority
Press this key to receive all faxes in memory without first printing them.
19Reset
Clears data from the printer memory, and then resets and restores to the factory default settings.
20On/OffLine
Use this key to turn the printer online (ready to receive PC data) and offline (not ready to receive PC data) alternately. When the printer is online, the LCD displays ONLINE.
21Help/Broadcast
Press this key whenever you want a quick reference Help List printed. The Help List shows how to perform functions, how to register information, and how to get basic information. Also use this key whenever you want to broadcast faxes to many different locations, maximum of 130 locations at once.
22Mode
Use to select how the MFC will handle incoming calls.
23Resolution
Sets the resolution when you send a fax.
24Tel-index
Lets you look up numbers stored in the dialing memory.
25Ink Empty Indicator
Blinks when ink cartridge is low and stays lit when ink is empty.
26Liquid Crystal Display
LCD displays messages to help you set and operate your MFC.
27(Left Arrow) (Right Arrow)
Moves the LCD cursor through text and options.
28Function
Lets you access the function and programming mode.
29Set
Stores a function setting in the MFC.
30Clear
Deletes entered data or backs up one step in function procedure.
15
16
14

I N T R O D U C T I O N |
5 |
|
|
|
|
MFC 7160C Control Panel Overview
33 |
32 |
31 |
30 |
29 |
28 |
27 |
26 |
25 24 |
23 |
22 |
34
35
1
2
3
4
5
716OC
status |
|
|
|
|
|
Fine |
FAX |
|
|
Voice |
|
Fax |
21 |
||
|
|
|
|
|
|
|
Record |
Erase |
Play |
||||||
status |
|
|
|
|
|
Photo |
|
|
|
||||||
|
|
|
|
|
|
|
|
|
|
|
|
|
20 |
||
|
|
|
|
|
|
S.Fine |
FAX/TEL |
|
|
|
|
|
|
||
|
|
|
|
|
|
|
|
Help/ |
|
|
|
|
|
|
19 |
Function |
|
Set |
|
Clear |
Tel-index |
Resolution Mode |
Broadcast |
On/Off Line |
Reset |
Priority |
Ink Management |
||||
|
|
|
|
|
|
|
|
|
|
|
|
|
|
|
18 |
Hold |
|
A BC |
DE F |
High |
01 |
02 |
03 |
04 |
Enlarge/ |
|
|
|
|
17 |
|
MIC |
1 |
2 |
3 |
|
|
|
Mono Copy Color Copy |
||||||||
|
|
13 |
14 |
15 |
16 |
Reduce |
Brightness |
||||||||
Redial / Pause |
GH I |
J KL |
MNO |
Low |
Volume |
|
|
|
|
|
|
|
|
|
16 |
|
|
|
|
|
|
|
|
|
|
|
|
|
|||
|
4 |
5 |
6 |
|
05 |
06 |
07 |
08 |
Paper Type |
Copy Quality |
|
|
|||
|
|
|
|
|
|
|
|
|
|
|
|
|
|||
Speed Dial |
PQRS |
TUV |
WXYZ |
|
17 |
18 |
19 |
20 |
|
|
|
|
|
|
15 |
|
7 |
8 |
9 |
|
09 |
10 |
11 |
12 |
|
Stop |
|
|
Start |
|
|
|
|
|
|
|
|
|
|
|
|
|
|
||||
Speaker Phone |
|
|
|
|
Shift |
22 |
23 |
24 |
|
|
|
|
|
|
|
|
|
0 |
|
|
21 |
|
|
|
|
|
|
|
|||
|
|
|
|
|
|
|
|
|
|
|
|
|
|
|
|
|
|
6 |
|
7 |
8 |
|
9 |
|
12 14 |
10 |
|
13 |
11 |
|
|
1Hold
Lets you put calls on hold.
2Microphone
Picks up your voice when you speak to another party using speakerphone.
3Redial / Pause
Redials the last number called. Also inserts a pause in autodial numbers.
4Speed Dial
Lets you dial stored phone numbers by pressing a two-digit number.
5Speaker Phone
Lets you speak to the person at the other end and dial telephone and fax numbers without lifting the handset.
6Dial Pad
Dials phone and fax numbers, and can be used as a keyboard for entering information into the MFC. # key lets you switch the dialling type during a telephone call from “PULSE” to “TONE”.
7Volume High / Low
Adjust speaker, ring and handset volume. The speaker volume is for message playback and Speaker Phone conversation.
8Shift
To access memory locations 13 through 24 in the One Touch keys hold down the Shift key.
9One Touch Keys
These 12 keys give you instant access to previously stored phone numbers.
10Stop
Stops a fax, cancels an operation, or exits from function mode.
11Start
Starts an operation, such as sending a fax.
12Enlarge/Reduce
Lets you reduce or enlarge copies depending on the ratio you select.
13Brightness
Lets you adjust the brightness of the whole image to be lighter or darker.
14Paper Type
Use this key to temporarily change the paper type setting for Copy and Video Printing modes.
15Copy Quality
Use this key to temporarily change the quality and type of original for Copy and Video Printing modes.
16Color Copy
Makes a full-color copy.
17Mono Copy
Makes a black-and-white or single-color copy.
18On/OffLine
Use this key to turn the printer online (ready to receive PC data) and offline (not ready to receive PC data) alternately. When the printer is online, the LCD displays ONLINE.
19Reset
Clears data from the printer memory, and then resets and restores to the factory default settings.
20Ink Management
Cleans the ink print heads and/or resets the ink dot counter after replacing an ink cartridge.
21Priority
Press this key to receive all faxes in memory without first printing them.
22Play
Lets you listen to voice messages and outgoing messages.
23Message Indicator Lights
Notify you that you have voice or fax messages in the memory.
24Erase
Lets you delete voice messages, and/or fax messages from the memory
25Record
Lets you record Outgoing Messages (OGM), memos and telephone calls.
26Help/Broadcast
Press this key whenever you want a quick reference Help List printed. The Help List shows how to perform functions, how to register information, and how to get basic information. Also use this key whenever you want to broadcast faxes to many different locations, maximum
of 174.
27Mode
Use to select how the MFC will handle incoming calls.
28Resolution
Sets the resolution when you send a fax.
29Tel-index
Lets you look up numbers stored in the dialing memory.
30Ink Empty Indicator
Blinks when ink cartridge is low and stays lit when ink is empty.
31Liquid Crystal Display
LCD displays messages to help you set and operate your MFC.
32 (Left Arrow)
 (Right Arrow)
Moves the LCD cursor through text and options.
33Function
Lets you access the function and programming mode.
34Set
Stores a function setting in the MFC.
35Clear
Deletes entered data or backs up one step in function procedure.
6 |
C H A P T E R O N E |
|
|

2 |
|
7 |
|
|
|
C H A P T E R T W O |
|
|
MFC Setup and |
|
|
Connections |
|
|
Caution
Never install telephone wiring during a lightning storm.
We recommend that this product be used with a surge protection device to protect the product against lightning storms.
Never install a telephone jack in a wet location unless the jack is specifically designed for a wet location.
Never touch telephone wires or terminals that are not insulated unless the telephone line has been disconnected at the network interface. Use caution when installing or modifying telephone lines.
Avoid using a telephone (other than a cordless type) during an electrical storm. There may be a remote risk of electric shock from lightning.
Do not use the telephone to report a gas leak in the vicinity of the leak.
For PLUGGABLE EQUIPMENT, the socket-outlet should be installed near the equipment and should be easily accessible.
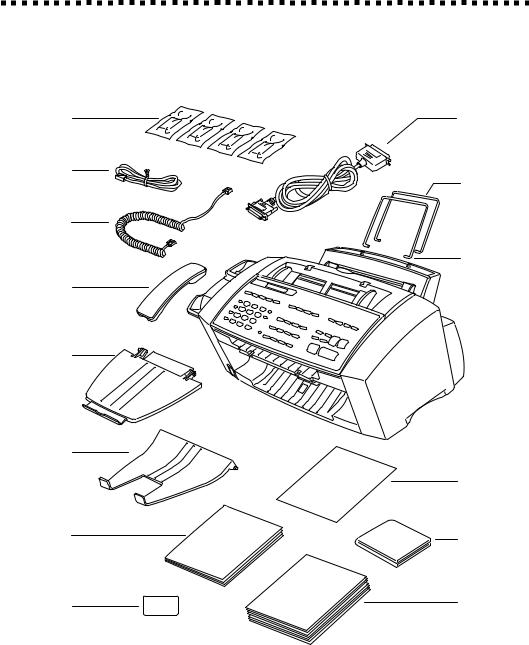
8 |
C H A P T E R T W O |
|
|
Packing List
Make sure you have the following items:
Ink
Cartridges
Telephone
Line Cord
Handset
Curled Cord
Telephone
Handset
Document Tray
Paper
Tray
Owner’s
Manual
Remote
Control
Access Card
Bi-directional
Parallel Cable
Paper
Wire
Extension
Document
Wire
Extension
Reference Guide for Improving Print Quality
Brother Color
Suite
2 CD-ROMS
Starter Coated
Paper
(Ink Jet Paper)
If an item is missing, call Brother Customer Service at 1-800-284-4329 (USA), 1-800-853-6660 (from within Canada) or 1-514-685-6464 (from within Montreal). See Ordering Accessories and Supplies on page ii for the correct item numbers.
Whenever you transport the MFC, use the packing materials that came with your MFC. If you do not pack the MFC correctly, you may void your warranty.
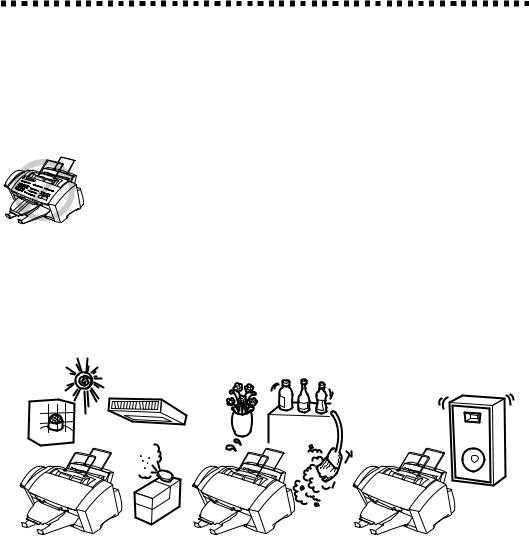
M F C S E T U P A N D C O N N E C T I O N S |
9 |
|
|
|
|
Choosing a Location
Place your MFC on a flat, stable surface, such as a desk. Select a place that is free of vibration and shocks. Locate the MFC near a telephone jack and a standard, grounded power outlet. Choose a location where the temperature remains between 50°F and 95°F (10°–35°C).
Avoid placing your MFC in a high-traffic area. Do not place near heaters, air conditioners, water, chemicals, or refrigerators. Do not expose the MFC to direct sunlight, excessive heat, moisture, or dust. Do not connect your MFC to electrical outlets controlled by wall switches or automatic timers. Disruption of power can wipe out information in the MFC’s memory. Do not connect your MFC to electrical outlets on the same circuit as large appliances or other equipment that might disrupt the power supply. Avoid interference sources, such as speakers or the base units of cordless phones.
 NO
NO
 ! NO ! NO !
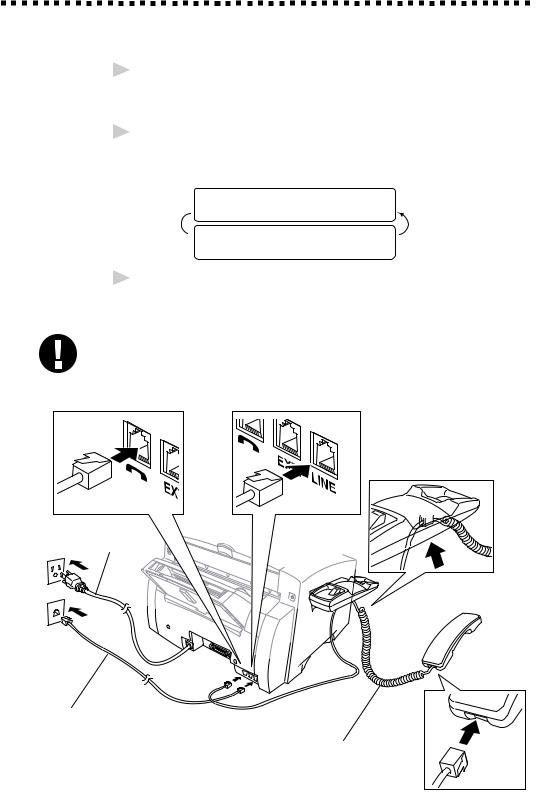
10 |
C H A P T E R T W O |
|
|
Assembly
1Connect the handset.
Connect the longer end of the curled handset cord to the MFC and the shorter end to the handset.
2Connect the power cord.
There is no ON/OFF switch. When you plug in the power cord, the power goes on and the screen alternately displays.
SET CARTRIDGES
OFFLINE
 PLS OPEN COVER
OFFLINE
3Connect the telephone line cord.
Connect one end of the telephone line cord to the jack on the MFC and the other end to a modular wall jack.
Caution
Operating the MFC before you install the ink cartridges will permanently damage the print head.
Power
Cord
Telephone
Line Cord
Handset
Curled Cord
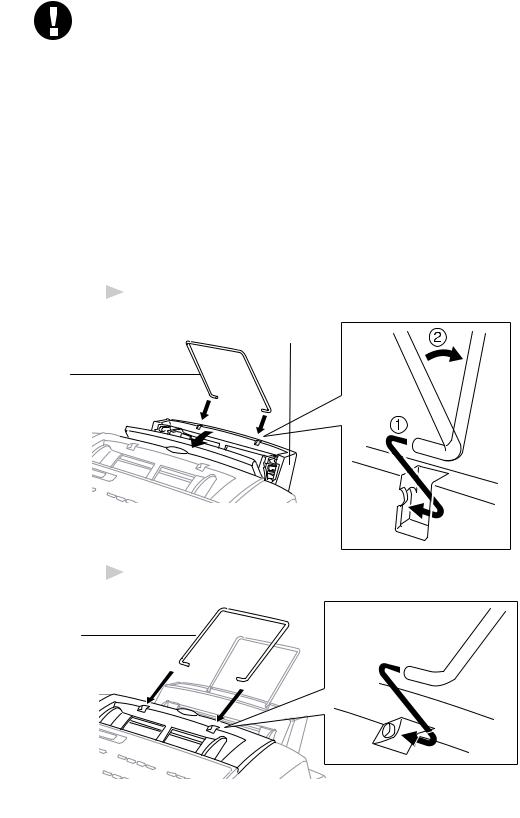
M F C S E T U P A N D C O N N E C T I O N S |
11 |
|
|
|
|
Caution
■The MFC must be grounded using a 3-prong plug.
■Since the MFC is grounded through the power outlet, you can protect yourself from potentially hazardous electrical conditions on the telephone network by keeping the power to your MFC on when you connect it to a telephone line. Similarly, you can protect yourself when you want to move your MFC, by disconnecting the telephone line first, and then the power cord.
■Lightning and power surges can damage this product! We recommend that you use a quality surge protection device on the AC power line as well as on the telephone line, or unplug the lines during a lightning storm.
4 Attach the paper wire extension to the multi-purpose sheet feeder.
Multi-purpose
Sheet Feeder
Paper Wire
Extension
5 Attach the document wire extension.
Document
Wire
Extension

12 |
C H A P T E R T W O |
|
|
6 Attach the paper tray to the paper output slot.
Caution
Please attach the Paper Tray to prevent paper jams and maintain print quality.
Paper
 Output
Slot
Paper Tray
7 Attach the document tray.
Document Tray
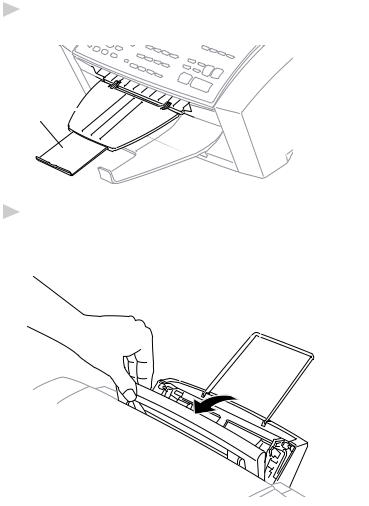
M F C S E T U P A N D C O N N E C T I O N S |
13 |
|
|
|
|
8 Pull out the plastic extension of the document tray.
Plastic
Extension
9Load paper in the multi-purpose sheet feeder (paper cassette). A Open the multi-purpose sheet feeder cover.
Multi-purpose
 Sheet Feeder
Cover
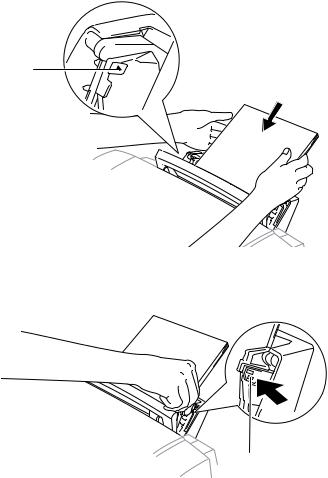
14 |
C H A P T E R T W O |
|
|
BFan the paper well. Load the paper. Make sure the print side is toward you and the paper level is stacked below the paper guide line.
Paper
Guide
Line
C Adjust the guides to fit the paper width.
 Guide
Guide
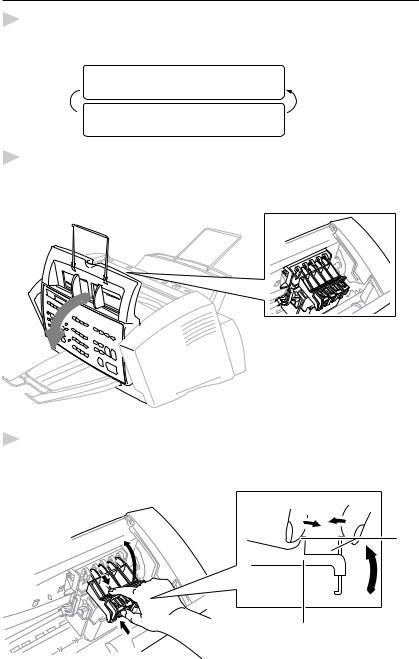
M F C S E T U P A N D C O N N E C T I O N S |
15 |
|
|
|
|
Installing the Ink Cartridges
1Check that you turned on the power (by plugging in the power cord). The screen alternately displays
SET CARTRIDGES
OFFLINE
 PLS OPEN COVER
OFFLINE
2Open the top cover by pulling it toward you. After a few seconds, the print head will move left to its replacement position.
Top Cover 
3Open the ink cartridge covers by pressing the clips together as shown in the illustration.
Clip
Cartridge
Cover
 Loading...