


 Loading...
OWNER’S MANUAL
(2in1 Copier/Printer)
MFC-9750
© 1999 Brother Industries, Ltd.

i
Table of Contents
1Introduction
2Assembly
3Making Copies
Using This Manual ................................................................................. |
1 |
Finding Information .............................................................................. |
1 |
Symbols Used In This Manual .............................................................. |
1 |
MFC-9750 Control Panel Overview ................................................... |
2 |
Table of Options ..................................................................................... |
4 |
Packing List ............................................................................................ |
5 |
Choosing a Location .............................................................................. |
6 |
Assembly ................................................................................................. |
7 |
Release the Scanner Lock Lever ........................................................... |
7 |
Install the Drum Unit Assembly (with Toner Cartridge) ...................... |
7 |
Loading Paper in Multi-purpose Paper Cassette ................................... |
9 |
Acceptable Paper ........................................................................ |
10 |
Manual Feed Slot ................................................................................ |
10 |
Acceptable Paper ........................................................................ |
10 |
Connect the Power Cord ..................................................................... |
11 |
Initial Setup .......................................................................................... |
12 |
Setting the Beeper Volume .................................................................. |
12 |
Setting the Sleep Mode ....................................................................... |
12 |
Setting the Print Density ..................................................................... |
13 |
Toner Save .......................................................................................... |
13 |
Checking the Drum Life ..................................................................... |
13 |
Printing a System Set up List .............................................................. |
14 |
Optional Lower Tray ........................................................................... |
14 |
Turning On Lower Tray ...................................................................... |
14 |
Setting Paper Size ............................................................................... |
14 |
Setting Tray Usage .............................................................................. |
15 |
Inserting Originals for Copying ........................................................ |
17 |
Using the ADF (Automatic Document Feeder) .................................. |
17 |
Using the Glass Platten ....................................................................... |
18 |
Copy Settings ........................................................................................ |
19 |
Copy Contrast (Temporary Setting) .................................................... |
19 |
Paper Size ........................................................................................... |
19 |
Reduce (Temporary Setting) ............................................................... |
20 |
Enlarge (Temporary Setting) ............................................................... |
20 |
Copy Mode (Temporary Setting) ........................................................ |
21 |

ii |
T A B L E O F C O N T E N T S |
|
4Setting Up the Machine and Computer to Work Together
5Printing
Copying a Photograph .................................................................... |
|
21 |
|
Basic Copy Operations ........................................................................ |
|
21 |
|
Copying One Page .............................................................................. |
|
21 |
|
Stacking Multiple Copies (Using the ADF) ........................................ |
22 |
||
Sorting Multiple Copies (Using the ADF) .......................................... |
22 |
||
Single or Multiple Copies (Using the Glass Platten) .......................... |
22 |
||
Special Copy Options ......................................................................... |
|
23 |
|
4in1 ................................................................................................. |
|
|
23 |
2in1 ................................................................................................. |
|
|
23 |
Poster .............................................................................................. |
|
|
24 |
Making Special Copies ................................................................... |
|
24 |
|
If You Get a Memory Full Message .................................................... |
24 |
||
Using the Brother Machine with Your PC ....................................... |
25 |
||
Before You Install Brother Drivers ................................................... |
25 |
||
Computer Requirements ..................................................................... |
|
25 |
|
Connecting the Brother MFC-9750 to a PC With a USB Cable |
|
||
(For Windows® 98 Users Only) ........................................................ |
26 |
||
Installing Brother Printer Driver Using USB Cable ........................... |
27 |
||
Installing True Type Fonts .................................................................. |
|
30 |
|
For Windows® |
95/98 and Windows NT® Workstation |
|
|
Version 4.0: ................................................................................... |
|
|
30 |
For Windows® |
3.1x: ........................................................................ |
|
31 |
Software for your MFC-9750 ............................................................. |
|
31 |
|
Software/Drivers ................................................................................. |
|
|
31 |
Connecting the Brother MFC-9750 to a PC Using a Parallel |
|
||
Cable .................................................................................................... |
|
|
32 |
Installing MFC-9750 Printer Driver ................................................... |
33 |
||
If you are using Windows NT® Workstation Version 4.0: .............. |
33 |
||
If you are using Windows® |
3.1 or 3.11: ......................................... |
34 |
|
If you are using Windows® |
95 or 98: .............................................. |
34 |
|
Installing the Maintenance Utility on MS-DOS® ............................ |
35 |
||
How to Use the MFC with Your DOS Application Software ............. |
35 |
||
What Does the Remote Printer Console Do? ...................................... |
35 |
||
Remote Printer Console Main Program ......................................... |
35 |
||
Printer Status Monitor Program ...................................................... |
36 |
||
Installing the Remote Printer Console ................................................ |
36 |
||
Running the Remote Printer Console Main Program ......................... |
36 |
||
Special Printing Features ................................................................... |
|
37 |
|
Windows® Printing .............................................................................. |
|
37 |
|
Alternate Printer Emulation Support .................................................. |
37 |
||
Remote Printer Console Program for DOS ......................................... |
37 |
||
Bi-directional Parallel Interface .......................................................... |
38 |
||
Printing From Your PC ....................................................................... |
|
38 |
|
T A B L E O F C O N T E N T S |
iii |
|
|
|
|
6Optional Accessories
7Important Information
8Troubleshooting and Maintenance
Paper Cassette ..................................................................................... |
38 |
Two-Sided Printing (Manual Duplexing) ........................................... |
39 |
Manual Feed Slot ................................................................................ |
39 |
Loading One Sheet of Paper ........................................................... |
40 |
Loading more than One Sheet of Paper .......................................... |
40 |
Printing on Envelops, Thicker Paper and Card Stock .................... |
41 |
Face Down Output Bin ....................................................................... |
42 |
Print Operations from the Control Panel ........................................ |
42 |
Job Cancel ........................................................................................... |
42 |
Menu Options ....................................................................................... |
43 |
Printing the Internal Font List ............................................................. |
43 |
Printing a Configuration List .............................................................. |
43 |
Printing a Test Page ............................................................................ |
43 |
Restoring Factory Default Settings ..................................................... |
44 |
Printing PC Data in Hexadecimal ....................................................... |
44 |
Acceptable Paper ................................................................................ |
45 |
Multi-purpose Paper Cassette (and Lower Tray Accessory) .......... |
45 |
Manual Feed Slot ............................................................................ |
45 |
Output Tray ..................................................................................... |
45 |
Memory Board ..................................................................................... |
47 |
Optional Memory for the Printing ...................................................... |
47 |
Optional Paper Tray ............................................................................ |
47 |
Important Safety Instructions ......................................................... |
49 |
IEC 825 Specification ..................................................................... |
51 |
For Your Safety ............................................................................... |
52 |
IEC 825 Laser Class ....................................................................... |
52 |
Disconnect device ........................................................................... |
52 |
IMPORTANT ................................................................................. |
52 |
Troubleshooting .................................................................................... |
53 |
Error Messages ................................................................................... |
53 |
Document Jams and Paper Jams ...................................................... |
55 |
Document Jam in the Top of the ADF Unit ........................................ |
55 |
Document Jam inside the ADF Unit ................................................... |
55 |
Printer Jam .......................................................................................... |
56 |
Paper is Jammed in the Multi-purpose Paper Cassette ................... |
57 |
Paper is Jammed near the Drum Unit ............................................. |
57 |
Paper is Jammed in the Fuser Unit ................................................. |
58 |
If You Are Having Difficulty with Your MFC .................................... |
59 |
Bi-directional Parallel Ports (nibble and byte modes) ........................ |
62 |
The Machine Connect Failure or Bi-directional Communication |
|
Error ............................................................................................. |
62 |

iv |
T A B L E O F C O N T E N T S |
|
|
Brother HL-6/6V/10h/630series/660series/960/1260/WL-660: ..... |
62 |
|
HP LaserJet series II, IID, IIP, IIP+, III, IIID or IIIP: .................... |
63 |
|
HP LaserJet 4 Plus: ......................................................................... |
63 |
|
NEC SuperScript 610/660: ............................................................. |
63 |
|
EPSON ActionLaser 1100/1400: .................................................... |
64 |
|
Lexmark WinWriter 200: ................................................................ |
64 |
|
Graphics or Text is Missing when the Document is Printed .......... |
65 |
|
Regular Maintenance .......................................................................... |
65 |
|
Cleaning the Scanner .......................................................................... |
65 |
|
Cleaning the Printer ............................................................................ |
66 |
|
Cleaning the Drum Unit ...................................................................... |
67 |
|
Replacing the Toner Cartridge ............................................................ |
68 |
|
Toner Empty Indicator .................................................................... |
68 |
|
Steps for Replacing Toner Cartridge .............................................. |
69 |
|
Drum Life Considerations for Your Brother Machine ........................ |
72 |
|
Replacing the Drum Unit .................................................................... |
73 |
|
Packing and Shipping the MFC ........................................................ |
76 |
Specifications |
Printer Specifications .......................................................................... |
79 |
|
Electrical and Environment ............................................................... |
80 |
9 |
Parallel Interface Specifications ........................................................ |
81 |
|
Resident Fonts ...................................................................................... |
81 |
|
Index ...................................................................................................... |
85 |
|
Accessory List ....................................................................................... |
87 |
1
C1H A P T E R O N E
Introduction
UsingThis Manual
Thank you for purchasing a Brother multifunction center (MFC).
This MFC has been designed to be simple to use. However, you can use your MFC to its fullest potential by taking a few minutes to read this manual.
Finding Information
All chapter headings and subheadings are listed in the Table of Contents. You will also be able to find information about a specific feature or function by checking the Index at the back of this manual. Also, throughout this manual, you will see special symbols alerting you to important information, cross-references, and warnings. Illustrations of some screen displays also help you choose the correct key-presses.
Symbols Used In This Manual
Note or additional information.
The MFC may be damaged or may not work correctly if this is not observed.
Warning. Damage can result if this is not observed.
2 |
C H A P T E R O N E |
|
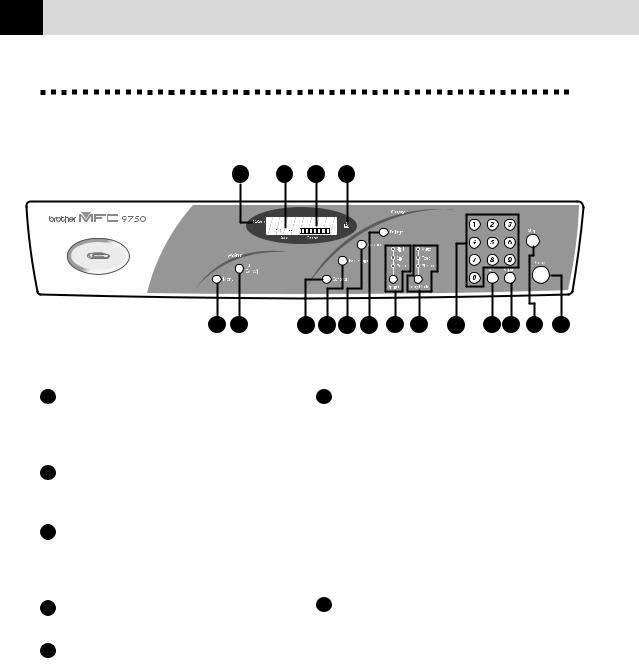
MFC-9750 Control Panel Overview
14 15 16 17
13 |
12 |
|
|
|
|
|
|
7 |
6 |
|
4 |
3 |
2 |
1 |
11 |
10 |
9 |
8 |
5 |
||||||||||
1Copy
Press this key to start copying an original that is in the ADF or on the glass platten.
2Stop
Press this key to cancel a copy operation. The original will be ejected.
3Clear
If you entered a wrong copy setting and want to return to the factory default settings before copying, press this key.
4Sort (Temporary Setting)
Press this key to sort multiple copies.
5Numeric Keys
Use the numeric keys to enter
the number of multiple copies (99 maximum).
6Copy Mode (and Indicators) (Temporary Setting)
Press to illuminate the LED that suits the type of original.
Auto — Select when the original contains both text and photographs.
Text — Select when the original contains only text.
Photo — Select when the original is a picture.
7Option (and Indicators) (Temporary Setting)
You can change the layout of copies on the print media. Press this key until the Option Indicator you want is lit.
4in1 — Save paper by copying four pages onto one page.
2in1 — Save paper or create a booklet by copying two pages onto one page.
Poster — This option copies a different portion of the original on each of nine sheets of print media. Tape the sheets together to get a copy that is nine times the size of the original.

I N T R O D U C T I O N |
3 |
|
|
|
|
Copy:
8Enlarge (Temporary Setting)
Each key press shows the next prestored enlargement ratios: 100%, 120%, 125%, 141%, 150%, 200%, 400%, MANUAL. For more choices, select MANUAL and use the numeric keys to type any percentage between 101% and 400%.
9Reduce (Temporary Setting)
Each key press shows the next pre-stored reduction ratios: 100%, 93%, 87%, 78%, 75%, 71%, 50%, 25%, AUTO, MANUAL. For more choices, select MANUAL and use the numeric keys to type any percentage between 25% and 99%. Select AUTO to automatically fit the original on the selected paper size.
10Paper Size
Press this key to identify the size of paper in the paper cassette that should be used for copying.
11Contrast (Temporary Setting)
Each key press changes the contrast setting. Choose from seven degrees of light to dark.
Print:
12Job Cancel
Terminates a print job in process and ejects the printout.
13Menu
Lets you access the function and programing mode.
LCD (Liquid Crystal Display):
14Status
Displays messages to help you set up and operate your machine.
15Ratio
Enlargement and reduction percentages will be displayed.
16Contrast
This area shows the degree of contrast you selected by pressing the Contrast key.
17Toner Empty Indicator
Flashes when toner cartridge is low and stays lit when toner is empty.

4 |
C H A P T E R O N E |
|
Table of Options
When you press Menu or Paper Size you can choose settings and test print operations. (See Initial Setup, chapter 2 for details.)
|
Menu |
|
|
|
|
|
|
Main Menu |
Sub Menu |
Options |
Factory Setting |
|
|
|
|
1.INITIAL SETUP |
1.BEEPER |
1.OFF2.LOW3.HIGH |
2.LOW |
|
|
|
|
|
2.SLEEP MODE |
–––– |
05 MIN |
|
|
|
|
|
3.PRINT DENSITY |
1.LOW2.MID3.HIGH |
–––– |
|
|
|
|
|
4.TONER SAVE |
1.ON 2.OFF |
2.OFF |
|
|
|
|
|
5.PAGE COUNTER |
–––– |
–––– |
|
|
|
|
|
6.DRUM LIFE |
|
REMAINING 100% |
|
|
|
|
|
7.LOWER TRAY |
1.ON 2.OFF |
2.OFF |
|
|
|
|
|
8.SYSTEM SETUP |
–––– |
–––– |
|
|
|
|
2.PRINT OPTIONS |
1.INTERNAL FONT |
|
|
|
|
|
|
|
2.CONFIGURATION |
|
|
|
|
|
|
|
3.TEST PRINT |
|
|
|
|
|
|
3.RESET PRINTER |
1.FACTORY RESET |
|
|
|
|
|
|
|
2.HEX DUMP MODE |
|
|
|
|
|
|
Paper Size
Sub Menu |
Options |
Factory Setting |
|
|
|
1.UPPER |
LETTER/EXECUTIVE/ |
A4 |
|
A4/A5/A6/B5/B6 |
|
|
|
|
2.LOWER |
LETTER/EXECUTIVE/ |
A4 |
|
A4/A5/B5/B6 |
|
|
|
|
3.TRAY USAGE |
1.UPPER ONLY |
AUTO |
|
2.LOWER ONLY |
|
|
3.AUTO |
|
|
|
|
2 |
5 |
|
|
C H A P T E R T W O |
|
Assembly |
|
Packing List
Make sure you have the following items:
Drum Unit Assembly (TN-6300)
IEEE-1284 Compliant
Bi-directioned Cable
Power Cord
Paper Cassette
 CD-ROM
Owner’s Manual
Whenever you transport the MFC, use the packing materials that came with your MFC and pack the MFC correctly.
6 |
C H A P T E R T W O |
|
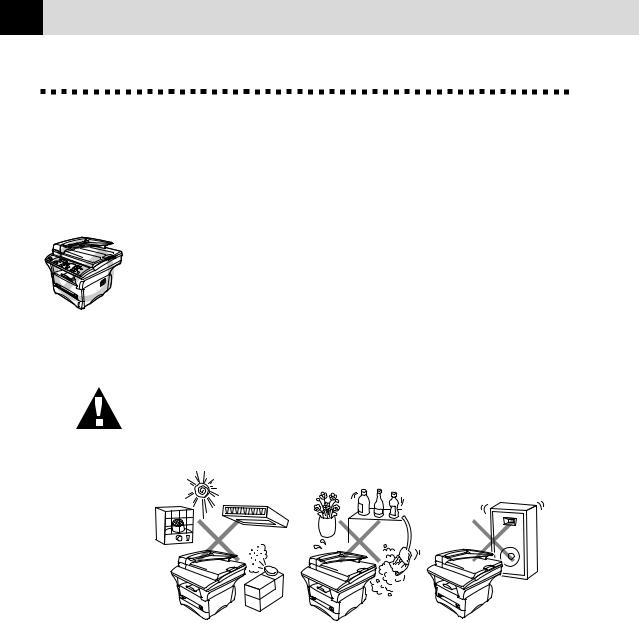
Choosing a Location
Place your MFC on a flat, stable surface, such as a desk. Select a place that is free of vibration and shocks. Locate the MFC near a standard, earthed electrical socket. Choose a location where the temperature remains between 10°C and 32.5°C.
Avoid placing your MFC where it may be knocked. Do not place near heaters, air conditioners, water, chemicals, or refrigerators. Do not expose the MFC to direct sunlight, excessive heat, moisture, or dust. Do not connect your MFC to electrical outlets on the same circuit as large appliances or other equipment that might disrupt the power supply. Avoid interference sources, such as speakers or the base units of cordless phones. Ensure the airflow from the fan on the right hand side of the MFC is not impeded.
Caution
Keep the MFC out of strong light such as direct sunlight.
A S S E M B L Y |
7 |
|
|
|
|
Assembly
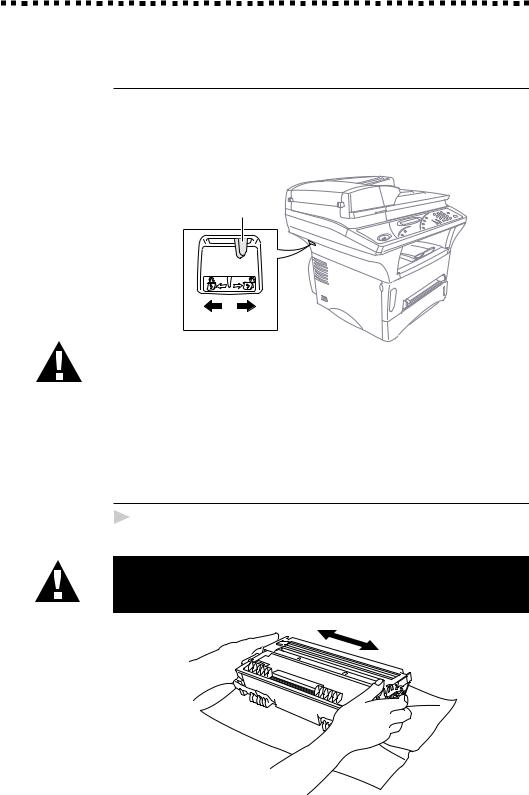
Release the Scanner Lock Lever
The blue scanner lock lever is on the left side of the MFC. Push the lever up to unlock the scanner.
IMPORTANT: This step must be made for the machine to work correctly.
Scanner Lock Lever
Lock Unlock
Caution
If CHECK SCAN LOCK appears on the LCD, immediately release the scanner lock lever. If you see MACHINE ERROR AF (or AE), stop operation and contact your Brother dealer for service.
Install the Drum Unit Assembly
(withToner Cartridge)
1Unpack the drum unit assembly, including the toner cartridge, and gently rock it from side to side five or six times.
To prevent damage to the drum, do not expose it to light for longer than a few minutes.

8 |
C H A P T E R T W O |
|
2 Open the front cover of the machine.
3 Insert the drum unit assembly into the machine.
4 Close the front cover.

A S S E M B L Y |
9 |
|
|
|
|
Loading Paper in Multi-purpose Paper
Cassette
1 Pull the paper cassette completely out of the machine.
2Slide the paper width and length adjusters to the position for the paper size you are using.
3Fan the paper well. Load paper in the paper cassette. Press down on the paper to flatten it in all four corners, keeping the paper level below the guide. The cassette can hold up to 250 sheets of 75 g/m2 (20 lb) paper.
Maximum
Paper
Height
Guide
10 |
C H A P T E R T W O |
|
4 Slide the paper cassette into the machine until it locks into place.
Acceptable Paper
Size |
: A4, Letter, B5, B6, A5, Executive |
|||
Weight |
: |
64 g/m |
2 |
2 |
|
– 105 g/m |
|||
Thickness |
: |
0.08 – |
0.13 mm |
|
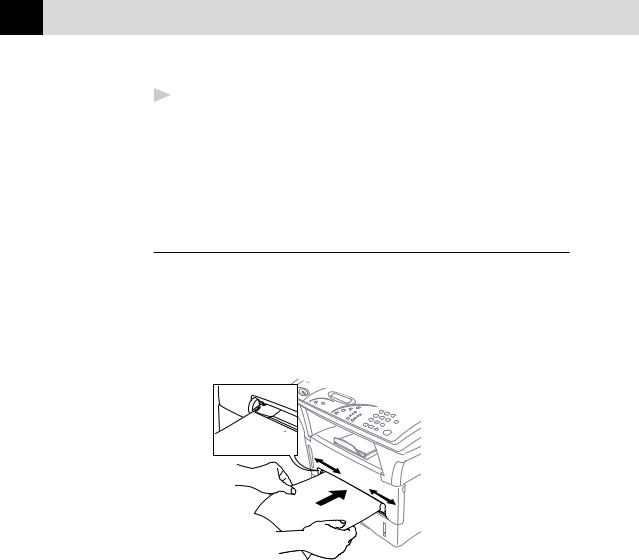
Manual Feed Slot
The manual feed slot is above the multi-purpose paper cassette. Load paper or an envelope one at a time. You do not have to remove paper from the paper cassette.
Use the manual feed slot to print or copy on an envelope, label, card stock or thicker paper:
Manual

 Feed
Feed
Slot
Acceptable Paper
Size |
: 70 x |
116 mm – 216 x 356 mm |
||
Weight |
: |
|
2 |
2 |
64 g/m |
– 158 g/m |
|||
Thickness |
: |
0.08 |
– |
0.20 mm |
A S S E M B L Y |
11 |
|
|
|
|
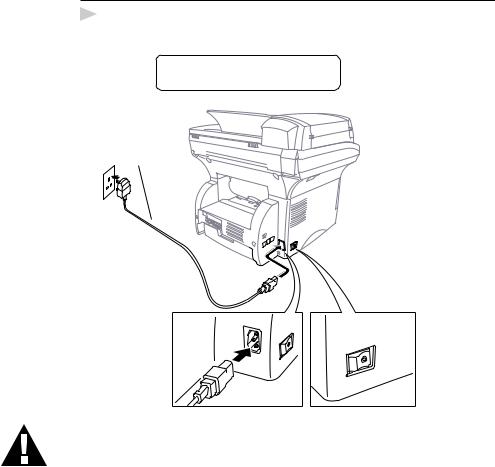
Connect the Power Cord
1Connect the power cord.
When you connect the power, the screen displays
READY
100% ■■■■■■■
Power Cord
NOTICE:
■The MFC must only be used with the AC cord supplied which is fitted with an earthed plug.
■Do not touch any parts that are moving.
■Lightning and power surges may damage this product. We recommend that you use a quality surge protection device or unplug the power cord during a lightning storm.
12 |
C H A P T E R T W O |
|
Initial Setup
The Menu key enables you to customize settings. Press Menu repeatedly until you see the option you want to select.
Setting the Beeper Volume
You can set the beeper to LOW, HIGH or OFF. The default setting is LOW. When the beeper is set to LOW or HIGH, the MFC beeps every time you press a key or make an error.
1Press Menu until you see 1.INITIAL SETUP.
2Press 1 on the numeric keys to select it.
3Press Menu until you see 1.BEEPER.
4Press 1 on the numeric keys to select it.
5Press a numeric key to select the option you want.
1.OFF2.LOW3.HIGH
6 Press Stop to exit.
Setting the Sleep Mode
Setting the Sleep Mode reduces power consumption while the machine is idle. You can choose how long the machine is idle (from 00 to 15 minutes) before it drops into sleep mode. The timer automatically resets when the machine receives PC data, or makes a copy. The default setting is 05 minutes.
1Press Menu until you see 1.INITIAL SETUP.
2Press 1 on the numeric keys to select it.
3Press Menu repeatedly until you see 2.SLEEP MODE.
4Press 2 on the numeric keys to select it.
5Press the numeric keys to enter the amount of time the machine is idle before it drops into sleep mode (00 to 15 minutes).
6Press Stop to exit.
If you make copies frequently, avoid constant machine warmup by increasing the idle time in sleep mode.

A S S E M B L Y |
13 |
|
|
|
|
Setting the Print Density
If your machine is printing too light or too dark, you can adjust the print density level. The new setting will remain until you change it again.
1Press Menu until you see 1.INITIAL SETUP.
2Press 1 on the numeric keys to select it.
3Press Menu repeatedly until you see 3.PRINT DENSITY.
4Press 3 on the numeric keys to select it.
5Press a numeric key to select the option you want.
1.LOW2.MID3.HIGH
6 Press Stop to exit.
Toner Save
You can conserve toner using this feature. When you set Toner Save to ON, print appears somewhat lighter. The default setting is OFF.
1Press Menu until you see 1.INITIAL SETUP.
2Press 1 on the numeric keys to select it.
3Press Menu repeatedly until you see 4.TONER SAVE.
4Press 4 on the numeric keys to select it.
5Press a numeric key to select the option you want.
1.ON 2.OFF
6 Press Stop to exit.
Checking the Drum Life
You can see the percentage of the drum’s life that remains available.
1Press Menu until you see 1.INITIAL SETUP.
2Press 1 on the numeric keys to select it.
3Press Menu repeatedly until you see 6.DRUM LIFE.
4Press 6 on the numeric keys to select it.
5Press Stop to exit.
Even if the remaining drum life is 0%, you may continue to use the drum unit until you have a print quality problem.
14 |
C H A P T E R T W O |
|
Printing a System Set up List
You can print a list of various system settings.
1Press Menu until you see 1.INITIAL SETUP.
2Press 1 on the numeric keys to select it.
3Press Menu repeatedly until you see 8.SYSTEM SETUP.
4Press 8 on the numeric keys to select it. The MFC starts printing.
5Press Stop to exit.
Optional LowerTray
Turning On LowerTray
Switch this function ON to use the optional lower paper cassette. If you switched ON, you can set the paper size for each cassette.
1Press Menu until you see 1.INITIAL SETUP.
2Press 1 on the numeric keys to select it.
3Press Menu repeatedly until you see 7.LOWER TRAY.
4Press 7 on the numeric keys to select it.
5Press 1 on the numeric keys to select ON.
1.ON 2.OFF
6 Press Stop to exit.
Setting Paper Size
You can use a variety of sizes of paper in the paper cassette(s): letter, A4, Executive, A5, A6, B5 and B6.
If you purchased and attached the optional Lower Tray, you can select the paper size for each cassette and decide which cassette will be used first.
1 Press Paper Size until you see 1.UPPER.
1.UPPER
2.LOWER
3.TRAY USAGE
A S S E M B L Y |
15 |
|
|
|
|
2Press 1 on the numeric keys to select it.
3Press Paper Size repeatedly to display the size of paper in the cassette, either: LETTER, A4, EXECUTIVE, A5, A6, B5 or B6. Press Stop to exit.
4Repeat Steps 1 to 3 for Lower Tray, if attached.
You cannot use A6 size paper in Lower Tray.
SettingTray Usage
If you purchased and connected Lower Tray, you can decide how the MFC will use the paper in the two cassettes.
The default setting of AUTO allows your machine to choose Lower Tray automatically if there is no paper in the upper cassette.
Choose 1.UPPER ONLY if you want to keep special paper in Lower Tray and control when it is used. From the Windows® Printer Driver you can override this setting and print on the paper in Lower Tray if necessary. When paper is out in Upper Tray, the LCD displays CHECK PAPER #1 and will wait for paper to be replaced in Upper Tray before printing. Choose 2.LOWER ONLY to reverse this process.
1Press Paper Size repeatedly until you see 3.TRAY USAGE.
2Press 3 on the numeric keys to select it.
3Press Paper Size repeatedly until you see the option you want.
1.UPPER ONLY
2.LOWER ONLY
3.AUTO
4Using the numeric keys, enter the number of that option. (For example, press 1 for UPPER ONLY.)
5Press Stop to exit.
You cannot use A6 size paper in Lower Tray.

16 |
C H A P T E R T W O |
|

3 |
17 |
|
|
C H A P T E R T H R E E |
|
Making Copies |
|
You can use your machine as a copier, making up to 99 copies at a time.
Inserting Originals for Copying
You can copy from either the ADF (Automatic Document Feeder) or from the glass platten.
Using the ADF (Automatic Document Feeder)
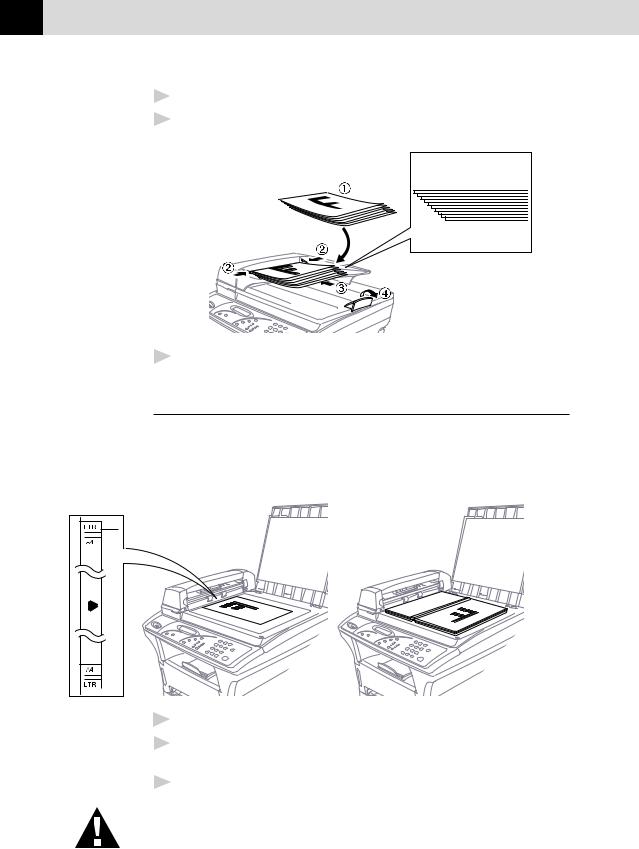
The automatic document feeder (ADF) can hold up to 50 pages, feeding each one individually through the machine. Use standard (75g/m2) paper when using the ADF. Always fan the pages well before placing them in the feeder.
DO NOT use curled, wrinkled, folded, or ripped paper, or paper with staples, paper clips, paste or tape attached. DO NOT use cardboard, newspaper, or fabric. (To copy or scan this kind of document, see “Using the Glass Platten” in this chapter.)
■ Make sure documents written with ink are completely dry.
■ Documents must be from 14.7 to 21.6 cm wide, and from 12.7 to 35.6 cm long.
1 Insert documents FACE UP, TOP EDGE FIRST.
Document is Face Up in the ADF
Document
 Stopper
18 |
C H A P T E R T H R E E |
|
2Adjust the paper guides to fit the width of your pages.
3Stagger multiple pages. Then place them in the ADF, until you feel the first page lightly touch the feed roller.
4 Pull up the document stopper.
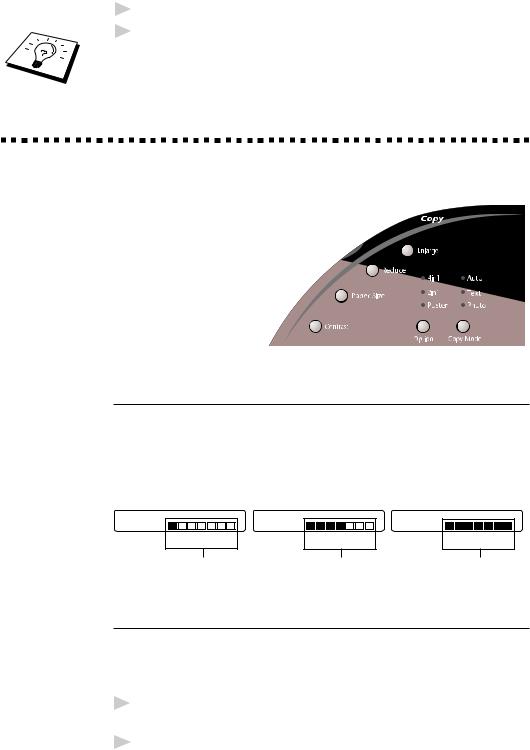
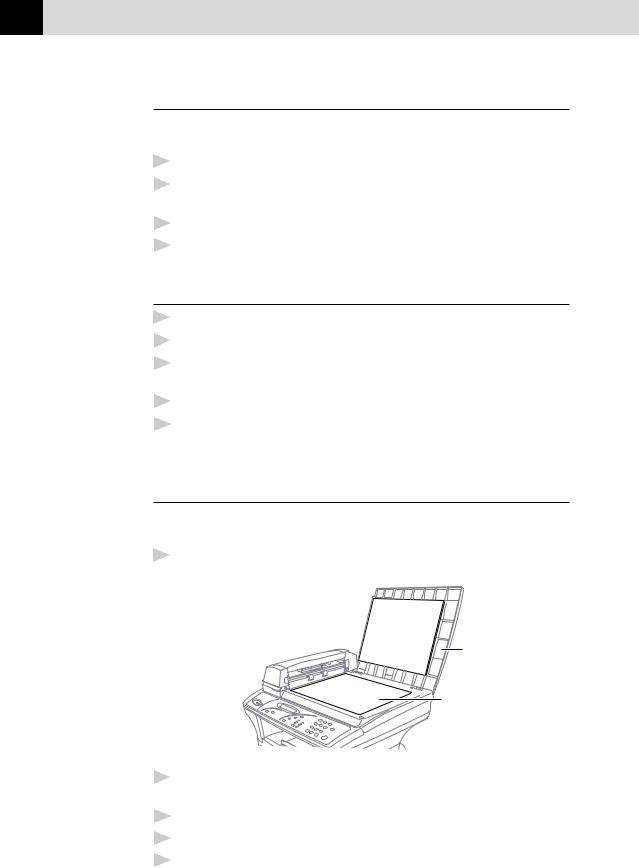
Using the Glass Platten
You can use the glass platten to copy one page at a time, or pages of a book. Documents can be letter or A4 size (21.6 cm to 29.7 cm). To use the glass platten, the ADF must be empty. You can make multiple copies; however, if you want them sorted you must use the ADF.
Documents are
Face Down
1Lift the document cover.
2Using the document guidelines on the left, center the document FACE DOWN on the glass platten.
3 Close the document cover.
If the document is a book or is thick, do not slam the cover or press on it, as damage to the glass platten may result.
M A K I N G C O P I E S |
19 |
|
|
|
|
4Press Copy to begin copying.
5Repeat Steps 1 to 4 for each page of your document.
Press Stop to cancel.
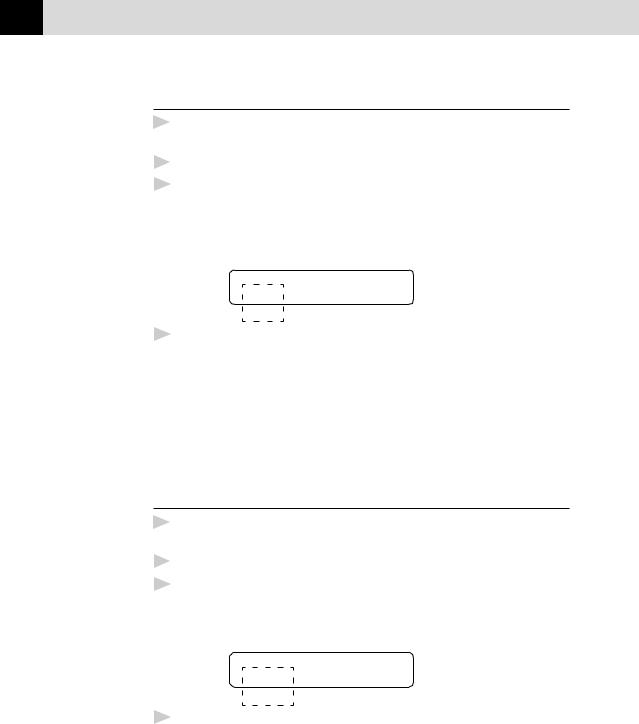
Copy Settings
The six Copy keys on the control panel enable you to combine multiple settings quickly and easily.
Copy Contrast (Temporary Setting)
If a document is in the ADF or on the glass platten, you can adjust copy contrast, to make copies darker or lighter. There are seven degrees of contrast. The default setting is normal.
■To lighten or darken the contrast, press Contrast repeatedly until you see the setting you want.
100% |
|
100% |
|
100% |
|
Ratio |
Contrast |
Ratio |
Contrast |
Ratio |
Contrast |
|
Lightest |
|
Normal |
|
Darkest |
Paper Size
Use Paper Size to identify the size of the paper in the paper cassette.
You can select LETTER, A4, B5, B6, A5, A6 or EXECUTIVE size paper.
1Press Paper Size repeatedly until the display shows the size of paper you loaded in the paper cassette.
2Press Copy to begin copying.
20 |
C H A P T E R T H R E E |
|
Reduce (Temporary Setting)
1Place the document(s) face up in the feeder or face down on the glass platten.
2Using the numeric keys, enter the number of copies.
3Press Reduce repeatedly until you see the reduction ratio you want:
100%, 93%, 87%, 78%, 75%, 71%, 50%, 25%, AUTO,
MANUAL — OR— Select AUTO to automatically fit the original on the selected paper size — OR— Select MANUAL to use the numenric keys to enter any percentage between 99% and 25%.
78% ■ ■ ■ ■■ ■ ■
Ratio Contrast
4 Press Copy.
Selecting Recomended Ratio
A4 |
→ |
B5 |
87% |
|
|
|
|
A4 |
→ |
A5 |
|
|
|
|
|
A5 |
→ |
A6 |
71% |
|
|
|
|
B5 |
→ |
B6 |
|
|
|
|
|
Enlarge (Temporary Setting)
1Place the document(s) face up in the feeder or face down on the glass platten.
2Using the numeric keys, enter the number of copies.
3Press Enlarge repeatedly until you see the enlargement ratio you want: 100%, 120%, 125%, 141%, 150%, 200%, 400%,
MANUAL. Select MANUAL to use the numenric keys to enter any percentage between 101% and 400%.
141% ■■■■■■■
Ratio Contrast
4 Press Copy.
Selecting Recomended Ratio
A5 |
→ |
A4 |
|
A6 |
→ |
A5 |
141% |
|
|
|
|
B6 |
→ |
B5 |
|
M A K I N G C O P I E S |
21 |
|
|
|
|
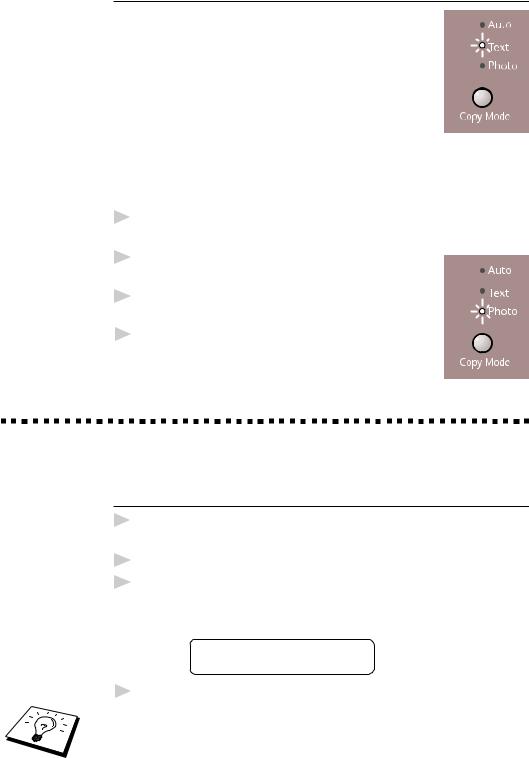
Copy Mode (Temporary Setting)
Press Copy Mode repeatedly until the LED is illuminated for Auto, Text or Photo, as needed. The factory default setting is Auto.
Auto — Select when the original includes both text and photographs.
Text — Select when the original contains only text.
Photo — Select when the original is a picture.
Copying a Photograph
1Insert the photo face up in the feeder or face down on the glass platten.
2Press Copy Mode until the Photo LED is
illuminated.
3 Using the numeric keys, enter the number of copies you want (up to 99).
4 Press Copy.
Basic Copy Operations
Copying One Page
1Insert the document face up in the feeder, or face down on the glass platten.
2If necessary, use the Copy keys to change the setting.
3Press Copy.
Do NOT pull on the paper while copying is in progress.
COPYING |
P.01 |
100% ■■■■■■■
4 To stop, press Stop to release the original document.
For details about using the Copy keys in step 2, please see “Copy Setting” in this chapter.
22 |
C H A P T E R T H R E E |
|
Stacking Multiple Copies (Using the ADF)
Unless you select Sort, multiple copies will be stacked (all copies of page 1, then all copies of page 2, etc.).
1Insert the documents face up in the feeder.
2Using the numeric keys, enter the number of copies you want (up to 99).
3If necessary, use the Copy keys to change the settings.
4Press Copy.
Sorting Multiple Copies (Using the ADF)
1Insert the documents face up in the feeder.
2Press Sort.
3Using the numeric keys, enter the number of copies you want (up to 99).
4If necessary, use the Copy keys to change the settings.
5Press Copy.
Single or Multiple Copies (Using the Glass Platten)
If you want to sort multiple copies, use the ADF. See “Sorting Multiple Copies (Using the ADF)” in this chapter.
1 Lift the Document Cover.
White Film 
Document
Cover
Glass
Platten
2Using the document guide on the left, center the document face down on the glass platten.
3Using the dial pad, enter the number of copies you want (up to 99).
4If necessary, use the Copy keys to change the settings.
5 Press Copy.
M A K I N G C O P I E S |
23 |
|
|
|
|
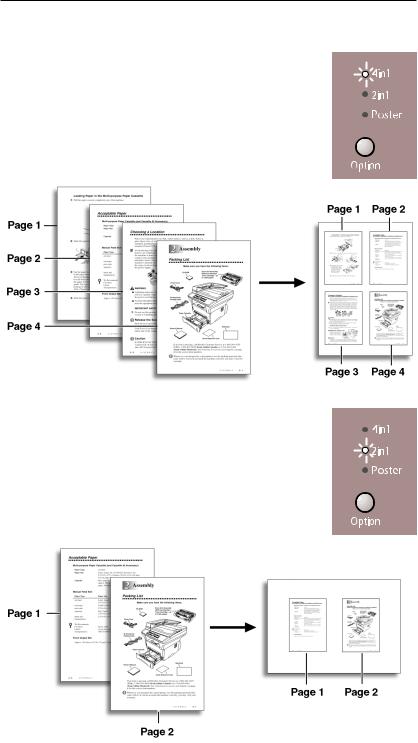
Special Copy Options
You can save paper by copying either two or four pages onto one page.
4in1
Press Option repeatedly until the 4in1 LED is illuminated.
2in1
Press Option repeatedly until the 2in1 LED is illuminated.
Loading...