


Basic User’s Guide
MFC-L8650CDW
MFC-L8850CDW
MFC-L9550CDW
Not all models are available in all countries.
Version 0
UK/IRE

If you need to contact customer service
Complete the following information for future reference:
Model Number: MFC-L8650CDW / MFC-L8850CDW / MFC-L9550CDW
(Circle your model number) Serial Number: 1
Date of Purchase:
Place of Purchase:
1The serial number is on the back of the unit. Retain this User’s Guide with your sales receipt as a permanent record of your purchase, in the event of theft, fire or warranty service.
Register your product on-line at
http://www.brother.com/registration/
© 2014 Brother Industries, Ltd. All rights reserved.

User’s Guides and where do I find them?
|
|
|
Which Guide? |
What’s in it? |
Where is it? |
Product Safety |
Read this Guide first. Read the Safety |
Printed / In the box |
Guide |
Instructions before you set up your machine. |
|
|
See this Guide for trademarks and legal |
|
|
limitations. |
|
Quick Setup Guide |
Follow the instructions for setting up your |
Printed / In the box |
|
machine and installing the drivers and |
|
|
software for the operating system and |
|
|
connection type you are using. |
|
Basic User's Guide |
Learn the basic Fax, Copy, Scan and Direct |
Printed / In the box |
|
Print operations and how to replace supplies. |
For |
|
See troubleshooting tips. |
|
|
Czech Republic, |
|
|
|
|
|
|
Hungary, |
|
|
Republic of Bulgaria, |
|
|
Republic of Poland, |
|
|
Romania, |
|
|
Slovak Republic : |
|
|
(Windows®) |
|
|
PDF file / CD-ROM / In the Box |
|
|
(Macintosh) |
|
|
PDF file / Brother Solutions |
|
|
Center 1 |
Advanced User's |
Learn more advanced operations: Fax, Copy, |
(Windows®) |
Guide |
security features, printing reports and |
PDF file / CD-ROM / In the Box |
|
performing routine maintenance. |
(Macintosh) |
|
|
PDF file / Brother Solutions |
|
|
Center 1 |
Software and |
This Guide provides instructions for |
(Windows®) |
Network User's |
Scanning, Printing, PC-FAX and other |
HTML file / CD-ROM / In the |
Guide |
operations that can be performed by |
Box |
|
connecting your Brother machine to a |
(Macintosh) |
|
computer. You can also find useful |
HTML file / Brother Solutions |
|
information about using the Brother |
Center 1 |
|
ControlCenter utility, using your machine in a |
|
|
network environment, and frequently used |
|
|
terms. |
|
Google Cloud Print |
This Guide provides details on how to |
PDF file / Brother Solutions |
Guide |
configure your Brother machine to a Google |
Center 1 |
|
account and use Google Cloud Print™ |
|
|
services for printing over the Internet. |
|
Mobile Print/Scan |
This Guide provides useful information about |
PDF file / Brother Solutions |
Guide for Brother |
printing from your mobile device and scanning |
Center 1 |
iPrint&Scan |
from your Brother machine to your mobile |
|
|
device when connected on a Wi-Fi® network. |
|
|
|
|
i |

|
|
|
Which Guide? |
What’s in it? |
Where is it? |
Web Connect Guide |
This Guide provides details about how to |
PDF file / Brother Solutions |
|
configure and use your Brother machine to |
Center 1 |
|
scan, load and view images and files on |
|
|
certain websites that provide these services. |
|
|
|
|
1 Visit http://solutions.brother.com/. |
|
|
ii |

Table of Contents
(Basic User’s Guide)
1 |
General information |
1 |
|
Using the documentation....................................................................................... |
1 |
|
Symbols and conventions used in the documentation .................................... |
1 |
|
Accessing Brother Utilities (Windows®)................................................................. |
2 |
|
Accessing the Advanced User's Guide, and Software and Network User's Guide ...... |
3 |
|
Viewing Documentation................................................................................... |
3 |
|
How to access the User’s Guides for Advanced Features .................................... |
4 |
|
Accessing Brother Support (Windows®)................................................................ |
5 |
|
Accessing Brother Support (Macintosh) ................................................................ |
5 |
|
Control panel overview .......................................................................................... |
6 |
|
Touchscreen LCD............................................................................................ |
8 |
|
Setting the Ready screen .............................................................................. |
12 |
|
Basic Operations ........................................................................................... |
12 |
|
Shortcut Settings ................................................................................................. |
13 |
|
Adding Copy Shortcuts.................................................................................. |
13 |
|
Adding Fax Shortcuts .................................................................................... |
14 |
|
Adding Scan Shortcuts .................................................................................. |
15 |
|
Adding Web Connect Shortcuts .................................................................... |
16 |
|
Adding Apps Shortcuts ................................................................................. |
17 |
|
Changing Shortcuts ....................................................................................... |
18 |
|
Editing Shortcut Names................................................................................. |
18 |
|
Deleting Shortcuts ......................................................................................... |
19 |
|
Recalling Shortcuts........................................................................................ |
19 |
|
Set the date and time .......................................................................................... |
19 |
|
Enter personal information (Station ID) ............................................................... |
20 |
|
Volume settings ................................................................................................... |
21 |
|
Ring volume................................................................................................... |
21 |
|
Beeper volume .............................................................................................. |
21 |
|
Speaker volume............................................................................................. |
21 |
2 |
Loading paper |
22 |
|
Loading paper and print media............................................................................ |
22 |
|
Loading paper in the standard paper tray and the optional lower tray .......... |
22 |
|
Loading paper in the multi-purpose tray (MP tray) ........................................ |
24 |
|
Unscannable and unprintable areas.............................................................. |
29 |
|
Paper settings...................................................................................................... |
30 |
|
Paper Size ..................................................................................................... |
30 |
|
Paper Type .................................................................................................... |
30 |
|
Tray Use in Copy mode................................................................................. |
31 |
|
Tray Use in Fax mode ................................................................................... |
31 |
|
Tray Use in Print mode.................................................................................. |
32 |
|
Acceptable paper and other print media.............................................................. |
33 |
|
Recommended paper and print media .......................................................... |
33 |
|
Paper type and size....................................................................................... |
33 |
|
Handling and using special paper ................................................................. |
35 |
iii

3 |
Loading documents |
38 |
|
How to load documents ....................................................................................... |
38 |
|
Using the automatic document feeder (ADF) ................................................ |
38 |
|
Using the scanner glass ................................................................................ |
39 |
4 |
Sending a fax |
40 |
|
How to send a fax ................................................................................................ |
40 |
|
Stop faxing..................................................................................................... |
41 |
|
Faxing Letter/Legal/Folio size documents from the scanner glass................ |
41 |
|
Cancelling a fax in process............................................................................ |
41 |
|
Transmission Verification Report................................................................... |
42 |
5 |
Receiving a fax |
43 |
|
Receive modes .................................................................................................... |
43 |
|
Choosing the receive mode........................................................................... |
43 |
|
Using receive modes ........................................................................................... |
45 |
|
Fax Only ........................................................................................................ |
45 |
|
Fax/Tel........................................................................................................... |
45 |
|
Manual........................................................................................................... |
45 |
|
External TAD ................................................................................................. |
45 |
|
Receive Mode settings ........................................................................................ |
46 |
|
Ring Delay ..................................................................................................... |
46 |
|
F/T Ring Time (Fax/Tel mode only)............................................................... |
46 |
|
Fax Detect ..................................................................................................... |
47 |
|
Fax Preview (Black and White only) .................................................................... |
48 |
|
How to preview a received fax....................................................................... |
48 |
|
Turning off Fax Preview................................................................................. |
50 |
6 |
Using PC-FAX |
51 |
|
How to use PC-FAX............................................................................................. |
51 |
|
PC-FAX Receive (Windows® only)................................................................ |
51 |
|
PC-FAX Send ................................................................................................ |
52 |
7 |
Telephone and external devices |
53 |
|
Telephone line services ....................................................................................... |
53 |
|
Setting the telephone line type ...................................................................... |
53 |
|
Connecting an external TAD ............................................................................... |
54 |
|
Connections................................................................................................... |
54 |
|
Recording an outgoing message (OGM)....................................................... |
55 |
|
Multi-line connections (PBX) ......................................................................... |
55 |
|
External and extension telephones...................................................................... |
55 |
|
Connecting an external or extension telephone ............................................ |
55 |
|
Operation from external or extension telephones.......................................... |
56 |
|
For Fax/Tel mode only................................................................................... |
56 |
|
Using extension telephones (U.K. only) ........................................................ |
56 |
|
Using a non-Brother cordless external handset ............................................ |
57 |
|
Using Remote Codes .................................................................................... |
57 |
iv

8 |
Dialling and storing numbers |
59 |
|
How to dial........................................................................................................... |
59 |
|
Manual dialling............................................................................................... |
59 |
|
Dialing from the Address Book ...................................................................... |
59 |
|
LDAP search ................................................................................................. |
59 |
|
Fax redial....................................................................................................... |
59 |
|
Storing numbers .................................................................................................. |
60 |
|
Storing a pause ............................................................................................. |
60 |
|
Storing Address Book numbers..................................................................... |
60 |
|
Changing Address Book names or numbers................................................. |
61 |
9 |
Making copies |
62 |
|
How to copy ......................................................................................................... |
62 |
|
Stop copying.................................................................................................. |
62 |
|
Copy preset settings...................................................................................... |
62 |
|
Copy Settings and Options............................................................................ |
63 |
10 |
Printing from a USB flash drive or digital camera |
|
|
supporting mass storage |
64 |
|
Creating a PRN file for direct printing .................................................................. |
64 |
|
Printing directly from the USB flash drive or digital camera supporting mass |
|
|
storage.............................................................................................................. |
65 |
|
Changing the default settings for direct print ................................................. |
67 |
11 |
How to print from a computer |
68 |
|
Printing a document............................................................................................. |
68 |
12 |
How to scan to a computer |
69 |
|
Before scanning................................................................................................... |
69 |
|
Scanning a document as a PDF file using ControlCenter4 (Windows®) ............. |
70 |
|
How to scan a document as a PDF file using the Touchscreen .......................... |
72 |
v |

A |
Routine maintenance |
74 |
|
Replacing supplies............................................................................................... |
74 |
|
Replacing the toner cartridges....................................................................... |
78 |
|
Replacing the drum unit................................................................................. |
84 |
|
Replacing the belt unit ................................................................................... |
90 |
|
Replacing the waste toner box ...................................................................... |
95 |
|
Cleaning and Checking the machine ................................................................. |
102 |
|
Cleaning the outside of the machine ........................................................... |
103 |
|
Cleaning the scanner glass ......................................................................... |
104 |
|
Cleaning the laser scanner windows ........................................................... |
105 |
|
Cleaning the corona wires ........................................................................... |
109 |
|
Cleaning the drum unit ................................................................................ |
112 |
|
Cleaning the paper pick-up rollers............................................................... |
118 |
|
Colour Calibration........................................................................................ |
119 |
|
Colour Registration...................................................................................... |
120 |
|
Auto Correction............................................................................................ |
120 |
B |
Troubleshooting |
121 |
|
Identifying the problem ...................................................................................... |
121 |
|
Error and maintenance messages..................................................................... |
123 |
|
Transferring your faxes or Fax Journal report ............................................. |
131 |
|
Document Jams................................................................................................. |
133 |
|
Document is jammed in the top of the ADF unit .......................................... |
133 |
|
Document is jammed under the document cover ........................................ |
133 |
|
Removing small documents jammed in the ADF......................................... |
134 |
|
Document is jammed at the output tray....................................................... |
134 |
|
Paper Jams........................................................................................................ |
135 |
|
Paper is jammed in the multi-purpose tray .................................................. |
135 |
|
Paper is jammed in the Paper Tray 1 or Tray 2........................................... |
136 |
|
Paper is jammed at the back of the machine .............................................. |
137 |
|
Paper is jammed inside the machine........................................................... |
139 |
|
Paper is jammed underneath the paper tray ............................................... |
142 |
|
If you are having difficulty with your machine .................................................... |
144 |
|
Setting Dial Tone detection ......................................................................... |
153 |
|
Telephone line interference / VoIP .............................................................. |
153 |
|
Improving the print quality.................................................................................. |
154 |
|
Machine Information .......................................................................................... |
162 |
|
Checking the Serial Number........................................................................ |
162 |
|
Checking the Firmware Version .................................................................. |
162 |
|
Reset operations ......................................................................................... |
162 |
|
How to reset the machine............................................................................ |
163 |
C |
Settings and features tables |
164 |
|
Using the Settings Tables.................................................................................. |
164 |
|
Settings Tables .................................................................................................. |
165 |
|
Features Tables................................................................................................. |
192 |
|
Entering text....................................................................................................... |
221 |
vi

D |
Specifications |
222 |
|
General.............................................................................................................. |
222 |
|
Document Size .................................................................................................. |
225 |
|
Print media......................................................................................................... |
226 |
|
Fax..................................................................................................................... |
227 |
|
Copy .................................................................................................................. |
228 |
|
Scanner ............................................................................................................. |
229 |
|
Printer ................................................................................................................ |
230 |
|
Interfaces........................................................................................................... |
231 |
|
Network.............................................................................................................. |
232 |
|
Direct Print feature............................................................................................. |
233 |
|
Computer requirements ..................................................................................... |
234 |
|
Supplies ............................................................................................................. |
235 |
|
Important information for the toner cartridge life................................................ |
236 |
E |
Index |
238 |
vii

Table of Contents
(Advanced User’s Guide)
You can view the Advanced User's Guide.
Windows®: |
PDF file / CD-ROM / In the Box |
Macintosh: |
PDF file / Brother Solutions Center at http://solutions.brother.com/ |
The Advanced User’s Guide explains the following features and operations.
1 General Setup
Memory storage
Set tone or pulse dialing mode Automatic Daylight Saving Time Set the Time Zone
Ecology features Quiet mode feature Touchscreen
7 Making copies
Copy settings
A Routine maintenance
Checking the machine Replacing periodic maintenance parts
Packing and shipping the machine
2 Security features
Secure Function Lock 3.0 Active Directory Authentication IPSec
Setting Lock
Dial Restriction (MFC models only)
3Sending a fax (MFC models only)
Additional sending options
Additional sending operations
4Receiving a fax (MFC models only)
Memory Receive Options
Remote retrieval
Additional receiving operations
5Dialling and storing numbers (MFC models only)
Telephone line services Additional dialling operations Additional ways to store numbers
6 Printing reports
B Options
Options
Optional paper tray (For DCP-L8400CDN, DCP-L8450CDW, MFC-L8650CDW and MFC-L8850CDW (LT-320CL)) (For MFC-L9550CDW (LT-325CL)) Memory board
CGlossary
DIndex
Fax reports (MFC models only) Reports
viii
 1 General information
Using the documentation
Thank you for buying a Brother machine! Reading the documentation will help you make the most of your machine.
Symbols and conventions used in the documentation
The following symbols and conventions are used throughout the documentation.
 WARNING
WARNING indicates a potentially hazardous situation which, if not avoided, could result in death or serious injuries.
1
Bold |
Bold style identifies the dial pad |
|
numbers of the Touchpanel or |
|
on the computer screen. |
Italics |
Italicized style emphasizes an |
|
important point or refers you to |
|
a related topic. |
Courier |
Courier New font identifies the |
New |
messages shown on the |
|
Touchscreen of the machine. |
Follow all warnings and instructions marked on the product.
NOTE
Most of the illustrations in this User’s Guide show the MFC-L8850CDW.
IMPORTANT
IMPORTANT indicates a potentially hazardous situation which, if not avoided, may result in damage to property or loss of product functionality.
NOTE
Notes tell you how you should respond to a situation that may arise or give tips about how the current operation works with other features.
Electrical Hazard icons alert you to a possible electrical shock.
Fire Hazard icons alert you to the possibility of fire.
Hot Surface icons warn you not to touch machine parts that are hot.
Prohibition icons indicate actions that must not be performed.
1 |

Chapter 1
Accessing Brother Utilities (Windows®)
Brother Utilities is an application launcher that offers convenient access to all Brother applications installed on your device.
a
b
(Windows® 7 / Windows Vista® / Windows® XP)
Click  (Start) menu, select All Programs > Brother >
  Brother Utilities
(Windows® 8)
Tap or click  (Brother Utilities) either on the Start screen or the desktop.
(Windows® 8.1) |
|
Move your mouse to the lower left corner of the Start screen and click |
(if you are using |
a touch-based device, swipe up from the bottom of the Start screen to bring up the Apps screen). When the Apps screen appears, tap or click  (Brother Utilities).
Select your machine.
c Choose the operation you want to use.
2 |

Accessing the
Advanced User's
Guide, and Software
and Network User's
Guide
This Basic User's Guide does not contain all the information about the machine such as how to use the advanced features for Fax, Copy, Printer, Scanner, PC-FAX and Network. When you are ready to learn detailed information about these operations, read the Advanced User's Guide and Software and Network User's Guide that are on the CD-ROM.
NOTE
Macintosh: You can find the Advanced User's Guide, and Software and Network User's Guide on the Brother Solutions Center at http://solutions.brother.com/.
Viewing Documentation
Viewing Documentation (Windows®)
(Windows® 7 / Windows Vista® /
Windows® XP)
To view the documentation, from |
(Start) |
menu, select All Programs > Brother >
Brother Utilities. Click the drop-down
list and select your model name (if not already selected). Click Support in the left navigation bar, and then click User's Guides.
(Windows® 8)
Click |
(Brother Utilities), and then click |
the drop-down list and select your model name (if not already selected). Click Support in the left navigation bar, and then click
User's Guides.
General information |
|
If you have not installed the software, you can |
|
find the documentation on the CD-ROM by |
|
following these steps: |
1 |
a Turn on your computer. Insert the CD-ROM into your CD-ROM drive.
NOTE
If the Brother screen does not appear, go to Computer (My Computer).
(Windows® 8: Click |
(File Explorer) |
on the taskbar, and then go to Computer (This PC).) Double-click the CD-ROM icon, and then double-click start.exe.
b If the model name screen appears, click your model name.
c If the language screen appears, click your language. The CD-ROM Top Menu appears.
d Click User's Guides.
e Click User’s guides on the CD-ROM. If the country screen appears, select your country. After the list of User’s Guides appears, select the Guide you want.
Viewing Documentation (Macintosh)
You can view and download User's Guides from the Brother Solutions Center at: http://solutions.brother.com/.
Click Manuals on your model’s page to download the documentation.
3 |

Chapter 1
How to find Scanning instructions
There are several ways you can scan documents. You can find the instructions as follows:
Software and Network User's Guide
Scanning
ControlCenter
Network Scanning
Nuance™ PaperPort™ 12SE How-to-Guides
(Windows®)
The complete Nuance™ PaperPort™ 12SE How-to-Guides can be viewed from the Help tab in the Nuance™ PaperPort™ 12SE application.
Presto! PageManager User’s Guide (Macintosh)
NOTE
Presto! PageManager must be downloaded and installed before use (for further instructions, see Accessing Brother Support (Macintosh) on page 5.
The complete Presto! PageManager User’s Guide can be viewed from the Help section in the Presto! PageManager application.
How to find Network setup instructions
Your machine can be connected to a wireless or wired network.
Basic setup instructions: (see Quick Setup Guide.)
Connection to a wireless access point or router supports Wi-Fi Protected Setup™ or AOSS™:
(see Software and Network User's Guide.)
More information about network setup: (see Software and Network User's Guide.)
How to access the User’s Guides for Advanced Features
You can view and download these Guides from the Brother Solutions Center at:
http://solutions.brother.com/
Click Manuals on your model’s page to download the documentation.
Google Cloud Print Guide
This Guide provides information about how to configure your Brother machine to a Google account and use Google Cloud Print™ services for printing over the Internet.
Mobile Print/Scan Guide for Brother iPrint&Scan
This Guide provides useful information about printing from your mobile device and scanning from your Brother machine to your mobile device when connected on a Wi-Fi network.
Web Connect Guide
This Guide provides information about how to configure and use your Brother machine to scan, load and view images and files on certain websites that provide these services.
4 |
|
|
|
|
General information |
|
Accessing Brother |
Accessing Brother |
|
Support (Windows®) |
Support (Macintosh) |
1 |
You can find all the contacts you will need, such as web support (Brother Solutions Center) on the CD-ROM.
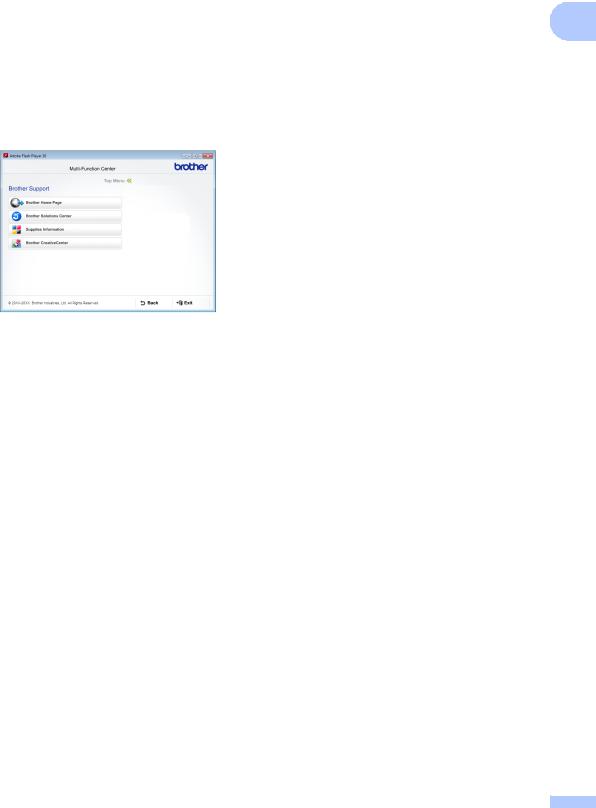
Click Brother Support on the Top Menu. The Brother Support screen appears.
To access our website (http://www.brother.com/), click Brother Home Page.
For the latest news and product support information (http://solutions.brother.com/), click
Brother Solutions Center.
To visit our website for original Brother Supplies (http://www.brother.com/original/), click
Supplies Information.
To access the Brother CreativeCenter (http://www.brother.com/creativecenter/) for FREE photo projects and printable downloads, click Brother CreativeCenter.
To return to the Top Menu, click Back or if you have finished, click Exit.
You can find all the contacts you will need, such as web support.
Visit the Brother Solutions Center at http://solutions.brother.com/.
5 |
Chapter 1
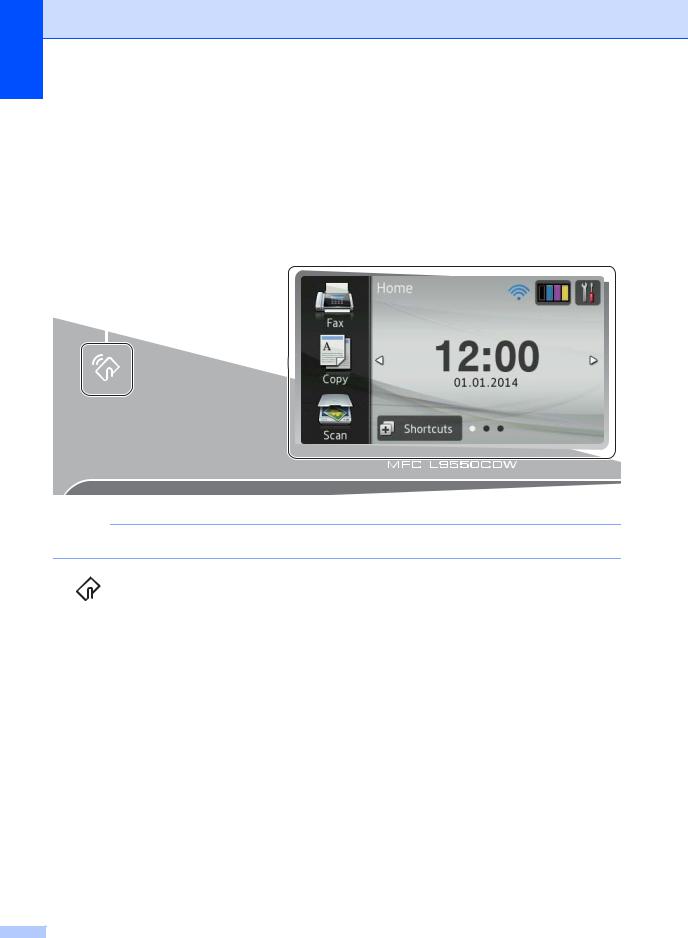
Control panel overview
MFC-L8650CDW has a 3.7 in. (93.4 mm) Touchscreen LCD and Touchpanel. MFC-L8850CDW and MFC-L9550CDW have a 4.85 in. (123.2 mm) Touchscreen LCD and Touchpanel.
1 |
2 |
|||
|
|
|
|
|
|
|
|
|
|
|
|
|
|
|
|
|
|
|
|
NOTE
The illustrations of the control panel are based on MFC-L9550CDW.
1  NFC (Near Field Communication) Reader (MFC-L9550CDW)
You can use card authentication by touching the IC card to the NFC Reader on the control panel.
2Touchscreen LCD (Liquid Crystal Display)
This is a Touchscreen LCD. You can access the menus and options by pressing them when they are displayed on this screen.
6 |
3
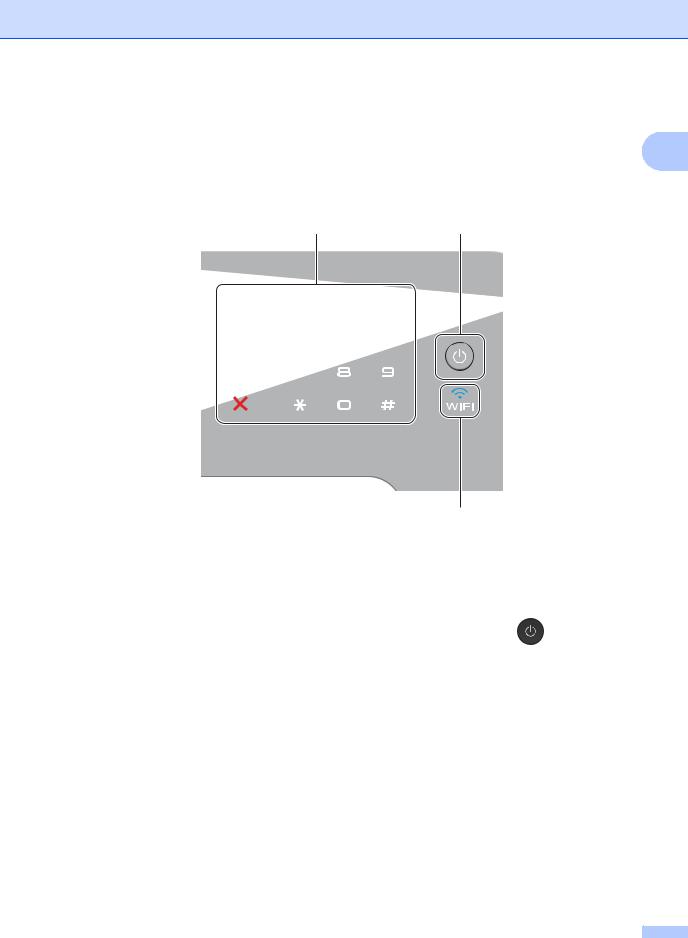
3Touchpanel:
 Back
Back
Press to go back to the previous menu level.
 Home
Home
Press to return to the Home screen. The factory setting displays the date and time, but you can change the Home screen’s default setting
(see Setting the Ready screen on page 12.)
 Cancel
Press to cancel an operation.
Dial Pad
Press the numbers on the Touchpanel to dial telephone and fax numbers or to enter the number of copies.
General information
1
4
5
4  Power On/Off
Press  to turn on the machine.
Press and hold down |
to turn off the |
machine. The Touchscreen LCD displays Shutting Down and stays on for a few seconds before going off.
5
The Wi-Fi light is on when your Brother machine is connected to a wireless access point.
7 |

Chapter 1
Touchscreen LCD
You can select three types of screens for the Home screen. When the Home screen is displayed, you can change the displayed screen by swiping left or right, or pressing d or c.
The following screens display the machines status when the machine is idle.
1 |
|
|
|
|
2 |
3 |
4 |
Home screen |
||||||
|
|
|
|
The Home screen displays the date and time and |
||||||||||
|
|
|
|
|
|
|
|
|
|
|
|
|
|
|
|
|
|
|
|
|
|
|
|
|
|
|
|
|
provides access to Fax, Copy, Scan, Wi-Fi setup, Toner |
|
|
|
|
|
|
|
|
|
|
|
|
|
|
|
|
|
|
|
|
|
|
|
|
|
|
|
|
|
levels, Setup and the Shortcuts screens. |
|
|
|
|
|
|
|
|
|
|
|
|
|
|
When the Home screen is displayed the machine is in |
|
|
|
|
|
|
|
|
|
|
|
|
|
|
Ready mode. When Secure Function Lock 1 is turned on |
|
|
|
|
|
|
|
|
|
|
|
|
|
|
an icon will be displayed. When Active Directory |
|
|
|
|
|
|
|
|
|
|
|
|
|
|
Authentication 1 is enabled, the machine's control panel |
|
|
|
|
|
|
|
|
|
|
|
|
|
|
|
|
|
|
|
|
|
|
|
|
|
|
|
|
|
will be locked. |
|
|
|
|
|
|
|
|
|
|
|
|
|
|
1 See Advanced User's Guide. |
|
|
|
|
|
|
|
|
|
|
|
|
|
|
|
6 |
|
|
|
|
|
|
|
5 |
|
|
|
|
||
|
|
|
|
|
|
|
|
|
|
|
|
|
|
|
|
|
|
|
|
|
2 |
3 |
4 |
More1 screen |
|||||
|
|
|
|
|
|
The More1 screen provides access to the Shortcuts |
||||||||
|
|
|
|
|
|
|
|
|
|
|
|
|
|
|
|
|
|
|
|
|
|
|
|
|
|
|
|
|
screen and additional features, such as Secure Print, |
|
|
|
|
|
|
|
|
|
|
|
|
|
|
|
|
|
|
|
|
|
|
|
|
|
|
|
|
|
Web Shortcut and Apps. |
|
|
|
|
|
|
|
|
|
|
|
|
|
|
|
|
|
|
|
|
|
|
|
|
|
|
|
|
|
|
|
|
|
|
|
|
|
|
|
|
|
|
|
|
|
6 |
7 |
|
8 |
|
|
|
|
9 |
|
|
||||
|
|
|
|
|
|
|
|
|
|
|
|
|
|
|
|
|
|
|
|
|
2 |
3 |
4 |
More2 screens |
|||||
|
|
|
|
|
|
The More2 screen provides access to the Shortcuts |
||||||||
|
|
|
|
|
|
|
|
|
|
|
|
|
|
|
|
|
|
|
|
|
|
|
|
|
|
|
|
|
screen and the USB menu. |
|
|
|
|
|
|
|
|
|
|
|
|
|
|
|
|
|
|
|
|
|
|
|
|
|
|
|
|
||
|
|
|
|
|
|
|
|
|
|
|
|
|
|
|
|
|
|
|
|
|
|
|
|
|
|
|
|
|
|
6 |
10 |
|
|
|
|
|
|
|
|
|
||||
|
|
|
|
|
|
|
|
|
|
|
|
|
|
|
8 |

NOTE
Swiping is a type of user operation on the Touchscreen that is performed by brushing your finger across the screen to display the next page or item.
1Modes:
Fax
Lets you access Fax mode.
Copy
Lets you access Copy mode.
Scan
Lets you access Scan mode.
2 (Wi-Fi Setup)
A four-level indicator on the Ready mode screen displays the current wireless signal strength if you are using a wireless connection.
0 |
Max |
You can easily configure the wireless settings by pressing 


 (for more
information, see Software and Network User's Guide.)
General information
3 |
(Toner) |
|
|
See the remaining toner life. |
1 |
Press to access the Toner menu.
NOTE
The remaining toner life will vary depending on the types of documents printed and customer’s usage.
4 |
(Settings) |
Press to access the main settings (for more information, see Settings screen on page 11).
5Date and Time
See the date and time that has been set in the machine.
6  (Shortcuts)
Press to set up Shortcuts.
You can quickly copy, scan, send a fax and connect to a web service using the options set as Shortcuts.
NOTE
Eight Shortcut tabs are available. You can set up to six Shortcuts in each Shortcut tab. A total of 48 Shortcuts are available.
7Secure Print
Lets you access the secure print menu.
9 |

Chapter 1
8Web
Press to connect the Brother machine to an Internet service (for more information, see Web Connect Guide).
9Apps
Apps may have been added and/or app names may have been changed by the provider since this document was published (for more information, see Web Connect Guide).
10USB
Press to access the Direct Print and Scan to USB menus.
11New Fax
When Fax Preview is set to On, you can see how many new faxes you received into the memory.
11
10
12 Warning icon 
12
The warning icon  appears when there
is an error or maintenance message; press Detail to view it, and then press
 to return to Ready mode.
For details, see Error and maintenance messages on page 123.
NOTE
•This product adopts the font of ARPHIC TECHNOLOGY CO.,LTD.
•MascotCapsule UI Framework and MascotCapsule Tangiblet developed by HI CORPORATION are used. MascotCapsule is a registered trademark of HI CORPORATION in Japan.
Settings screen
The Touchscreen displays the machines settings when you press  .
.
You can check and access all the machine’s settings from the following screen.
1 2 3 4
5
8 |
7 |
6 |
1Toner
See the remaining toner life. Press to access the Toner menu.
2Receive Mode
See the current Receive Mode.
Fax
Fax/Tel
External TAD
Manual
3Network
Press to set up a network connection.
A four level indicator on the screen shows the current wireless signal strength if you are using a wireless connection.
4 (Date & Time) See the date and time.
Press to access the Date & Time menu.
5Fax Preview
See the Fax Preview status.
Press to access the Fax Preview setting.
General information
6 |
All Settings |
|
|
|
Press to access the full settings menu. |
1 |
|
7 |
Tray Setting |
||
|
See the selected paper size. Press to change the paper size and paper type settings if needed.
8Wi-Fi Direct
Press to set up a Wi-Fi Direct™ network connection.
11
Chapter 1
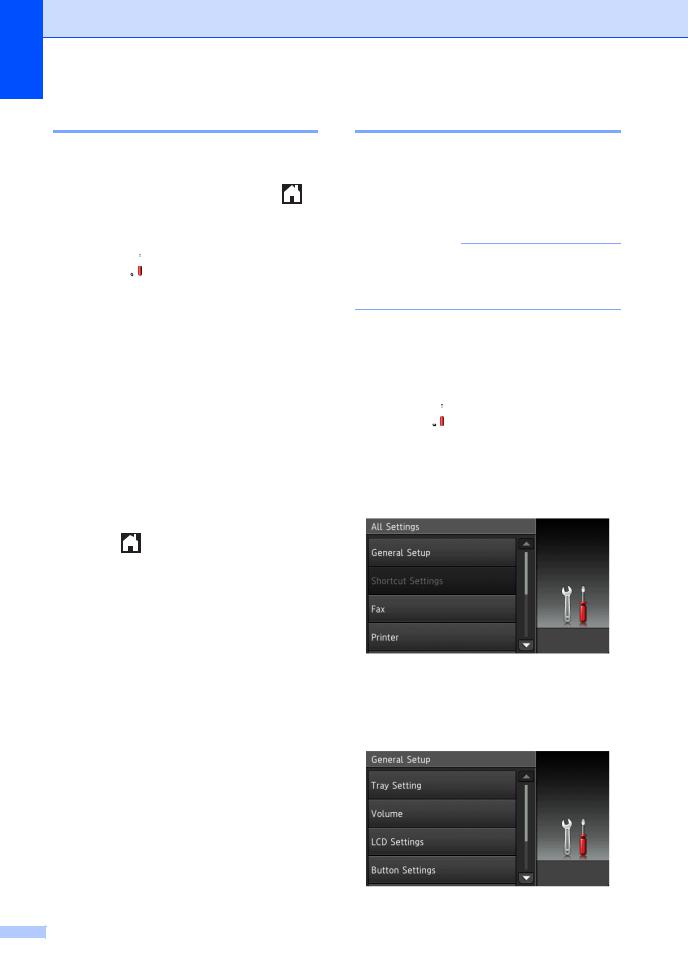
Setting the Ready screen
Set the Ready screen to either Home, More1 or More2.
When the machine is idle or you press , the Touchscreen will return to the screen you set.
a Press  .
.
b Press All Settings.
c Swipe up or down, or press a or b to display General Setup.
d Press General Setup.
e Swipe up or down, or press a or b to display Button Settings.
f Press Button Settings.
g Press Home Button Settings. h Press Home, More1 or More2.
i Press .
The machine will go to your chosen Home screen.
Basic Operations
Press your finger on the Touchscreen to operate it. To display and access all the screen menus or options, swipe left, right, up, down, or press d c or a b to scroll through them.
IMPORTANT
DO NOT press the Touchscreen with a sharp object, such as a pen or stylus. It may damage the machine.
The following steps explain how to change a setting in the machine. In this example, the Touchscreen Backlight setting is changed from Light to Med.
a Press  .
.
b Press All Settings.
c Swipe up or down, or press a or b to display General Setup.
d Press General Setup.
e Swipe up or down, or press a or b to display LCD Settings.
12
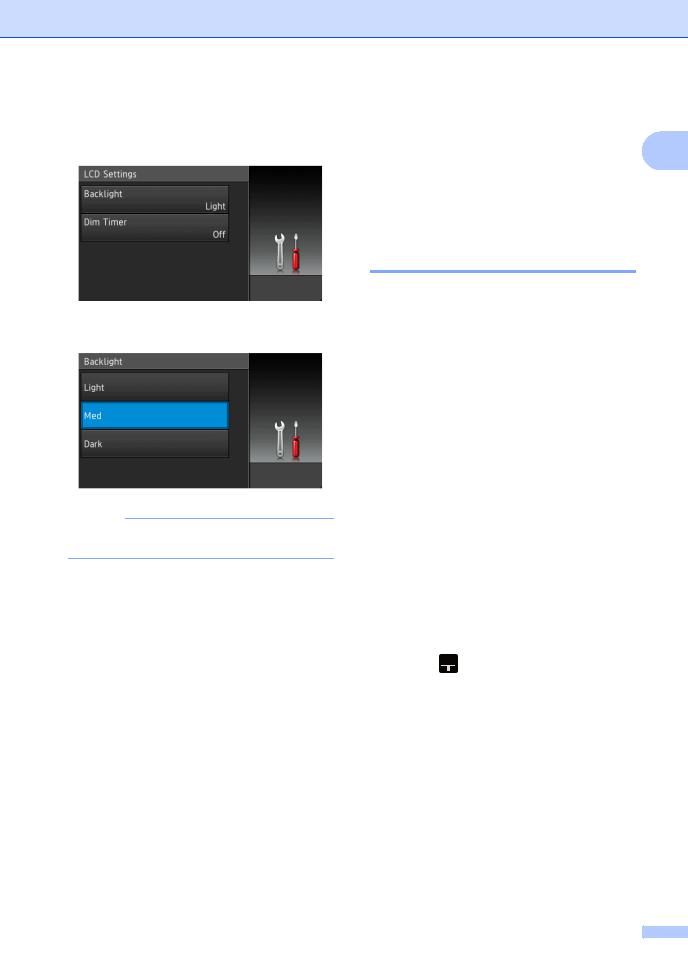
f Press LCD Settings.
g Press Backlight.
h Press Med.
NOTE
Press  to go back to the previous level.
i Press  .
.
General information
Shortcut Settings
You can add the fax, copy, scan and Web |
1 |
Connect settings you use most frequently by setting them as your Shortcuts. Later you can recall and apply these settings quickly and easily. You can add up to 48 Shortcuts.
Adding Copy Shortcuts
The following settings can be included in a copy Shortcut:
Quality
Enlarge/Reduce
Density
Contrast
Stack/Sort
Page Layout
Colour Adjust
2-sided Copy
2-sided Copy Page Layout
Tray Use
Remove Background Colour
a Press  . b Press a tab from 1 to 8.
c Press  where you have not added a Shortcut.
d Press Copy.
e Read the information on the Touchscreen, and then confirm it by pressing OK.
f Swipe up or down, or press a or b to display the copy presets, and then press the preset you want.
g Swipe up or down, or press a or b to display the available settings, and then press the setting you want.
13

Chapter 1
h Swipe up or down, or press a or b to display the available options for the setting, and then press the option you want.
Repeat steps g and h until you have selected all the settings for this Shortcut.
i When you have finished changing the settings, press Save as Shortcut.
j Read and confirm the displayed list of settings you selected, and then press OK.
k Enter a name for the Shortcut using the keyboard on the machine's Touchscreen. (To help you enter characters, see Entering text
on page 221.) Press OK.
l Press OK to save your Shortcut.
Adding Fax Shortcuts
The following settings can be included in a fax Shortcut:
Address
Fax Resolution
2-sided Fax
Contrast
Broadcasting
Real Time TX
Coverpage Setup
Overseas Mode
Glass Scan Size
a Press  . b Press a tab from 1 to 8.
c Press  where you have not added a Shortcut.
d Press Fax.
14
e Read the information on the Touchscreen, and then confirm it by pressing OK.
f Enter the fax or telephone number using the dial pad on the Touchpanel, the Address Book or the Call History on the Touchscreen. When you have finished, go to step g.
NOTE
•You can enter up to 20 digits for a fax number.
•If the Shortcut is to be used for broadcasting, press Options and select Broadcasting in step hbefore entering the fax or telephone number in step f.
•You can enter up to 20 fax numbers if the Shortcut is for broadcasting. The fax numbers can be entered in any combination of Group numbers from the Address Book, individual fax numbers from the Address Book or numbers entered manually (see Advanced User's Guide).
•When you enter a fax number in a Shortcut, it will be added automatically to the Address Book. The name in the Address Book will be the Shortcut name plus a sequential number.
g Press Options.
h Swipe up or down, or press a or b to display the available settings, and then press the setting you want.
i Press the option you want.
Repeat steps h and i until you have selected all the settings for this Shortcut. Press OK.
j When you have finished changing the settings, press Save as Shortcut.
k Read and confirm the displayed list of settings you selected, and then press OK.

l Enter a name for the Shortcut using the keyboard on the machine's Touchscreen. (To help you enter letters, see Entering text on page 221.)
Press OK.
m Press OK to save your Shortcut.
Adding Scan Shortcuts
The following settings can be included in a scan Shortcut:
to USB
2-sided Scan
Scan Type
Resolution
File Type
Glass Scan Size
File Name
File Size
Remove Background Colour
to E-mail Server (MFC-L8650CDW is supported only after IFAX is downloaded)
Address
2-sided Scan
Scan Type
Resolution
File Type
Glass Scan Size
File Size
to OCR / to File / to Image / to E-mail
PC Select
to FTP/SFTP / to Network
Profile Name
a Press  . b Press a tab from 1 to 8.
General information
c Press  where you have not added a
Shortcut. |
1 |
|
d Press Scan. |
||
|
||
e Swipe up or down, or press a or b to |
|
|
display the type of scan you want, and |
|
|
then press it. |
|
f Do one of the following:
If you pressed to USB, read the information on the Touchscreen, and then press OK to confirm it. Go to step i.
If you pressed to E-mail Server, read the information on the Touchscreen, and then press OK to confirm it. Go to step g.
If you pressed to OCR, to File, to Image or to E-mail, read the information on the Touchscreen, and then press OK to confirm it. Go to step h.
If you pressed to FTP/SFTP or to Network, read the information on the Touchscreen, and then press OK to confirm it.
Swipe up or down, or press a or b to display the Profile Name, and then press it.
Press OK to confirm the Profile Name you have selected. Go to step n.
NOTE
To add a Shortcut for to FTP/SFTP and to Network you must have added the Profile Name beforehand.
15

Chapter 1
g Do one of the following:
To enter an E-mail address manually, press Manual. Enter the E-mail address using the keyboard on the machine's Touchscreen. (To help you enter letters, see Entering text on page 221.)
Press OK.
To enter an E-mail address from the
Address Book, press Address Book. Swipe up or down, or press a or b to display the E-mail address you want, and then press it.
Press OK.
After you confirm the E-mail address you entered, press OK. Go to step i.
NOTE
Press Detail to view the list of addresses you have entered.
h Do one of the following:
When the machine is connected to a computer using a USB connection:
Press OK to confirm USB is selected as the PC Name. Go to step n.
When the machine is connected to a network:
Swipe up or down, or press a or b to display the PC Name, and then press it. Press OK to confirm the PC Name you selected. Go to step n.
iPress Options.
jSwipe up or down, or press a or b to display the available settings, and then press the setting you want.
kSwipe up or down, or press a or b to display the available options for the setting, and then press the option you want.
Repeat steps j and k until you have selected all the settings for this Shortcut. Press OK.
16
l Review the settings you have selected:
If you need to make additional changes, return to step i.
If you are satisfied with your changes, press Save as Shortcut.
m Review your settings on the Touchscreen, and then press OK.
n Enter a name for the Shortcut using the keyboard on the machine's Touchscreen. (To help you enter letters, see Entering text on page 221.)
Press OK.
o Read the information on the Touchscreen, and then press OK to save your Shortcut.
Adding Web Connect
Shortcuts
The settings for these services can be included in a Web Connect Shortcut:
Skydrive®
Box
Picasa Web Albums™
Google Drive™
Flickr®
Evernote®
Dropbox
NOTE
•Web services may have been added and/or service names may have been changed by the provider since this document was published.
•To add a Web Connect Shortcut, you must have an account with the desired service (for more information, see Web Connect Guide).

a Press  . b Press a tab from 1 to 8.
c Press  where you have not added a Shortcut.
d Press Web.
e If information about the Internet connection is displayed, read the information and confirm it by pressing
OK.
NOTE
Occasionally, updates or announcements about your machine's feature will be displayed on the machine's Touchscreen.
Read the information, and then press OK.
f Swipe left or right, or press d or c to display the available services, and then press your desired service.
g Press your account.
If the account needs a PIN code, enter the PIN for the account using the keyboard on the machine's Touchscreen.
Press OK.
h Press the function you want.
NOTE
The functions that can be set vary depending on the selected service.
i Read and confirm the displayed list of functions you selected, and then press OK.
j Enter a name for the Shortcut using the keyboard on the Touchscreen. (For help entering letters, see Entering text
on page 221.) Press OK.
k Press OK to save your Shortcut.
General information
Adding Apps Shortcuts
The settings for these services can be |
1 |
included in an Apps Shortcut: |
|
NoteScan
Outline&Scan
Outline&Copy
NOTE
Web services may have been added and/or service names may have been changed by the provider since this document was published.
a Press  . b Press a tab from 1 to 8.
c Press  where you have not added a Shortcut.
d Press Apps.
e If information about the Internet connection is displayed, read the information and confirm it by pressing
OK.
NOTE
Occasionally, updates or announcements about your machine's feature will be displayed on the Touchscreen.
Read the information, and then press OK.
f Swipe left or right, or press d or c to display the available apps, and then press your desired app.
g Press your account.
If the account needs a PIN code, enter the PIN for the account using the keyboard on the machine's Touchscreen.
Press OK.
h Press the app you want.
17
Chapter 1
i Read and confirm the displayed list of apps you selected, and then press OK.
j Enter a name for the Shortcut using the keyboard on the machine's Touchscreen. (For help entering letters, see Entering text on page 221.)
Press OK.
k Press OK to save your Shortcut.
Changing Shortcuts
You can change the settings in a Shortcut.
NOTE
You cannot change a Web Connect Shortcut. If you want to change the Shortcut, you must delete it, and then add a new Shortcut.
(For more information, see Deleting Shortcuts on page 19 and Adding Web Connect Shortcuts on page 16.)
h To create a new Shortcut, hold down
 to delete the current name, and then enter a new name using the keyboard on the machine's Touchscreen. (To help you enter letters, see Entering text
on page 221.) Press OK.
i Press OK to confirm.
Editing Shortcut Names
You can edit a Shortcut name.
a Press  .
.
b Press a tab from 1 to 8 to display the Shortcut you want.
c Press .
NOTE
a Press |
. |
You can also press |
, All Settings |
|
|
and Shortcut Settings. |
|
b Press a tab from 1 to 8 to display the Shortcut you want to change.
c Press the Shortcut you want. The settings for the Shortcut that you chose are displayed.
d Change the settings for the Shortcut you chose in step c (for more information, see Shortcut Settings on page 13).
e When you have finished changing settings, press Save as Shortcut.
f Press OK to confirm. g Do one of the following:
To overwrite the Shortcut, press Yes. Go to step i.
If you do not want to overwrite the Shortcut, press No to enter a new Shortcut name. Go to step h.
d e
f
Press the Shortcut.
Press Edit Shortcut Name.
To edit the name, hold down  to
to
delete the current name, and then enter a new name using the keyboard on the machine's Touchscreen. (To help you enter letters, see Entering text
on page 221.) Press OK.
18

Deleting Shortcuts
You can delete a Shortcut.
a Press  .
.
b Press a tab from 1 to 8 to display the Shortcut you want.
c Press .
NOTE
You can also press 
 , All Settings and Shortcut Settings.
d Press the Shortcut.
e Press Delete to delete the Shortcut that you chose in step d.
f Press Yes to confirm.
Recalling Shortcuts
The Shortcut settings are displayed on the Shortcut screen. To recall a Shortcut, simply press the Shortcut name.
General information
Set the date and time
The Touchscreen displays the date and time. |
1 |
|
You can also add the current date and time to |
|
|
each fax you send by setting your Station ID |
|
|
(see Enter personal information (Station ID) |
|
|
on page 20). |
|
|
a Press |
. |
|
b Press |
. |
|
c Press Date.
d Enter the last two digits of the year using the numbers on the Touchscreen, and then press OK.
(e.g., Enter 1, 4 for 2014.)
e Enter the two digits for the month using the numbers on the Touchscreen, and then press OK.
f Enter the two digits for the day using the numbers on the Touchscreen, and then press OK.
g Press Time.
h Enter the time in 24-hour format using the numbers on the Touchscreen, and then press OK.
i Press  .
.
19

Chapter 1
Enter personal information (Station ID)
Set the machine's Station ID if you want the date and time to appear on each fax you send.
a Press  .
.
b Press All Settings.
c Swipe up or down, or press a or b to display Initial Setup.
Press Initial Setup.
d Swipe up or down, or press a or b to display Station ID.
Press Station ID. e Press Fax.
f Enter your fax number (up to 20 digits) using the numbers on the Touchscreen, and then press OK.
g Press Tel.
h Enter your telephone number (up to 20 digits) using the numbers on the Touchscreen, and then press OK. If your telephone number and fax number are the same, enter the same number again.
i Press Name.
j Use the Touchscreen to enter your name (up to 20 characters), and then press OK.
20
NOTE
•To enter numbers or special characters,
press  repeatedly until the character you want to enter appears, then press the character you want.
•If you entered a character incorrectly and want to change it, press d or c to move the cursor to the incorrect character, then press  .
.
•To enter a space, press Space.
•For more details, see Entering text on page 221.
k Press  .
.
 Loading...