


/Multitom Stand/ Stand Multi-Tom/
/Multitom Stand/ Stand Multi-Tom/
/Marching Bass Drum Stand/ Stand de grosse caisse de marche/
/Marching Snare Drum Stand/ Stand de tambour de marche/
MTS-810A/B  MTS-410A
  MBS-810A
  MSS-810A
/ Owner’s Manual / Mode d’emploi /
Please read this Owner’s Manual throughly before use.
Prenez soin de lire ce mode d’emploi en entier avant d’utiliser le stand.
MTS-810A/B |
MTS-410A |
MSS-810A
MBS-810A
■ |
■ |
|||||
|
|
|
|
|
||
|
|
|||||
|
|
|||||
|
|
|
|
|||
|
|
|
|
|
|
|
|
|
|
|
|
||
|
|
|
|
|
|
|
|
|
|
|
|
|
|
|
|
|
|
|
|
|
|
|
|
|
|
||
|
|
|
|
|||
|
|
|
|
|
||
|
|
|
|
|
|
|
|
|
|
|
|
|
|
|
|
|
|
|
|
|
|
|
|
|
|||
|
|
|
|
[MTS-410A] |
||
|
|
|
|
|||
|
|
|
|
|
||
|
|
|
|
|
||
|
|
|
|
|||
[MTS-410A] |
|
|
|
|||
|
|
|
||||
|
|
|
|
|||
|
|
|
|
|
||
|
|
|
|
|||
|
|
|
|
|||
|
|
|
|
|
||
|
|
|||||
|
|
|
|
|||
|
|
|
|
|||
|
|
|
|
|||
|
|
|
|
|
|
|
|
|
|
||||
|
|
|
||||
|
|
|
|
|||
|
|
|
|
|||
|
|
|
||||
|
|
|
||||
|
|
|
|
|||
|
|
|
|
|||
|
|
|
|
|||
|
|
|
|
|
|
|
|
|
|
|
|
||
|
|
|
|
|
||
|
|
|
|
|||
|
|
|
|
|||
|
|
|
|
|||
|
|
|
||||
|
||||||
|
|
|
|
|||
|
|
|
|
|
||
があります。
●
2

CAUTION
•Always place the stand on a flat, stable surface. Placing the stand on uneven surfaces such as uneven flooring or stairs may cause the stand to become unstable or overturn.
•[MTS-410A] When attaching/removing the instrument, do not push/pull on the tom holder frame alone (this is dangerous!). Please hold the tom itself to keep the weight balance of the whole instrument.
•Always check to make sure that all screws are tightened firmly. The instrument may also overturn or suddenly drop, etc., resulting in injury.
•When making adjustments to the height or angle of the stand, do not loosen the screws abruptly. The stand or drum may suddenly overturn or drop, pinching hands or fingers in the stand’s framework, resulting in injury.
•Pipe ends have sharp edges so be careful when handling the stand around its edges. Never use the stand as a toy, etc..
•Do not rough play in the vicinity of the stand. Injury to the face or head may result by falling onto the stand. Also, keep children from playing around the stand.
•Strong earthquakes may cause the stand to move about or overturn. Stay away from the stands during earthquakes.
•[MTS-410A] Since the upper pipe is slightly bent, the pushing/pulling direction should be matched accordingly when attaching/removing the holder.
•When folding the stand, watch your fingers so they do not become pinched in the folding supports. Fingers pinched in the framework may result in injury.
•Be careful around the ends and insides of the pipe. The pipe tubing has rough edges and slivers that may fall out and cause injury if care is not taken. Do not purposely put fingers into the ends of the pipe.
•Do not use the stand in the rain. If the stand becomes wet, use a soft dry cloth to wipe the stand as soon as possible.
•Always use a soft, dry cloth to clean the stand as a part of periodic maintenance. Never use thinner, benzene, or other similar solvents to clean the stand.
ATTENTION
•Placez toujours le stand sur une surface plane et stable. Le placer sur une surface inégale, par exemple un sol instable ou un escalier, peut entraîner sa chute.
•[MTS-410A] Lorsque vous montez ou démontez l’instrument, ne poussez ou ne tirez pas uniquement le châssis du support de toms (ce serait dangereux !). Tenez toujours les toms pour ne pas déséquilibrer l’ensemble.
•Vérifiez systématiquement que toutes les vis de l’ensemble sont bien serrées. Un défaut à ce niveau pourrait également entraîner la chute de l’instrument et entraîner des dommages corporels.
•Lorsque vous réglez la hauteur ou l’angle du stand, ne desserrez pas les vis de façon soudaine. Le stand ou les toms pourraient chuter, vous pourriez vous pincez les mains ou les doigts dans le châssis, etc.
•Les extrémités des tubes du châssis ont des bords coupants ; soyez donc prudents lorsque vous vous tenez à proximité
d’elles. N’utilisez en aucun cas le stand comme un jouet, etc.
•Ne laissez pas d’enfants jouer de façon turbulente autour du stand. Une chute sur celui-ci pourrait entraîner des blessures à la tête ou à au visage.
•Les tremblements de terre peuvent entraîner le déplacement ou le renversement du stand. Éloignez-vous de l’instrument lors des tremblements de terre.
•[MTS-410A] Étant donné que le tube supérieur est légèrement courbé, le sens dans lequel vous poussez ou tirez doit épouser cette courbe lorsque vous montez ou démontez le stand.
•Lorsque vous repliez le stand, faites attention de ne pas mettre vos doigts entre les tubes. Vous risqueriez de les blesser.
•Méfiez-vous des extrémités et de l’intérieur des tubes. Les tubes comportent des bords coupants et des copeaux de métal qui pourraient s’en échapper et vous blesser si vous n’êtes pas attentif. N’introduisez pas exprès vos doigts dans les extrémités des tubes.
•N’utilisez pas le stand sous la pluie. Si le stand est mouillé, utilisez un chiffon doux et sec pour l’essuyer aussi rapidement que possible.
•Utilisez toujours un chiffon doux et sec pour nettoyer le stand dans le cadre de son entretien régulier. N’utilisez jamais de white spirit, de benzine ou d’autres solvants du même type pour nettoyer le stand.
••
•[MTS-410A] / /
• 从而造成伤害。
• 切勿将支架用作玩具等。
•[MTS-410A] / /
• 能会被框架夹伤。
• 手指插入管的末端。
• 的布擦拭支架。
• 切勿使用稀释剂、苯或其他类似的溶剂清洁支架。
3

MTS-810A/B
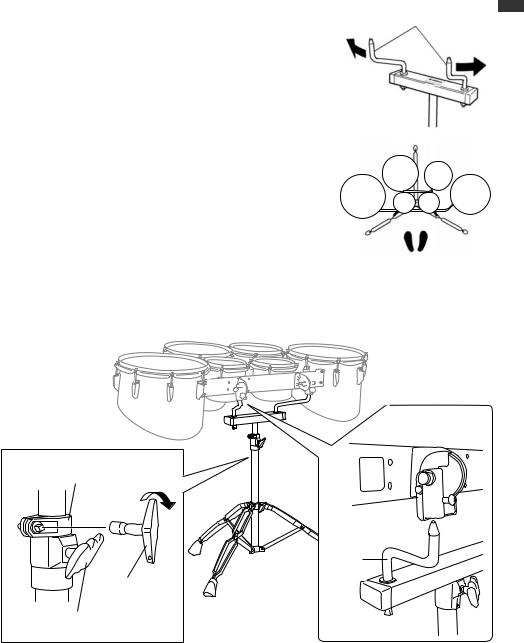
/Assembly Procedure
1. A
B Arms
Stand Mounting
1. Spread the legs and fasten wing bolt (A) tightly.
*The directions of the legs to be spreaded should be done according to the diagram on the right.
2.Insert the pipe of the upper stand into the pipe of the lower stand. Adjust the ideal position and fasten wing bolt (B) tightly.
Player
Arms
Sand (Upper)
|
|
|
Wing Bolt (B) |
|
A |
|
Wing Bolt (A) |
|
|
Leg |
|
Sand (Lower) |
|
Player
4
|
/Assembly Procedure |
|
|
|
|
|
|
|
1. |
Arms |
|
|
||
2.
3. (B)
Multi Tom Mounting
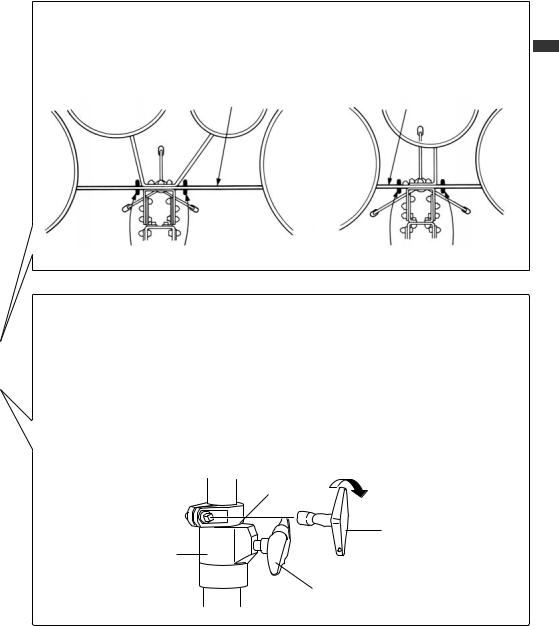
1. Adjust the arms of the stand to match the space between the two pivots of the multi tom carrier. (diag. on the right)
2. Adjust the arms to the pivot positions and insert them firmly and completely. (see diag. below)
3. Adjust the height of the multi toms by moving the upper stand up and down and fasten
it with wing bolt (B), then fasten the screw of the position clamp with a drum key. (see diag. below)
MTS-810A/B
Position Clamp

Pivot
Arms
Drum Key
Wing Bolt (B)
5
MTS-810A/B
Montage/
Montage du stand
1. Déployez les pieds et serrez fermement la vis papillon (A).
*Les pieds doivent être déployés selon le schéma de droite.
2. |
Introduisez le tube de la partie supérieure du stand dans |
Bras |
|
celui de la partie inférieure. Trouvez la position idéale et |
|
|
serrez fermement la vis papillon (B). |
|
|
|
|
1. |
(A) |
|
*
2. 旋紧蝶型螺栓(B)
Bras
Partie supérieure du stand
Musicien
Partie inférieure du stand

 Vis papillon (B)
(B)
Vis papillon (A)
(A)
Pied
Musicien
6

Montage/
Montage du support multi-tom
1. |
Réglez les bras du stand de façon à ce que leur écar- |
Bras |
|
||
|
tement corresponde à celui des deux pivots du support |
|
|
multi-tom. (schéma à droite) |
|
2. |
Faites correspondre les bras avec les pivots et introdui- |
|
|
sez-les dedans jusqu’en butée. (voir schéma ci-dessous) |
|
3. |
Réglez la hauteur du support multi-tom en montant ou en |
|
descendant la partie supérieure du stand et en resserrant la vis papillon (B), puis serrez la vis du collier de positionnement avec la clef d’accord. (voir schéma ci-dessous)
MTS-810A/B
1.
2.
3. (B)
Collier de positionnement
Pivot 
Bras
Clef d’accord
Vis papillon (B)
(B)
7
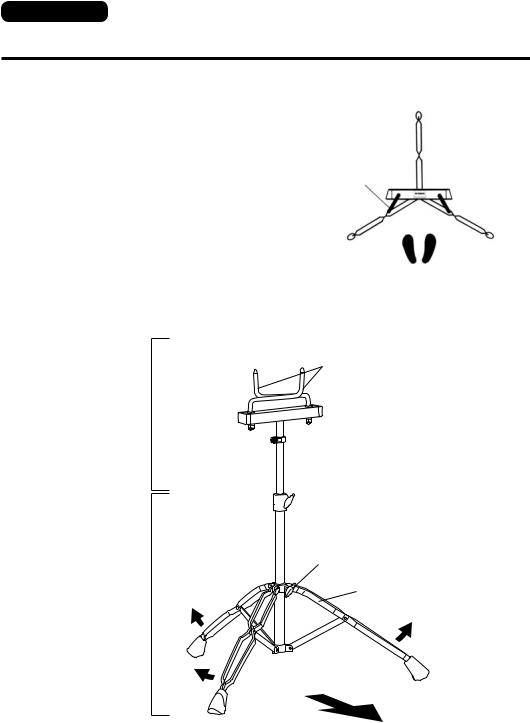
MTS-410A
/Assembly Procedure
Mount the upper stand on the lower stand. (refer to diagram below)
1. A
1. Spread the legs of the stand and secure them by tightening wing bolt (A).
2. BB
てあります。向きに注意してください。
2.Loosen wing bolt (B) to adjust the height of the upper pipe. After adjustment, re-tighten wing bolt (B).
Catcher
When the toms are attached to the
stand, the holder can be removed.
*Position the feet and the catcher as shown in the illustration below. (The upper end of the pipe is bent slightly. Make sure to set it correctly.)
/ Trio
|
|
Upper Pipe |
|
|
|
Position Clamp |
|
|
|
Wing Bolt (B) |
|
|
|
|
Wing Bolt (A) |
Leg
|
/ Quad |
|
|
Player |
|
Player
8
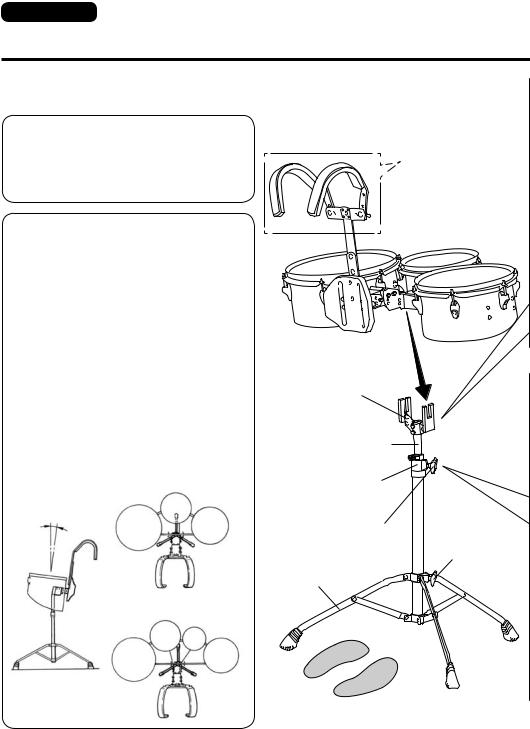
|
/Assembly Procedure |
|
|
3. 3. |
Align the frame of the multi tom hold- |
|
er with the catcher on the stand and |
|
insert the holder until it stops. |
● / Quad |
● / Trio |
|
|
Tom Holder Flame |
Tom Holder Flame |
/ Catcher |
/ Catcher |
MTS-410A
4. B B
4. Loosen wing bolt (B) to adjust the height of the drum-heads by raising or lowering the upper pipe, and re-tighten wing bolt (B) securely after adjustment. Furthermore, to prevent the toms from slipping down during performance, push the position clamp against the mounting base and securely tighten its screw using a drum key.
Position Clamp
Drum Key
Mounting Base
Wing Bolt (B)
9

MTS-410A
Montage/
Montez la partie supérieure du stand sur sa partie inférieure. (voir l’illustration ci-dessous)
1. Écartez les pieds du stand et fixez-les en serrant la vis papillon (A).
1. (A)
2. Desserrez la vis papillon (B) pour régler la hauteur du tube supérieur. Suite à ce réglage, resserrez la vis papillon (B).
*Placez les pieds et le berceau comme indiqué sur l’illustration cidessous. (La partie supérieure du tube est légèrement courbée. Veillez à l’installer correctement.)
2.(B) (B)
*
Configuration Trio /
Configuration Quad /
Musicien
* Lorsque les toms sont fixés au stand, le harnais peut être retiré.
*
Berceau
Tube supérieur |
|
|
|
Collier de |
|
positionnement |
|
|
|
Vis papillon (B) |
|
(B) |
Vis papillon (A) |
|
|
|
(A) |
Pied
Musicien
10
Montage/
3. Alignez le châssis du support multi-tom avec le berceau du stand et introduisez-y le support jusqu’à ce qu’il vienne en butée.
3.
● Configuration Quad / |
● Configuration Trio / |
Châssis du support des toms |
Châssis du support des toms |
|
|
Berceau / |
Berceau / |
MTS-410A
4. Desserrez la vis papillon (B) pour régler la hauteur des toms en montant ou en descendant le tube supérieur, puis resserrez ensuite la vis papillon (B). De plus, pour empêcher les toms de glisser pendant le jeu, poussez le collier de positionnement contre l’étrier de montage et serrez-le fermement à l’aide d’une clé d’accord de tambour.
4. (B) (B)
Collier de positionnement
Clef d’accord
Étrier de montage
Vis papillon (B)
(B)
11
 Loading...