


 Loading...
MUSIC PRODUCTION SYNTHESIZER
Owner’s Manual
EN
SPECIAL MESSAGE SECTION
PRODUCT SAFETY MARKINGS: Yamaha electronic products may have either labels similar to the graphics shown below or molded/stamped facsimiles of these graphics on the enclosure. The explanation of these graphics appears on this page. Please observe all cautions indicated on this page and those indicated in the safety instruction section.
CAUTION |
RISK OF ELECTRIC SHOCK |
DO NOT OPEN |
CAUTION: TO REDUCE THE RISK OF ELECTRIC SHOCK. |
DO NOT REMOVE COVER (OR BACK). |
NO USER-SERVICEABLE PARTS INSIDE. |
REFER SERVICING TO QUALIFIED SERVICE PERSONNEL. |
The exclamation point within the equilateral triangle is intended to alert the user to the presence of important operating and maintenance (servicing) instructions in the literature accompanying the product.
The lightning flash with arrowhead symbol, within the equilateral triangle, is intended to alert the user to the presence of uninsulated “dangerous voltage” within the product’s enclosure that may be of sufficient magnitude to constitute a risk of electrical shock.
IMPORTANT NOTICE: All Yamaha electronic products are tested and approved by an independent safety testing laboratory in order that you may be sure that when it is properly installed and used in its normal and customary manner, all foreseeable risks have been eliminated. DO NOT modify this unit or commission others to do so unless specifically authorized by Yamaha. Product performance and/or safety standards may be diminished. Claims filed under the expressed warranty may be denied if the unit is/has been modified. Implied warranties may also be affected.
SPECIFICATIONS SUBJECT TO CHANGE: The information contained in this manual is believed to be correct at the time of printing. However, Yamaha reserves the right to change or modify any of the specifications without notice or obligation to update existing units.
92-469- 1 (rear)
ENVIRONMENTAL ISSUES: Yamaha strives to produce products that are both user safe and environmentally friendly. We sincerely believe that our products and the production methods used to produce them, meet these goals. In keeping with both the letter and the spirit of the law, we want you to be aware of the following:
Battery Notice: This product MAY contain a small nonrechargeable battery which (if applicable) is soldered in place. The average life span of this type of battery is approximately five years. When replacement becomes necessary, contact a qualified service representative to perform the replacement.
Warning: Do not attempt to recharge, disassemble, or incinerate this type of battery. Keep all batteries away from children. Dispose of used batteries promptly and as regulated by applicable laws. Note: In some areas, the servicer is required by law to return the defective parts. However, you do have the option of having the servicer dispose of these parts for you.
Disposal Notice: Should this product become damaged beyond repair, or for some reason its useful life is considered to be at an end, please observe all local, state, and federal regulations that relate to the disposal of products that contain lead, batteries, plastics, etc.
NOTICE: Service charges incurred due to lack of knowledge relating to how a function or effect works (when the unit is operating as designed) are not covered by the manufacturer’s warranty, and are therefore the owners responsibility. Please study this manual carefully and consult your dealer before requesting service.
NAME PLATE LOCATION: The graphic below indicates the location of the name plate. The model number, serial number, power requirements, etc., are located on this plate. You should record the model number, serial number, and the date of purchase in the spaces provided below and retain this manual as a permanent record of your purchase.
MOTIF XF6
MOTIF XF7
MOTIF XF8
Model
Serial No.
Purchase Date
2MOTIF XF Owner’s Manual
CAUTION
RISK OF ELECTRIC SHOCK
DO NOT OPEN
CAUTION: TO REDUCE THE RISK OF ELECTRIC SHOCK, DO NOT REMOVE COVER (OR BACK). NO USER-SERVICEABLE PARTS INSIDE. REFER SERVICING TO QUALIFIED SERVICE PERSONNEL.
The above warning is located on the rear of the unit.
Explanation of Graphical Symbols
The lightning flash with arrowhead symbol within an equilateral triangle is intended to alert the user to the presence of uninsulated “dangerous voltage” within the product’s enclosure that may be of sufficient magnitude to constitute a risk of electric shock to persons.
The exclamation point within an equilateral triangle is intended to alert the user to the presence of important operating and maintenance (servicing) instructions in the literature accompanying the product.
IMPORTANT SAFETY INSTRUCTIONS
1Read these instructions.
2Keep these instructions.
3Heed all warnings.
4Follow all instructions.
5Do not use this apparatus near water.
6Clean only with dry cloth.
7Do not block any ventilation openings. Install in accordance with the manufacturer’s instructions.
8Do not install near any heat sources such as radiators, heat registers, stoves, or other apparatus (including amplifiers) that produce heat.
9Do not defeat the safety purpose of the polarized or grounding-type plug. A polarized plug has two blades with one wider than the other. A grounding type plug has two blades and a third grounding prong. The wide blade or the third prong are provided for your safety. If the provided plug does not fit into your outlet, consult an electrician for replacement of the obsolete outlet.
10Protect the power cord from being walked on or pinched particularly at plugs, convenience receptacles, and the point where they exit from the apparatus.
11Only use attachments/accessories specified by the manufacturer.
12Use only with the cart, stand,
tripod, bracket, or table specified by the manufacturer, or sold with the apparatus. When a cart is used, use caution when moving the cart/apparatus combination to avoid injury from tip-over.
13Unplug this apparatus during
lightning storms or when unused for long periods of time.
14Refer all servicing to qualified service personnel. Servicing is required when the apparatus has been damaged in any way, such as power-supply cord or plug is damaged, liquid has been spilled or objects have fallen into the apparatus, the apparatus has been exposed to rain or moisture, does not operate normally, or has been dropped.
WARNING
TO REDUCE THE RISK OF FIRE OR ELECTRIC SHOCK, DO NOT EXPOSE THIS APPARATUS TO RAIN OR MOISTURE.
(UL60065_03)
Information for Users on Collection and Disposal of Old Equipment
This symbol on the products, packaging, and/or accompanying documents means that used electrical and electronic products should not be mixed with general household waste.
For proper treatment, recovery and recycling of old products, please take them to applicable collection points, in accordance with your national legislation and the Directives 2002/96/EC.
By disposing of these products correctly, you will help to save valuable resources and prevent any potential negative effects on human health and the environment which could otherwise arise from inappropriate waste handling.
For more information about collection and recycling of old products, please contact your local municipality, your waste disposal service or the point of sale where you purchased the items.
For business users in the European Union
If you wish to discard electrical and electronic equipment, please contact your dealer or supplier for further information.
Information on Disposal in other Countries outside the European Union
This symbol is only valid in the European Union. If you wish to discard these items, please contact your local authorities or dealer and ask for the correct method of disposal.
(weee_eu)
MOTIF XF Owner’s Manual 3
PRECAUTIONS
PLEASE READ CAREFULLY BEFORE PROCEEDING
* Please keep this manual in a safe place for future reference.
 WARNING
Always follow the basic precautions listed below to avoid the possibility of serious injury or even death from electrical shock, short-circuiting, damages, fire or other hazards. These precautions include, but are not limited to, the following:
|
Water warning |
Power supply/Power cord |
•Do not place the power cord near heat sources such as heaters or radiators, and do not excessively bend or otherwise damage the cord, place heavy objects on it, or place it in a position where anyone could walk on, trip over, or roll anything over it.
•Only use the voltage specified as correct for the instrument. The required voltage is printed on the name plate of the instrument.
•Use only the supplied power cord/plug.
•Check the electric plug periodically and remove any dirt or dust which may have accumulated on it.
•Be sure to connect to an appropriate outlet with a protective grounding connection. Improper grounding can result in electrical shock.
Do not open
•This instrument contains no user-serviceable parts. Do not attempt to disassemble or modify the internal components in any way. If it should appear to be malfunctioning, discontinue use immediately and have it inspected by qualified Yamaha service personnel.
•Do not expose the instrument to rain, use it near water or in damp or wet conditions, or place containers on it containing liquids which might spill into any openings. If any liquid such as water seeps into the instrument, turn off the power immediately and unplug the power cord from the AC outlet. Then have the instrument inspected by qualified Yamaha service personnel.
•Never insert or remove an electric plug with wet hands.
Fire warning
•Do not put burning items, such as candles, on the unit. A burning item may fall over and cause a fire.
If you notice any abnormality
•When one of the following problems occur, immediately turn off the power switch and disconnect the electric plug from the outlet. Then have the device inspected by Yamaha service personnel.
•The power cord or plug becomes frayed or damaged.
•It emits unusual smells or smoke.
•Some object has been dropped into the instrument.
•There is a sudden loss of sound during use of the instrument.
 CAUTION
Always follow the basic precautions listed below to avoid the possibility of physical injury to you or others, or damage to the instrument or other property. These precautions include, but are not limited to, the following:
Power supply/Power cord
•Do not connect the instrument to an electrical outlet using a multiple-connector. Doing so can result in lower sound quality, or possibly cause overheating in the outlet.
•Always connect the three-pin attachment plug to a properly grounded power source. (For more information about the main power supply, see page 16.)
•When removing the electric plug from the instrument or an outlet, always hold the plug itself and not the cord. Pulling by the cord can damage it.
•Remove the electric plug from the outlet when the instrument is not to be used for extended periods of time, or during electrical storms.
Location
•Do not place the instrument in an unstable position where it might accidentally fall over.
•Before moving the instrument, remove all connected cables.
•When setting up the product, make sure that the AC outlet you are using is easily accessible. If some trouble or malfunction occurs, immediately turn off the power switch and disconnect the plug from the outlet. Even when the power switch is turned off, electricity is still flowing to the product at the minimum level. When you are not using the product for a long time, make sure to unplug the power cord from the wall AC outlet.
(7)-1 1/2
4MOTIF XF Owner’s Manual
|
Handling caution |
Connections |
•Before connecting the instrument to other electronic components, turn off the power for all components. Before turning the power on or off for all components, set all volume levels to minimum.
•Be sure to set the volumes of all components at their minimum levels and gradually raise the volume controls while playing the instrument to set the desired listening level.
•Never insert or drop paper, metallic, or other objects into the gaps on the panel or keyboard.
•Do not rest your weight on, or place heavy objects on the instrument, and do not use excessive force on the buttons, switches or connectors.
•Do not use the instrument/device or headphones for a long period of time at a high or uncomfortable volume level, since this can cause permanent hearing loss. If you experience any hearing loss or ringing in the ears, consult a physician.
Yamaha cannot be held responsible for damage caused by improper use or modifications to the instrument, or data that is lost or destroyed.
Always turn the power off when the instrument is not in use.
NOTICE
To avoid the possibility of damage to the product, data or other property, follow the notices below.
Handling and Maintenance
•Do not use the instrument in the vicinity of a TV, radio, stereo equipment, mobile phone, or other electric devices. Otherwise, the instrument, TV, or radio may generate noise.
•Do not expose the instrument to excessive dust or vibrations, or extreme cold or heat (such as in direct sunlight, near a heater, or in a car during the day) to prevent the possibility of panel disfiguration or damage to the internal components.
•Do not place vinyl, plastic or rubber objects on the instrument, since this might discolor the panel or keyboard.
•When cleaning the instrument, use a soft, dry/dry or slightly damp cloth. Do not use paint thinners, solvents, cleaning fluids, or chemicalimpregnated wiping cloths.
Saving data
•SDRAM data is lost when you turn off the power to the instrument. Save the data to a USB storage device/external device such as a computer.
•To protect against data loss through media damage, we recommend that you save your important data onto two USB storage devices/external media.
Information
About copyrights
•Copying of the commercially available musical data including but not limited to MIDI data and/or audio data is strictly prohibited except for your personal use.
•This product incorporates and bundles computer programs and contents in which Yamaha owns copyrights or with respect to which it has license to use others’ copyrights. Such copyrighted materials include, without limitation, all computer software, style files, MIDI files, WAVE data, musical scores and sound recordings. Any unauthorized use of such programs and contents outside of personal use is not permitted under relevant laws. Any violation of copyright has legal consequences. DON’T MAKE, DISTRIBUTE OR USE ILLEGAL COPIES.
About functions/data bundled with the instrument
•This device is capable of using various types/formats of music data by optimizing them to the proper format music data for use with the device in advance. As a result, this device may not play them back precisely as their producers or composers originally intended.
About this manual
•The illustrations and LCD screens as shown in this manual are for instructional purposes only, and may appear somewhat different from those on your instrument.
•Windows is a registered trademark of Microsoft® Corporation in the United States and other countries.
•Apple, Mac and Macintosh are trademarks of Apple Inc., registered in the U.S. and other countries.
•FireWire and the FireWire symbol are trademarks of Apple, Inc., registered in the U.S. and other countries. The FireWire logo is a trademark of Apple, Inc.
•The company names and product names in this manual are the trademarks or registered trademarks of their respective companies.
About the latest Firmware Version
Yamaha may from time to time update firmware of the product and the accessory application software without notice for improvement. We recommend that you check our web site for later releases and upgrade your firmware of the MOTIF XF or the accessory application software.
http://www.yamahasynth.com/
Note that the explanations in this Owner’s Manual apply to the version of firmware when this Owner’s Manual was produced. For details about the additional functions due to later releases, refer to the above website.
(7)-1 2/2
MOTIF XF Owner’s Manual 5

Welcome
A message from the MOTIF XF Development Team
Thank you for purchasing the Yamaha MOTIF XF Music Synthesizer.
Since the first MOTIF was launched in 2001, the MOTIF series has evolved with the times and has finally reached fourthgeneration status.
The new MOTIF XF adds a number of significant enhancements to its predecessors and features many powerful functions that make it an indispensable tool in both music production and live performance.
Second, the User Interface via the color LCD display introduced from the MOTIF XS has been drastically improved so that it is easy to view the important information like Voice program number even another keyboard is located above the MOTIF XF at the live scene.
In terms of the sound, the MOTIF XF provides a wide variety of Voices that fully take advantage of the Expanded Articulation feature, which enables expressive tonal change (via Velocity and the Assignable Function buttons). Many Voices have been added and enhanced to improve the MOTIF’s famed set of ultra-realistic acoustic instrument sounds. We’ve also strengthened the synthesizer sound engine, giving it a wealth of powerful and dynamic synth waveforms and effect-related Voices. They allowing you to truly play and perform with the synth sounds, tweaking the filters and controllers for extraordinary expressiveness—far beyond even what you’ve come to expect from a digital keyboard.
Secondly, the user interface and the color LCD display introduced with the MOTIF XS has been improved dramatically, making it even easier to view important information, such as the Voice program name and number—even when another keyboard is placed above the MOTIF XF onstage.
Furthermore, in one of the most important advantages of the MOTIF XF, an optional Flash Memory Expansion Board can be installed. This feature was included in response to many and repeated requests from power users. Now, Sample (audio) data remains on the board, even when the power is turned off—allowing you to instantly use Waveforms containing Samples you’ve recorded when you turn the power back on, without the need to load them from an external USB storage device.
We are confident these new features, in addition to the already strong set of functions of the MOTIF series, will aid in all your musical endeavors—from writing and recording to live performance.
In order to take full advantage of the MOTIF XF’s functionality, please read this manual carefully. We also recommend that you keep this manual in a safe and handy place for future reference.
We really hope that the MOTIF XF will help your creativity and musical work grow by leaps and bounds.
Enjoy!
Sincerely,
The Yamaha MOTIF XF Development Team
About this Manual
Owner’s Manual (this book)
Provides overall explanations of the basic functions for each mode.
Please use this Owner’s Manual for an overview of the basic and more important operations of the MOTIF XF. If you need more detailed information or instructions on specific functions, use the Reference Manual described below.
PDF documentation (included in the CD-ROM)
The following manuals are available in the included CD-ROM as PDF format. Please insert the CD-ROM to the disk drive of your computer then click/open any of them.
Reference Manual
Explains in detail about the internal structure, connection examples and all the parameters for each mode. Use this manual if you need more detailed information which is not covered in the Owner’s Manual.
If you need more information on the current status or display of the MOTIF XF, use the Function Tree provided in this manual. This convenient Function Tree helps you quickly find the page covering the relevant function or operation.
Data List
This contains various important lists such as the Voice List, Waveform List, Performance List, Performance List, Effect Type List, Master Program List, Arpeggio Type List, MIDI Implementation Chart and Remote Control Function List.
6MOTIF XF Owner’s Manual

How to use the PDF manuals
The Reference Manual and the Data List are provided as data documents in PDF format. These PDF files can be viewed and read on a computer. When using Adobe® Reader® to view a PDF file, you can search for specific words, print a specific page or link to open a desired section in the manual. The term search and link functions are especially convenient methods of navigating through a PDF file, and we recommend that you use them.
The latest version of Adobe Reader can be downloaded from the following URL. http://www.adobe.com/products/reader/
Accessories
•AC Power cord
•Owner’s Manual (this book)
•CD-ROM x 1 (Containing the PDF files of the Reference Manual and Data List)
•DVD-ROM×1 (containing DAW software)
About the accessory disk
Special Notice
•The software included in the accessory disk and the copyrights thereof are under exclusive ownership by Steinberg Media Technologies GmbH.
•Copying of the software or reproduction of this manual in whole or in part by any means is expressly forbidden without the written consent of the manufacturer.
•Yamaha makes no representations or warranties with regard to the use of the software and documentation and cannot be held responsible for the results of the use of this manual and the software.
•This disk is NOT for audio/visual purposes. Do not attempt to play the disk on an audio/visual CD/DVD player. Doing so may result in irreparable damage to your player.
•Note that Yamaha does not offer technical support for the DAW software in the accessory disk.
About the DAW software in the accessory disk
The accessory disk contains DAW software both for Windows and Mac.
NOTE
•Make sure to install DAW software under the “Administrator” account.
•In order to have continuous use of DAW software, including support and other benefits, you will need to register the software and activate your software license by starting it while the computer is connected to the Internet. Click the “Register Now” button shown when the software is started, then fill in all required fields for registration. If you do not register the product, you will be unable to use the application after a limited period of time expires.
•If you are using a Mac computer, double-click the “***.mpkg” file to start installation.
For information about the minimum system requirements and latest information on the software in the disk, check the web site below.
http://www.yamahasynth.com/download/
About software support
Support for the DAW software in the accessory disk is provided by Steinberg on its website at the following address.
http://www.steinberg.net
You can visit the Steinberg site also via the Help menu of the included DAW software. (The Help menu also includes the PDF manual and other information on the software.)
MOTIF XF Owner’s Manual 7

Main Features
New, enhanced Voice set covering a wide range of music styles
The MOTIF XF is loaded with 741 MB of preset Wave memory—more than double the size of the previous MOTIF XS—and has 136 additional Voices. These new Voices include Synthesizer, Brass, Saxophone, Strings, Guitar, Bass and Drum Kit as well as Piano, Clavi, and Combo Organ.
XA (Expanded Articulation) feature
Expanded Articulation (XA) is a newly designed, sophisticated tone generation system that allows you to more effectively recreate realistic sound and natural performance techniques—such as legato and staccato—often used on acoustic instruments but up to now unavailable or difficult to realize on electronic keyboards. This feature enables:
•Realistic legato performance
•Authentic note release sound
•Special “key off” sounds, by setting the XA control parameter for desired Elements
•Switching among different sounds to recreate the natural performance on an acoustic instrument
•Potential for completely new sounds and new styles of playing
Extensive Effect Processing
The MOTIF XF gives you a wide array of signal processing options, including separate Reverb and Chorus, an overall Master Effect, including multi-band compression, five-band master EQ, and a total of eight independent Insertion Effects. The latter include a huge variety of effects, plus a special Vocoder feature.
Improved User Interface
Unlike the MOTIF series, this new MOTIF XF provides several design types of the LCD display for each mode. From these types, you can select the desired one according to the use scene including the music creation and live performance.
Expanded, enhanced Arpeggio function, including Ending types
The MOTIF XF has added 1,248 new Arpeggio types, for a total of 7,881 Arpeggio types—including Ending types, as well as synthesizer and vintage sequencer style Arpeggios and Drum/Percussion loop Arpeggios.
Built-in SDRAM for Sampling
Unlike its predecessors, the MOTIF XF features 128 MB of SDRAM built in, letting you perform audio sampling, without the need for installing an optional DIMM.
Optional Flash Memory Expansion Module
The MOTIF XF also newly provides the option of installing a Flash Memory Expansion Module (FL512M/FL1024M), allowing you to internally store Waveforms that include your sampled audio sounds, and keep those Waveforms/sounds intact, even when turning off the power.
Responsive, expressive keyboard
The MOTIF XF6 features a 61-key keyboard, while the MOTIF XF7 has 76 keys with the high-quality FSX keyboard and the MOTIF XF8 has 88 keys with the high-quality BH (Balanced Hammer) keyboard. All are equipped with a touch response feature (both initial touch and aftertouch). These allow you to expressively change the sound in various ways — initial touch by the strength with which you play the keys, and aftertouch by how strongly you press the keys when holding them down.
Audio Record/Playback
You can now record your performances on the MOTIF XF as WAV-format audio files (44.1-kHz, 16-bit, stereo) on a USB storage device or a computer connected via a network. What’s more, the MOTIF XF can now also play WAV or AIFF audio files stored on a connected USB storage device or computer.
Integration with Cubase
The MOTIF XF is specially designed to work seamlessly with Cubase, Steinberg’s full-featured DAW software (included in the accessory disk) — giving you a comprehensive, all-in-one music production system, in which hardware and software are fully integrated.
8MOTIF XF Owner’s Manual
Contents
Welcome |
|
—A message from the MOTIF XF Development Team ............... |
6 |
About this Manual ....................................................................... |
6 |
Accessories................................................................................. |
7 |
About the accessory disk............................................................ |
7 |
Main Features.............................................................................. |
8 |
Controls and Functions |
10 |
Top Panel .................................................................................. |
10 |
Rear Panel................................................................................. |
14 |
Setting Up |
16 |
Power Supply ............................................................................ |
16 |
Connecting Speakers or Headphones...................................... |
16 |
Powering Up the System........................................................... |
16 |
Adjusting the Volume and the Brightness of the Display .......... |
17 |
Listening to the Demo Song ...................................................... |
17 |
Resetting the User Memory to the Initial Factory Settings ........ |
18 |
Basic Operation |
19 |
Modes |
21 |
Playing the Keyboard in the Voice mode |
22 |
Selecting a Preset Voice ........................................................... |
22 |
Using the Category Search function ......................................... |
23 |
Using the Arpeggio function ..................................................... |
23 |
Changing the Arpeggio type..................................................... |
24 |
Using the Controllers................................................................. |
25 |
Using the Knobs........................................................................ |
25 |
Voice Editing ............................................................................. |
26 |
Enhancing the sound with Effects............................................. |
27 |
Storing the edited Voice............................................................ |
27 |
Playing the Keyboard in the Performance mode |
28 |
Selecting a Performance........................................................... |
28 |
Performance Play mode indications.......................................... |
28 |
Using the Controllers and Knobs .............................................. |
28 |
How Voices are assigned to Parts of a Performance................ |
28 |
Creating a Performance by combining Voices ......................... |
29 |
Changing the Arpeggio settings for each Part.......................... |
30 |
Storing the Performance ........................................................... |
30 |
Recording in the Performance mode |
31 |
Performance Record Structure ................................................. |
31 |
Recording the Melody and Arpeggio playback to the Song..... |
31 |
Recording Arpeggio playback to a Pattern............................... |
32 |
Audio Record/Playback |
33 |
Recording your performance as audio ..................................... |
33 |
Playing an audio file .................................................................. |
34 |
Using as a Master Keyboard (Master Mode) |
35 |
Registering the Edited Voice/Performance/Song/Pattern ......... |
35 |
Making settings for use as a master keyboard ......................... |
35 |
Creating an original Song |
37 |
Terminology............................................................................... |
37 |
Song Playback .......................................................................... |
37 |
Recording to a track.................................................................. |
38 |
Creating a Song by using Arpeggio.......................................... |
38 |
Correcting wrong notes............................................................. |
39 |
Creating a swing feel—Play Effect............................................ |
40 |
Storing the created Song .......................................................... |
40 |
Creating an original Pattern |
41 |
Pattern Structure ....................................................................... |
41 |
Listening to the Demo Patterns ................................................. |
41 |
Viewing the Demo Pattern’s Patch display ............................... |
42 |
Creating a Pattern by using Arpeggio ...................................... |
42 |
Storing the created Pattern ....................................................... |
43 |
Creating a Pattern Chain for converting to a Song ................... |
43 |
Multi-timbral Tone Generator Settings |
|
for Song/Pattern Playback (Mixing mode) |
46 |
Using the Sampling feature |
47 |
Setting up for Sampling............................................................. |
47 |
Sampling in the Voice/Performance mode................................ |
48 |
Sampling in the Pattern mode................................................... |
50 |
Sampling a one-shot sound in the Song mode......................... |
52 |
Saving a Waveform to the Flash Memory Expansion Module... |
53 |
Making Global System Settings (Utility mode) |
54 |
Setting automatic power-on tasks............................................. |
54 |
Selecting the Design Type of the display ................................. |
54 |
Adjusting the tuning .................................................................. |
55 |
Transpose ................................................................................. |
55 |
Using a Connected Computer |
56 |
Using the USB TO HOST terminal............................................. |
56 |
Using the MIDI terminal............................................................. |
57 |
Using the IEEE1394 terminal..................................................... |
57 |
Song playback from a DAW using the MOTIF XF as a tone |
|
generator................................................................................... |
59 |
Recording your performance on the MOTIF XF to the DAW..... |
59 |
Using another tone generator together with the MOTIF XF ...... |
60 |
Using the MOTIF XF as an audio interface ............................... |
61 |
Remote-controlling the software (Remote mode) ..................... |
61 |
Using the MOTIF XF Editor VST ................................................ |
63 |
Saving / Loading Data in the File mode |
64 |
Saving the settings to a USB storage device............................ |
64 |
Loading the settings from a USB storage device ..................... |
64 |
USB storage devices ................................................................ |
65 |
Display Messages |
66 |
Troubleshooting |
68 |
Installing Optional Hardware |
74 |
Specifications |
78 |
Index |
80 |
MOTIF XF Owner’s Manual 9
Controls and Functions
Top Panel
|
7 |
|
|
8 |
! |
@ |
|
|
|
|
|
|
# |
|
& |
|
|
$ |
|
9 |
|
|
|
|
% |
|
|
|
|
|
|
5 |
|
|
( |
|
|
|
|
6 |
) |
^ |
* |
2 3
4
A-1 B-1 C0 |
D0 |
E0 |
F0 G0 A0 B0 C1 |
C2 |
C3 |
|
|
|
1 |
|
|
1 Keyboard
The MOTIF XF6 features a 61-key keyboard, while the MOTIF XF7 has 76 keys and the MOTIF XF8 has 88 keys. All are equipped with a touch response feature (both initial touch and aftertouch). With initial touch, the instrument senses how strongly or softly you play the keys, and uses that playing strength to affect the sound in various ways, depending on the selected Voice. With aftertouch, the instrument senses how much pressure you apply to the keys while playing, and uses that pressure to affect the sound in various ways, depending on the selected Voice.
Moreover, any of a variety of functions can be assigned to aftertouch for each Voice.
2 Pitch Bend wheel
Controls the pitch bend effect. You can also assign other functions to this controller.
3 Modulation wheel
Controls the modulation effect. You can also assign other functions to this controller.
4 Ribbon Controller
This controller is touch sensitive, and is controlled by running your finger lightly across its surface laterally. You can also assign other functions to this controller.
5 ASSIGNABLE FUNCTION buttons
According to the XA Mode (Expanded Articulation Mode) settings in the Voice Element Edit mode, you can call up the specific Element of the selected Voice by pressing each of these buttons during your keyboard performance.
In addition, you can assign other functions to these buttons.
6 MASTER VOLUME (page 17)
Move the slider upwards to raise the output level from the OUTPUT L/R jacks and the PHONES jack.
NOTE The MASTER VOLUME cannot control the volume of audio signal output from the DIGITAL OUT connector and IEEE1394 connector of the optional FireWire expansion board (if installed).
7 Knobs (page 25)
These eight highly versatile knobs let you adjust various aspects or parameters of the current Voice. Use the [SELECTED PART CONTROL] button or [MULTI PART CONTROL] button to change the functions assigned to the knobs.
8 [SELECTED PART CONTROL] button (page 25)
Pressing this button changes the functions assigned to the eight knobs. The lamp next to the currently active parameters will light. In the Voice mode, the function of each knob is applied to the current Voice. In the Performance mode, the function of each knob is applied only to the currently selected Part or to all Parts depending on the setting. In the Song/Pattern mode, the function of each knob is applied only to the currently selected Part.
10 MOTIF XF Owner’s Manual
Controls and Functions
NOTE For more information about 1 – 5, refer to “Controller Block” in the Reference Manual.
A |
G |
I H |
|||
|
|
|
|
|
|
|
|
|
|
|
|
|
L |
|
M |
C |
B |
|
N O |
|
|
K |
E |
F |
P Q |
DJ
C4 |
C5 |
C6 |
C7 |
9 [MULTI PART CONTROL] button
Pressing this button changes the functions assigned to the eight knobs in the Performance /Song/Pattern mode. The lamp next to the currently active parameters will light. In the Performance mode, the four knobs at the left end correspond to Parts 1 – 4. In the Song/Pattern mode, all knobs correspond to Parts 1 – 8 or 9 –16 (depending on the currently selected Part)
) Control Sliders (pages 25, 28)
These sliders control the volume of the sound in different ways depending on the mode selected:
Voice mode: volume of the eight Elements Performance mode: volume of the four Parts
Song/Pattern modes: volume of the eight Parts, including the current Part
Master mode: volume or specified Control Change number of the eight Zones
NOTE If all of the Control Sliders are set to the minimum, you may not hear any sound from the instrument, even when playing the keyboard or a Song/Pattern. If this is the case, raise all the sliders to a suitable level.
NOTE The MASTER VOLUME slider adjusts the audio output level from this instrument. On the other hand, the Control Sliders adjust the volume for each Element of the Voice or each Part of the Performance/Song/Pattern as a parameter. Accordingly, the values set via the Control Sliders can be stored as Voice, Performance, Song, or Pattern data.
! [REMOTE ON/OFF] button (page 61)
The Remote mode lets you control sequencer software on your computer from the panel controls of the instrument. Turn the [ON/OFF] button on to enter the Remote mode.
@ [ARPEGGIO ON/OFF] button (page 23)
Press this button to enable or disable playback of the Arpeggio for each Voice, Performance, Song, or Pattern. If the Arpeggio Switch of the selected Part is set to off in the Performance/Song/Pattern mode, however, pressing this button has no effect.
# EFFECT buttons
The extensive effect block of the instrument provides Insertion effects (eight sets, with two effect units per set), System Effects (Reverb and Chorus), and Master Effects. The effects can be applied to the keyboard-played Voices and to Song/Pattern playback.
When the lamp of the [INSERTION] or [SYSTEM] button is turned on, the corresponding Effect is on.
MOTIF XF Owner’s Manual 11

Controls and Functions
$ [MASTER EFFECT] button
When this button is pressed (the lamp lights), the Master Effect is applied to the overall sound of this instrument. Also, to access the Master Effect setting display, press and hold the [MASTER EFFECT] button for a second or two.
% OCTAVE [UP] and [DOWN] buttons
Use these buttons to change the note range of the keyboard. To restore the normal octave setting, press both buttons simultaneously.
^ SEQ TRANSPORT buttons (page 17)
These buttons control recording and playback of the Song/ Pattern sequence data.
[T] (Top) button
Instantly returns to the beginning of the current Song or Pattern (i.e., the first beat of the first measure).
[G] (Reverse) button
Press briefly to move back one measure at a time, or hold to continuously rewind.
[H] (Forward) button
Press briefly to move forward one measure at a time, or hold to continuously fast-forward.
[I] (Record) button
Press this to enable recording (Song or Pattern phrase). (The indicator lights.)
[J] (Stop) button
Press to stop recording or playback.
[R] (Play) button
Press to start playback from the current point in the Song or Pattern. During recording and playback, the indicator flashes at the current tempo.
& LCD Display (page 17)
The large backlit LCD displays the parameters and values related to the currently selected operation or mode.
* [F1] – [F6] (Function) buttons (page 19)
These buttons located directly below the LCD display call up the corresponding functions indicated in the display.
([SF1] – [SF6] (Sub Function) buttons (page 19)
These buttons located directly below the LCD display call up the corresponding sub functions indicated in the display. These buttons can be also used to call up the Arpeggio type in some displays of the Play mode, Edit mode and Record mode. These buttons can be also used as Scene buttons in the Song Play/Song Record/Pattern Play/Pattern Record modes.
A Data dial (page 19)
For editing the currently selected parameter. To increase the value, turn the dial right (clockwise); to decrease the value, turn the dial left (counter-clockwise). If a parameter with a wide value range is selected, you can change the value in broader strokes by quickly turning the dial.
B [INC/YES] button (page 19)
For increasing the value of the currently selected parameter. Also, this is used to actually execute a Job or a Store operation.
C [DEC/NO] button (page 19)
For decreasing the value of the currently selected parameter. Also, this is used to cancel a Job or a Store operation.
NOTE You can also use the [INC/YES] and [DEC/NO] buttons to quickly move through parameter values in 10-unit jumps, especially those with large ranges. Simply hold down one of the buttons (of the direction you want to jump), and simultaneously press the other button. For example, to jump in the positive direction, hold down the [INC/YES] button and press [DEC/NO].
D Cursor buttons (page 19)
The cursor buttons move the “cursor” around the LCD display screen, highlighting and selecting the various parameters.
E [EXIT] button
The menus and displays of the MOTIF XF are organized according to a hierarchical structure. Press this button to exit from the current display and return to the previous level in the hierarchy.
F [ENTER] button
Use this button to actually enter a number when selecting a Memory or Bank for Voice or Performance. Also use this button to execute a Job or a Store operation.
G MODE buttons (page 21)
These buttons select the MOTIF XF operating modes (e.g., Voice mode).
H Bank buttons (page 22)
Each button selects a Voice or Performance Bank. When the [CATEGORY SEARCH] button is turned on, these buttons can be used to select the Main category (printed below each button). When the [TRACK] button is turned on in the Pattern mode, these lower buttons are used to select the desired Section from I – P.
I Group [A] – [H] buttons (page 22)
Each button selects a Voice or Performance Group. When the [CATEGORY SEARCH] button is turned on, these buttons can be used to select the Sub category. When the [TRACK] button is turned on in the Pattern mode, these buttons are used to select the desired Section from A – H.
J Number [1] – [16] buttons (page 22)
Use of these buttons differs depending on the on/off status of the [TRACK], [MUTE], [SOLO] and [PERFORMANCE CONTROL] buttons.
12 MOTIF XF Owner’s Manual

|
|
|
|
Controls and Functions |
|
Functions of the Number [1] – [16] buttons |
|
|
|
||
|
|
|
|
|
|
Mode |
[PERFORMANCE |
[TRACK] button |
[MUTE] button |
[SOLO] button |
|
|
CONTROL] button |
|
|
|
|
|
|
|
|
|
|
Voice Play |
— |
Keyboard transmit channel setting |
— |
— |
|
|
|
|
|
|
|
Normal Voice Edit |
— |
Changes the Edit mode from Common Edit |
Element Mute setting |
Solo Element selection |
|
|
|
to Element Edit and Element selection (1 – |
(9 – 16) |
(9 – 16) |
|
|
|
8) |
|
|
|
|
|
|
|
|
|
Drum Voice Edit |
— |
Changes the Edit mode from Common Edit |
— |
— |
|
|
|
to Drum Key Edit |
|
|
|
|
|
|
|
|
|
Performance Play |
Performance Control (N) |
Keyboard transmit channel setting |
Part Mute setting (1 – 4) |
Solo Part selection (1 – 4) |
|
|
|
|
|
|
|
Performance Edit |
Performance Control (N) |
Performance Part selection (1 – 4) |
Part Mute setting (1 – 4) |
Solo Part selection (1 – 4) |
|
|
|
|
|
|
|
Master Play |
— |
Keyboard transmit channel setting (when |
— |
— |
|
|
|
memorizing the Voice mode or |
|
|
|
|
|
Performance mode to the current Master) |
|
|
|
|
|
or Song/Pattern track selection (when |
|
|
|
|
|
memorizing the Song mode or Pattern |
|
|
|
|
|
mode to the current Master) |
|
|
|
|
|
|
|
|
|
Master Edit |
— |
Changes the Edit mode from Common Edit |
— |
— |
|
|
|
to Zone Edit and Zone selection (1 – 8) |
|
|
|
|
|
|
|
|
|
Song Play/ |
— |
Song/Pattern track selection |
Song/Pattern track Mute |
Solo track selection |
|
Pattern Play |
|
|
setting |
|
|
|
|
|
|
|
|
Song Mixing/ |
— |
Song/Pattern Part selection |
Song/Pattern Part Mute |
Solo Part selection |
|
Pattern Mixing |
|
|
setting |
|
|
|
|
|
|
|
|
Mixing Voice Edit |
Element selection (1 – 8) |
Element selection (1 – 8) |
Element Mute setting |
Solo Element selection |
|
|
|
|
(9 – 16) |
(9 – 16) |
|
|
|
|
|
|
|
K [COMMON EDIT] button
Turning this button on enters the Common Edit mode, which lets you edit the parameters commonly applied to all Elements, Parts or Zones in the Voice Edit mode, Performance Edit mode, Song Mixing Edit mode, Pattern Mixing Edit mode, and Mixing Voice Edit mode.
L [PROGRAM] button (page 22)
When this button is turned on, using the Bank/Group/ Number buttons selects a Voice, Performance, Song, Pattern, and Master in the corresponding mode.
M [CATEGORY SEARCH] button (page 23)
This button is used to call up the Category Search function (page 23).
In the Voice Play mode, this function can be used for finding and selecting a desired Voice.
In the Performance Play mode, this function can be used for assigning a desired Voice to each Part on the [F2] Voice display. On the displays other than [F2], this function can be used for selecting a desired Performance.
On the [F1] Track View display in the Song Play mode, [F1] Play display in the Pattern Play mode, and [F1] 1 – 16 display in the Mixing Play mode, this function can be used for assigning a desired Voice to each Part.
N [PERFORMANCE CONTROL] button
This button is available only in the Performance Mode. When this button is turned on, the following functions are assigned to the Number buttons [1] – [16].
Number |
Function |
buttons |
|
[1] – [4] |
Selecting Parts 1 – 4. |
|
|
[5] – [8] |
Setting the Arpeggio Switch to on/off for Parts 1 – 4. |
|
|
[9] – [12] |
Setting the mute status for Parts 1 – 4. |
|
|
[13] – [16] |
Setting the Arpeggio Hold for Parts 1 – 4. |
|
|
O [TRACK] button (page 38)
Turning this button on in the Song/Pattern mode enables the Number [1] – [16] buttons for selecting corresponding Song/ Pattern tracks. When this button is turned on in the Pattern mode, the Group buttons [A] – [H] can be used to select the desired Section from A – H and the lower buttons of the Bank buttons can be used to select the desired Section from I – P.
P [MUTE] button (page 37)
Turning this button on in the Normal Voice Edit mode and Mixing Voice Edit mode enables the Number buttons [1] – [8] for muting Voice Elements (1 – 8). Turning this button on in the other modes enables the Number buttons [1] – [16] for muting Performance Parts (1 – 4), Song Tracks/Parts (1 – 16), and Pattern Tracks/Parts (1 – 16).
Q [SOLO] button (page 37)
Turning this button on in the Normal Voice Edit mode and Mixing Voice Edit mode enables the Number buttons [1] – [8] for soloing a Voice Element (1 – 8). Turning this button on in the other modes enables the Number buttons [1] – [16] for soloing a Performance Part (1 – 4), a Song Track/Part (1 – 16), and a Pattern Track/Part (1 – 16).
NOTE The on/off status of the buttons (O – Q) affects the Number [1] – [16] buttons in different ways, depending on the currently selected mode. Refer to the table at the top of this page.
MOTIF XF Owner’s Manual 13
Controls and Functions
Rear Panel
1 |
2 |
3 |
1 P (Power switch) (page 16)
Press to turn power on (O) or off (N).
2 AC IN (AC Power Cord Socket)
Be sure to plug the AC power cord into this socket before plugging the power cord into an AC outlet. Use only the AC power cord supplied with this instrument. If the supplied cord is lost or damaged and needs to be replaced, contact your Yamaha dealer. The use of an inappropriate replacement can pose a fire and shock hazard!
3 ETHERNET connector
You can connect the MOTIF XF to a LAN network by using this connector and a LAN cable. When connected to a network, the MOTIF XF is capable of mounting and accessing drives of computers on the same network. For more information, refer to “Connections” in the Reference Manual.
4 USB connectors (pages 56, 65)
There are two different types of USB connectors, and the rear panel of the instrument features both.
The USB TO HOST connector is used to connect this instrument to the computer via the USB cable and allows you to transfer MIDI data between the devices. Unlike MIDI, USB can handle multiple ports (page 57) via a single cable. The USB connection between the instrument and the computer can only be used for transfer of MIDI data. No audio data can be transferred via USB.
The USB TO DEVICE connector is used to connect this instrument to a USB storage device (hard disk drive, CDROM drive, flash memory, etc.) via the USB cable. This lets you save data created on this instrument to an external USB storage device and load data from a USB device to the instrument. Save/Load operations can be performed in the File mode.
USB
USB is an abbreviation for Universal
Serial Bus. It is a serial interface for connecting a computer with peripheral devices, and enables much faster data transfer compared to conventional serial port connections.
4 5
6 


5 LCD Contrast Control (page 17)
Use this control to set the LCD display for optimum legibility.
6FireWire expansion board (FW16E) cover (page 74)
The optional FW16E can be installed by removing this cover. By installing an FW16E board (equipped with the IEEE1394 connector), you can upgrade your MOTIF XF for convenient and easy connection to an IEEE1394-compatible computer.
NOTE Yamaha recommends that you use an IEEE1394 cable with a length of 4.5 meters or less.
NOTE The digital audio output via the IEEE1394 connector is fixed to a resolution of 24 bit/44.1 kHz.
7 DIGITAL OUT connector
Use this connector to output digital signals over a coaxial (RCA-pin) cable. The digital signal format is CD/DAT (S/P DIF). This connector outputs a digital signal of 44.1 kHz/24 bit. By using this jack, you can record the keyboard performance or Song/Pattern playback of this synthesizer to external media (e.g., a CD recorder) with exceptionally highquality sound—thanks to the direct digital connection.
NOTE Audio signal output from the DIGITAL OUT connector is equivalent to the one output from the OUTPUT L/MONO and R jacks with the exception that audio signal is digital or analog. It results that the output setting of the DIGITAL OUTPUT for each Part or each Drum Key depends on the one of the OUTPUT L/ MONO and R jacks.
8 MIDI IN/OUT/THRU connectors
MIDI IN is for receiving control or performance data from another MIDI device, such as an external sequencer. MIDI THRU is simply for redirecting any received MIDI data (via MIDI IN) to connected devices, allowing convenient chaining of additional MIDI instruments. MIDI OUT is for transmitting all control, performance and playback data from the MOTIF XF to another MIDI device, such as an external sequencer.
14 MOTIF XF Owner’s Manual
Controls and Functions
7 |
8 |
9 |
) |
! |
@ |
# |
$ |
% |
9 FOOT SWITCH jacks
For connection of an optional FC3/FC4/FC5 Footswitch to the SUSTAIN jack and a FC4/FC5 Footswitch to the ASSIGNABLE jack. When connected to the SUSTAIN jack, the Footswitch controls sustain. When connected to ASSIGNABLE, it can control one of various different assignable functions. The function assignment can be set in the Voice Edit mode.
For more information, refer to “Voice mode” in the Reference Manual.
) FOOT CONTROLLER jacks
For connection of optional foot controllers (FC7 and FC9). Each jack lets you continuously control one of various different assignable functions—such as volume, tone, pitch, or other aspects of the sound. The function assignment can be set in the Voice Edit mode.
For more information, refer to “Voice mode” in the Reference Manual.
! ASSIGNABLE OUT L and R jacks
Line level audio signals are output from this instrument via these phone jacks (1/4" mono phone plug). These outputs are independent of the main output (at the L/MONO and R jacks below), and can be freely assigned to any of the Drum Voice keys or the Parts. This lets you route specific Voices or sounds for processing with a favorite outboard effect unit. The Parts which can be assigned to these jacks are as follows:
•Audio Part in the Voice mode
•Drum Voice key to which the drum/percussion instrument is assigned
•Any Part of a Performance*
•Any Part of a Song*
•Any Part of a Pattern*
*Including the Audio Input Part
The Part assignment above can be set via the Output Select parameter. For details, refer to the Reference Manual.
@ OUTPUT L/MONO and R jacks
Line level audio signals are output via these phone jacks. For monophonic output, use only the L/MONO jack.
# PHONES (Headphone) jack (page 16)
This standard stereo phones jack is for connection to a set of stereo headphones.
$ A/D INPUT jacks (page 47)
External audio signals can be input via these phone jacks (1/4" mono phone plug). Various devices such as microphone, guitar, bass, CD player, synthesizer can be connected to these jacks and their audio input signal can be sounded as the Audio Part of the Voice, Performance, Song, or Pattern. In the Sampling mode (page 47), these jacks are used for capturing audio data as samples. In addition, you can use the special Vocoder feature by connecting a microphone to this L jack and inputting your Voice to the microphone.
Use 1/4" mono phone plugs. For stereo signals (such as from audio equipment), use both jacks. For mono signals (such as from a microphone or guitar), use only the L jack.
% GAIN knob (page 50)
For adjusting the input gain of the audio at the A/D INPUT jacks (above). Depending on the connected device (microphone, CD player, etc.), you may need to adjust this for optimum level.
MOTIF XF Owner’s Manual 15

Setting Up
Power Supply
Connect the supplied AC power cord in the following order. Make sure the Power switch on the MOTIF XF is set to off.
1Connect the supplied power cord to the AC IN on the instrument’s rear panel.
2Connect the other end of the power cord to an AC outlet.
Rear panel
AC IN
 Power cord (included)
NOTE Follow this procedure in reverse order when disconnecting the power cord.
 WARNING
Use only the AC power cord supplied with the MOTIF XF. The use of an inappropriate replacement can pose a fire and shock hazard!
 CAUTION
•Make sure your MOTIF XF meets the voltage requirement for the country or region in which it is being used. The power cord includes a grounding pin to prevent electrical shock and damage to equipment. When connecting to an outlet, connect the adaptor’s ground lead to the ground screw. If you’re unsure how to connect, then contact your Yamaha dealer or service center.
•Even when the Power switch is in the off position, a small amount of electricity is still flowing to the unit. When you are not using the MOTIF XF for a long time, make sure to unplug the AC power adaptor from the wall AC outlet.
Connecting Speakers or
Headphones
Since the MOTIF XF has no built-in speakers, you will need to monitor the sound of the instrument by using external equipment. Connect a set of headphones, powered speakers, or other playback equipment as illustrated below. When making connections, be sure that your cables have the appropriate ratings.
Powered speaker |
Powered speaker |
(Left) |
(Right) |
Headphones
OUTPUT L/MONO |
OUTPUT R |
PHONES 


MOTIF XF
Powering Up the System
Make sure the volume settings of the MOTIF XF and external devices such as powered speakers are turned down to the minimum before turning the power on. When connecting the MOTIF XF to the powered speakers, turn on the power switch of each device in the following order.
When turning the power on:
First, the MOTIF XF, then the connected powered speakers.
When turning the power off:
First, the connected powered speakers, then the MOTIF XF.
Please keep in mind that the Power switch is located at the right side (from the view of the keyboard) of the AC IN socket on the rear panel of the MOTIF XF.
AC IN  POWER switch
MOTIF XF
16 MOTIF XF Owner’s Manual
Adjusting the Volume and the
Brightness of the Display
Adjust the volume levels of the MOTIF XF and the connected amplifier/speaker system. If the display is not easily visible, use the Contrast control to adjust for optimum visibility.
Adjust the volume with the |
Adjust the display contrast |
|
MASTER VOLUME slider. |
with the Contrast control. |
|
Max. |
|
|
Min. |
Light |
Dark |
MOTIF XF
 CAUTION
Do not listen with the headphones at high volume for long periods of time. Doing so may cause hearing loss.
NOTE Keep in mind that the LCD display is not a touch screen type. Do not touch and press the display directly or forcefully.
Listening to the Demo Song
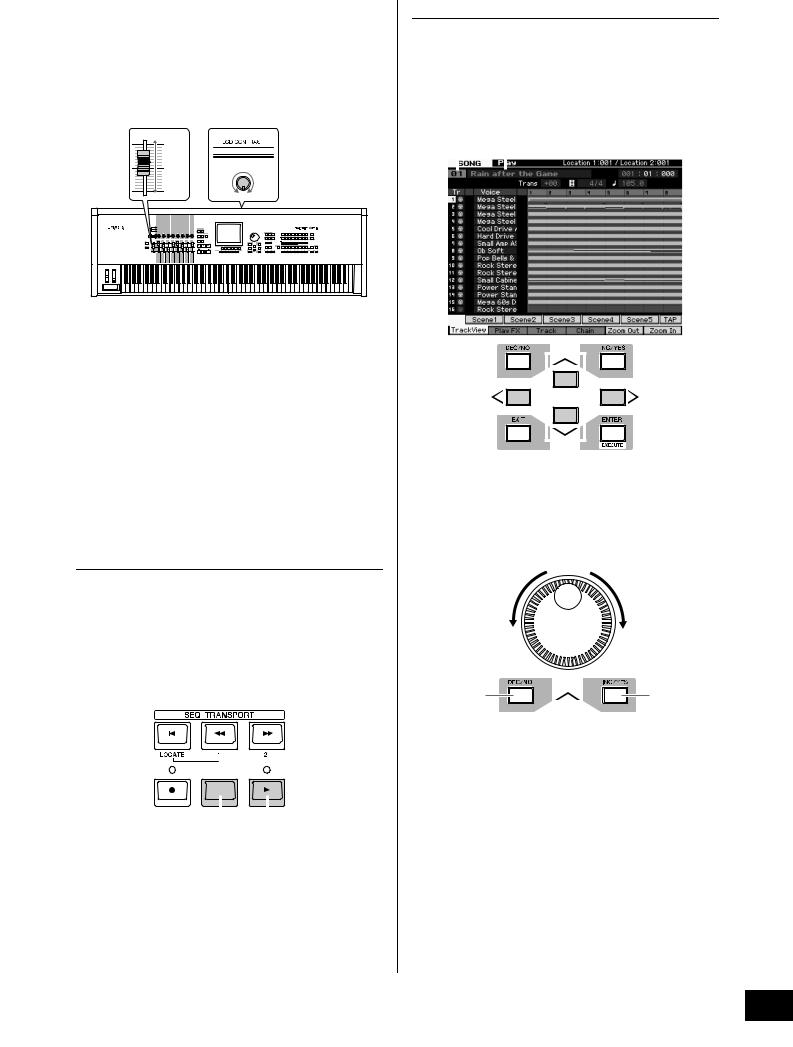
Try listening to the preset Demo Songs, enjoy the highquality sound, and get a taste for how you can use the MOTIF XF to create your own music.
Playing the Demo Song
1Press the [SONG] button to enter the Song Play mode.
The Track View display of the Song Play mode appears.
2Press the SEQ TRANSPORT [F] (Play) button to start the Demo Song.
The Song currently shown on the display starts.
|
|
|
|
|
|
|
|
|
|
|
|
Stop button |
Play button |
||||
NOTE To adjust the volume level of the Demo Songs, use the MASTER VOLUME slider.
3Press the SEQ TRANSPORT [J] (Stop) button to stop the Demo Song.
Setting Up
Selecting another Song
1Make sure that the cursor is located on the Song Number in the Track View display.
The highlighted frame within the display is called the “cursor.” You can move the cursor up, down, left and right by using the Cursor buttons. If the cursor is located on another parameter, move the cursor to the Song Number.
Song number |
Song name |
||||||||
|
|
|
|
|
|
|
|
|
|
|
|
|
|
|
|
|
|
|
|
|
|
|
|
|
|
|
|
|
|
|
|
|
|
|
|
|
|
|
|
|
|
|
|
|
|
|
|
|
|
|
|
|
|
|
|
|
|
|
|
|
|
|
|
|
|
|
|
|
|
|
|
|
|
|
|
|
|
|
|
|
|
|
|
|
|
|
|
|
|
|
|
|
|
|
|
|
|
|
|
|
|
|
|
|
|
|
|
|
|
NOTE Keep in mind that the example displays shown in this manual are for instruction purposes only, and may appear somewhat different from those on your instrument.
2Press the [INC/YES] and [DEC/NO] buttons or rotate the data dial to change the Demo Song number.
Decreases |
Increases |
number |
number |
Decreases |
Increases |
number |
number |
NOTE You can change the value of various parameters as well as the Song number by using the [DEC/NO]/[INC/YES] button or data dial after moving the cursor to the desired location. This basic operation is used for all of the selection and adjustment operations on the instrument.
MOTIF XF Owner’s Manual 17
Setting Up
Loading the Demo data
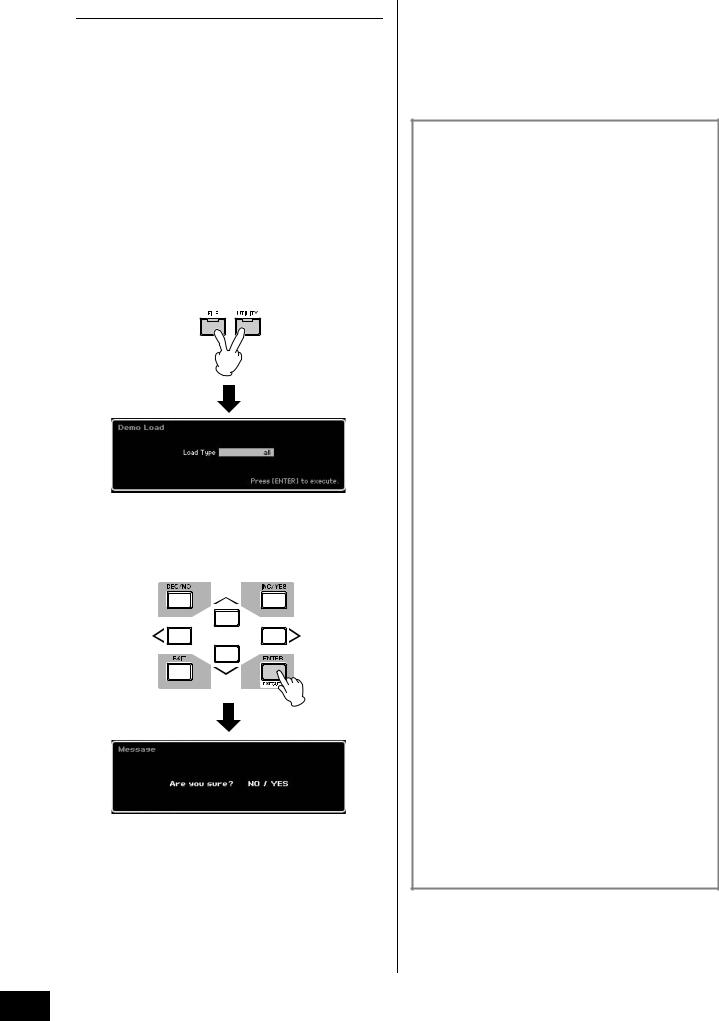
In the default settings (when shipped from the factory), several Demo Songs and Patterns are stored to the instrument, starting at Song 01 and Pattern 01. However, you may delete them by recording your original data or loading a different Song/Pattern from an external USB storage device. To restore the original Demo data, follow the instructions below.
 NOTICE
Loading the Demo data overwrites all the Songs or Patterns. Before loading the Demo data, please check whether or not there is important data in the Songs or Patterns. If there is important data in the Songs or Patterns, save it to the external USB storage device or a computer on the network before loading the Demo data. For information about how to save, see page 64.
1Press the [FILE] button and [UTILITY] button simultaneously.
The Demo Load display appears.
2Make sure that the Load Type is set to “all,” then press the [ENTER] button to load the Demo data.
A display prompt appears to confirm whether or not the destination data (Song/Pattern) should be deleted.
NOTE If you want to load only the Demo Song data, set the Load Type to “song.” If you want to load only the Demo Pattern data, set the Load Type to “pattern.”
 NOTICE
Loading the Demo data will overwrite all the Song/Pattern data already created and stored, regardless of the Load Type setting.
3Press the [INC/YES] button to execute the Demo Load operation.
The Demo data is loaded to the Song and Pattern memory location, then the Song Play Track View display appears.
NOTE If you set the Load Type to “pattern” in step 2 above, the Pattern Play display appears after loading.
Resetting the User Memory to the Initial Factory Settings
The original factory settings of this synthesizer’s User Memory can be restored as follows.
NOTE When connecting a computer to the MOTIF XF via a IEEE1394 cable, disable the driver used for this connection beforehand, and follow the procedure below to execute Factory Set.
 NOTICE
When the factory settings are restored, all the Voice, Performance, Song, Pattern, and system settings in the Utility mode you created will be erased. Make sure you are not overwriting any important data. Be sure to save all important data to your USB storage device or a computer on the network before executing this procedure (page 64).
1Press the [UTILITY] button then the [JOB] button to call up the Factory Set display.
2Set the check box of “All” to on, then press the [ENTER] button.
The display prompts you for confirmation. Press the [DEC/NO] button to cancel the Load operation.
3Press the [INC/YES] button to execute the Factory Set.
After the Factory Set has been completed, a “Completed” message appears and operation returns to the original display.
 NOTICE
•For Factory Set operations that take longer to process, you will see the message “Now executing Factory Set…” during processing. While such a message is shown on the display, never attempt to turn off the power while data is being written to Flash ROM. Turning the power off in this state results in loss of all user data and may cause the system to freeze (due to corruption of data in the Flash ROM). This means that this synthesizer may not be able to start up properly, even when turning the power on next time.
•When entering a checkmark to the box of the Power On Auto Factory Set and executing the Factory Set, the Factory Set will automatically be executed each time turning the power on. Keep in mind that this also means that your original data in Flash ROM will be erased each time you turn on the power. Therefore, the checkmark of this box should normally be removed. If you remove the checkmark of this box and execute the Factory Set, the Factory Set will not be executed when turning the power on next time.
For details about the Factory Set, refer to “Resetting the User Memory to the Initial Factory Settings—[JOB] (Factory Set)” in the Reference Manual.
18 MOTIF XF Owner’s Manual
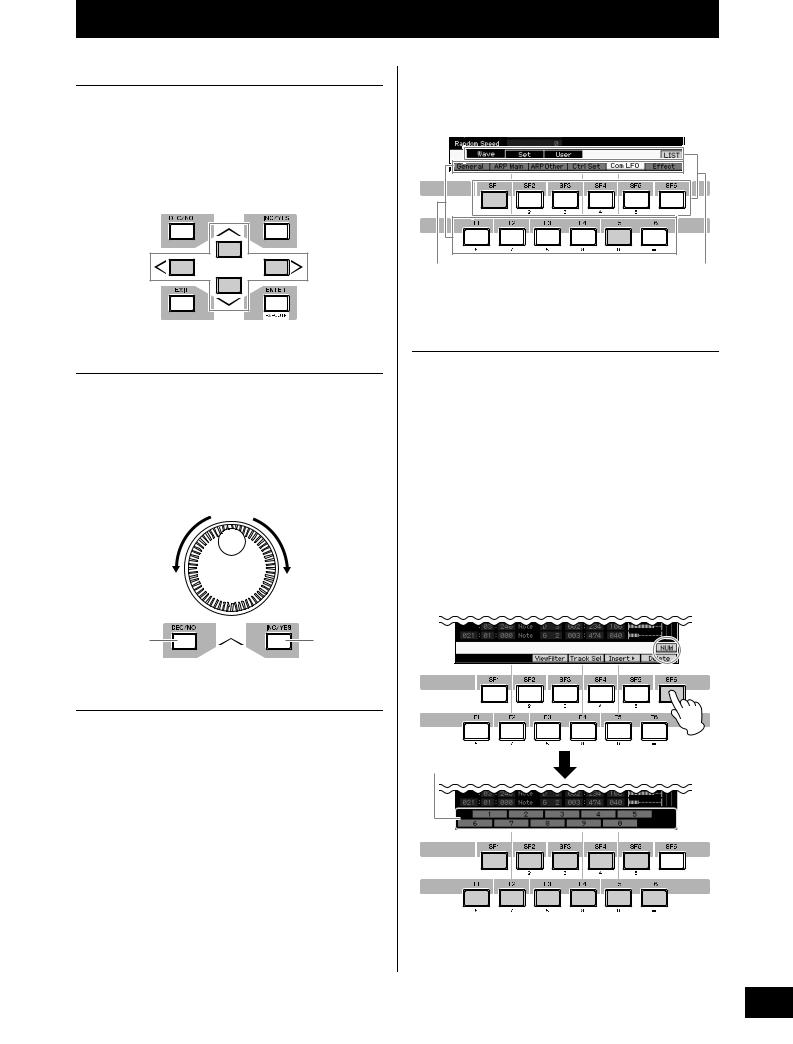
Basic Operation |
||
Moving the Cursor |
mode. (Some displays may not have any sub-functions for |
|
Use these four buttons to navigate the display, moving the |
these buttons.) |
|
The example display below is called up by pressing the [F5] |
||
cursor around the various selectable items and parameters |
||
button then pressing the [SF1] button. |
||
in the screen. When selected, the relevant item is highlighted |
||
|
||
(the cursor appears as a dark block with inverse characters). |
|
|
You can change the value of the item (parameter) at which |
|
|
the cursor is located by using the data dial, [INC/YES] and |
|
|
[DEC/NO] buttons. |
|
|
These functions can be selected |
These functions can be selected |
via the corresponding button |
via the corresponding button |
([F1] – [F6]). |
([SF1] – [SF6]). |
|
|
Inputting a number directly |
|
Changing (editing) parameter values |
For parameters having large value ranges (such as the start |
||
Rotating the data dial to the right (clockwise) increases the |
and end points of a sample), you can also enter the value |
||
directly, using the buttons below the LCD display as a |
|||
value, while rotating it to the left (counter-clockwise) |
|||
numeric keypad. When the cursor is located on such a |
|||
decreases it. For parameters with large value ranges, you |
|||
parameter, the [NUM] icon appears at the lower right corner |
|||
can increase the value by 10 by simultaneously holding |
|||
of the LCD display. When the [SF6] NUM button is pressed in |
|||
down the [INC/YES] button and pressing the [DEC/NO] |
|||
this status, each digit (1 – 9, 0) is assigned to the [SF1] – |
|||
button. |
|
||
|
[SF5] and [F1] – [F5] buttons as shown below, allowing you |
||
To decrease by 10, do the opposite; simultaneously hold |
|||
to input a number directly by using these buttons. |
|||
down the [DEC/NO] button and press the [INC/YES] button. |
|||
Depending on the selected parameter, a negative value can |
|||
|
|
||
Decreases |
Increases |
be input. When such a parameter is selected and you wish |
|
to input a negative value, press the [F6] button (to which “-” |
|||
number |
number |
||
|
|
is assigned) then use the [SF1] – [SF5] and [F1] – [F5] |
|
|
|
buttons. |
|
|
|
After completing the number input, press the [ENTER] button |
|
|
|
to actually enter the number. |
|
Decreases |
Increases |
|
|
number |
number |
|
|
Functions and Sub-Functions |
|
||
Each mode described above contains various displays, with |
|
||
various functions and parameters. To navigate your way |
|
||
through these displays and select a desired function, use the |
You can use these buttons |
||
[F1] – [F6] buttons and the [SF1] – [SF5] buttons. When you |
as the numeric keypad. |
||
select a mode, the available displays or menus appear |
|
||
directly above the buttons at the bottom of the display (as |
|
||
shown below). |
|
|
|
Depending on the currently selected mode, up to six |
|
||
functions are available and can be called up with the [F1] – |
|
||
[F6] buttons. Keep in mind that the available functions differ |
|
||
depending on the selected mode. |
|
|
|
Depending on the currently selected mode, up to five |
|
||
functions (sub-functions) are available and can be called up |
|
||
with the [SF1] – [SF5] buttons (the [SF6] button is used |
|
||
mainly to call up the INFO and LIST displays). Keep in mind |
|
||
that the available functions differ depending on the selected |
|
||
MOTIF XF Owner’s Manual 19

Basic Operation
Naming (Inputting Characters)
You can freely name the data you’ve created, such as Voices, Performances, Songs, Patterns and files saved to a USB storage device.
When the cursor is located on such a naming parameter, the CHAR icon appears at the lower right corner of the display. When pressing the [SF6] button in this status, the Input Character window appears as shown below. In the Edit area, you can move the cursor to determine the location at which the character is to be input by using the [F1] and [F2] buttons. In the Character List, you can move the cursor to determine the character to be input by using the Cursor buttons, [INC/YES] button, [DEC/NO] button and the data dial. After selecting the character, press the [F4] button to actually enter the selected character to the location specified in the Edit area. To delete the character at the cursor location, press the [F5] Delete button. To delete all the characters, press the [F6] All Clear button. After completing the character input, press the [ENTER] button to actually enter the currently edited name.
Editing area |
Character List |
||||
|
|
|
|
|
|
|
|
|
|
|
|
|
|
|
|
|
|
Calling up the List
Depending on the parameter, you can call up a convenient pop-up List by pressing the [SF6] LIST button, from which you can select the desired parameter setting or item. When the cursor is located on such a parameter (indicated with an upside down triangular arrow), the LIST icon appears at the lower right corner of the display. In this condition, press the [SF6] button to call up the List. To select the desired item or setting, use the [INC/YES], [DEC/NO] buttons and the data dial. After selecting, press the [ENTER] button to fix the selection and close the List.
This indicates that you can call up the List by pressing the [SF6] LIST button.
The List appears. You can select one from this List.
Note (Key) and Velocity settings
Several parameters let you set a key range or velocity range for a function—for example, in setting up a keyboard split— by specifying certain note values. You can use the [INC/YES] and [DEC/NO] buttons or data dial to set these parameters, or you can directly enter the values from the keyboard by pressing the appropriate keys.
When the cursor is located on such a parameter, the KBD icon appears at the lower right corner of the display. You can set the note or velocity directly from the Keyboard, by holding down the [SF6] button and pressing the desired key.
6 |
7 |
8 |
9 |
0 |
|
|
|
|
|
|
|
|
|
|
20 MOTIF XF Owner’s Manual
Modes
There are several operation modes in the MOTIF XF, and they can be selected by using the nine mode buttons. These modes include: Voice, Performance, Song, Pattern, Mixing, Sampling and Master. Depending on the selected mode, you can play and perform on the keyboard and create your own original music.
If you want to play the keyboard conventionally, use the Voice or Performance mode. If you’re creating music, particularly multipart arrangements, use the Song or Pattern mode. In addition, the following modes are available: the Utility mode for making overall settings and the File mode for managing files for saving the data you created on this synthesizer and recording your keyboard performance as audio data and playing back audio files.
Playing Voices from the keyboard
Voice mode
[VOICE] button
This synthesizer has a wealth of highquality, dynamic sounds—also referred to as “Voices.” You can play these Voices— one Voice at a time—from the keyboard in the Voice mode. This mode also lets you create your own original Voices.
Recording your performance to create an original Song
Song mode
[SONG] button
This mode lets you record, edit and play your own original Songs. This mode also lets you set up this instrument as a multi-timbral tone generator for use with computer-based DAW software or external sequencers.
Playing multiple Voices from the keyboard
Performance mode
[PERFORM] button
This mode lets you play and create Performances. A Performance lets you put several different Voices together in layers or play different two Voices in a keyboard split.
Creating original program sets
Master mode
[MASTER] button
This mode lets you register settings that you often use in the Voice, Performance, Song or Pattern mode, and instantly recall the relevant mode and custom settings together in a single button press—without having to first select a mode. In addition, this mode lets you divide the keyboard into four separate sections—just as if you were playing four different MIDI keyboards.
Creating an original Rhythm Pattern
Pattern mode
[PATTERN] button
This mode lets you play, record, edit and play your own original rhythm patterns. This mode also lets you set up this instrument as a multi-timbral tone generator for use with computer-based DAW software or external sequencers.
Executing the Sampling feature
Sampling mode
[INTEGRATED SAMPLING] button
This mode lets you record audio signals such as vocals and CD playback sound to this instrument as digital data.
Making a setup of the multitimbral tone generator
Mixing mode
[MIXING] button
This mode lets you set up detailed parameters about the multi-timbral tone generator for use with Song/Pattern playback, computer-based DAW software or external sequencers.
Backing up data / recording and playing back audio files
File mode
[FILE] button
This mode lets you save data you've created on this instrument to a USB storage device or to a computer connected via network to the MOTIF XF, and allows you to load data from the USB storage device or from the computer to the MOTIF XF.
In addition, this mode lets you record your keyboard performance as audio data to a USB storage device or to a computer connected via network to the MOTIF XF, and allows you to play back audio files (WAV or AIFF) from the USB storage device or the computer.
Setting the system parameters
Utility mode
[UTILITY] button
This mode lets you set parameters that apply to the entire system of this instrument.
For more information, refer to the “Function Tree” in the Reference Manual.
MOTIF XF Owner’s Manual 21
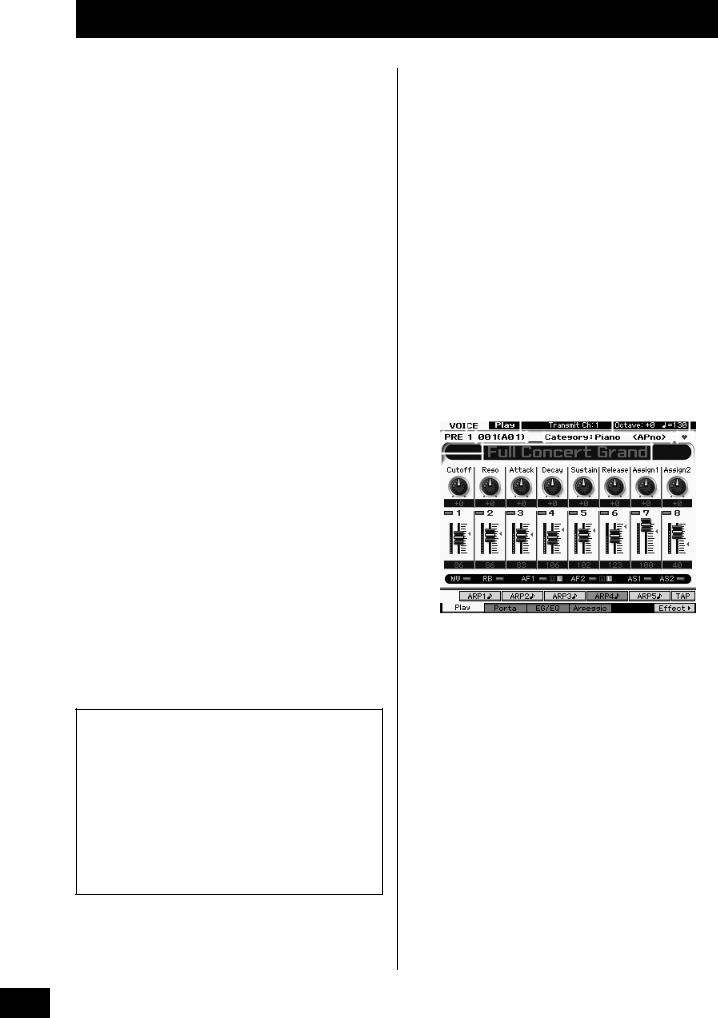
Playing the Keyboard in the Voice mode
In the Voice Play display (the top display of the Voice mode), you can select and play a single Voice. The Voices of this instrument are divided into the following two types:
Normal Voices
Normal Voices are mainly pitched musical instrument type sounds (piano, organ, guitar, etc.) that can be played over the range of the keyboard.
Drum Voices
Drum Voices are mainly percussion/drum sounds that are assigned to individual notes. These Voices are used to perform rhythm parts.
This instrument features Banks for memorizing Voices. There are basically three different types of Banks: Preset, User, and GM. The contained Voices and features depend on the Bank as described below.
Preset Banks
The Preset Banks contain a full set of specially programmed Voices. Voices you've edited yourself cannot be saved in the Preset Banks.
User Banks
The User Banks contain the Voices you have edited and stored. The Voices of User Bank 1 are those of your original creation, while the Voices of User Banks 2 – 4 are picked up from Preset Voices by default. The Voices No. 1 – 8 of the User Drum Bank are those of your original creation, while the Voices No. 9 – 32 of the User Drum Bank are picked up from Preset Voices by default.
 NOTICE
If a Voice in a User Bank (User Voice) is overwritten or replaced, that User Voice will be lost. When you store an edited Voice, be careful not to overwrite any important User Voices.
GM Bank
The GM Bank contains the Voices allocated according to the GM standard.
GM Voice
GM (General MIDI) is a worldwide standard for Voice organization and MIDI functions of synthesizers and tone generators. It was designed primarily to ensure that any song data created with a specific GM device would sound virtually the same on any other GM device—no matter the manufacturer or the model. The GM Voice bank on this synthesizer is designed to appropriately play back GM song data. However, keep in mind that the sound may not be exactly the same as played by the original tone generator.
In the Voice mode, a total of 16 Banks (Preset Bank 1 – 8, User Bank 1 – 4, GM Bank, Preset Drum Bank, User Drum, GM Drum Bank) are available. Each of these Banks includes
the Voices according to the Voice type. In the Voice Play display, you can select the desired Voice from various Voice Banks and play it.
NOTE For details about the Voice, refer to “Basic Structure.” For a list of the Preset Voices, refer to the separate Data List PDF file.
Selecting a Preset Voice
1Press the [VOICE] button.
This calls up the Voice Play display. (The [VOICE] button lamp lights.)
2Press the [PROGRAM] button so that the lamp lights then press one of the Bank buttons to select a Voice Bank.
In this condition, playing the keyboard sounds the Voice indicated in the display. The parameters shown in the Voice Play mode are briefly explained below.
Voice name |
|
Voice number |
Status whether or not the current Voice is |
|||||||||||||
|
|
|
|
(Group and Number) |
registered to the Favorite Category |
|||||||||||
|
|
|
|
|||||||||||||
|
|
|
|
|
|
|
|
|
|
|
|
|
||||
|
|
Bank |
|
|
|
|
|
Category Main 1 and Sub 1 |
|
|
||||||
|
|
|
|
|
|
|
|
|
|
|
|
|
|
|
|
|
|
|
|
|
|
|
|
|
|
|
|
|
|
|
|
|
|
|
|
|
|
|
|
|
|
|
|
|
|
|
|
|
|
|
|
|
|
|
|
|
|
|
|
|
|
|
|
|
|
|
|
|
|
|
|
|
|
|
|
|
|
|
|
|
|
|
|
|
|
|
|
|
|
|
|
|
|
|
|
|
|
|
|
|
|
|
|
|
|
|
|
|
|
|
|
|
|
|
|
|
|
|
|
|
|
|
|
|
|
|
|
|
|
|
|
|
|
|
|
NOTE The above display appears when the Type is set to “1” and the Name Position is set to “TOP” at the VOICE line in the display called up via the [UTILITY] [F1] General [SF2] Screen. You can change this parameter setting by pressing any of the Cursor buttons while holding the [EXIT] button. This operation lets you call up the desired one from four types of the display design provided in the MOTIF XF.
Normal Voice Banks
There are 13 different banks for the Normal Voices: PRE1 – 8 (Preset Banks), GM (GM Bank), USR1 – 4 (User Banks).
Drum Voices Banks
There are 3 different banks for the Drum Voices: PDR (Preset Drum Bank), GMDR (GM Drum Bank), UDR (User Drum Bank).
3Press one of the Group buttons [A] – [H] then press one of the Number buttons [1] – [16] to select a Voice.
NOTE You can use the data dial or [DEC]/[INC] buttons to select the Voice number. This operation lets you call up Voices in subsequent or previous Banks.
4 Play the keyboard.
22 MOTIF XF Owner’s Manual
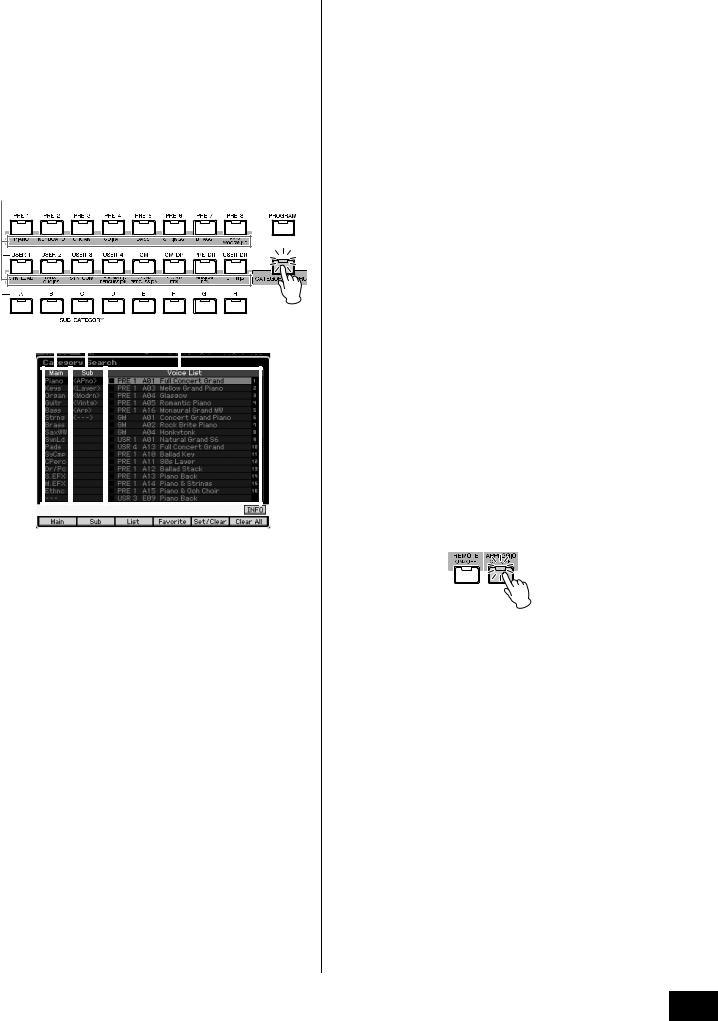
Using the Category Search function
The Voices are conveniently divided into specific Categories, irrespective of their bank locations. The categories are divided based on the general instrument type or sound characteristics. The Category Search function gives you quick access to the sounds you want.
1Press the [CATEGORY SEARCH] button in the Voice Play display.
The Category Search dialog appears.
 Main Category
Main Category |
Sub Category |
Voice List |
|||||||
|
|
|
|
|
|
|
|
|
|
|
|
|
|
|
|
|
|
|
|
|
|
|
|
|
|
|
|
|
|
|
|
|
|
|
|
|
|
|
|
2Move the cursor position to “Main” (Main Category) with the Cursor [<] button, and use the data dial to select the Main Category.
3Move the cursor position to “Sub” (Sub Category) with the Cursor [>] button, and use the data dial to select the Sub Category.
4Move the cursor position to “Voice List” with the Cursor [>] button, and use the data dial to select the Voice.
If you want to change the Category or Sub Category, press the Cursor [<] button to go back to step 2 or 3.
5Press the [ENTER] button to actually call up the selected Voice.
This closes the Category Search dialog.
Playing the Keyboard in the Voice mode
Below is a list of the Categories and their panel abbreviations.
Abbreviation |
Category |
Piano |
Piano |
|
|
Keys |
Keyboard instruments (Harpsichord, Clav, etc.) |
|
|
Organ |
Organ |
|
|
Guitr |
Guitar |
|
|
Bass |
Bass |
|
|
Strng |
Strings |
|
|
Brass |
Brass |
|
|
SaxWW |
Saxophone and other woodwind instruments |
|
|
SynLd |
Synth Lead |
|
|
Pads |
Synth Pad |
|
|
SyCmp |
Synth Comp |
|
|
CPerc |
Chromatic Percussion (Marimba, Glockenspiel, etc.) |
|
|
Dr/Pc |
Drum/Percussion |
|
|
S.EFX |
Sound Effect |
|
|
M.EFX |
Musical Effect |
|
|
Ethnc |
Ethnic |
|
|
Using the Arpeggio function
This function lets you trigger rhythm patterns, riffs and phrases using the current Voice by simply playing notes on the keyboard. Since the preset Voices already have their own Arpeggio types pre-assigned, all you need to do is select the desired Voice and turn on the Arpeggio function. For certain Voices, simply selecting the Voice will turn Arpeggio on.
Try selecting different Voices and check out the various Arpeggio types.
For example, select the Voice numbered “A01” of the Preset Drum Bank, turn the [ARPEGGIO ON/OFF] button on, then hold down a key (any key) on the keyboard, and listen as a rhythm is played automatically. The rhythm stops when you release the key.
Other preset Voices also have their own appropriate Arpeggio types for automatic playing of arpeggio/rhythm patterns. Up to five Arpeggio types can be assigned to the [SF1] – [SF5] buttons for each Voice.
When a certain Voice is selected, the same sequence is played back both regardless of the pressed note or notes. When a certain Voice is selected, on the other hand, the different sequence is played back depending on which notes are played or how they are played. Check out how Arpeggios are played back for different Voices by selecting various Voices and playing notes in various ways.
MOTIF XF Owner’s Manual 23
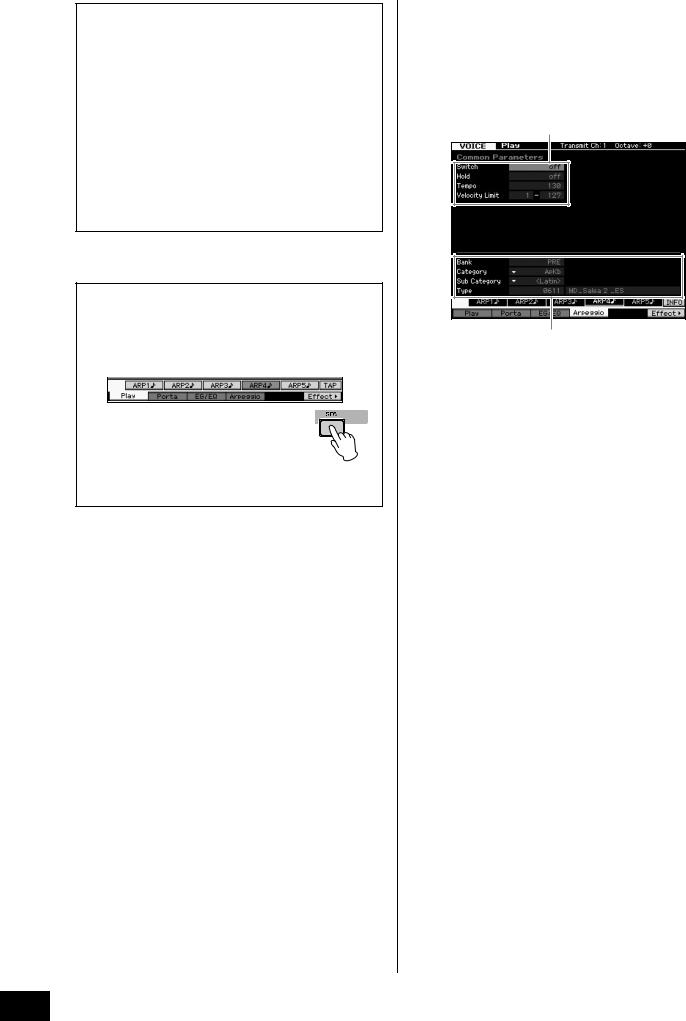
Playing the Keyboard in the Voice mode
Transmitting Arpeggio playback as MIDI data
The Arpeggio phrase can be transmitted as MIDI data by setting the following parameters to on:
Voice Arpeggio
Voice mode [UTILITY] [F3] Voice [SF3] Arpeggio“ARP MIDI Out Switch”
Performance Arpeggio
Performance mode [EDIT] select a Part [F3] ARP Other “MIDI Out Switch”
Song/Pattern Arpeggio
Song mode/Pattern mode [MIXING] [EDIT] select a Part [F3] ARP Other “MIDI Out Switch”
NOTE The transmit channel for Arpeggio can be set at the “MIDI Out Channel” parameter in the same display as “MIDI Out SW.”
Setting the Arpeggio Tempo by using the Tap button
The Arpeggio playback tempo can be changed by pressing the [SF6] TAP button in the Voice Play display. Press this button several times at the desired tempo.
NOTE This Tap function is available also in the top display of the Performance/Song/Pattern/Master mode.
Changing the Arpeggio type
The Arpeggio type assigned to each of the [SF1] – [SF5] buttons can be changed as desired.
1From the Voice Play display, press the [F4] button to call up the Arpeggio display.
These global parameters apply to all the [SF1] – [SF5] buttons as a group.
These parameters can be set for each of the [SF1] – [SF5] buttons.
2Press one of the [SF1] – [SF5] buttons.
The lower half of the display will be changed for the pressed button. The upper half of the display is common to all the [SF1] – [SF5] buttons.
3In the lower half of the display, select the Category, Sub Category and Type of the Arpeggio.
The Category determines the instrument type, the Sub Category determines the rhythm type, and the Type determines the Arpeggio type itself. Press any note to trigger the Arpeggio playback to find your favorite one.
Go on and assign Arpeggio types in the same way to the other [SF] buttons as desired.
24 MOTIF XF Owner’s Manual
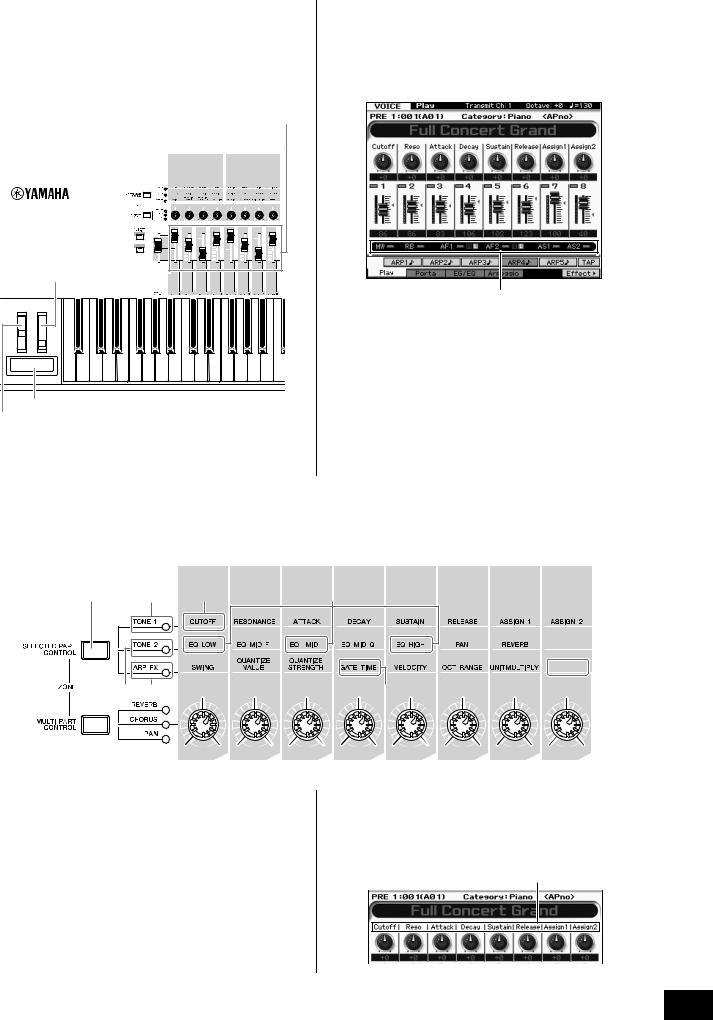
Using the Controllers
The MOTIF XF gives you an amazing amount of control options. Not only is it equipped with conventional Pitch Bend and Modulation Wheels, it also features an extensive array of special Knobs, Sliders, Ribbon Controller, and Assignable Function buttons.
ASSIGNABLE FUNCTION [1]/[2] buttons |
|
|
|
|
|
|
|
Knobs |
|
|
|
|
|
|
|
Sliders |
|||||||||||||||
|
|
|
|
|
|
|
|
|
|
|
|
|
|
|
|
|
|
|
|
|
|
|
|
|
|
|
|
|
|
|
|
|
|
|
|
|
|
|
|
|
|
|
|
|
|
|
|
|
|
|
|
|
|
|
|
|
|
|
|
|
|
|
|
|
|
|
|
|
|
|
|
|
|
|
|
|
|
|
|
|
|
|
|
|
|
|
|
|
|
|
|
|
|
|
|
|
|
|
|
|
|
|
|
|
|
|
|
|
|
|
|
|
|
|
|
|
|
|
|
|
|
|
|
|
|
|
|
|
|
|
|
|
|
|
|
|
|
|
|
|
|
|
|
|
|
|
|
|
|
|
|
|
|
|
|
|
|
|
|
|
|
|
|
|
|
|
|
|
|
|
|
|
|
|
|
|
|
|
|
|
|
|
|
|
|
|
|
|
|
|
|
|
|
|
|
|
|
|
|
|
|
|
|
|
|
|
|
|
|
|
|
|
|
|
|
|
|
|
|
|
|
|
|
|
|
|
|
|
|
|
|
|
|
|
|
|
|
|
|
|
|
|
|
|
|
|
|
|
|
|
|
|
|
|
|
|
|
|
|
|
|
|
|
|
|
|
|
|
|
|
|
|
|
|
|
|
|
|
|
|
|
|
|
|
|
|
|
|
|
|
|
|
|
|
|
|
|
|
|
|
|
|
|
|
|
|
|
|
|
|
|
|
|
|
|
|
|
|
|
|
|
|
|
|
|
|
|
|
|
|
|
|
|
|
|
|
|
|
|
|
|
|
|
|
|
|
|
|
|
|
|
|
|
|
|
|
|
|
|
|
|
|
|
|
|
|
|
|
|
|
|
|
|
|
|
|
|
|
|
|
|
|
|
|
|
|
|
|
|
|
|
|
|
|
|
|
|
|
|
|
|
|
|
|
|
|
|
|
|
|
|
|
|
|
|
|
|
|
|
|
|
|
|
|
|
|
|
|
|
|
|
|
|
|
|
|
|
|
|
|
|
|
|
|
|
|
|
|
|
|
|
|
|
|
|
|
|
|
|
|
|
|
|
|
|
|
|
|
|
|
|
|
|
|
|
|
|
|
|
|
|
|
|
|
|
|
|
|
|
|
|
|
|
|
|
|
|
|
|
|
|
|
|
|
|
|
|
|
|
|
|
Modulation wheel
Ribbon controller
Pitch Bend wheel
Playing the Keyboard in the Voice mode
The Voice Play display lets you confirm the assignment status for each of the six Controllers—in other words, whether or not the specific function is assigned. (See the controller assignment chart below.) Keep in mind that the name of the Voice may include an abbreviation of the controller most suitable for use when playing the Voice.
|
Indicates the controller assignment |
|
|
Display |
Description |
AS1, AS2 |
Indicates whether or not the specific function is assigned to |
|
the knobs 7 (AS1) and 8 (AS2) respectively when the TONE |
|
1 lamp is turned on. |
|
|
AF1, AF2 |
Indicates whether or not the specific function is assigned to |
|
the ASSIGNABLE FUNCTION [1] and [2] buttons |
|
respectively. |
|
When the “m” indicator is turned on, pressing/holding the |
|
button turns the lamp on and releasing the button turns the |
|
lamp off. When the “L” indicator is turned on, pressing the |
|
button alternates the lamp status between on and off. |
|
|
MW, RB |
Indicates whether or not the specific function is assigned to |
|
the Modulation Wheel and Ribbon Controller respectively. |
|
|
Using the Knobs
Try using the Knobs with your left hand while playing the keyboard with your right with the Voice A01 “Full Concert Grand.”
[SELECTED PART |
1 |
2 |
4 |
|
CONTROL] button |
||||
|
|
|
 3
3 


 6
6
3 |
5 |
|
|
|
7 |
|
|
|
|
Knob 1 |
Knob 2 |
Knob 3 |
Knob 4 |
Knob 5 |
Knob 6 |
Knob 7 |
Knob 8 |
1Press the [SELECTED PART CONTROL] button a few times so that the TONE 1 lamp lights.
The Control Function window appears when a display other than the Voice Play display is shown. You can also turn on the TONE 1 lamp by holding down the [SELECTED PART CONTROL] button.
2Rotate the Knob 1 (at the far left) while playing the keyboard.
Turning the knob clockwise results in a brighter sound, while turning it counterclockwise results in a softer, muffled sound.
The sound changes in this way because Knob 1 is assigned to the Cutoff Frequency parameter (labeled CUTOFF in the matrix above Knob 1 and next to TONE 1).
NOTE The functions assigned to each of Knobs and current values are shown in the display.
Functions assigned to Knobs
MOTIF XF Owner’s Manual 25

Playing the Keyboard in the Voice mode
3Press the [SELECTED PART CONTROL] button a few times so that the TONE 2 lamp lights, then rotate the Knob (at the far right).
The CHORUS (as printed above the Knob) is applied to the current Voice.
NOTE A red point on the Knob or Slider graphic indicates the current value to which the Knob or Slider is set. Moving the Knob or Slider has no effect on the sound until this point is reached. Once you move the Knob or Slider past this point, the red point disappears and moving the Knob or Control Slider affects the sound.
4Turn Knob 1, Knob 3, and Knob 5 with the TONE 2 lamp turned on.
You can change the sound by boosting or attenuating the LOW, MID and HIGH band (as printed above the Knobs respectively) of the EQ (equalizer).
5Press the [SELECTED PART CONTROL] button a few times so that the ARP FX lamp lights, turn [ARPEGGIO ON/OFF] on, then turn the Knobs with your left hand while playing the notes with your right hand.
In this status, all the Knobs can be used to change how the Arpeggio is played back.
Then, turn the [ARPEGGIO ON/OFF] button ON and operate the Knobs with your left hand while holding the keys with your right hand.
6Rotate Knob 8 (at the far right) while playing the keyboard to change the tempo of the Arpeggio.
7Rotate Knob 4 to change the gate time of the Arpeggio notes, for example, from staccato to legato playback.
Try out other Knobs as well.
NOTE For more information about the functions assigned to the Knobs in the Voice mode, refer to the Reference Manual.
By using the Knobs in this way, you can change the sound of the Preset Voice to create your own original Voice.
NOTE Controlling the knobs does not affect some Voices.
The Edit [E] Indicator
When changing the value of the parameter in the Voice Play or Edit display, the Edit Indicator will appear on the top right corner of the LCD. This gives a quick confirmation that the current Voice has been modified but not yet stored. To store the current edited status, execute the Store operation (page 27).
Voice Editing
“Editing” refers to the process of creating a Voice by changing the parameters that make up the Voice. This can be done in Voice Edit, a sub mode within the Voice mode. The actual parameters that are available differ depending on the Voice type.
Normal Voice Edit
A Normal Voice (pitched musical instrument-type sounds) can consist of up to eight Elements. There are two types of Voice Edit displays: Common Edit, for editing the settings common to all eight Elements; and Element Edit, for editing individual Elements.
About Elements
An Element is the basic and the smallest unit for a Voice, and is created by applying various parameters (Effect, EG, etc.) to the waveform of the instrument sound. Each Voice of this instrument consists of several Elements.
Drum Voice Edit
There are two types of Drum Voice Edit displays: Common Edit, for editing the settings that apply to all Drum keys in the Voice; and Element Edit, for editing individual keys (Elements).
For details about Voice Edit, refer to the Voice mode chapter in the Reference Manual.
26 MOTIF XF Owner’s Manual
Loading...