


 CONNECTÉE
Owner’s Manual Mode d’emploi Bedienungsanleitung Bruksanvisning Manuale di istruzioni Manual de instrucciones Gebruiksaanwijzing Manual do Proprietário
Инструкция по эксплуатации
Русский Português Nederlands Español Italiano Svenska Deutsch Français English

This product is designed for use at home to enjoy listening to audio.
PRECAUTIONS
PLEASE READ CAREFULLY BEFORE USE. BE SURE TO FOLLOW THESE INSTRUCTIONS.
The precautions listed below are to prevent risk of harm to the user and others, as well as to prevent property damage, and to help the user use this unit properly and safely. Be sure to follow these instructions.
After reading this manual, be sure to keep it in a safe place where it can be referenced at any time.
•Be sure to request inspections or repairs from the dealer where you purchased the unit or from qualified Yamaha service personnel.
•Yamaha cannot be held responsible for injury to you or damage of the products caused by improper use or modifications to the unit.
•This product is for ordinary homes. Do not use for applications requiring high reliability, such as managing lives, health care or high-value assets.
 WARNING
This content indicates “risk of serious injury or death.”
Power supply/AC adaptor
•Do not do anything that could damage the power cord.
-Do not place it near a heater.
-Do not bend it excessively or alter it.
-Do not scratch it.
-Do not place it under a heavy object.
Using the power cord with the core of the cord exposed could cause electric shocks or a fire.
•Do not touch the power plug or cord if there is a chance of lightning. Failure to observe this may cause electric shocks.
•Use this unit with the power supply voltage printed on it. Failure to connect to an appropriate AC outlet may cause a fire, electric shocks, or malfunctions.
•Be sure to use the supplied AC adaptor. Failure to observe the above may cause a fire, burns, or malfunctions.
•Check the electric plug periodically and remove any dirt or dust which may have accumulated on it. Failure to observe this may cause a fire or electric shocks.
2En
•When setting up the unit, make sure that the AC outlet you are using is easily accessible. If some trouble or malfunction occurs, immediately turn off the power switch and disconnect the plug from the AC outlet. Even when the power switch is turned off, as long as the power cord is not unplugged from the wall AC outlet, the unit will not be disconnected from the power source.
•If you hear thunder or suspect approaching lightning, quickly turn off the power switch and pull the power plug from the AC outlet. Failure to observe this may cause a fire or malfunctions.
•If not using the unit for long periods of time, be sure to pull the power plug from the AC outlet. Failure to observe this may cause a fire or malfunctions.
Do not disassemble
•Do not disassemble or modify this unit. Failure to observe this may cause a fire, electric shocks, injury, or malfunctions. If you notice any irregularities, be sure to request an inspection or repair from the dealer where you purchased the unit or from qualified Yamaha service personnel.

Water warning
•Do not expose the unit to rain, use it near water or in damp or wet conditions, or place on it any containers (such as vases, bottles or glasses) containing liquids which might spill into any openings or places where water may drop. A liquid such as water getting into the unit may cause a fire, electric shocks, or malfunctions. If any liquid such as water seeps into the device, turn off the power immediately and unplug the power cord from the AC outlet. Then, request an inspection from the dealer where you purchased the unit or from qualified Yamaha service personnel.
•Never insert or remove an electric plug with wet hands. Do not handle this unit with wet hands. Failure to observe this may cause electric shocks or malfunctions.
Fire warning
•Do not place any burning items or open flames near the unit, since they may cause a fire.
Wireless unit
•Do not use this unit near medical devices or inside medical facilities. Radio waves from this unit may affect electro-medical devices.
•Do not use this unit within 15 cm (6 in) of persons with a heart pacemaker implant or a defibrillator implant. Radio waves from this unit may affect electro-medical devices, such as a heart pacemaker implant or defibrillator implant.
If you notice any abnormality
•If any of the following abnormalities occur, immediately turn off the power and disconnect the power plug.
-The power cord/plug is damaged.
-An unusual smell or smoke is emitted from the unit.
-Foreign material gets into the interior of the unit.
-There is a crack or damage in the unit.
Continued use could cause electric shocks, a fire, or malfunctions. Immediately request an inspection or repair from the dealer where you purchased the unit or from qualified Yamaha service personnel.
•Be careful not to drop or apply strong impact to this unit or the AC adaptor. If you suspect the unit may have been damaged due to dropping or impact, immediately turn off the power and pull the power plug from the AC outlet. Failure to observe this may cause electric shocks, a fire, or malfunctions. Immediately request an inspection from the dealer where you purchased the unit or from qualified Yamaha service personnel.
English
En 3

 CAUTION
This content indicates “risk of injury.”
Power supply/AC adaptor
•Do not cover or wrap the AC adaptor with a cloth or blanket. Failure to observe this may trap heat, causing deformation in the case or a fire.
•Do not use an AC outlet where the power plug fits loosely when inserted. Failure to observe this may cause a fire, electric shocks, or burns.
•When removing the electric plug from the unit or an AC outlet, always hold the plug itself and not the cord. Pulling by the cord can damage it and cause electric shocks or a fire.
•Insert the power plug firmly all the way into the AC outlet. Using the unit when it is not plugged in sufficiently can cause dust to accumulate on the plug, causing a fire or burns.
Installation
•Do not place the unit in an unstable position where it might accidentally drop or fall over and cause injuries.
•When installing this unit:
-Do not cover it with any cloth.
-Do not install it on a carpet or rug.
-Make sure the top surface faces up; do not install on its sides or upside down.
•Ensure that the top is facing upwards. Failure to observe this may cause malfunctions or for the unit to fall and cause injury.
•Do not install the unit in places where it may come into contact with corrosive gases or salt air or places that have excessive smoke or steam. Doing so may result in malfunction.
•Avoid being near the unit during a disaster, such as an earthquake. Since the unit may turn over or fall and cause injury, quickly move away from the unit and go to a safe place.
•Before moving this unit, be sure to turn off the power switch and disconnect all connection cables. Failure to observe this may damage the cables or cause you or someone else to trip and fall.
Hearing loss
•Before connecting the unit to other devices, turn off the power for all devices. Failing to do so may result in hearing loss, electric shock, or device damage.
•When turning on the AC power in your audio system, always turn on the amplifier or receiver LAST, to avoid hearing loss and speaker damage. When turning the power off, the amplifier or receiver should be turned off FIRST for the same reason. Failure to observe the above may cause hearing impairment or speaker damage.
Maintenance
•Remove the power plug from the AC outlet before cleaning the unit. Failure to observe this may cause electric shocks.
Handling caution
•Keep small parts out of the reach of infants. Your children may accidentally swallow them.
•Do not do the following:
-stand on or sit on the equipment.
-put heavy items on top of the equipment.
-place the equipment in a stack.
-apply unreasonable force to buttons, switches, input/output terminals, etc.
-lean against the equipment.
•Avoid pulling the connected cables to prevent injuries or damage to the unit by causing it to fall.
4En

Notice
Indicates points that you must observe in order to prevent product failure, damage or malfunction and data loss.
Power supply/AC adaptor
•If not using the unit for a long period of time, be sure to pull the power plug from the outlet. A minute current is still flowing even if the power has been turned off (the power is in standby).
Installation
•Do not use this unit in the vicinity of other electronic equipment, such as a TV, radio, or mobile phone. Failure to observe this may cause this unit or the TV or radio to produce noise.
•Do not use this unit in a location that is exposed to direct sunlight that becomes extremely hot, such as near a heater, or extremely cold, or that is subject to excessive dust or vibration. Failure to observe this may cause the unit’s panel to become deformed, the internal components to malfunction, or for operation to become unstable.
•If using a wireless function, avoid installing this unit near metal walls or desks, microwave ovens, or other wireless network devices.
Obstructions could shorten the transmission distance.
Connections
•If connecting external units, be sure to thoroughly read the manual for each unit and connect them in accordance with the instructions.
Failure to properly handle a unit in accordance with the instructions could cause malfunctions.
Handling
•Do not place plastic or rubber products on this unit. Failure to observe this may cause discoloration or deformation in the panel of this unit.
•If the ambient temperature changes drastically (such as during unit transportation or under rapid heating or cooling) and there is a chance condensation may have formed in the unit, leave the unit for several hours without turning on the power until it is completely dry before use. Using the unit while there is condensation can cause malfunctions.
Maintenance
•If the temperature or humidity changes drastically, water droplets (condensation) may form on the unit surface. If water droplets form, immediately wipe them off with a soft cloth. If water droplets are left on the unit, they may be absorbed into the wooden parts, causing deformation.
•When cleaning the unit, use a dry, soft cloth. Using chemicals such as benzine or thinner, cleaning agents, or chemical scrubbing cloths can cause discoloration or deformation.
Information
About content in this manual
•The illustrations and screens in this manual are for instructional purposes only.
•The company names and product names in this manual are the trademarks or registered trademarks of their respective companies.
•Software may be revised and updated without prior notice.
About the name plate of the unit
The model number, serial number, power requirements, etc., may be found on or near the name plate, which is at the bottom of the unit. You should note this serial number in the space provided below and retain this manual as a permanent record of your purchase to aid identification in the event of theft.
Model No.
Serial No.
(bottom_en_01)
English
En 5

[Europe model]
Wireless communication functions
Bluetooth
Radio Frequency (Operational Frequency): 2402 MHz to 2480 MHz Maximum Output Power (EIRP): 7.27 dBm
Wi-Fi (2.4 GHz)
Radio Frequency: 2402 MHz to 2482 MHz
Maximum Output Power (EIRP): 19.98 dBm
Wi-Fi (5 GHz)
Radio Frequency, Maximum Output Power (EIRP): 5170 to 5250MHz, 22.03 dBm
5250 to 5330MHz, 22.27 dBm
5490 to 5710MHz, 24.56 dBm
5735 to 5835MHz, 13.96 dBm
•Wireless devices transmitting over a 5 GHz frequency band can only be used indoors. Use of such devices outdoors is prohibited by law.
Information for users on collection and disposal of old equipment and used batteries:
These symbols on the products, packaging, and/or accompanying documents mean that used electrical and electronic products and batteries should not be mixed with general household waste.
For proper treatment, recovery and recycling of old products and used batteries, please take them to applicable collection points, in accordance with your national legislation.
By disposing of these products and batteries correctly, you will help to save valuable resources and prevent any potential negative effects on human health and the environment which could otherwise arise from inappropriate waste handling.
For more information about collection and recycling of old products and batteries, please contact your local municipality, your waste disposal service or the point of sale where you purchased the items.
For business users in the European Union:
If you wish to discard electrical and electronic equipment, please contact your dealer or supplier for further information.
Information on Disposal in other Countries outside the European Union:
These symbols are only valid in the European Union. If you wish to discard these items, please contact your local authorities or dealer and ask for the correct method of disposal.
Note for the battery symbol (bottom two symbol examples):
This symbol might be used in combination with a chemical symbol. In this case it complies with the requirement set by the EU Battery Directive for the chemical involved.
(weee_battery_eu_en_02)
6En

English
En 7

Contents
Before you start |
10 |
|
|
What you can do with the unit . . . . . . . . . . . . . . . . 10
About this manual . . . . . . . . . . . . . . . . . . . . . . . . . . 11
Handling records . . . . . . . . . . . . . . . . . . . . . . . . . . . 11
Check the supplied accessories . . . . . . . . . . . . . . . 11
Parts and their functions . . . . . . . . . . . . . . . . . . . . . 12
Top panel. . . . . . . . . . . . . . . . . . . . . . . . . . . . . . . . 12
Back panel . . . . . . . . . . . . . . . . . . . . . . . . . . . . . . . 14
8En
Getting ready |
15 |
|
|
Location . . . . . . . . . . . . . . . . . . . . . . . . . . . . . . . . . . 15
Assembly . . . . . . . . . . . . . . . . . . . . . . . . . . . . . . . . . 15
Assembling the unit. . . . . . . . . . . . . . . . . . . . . . . . . 15 Attaching the dust cover . . . . . . . . . . . . . . . . . . . . . 17
Making connections. . . . . . . . . . . . . . . . . . . . . . . . . 18
Connecting to an amplifier . . . . . . . . . . . . . . . . . . . 18 Connecting a network cable . . . . . . . . . . . . . . . . . . 19
Making adjustments. . . . . . . . . . . . . . . . . . . . . . . . . 20
Adjusting the stylus pressure . . . . . . . . . . . . . . . . . 20 Adjusting the anti-skating . . . . . . . . . . . . . . . . . . . . 22
Turning the power on . . . . . . . . . . . . . . . . . . . . . . . . 22
About this unit’s standby modes. . . . . . . . . . . . . . . 22
Connecting the unit to the network. . . . . . . . . . . . . 23

Playback |
25 |
|
|
Listening to a record . . . . . . . . . . . . . . . . . . . . . . . . 25
Listening to Internet radio . . . . . . . . . . . . . . . . . . . . 28
Listening to streaming services . . . . . . . . . . . . . . . 28
Playing music files stored on a media server (PC/NAS) . . . . . . . . . . . . . . . . . . . . . . . . . . . . . . . . . 29
Media sharing setup . . . . . . . . . . . . . . . . . . . . . . . . 29 Playing music files . . . . . . . . . . . . . . . . . . . . . . . . . 29
Listening to music via Bluetooth. . . . . . . . . . . . . . . 30
Listening to music via AirPlay . . . . . . . . . . . . . . . . . 31
Using MusicCast CONTROLLER to register
favorites . . . . . . . . . . . . . . . . . . . . . . . . . . . . . . . . . . 31
Detailed settings |
32 |
|
|
Making settings via MusicCast CONTROLLER . . . 32
Setting the sleep timer . . . . . . . . . . . . . . . . . . . . . . 32 Enabling/disabling automatic playback . . . . . . . . . . 32 Enabling/disabling automatic standby . . . . . . . . . . 32
Making settings via a web browser . . . . . . . . . . . . 33
Accessing the settings screen . . . . . . . . . . . . . . . . 33
Contents
When necessary |
34 |
English |
|
||
|
|
|
Updating the firmware . . . . . . . . . . . . . . . . . . . . . . . 34
Initializing the settings . . . . . . . . . . . . . . . . . . . . . . . 35
Connecting to a network using the WAC function . . 35
Care. . . . . . . . . . . . . . . . . . . . . . . . . . . . . . . . . . . . . . 36
Replacement . . . . . . . . . . . . . . . . . . . . . . . . . . . . . . 36
Replacing the belt . . . . . . . . . . . . . . . . . . . . . . . . . . 36 Replacing the record stylus. . . . . . . . . . . . . . . . . . . 37
Moving this unit . . . . . . . . . . . . . . . . . . . . . . . . . . . . 37
Troubleshooting . . . . . . . . . . . . . . . . . . . . . . . . . . . . 38
General. . . . . . . . . . . . . . . . . . . . . . . . . . . . . . . . . . 38
Bluetooth . . . . . . . . . . . . . . . . . . . . . . . . . . . . . . . . 40
Network . . . . . . . . . . . . . . . . . . . . . . . . . . . . . . . . . 41
Supported devices and file formats . . . . . . . . . . . . 43
Supported devices . . . . . . . . . . . . . . . . . . . . . . . . . 43 File formats . . . . . . . . . . . . . . . . . . . . . . . . . . . . . . . 43
Trademarks. . . . . . . . . . . . . . . . . . . . . . . . . . . . . . . . 44
Specifications . . . . . . . . . . . . . . . . . . . . . . . . . . . . . . 45
En 9

Before you start
What you can do with the unit
This unit is a network turntable that supports playback from network sources such as media servers or mobile devices, in addition to playing records.
When you install MusicCast CONTROLLER on your mobile device and connect it to the network, you’ll be able to ...
|
This unit |
Operate this unit from your mobile device, or share |
||
|
|
Enjoy internet radio, or music files saved |
||
|
|
on your mobile device or computer. |
audio from a record or a network source via devices |
|
Amplifier |
that are located in other rooms and are compatible |
|||
|
|
|
with MusicCast CONTROLLER. |
|
|
|
|
|
|
|
|
|
|
|
Router *
AirPlay (iOS device)Bluetooth
Records Mobile device
Internet radio
Streaming service
PC
AirPlay (iTunes)
Network Attached Storage (NAS)
*You will need a commercially available wireless LAN router (access point) if you plan to use a mobile device.
Record playback ( page 25)
Listening to Internet radio ( page 28)
Listening to streaming services ( page 28)
Playing music files stored on your PC ( page 29)
Playing music files with AirPlay ( page 31)
10 En
Playing music files stored on a Network Attached Storage (NAS) device ( page 29)
Playing audio content from a Bluetooth device ( page 30)
Playing music using MusicCast CONTROLLER ( page 23)
About this manual
When reading this manual, please note the following.
Specifications and appearance are subject to change without notice in order to improve the product.
In this manual, iPhone, iPad and iPod touch are collectively referred to as “iOS device”.
This manual uses MusicCast CONTROLLER screens displayed in English on an iPhone as examples.
Explanation of graphic symbols used in this manual:
-“ WARNING” indicates points that you must observe to avoid risk of death or serious injury.
-“ CAUTION” indicates points that you must observe to avoid risk of injury.
-NOTICE indicates points that you must observe to avoid
damaging the product or causing it to malfunction.
- |
NOTE |
indicates supplementary information that you will find |
useful.
Handling records
When you hold a record, you should either support the record’s label area and its outer edge, or hold the record’s outer edges between your two hands.
Label area |
Outer edge |
Before you start | About this manual
Check the supplied accessories |
English |
|
Make sure that all items are present.
Platter ×1 |
Platter sheet ×1 |
Belt ×1 |
|
|
* The belt is installed on the |
|
|
platter. |
Counter weight ×1 |
Head shell ×1 |
45 rpm adaptor ×1 |
||
|
|
|
(with cartridge) |
|
|
|
|
|
|
|
|
|
|
|
Dust cover ×1 |
Dust cover hinge ×2 |
RCA stereo cable ×1 |
|
|
|
AC adaptor ×1 |
Owner’s Manual (this manual) |
* For details, refer to the |
Supplement (leaflet) |
included “Supplement” |
|
(leaflet). |
|
En 11

Before you start | Parts and their functions
Parts and their functions
Top panel
STANDBY/ON (power)
This switches the unit’s power between on and standby (off). ( page 22)
STANDBY/ON (power) indicator
This indicates the status of the unit’s power.
Lit: Power is on
Dimly lit: Power is in the network standby state ( page 22)
Unlit: Power is in the eco standby state ( page 22)
|
|
|
33/45 (speed) ( page 26) |
|
|
|
|
|
|
|
Speed indicator ( page 26) |
|
|
|
Platter ( page 15) |
|
|
|
Platter sheet ( page 16) |
|
|
|
Center spindle ( page 15) |
|
|
|
12 En

PLAY/STOP (play/stop) ( page 26)
Makes the platter rotate or stop.
NOTE
If the source (audio source) is network or Bluetooth, this plays/stops the network source.
SOURCE
Selects the source (audio source) for this unit. Each time you press this, the source alternates between PHONO, network, and Bluetooth.
NOTE
The source can be switched if this unit’s back panel audio output select switch is set to LINE OUT.
SOURCE indicator
The color of the indicator changes depending on the source.
Source |
|
Indicator color |
|
|
|
PHONO |
|
White |
network (AirPlay) |
|
Pink |
network (other than AirPlay) |
|
Green |
Bluetooth |
|
Blue |
NOTE
When new firmware is provided, the indicator flashes orange. ( page 34)
CONNECT
Use this when using MusicCast CONTROLLER to make network connection settings. ( page 23)
Before you start | Parts and their functions
English
En 13

Before you start | Parts and their functions
Back panel
SERVICE jack
This jack is only for service. It is not normally used.
NETWORK jack
Use a LAN cable (commercially available) to connect this to your network.
WIRELESS switch
Enables/disables this unit’s wireless functionality (including Bluetooth).
AUTO (default): Wireless functionality is enabled.
OFF: Wireless functionality is disabled.
|
|
|
|
|
|
|
|
|
|
|
|
|
|
|
|
|
LINE OUT jacks
Output the playback audio from the record or the network source. ( page 18)
Audio output select switch
Switches the audio output. ( page 18)
LINE OUT (default): The signal from the cartridge is amplified by the phono equalizer that is built into this unit, and is output from the LINE OUT jacks.
PHONO OUT: The signal from the cartridge is output directly from the PHONO OUT jacks.
PHONO OUT jacks
These jacks output the playback audio of the record. ( page 19)
DC IN jack
Connect the AC adaptor (included) to this jack. ( page 18)
14 En
Getting ready
Location
Because record playback is easily affected by vibration, you should place the unit in a level location that is not subject to external vibration. Place it sufficiently far from your speaker system so that it will not be affected by sound pressure or vibration.
Assembly
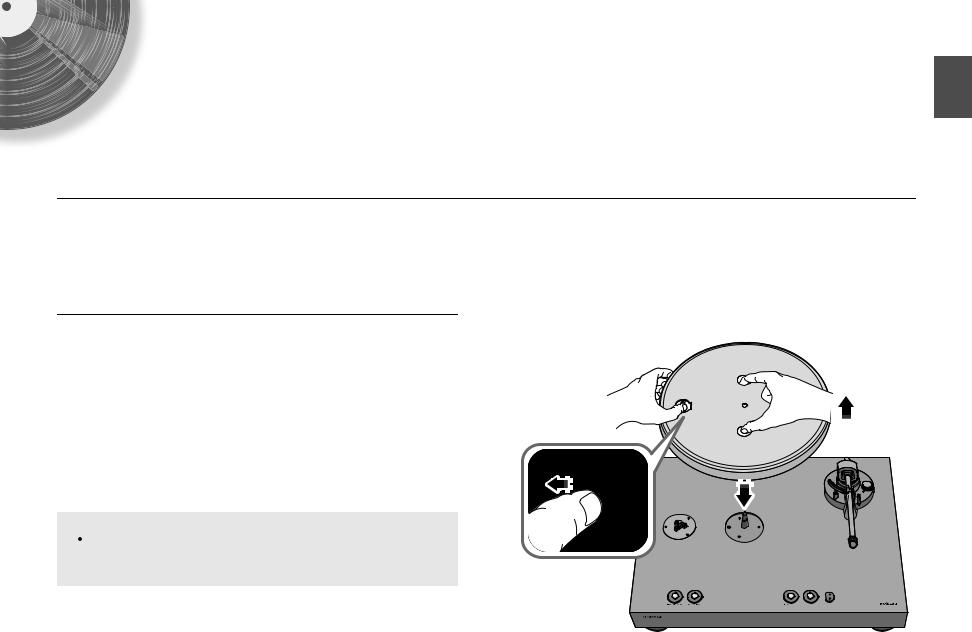
Assembling the unit |
|
1 Lift up the platter. |
1 |
Reaching through the round hole in the platter, pull the belt |
|
2 outward, hooking it over your finger. |
2 |
3 Insert the platter onto the center spindle.
3 |
 CAUTION
Take care not to drop the platter. Dropping it might cause injury, or might damage the unit.
English
En 15

Getting ready | Assembly
4 Align the round hole of the platter with the pulley.
5Use your finger to hook the belt onto the pulley.
Take care that the belt is not twisted. After hooking the belt onto the pulley, rotate the platter several times to ensure that the belt is smoothly in place.
Pulley
6 Place the platter sheet on the platter.
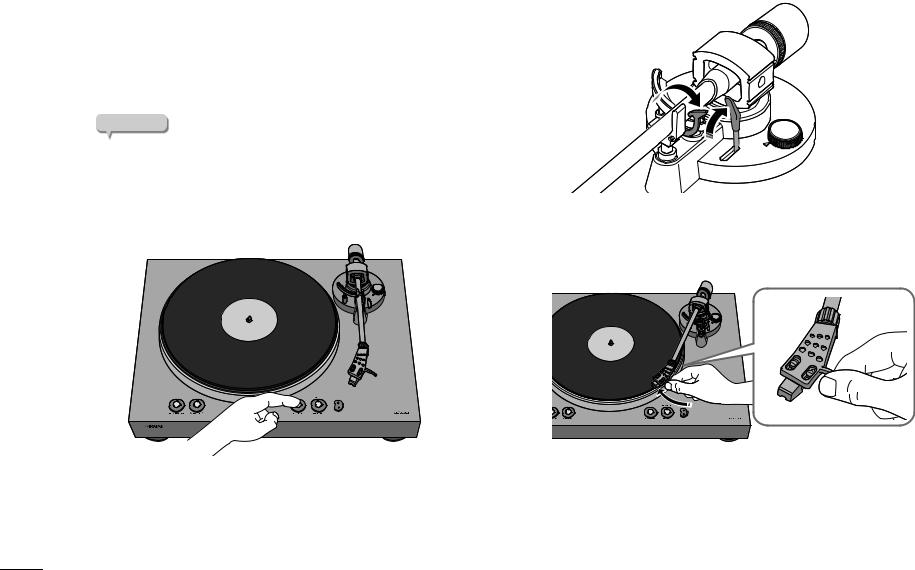
7Attach the counter weight to the tone arm.
With the markings on the counter weight facing you, slide it onto the back end of the tone arm.
8Attach the head shell to the tone arm.
Insert the head shell into the front end of the tone arm, and turn the lock nut to secure it.
Lock nut
16 En

|
Getting ready | Assembly |
|
Attaching the dust cover |
|
|
|
English |
|
|
|
|
The dust cover protects this unit from dust etc. |
|
|
|
|
|
Insert the hinges into the appropriate locations at two sides of the |
Attach the dust cover by inserting the hinges into the hinge bases |
|
1 dust cover. |
2 located on the back panel of the unit. |
|
Hinge base
NOTE
To remove the dust cover, grasp the two sides of the dust cover and slowly lift upward to remove the cover together with its hinges.
 CAUTION
Take care not to pinch your hands or fingers when opening or closing the dust cover.
En 17
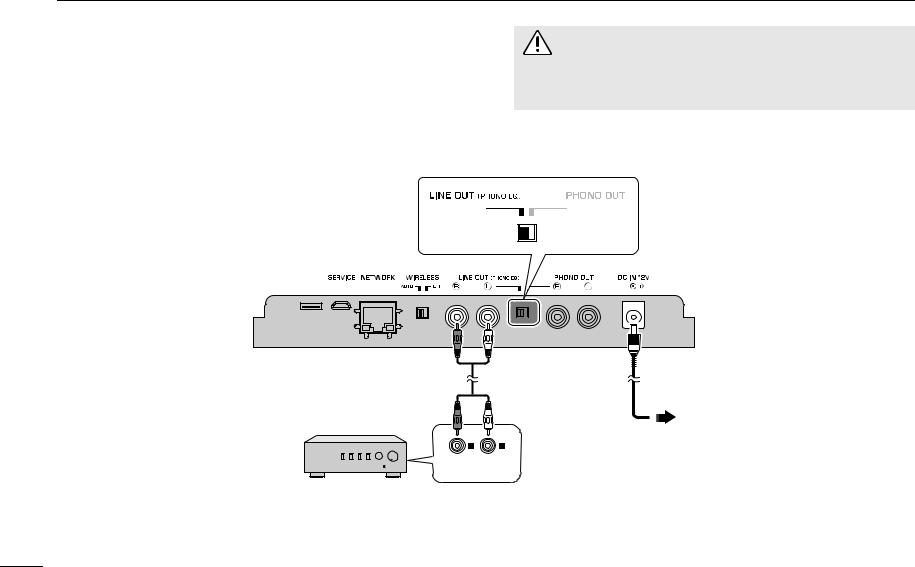
Getting ready | Making connections
Making connections
Connecting to an amplifier
CAUTION
Make connections as shown in the following illustration.
Do not plug the power cords of this unit and other connected devices into AC outlets until all connections and audio output select switch settings are complete.
If using this unit’s LINE OUT jacks
Sources that can be played back: Records, all network sources including internet radio, Bluetooth
This unit (back panel)
RCA stereo cable |
AC adaptor |
(supplied) |
(supplied) |
Connect to AC outlet
AUX IN
Pre-main amplifier or speakers with built-in amplifier, etc. (external input jacks)
18 En
If using this unit’s PHONO OUT jacks
Sources that can be played back: Records
This unit’s network functionality cannot be used.
This unit (back panel)
RCA stereo cable |
AC adaptor |
(supplied) |
(supplied) |
Connect to AC outlet
PHONO IN
Pre-main amplifier or phono equalizer, etc. (PHONO input jacks)
Getting ready | Making connections
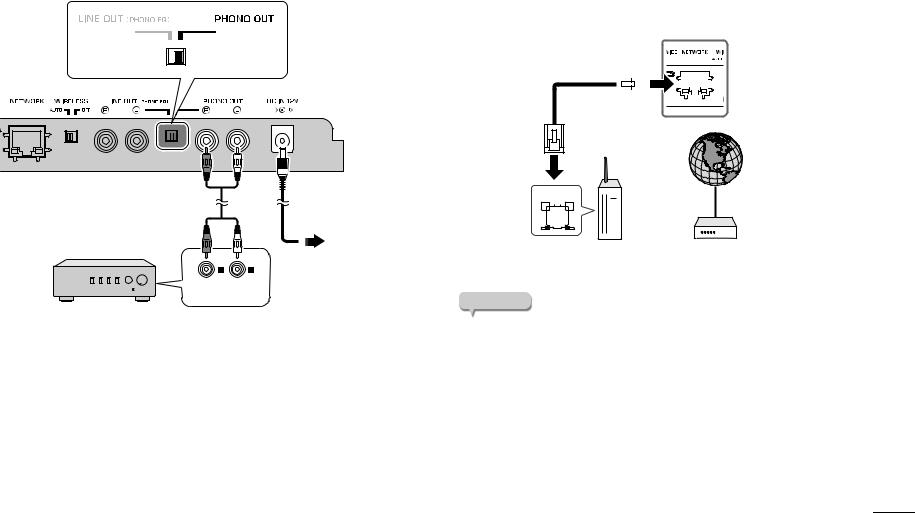
Connecting a network cable |
English |
|||||||||||||||||||
|
||||||||||||||||||||
To use a wired connection to the network, connect this unit to your router using |
|
|||||||||||||||||||
a commercially-available STP network cable (CAT-5 or higher straight cable). |
|
|||||||||||||||||||
To connect wirelessly to the network, proceed to “Connecting the unit to the |
|
|||||||||||||||||||
network” ( page 23). |
|
|||||||||||||||||||
|
|
|
|
|
|
|
|
This unit |
|
|||||||||||
|
|
|
|
|
|
|
|
(back panel) |
|
|||||||||||
Network cable |
|
|
|
|
|
|
|
|
|
|
|
|||||||||
|
|
|
|
|
|
|
|
|
|
|
|
|
|
|
|
|
|
|
|
|
|
|
|
|
|
|
|
|
|
|
|
|
|
|
|
|
|
|
|
|
|
|
|
|
|
|
|
|
|
|
|
|
|
|
|
|
|
|
|
|
|
|
|
|
|
|
|
|
|
|
|
|
|
|
|
|
|
|
|
|
|
|
|
|
|
|
|
|
|
|
|
|
|
|
|
|
|
|
|
|
|
|
|
|
Internet
LAN
|
|
|
|
|
|
|
|
|
|
|
|
|
|
|
|
|
|
|
|
|
|
|
|
|
|
|
|
|
|
|
|
|
|
|
|
|
|
|
|
|
|
|
|
|
|
|
|
|
Wireless router |
Modem |
|||||||||
NOTE
Connect the network cable before you turn on the power of this unit.
You can connect to the network via a wired connection regardless of whether
the WIRELESS switch located on the back panel of this unit is set to AUTO or OFF. ( page 14)
If the unit is already wirelessly connected to the network, put this unit’s power
in standby mode, connect the network cable, turn the back panel WIRELESS switch OFF, and then turn on the power. ( page 14)
En 19

Getting ready | Making adjustments
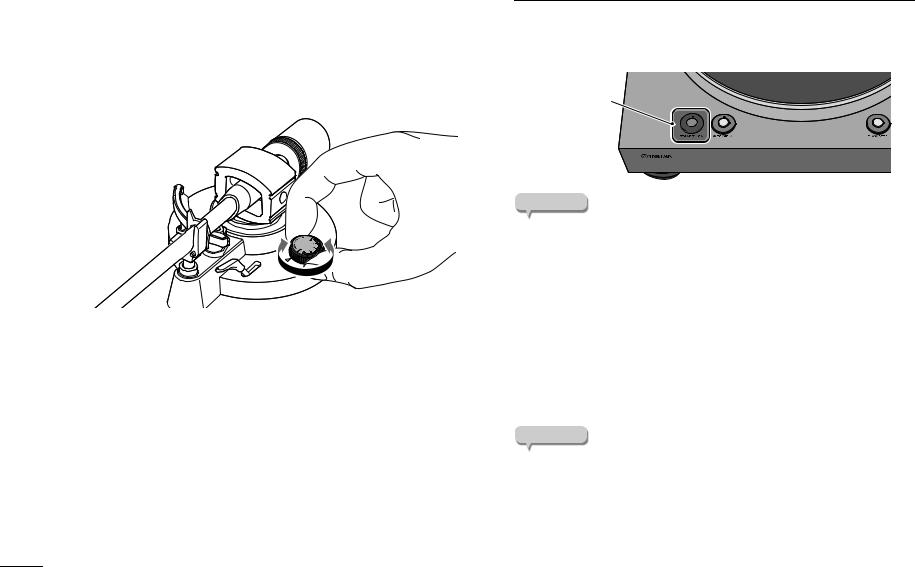
Making adjustments
Adjusting the stylus pressure |
3 |
Release the tone arm lock. |
|
Adjust the tone arm so that the appropriate stylus pressure is applied to the record.
1
2
Detach the stylus cover.
NOTICE |
4 |
Move the tone arm off of the arm rest and slightly to the left. |
|
Take care that the stylus cover or your finger do not contact the stylus.
Set the anti-skating adjustment to the “0” position.
NOTICE
Take care that the needle does not contact any part of the unit.
20 En
5 Turn the counter weight so that the tone arm is horizontal.
Toward 1: Counter weight moves forward on the tone arm. Toward 2: Counter weight moves backward on the tone arm.
1
2 
Correct |
Tone arm is horizontal |
|
(balanced) |
||
|
||
Incorrect |
Counter weight is too far |
|
forward |
||
|
||
Incorrect |
Counter weight is too far |
|
backward |
||
|
6 Return the tone arm to the arm rest, and lock it in place.
Getting ready | Making adjustments
Turn the counter ring so that the “0” marking is aligned with the |
English |
7 center line on the back end of the tone arm. |
|
Center line |
|
NOTE
When turning the counter ring, use your fingers to press the counter weight so that it does not rotate.
8By turning the counter weight, set the counter weight markings to the stylus pressure specified for the cartridge.
The specified stylus pressure for the supplied cartridge is 3.5 g.
NOTE
Turning the counter weight also turns the counter ring.
En 21
Getting ready | Turning the power on
Adjusting the anti-skating
As the platter rotates, the tip of the stylus generates a force that pulls it toward the center of rotation. If the anti-skating value is set to the same value as the stylus pressure, a force is generated that pulls the tip of the stylus outward away from the center of rotation, and the two forces cancel each other.
1Turn the anti-skating adjustment to the same value as the stylus pressure of the cartridge.
Turning the power on
On the top panel of the unit, press STANDBY/ON (power) to turn on the power of the unit. Press STANDBY/ON (power) once again to put the unit in standby mode.
STANDBY/ON
(power)
NOTE
When you first turn on the power after purchasing the unit or initializing it, the  (wireless LAN) indicator might flash. If it flashes, you can connect to the
wireless network by sharing the network settings of your iOS device. ( page 35) In order to enjoy music from a variety of network sources, use MusicCast CONTROLLER to connect to your network. ( page 23)
About this unit’s standby modes
This unit has two types of standby mode.
Network standby: This device’s power can be turned on from a network device. (only when the audio output select switch is set to LINE OUT)
Eco standby: This mode reduces the standby power consumption.
NOTE
If you want to switch to the eco standby setting, you can use your web browser to change the Standby setting. ( page 33)
If you want to temporarily switch to eco standby, hold down STANDBY/ON (power) for five seconds while the unit is powered-on. (only when the audio output select switch is set to LINE OUT)
22 En

Connecting the unit to the network
This section explains how to register the unit with MusicCast and set up the unit for the network connection.
Getting ready | Connecting the unit to the network
English
Even if this device is connected to the network via a cable, MusicCast registration is necessary in order to play back network sources.
NOTE
If you want to play high-resolution audio sources via the network, a wired connection is recommended for more stable playback. ( page 19)
Your mobile device must already be connected to the wireless LAN router (access point).
1 Install MusicCast CONTROLLER on your mobile device.
In the App Store or in Google Play, search for MusicCast CONTROLLER (free), and install it on your mobile device.
For more about MusicCast CONTROLLER, refer to the following website.
https://www.yamaha.com/musiccast/
2Start the MusicCast CONTROLLER on your mobile device, and then tap “Setup”.
 Tap here.
MusicCast CONTROLLER is an app for controlling devices that support MusicCast. It allows you to share music between multiple MusicCast compatible devices that are placed in different rooms. You can use your smartphone or other mobile device as a remote controller, and easily select songs and make settings on the MusicCast compatible device.
3Operate MusicCast CONTROLLER as directed by the instructions that appear on the screen of your mobile device, and on the top panel of this unit, hold down the CONNECT button for five seconds.
The  (wireless LAN) indicator flashes.
CONNECT |
|
(wireless LAN) indicator |
En 23

Getting ready | Connecting the unit to the network
4Follow the instructions on the display of the mobile device to operate MusicCast CONTROLLER to make the network settings.
When this unit connects to the network, the  (wireless LAN) indicator is lit.
Now the unit is registered with MusicCast and the network settings are complete.
Use MusicCast CONTROLLER to play the music.
NOTE
To set up additional MusicCast-compatible devices, tap the  (Settings) in the upper-right corner of the MusicCast CONTROLLER screen, and then select “Add New Device”.
 Tap here to start settings.
24 En

Playback
Listening to a record
Here’s how to play back a record.
Starting playback |
1 |
Open the dust cover, and place the record on the platter. |
|
If you’re playing a 45 rpm record, use the included 45 rpm adaptor.
 CAUTION
If you play back a record without sufficiently lowering the volume of your amplifier, a loud sound might occur when the tip of the stylus contacts the record. This can cause hearing loss and might damage your amplifier and speaker, so be sure to lower the volume of your amplifier.
If you are playing a record and the sound is being output from the LINE OUT jacks, the platter will stop when you switch the source from PHONO to network or Bluetooth.
NOTE
MusicCast CONTROLLER cannot start/stop record playback or switch the speed.
English
En 25
Playback | Listening to a record
2 Press 33/45 (speed) to select the appropriate speed for the record. |
5 |
The speed switches each time you press 33/45 (speed).
Speed indicator lit: 33 1/3 rpm
Speed indicator unlit: 45 rpm
3Press SOURCE to switch the source to PHONO.
The SOURCE indicator is lit white.
NOTE
If the audio output select switch is set to PHONO OUT, there’s no need to switch the source.
4Press PLAY/STOP (play/stop).
The platter rotates.
6
Release the tone arm lock, and raise the lift lever.
Move the tone arm to the playback position of the record.
26 En

7Lower the lift lever.
The tone arm is lowered, and playback starts.
|
|
Playback | Listening to a record |
|
|
|
|
|
Pausing playback |
|
English |
|
|
|
||
If you raise the lift lever, the tone arm rises and playback pauses. |
|
||
When you lower the lift lever, playback resumes. |
|
|
|
|
|
||
Stopping playback |
|
|
|
1 |
Raise the lift lever. |
|
|
2 |
Return the tone arm to the arm rest. |
|
|
3 |
Lower the lift lever. |
|
|
4Press PLAY/STOP (play/stop).
The platter stops rotating.
5 Lock the tone arm.
NOTE
The tone arm does not automatically rise when the record finishes playing.
If you will not be using the unit for a time, attach the cover to the stylus to protect it.
En 27

Playback | Listening to Internet radio
Listening to Internet radio
Here’s how to select an internet radio station using the MusicCast CONTROLLER that’s installed on your mobile device.
NOTE
Before you select a station, register this unit with MusicCast. ( page 23)
Certain Internet radio stations might not be available at all times or during certain hours.
This function uses the “airable.Radio” service. This service is provided by Tune In GmbH.
This service may change or end without notice.
1 Use MusicCast CONTROLLER to select the room in which this unit is located (e.g., Room 1).
2 |
Tap “Net Radio”. |
3 |
Select the internet radio station to which you want to listen. |
Listening to streaming services
You can listen to a streaming service using the MusicCast CONTROLLER that’s installed on your mobile device. For details on streaming services, refer to the supplementary explanation(s) regarding the streaming service(s) that are available in your area. Access the Yamaha Downloads site to download the supplementary explanation(s).
https://download.yamaha.com/
NOTE
Service is limited to certain areas.
Services supported by the unit might not be available depending on the region in which the unit was purchased.
The service may change or end without notice.
28 En

Playback | Playing music files stored on a media server (PC/NAS)
Playing music files stored on a media server (PC/NAS) |
English |
|
You can play music files stored on your PC or DLNA-compatible Network Attached Storage (NAS) device on the unit.
NOTE
Audio may be interrupted while using a wireless network connection. In this case, use a wired network connection. ( page 19)
For information on the file format that can be played by the unit, please refer to “Supported devices and file formats” ( page 43). Also, please refer to the specifications for the NAS device.
Media sharing setup
To play music stored on the PC (or NAS device) on the unit, you need to enable media sharing between this unit and the other devices.
For a PC that runs Windows Media Player
The setting procedure may vary depending on the PC or the version of Windows Media Player. The following instructions use Windows Media Player12 as an example.
NOTE
The method will depend on the computer and the settings that you’re using. For details, refer to the manufacturer of your computer or to the Windows Media Player help.
1 |
Start Windows Media Player 12 on your PC. |
2 |
Select “Stream”, then “Turn on media streaming”. |
3 |
Click “Turn on media streaming”. |
4 Selectname. “Allowed” from the drop-down list next to the unit’s model
5Click “OK” to exit.
For a PC or a NAS that runs DLNA server software other than Windows Media Player
Refer to the instruction manual for the device or software and configure the media sharing settings.
Playing music files
Here’s how to play back using the MusicCast CONTROLLER that’s installed on your mobile device.
NOTE
Register the unit as a MusicCast-enabled device before playing music files. ( page 23)
1 Use MusicCast CONTROLLER to select the room in which this unit is located (e.g., Room 1).
2 |
Tap “Server”. |
3 |
Follow the on-screen instructions to select a song. |
En 29

Playback | Listening to music via Bluetooth
Listening to music via Bluetooth
You can play music files stored on a Bluetooth device (such as a smartphone) on the unit.
NOTE |
4 On the Bluetooth device, select a song and start playback. |
|
In order to use Bluetooth functionality, set the WIRELESS switch located on |
NOTE |
|
|
||
the back panel of this unit to AUTO. ( page 14) |
If the unit detects a Bluetooth device that was previously connected, |
|
For information on supported Bluetooth devices, refer to “Supported devices |
||
the unit will automatically connect to the Bluetooth device after you |
||
and file formats” ( page 43). |
||
perform Step 1. To establish another Bluetooth connection, first |
||
|
||
|
terminate the current Bluetooth connection. |
|
On the top panel of this unit, press SOURCE to switch the source |
To terminate a Bluetooth connection, perform one of the following |
|
1 to Bluetooth. |
operations: |
|
The SOURCE indicator is lit blue. |
- Disconnect from the Bluetooth device. |
|
- Select any option other than “Bluetooth” as the source for this unit. |
||
|
2
3
On the Bluetooth device, turn the Bluetooth function on.
On the Bluetooth device, select this unit from the list of available devices.
When this unit connects to a Bluetooth device, the  (Bluetooth) indicator is lit.
NOTE
If you are prompted to enter a passkey, enter the number “0000”.
If the unit is registered as a MusicCast device, the room name will appear on the available device list.
If you enable Bluetooth standby, this unit automatically turns on when
a connect operation is performed on the Bluetooth device. ( page 33)
30 En
 Loading...