

LCD TV with DVD + DVB + HDMI
HTC 1525D (without HDMI)
HTC 1925D
HTC 2225D
OPERATION MANUAL
BEDIENUNGSANLEITUNG
MODE D'EMPLOI
MANUAL DE OPERACIÓN


Sicherheitshinweise
Um einen zuverlässigen und sicheren Betrieb dieses Gerätes zu gewährleisten, lesen Sie
bitte sämtliche Anleitungen in dieser Bedienungsanleitung gründlich, insbesondere die nachfolgenden Hinweise zur Sicherheit.
Elektronische Sicherheit
• Das Fernsehgerät sollte ausschließlich an Stromquellen angeschlossen werden, die
derjenigen entsprechen, die auf dem Etikett des Stromadapters angegeben ist.
• Um eine Überlastung zu vermeiden, betreiben Sie nicht zu viele weitere Geräte an
der gleichen Steckdose.
• Verlegen Sie Stromkabel unbedingt immer so, dass niemand darüber stolpern kann.
• Wenn Sie das Gerät für längere Zeit nicht mehr nutzen, ziehen Sie unbedingt das
Stromkabel ab und entfernen Sie das Antennenkabel.
• Weder das Gerät noch die Fernbedienung dürfen Wasser oder Feuchtigkeit ausge-
setzt sein.
• Ziehen Sie in folgenden Fällen das Stromkabel ab und suchen Sie professionelle
Hilfe auf:
- bei Beschädigung des Stromsteckers oder der Stromkabel;
- wenn Flüssigkeiten auf das Gerät laufen oder dieses versehentlich Wasser oder
Feuchtigkeit ausgesetzt wird;
- wenn eine Substanz oder ein Gegenstand versehentlich in die Belüftungsschlitze
eindringt;
- wenn das Gerät nicht normal funktioniert.
• Entfernen Sie nie die Abdeckung - es befinden sich keine Teile im Inneren, die vom
Benutzer selbst repariert werden können.
• Erlauben Sie ausschließlich entsprechend ausgebildetem Fachpersonal, Reparatu-
ren an diesem Gerät vorzunehmen.
• Entfernen Sie in folgenden Fällen die Batterien aus der Fernbedienung, um ein Aus-
laufen zu verhindern:
- wenn die Batterien leer sind;
- wenn die Fernbedienung für längere Zeit nicht verwendet wird.
• Entsorgen Sie die Batterien ordnungsgemäß - sie dürfen nicht verbrannt werden.
Sonstige Sicherheitshinweise
• Das Gerät muss mindestens 5 cm (2 Zoll) von der Wand oder Möbelstücken entfernt
aufgestellt werden.
• Klopfen Sie niemals auf das Gerät und rütteln Sie nie daran.
• Lassen Sie die Fernbedienung nicht fallen, und setzen Sie sich nicht darauf.
• Säubern Sie das Gerät mit einem weichen, sauberen und trockenen Tuch.
Verwenden Sie keine Lösungsmittel.
Deutsch
3

Inhaltsangabe
Sicherheitshinweise
Elektronische Sicherheit...................................................................................................3
Sonstige Sicherheitshinweise........................................................................................... 3
Verpackungsinhalt............................................................................................................5
Deutsch
Merkmale..........................................................................................................................5
Anschlüsse
Rückseite.......................................................................................................................... 6
Bedienelemente (Tasten) der rechten Seite..................................................................... 6
Anschließen...................................................................................................................... 7
Fernbedienung
Einlegen der Batterien in die Fernbedienung .................................................................10
Reichweite ......................................................................................................................10
Fernbedienung ...............................................................................................................11
LCD Menü
Video-Menü ....................................................................................................................13
PC-Menü ........................................................................................................................14
HDMI Menü ....................................................................................................................15
Audio-Menü ....................................................................................................................16
TV-Menü.........................................................................................................................16
Allgemeines Menü..........................................................................................................18
Problembehandlung.....................................................................................................19
DVB-T Modus
Hauptmenü .....................................................................................................................20
Erstinstallation und Programmeinstellungen ..................................................................20
Kanalliste........................................................................................................................21
Favoritenliste ..................................................................................................................23
Systemeinstellungen ......................................................................................................23
EPG ................................................................................................................................26
Teletext...........................................................................................................................27
Andere Funktionen .........................................................................................................27
Problemlösung DVB-T....................................................................................................28
DVD-Player
Disc einlegen..................................................................................................................29
Funktionen......................................................................................................................29
MPEG-1, MPEG-2 und MPEG-4 Videos ........................................................................34
Einstellungsmenü ........................................................................................................... 36
Problemlösung................................................................................................................41
Spezifikationen ............................................................................................................... 43
4

Packungsinhalt
Folgende Bestandteile sollte sich in der Verpackung befinden:
• Xoro HTC 1525D/HTC 1925D/HTC 2225D LCD-TV Fernsehgerät
• Fernbedienung mit Batterien
• Anleitung
• Netzadapter
• Stromkabel
• Garantiekarte
Falls eines dieser Teile fehlen sollte, wenden Sie sich schnellstmöglich an Ihren Händler.
Bewahren Sie die Originalverpackung für den Fall auf, dass das Gerät an den Händler zurückgeschickt werden muss.
Merkmale
• Qualitativ hochwertiges Display
• Vielfältige Anschlußmöglichkeiten wie VGA, RF, Video, S-VIDEO, SCART und HDMI
• Unterstützt bei HDMI Videosignal bis zu 1080i (nur bei HTC 1925d und HTC 2225d)
• Stereo-Audio-Eingänge
• Integrierter analoger TV Tuner mit Teletext
• Integrierter digitaler TV Tuner (DVB-T) mit Teletext und EPG
• DVD-Player
• Automatische und manuelle Kanalsuche
• Automatische Abschaltung als Stromsparfunktion, wenn kein Signaleingang vorliegt
Hinweis:
Der HTC 1525d enthält keinen HDMI Eingang.
Deutsch
5
Anschlüsse
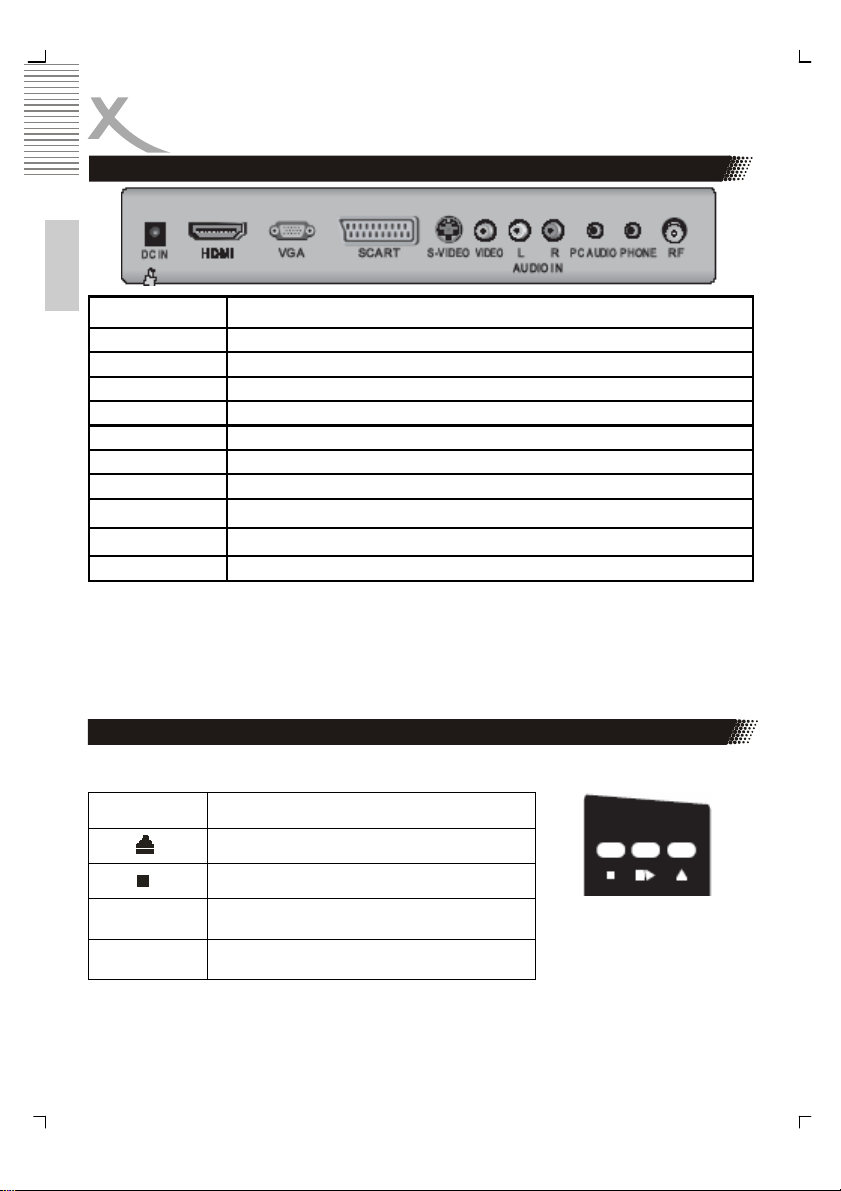
Rückseite
Deutsch
Bezeichnung Funktionsbeschreibung
DC In DC Stromeingang
HDMI HDMI Audio/Video Eingang (nur bei HTC 1925D und HTC 2225D)
VGA VGA-Signal vom Computer
SCART EuroAV (SCART) Eingang
S-Video S-Video-Eingang
Video Video-Signaleingang
Audio IN L / R Audio-Signaleingang für AV z.B. CVBS oder S-Video
PC Audio
Phone
RF Anschließen einer Antenne oder eines Empfangskabels
Hinweis:
Der HTC 1525D hat keinen HDMI Eingang.
Tasten der rechten Seite
Auf der rechten Seite im oberen Teil befinden sich folgende Tasten:
Audio-Eingang für VGA
Audio-Ausgang für Kopfhörer
Taste Funktion
Öffnen und Schließen des Laufwerks
Wiedergabe stoppen
|| / > Abspielen / Pause
DVD Slot-In Loader des DVD-Players
6
Bedienelemente
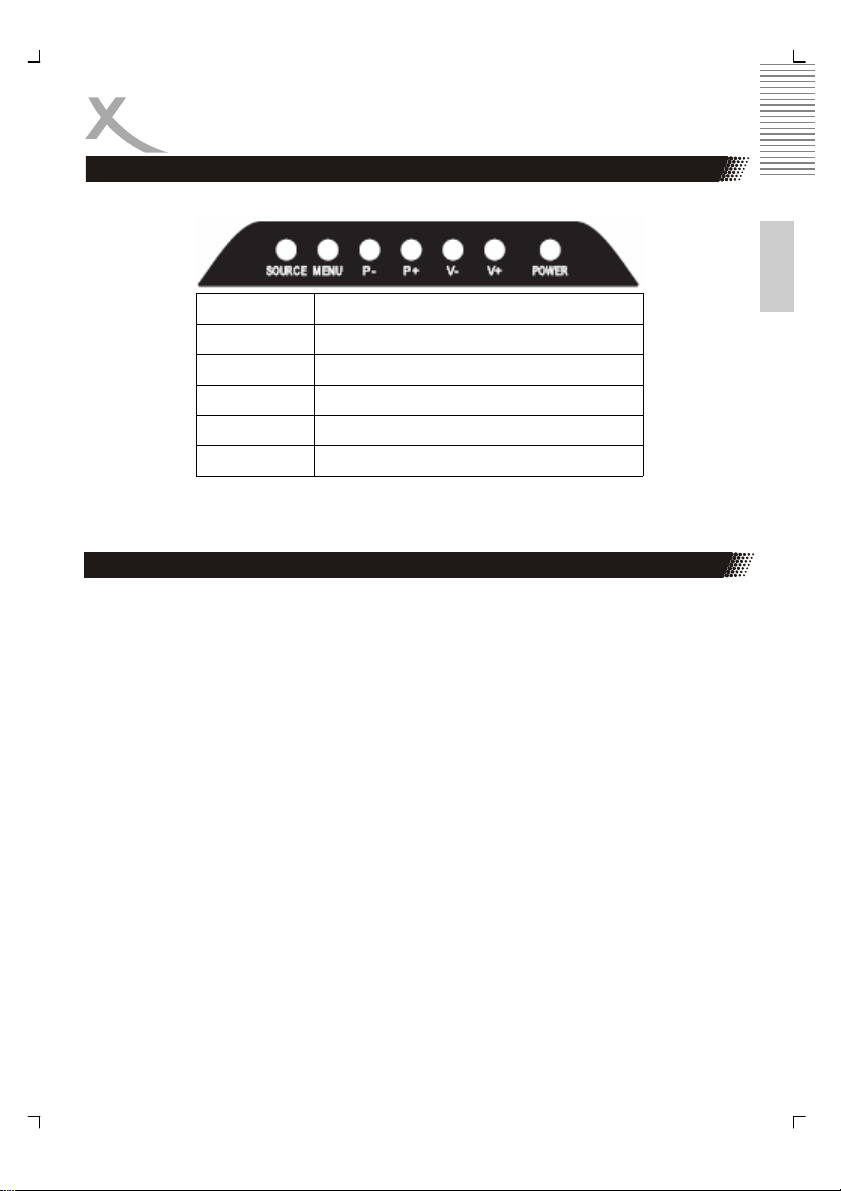
Tasten der oberen Seite
Auf der oberen Seite befinden sich folgende Tasten:
Hinweis:
Mit dem Drücken der SOURCE Taste werden folgende Quellen abgerufen:
TV — SCART — AV — S-Video — PC — HDMI — DVB-T — DVD
Inbetriebnahme
1. Schließen Sie die Antenne bzw. Eingangsquelle am entsprechenden Eingang auf der
Rückseite des Geräts an.
2. Stecken Sie den kleinen, runden Stecker des Stromadapterkabels in den Stromeingang
auf der Rückseite des Geräts.
3. Verbinden Sie das Stromkabel mit dem Stromadapter und der Steckdose.
4. Schalten Sie das Gerät ein, indem Sie bei den Bedienelementen direkt am Gerät oder
auf der Fernbedienung die Taste POWER drücken. Die LED fängt daraufhin an, grün zu
leuchten.
5. Wählen Sie mit der Taste SOURCE am Gerät bzw. auf der Fernbedienung die gewünschte Eingangsquelle aus: TV, SCART, AV, S-Video, PC-RGB, HDMI, DVB-T und
DVD. Sie können sowohl mit den Bedienelementen auf der Vorderseite des Geräts als
auch mit der Fernbedienung die Lautstärke anpassen oder einen Kanal auswählen.
A. DVB-T Modus:
Schalten Sie das Gerät an und drücken sie mehrmals die SOURCE-Taste, bis rechts
oben „DVB“ angezeigt wird. Nun befindet sie der HTC xx25D im DVB-T Modus.
B. DVD-Player:
Schalten Sie das Gerät an und drücken sie mehrmals die SOURCE-Taste, bis rechts
oben „DVD“ angezeigt wird. Nun befindet sie der HTC xx25D im DVD Modus.
C. Analoger TV Tuner (z.B. Kabelnetz):
Schalten Sie das Gerät an und drücken sie mehrmals die SOURCE-Taste, bis rechts
oben „TV“ angezeigt wird. Nun befindet sie der HTC xx25D im TV Modus.
6. Um das Gerät für kurze Zeit auszuschalten, drücken Sie die Taste POWER. Daraufhin
wechselt es in den Bereitschaftsmodus (Stand-By), und die LED leuchtet rot. Falls Sie
das Gerät über einen längeren Zeitraum nicht mehr nutzen, schalten Sie es komplett
aus, indem Sie das Stromkabel abziehen.
Taste Funktion
Source Quelle wählen
Menu LCD Einstellungen
V+ / V- Lautstärke ändern
CH+ / CH- TV Kanal ändern
Power An / Aus (Stand-By) Modus
Deutsch
7

VERBINDEN
Stromverbindung
Verbinden Sie den AC/DC Adapter mit den HTC Fernseher am „DC IN“ Eingang und danach den Stromstecker mit der Steckdose.
An der Vorderseite leuchtet dann ein rote LED. Der
Deutsch
Fernseher befindet sich nun im Stand-By Modus. Drücken Sie entweder die „POWER“ Taste auf der Fernbedienung oder auf der Oberseite des Gerätes. Die
rote LED wechselt zu einer grünen LED Anzeige.
Antenne
Der HTC Fernseher verfügt über einen analogen und
einem digitalen TV Tuner. Für den analogen TV Empfang schließen Sie das Antennenkabel entweder mit
der VHF/UHF Dachantenne oder mit dem analogen Kabelanschluss an.
Für den digitalen terrestrischen (DVB-T) TV Empfang schließen Sie den Fernseher entweder an die Dachantenne (für den
besten DVB-T Empfang) oder an eine DVB-T Zimmerantenne
an.
Wechseln Sie mit der SOURCE Taste zu „TV“ für analogen TV
Empfang oder zu „DVB-T“ bei digitalen terrestrischen TV Empfang.
Hinweis:
Den besten Empfang für DVB-T erhalten Sie mit einer Dachantenne. Falls Sie nur eine Zimmerantenne benutzen können,
achten Sie hier auf die Ausrichtung der Antenne und nutzen
Sie ggf. eine aktive Zimmerantenne.
SCART Eingang
Audio- und Videosignale können Sie z.B. von einem Videorekorder oder einer Setopbox via der SCART Schnittstelle übertragen.
Verbinden Sie ein entsprechendes Endgerät mit einem SCART
Kabel an dem SCART Eingang des HTC Fernseher an.
Wechseln Sie mit der SOURCE Taste zu SCART.
CVBS Videoeingang und Stereo Audioeingang
Wenn Sie mehrere Endgeräte verbinden möchten und die entsprechenden Schnittstellen (SCART, S-VIDEO oder HDMI) sind
schon belegt, oder Ihr Endgerät biete keinen andere Möglichkeit
als eine AV Verbindung via Komponentenkabel, dann verbinden
Sie das entsprechende Endgerät mit dem gelben Strang eines
dreipoligen Audio/Videokabel mit dem „VIDEO“ Eingang des HTC
Fernsehers. Um auch den Ton zu übertragen, müssen Sie eine
8
VERBINDEN
Tonverbindung etablieren. Verbinden Sie dazu den weiß und rot markierten Kabelstrang mit
dem entsprechenden Audio Eingang „L“ und „R“ an dem HTC Fernseher.
Wechseln Sie mit der SOURCE Taste zu „AV“.
S-Video Videoeingang und Stereo Audioeingang
Wenn Sie mehrere Endgeräte verbinden möchten und die entsprechenden Schnittstellen
(SCART, VIDEO oder HDMI) sind schon belegt, oder Ihr Endgerät biete keinen andere Möglichkeit als eine AV Verbindung via Komponentenkabel, dann verbinden Sie das entsprechende Endgerät mit dem gelben Strang eines dreipoligen Audio/Videokabel mit dem „SVIDEO“ Eingang des HTC Fernsehers. Um auch den Ton zu übertragen, müssen Sie eine
Tonverbindung etablieren. Verbinden Sie dazu den weiß und rot markierten Kabelstrang mit
dem entsprechenden Audio Eingang „L“ und „R“ an dem HTC Fernseher.
Wechseln Sie mit der SOURCE Taste zu „S-Video“.
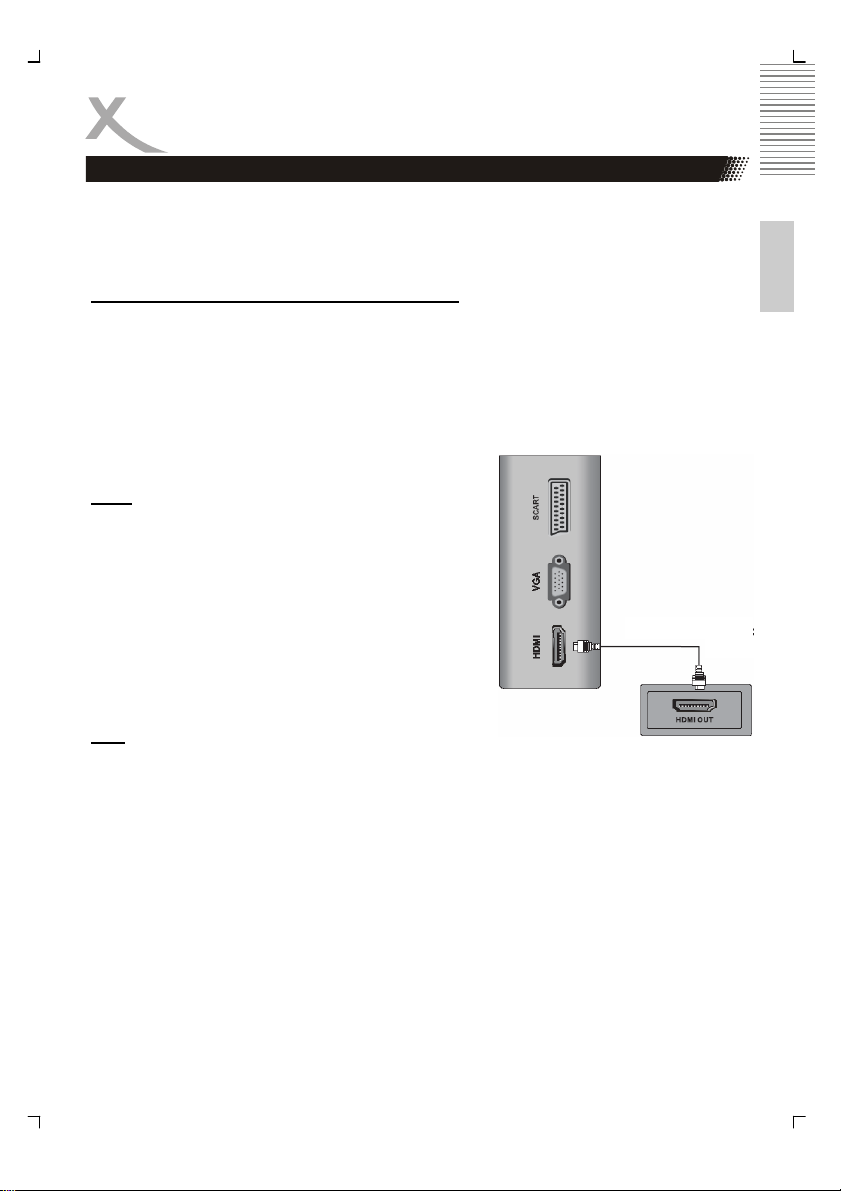
HDMI
Wenn Sie ein Endgerät mit HDMI, wie z.B. eine PS3
Spielekonsole an dem HTC Fernseher nutzen möchten,
verbinden Sie den HTC Fernseher mit einem HDMI
Kabel an dem HDMI Eingang und dem HDMI Ausgang
des entsprechenden Endgerätes.
Wechseln Sie mit der SOURCE Taste zu „HDMI“.
VGA
Sie können den HTC Fernseher auch als PC Monitor betreiben. Verbinden Sie Ihren Computer (PC) mit einem VGA Kabel and dem VGA Eingang des HTC Fernsehers.
Wechseln Sie mit der SOURCE Taste zu „PC-VGA“.
Hinweise:
1. Bevor Sie die Verbindung etablieren, bitte wechseln Sie die Auflösung des Compu-
ters zu einer der folgenden Auflösung: 640 x 480, 800 x 600 oder 1024 x 768.
2. Verbinden Sie die beiden Geräte und aktivieren Sie nun den PC-VGA Eingang des
HTC Fernsehers.
3. Sie können nun die optimale Auflösung des HTC Fernsehers an Ihrem Computer
einstellen.
• HTC 1525d —> 1280 x 800 Pixel
• HTC 1925d —> 1440 x 900 Pixel
• HTC 2225d —> 1680 x 1050 Pixel
Deutsch
9
Fernbedienung
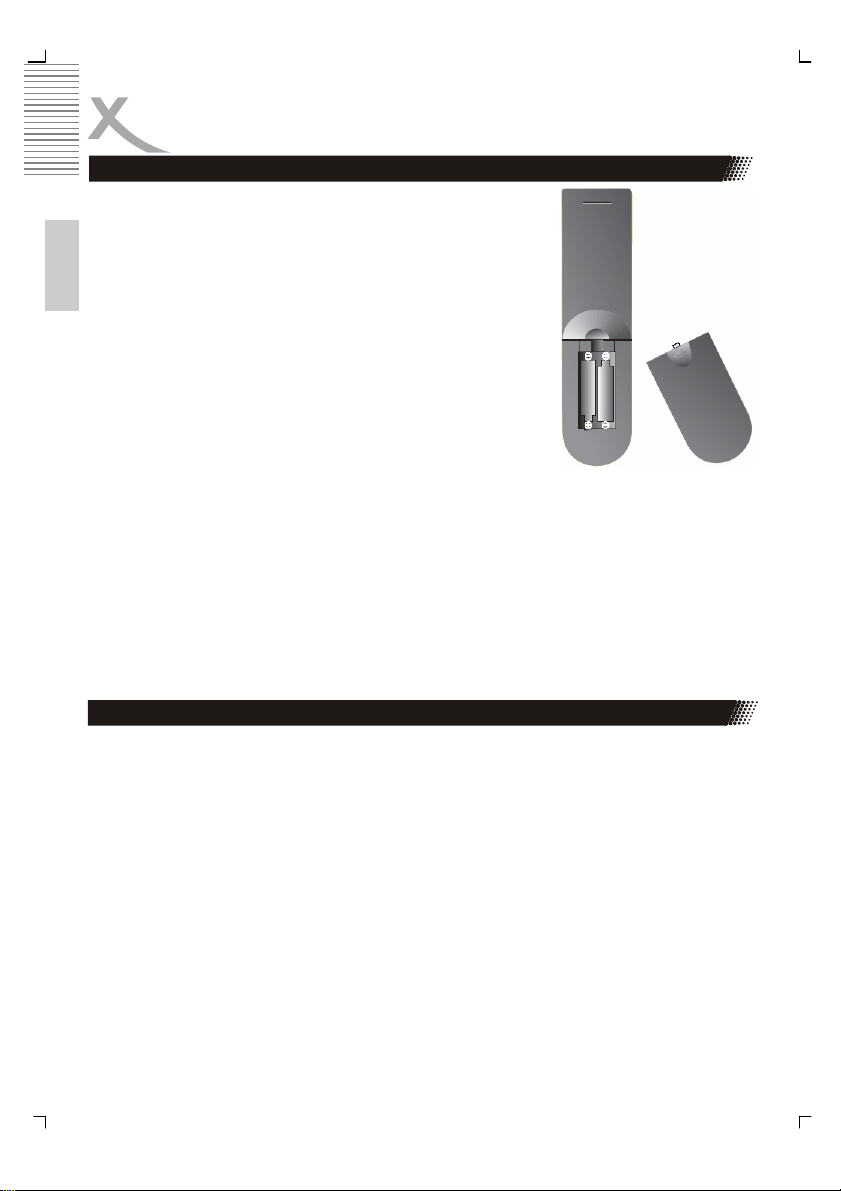
Einlegen der Batterien in die Fernbedienung
Um die Fernbedienung verwenden zu können, legen Sie die
Batterien in das Batteriefach.
1. Öffnen Sie das Batteriefach
2. Legen Sie die mitgelieferten Batterien ein und achten Sie
Deutsch
auf die richtige Ausrichtung der Polung.
3. Schließen Sie das Batteriefach.
Hinweise zu den Batterien
Falsche Behandlung der Batterien kann dazu führen, dass Batteriesäure austritt. Dies führt zu schädlicher Korrosion und möglicherweise zu einem dauerhaften Defekt an der Fernbedienung.
Beachten Sie daher folgende Regeln:
• Achten Sie immer auf eine korrekte Polung der Batterien.
Legen Sie diese nur so ein, wie im Batteriefach anhand der
Symbole + und - dargestellt
• Verwenden Sie nie zwei verschiedene Batterietypen und mischen Sie nie alte und neue
Batterien. Benutzen Sie ausschließlich AAA 1,5 V Batterien.
• Sollten Sie die Fernbedienung längere Zeit nicht benutzen, nehmen Sie bitte die Batte-
rien aus dem Batteriefach. So beugen Sie möglichen Korrosionsschäden vor.
• Arbeitet die Fernbedienung nicht korrekt oder nimmt Ihre Reichweite ab, tauschen Sie
die Batterien gegen neue aus.
• Sollten Batterien auslaufen, wischen Sie das Batteriefach aus und legen neue ein.
• Verbrauchte Batterien gehören nicht in den Hausmüll. Geben Sie verbrauchte Batterien
bei autorisierten Sammelstellen (im Handel oder an Servicestationen) ab.
Reichweite der Fernbedienung
Zeigen Sie mit der Fernbedienung auf den Infrarotsensor des Fernsehers und drücken Sie
die gewünschte Taste. Der maximale Abstand sollte nicht mehr als 5 Meter und der maximale Winkel nicht mehr als etwa 30° Grad in beiden Richtungen betragen.
Hinweise zur Fernbedienung
• Richten Sie die Fernbedienung auf den Infrarotempfänger des Gerätes.
• Vermeiden Sie eine Beschädigung der Fernbedienung durch Herunterfallen oder hefti-
ge Stöße.
• Legen Sie die Fernbedienung niemals an einen sehr heißen oder feuchten Platz.
• Schütten Sie keine Flüssigkeiten über die Fernbedienung. Öffnen Sie nie das Gehäuse
der Fernbedienung
• Achten Sie darauf, dass der Infrarotempfänger sich nicht im Einstrahlbereich direkten
Sonnenlichts oder einer starken Lampe befindet. Das Gerät könnte möglicherweise
sonst nicht mehr auf die Signale Ihrer Fernbedienung reagieren.
10
Fernbedienung
1.
2.
3.
4.
5.
6.
7.
8.
9.
10.
11.
12.
13.
14.
15.
16.
17.
18.
19.
20.
21.
22.
23.
24.
25.
26.
27.
28.
29.
30.
31.
32.
33.
34.
35.
36.
37.
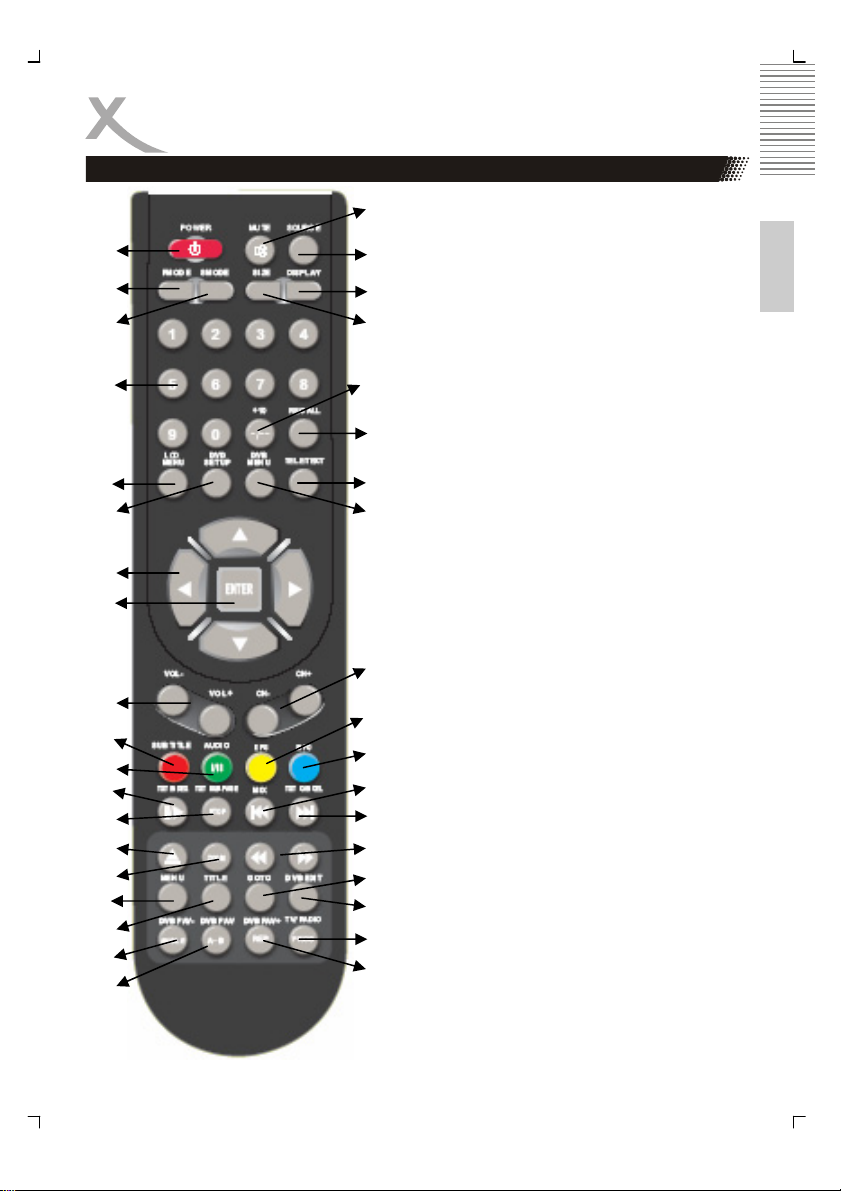
Tasten der Fernbedienung:
ATV: Analoger TV Tuner
DVB-T: Digitaler TV Tuner
DVD: DVD Player
1. An/Aus Schalter (POWER)
2. Bildmodus (PMODE)
3. Tonmodus (SMODE)
4. Numerische Tasten (0—9)
5. LCD Einstellungen (LCD MENU)
6. DVD Einstellungen (DVD SETUP)
7. Navigationskreuz
8. Bestätigen (ENTER)
9. Lautstärkeregelung (Vol- / Vol+)
10. ATV: Rote Teletext Taste; DVB-T:
Rote Teletext Taste und Untertitel;
DVD: Untertitel Taste
11. ATV: Grüne Teletext Taste und
NICAM; DVB-T: Grüne Teletext
Taste und Audio Taste; DVD: Audio
Taste
12. ATV: Teletext Index Taste; DVD:
Abspielen / Pause
13. ATV: Teletext Unterseite Taste;
DVD: Stopp
14. DVD: Öffnen / Schließen
15. DVD: Vergrößern
16. DVD: Video DVD Menü
17. DVD: Video DVD Titelmenü
18. DVB-T: Favoritenprogramm -; DVD:
Kamerawinkel
19. DVB-T: Favoriten; DVD: A-B Segment Wiedergabe
20. Stumm (MUTE)
21. Quelle (SOURCE)
22. Seitenverhältnis 4:3 / 16:9 (SIZE)
23. Quellenangabe
24. Wechsel von einstelligen zu zweistelligen Kanalnummern (-/—)
25. Letzter Sender (RECALL)
26. Teletext in ATV und DVB-T
27. DVB-T Einstellungen (DVB MENU)
Weitere Beschreibungen auf der
nächsten Seite!
Deutsch
11
Fernbedienung
1.
2.
Deutsch
3.
4.
5.
6.
7.
8.
9.
10.
11.
12.
13.
14.
15.
16.
17.
18.
19.
20.
21.
22.
23.
24.
25.
26.
27.
28.
29.
30.
31.
32.
33.
34.
35.
36.
37.
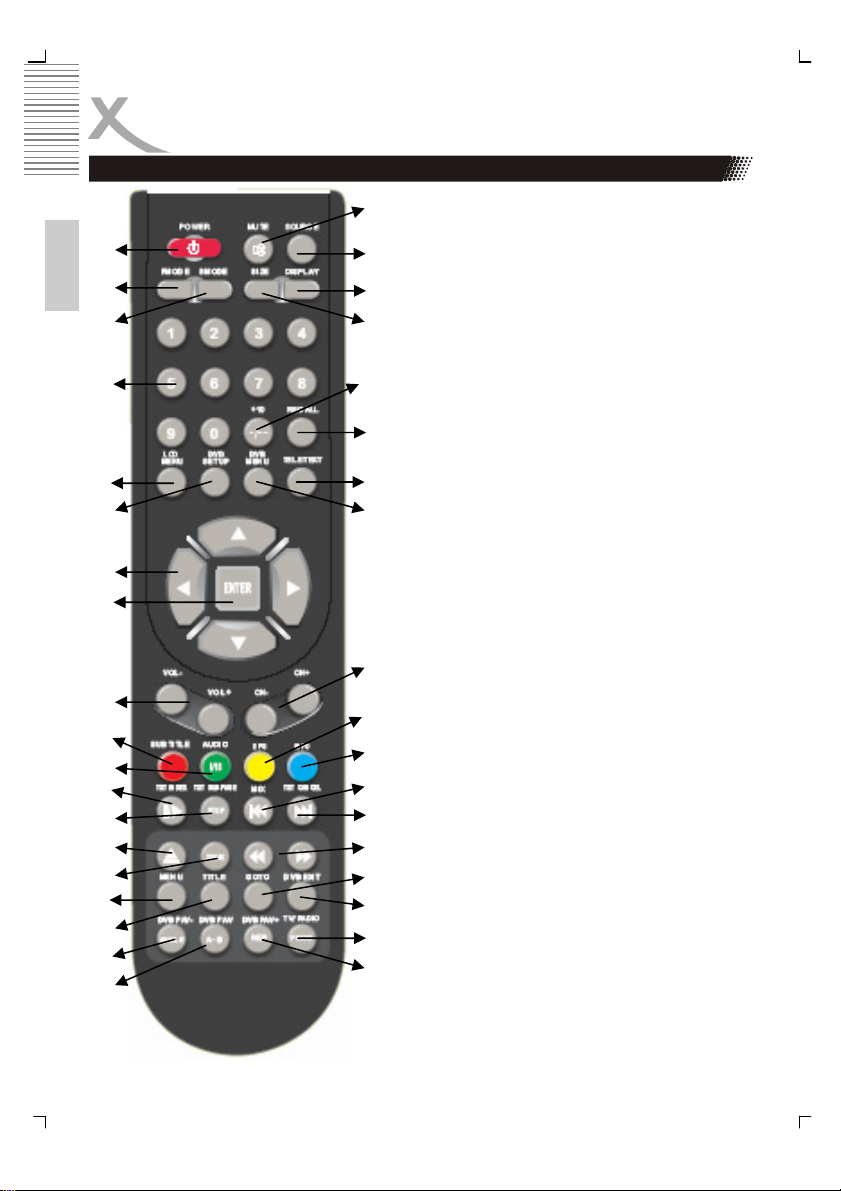
Tasten der Fernbedienung:
ATV: Analoger TV Tuner
DVB-T: Digitaler TV Tuner
DVD: DVD Player
28. Kanalwechsel ATV und DVB-T (CH/ CH+)
29. ATV: Gelbe Teletext Taste; DVB-T:
EPG und gelbe Teletext Taste
30. ATV: Blaue Teletext Taste; DVB-T:
Informationsanzeige und blaue
Teletext Taste; DVD: Informationsanzeige
31. ATV: Teletext Mix Darstellung;
DVD: vorheriges Kapitel / Stück
32. ATV: Teletext beenden; DVD:
Nächstes Kapitel / Stück
33. DVD: Schneller Rück– bzw. Vorlauf
(<< / >>)
34. DVD: Gehe zu Taste (GOTO)
35. DVB-T: Beenden DVB-T Einstellungen
36. DVB-T: Wechsel zwischen TV und
Radiokanälen
37. DVB-T: Favoritenprogramm +; DVD:
Programm
12
LCD Menü
Bei allen nachfolgend erwähnten Tasten können sowohl das Bedienelement direkt am Gerät
als auch die Fernbedienung verwendet werden.
Zum Anzeigen der Menüs drücken Sie die Taste LCD MENU. Dadurch wird entweder:
• das VIDEO-Menü angezeigt, wenn das Gerät auf TV, AV, S-Video, SCART, DVB-T,
DVD
• das PC-Menü angezeigt, wenn das Gerät auf PC-RGB
• Das HDMI Menü, wenn das Gerät auf HDMI
geschaltet ist.
Wenn Sie die Taste LCD MENU erneut drücken, können nacheinander folgende Menüs
aufgerufen werden:
• das AUDIO-Menü
• das TV-Menü (nur wenn auf TV geschaltet)
• das Menü GENERAL (Allgemein)
• Abschalten der Menüs.
Um einen Menüpunkt auszuwählen (z.B. COLOUR (Farbe)), scrollen Sie mit den Tasten
CH+ und CH- durch die Liste.
• Wenn ein Menüpunkt markiert ist, können Sie die Einstellung mit den Tasten VOL+ und
VOL- ändern.
Deutsch
Nachdem Sie die Einstellungen geändert haben, können Sie das Menü folgendermaßen
verlassen:
• Warten Sie 15 Sekunden, ohne eine Taste zu drücken;
• Drücken Sie die Taste LCD MENU mehrmals hintereinander, bis die Menüs ausge-
schaltet sind.
13

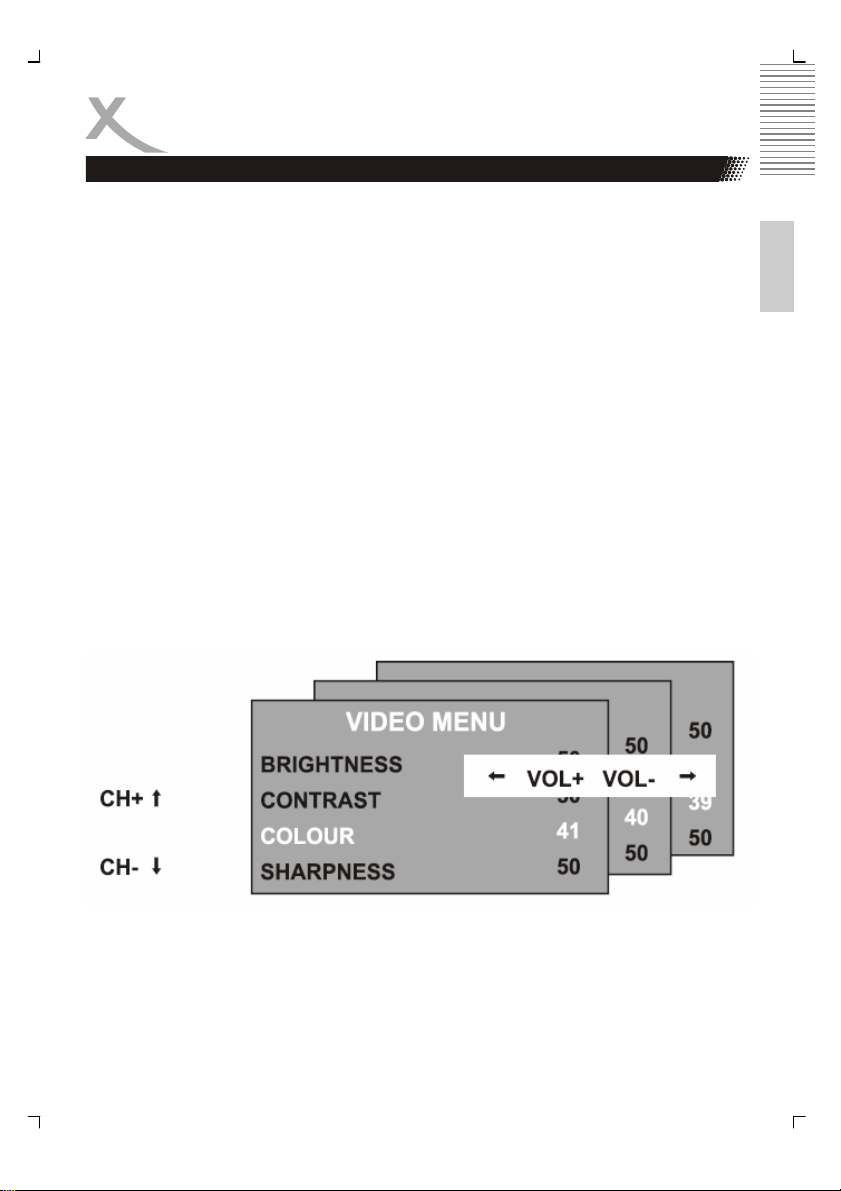
LCD Menü
Beim ersten Drücken der Taste LCD MENU wird das VIDEO-Menü gezeigt, wenn das Gerät
auf TV, AV, S-Video, SCART, DVD oder DVB-T geschaltet ist. Im Video Menü können Sie
die Helligkeit, den Kontrast, die Farbtemperatur oder die Schärfe einstellen.
Helligkeit (Brightness)
Deutsch
Mit den Tasten VOL+ und VOL- wird die
Helligkeit des Bildes eingestellt.
Kontrast (Contrast)
Mit den Tasten VOL+ und VOL- wird der
Kontrast des Bildes eingestellt.
Farbe (Colour)
Mit den Tasten VOL+ und VOL- wird die
Farbe des Bildes eingestellt.
Schärfe (Sharpness)
Mit den Tasten VOL+ und VOL- wird die
Bildschärfe eingestellt.
PC-Menü
Ist der LCD über VGA an einem Computer (PC) oder einer anderen Quelle mit VGA verbunden, so wird bei dem Drücken der LCD Menü (Menu)-Taste das PC-Menü aufgerufen.
Helligkeit (Brightness)
Mit den Tasten VOL+ und VOL- wird die
Helligkeit des Bildes eingestellt.
Kontrast (Contrast)
Mit den Tasten VOL+ und VOL- wird der
Kontrast des Bildes eingestellt.
Farbeinstellung (Colour Setting)
Mit den Tasten VOL+ und VOL- können Sie
zwischen den Einstellungen 6500k, 9300k
oder USER (BENUTZER) auswählen.
Bei Auswahl von USER (BENUTZER) können Sie mit den Tasten VOL+ und VOL- die
Rot-, Grün- und Blau-Werte einzeln einstellen. Drücken Sie die Taste LCD MENU,
wenn Sie mit den Einstellungen fertig sind.
14
LCD Menü
PC-Menü
Autom. Konfiguration (Auto Configure)
Mit der Taste VOL+ können Sie die folgenden Einstellungen automatisch konfigurieren:
Horizontale und vertikale Position
Mit den Tasten VOL+ und VOL- können Sie die Position des Bildes auf dem Bildschirm einstellen.
Phase
Mit den Tasten VOL+ und VOL- wird die Phase der ADC-Sampling-Uhr im Verhältnis zum
H-Sync-Signal einstellt, bis ein stabiles, klares und schärferes Bild erreicht wird.
Takt (Clock)
Mit den Tasten VOL+ und VOL- wird die Pixeluhrfrequenz so lange eingestellt, bis die Bildgröße für den Bildschirm maximiert wurde. Diese Einstellung kann Streifen oder Balken
reduzieren bzw. entfernen.
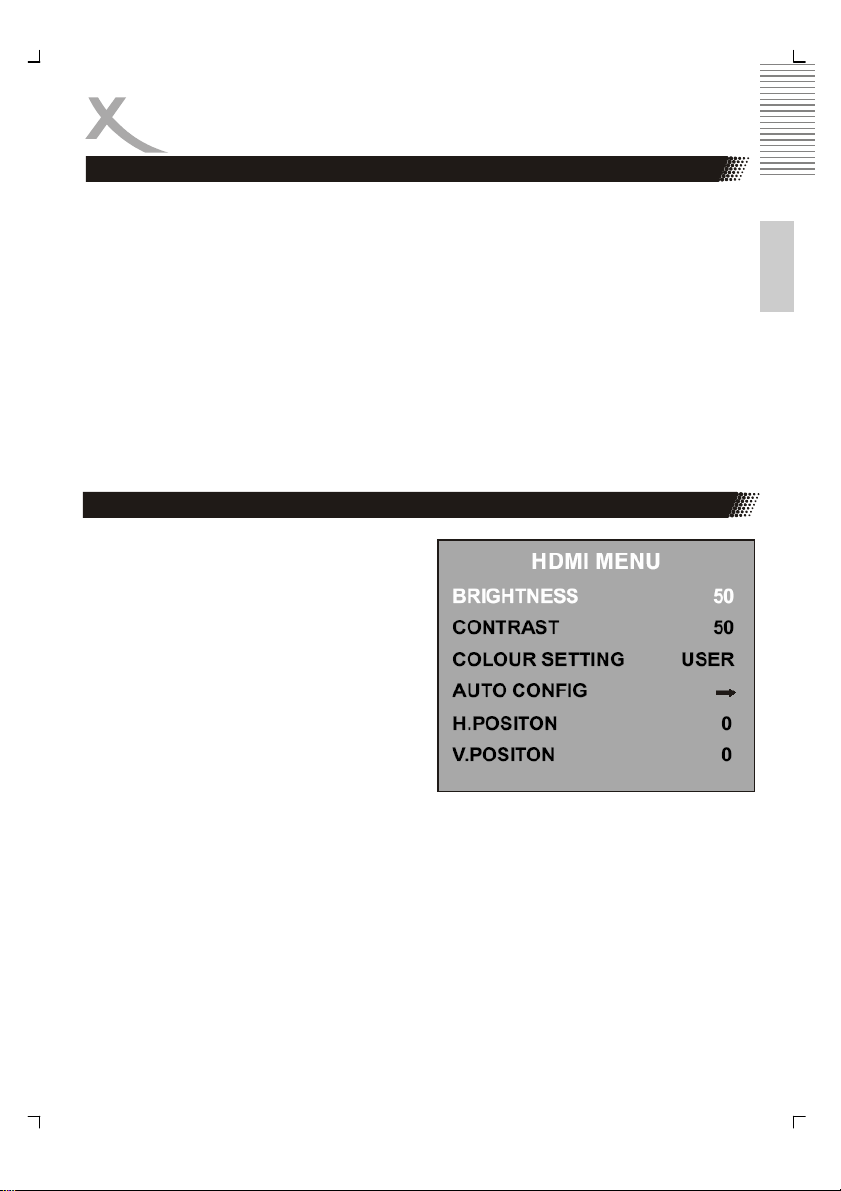
HDMI-Menü
Ist der LCD über HDMI an einem Computer
(PC) oder einer anderen Quelle (DVD-Player,
Settopbox) mit HDMI verbunden, so wird bei
dem Drücken der LCD Menü (Menu)-Taste das
HDMI-Menü aufgerufen.
Helligkeit (Brightness)
Mit den Tasten VOL+ und VOL- wird die
Helligkeit des Bildes eingestellt.
Kontrast (Contrast)
Mit den Tasten VOL+ und VOL- wird der
Kontrast des Bildes eingestellt.
Farbeinstellung (Color Setting)
Mit den Tasten VOL+ und VOL- können Sie zwischen den Einstellungen 6500k, 9300k oder
USER (BENUTZER) auswählen.
Bei Auswahl von USER (BENUTZER) können Sie mit den Tasten VOL+ und VOL- die Rot-,
Grün- und Blau-Werte einzeln einstellen. Drücken Sie die Taste LCD MENU, wenn Sie mit
den Einstellungen fertig sind.
Autom. Konfiguration (Auto Configure)
Mit der Taste VOL+ können Sie die folgenden Einstellungen automatisch konfigurieren:
Horizontale und vertikale Position
Mit den Tasten VOL+ und VOL- können Sie die Position des Bildes auf dem Bildschirm einstellen.
Deutsch
15
LCD Menü
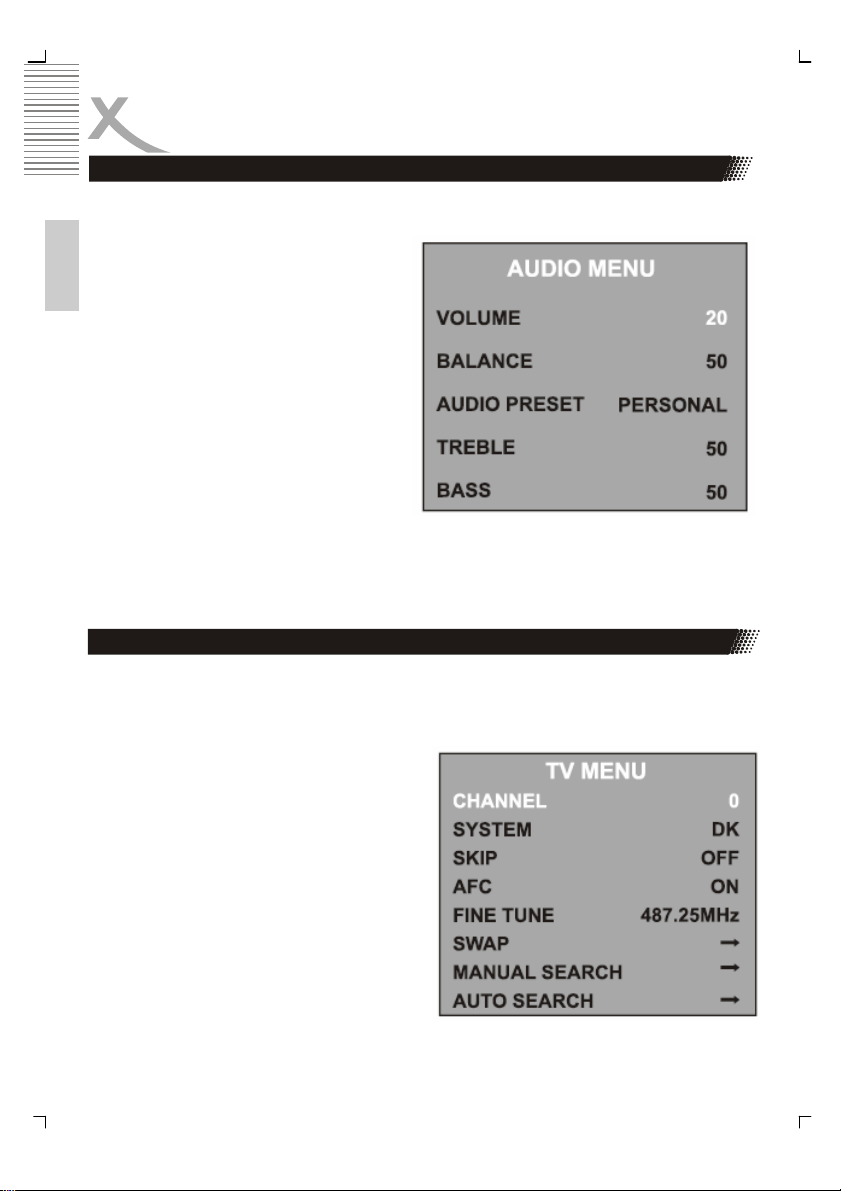
Audio-Menü
Drücken Sie die Taste LCD MENU erneut, um das AUDIO-Menü aufzurufen.
Lautstärke (Volume)
Mit den Tasten VOL+ und VOL- wird die
Klanglautstärke eingestellt.
Deutsch
Balance
Mit den Tasten VOL+ und VOL- können Sie
die Links-/Rechtsbalance des Tons einstellen.
Audio-Voreinstellung (Audio Preset)
Mit den Tasten VOL+ und VOL- können Sie
zwischen den Einstellungen PERSONAL
(PERSÖNLICH), VOICE (SPRACHE), MUSIC (MUSIK) oder THEATRE (KINO)
auswählen.
Höhe (Treble) und Bass
Mit den Tasten VOL+ und VOL- lässt sich die Klangfarbe ändern.
Hinweis:
Bass– und Höheneinstellungen sind nur bei der persönlichen Einstellung verfügbar.
TV-Menü
Wenn Sie die Taste LCD MENU erneut drücken, wird das TV-Menü aufgerufen (nur wenn
auf TV geschaltet).
Kanal (Channel): Mit den Tasten VOL+ und VOL- können Sie einen Kanal auswählen.
System: Mit den Tasten VOL+ und VOL-
können die Anzeigesysteme DK, BG I oder L
TV ausgewählt werden.
Überspringen (Skip): Mit den Tasten VOL+
und VOL- kann der Kanalsprung aktiviert werden:
• ON - der Kanal wird übersprungen, wenn
Kanäle mit den CH-Tasten gewechselt
werden.
• OFF - der Kanal wird beim Wechseln von
Kanälen mit den CH-Tasten berücksichtigt.
AFC: Automatische Frequenzkontrolle
AFC wird mit den Tasten VOL+ und VOL- ein- bzw. ausgeschaltet.
16
LCD Menü
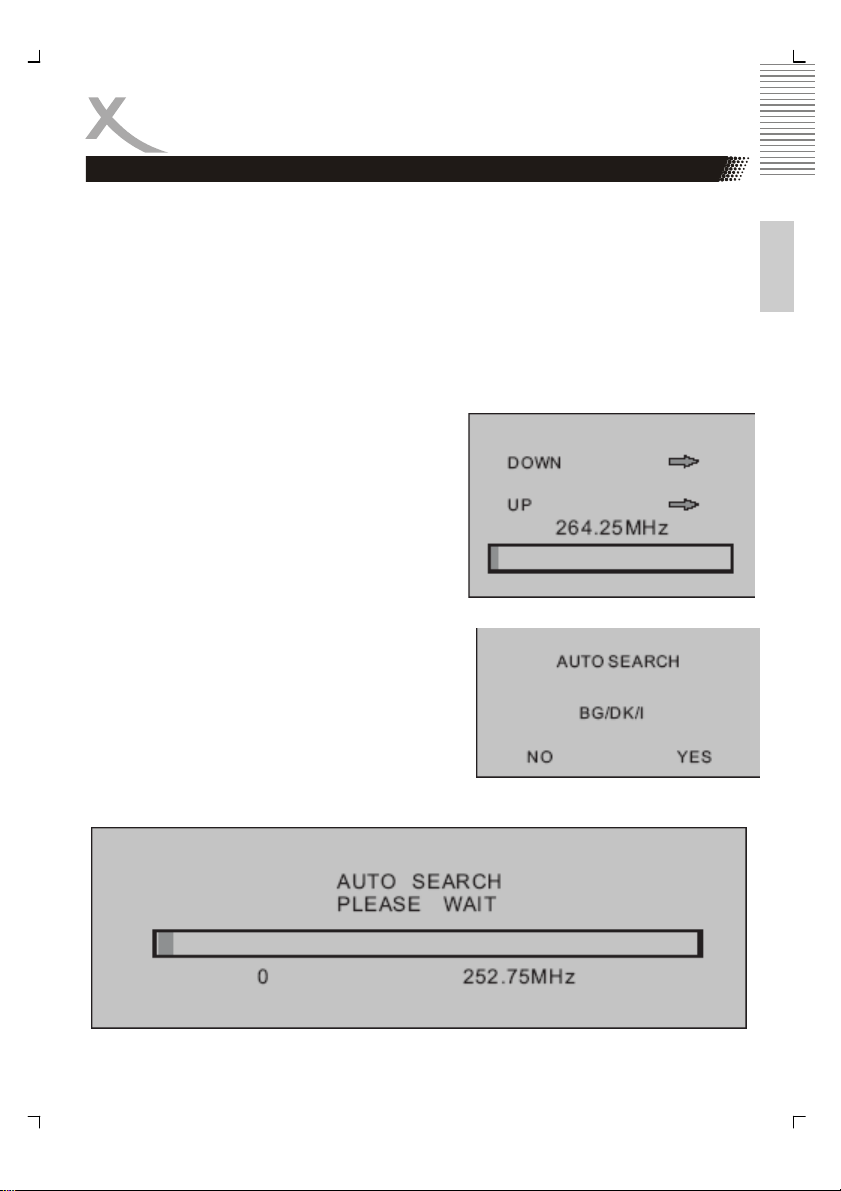
TV-Menü
Feineinstellung (Fine Tune):
Sie können mit den Tasten VOL+ und VOL- die Frequenz fein einstellen, wenn der aktuelle
Kanal ein schwaches Signal aufweist. Bei Verwendung der Feineinstellungssteuerungen
wird AFC abgeschaltet.
Tauschen (SWAP):
Rufen Sie mit der Taste VOL+ dieses Menü auf; drücken Sie VOL+/-, um den Kanal auszuwählen, zu dem das Programm vom Menü “FROM” (Von) hinzugefügt werden soll, und dann
die Taste CH-, um zum Menü “TO” (Nach) zu wechseln. Wählen Sie mit der Taste VOL+/-
den Kanal aus, dessen Programm Sie sehen möchten, und bestätigen Sie die Eingabe mit
der Taste VOL+/-.
Manuelle Suche (Manual Search):
Drücken Sie die Taste VOL+ einmal bzw. zweimal,
um zwischen Aufwärts bzw. Abwärts auszuwählen.
Mit der Taste LCD MENU wird die manuelle Sendersuche gestartet. Wenn die Suche abgeschlossen
ist, wird der erste gefundene Sender dem aktuellen
Kanal zugewiesen.
Automatische Suche (Auto Search ):
Drücken Sie die Taste VOL+ einmal. Wählen Sie mit
VOL+ oder VOL- den Modus DK/BG/I oder SECAM L
aus, und drücken Sie anschließend CH+ und CH-
zum Auswählen von „Ja“ oder „Nein“. Bestätigen Sie
Ihre Angabe mit der Taste LCD MENU. Die automatische Sendersuche wird gestartet. Wenn die Suche
beendet ist - z. B. wenn 12 Sender gefunden wurden
-, werden diese den ersten (12) Kanälen zugewiesen.
Deutsch
17
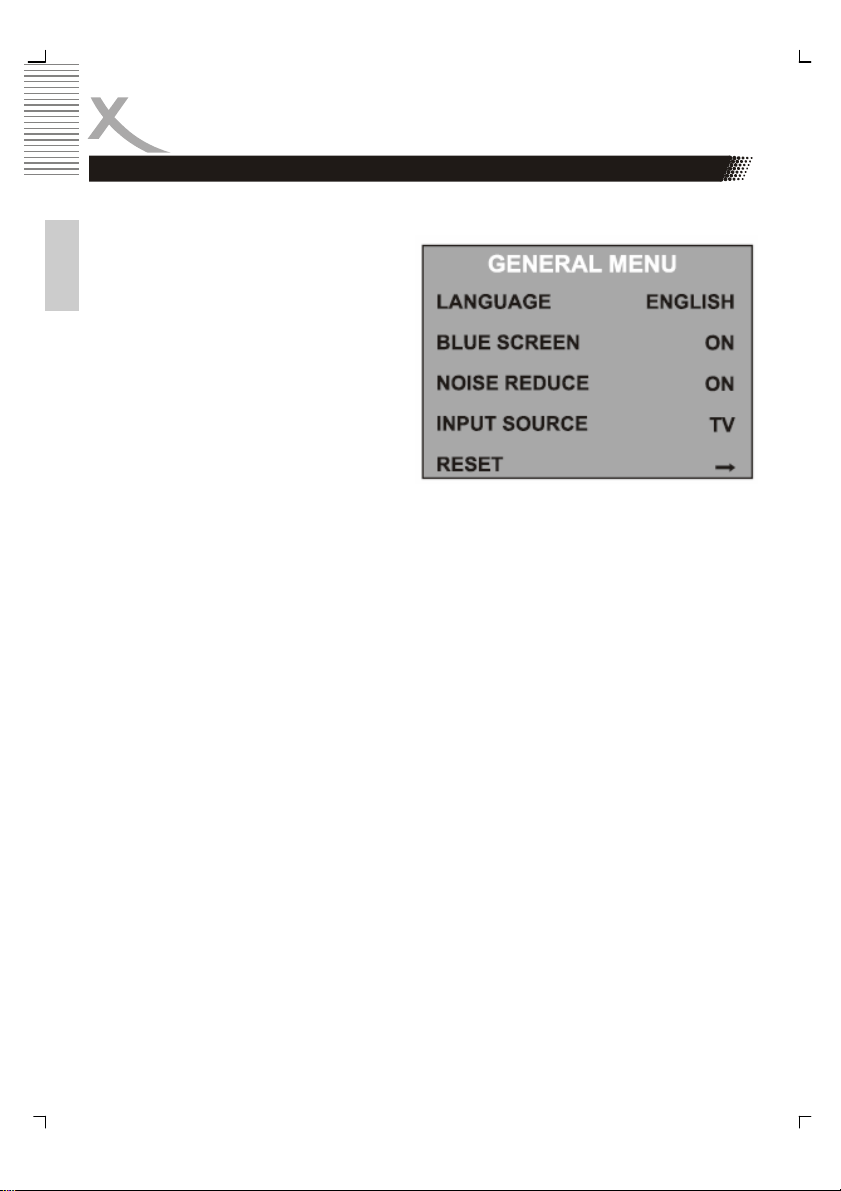
LCD Menü
Allgemeines-Menü
Drücken Sie die Taste LCD MENU erneut, wird das Menü GENERAL (Allgemein) aufgerufen.
Sprache (Language)
Mit den Tasten VOL+ und VOL- können Sie
Deutsch
aus einer Reihe europäischer Sprachen
auswählen.
Blauer Bildschirm (Blue Screen)
Mit den Tasten VOL+ und VOL- aktivieren
Sie den blauen Bildschirm:
• ON (Ein) - der Bildschirm wird blau,
wenn kein Signal anliegt.
• OFF (Aus) - der blaue Bildschirm
wird abgeschaltet.
Rauschunterdrückung (Noise Reduce)
Mit den Tasten VOL+ und VOL- wird das Rauschunterdrückungssystem aktiviert:
• ON (Ein) - Reduzieren des Rauschens, wenn der Empfang schlecht ist
• OFF (Aus) - Verbessern der Bild- und Tonqualität, wenn der Empfang gut ist
Eingangsquelle (Input Source)
Mit den Tasten VOL+ und VOL- wählen Sie aus, welche Eingangsquelle verwendet werden
soll:
TV, SCART, PC-RGB, AV, S-Video, HDMI, DVB-T und DVD.
Zurücksetzen (Reset)
Drücken Sie die Taste VOL+, um das Gerät auf die Werkseinstellungen zurückzusetzen.
Alle Einstellungen aus den VIDEO-, PC- und AUDIO-Menüs und „Blue Screen“ (Blauer Bildschirm) aus dem Menü GENERAL (Allgemein) werden auf die Einstellungen zurückgesetzt,
die in dieser Bedienungsanleitung gezeigt werden.
18
Problembehandlung
Lesen Sie bitte die folgenden Informationen, um die mögliche Ursache zu einem Problem
herauszufinden, bevor Sie sich an den Kundendienst wenden.
• Technischer Kundendienst von Xoro/MAS: Tel.:: 040/77 11 09 17
• Internet: www.xoro.de/support.htm
Problem Lösung
TV lässt sich nicht
einschalten
Kein Bild
Kein Ton
Bild weist falsche
Farben auf
Das Bild ist instabil bei
Nutzung mit einem PC
• Überprüfen Sie, ob das Stromkabel korrekt an der Steckdose
und dem Stromadapter angeschlossen ist.
• Überprüfen Sie, ob das Kabel des Stromadapters korrekt am
TV-Gerät angeschlossen ist.
• Der elektronische Schaltkreis wurde evtl. zurückgesetzt.
Ziehen Sie den Stecker heraus, warten Sie 1 Minute, und
schließen Sie dann den Stecker wieder an.
• Überprüfen Sie, ob das Antennenkabel korrekt angeschlos-
sen ist.
• Überprüfen Sie, ob der korrekte Eingang ausgewählt wurde;
verwenden Sie die Taste SOURCE oder das Menü GENERAL (Allgemein).
• Überprüfen Sie die Helligkeits- und Kontrasteinstellungen im
VIDEO- oder PC-Menü.
• Überprüfen Sie, ob der Ton ausgeschaltet oder die Stumm-
schaltung aktiviert ist (MUTE).
• Prüfen Sie, ob die Audio-Kabel an den korrekten Eingängen
angeschlossen sind.
• Prüfen Sie, ob der korrekte Eingang ausgewählt ist; verwen-
den Sie die Taste SOURCE oder das Menü GENERAL
(Allgemein).
• Überprüfen Sie, ob die Einstellungen im PC-Menü mit den
Video-Ausgangseinstellungen des PCs übereinstimmen.
Deutsch
Es gibt einige farbige
Punkte auf dem Bildschirm
Bild falsch gestreckt
• Hochauflösende LCD-Bildschirme weisen häufig einige, weni-
ge fehlerhafte Pixel auf.
• Dies ist normal und innerhalb der Grenzen unserer Qualitäts-
kontrollen.
• Der LCD befindet sich im falschen Anzeigemodus. Bitte betä-
tigen Sie die Size-Taste um das Anzeigeformat von 16:9 auf
4:3 zu ändern.
19
DVB-T Modus
Vergewissern Sie sich, dass Sie zuvor das richtige DVB-Eingangssignal eingestellt haben.
Bitte wechseln Sie in den DVB-T Modus:
1. Schalten Sie das Gerät an.
2. Drücken Sie die SOURCE Taste mehrmals,
Deutsch
bis oben rechts „DVB“ erscheint.
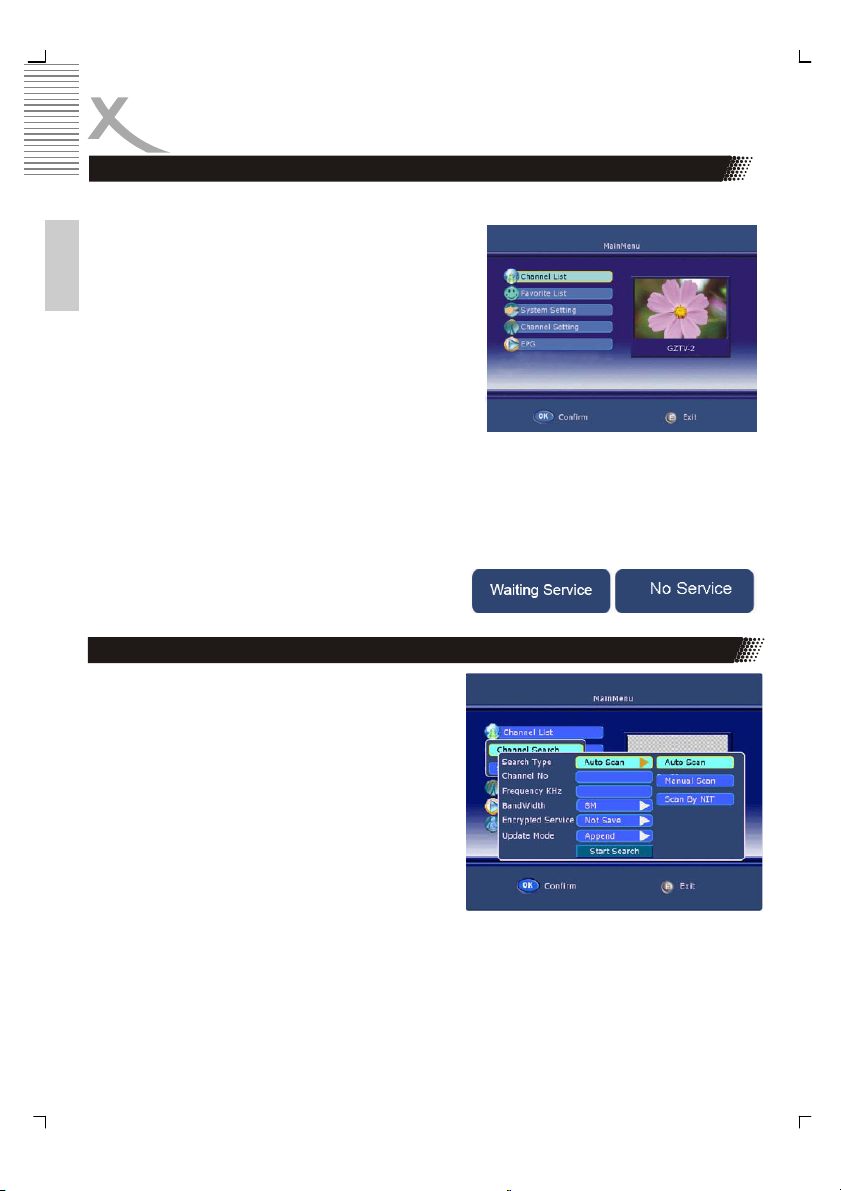
Aufrufen des Hauptmenüs
• Betätigen Sie die DVB MENÜ-Taste auf der
Fernbedienung zum Aufrufen des Hauptmenüs auf dem Bildschirm. Betätigen Sie die
Taste erneut, um zum vorigen Menü oder zur
Fernsehanzeige zurückzukehren.
Benutzung des OSD-Menüs
1. Benutzen Sie ▲/▼, um das jeweilige Einstellungsmenü zu aktivieren.
2. Betätigen Sie ► und benutzen Sie dann ▲/▼/◄/► zur Auswahl und Einstellung der
jeweiligen Menüpunkte.
3. Betätigen Sie die DVB MENÜ-Taste, um in das vorige Menü zurückzukehren und
betätigen Sie EXIT, um zur Fernsehanzeige zurückzukehren.
4. Betätigen Sie Enter zur Bestätigung Ihrer Einstellungen.
Waiting SERVICE oder NO SERVICE
Es ist in diesem Fall kein Signal oder Dienst vorhanden.
Programmeinstellung
Bei der Erstinstallation müssen die TV Programme
gesucht werden. Navigieren Sie mit den Pfeilasten
zu Programmeinstellung (Channel Setting) und
aktivieren Sie das Menü mit der ENTER Taste .
Wählen Sie die Option „Programmsuche“ aus.
Programmsuche (Channel Search)
Benutzen Sie ▲/▼ zur Auswahl von Channel
Search und betätigen Sie die Enter-Taste zur
Bestätigung. Standardeinstellung ist „AUTO“
Typ Suchlauf (Search Type)
Betätigen Sie ► und benutzen Sie ▲/▼ zur Auswahl einer der folgenden Sucharten: Auto Scan,
Manual Scan und Scan By NIT.
Programm (Channel No.)
Geben Sie direkt eine Kanalnummer ein. Der gültige Kanalbereich liegt zwischen 0 und – 69.
20
DVB-T Modus
Frequenz
Mithilfe dieser Funktion können Sie die Frequenz der
jeweiligen Kanäle anzeigen.
Bandweite
Betätigen Sie ► und benutzen Sie ▲/▼ zur Auswahl
einer der folgenden Frequenzbandoptionen: 6M/ 7M/
8M.
Encrypted Service
Betätigen Sie ► und benutzen Sie ▲/▼ zur Auswahl
einer der folgenden Optionen für verschlüsselte
Dienste: Save / Not Save.
Update Mode
Betätigen Sie ► und benutzen Sie ▲/▼ zur Auswahl einer der folgenden Aktualisierungsoptionen: Append / Replace.
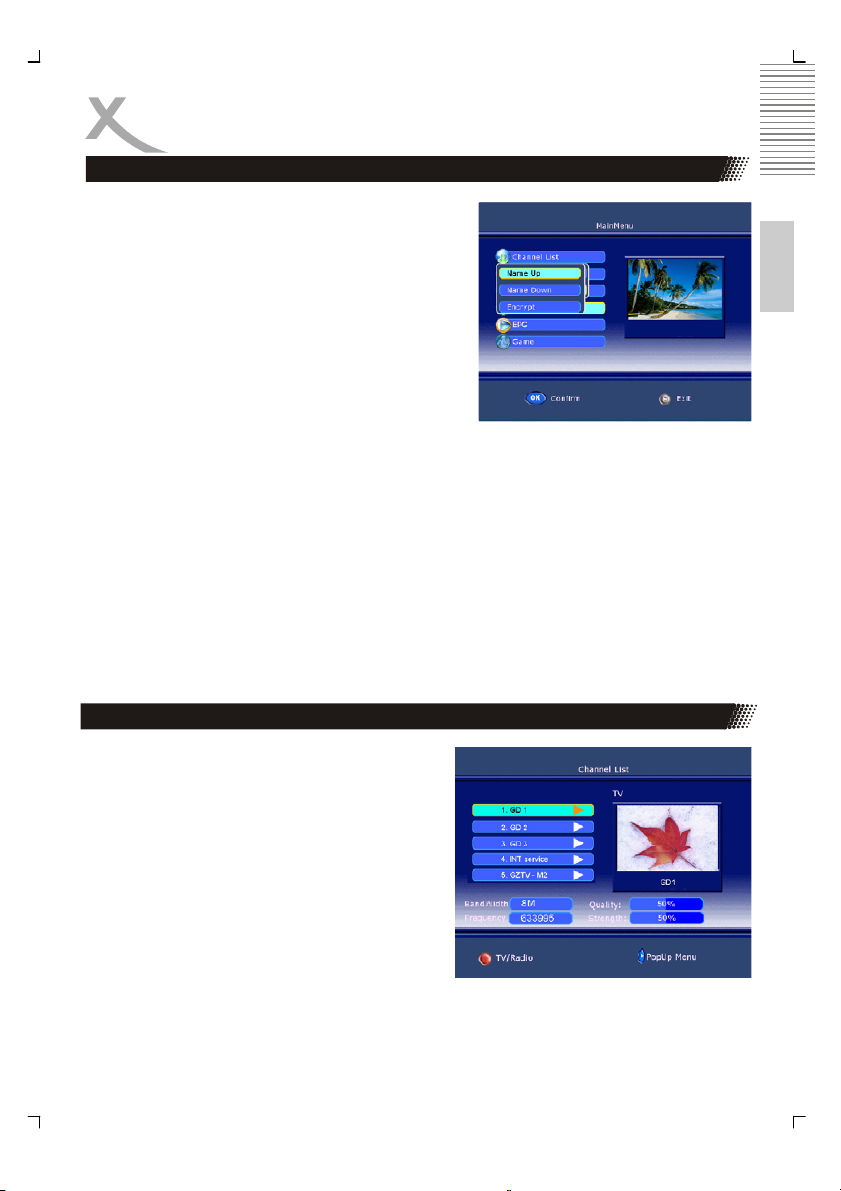
Sort Channel
Benutzen Sie ▲/▼ zur Auswahl von Sort Channel und betätigen Sie die Enter-Taste zur
Bestätigung.
• Name UP – Betätigen Sie die Enter-Taste zum alphabetischen Sortieren der Kanä-
le.
• Name Down – Betätigen Sie die Enter-Taste zum umgekehrten alphabetischen
Sortieren der Kanäle.
• Encrypt – Betätigen Sie die Enter-Taste zum Sortieren der Kanäle nach Verschlüs-
selung.
Deutsch
Programmliste
Kanalliste
1. Betätigen Sie die DVB MENÜ-Taste auf
der Fernbedienung zum Aufrufen des
Hauptmenüs auf dem Bildschirm. Benutzen Sie ▲/▼ zur Auswahl des Channel
List-Menüs.
2. Betätigen Sie die Enter-Taste zur Bestäti-
gung Ihrer Auswahl und das Channel
List-Menü wird auf dem Bildschirm angezeigt.
3. In diesem Menü befindet sich eine Liste
der DVB-T-Dienste. Es werden Ihnen
außerdem Frequenzband, Qualität, Frequenz und Signalstärke des aktuellen
Dienstes angezeigt.
4. Benutzen Sie ▲/▼ zur Auswahl des gewünschten Kanal und betätigen Sie►, um
den Kanal zu löschen, bewegen, sperren oder freizugeben.
21
DVB-T Modus
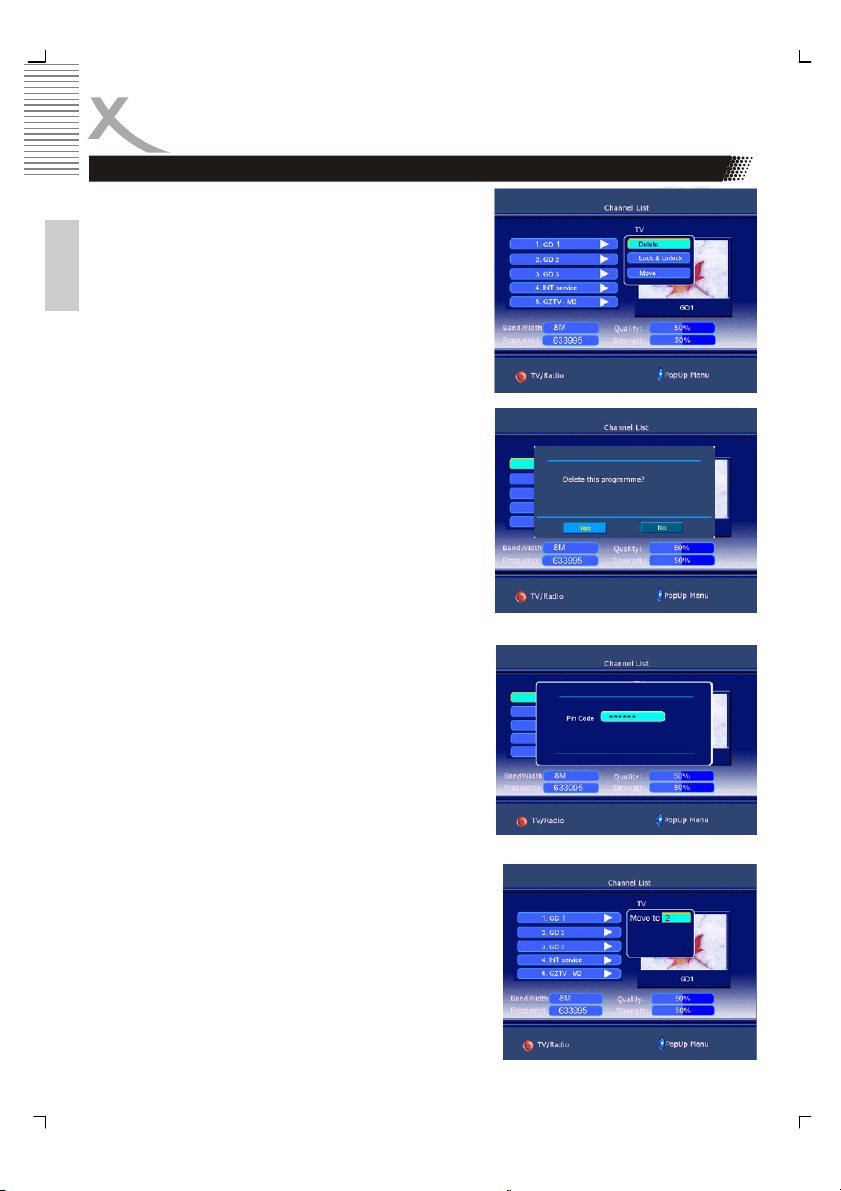
Programmliste
Delete
1. Benutzen Sie ▲/▼ zur Auswahl von Löschen
(Delete) und betätigen Sie die Enter-Taste zur
Bestätigung. Das Löschmenü wird entspre-
Deutsch
chend angezeigt (siehe Abbildung unten):
2. Betätigen Sie die Enter-Taste zum Löschen
des Kanal und betätigen Sie die DVB MENÜTaste, um in das vorige Menü zurückzukehren.
3. Wenn Sie den gelöschten Kanal wieder zur
Liste hinzufügen wollen, müssen Sie eine erneute Suche durchführen.
Sperren & Entsperren (Lock & Unlock)
1. Benutzen Sie ▲/▼ zur Auswahl von Lock &
Unlock und betätigen Sie die Enter-Taste zur
Bestätigung. Sie werden aufgefordert, eine PINNummer einzugeben.
2. Geben Sie die PIN direkt über die Zifferntasten
ein. Die PIN besteht aus 6 Ziffern und ist werksmäßig auf 888888 gestellt. Sie können die PIN
unter System Setting (Systemeinstellungen)
verändern.
3. Wenn ein Kanal bereits gesperrt wurde, müssen Sie ggf. die PIN eingeben.
Verschieben (Move)
1. Mit der Verschieben-Funktion können Sie die Reihenfolge der Kanalliste verändern.
22
DVB-T Modus
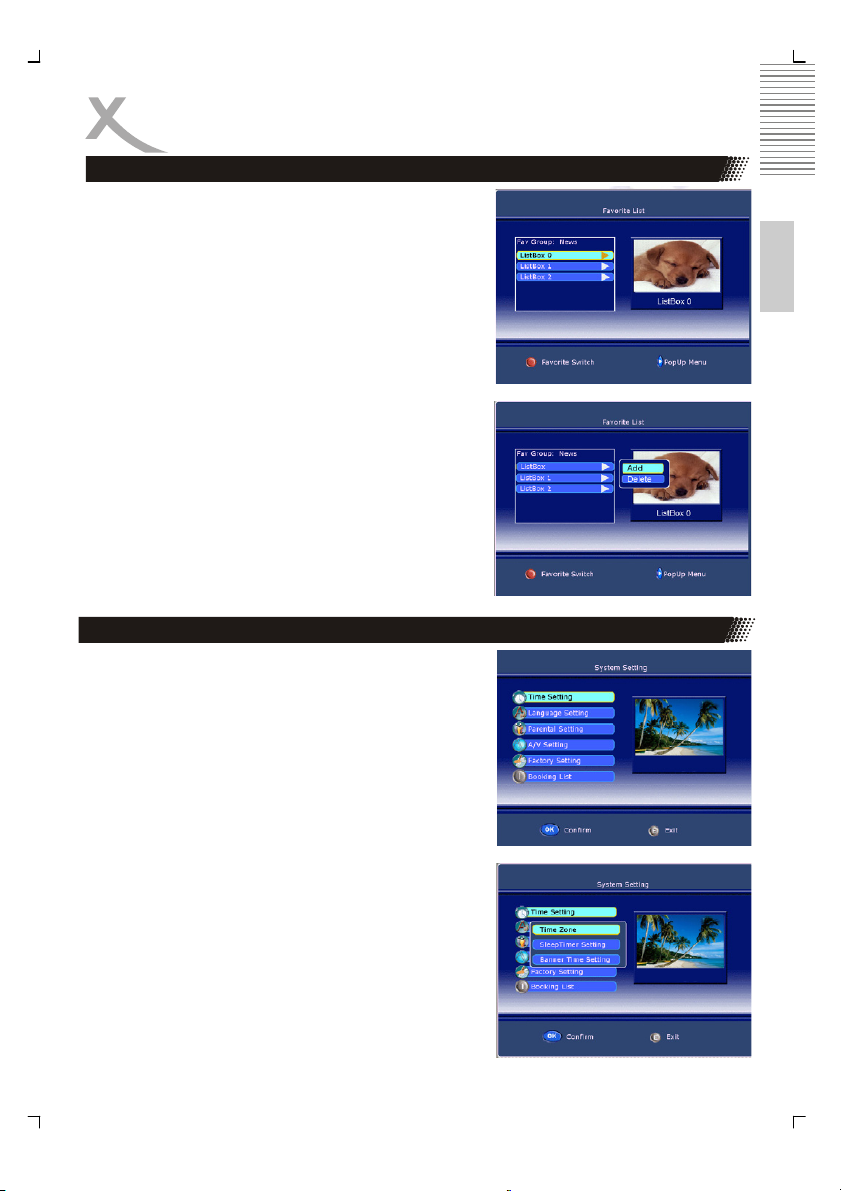
Favoritenliste
1. Betätigen Sie die DVB MENÜ-Taste auf der
Fernbedienung zum Aufrufen des Hauptmenüs
auf dem Bildschirm. Benutzen Sie ▲/▼ zur
Auswahl des Favorite List-Menüs.
2. Betätigen Sie die Enter-Taste zur Bestätigung
Ihrer Auswahl und das Favorite List-Menü wird
auf dem Bildschirm angezeigt.
3. Betätigen Sie ► zum Hinzufügen oder Löschen
bevorzugter Kanäle.
4. Benutzen Sie ▲/▼ zur Auswahl eines Kanals
und betätigen Sie die Enter-Taste zur Bestätigung. Auf der rechten Seite wird eine Kanalliste
angezeigt. Sie können ▲/▼ zur Auswahl benutzen und den gewünschten Kanal mit der EnterTaste bestätigen.
5. Betätigen Sie die DVB MENÜ-Taste, um in das
vorige Menü zurückzukehren. Durch Betätigung
der Enter-Taste können Sie dann zum Fernsehmodus zurückkehren.
Systemeinstellungen
Betätigen Sie die DVB MENÜ-Taste auf der Fernbedienung oder auf der Gerätevorderseite zum Aufrufen des
Hauptmenüs auf dem Bildschirm. Benutzen Sie ▲/▼
zur Auswahl des Systemeinstellung-Menüs. Betätigen
Sie die Enter-Taste zur Bestätigung Ihrer Auswahl und
das Systemeinstellung-Menü wird auf dem Bildschirm
angezeigt.
Zeiteinstellung (Time Setting)
Benutzen Sie ▲/▼ zur Auswahl von Zeiteinstellung
und betätigen Sie die Enter-Taste zur Bestätigung.
Zeitzone (Time Zone)
Benutzen Sie ▲/▼ zur Auswahl von Zeitzone und betätigen Sie die Enter-Taste zur Bestätigung. Sie können
die Zeitzonen GMT+0 bis +8 einstellen.
Einblendzeit (Banner Time Setting)
Diese Funktion ermöglicht Ihnen die
zustellen. Benutzen Sie ▲/▼ zur Auswahl einer der
folgenden Zeiteinstellungen: 1 secs/ 3 secs / 5 secs/ 7
secs/ 9 secs.
Einblendzeit ein-
Deutsch
23

DVB-T Modus
Systemeinstellungen
Spracheinstellungen (Language Setting)
Benutzen Sie ▲/▼ zur Auswahl von Spracheinstellung und betätigen Sie die Enter-Taste zur Bestäti-
gung. Die Unteroptionen sind Menü und Audio.
Menü
Deutsch
Diese Funktion ermöglicht Ihnen die OSD-Menü Spra-
che einzustellen. Benutzen Sie ▲/▼ zur Auswahl einer
der folgenden Sprachen: Englisch / Französisch /
Deutsch / Spanisch / Italienisch
Audio Sprache
Diese Funktion ermöglicht Ihnen die Audio Sprache einzustellen. Benutzen Sie ▲/▼ zur
Auswahl einer der folgenden Sprachen: Englisch / Französisch / Deutsch / Spanisch / Italienisch.
Kindersicherung (Parental Setting)
Benutzen Sie ▲/▼ zur Auswahl von Kindersicherung und betätigen Sie die Enter-Taste
zur Bestätigung. Wenn ein Kanal bereits gesperrt
wurde, müssen Sie ggf. die PIN eingeben.
Passwort ändern (Change Pin Code)
Diese Funktion ermöglicht Ihnen die PIN zu verän-
dern. Geben Sie die neue PIN zweimal ein und betätigen Sie die Enter-Taste zur Bestätigung.
Stufe (CensorShip)
Benutzen Sie ▲/▼ zur Auswahl einer der folgenden
Alterseinstufungen: None Block / 6/ 10/ 14/ 18.
Bildeinstellung (A/V Setting)
Benutzen Sie ▲/▼ zur Auswahl von Bildeinstellung
und betätigen Sie die Enter-Taste zur Bestätigung.
TV Format (TV Shape)
Diese Funktion ermöglicht Ihnen das richtige TV Format für die jeweilige Sendung einzustellen. Sie kön-
nen entweder 4:3 oder 16: 9 einstellen.
Darstellung (Conversion Prefer)
Mit dieser Funktion können Sie eine von verschiedenen Anzeigearten wählen: Full Frame / Vertical cut /
Pillar Box oder Full Frame / Pan & Scan / Letterbox.
Helligkeit & Kontrast (Bright & Contrast)
Benutzen Sie ◄/► zum Verändern von Helligkeit und
Kontrast.
24
DVB-T Modus
Sättigung (Saturation)
Verwenden Sie ◄/► zum Verändern der Sättigung.
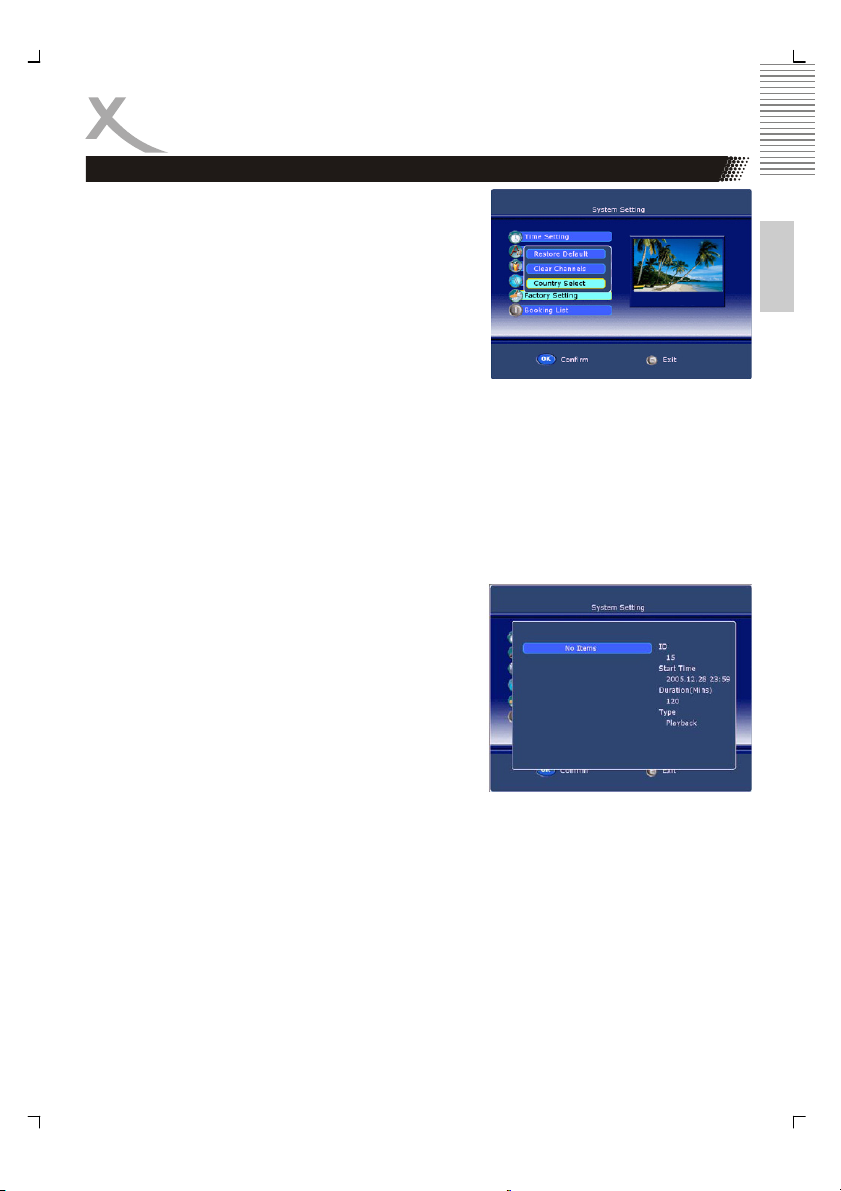
Werkseinstellung (Factory Setting)
Verwenden Sie ▲/▼ zur Auswahl von Werkeinstellung und betätigen Sie die Enter-Taste zur Bestäti-
gung.
Zurücksetzen (Restore Default)
Betätigen Sie die Enter-Taste, um das Zurücksetzen-
Menü aufzurufen und betätigen Sie die Enter-Taste zur
Bestätigung. Ansonsten können Sie die DVB MENÜTaste benutzen, um in das vorige Menü zurückzukehren.
Programme löschen (Clear Channels)
Betätigen Sie die Enter-Taste, um das Programme löschen-Menü aufzurufen und betätigen Sie die OK-Taste zur Bestätigung. Ansonsten können Sie die DVB MENÜ-Taste ver-
wenden, um in das vorige Menü zurückzukehren.
Länderwahl (Country Select)
Betätigen Sie die OK-Taste, um das Country Select-Menü aufzurufen und verwenden Sie
▲/▼ zur Auswahl eines Landes, dass Sie als Standardeinstellung wünschen.
Timer Liste (Booking List)
Verwenden Sie ▲/▼ zur Auswahl von Booking List
und betätigen Sie die Enter-Taste zur Bestätigung.
Diese Funktion ermöglicht Ihnen bestimmte Fernsehprogramme zu abonnieren. Betätigen Sie die Enter-
Taste zum Aufrufen des Einstellungsmenüs.
Ereignis-Nr (Event Id)
Betätigen Sie ► und benutzen Sie ▲/▼ zur Auswahl
einer der folgenden Event Id -Optionen: 1/ 2/ 3/ 4/ 5.
Service
Betätigen Sie die Enter-Taste und benutzen Sie ▲/▼
zur Auswahl des Kanals, den Sie abonnieren möchten.
Wiederholungsinterv. (Event type)
Betätigen Sie ► und benutzen Sie ▲/▼ zur Auswahl einer der folgenden Event type: ONCE / DAILY / WEEKLY.
Startzeit (Start Time)
Benutzen Sie ◄/► zur Auswahl. Geben Sie die Zeit dann direkt ein, um die Startzeit des
abonnierten Kanals festzulegen.
Startdatum (Start date)
Benutzen Sie ◄/► zur Auswahl. Geben Sie die Zeit dann direkt ein, um die Startdatum des
abonnierten Kanals festzulegen.
Deutsch
25
DVB-T Modus
Dauer (Duration)
Geben Sie direkt mit den Zifferntasten an, wie lange Sie den Kanal abonnieren möchten.
Status
Betätigen Sie ► und benutzen Sie ▲/▼ zur Auswahl einer der folgenden Optionen: ON /
OFF. Damit aktivieren Sie den Timer.
Deutsch
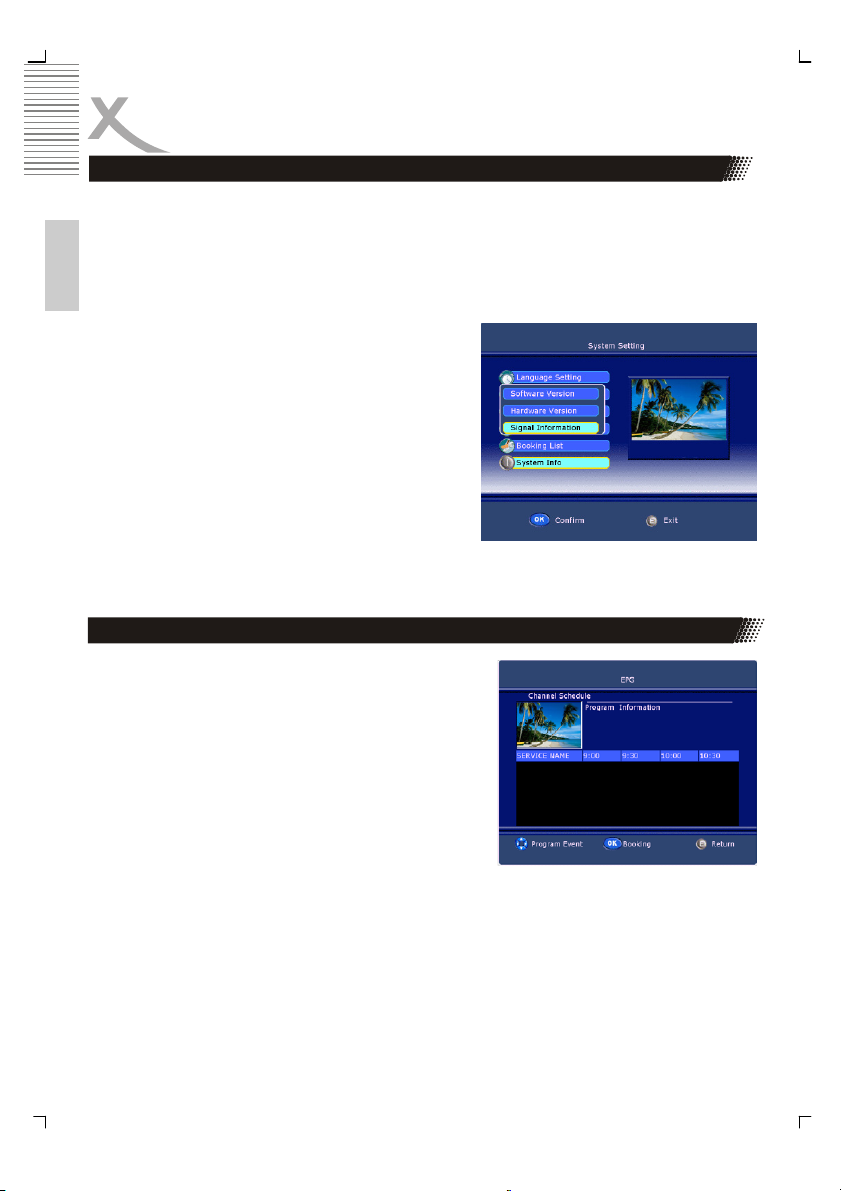
Systeminformation
Verwenden Sie ▲/▼ zur Auswahl von System Info
und betätigen Sie die Enter-Taste zur Bestätigung.
Software Version
Verwenden Sie ▲/▼ zur Auswahl von Software Version und betätigen Sie die Enter-Taste zur Anzeige
der Firmware-Version.
Hardware-Version
Verwenden Sie ▲/▼ zur Auswahl von Hardware
Version und betätigen Sie die EnterK-Taste zur An-
zeige der Hardware-Version.
Signal Information
Verwenden Sie ▲/▼ zur Auswahl von Signal Information und betätigen Sie die Enter-
Taste zur Anzeige von Signalqualität und -stärke.
EPG –elektronische Programmzeitschrift
Das letzte Untermenü ist EPG.
1. Betätigen Sie die DVB MENÜ-Taste auf der
Fernbedienung oder auf der Gerätevorderseite
zum Aufrufen des Hauptmenüs auf dem Bildschirm. Benutzen Sie ▲/▼ zur Auswahl des
EPG-Menüs.
2. Betätigen Sie die Enter-Taste zur Bestätigung
Ihrer Auswahl und das EPG-Menü wird auf dem
Bildschirm angezeigt.
3. Diese Funktion stellt Ihnen detaillierte Programminformationen zu den Kanälen zur Verfügung.
4. Sie können den Kanal abonnieren, indem Sie die Enter-Taste betätigen. Die Bedie-
nung entspricht der Benutzung der Abo-Liste.
26

DVB-T Modus
FERNSEHTEXT (TELETEXT)
Mithilfe dieser Taste können Sie den Fernsehtextmodus aufrufen. Betätigen Sie die Taste
erneut und der Fernsehtexthintergrund wird durchsichtig. Betätigen Sie Taste ein weiteres
Mal und Sie verlassen den Fernsehtextmodus und kehren zur normalen Fernsehanzeige
zurück.
FARBTASTEN ROT, GRÜN, GELB, BLAU
Verwenden Sie diese Tasten für den direkten Zugriff auf Seitenverknüpfungen an der
Fernsehtext-Bildschirmunterseite.
SEITENAUSWAHL
• Verwenden Sie ▲/▼, um eine Seite vor oder zurück zu gehen.
• Sie können ebenfalls die Seitennummer (drei Ziffern) mithilfe der Zifferntasten direkt
eingeben. Wenn Sie einen Eingabefehler machen, schreiben Sie die Nummer zu
Ende und geben Sie die korrekte Seitennummer einfach erneut ein.
• Verwenden Sie ◄/► zur Auswahl einer Unterseite.
Andere Funktionen
TV/RADIO
Betätigen Sie die TV/Radio-Taste zur Auswahl des TV- oder Radiomodus. Diese Funktion
wird nicht in allen Länder angeboten.
UNTERTITEL (SUBTITLE)
Betätigen Sie diese Taste zur Anzeige der momentanen Untertitel. Betätigen Sie die Taste
erneut, um die Untertitel wieder zu verstecken.
SPRACHE (AUDIO)
Betätigen Sie diese Taste zur Auswahl der Sprache momentanen Programms.
EPG
Betätigen Sie diese Taste, um das EPG-Menü direkt aufzurufen.
FAV
Betätigen Sie diese Taste, um das FAV-Menü direkt aufzurufen.
INFO
Betätigen Sie diese Taste zur Anzeige bestimmter Programminformationen.
Deutsch
27

Problemlösung DVB-T
Unser Kundendienst hilft Ihnen gerne bei Problemen. Haben Sie schon die Hinweise zur
Problemlösungen gelesen?
• Technischer Kundendienst von Xoro/MAS: Tel.: 040/77 11 09 17
• Internet: www.xoro.de/support.htm
Deutsch
Kein Signal bei DVB-T?
Bitte kontrollieren Sie ob der HTC xx25d sich im DVB-T Modus befindet. Falls nicht, bitte
wechseln Sie in diesem Modus.
Schlechte Empfangsqualität?
Bitte richten Sie Ihre Antenne optimal in Richtung des Sendemastes aus. Nutzen Sie eine
Antenne mit aktiven Verstärker oder eine Haus-/Dachantenne. Falls Sie mit dem HTC xx25d
den Raum gewechselt haben, richten Sie entweder die Antenne neu aus oder schließen Sie
eine aktive Antenne an.
Keine TV Programme mehr?
Falls Sie keine TV Programme mehr in ihrer Kanalliste haben, bitte führen Sie den Suchlauf
nochmals aus.
Fernbedienung reagiert nicht!
Bitte richten Sie die Fernbedienung auf das Gerät. Falls das Problem noch nicht behoben
ist, dann wechseln Sie die Batterien.
Hinweis:
In bestimmten Gebieten mit schwachen DVB-T-Signalen empfiehlt sich der Einsatz von
Verstärkerantennen zum Empfang aller verfügbaren TV-Kanäle.
28

DVD-Player
Der DVD Player wird durch mehrmaliges Drücken der AV-Taste aktiviert.
Nun hören Sie ein Geräusch des Laufwerkes, welches sich in den geöffneten Zustand versetzt. Das Laufwerk (Slot-In Loader) befindet sich auf der linken Seite des HTC xx25d. Legen Sie die Disc mit der bedruckten oder beschrifteten Seite nach hinten ein, so dass Sie die
verspiegelte Seite sehen können. Die Disc wird automatisch eingezogen und der DVDPlayer analysiert den Inhalt.
Hinweis:
Falls Sie eine Disc mit der bedruckten oder beschrifteten Seite nach hinten eingelegt haben, versucht das
Laufwerk den Inhalt der Scheibe zu lesen. Dieser Vorgang dauert länger als im regulären Fall. Es folgt dann
die Meldung „Keine Disc“ und das Laufwerk öffnet sich
und schiebt die Disc nach draußen.
HINWEIS:
Um eine CD oder DVD aus dem Laufwerk auszuwerfen, muss sich das Gerät im DVD Modus befinden.
Drücken Sie dazu die ÖFFNEN/SCHLIEßEN-Taste
(▲
im DVD Modus befindet, bleibt diese Taste ohne Funktion.
Drücken Sie die SOURCE Taste bis oben rechts
„DVD“ angezeigt wird.
) auf der Fernbedienung. Wenn das Gerät sich nicht
Deutsch
Funktionen des DVD-Players
INFO
Es wird eine OSD-Anzeige (On Screen Display) auf dem oberen Teil des Bildschirms eingeblendet, wenn bestimmte Funktionen ausgeführt werden oder die INFO Taste auf der Fernbedienung gedrückt wird. Das OSD ist eine benutzerfreundliche Oberfläche zum Anzeigen
des Status des Wiedergabetyps. Je nachdem, was für eine Disc eingelegt ist (DVD, CD,
Musik-Disc), sieht die OSD-Leiste anders aus.
Bei einer Video-DVD erscheint folgende OSD Informationsleiste mit der Anzahl der Titel und
welcher abgespielt wird (TT 1/2), der Anzahl von Kapitel in einem Titel (CH 33/35) und der
bis dahin abgelaufenen Abspielzeit in dem Kapitel.
29
DVD-Player
Funktionen des DVD-Players
Bei dem erneuten Drücken der INFO Taste erscheint bei einer Video-DVD folgendes Bild:
1. Aktive Tonspur
Deutsch
2. Format der Tonspur DD 5.1 CH (Kanal)
3. Untertitel (hier im Beispiel sind keine vorhanden (OFF)
4. Weitere Perspektiven (in diesem Beispiel sind keine andere Perspektiven zur Zeit
aktiv).
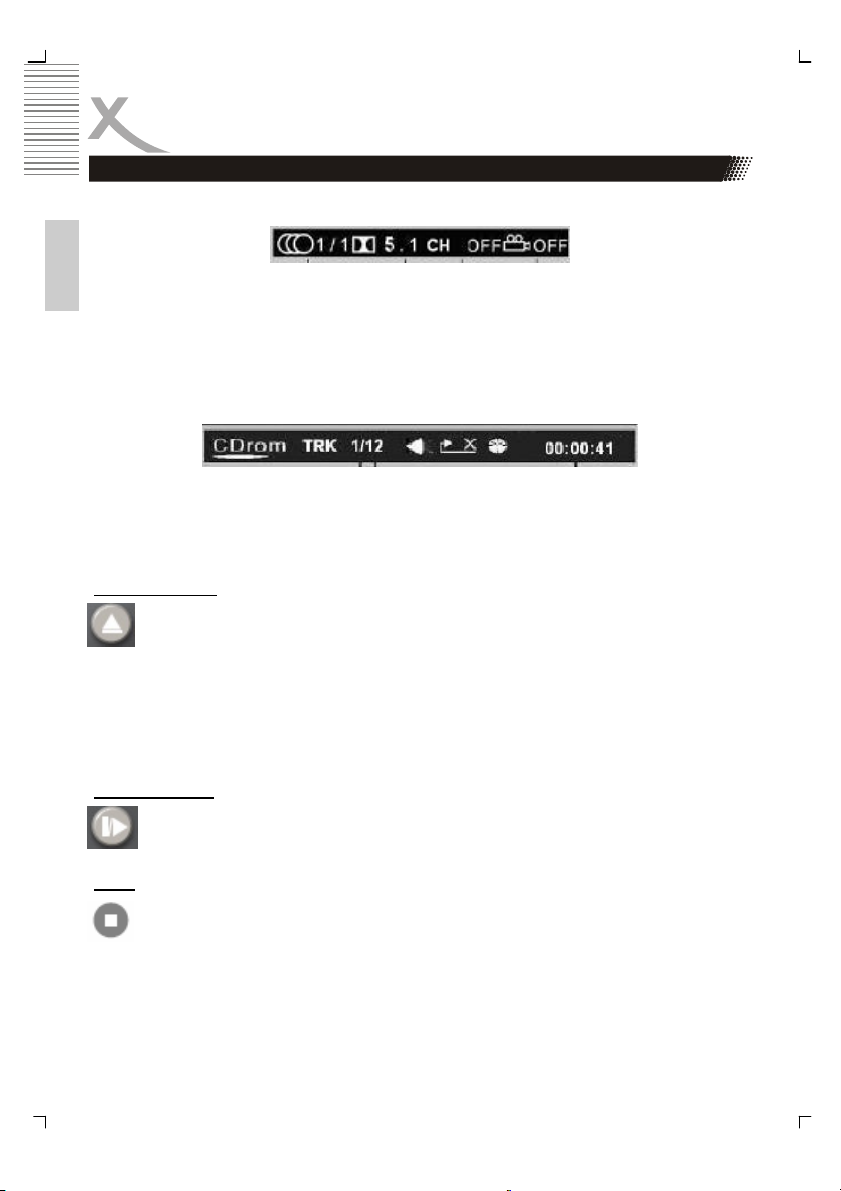
Bei einer MPEG-4 Video Datei werden etwas andere Informationen angezeigt als bei einer
DVD-Video. Wichtige Information bei einer ISO Datendisk mit MPEG-4 Dateien sind:
1. Disk Format (hier CDROM)
2. Anzahl der Stücke oder Tracks und welcher gerade abgespielt wird (TRK 1/12)
3. Mit oder ohne Ton
4. Abgelaufende Zeit
Öffnen/Schließen
Um das Laufwerk (Slot-In Loader) zu öffnen oder zu schließen, drücken Sie am Gerät
oder der Fernbedienung die Öffnen-Taste.
Hinweis:
Nun ist ein Geräusch zu hören, welches den Slot-In Loader des DVD-Player in den Zustand
der Diskaufnahme versetzt (Geöffnet). Entweder betätigen Sie die Taste erneut, damit die
Disk eingezogen wird oder schieben Sie sanft die Disk in den Loader bis diese automatisch
weiter eingezogen wird.
Abspielen/Pause
Drücken Sie die Wiedergabe/Pause-Taste, um die Disc abzuspielen. Erneutes Drücken von PLAY/PAUSE bewirkt eine Pause bei der Wiedergabe. Nochmaliges Drücken der Taste setzt die Wiedergabe fort.
Stopp
Mit der Stopp-Taste können Sie die Wiedergabe auf zwei Weisen anhalten:
• Wenn Sie die Stopp-Taste einmal drücken, wird der Unterbrechungspunkt
gespeichert, und das OSD zeigt PRESTOP (Vorstopp) an. Die Wiedergabe wird mit
der Wiedergabe-Taste fortgesetzt.
• Drücken Sie die Stopp-Taste zweimal, wird die Disc komplett angehalten. Auf dem
OSD ist “STOP” zu sehen; die Wiedergabe-Taste setzt die Disc fort.
30

DVD-Player
Funktionen des DVD-Players
Mit dieser Taste springen Sie zum nächsten Kapitel einer Video-DVD oder zum
nächsten Song / Stück einer Audio-CD / MPEG-4 Video Datei.
Mit dieser Taste springen Sie zum vorherigen Kapitel einer Video-DVD oder zum
vorherigen Song /Stück einer Audio-CD / MPEG-4 Video Datei.
Hinweis:
Bei einer DVD mit einem Kapitel oder einer CD mit einem Song ist Springen nicht möglich.
Schneller Rück– oder Vorlauf
Mit dieser Taste können Sie die Disc zurückspulen. Drücken Sie mehrmals die Taste,
um die Geschwindigkeit zu erhöhen.
Mit dieser Taste können Sie die Disc vorspulen. Drücken Sie mehrmals die Taste, um
die Geschwindigkeit zu erhöhen.
Hinweis:
• Die Geschwindigkeit des schnellen Vor– und Rücklaufes ändert sich in folgender
Weise: Normal —> x2 —> x4 —> x8 —> x20 —> Normal
• Mit der Wiedergabe-Taste kann die normale Wiedergabe fortgesetzt und der schnel-
le Rück– oder Vorlauf beendet werden.
• Der Player wird während des Spulens stumm geschaltet.
Menü
Wenn Sie während der Wiedergabe einer DVD die Taste MENU drücken, kehren Sie
zum Startmenü der DVD zurück.
Title
Wenn Sie während der Wiedergabe einer Video-DVD die Taste TITLE drücken, kehren Sie in das Title Menü einer Video-DVD zurück.
Gehezu (Goto)
1. Drücken Sie die Taste GOTO.
2. Mit dem Cursor und der Taste ENTER können Sie den gewünschten Menü-
3. Über die Taste ENTER bestätigen Sie die Auswahl.
4. Über die Taste GOTO setzen Sie die normale Wiedergabe fort.
punkt für die Auswahl Wiedergabezeit, Titel, Kapitel oder Track bestimmen.
Deutsch
31

DVD-Player
Funktionen des DVD-Players
Zahlentasten
Deutsch
Hinweis: Von einigen DVDs wird der Direktzugriff nicht unterstützt.
Abschnitt A-B wiederholen
Wiederholen der Wiedergabe eines bestimmten Disc-Abschnitts.
Drücken Sie die Taste A-B am Anfangspunkt des gewünschten Abschnitts; es wird
“REPEAT A-” (Wiederholung A-) auf dem Bildschirm angezeigt.
• Drücken Sie am Ende des gewünschten Abschnitts erneut die Taste A-B; es wird
“REPEAT A-B” (Wiederholung A-B) auf dem Bildschirm angezeigt. Der Abschnitt von
A bis B wird so oft wiederholt, bis die Funktion abgebrochen wird.
• Um die Funktion abzubrechen und zur normalen Wiedergabe zurückzukehren, drücken
Sie erneut die Taste A-B.
Hinweis: Von einigen DVDs wird die A-B-Funktion nicht unterstützt.
Wiederholung (REPEAT)
Wiederholte Wiedergabe des gewünschten Titels, Kapitels oder Songs.
Drücken Sie die Wiederholungstaste mehrmals hintereinander, um den Wiederholungsmodus auszuwählen.
Im DVD-Modus Im CD-Modus
REP. CHAPTER Kapitel wiederholen REP. 1 Song wiederholen
REP. TITLE Titel wiederholen REP. ALL Disc wiederholen
REP. OFF Wiederholen aus REP. OFF Wiederholen aus
Hinweis: Von einigen DVDs wird die Wiederholungsfunktion nicht unterstützt
Kamerawinkel
Drücken Sie während der DVD-Wiedergabe wiederholt auf die Taste ANGLE, um
den gewünschten Kamerawinkel auszuwählen. Eine DVD kann bis zu 9 auswählbare
Kamerawinkel enthalten.
Untertitel
Drücken Sie während der DVD-Wiedergabe wiederholt die Taste SUBTITLE, um
den gewünschten Untertitel auszuwählen. Eine DVD kann bis zu 32 auswählbare
Untertitel enthalten.
Die Zahlentasten ermöglichen einen direkten Zugriff auf die Stücke, Dateien oder Songs einer Disk.
1. Um direkt auf ein DVD-Kapitel oder einen CD-Song zuzugreifen, geben
Sie mit den Zahlentasten das gewünschte Kapitel bzw. den Song ein.
2. Geben Sie Daten für das DVD-Startmenü oder das Einstellungsmenü
des Players ein.
.
32

DVD-Player
Audio-Sprache
Drücken Sie während der DVD-Wiedergabe wiederholt die Taste AUDIO, um die
gewünschte Tonspur auszuwählen. Eine DVD kann bis zu 8 auswählbare Tonspuren
enthalten.
Hinweis:
Das DVD-Startmenü kann Einstellungsmöglichkeiten für Winkel, Untertitel und Tonspur
bieten, d. h. Sie können diese Einstellungen möglicherweise auch dort vornehmen.
ZOOM
Drücken Sie die Zoom-Taste wiederholt. Es wird Folgendes auf dem TV-Bildschirm
angezeigt: Normal —> x2 —> x3 —> x4 —> x1/2 —> x1/3 —> x1/4 —> ZOOM OFF
Bei Wiedergabe eines JPEG-Fotos:
Drücken Sie die Zoom-Taste nacheinander für die Zoom-Faktoren x1/2, x1/3, x1/4; mit der
Richtungstaste drehen Sie das Bild. Wenn Sie während der Anzeige des Zoom-Faktors x2,
x3 oder x4 die Richtungstaste drücken, verschieben Sie die Bildposition.
PROGRAM
Drücken Sie die Taste PROGRAM, um das Programm-Menü zu starten. Erneutes
Drücken ermöglicht auch das sofortige Beenden des Programm-Menüs.
Im DVD-Modus
Wenn das Programm-Menü angezeigt wird, geben Sie die Titel- und Kapitelnummer ein. Sie
können mit den Pfeiltasten zu den entsprechenden Positionen wechseln und auch Play oder
Clear aktivieren.
Drücken Sie die Wiedergabetaste (PLAY) zum Starten des Programms.
Drücken Sie die Taste CLEAR, wenn Sie eine falsche Eingabe gemacht haben. Wenn Sie
CLEAR erneut drücken, werden alle Tracks abgebrochen.
Im CD-Modus
Wenn das Programm-Menü angezeigt wird, geben Sie die
Songnummer ein, und drücken Sie die Taste ENTER,
wenn die Programmierung abgeschlossen ist. Drücken
Sie die Wiedergabe-Taste (Play) zum Starten des Programms. Drücken Sie die Taste CLEAR, wenn Ihre Eingabe falsch war oder Sie den Song abbrechen möchten.
Wenn Sie CLEAR erneut drücken, werden alle Songs
abgebrochen.
Um den Programm-Modus zu verlasen, drücken Sie zweimal die Stopp-Taste.
Hinweis:
• Von einigen DVDs wird die Programmbearbeitung nicht unterstützt.
• Discs mit nur einer Spur können nicht programmiert werden.
Deutsch
33

DVD-Player
Datendisc mit Musik-, JPEG– oder Video-Dateien
Legen Sie eine Daten-Disc oder –DVD in das Laufwerk, der Player durchsucht automatisch
die Verzeichnisse nach gespeicherten Musik-/JPEG/Video-Dateien. Danach wechselt er
automatisch in das erste Verzeichnis mit Musik-Dateien (bei Discs mit sowohl Musik- als
auch JPEG-Dateien; bei Discs mit nur einem Dateityp wechselt er in das erste Verzeichnis)
und spielt den ersten Song ab (der Dateiname wird hervorgehoben). Der Bildschirm sieht
ungefähr wie unten abgebildet aus:
Deutsch
Name des aktuellen
Verzeichnisses
Hinweise:
Musik
• Mit der Pfeiltaste nach Rechts können Sie zwischen dem Verzeichnis-Fenster, dem
Stück-/Track-Fenster und der dem Dateiformat wechseln. Dateiformate sind der
Reihenfolge: Musik (Note), Bilder (Kamera) und Video (Pfeil).
• Der DVD-Player startet mit der Musikwiedergabe.
Aktueller Dateiname
Stück-/Track-Fenster
Die Leisten bewegen
sich mit der Datei
Die abgespielte Datei
ist eine Video-Datei.
JPEG-Bild
34

DVD-Player
Datendisc mit Musik-, JPEG– oder Video-Dateien
1. Wechseln Sie mit den Pfeiltasten in den Verzeichnisbereich, und markieren Sie
das gewünschte Verzeichnis; danach wird die erste Datei darin wiedergegeben.
Sie können auch mit den Pfeiltasten in den Dateibereich wechseln, um dort die
Datei auszuwählen, die wiedergegeben werden soll.
Hinweise:
• Drücken Sie die linke und rechte Pfeiltaste; Sie können den Verzeichnisbe-
reich, Dateibereich und Dateiwechselbereich individuell aktivieren.
• Die Markierung im Verzeichnis- und Dateibereich sieht aus wie im Bild oben.
Sie wird als transparentes Rechteck dargestellt.
• Im Dateiwechselbereich können Sie mit der linken bzw. rechten Pfeiltaste die
Markierung ändern und dann die Taste ENTER drücken; die Schaltflächen ”
” “ ” und “ ” sind wie im obigen Bild zu sehen. Wenn beispielsweise
eine Disc mit Musik- und JPEG-Dateien ohne geladene Video-Dateien einge-
legt wird, ist die Farbe von “ ” und “ ” Weiß und für “ ” Schwarz. Wird
eine Musik-Datei abgespielt, wird “ ” rot.
• Bei einer Disc mit Musik- und JPEG-Dateien können Sie beim Anzeigen eines
JPEG-Bilds mit der Taste STOP zur JPEG-Liste zurückkehren.
• Mit dem Ziffernblock können Sie die Datei auswählen, die wiedergegeben
werden soll. Beispiel: Wenn das 15. Lied in der aktuellen Liste abgespielt werden soll, drücken Sie zuerst die Taste 10+ und anschließend 5. Daraufhin wird
Hinweise:
das 15. Lied wiedergegeben.
• Wenn Sie eine Disc mit Musik-Dateien wiedergeben, können keine Videos
angezeigt werden.
• Mit den PREVIEW-Tasten (Vorschau) erhalten Sie hilfreiche Hinweise.
• Drücken Sie beim Anzeigen von JPEG-Bildern die Programm-Taste, um den
Bildwechselmodus auszuwählen; es gibt 17 Wechselmodi. Drücken Sie die
Programm-Taste mehrmals hintereinander, um die Funktion zu aktivieren und
den gewünschten Wechselmodus auszuwählen.
Deutsch
35

DVD-Player SETUP
SYSTEM SETUP
Um das Einstellungsmenü des Players aufzurufen, drücken Sie die Taste
DVD-SETUP. In diesem Menü können Sie Detaileinstellungen für das
Gerät vornehmen. Markieren Sie mit den Richtungstasten die Funktionssymbole. Drücken Sie die Taste ENTER zum Bestätigen einer Auswahl.
Deutsch
Systemeinstellungen (SYSTEM SETUP)
Wählen Sie mit der Auf-/Abwärtstaste die
entsprechende Option aus. Drücken Sie die
Taste ENTER, um das entsprechende
Untermenü anzuzeigen.
• Drücken Sie die Auf / Abwärtstaste, um die
gewünschte Option zu markieren.
• Bestätigen Sie Ihre Eingabe mit der Taste
ENTER
TV-SYSTEM
Es stehen drei Modi zur Auswahl, die für Ihr TV-System in Frage kommen: NTSC / PAL /
PAL 60 / AUTO. Falls der TV-Modus nicht stimmt, blinkt das Display des DVD-Players und
der Bildschirm ist farblos. Die Standardeinstellung ist PAL.
Bildschrimschoner
Aktiviert oder deaktiviert den Bildschirmschoner. Wenn diese Option an ist, dann schaltet
sich der Bildschirmschoner automatisch an, wenn die Wiedergabe längere Zeit gestoppt
wurde oder keine Disc im Laufwerk ist.
Video-Ausgabe
Der DVD Player ist intern über YPbPr mit progressiven Scan verbunden. Somit kann diese
Option ncícht verändert werden.
TV-Type
4:3 (Pan & Scan)
Mit dieser Einstellung wird bei dem versucht wird, einen
Teil des Widescreen-Bildes, das im Kino gezeigt wird, auf
einem 4:3-Fernsehbildschirm darzustellen. So kommt es,
dass im Schnitt ein Film im Fernseher nur 33 - 50 % des
Kinofilmbildes enthält.
4:3 (Letterbox)
Die andere Möglichkeit, dem Problem der Darstellung eines
zu großen Films auf einem zu kleinen Fernseher anzuzeigen, bei dem oben und unten schwarze Balken entstehen,
der Film aber im Schnitt zu mindestens 90 % angezeigt
wird.
.
36

DVD-Player SETUP
16:9 (Breitbild)
Die Begriffe Breitbild oder Widescreen (engl. für Breitbild) wird allgemein, etwa bei der Vermarktung von DVD- und VHS-Filmen, für alle Bildformate verwendet, die breiter als das
Standardfernsehformat von 1,33:1 (4:3) sind, unabhängig davon, ob der Film im LetterboxFormat innerhalb eines 4:3-Rahmens oder anamorph gespeichert ist – in der Regel in Formaten ab etwa 1,66:1, häufig 2,35:1 und bis hin zu 2,76:1. Als „Breitbildfernseher“ werden
meist Geräte mit einem Seitenverhältnis von 16:9 (ca. 1,78:1, nahezu dem ebenfalls gängigen Kinoformat von 1,85:1 entsprechend) bezeichnet.
Kennwort (PASSWORD)
Bewegen Sie den Cursor zum Eintrag PASSWORD (Kennwort), drücken Sie die Taste ENTER, und geben Sie den Geheimcode „0000“ (wenn dies der erste Gebrauch ist) ein. Nach
der Bestätigung müssen Sie einen neuen Geheimcode eingeben und diesen mit ENTER
bestätigen.
Hinweis:
Bitte merken Sie sich den neuen Geheimcode, da Sie die Kindersicherung ansonsten nicht
mehr ändern können. Falls Sie den Code vergessen haben, kontaktieren Sie Ihren Händler
oder unser Unternehmen.
Kindersicherung (RATING)
Es gibt acht Stufen für diese Einstellung:
1. KID-SAFE (kindersicher)
2. 2. G
3. 3. PG
4. 4. PG13
5. 5. PG-R
6. 6. R
7. 7. NC-17
8. 8. ADULT (Erwachsene)
Die erste Stufe ist für Discs, die für jedes Alter geeignet sind, und die achte Stufe für Discs,
die nur für Erwachsene bestimmt sind. Wenn Sie die Kindersicherungseinstellung ändern
möchten, wählen Sie die entsprechende Einstellung aus, und geben Sie dann den vierstelligen Geheimcode ein. Die Werkseinstellung für den Code lautet 8357 (wenn Sie den Player
zum ersten Mal verwenden, geben Sie einfach diesen Code ein). Wurde der eingegebene
Code bestätigt, wird die Stufeneinstellung angezeigt. Bewegen Sie den Cursor zur gewünschten Stufe, und drücken Sie die Taste ENTER zum Bestätigen und Speichern.
Standardeinstellungen (DEFAULT)
Mit dieser Funktion (Default) können Sie die Werkseinstellungen wiederherstellen. Wenn Sie
RESTORE (Wiederherstellen) auswählen, werden die letzten Benutzereinstellungen rückgängig gemacht und der Player auf die Werkseinstellungen zurückgesetzt.
Deutsch
37

DVD-Player SETUP
Spracheinstellungen
Drücken Sie im Stopp-Modus die Taste
DVD-SETUP, und wählen Sie LANGUAGE
(Sprache) aus.
• Drücken Sie die Auf-/Abwärtstaste.
• Drücken Sie die Taste ENTER; das
Deutsch
Untermenü wird auf dem Bildschirm
angezeigt.
• Markieren Sie mit der Auf-/
Abwärtstaste den gewünschten Eintrag im Menü: OSD, Audio Sprache,
Untertitel Sprache, Menü Sprache und MPEG-4 Untertitel Sprache.
• Bestätigen Sie mit ENTER den ausgewählten Eintrag.
MPEG-4 Untertitel Sprache:
Wählen Sie die entsprechende Codepage für die MPEG-4 Untertitel aus :
• Zentral EU: Schwedisch etc.
• Kyrillisch: Russisch, Serbisch etc.
• Western EU: Deutsch, Französisch etc.
• East EU: Polnisch, Slowenisch etc.
Video-Einstellungen
Helligkeit
Im Video-Setup-Menü können Sie den Menüpunkt „BRIGHTNESS“ (Helligkeit) auswählen, mit den Richtungstasten
gewünschte Einstellung vornehmen und mit
der Taste ENTER bestätigen.
Kontrast
Im Video-Setup-Menü können Sie den Menüpunkt „CONTRAST“ (Kontrast) auswählen, mit den Richtungstasten
ENTER bestätigen.
Farbton
Im Video-Setup-Menü können Sie den Menüpunkt „HUE“ (Farbton) auswählen, mit den
Richtungstasten
bestätigen.
Sättigung
Im Video-Setup-Menü können Sie den Menüpunkt „SATURATION“ (Sättigung) auswählen,
mit den Richtungstasten
ENTER bestätigen.
38
∧/∨ die
∧/∨ die gewünschte Einstellung vornehmen und mit der Taste
∧/∨ die gewünschte Einstellung vornehmen und mit der Taste ENTER
∧/∨ die gewünschte Einstellung vornehmen und mit der Taste

DVD-Player SETUP
Schärfe
Im Video-Setup-Menü können Sie den Menüpunkt „SHARPNESS“ (Schärfe) auswählen, mit
den Richtungstasten
bestätigen.
Lautsprecher-Einstellungen
Drücken Sie im Stopp-Modus die Taste
DVD-SETUP, und markieren Sie SPEAKER
SETUP (Lautsprecher-Einstellung). Drücken
Sie die Taste ENTER, um das nächste Untermenü aufzurufen.
Downmix
Drei Optionen sind verfügbar:
LT/RT
Bei dieser Einstellung werden Pro Logic
Dolby Digital Formate in Kinoqualität wiedergegeben.
STEREO
Bei dieser Einstellung 5.1 Kanal-Signale über 2 Kanäle ausgegeben. Die 2-Kanal-Signale
werden in Stereo ausgegeben.
VSS (Virtual Surround Sound)
Bei dieser Einstellung werden 5.1-Kanal-Signale als fiktiver Surround Sound zusätzlich zum
Sound des Soundtracks ausgegeben.
Vorderer Lautsprecher (Front)
Mit dieser Einstellung können Sie die Größe der Lautsprecher einstellen, Groß oder Klein.
Standard ist Groß eingestellt.
∧/∨ die gewünschte Einstellung vornehmen und mit der Taste ENTER
Deutsch
Audio Lautsprecher-Einstellungen
Das AUDIO Setup enthält nur eine Einstellung.
Positive Werte erhöhen die Höhen.
Negative Werte erhöhen die Bässe.
39

DVD-Player SETUP
Digital-Einstellungen
Die Digital-Einstellungen enthalten zwei
Optionen, der dynamische Bereich und Dual
Mono.
Dynamischer Bandbreite
Deutsch
Mit der Option „dynamische Bandbreite“
können Sie das Maß der Dämpfung definieren. Bei der Einstellung „Full“ wird die Ausgabe am stärksten gedämpft. Der so genannte
Nachtmodus.
Bei der Option „Aus“ wird Tonausgabe nicht
verändert und keine Kompression findet statt.
Dual Mono
Die Optionen bei Dual Mono sind:
Stereo: Der linke Monosound wird zu dem linken Lautsprecher gesendet und der
rechte Monosound zu dem rechten Lautsprecher.
L-Mono: Der linke Monosound wird zu beiden Lautsprecher gesendet.
R-Mono: Der rechte Monosound wird zu beiden Lautsprecher gesendet.
Mix-Mono: Linker und rechter Monosound wird vermischt an beide Lautsprecher gesen-
det.
40

Problemlösung DVD-Player
Sollte es Probleme mit Ihrem DVD-Player geben, prüfen Sie die folgende Liste, bevor Sie
sich an den Kundendienst wenden:
Technischer Kundendienst von Xoro/MAS:
• Tel.: 040/77 11 09 17
• Internet: www.xoro.de/support.htm
Symptom Prüfen und Maßnahme
Keine Disc eingelegt; legen Sie eine Disc ein.
Disc wurde falsch herum eingelegt; legen Sie die Disc mit der beschrifteten Seite nach oben ein. Regionaleinstellung der Disc stimmt nicht mit der
Keine Wieder-
gabe
Kein Bild
Bild verrauscht/
verzerrt
Kein Vollbild
Fehlermeldung
auf Bildschirm
des Players überein.
Alterseinstufung der Disc ist höher als Einstellung bei Kindersicherung.
Disc-Typ ist nicht für den Player geeignet.
Disc ist beschädigt oder Gerät war bereits ein oder zwei Stunden eingeschaltet. Im Player ist es möglicherweise zu Kondensationen gekommen.
Entnehmen Sie die Disc, und lassen Sie das Gerät ein oder zwei Stunden
eingeschaltet.
Überprüfen Sie die Verbindungen der Geräte.
Überprüfen Sie, ob die Verbindungskabel beschädigt sind.
Säubern Sie die Disc.
Die Disc ist verschmutzt oder beschädigt. Säubern Sie die Disc, oder
legen Sie eine andere Disc ein.
Wählen Sie das Bildschirmformat im Einstellungsmenü des Players aus.
S. Abschnitt „Einstellungsmenü (Setup)“ in dieser Bedienungsanleitung.
Wählen Sie das Bildschirmformat im DVD-Disc-Menü aus.
Es wird folgende Meldung angezeigt, wenn ein Problem bei der eingeleg-
ten Disc vorliegt:
1. “WRONG REGIONAL DISC
nalcode stimmt nicht mit dem des Players überein.
2. “WRONG PASSWORD
Disc nicht ab, deren Altersangabe höher als die Player-Einstellung
der Kindersicherung ist.
3. “WRONG DISC
schen Disc-Qualitätserkennungssoftware ausgestattet. Wenn der
Player eine fehlerhafte oder beschädigte Disc entdeckt, spielt er sie
möglicherweise mit niedrigerer Qualität ab oder stellt die Wiedergabe ganz ein - dies hängt vom Beschädigungsgrad der Disc ab.
” (falsche Disc): Der Player ist mit einer automati-
” (Disc der falschen Region): Der Regio-
” (falsches Kennwort): Der Player spielt eine
Deutsch
41

Problemlösung DVD-Player
Symptom Prüfen und Maßnahme
Springen und
Suchen nicht
möglich
Deutsch
Fernbedienung
funktioniert nicht
Macrovision
U.S. Patens Nos. 4,631,603; 4,577,216; 4,819,098; 4,907,093; 5,315,448 and 6,516,132
"This product incorporates copyright protection technology that is protected by U.S. patents
and other intellectual property rights. Use of this copyright protection technology must be
authorized by Macrovision, and is intended for home and other limited viewing uses only
unless otherwise authorized by Macrovision. Reverse engineering or disassembly is prohibited."
Manche Discs sind so programmiert, dass Benutzer einige Abschnitte nicht überspringen oder einen Suchlauf durchführen können
(insbesondere im WARNUNG-Abschnitt). Bei Discs mit nur einem
Kapitel ist die Springen-Funktion nicht möglich.
Beseitigen Sie eventuelle Sichthindernisse zwischen Fernbedienung
und Player.
Richten Sie die Fernbedienung auf den Empfangssensor des Players.
Überprüfen Sie, ob die Batterien in der Fernbedienung korrekt eingelegt sind (achten Sie auf die Polarität).
Tauschen Sie die Batterien der Fernbedienung aus.
42

Spezifikationen
HTC 1525D HTC 1925 HTC 2225D
Bildschirmgröße 39 cm (15,4 Zoll) 48 cm (19 Zoll) 56 cm (22 Zoll)
Display Typ TFT LCD
Auflösung in Pixel 1280 x 800 1440 x 900 1680 x 1050
Seitenverhältnis 16:10
2
Helligkeit 200 cd/m
Kontrast 300:1 1000:1 1000:1
Reaktionszeit 25 ms 6,5 ms 5 ms
Blickwinkel 90 ° 160 ° 160 °
TV System PAL BG / DK / I
Stereo NICAM / A2
Anschlüsse
CVBS Video 1,0 V p-p 75 Ohm unausgeglichen
S-Video Y: 1,0 V p-p +/- 3 dB
Scart CVBS: 1,0 V p-p 75 Ohm
PC VGA 640 x 480 bei 60 Hz / 800 x 600 bei 60 Hz / 1024 x 768 bei 60 Hz
Antenne RF Antennenanschluss, 75 Ohm
Lautsprecher 2 x 3 Watt 2 x 3 Watt 2 x 5 Watt
Video System PAL / NTSC
300 cd/m2 400 cd/m2
SECAM BG / DK / L / L‘
C: 0,3 V p-p +/- 3 dB
RGB: 1,0 V p-p 75 Ohm
Empfohlen wird immer die native Auflösung.
Deutsch
AC / DC Adapter AC: 110—260 V 50 / 60 Hz
Verbrauch
Abmessung
(LxTxH)
Gewicht 5,5 kg 6,5 kg 7,0 kg
385 x 175 x 336 mm 465 x 210 x 410 mm 540 x 210 x 460 mm
DC: 12 V bei max. 5 A
60 W / Standby 3 W
43


Safety Information
To ensure reliable and safe operation of this equipment, please read carefully all the
Instructions in this user guide, especially the safety information below.
Electrical safety
• The TV set should only be connected to a mains supply which matches that stated
on the label on the mains adapter.
• To prevent overload, don’t share the same mains supply socket with too many other
items of equipment.
• Be careful to route the mains power cable away from areas where people can trip
over it.
• Be sure to hold the plug-not the set is not to be used for a long time, Disconnect both
the aerial and the mains power cable.
• Take care not to expose the set or the remote control to water or moisture.
• Pull the plug out immediately, and seek professional help if:
- the mains plug or cable is damaged
- liquid is spilt onto the set, or if it is accidentally exposed to water or moisture
- anything accidentally penetrates the ventilation slots
- the set doesn’t work normally.
• Never remove the cover, there are No user-serviceable parts inside.
Allow only qualified service personnel to repair this equipment.
• To avoid leakage, take out the remote control batteries when:
- the batteries are exhausted
- you are not going to use the remote control for a long time.
• Dispose of the batteries properly-do not put them into a fire.
Physical safety
• Make sure the set is positioned at 5cm (2 inch) from the wall or furniture.
• Never tap or shake the screen for any reason.
• Take care not to drop or sit on the remote control.
• Clean the set using only a soft, clean, dry cloth. Do not use any solvents.
English
1

Contents
Safety information
Electrical safety......................................................................................................1
Physical safety.......................................................................................................1
In the box......................................................................................................................... 3
Features...........................................................................................................................3
Connection
Rear connection panel............................................................................................4
Right Side ...............................................................................................................4
English
Connecting up.........................................................................................................5
The Remote Control
Insert Battery ..........................................................................................................8
Operation range......................................................................................................8
Buttons....................................................................................................................9
LCD Menus
Using the menus...................................................................................................11
The Video menu ...................................................................................................11
The PC menu .......................................................................................................12
The HDMI menu ...................................................................................................13
The Audio menu ...................................................................................................14
The TV menu........................................................................................................ 14
The General menu................................................................................................15
Troubleshooting for LCD ......................................................................................16
DVB-T Mode
Getting into DVB-T mode .....................................................................................17
First time installation (Channel Setting)................................................................17
Channel List..........................................................................................................18
Favorite List..........................................................................................................20
System Settings....................................................................................................20
EPG......................................................................................................................23
Teletext................................................................................................................. 24
Troubleshooting for DVB-T...................................................................................25
DVD Player
Getting into DVD mode.........................................................................................27
Insert a Disc..........................................................................................................27
Functions..............................................................................................................27
MPEG-1, MPEG-2 and MPEG-4 videos...............................................................31
System Setup .......................................................................................................33
Troubleshooting.................................................................................................... 38
Specifications ...............................................................................................................40
2

In the Box
Following accessories should be in the box:
• HTC 1525D/HTC1925D/HTC 2225D LCD-TV
• Remote Control with Battery
• Manual
• Main adapter
• Wire for the main adapter
• Warranty card
If any of the accessories are missing, then contact your dealer as soon as possible. Keep all
the original packaging in case you need to return the set to the dealer.
Features
• High quality display
• Many Connections: VGA, RF, Video, S-VIDEO, SCART and HDMI
• HDMI Supports up to 1080i input resolutions (only HTC 1925D and HTC 2225D)
• Stereo audio inputs
• Integrated analog TV Tuner
• Integrated digital terrestrial TV Tuner (DVB-T)
• Automatic or manual channel search
• Auto-shutdown to save power when no signal input
• DVD-Player inside with Slot-in technology
Note:
The HTC 1525D has no HDMI interface.
English
3

Connection
Rear Connection Panel
Name Function Description
DC In
HDMI
English
VGA
SCART
S-video
Video
AUDIO IN L / R
PC Audio
PHONE Headphone
RF
Note:
The HTC 1525D has no HDMI interface.
Buttons on the right side
On the right bottom side are the following buttons:
Button Function
Open / Close the loader
Stop
>|| Play / Pause
DVD DVD Slot-in loader
Connect to Power Adapter
HDMI input (only for HTC 1925D and HTC 2225D)
VGA signal of computer input
Euro AV (Audio/Video) input
S-video input
Video signal input
Audio signal input for Video and S-Video
Audio signal of computer input
Connect to cable or air
4

Connecting Up
On the right upper side are the following buttons:
Note:
Select source by pressing the AV/TV button from TV, Scart, AV, S-Video, PC, HDMI DVB-T
and DVD.
Connecting Up
1. Connect the aerial or input source to the appropriate input socket at the rear of the set.
(see page 4).
2. Connect the small round plug on the power adaptor cable to the power input socket at
the rear of the set.
3. Connect the main cable between the power adapter and the main supply.
4. Switch the power on by pressing the POWER button on the front panel or the remote
control. The LED will show green.
5. Use the SOURCE button on the front panel or the remote control to select which input
source to use :TV, PC-RGB, AV, S-video, Scart, DVBT or DVD. You can use the front
panel control to adjust the volume or select a channel, as shown below, or you may use
the remote control (see page 11).
A. Analog TV tuner (for example: cable system)
After switched on and press the SOURCE button repeatedly, till “TV” is displayed
right above on screen. Now the HTC xx25D is in TV Mode.
B. DVD-Player:
Switch on the unit and press the SOURCE button repeatedly, till “DVD” is displayed right above on screen. Now the HTC xx25D is in DVD Mode.
C. DVB-T mode:
Switch on the unit and press the SOURCE button repeatedly, till “DVB” is displayed on screen. Now the HTC xx25D is in DVB-T mode.
6. To switch the set off a short time, press the POWER button, the set will go into stand-by
and the LED will show red . lf you are not going to use the set for some time, switch the
power off completely by unplugging the mains cable .
Button Function
Power Power On/Off (StandBy)
Menu LCD Setup Settings
V+ / V+ Change Volumen
P+ / P- Change TV channel
SOURCE Choose Source
English
5

Connection
Power connection
Connect the AC/DC power adapter with the DC IN
input of the HTC TV set. After than, please connect the
power cable with the wall mounted power outlet.
On the front side you can see a red LED light. The
HTC TV set is now in Stand-By mode. By pressing the
POWER button on the remote control or on the top
side of the device the red LED changes to a green
light.
Antenna
English
The HTC TV set has an analogue and a digital TV
Tuner inside. For receiving analogue TV signals please
connect the antenna cable with the RF connector on
the HTC TV set and with the VHF/UHF roof antenna or
with a CATV antenna plug.
For receiving digital terrestical TV signals please connect the
HTC TV set with the RF plug and also with the roof antenna. If
no roof antenna is available, please use indoor aerial.
For activating the analogue TV Tuner, please switch with the
Source button to „TV“. For viewing DVB-T, please change with
the SOURCE button to „DVB“.
Note:
For getting the best DVB-T reception please uses the roof
antenna. If not possible, than you can connect the HTC TV set
with an active indoor aerial.
SCART Input
Audio– and Video signals from a VCR or a setop box can be
transmitted by SCART. Please connect a SCART cable with the
SCART input on the HTC TV set and with the SCART output on
the VCR or setop box.
Press the SOURCE button again until „SCART“ appears on the
screen and the SCART interface is activated.
CVBS Video– and Stereo Audio input
If you uses more than one multimedia terminals and the SCART,
HDMI and S-Video connection are used, than you connect the
next device by the audio/video component input. Please connect
the yellow wire of an 3-pin component cable with the VIDEO input
of the HTC TV set and the multimedia device. With this kind of
connection only video signals are transmitted. For listening sound
on the TV you should establish also a sound connection.
Please connect the white and red wire of the 3-pin component
cable with the AUDIO IN L / R and the correspondent audio out on
the multimedia device.
6

Connection
Please press the SOURCE button until „AV“ appears on the screen and the AV input is active.
S-Video Video- und Stereo Audio input
If you uses more than one multimedia terminals and the SCART, HDMI and AV connection
are used, than you connect the next device by the S-Video. Please connect the S-Video
cable with the S-VIDEO input of the HTC TV set and with the S-Video output of the multimedia device. With this kind of connection only video signals are transmitted. For listening
sound on the TV you should establish also a sound connection.
Please connect the white and red wire of the 2-pin cable with the AUDIO IN L / R and the
correspondent audio out on the multimedia device.
Please press the SOURCE button until „S-Video“ appears on the screen and the S-Video
input is active.
HDMI
If you want connect a multimedia device with HDMI like
a game console „PS3“ or a setop box with the HTC TV
set, you can establish a HDMI connection. Please connect the HDMI cable on the HDMI interface on the HTC
TV set and the HDMI output of the multimedia device.
Please press the SOURCE button until „HDMI“ appears
on the screen and the HDMI input is active.
VGA
You can use the HTC TV set as a PC monitor by using
the VGA interface. Please connect a VGA cable with the
VGA input of the HTC TV set and with the PC.
Please press the SOURCE button until „PC-VGA“ appears on the screen and the PC-VGA
input is active.
Notes:
1. Before you connect the HTC TV set with the PC, please change the graphic resolu-
tion of the PC to: 640 x 480, 800 x 600 or 1024 x 768.
2. Please establish the connection and switch to „PC-VGA“ input.
3. For displaying the best results, please uses the native resolution of the TV LCD
panel:
• HTC 1525d —> 1280 x 800 Pixel
• HTC 1925d —> 1440 x 900 Pixel
• HTC 2225d —> 1680 x 1050 Pixel
English
7

Remote Control
Insert battery into the remote control
Insert the batteries in the remote control:
1. Open the cover.
2. Insert the batteries. Make sure to match - and +.
3. Close the cover
English
Notes on batteries:
Improper use may cause battery leakage and corrosion.
Please follow the instructions below:
• Do not insert the batteries in the wrong direction
• Do not use different types of batteries together
• If you do not use the remote control for a long time, remove the batteries
• If the remote control operates not correctly, replace the batteries
• lf battery leakage occurs, wipe the battery liquid from the battery compartment, then
insert new batteries
• Make sure that the used batteries are disposed properly according to you local regu-
lations.
Operation range
Point the remote control at the IR:
1. Within about 5 m with angle about 30 grade in both direction.
Notes:
• Do not expose the IR of the device to a strong light source or direct sunlight.
• Direct the remote control at the infrared receiver (IR) of the player
• Do not drop the remote control.
• Do not spill water or put anything wet on it.
• Do not disassemble the remote control.
8

Remote Control
1.
2.
3.
4.
5.
6.
7.
8.
9.
10.
11.
12.
13.
14.
15.
16.
17.
18.
19.
20.
21.
22.
23.
24.
25.
26.
27.
28.
29.
30.
31.
32.
33.
34.
35.
36.
37.
Buttons of the remote control:
ATV: Analogue TV Tuner
DVB-T: Digital TV Tuner
DVD: DVD Player
1. POWER button
2. Picture mode (PMODE)
3. Sound mode (SMODE)
4. Numeric buttons (0—9)
5. LCD settings (LCD MENU)
6. DVD settings (DVD SETUP)
7. Navigation cross
8. ENTER button
9. Volume (Vol- / Vol+)
10. ATV: Red Teletext button; DVB-T:
Red Teletext button and subtitle;
DVD: subtitle button
11. ATV: Green Teletext button and
NICAM; DVB-T: Green Teletext and
Audio button; DVD: Audio button
12. ATV: Teletext Index button; DVD:
Play / Pause
13. ATV: Teletext sub page button;
DVD: Stop
14. DVD: Open / Close
15. DVD: Zoom
16. DVD: Video DVD Menu
17. DVD: Video DVD Title menu
18. DVB-T: Favorite -; DVD: Angle
19. DVB-T: Favorites; DVD: A-B Segment Playback
20. MUTE button
21. SOURCE button
22. Aspect Ratio LCD 4:3 / 16:9 (SIZE)
23. Source information (Display)
24. One or two digits of channel numbers (-/—)
25. Last TV channel (RECALL)
26. Teletext in ATV and DVB-T
27. DVB-T settings (DVB MENU)
More button description on the next
page.
English
9

Remote Control
English
1.
2.
3.
4.
5.
6.
7.
8.
9.
10.
11.
12.
13.
14.
15.
16.
17.
18.
19.
20.
21.
22.
23.
24.
25.
26.
27.
28.
29.
30.
31.
32.
33.
34.
35.
36.
37.
Buttons of the remote control:
ATV: Analogue TV Tuner
DVB-T: Digital TV Tuner
DVD: DVD Player
28. Channel ATV und DVB-T (CH- /
CH+)
29. ATV: Yellow Teletext button; DVBT: EPG and yellow Teletext button
30. ATV: Blue Teletext button; DVB-T:
Information and blue Teletext button; DVD: Information
31. ATV: Teletext Mix displaying; DVD:
Previous chapter / track
32. ATV: Teletext exit; DVD: Next chapter / Track
33. DVD: Fast back– or Forward (<< /
>>)
34. DVD: GOTO button
35. DVB-T: Exit of DVB-T settings
36. DVB-T: Switch to TV and Radio
channels
37. DVB-T: Favorites +; DVD: Program
10

LCD Menu
For all the buttons mentioned below, you can use those on the front panel, or you can use
those on the remote control. To see the menus, press the LCD MENU button. The first will
show either:
• the VIDEO menu, if the set is switched to TV, AV, S-video, SCART, DVB-T, DVD
• the PC menu, if the set is switched to PC
• The HDMI menu, if the set is switched to HDMI
Press the MENU button again, to see the other menus:
• another press to see the AUDIO menu
• another press to see the TV menu (only when switched to TV)
• another press to see the GENERAL menu
• another press to see the menus off.
To select a menu item, for example COLOUR, press the CH+ and CH- buttons to
• scroll up and down the list.
• When a menu item is highlighted, use the VOL+ or VOL-buttons to change the setting.
English
When you have changed the settings, you can exit from the menu:
• by waiting fifteen seconds without pressing any buttons,
• by pressing the LCD MENU button few times until the menus turn off.
11

LCD Menu
Video Menu
The first press of the LCD MENU button will show the VIDEO menu, if the set is switched to
TV, AV, S-Video, SCART, DVB-T, DVD. In this menu it is possible to change brightness,
contrast, colour and the sharpness.
Brightness
Use the VOL+ or VOL- buttons to adjust the
brightness of the picture.
Contrast
Use the VOL+ or VOL- buttons to adjust the
contrast of the picture.
Colour
English
Use the VOL+ or VOL- buttons to adjust the
colour of the picture.
Sharpness
Use the VOL+ or VOL- buttons to adjust the
sharpness of the picture.
PC Menu
If the LCD is connected by VGA to a personal computer (PC) or to a device with VGA output, so by pressing the LCD MENU button the PC-Menu starts up.
Brightness
Use the VOL+ or VOL- buttons to adjust the
brightness of the picture.
Contrast
Use the VOL+ or VOL- buttons to adjust the
contrast of the picture.
Color setting
Use the VOL+ or VOL- buttons to select from
6500k, 9300k or USER.
If you select USER, you can use the VOL+ or
VOL- buttons to adjust the RED.
Green and blue values individually. Press
MENU button when you have finished adjusting .
Auto configure
Press the VOL+ button to have the following
settings configured automatically.
12

LCD Menu
PC Menu
Horizontal and vertical position
Use the VOL+ or VOL- buttons to adjust the position of the picture on the screen.
Phase
Use VOL+ or VOL- buttons to adjust the phase of the ADC sampling clock relative to the Hsync signal, until a stable image is obtained.
Clock
Use the VOL+ or VOL- buttons to adjust the pixel clock frequency, until the image size is
maximized for the screen.
HDMI Menu
If the LCD is connected by HDMI to a personal computer (PC) or to a device with HDMI
output, so by pressing the LCD MENU button the PC-Menu starts up.
Brightness
Use the VOL+ or VOL- buttons to adjust the
brightness of the picture.
Contrast
Use the VOL+ or VOL- buttons to adjust the
contrast of the picture.
Color setting
Use the VOL+ or VOL- buttons to select from
6500k, 9300k or USER.
If you select USER, you can use the VOL+ or
VOL- buttons to adjust the RED.
Green and blue values individually. Press
MENU button when you have finished adjusting .
Auto configure
Press the VOL+ button to have the following settings configured automatically
Horizontal and vertical position
Use the VOL+ or VOL- buttons to adjust the position of the picture on the screen.
English
13

LCD Menu
Audio Menu
Press the LCD MENU button again to see the AUDIO menu.
Volume
Use the VOL+ or VOL- buttons to adjust the
volume of the sound.
Balance
Use the VOL+ or VOL- buttons to adjust the
left/right balance of the sound.
Audio preset
English
Use the VOL+ or VOL- buttons to select
from PERSONAL, VOICE, MUSIC or
THEATRE.
If you select personal, you can adjust the
following settings.
Treble and bass
Use the VOL+ or VOL- buttons to adjust the tone of the sound.
TV Menu
Press the LD MENU button again, to see the TV menu (only if switched to TV ).
Channel
Use the VOL+ or VOL- buttons to select a
channel.
System
Use the VOL+ or VOL- buttons to select
from DK, BG I or L TV display systems.
Skip
Use the VOL+ or VOL- buttons to turn the
channel ship:
• ON – this channel will be shipped when
changing channel using the CH buttons.
• OFF - this channel will be included when
changing channel using the CH buttons.
AFC
Automatic frequency control. Use the VOL+ or VOL- buttons to turn AFC On or OFF.
Fine Tune
Use the VOL+ or VOL- buttons to fine tune the frequency if you are having Press with a
week signal on the current channel. The AFC will turn off if you use the fine Tune controls.
14

LCD Menu
TV Menu
SWAP
Press the VOL+ buttons to enter the SWAP menu, press the VOL+/- button to select the
channel that you want the program to be put in “FROM” menu, then press the CH- button to
go to the “TO” menu, press the VOL+/-button to select the channel Whose program you
want, press the VOL+/-button to confirm if “SWAP” menu.
Manual search
Press the VOL+ button once, then again to select from down or up
Press the MENU button to start the manual station search. When the search is finished, the
first station found will be allocated to the current channel.
Auto Search
Press the VOL+ button once . Use the VOL+ or VOL- buttons to select the DK/BG/I or SECAM L mode then press CH+ and CH- to select yes or no, press MENU button to confirm,
The automatic Station Search will start . When the searching is finished, then for example, if
12 station have been found, they will be allocated to the first 12 channel.
General Menu
Press the MENU button again to see the GENERAL menu.
Language
Use the VOL+ or VOL- buttons to select
from a number of European languages.
Blue Screen
Use the VOL+ or VOL- buttons to turn the
blue screen:
• ON – The screen will turn blue when
the signal strength is very poor.
• OFF – The picture and sound will be
noisy when the signal is very poor.
(Use this function if reception cannot be
improved, to stop the screen from turning
blue screen)
Noise Reduce
Use the VOL+ or VOL- buttons to turn the noise reduction system:
• ON: to reduce noise when reception is poor
• OFF: improve picture and sound quality when reception is good.
Input Source
Use the VOL+ or VOL-buttons to select which input source to use:
TV, SCART, PC-RGB, AV or S-video, DVD
Reset
Press the VOL+ button to return the set to the factory default setting.
All the setting in the VIDEO, PC and AUDIO menus, and blue screen in the GENERAL menu
will be returned to be the settings shown in this user guide.
English
15

Troubleshooting
Check the following guide for the possible cause of a problem before contacting service.
Technical Support of Xoro/MAS:
• Tel.: 040/77 11 09 17
• Internet: www.xoro.de/support.htm
Problem Solution
TV won’t switch on
English
No picture
No sound
Picture is wrong
colour
• Check the mains cable is connected properly to both the mains
supply and the mains adapter
• Check the cable from the mains adapter is connected properly
to the set.
• The electronic circuit may have reset. Pull the plug out, wait for
60 seconds, then plug back again.
• Check the aerial or other input is connected properly.
• Check that the correct input is selected, using the SOURCE
button or the GENERAL menu.
• Check the brightness and contrast settings in the VIDEO or PC
menu.
• Check that the VOLUME isn’t turned down, or the MUTE but-
ton pressed.
• Check that the audio cables are connected to the correct in-
puts.
• Check that the correct input is selected, using the TV/AV but-
ton or the GENERAL menu.
The picture is unstable when used
with a PC
There are a few
coloured spots on
the screen
Picture with wrong
scaling
16
• Check that the settings in the PC menu match the video output
settings of the PC.
• High resolution LCD screens often have a small number of
faulty pixels.
• This is normal and within the bounds of our quality control
checks.
• The LCD has the wrong aspect ratio. Please press the Size
button to switch the aspect ratio from 16:9 to 4:3.

DVB-T Mode
Be sure to select the DVB source before operation. Please follow the way to switch into the
DVB-T mode:
1. Power on the device
2. Press the AV/TV button often until a “DVB” comes on the right top side.
Enter Main Menu
Press the DVB MENU on the remote control to bring
up the main menu on the screen and press it again to
return to the previous menu or return to TV viewing.
Adjust the OSD on screen
1. Press ▲ / ▼ button select each menu.
2. Press ► button and then use ▲ / ▼ / ◄ / ►
button to select and adjust the available
menus.
3. Press DVB MENU or ◄ button to return to
previous menu and press EXIT to return to TV
viewing.
4. Press Enter to confirm your settings
Waiting SIGNAL or NO SERVICE
Here is no signal or no service prompt.
Channel Setting
For the first time installation you should start the searching to the TV Programs. Please navigates to Channel Setting and activate the Menu by
pressing Enter button. Choose there the option
“Channel Scan” and confirm by pressing the Enter
button.
Search Type
Press ► and then use ▲ / ▼ to select one of the
search type options: Auto Scan/ Manual Scan/
Scan By NIT. Standard setting is “AUTO Scan”.
Channel No
Input the number directly to select the channel
number, but the range of channel is 0 --- 69. This
option is by “Auto Scan” not active.
Frequency
This function let you know the frequency accordance the channel.
English
17

DVB-T Mode
Channel Setting
Band Width
Press ► and then use ▲ / ▼ to select one of the band width options: 6M/ 7M/ 8M.
Encrypted Service
Press ► and then use ▲ / ▼ to select one of the encrypted service options: Save/ Not
Save.
Update Mode
Press ► and then use ▲ / ▼ to select one of the update mode options: Append/ Replace.
Sort Channel
English
Use the ▲ / ▼ to select Sort Channel item and then
press Enter to confirm it
• Name UP Press Enter to rise to the channel list
by name.
• Name Down Press Enter to drop the channel
list by name.
• Encrypt Press Enter to sort the channel list by
encrypting.
Channel List
1. Press the DVB MENU on the remote control
to bring up the main menu on the screen and
use ▲ / ▼ to select the Channel List menu.
2. Press the Enter to confirm your selection
and there will be a Channel List menu on
the screen
3. There is a channel list of DVB-T services in
this menu, also you cansee the Band Width/
Quality/ Frequency and Strength of the current service.
4. Using the ▲ / ▼ to select channel which you
like, and press ► that allow you to delete/
move/ Lock & Unlock it.
18

DVB-T Mode
Channel List
Delete
1. Press ▲ / ▼ to select the delete item and press OK
to confirm it. There is a delete menu on screen as
below:
2. Press ENTER to delete the channel and press DTV
MENU to return to previous menu.
3. If you want to restore the channel that have been
deleted, you should search again.
Lock & Unlock
1. Press ▲ / ▼ to select Lock & Unlock item and
press OK to confirm it. There is a pin code menu
on screen.
2. Press the number buttons directly to input the pin
code that is made up of six numbers and the
initial is: 888888. You can change it in System
Setting.
3. If Lock is already set, enter the pin code as requested.
Move
1. This function allows you to change the order of
channel in the list.
English
19

DVB-T Mode
Favorite List
1. Press the DVB MENU on the remote control to
bring up the main menu on the screen and use
▲ / ▼ to select the Favorite List menu.
2. Press the Enter to confirm your selection and
there have a Favorite List menu on screen as
below:
3. Press ► that you can continue add or delete the
favorite channel.
4. Use the ▲ / ▼ to select add item and then press
Enter to confirm it, there have a Channel list
English
menu display on the right, you can use ▲ / ▼
and Enter to select one of them to your favorite
list.
5. Press DVB MENU to return to previous menu,
then press Enter to TV viewing.
System Settings
Press the DVB MENU on the remote control or on the
front panel to bring up the main menu on the screen and
use ▲ / ▼ to select the System Setting menu. Press the
Enter to confirm your selection and there have a System
Setting menu on screen as below:
Time Setting
Use the ▲ / ▼ to select Time Setting item and then
press Enter to confirm it
Time zone
Press ▲ / ▼ to select Time Zone, then press OK to con-
firm it, you can select the option of GMT+0 --- 8.
Banner Time Setting
This function allows you to set the time of banner display, you can Press ▲ / ▼ to select banner time options:
1secs/ 3 secs / 5 secs/ 7 secs/ 9 secs.
20

DVB-T Mode
System Settings
Language Setting
Use the ▲ / ▼ to select Language Setting item and then
press Enter to confirm it.
Menu language
This function allows you to set the language of OSD
display, you can Press ▲ / ▼ to select the options: Eng-
lish / French / German /Spanish / Italian / Portuguese.
Audio language
This function allows you to set the language of audio, you can Press ▲ / ▼ to select the
options: English / French / German / Spanish / Italian / Portuguese.
Parental Setting
Use the ▲ / ▼ to select Parental Setting item and then press Enter to confirm it If the lock
is already set, enter the pin code as requested.
Chang Pin Code
This function allows you to change the pin code, you
should to input a new pin code twice and press OK to
confirm it.
Censorship
You can Press ▲ / ▼ to select an age bracket options:
None Block/ 6/ 10/ 14/ 18.
A/V Setting
Use the ▲ / ▼ to select A/V Setting item and then
press Enter to confirm it.
TV Shape
This function allows you to select the proper picture
proportion to match the source’s image, you can select
one of 4 : 3 and 16: 9.
Conversion Prefer
This function allows you to select the screen conversion
mode options: Full Frame/ Vertical cut/ Pillar Box or Full
Frame/ Pan & Scan/ Letterbox.
Bright & Contrast
Press the ◄ / ► to adjust the value of bright and con-
trast.
English
21

DVB-T Mode
System Settings
Saturation
Press the ◄ / ► to adjust the value of saturation.
Factory Setting
Use the ▲ / ▼ to select Factory Setting item and then press Enter to confirm it
Restore Default
Press Enter to enter the restore default menu and
use Enter to do it else use Menu to return to previous menu.
English
Clear Channels
Press Enter to enter the clear menu and use Enter
to do it else use Menu to return to previous menu.
Country Select
Press Enter to enter the country select menu and
use ▲ / ▼ to select country that one of Default.
Timer List
Use the ▲ / ▼ to select Booking List item and
then press Enter to confirm it. This function allows
you booking the TV program, press Enter to enter
the setting menu
Event ID
Press ► and then use ▲ / ▼ to select event id
options: 1/ 2/ 3/ 4/ 5.
Service
Press Enter and then use ▲ / ▼ to select channel
which you want to book from channel list.
Event type
Press ► and then use ▲ / ▼ to select event type options: ONCE/ DAILY/ WEEKLY.
Start Time
Press the ◄ / ► to select the move cursor and input the number directly to set the begin
time of channel which you have booked.
Start date
Press the ◄ / ►
date of channel which you have booked.
to select the move cursor and input the number directly to set the begin
22

DVB-T Mode
System Settings
Duration
Input the number directly to set the last time of the channel which you have booked.
Status
Press ► and then use ▲ / ▼ to select options: ON/ OFF.
System Info
Use the ▲ / ▼ to select System Info item and then
press Enter to confirm it.
Software Version
Use the ▲ / ▼ to select Software Version item and
then press Enter to refer to the version of software.
Hardware Version
Use the ▲ / ▼ to select Hardware Version item and
then press Enter to refer to the version of hardware.
Signal Information
Use the ▲ / ▼ to select Signal Information item and then press Enter to refer to the signal
quality and strength of signal.
EPG
The last submenu in the main menu is EPG.
1. Press the DVB MENU on the remote control or
on the front panel to bring up the main menu on
the screen and use ▲ / ▼ to select the EPG
menu.
2. Press the Enter to confirm your selection and
there have a EPG menu on screen as below.
3. This function let you know the detailed information of the channel, that can predict the time of
the program playing.
4. You can book channel by pressing Enter, and
the operation of it is the same as Book setting.
English
23

DVB-T Others
Teletext
Press this button to enter Teletext interface. Press it again the background of teletext will
become transparent and press it once more to exit teletext mode and return to normal TV
viewing.
RED/ GREEN/ YELLOW/ BLUE
Press these buttons to access directly to the corresponding color pages displayed at the
lower parts of the teletext screen.
PAGE SELECTION
• Press UP and Down buttons to select the preceding or following page.
• You also can enter page number (three digital) directly using the number buttons to
English
select the page, and if you press a wrong number during input, you must complete
the three digital number and re-enter the correct page number.
• Press Right and Left buttons to select the sub page of one page.
Other Operations
TV/RADIO
Press TV/Radio to select TV or Radio mode in sequence.
AUDIO
Press audio to select one of audio type as following: Stereo/ Left/ Right/ Mono.
SUBTITLE
Press this button to display the current sub-title, and press it again to hide it.
AUDIO
Press this button to select the Language of the current program.
EPG
Press this button to enter the EPG menu directly.
FAV
Press this button to enter the FAV menu directly.
INFO
Press this button to display some information about current program.
24

Troubleshooting DVB-T
Our custom service will help you. Did you already read the notes for Troubleshooting?
Technical custom service of Xoro/MAS :
• Phone: +49 40 77 11 09 17
• Internet: www.xoro.de/support.htm
No DVB-T Signals?
Please check if the HTC xx25D is in DVB-T mode ? If not please switch to this mode.
Bad reception quality?
Please, align your antenna optimally in direction of the mast. Use a antenna with active amplifier or a house antenna and roof antenna. If you have changed the HTC xx25D area, adjust the antenna new or connect an active antenna
No TV programs ?
If there are no more programs shown in the Channel list. Please start automatic searching
again.
Remote control works not ?
Please, direct the remote control upon the device. If the problem is not repaired yet, then
change the batteries.
NOTE:
In areas with less DVB-T signals the application of amplifier aerials is recommended to the
reception of all available TV channels.
English
25

DVD-Player
The DVD Player is activated by repeated printings of the AV/TV key.
The DVD Slot-In loader opens and produces now some noise. The Slot-In loader is on the
left side of the HTC xx25D. Place the disc with the printed side to the rear into the loader
and push very slightly to the right side. You can see the silver side. The loader moves in the
disc automatically and reads the disc information.
Note:
If the disc is inserts with the wrong side, than the
loader tries to read the disc. This procedure needs
more time than in a normal way. The loader can not
English
read the disc content and displays the message “No
disc” and moves out the disc.
NOTE:
To be able to eject a CD or DVD it is necessary to
enable the DVD mode. Otherwise the pressing of the
OPEN/CLOSE button (▲
Switch on the unit and press the SOURCE button
repeatedly, until “DVD” is displayed right above on the
screen. Now the HTC xx25d is in DVD mode.
) will be without function.
Function
An On Screen Display (OSD) indicator will be displayed at the upper part TV screen when
certain functions are executed, or when pressing the OSD button on the remote control.
The OSD indicator is a user friendly interface designed to display the status of playback type . When a different disc is loaded (DVD, CD, Music ready); the OSD indicator
bar will be different
The OSD bar will appear automatically if it is activated by pressing the OSD button, Press
the OSD button again and a new status bar will appear. Press OSD button a third time and
the OSD bar will disappear. When OSD indicator bar appears, press other button, the OSD
indicator bar will disappear automatically.
26

DVD-Player
Function
By pressing the OSD button again the following picture is shown by Video –DVD:
1. Active sound track
2. Format of sound track DD 5.1 CH (channel)
3. Subtitle (not included in this example) (OFF)
4. More aspects (in this example there are no aspects activate at moment)
By MPEG-4 video files the information is a bit different than with a video DVD.
Important information for a ISO Data disk with MPEG-4 files are:
1. Disc Format (here CDROM)
2. Number of tracks and which one is just played
3. With or without sound
4. Running time
Open/Close
To open and close the disc tray. Press OPEN button on the front panel or the remote.
Notes:
• Player will not skip forward or backward during “WARNING” section of a DVD disc.
• Single chapter DVD or single track CD cannot skip
Play/Pause
Press PLAY button to play the disc. Press PLAYP/AUSE button again to pause (still
picture). Press PLAY/PAUSE button to playback the content.
Stop
Press STOP button to stop in two modes:
• Press STOP button once. Stop memorizes the interrupt position and the
OSD shows PRESTOP. Resume play by pressing PLAY button.
• Press STOP button twice completely stop disc. The OSD shows “STOP” and
the PLAY button will resume disc.
English
27

DVD-Player
Function
Press this button skip advance DVD chapter or CD track.
Press this button skip backward DVD chapter or CD track.
Fast Backward/Fast Forward
Press this button to fast backward through the disc. Repeatedly press the button.
Press this button to fast forward through the disc. Repeatedly press the button will
increase the search speed.
Notes:
English
• The changes in speed by fast backward or fast forward are from Normal —> x2 —>
x4 —> x8 —> 20 —> Normal
• The player is muted in fast forward or fast backward this mode.
• Player will not fast forward or fast backward during WARNING section of a DVD disc
DVD Menu
While playing a DVD, press the MENU button return to the DVD disc menu.
Numeric Buttons
Title
While playing a DVD, press the TITLE button return to the DVD disc title menu.
Audio Track
While playback a DVD disc, press LANG button repeatedly to select the desired
audio sound track. A DVD disc may contains up to 8 selectable audio sound tracks.
Numerical key pad (Random Program access)
1. To direct access a DVD chapter or a CD track, input the desired
DVD chapter or CD track number using the numerical key pad.
2. Input data for the DVD disc start menu or the player’s setup menu.
28

DVD-Player
Function
Repeat section A-B
To repeat playback a specific section of a disc.
• Press the A-B button at the starting point of the desired section, “REPEAT A-”
display on screen.
• Press the A-B button again, at the end of the desired section, “REPEAT A-B” display on
screen. The desired section A to B until the function is cancelled.
• To cancel the function, Press the A-B button again return to normal play.
Note:
Some DVD discs do not allow A-B function
Repeat Mode
Press PEPEAT button repeatedly to select the repeat mode.
In DVD mode In CD mode
REP. CHAPTER Repeat chapter REP. 1 Repeat track
REP. TITLE Repeat title REP. ALL Repeat disc
REP. OFF Repeat off REP. OFF Repeat off
Note:
Some DVD discs do not allow repeat function
Angle
While playback a DVD disc, press ANGLE button repeatedly to select the desired
camera angle. A DVD disc may contain up to 9 selectable camera angles.
Subtitle
While play a DVD disc, press SUB-T button repeatedly to select the desired subtitle,
A DVD disc may contains up to 32 selectable subtitles.
.
Note:
DVD disc start menu may contains set up of angle, Subtitle and Audio soundtrack selection.
You may do the selection in the disc start menu.
Zoom
Press the ZOOM button repeatedly TV Screen display:
ZOOM x2 —> ZOOM x3 —> ZOOM x4 —>ZOOM x1/2 —> ZOOM x1/3 —> ZOOM
x1/4 —> ZOOM OFF
When playback the JPEG. Press the ZOOM button display the zoom x1/2, x1/3, x1/4, press
direction button to rotate picture. While display the zoom x2, x3, x4, press direction button to
move picture position.
English
29

DVD-Player
Function
Program
Press PROG button to quit the program menu.
In DVD mode
When the program menu appears input the Title and Chapter Number
PLAY: Press PLAY button to start program play.
CLEAR: Press CLEAR button if you want to cancel the wrong information you input. Press
CLEAR again to cancel all the tracks.
In CD mode
English
When the program menu appears, input the Track number, press ENTER, when the
programming is completed.
30

DVD-Player
Data disc with Music, JPEG or Video files
1. Switch on the unit
2. Pressing SOURCE button repeatedly till “DVD” is displayed above left on screen.
3. Insert a disc with Music, JPEG or MPEG-1, MPEG-2 or MPEG-4 video files
Insert the a disc and the player will auto search the directories saved Music/JPEG files. After
searching, it will auto go to the first directory saved Music files (to the disc containing both
Music and JPEG files. To the disc containing single type of files, it will go to the first directory) and play the first song in the directory (File name is highlighted). The screen displays
as the picture below:
Note:
Current directory name
The playing file is music
The playing file is a JPEG
• With the arrow key to the right you can change between the catalogue window, the
Chops and Track window and to the file format. File formats are of the order: music
(mark (note)), pictures (camera) and video (arrow).
• The DVD player starts with the playback of Music files.
Current file name
The slide bars will be
moved down while file
moves
File Switch Region: Display the
file type of the
playing and the
switching
The playing file is a video file
English
31

DVD-Player
Data disc with Music, JPEG or Video files
1. Use the Arrow buttons to enter the Directory Region and highlight the desired directory,
then the first track under it starts playback. You also can use the arrow buttons to enter
the File Region and select the file you want to play .
Notes:
• With pressing the Left and Right arrow buttons, you can activate Directory
Region, File Region and File Switch Region separately.
• The highlight in Directory Region and File Region is shown as the picture on
left page; While highlighted, a transparent rectangle appears
• In File Switch Region, you can press the Left and Right arrow buttons to switch
English
Notes:
the highlight, then press Enter; the ” ” “ ” and “ ”Button is illustrated in
the left side picture. For example, if a disc with Music and JPEG files but with-
out any Video files is loaded, the color of the letter “ ” and “ ” will be
white and “ ” black. If a Music file playing, “ ” turns red.
• When playing a JPEG picture on discs containing WMA, MP3 and JPEG files,
press the Return button to return to JPEG list.
• You can press the Numeric buttons to select the file you want to play. For
example, if you desire the 15
then press “5”, the 15
th
th
track in current list, press the “10+” Button once,
starts playback.
• When playing a disc with MP3files, no video can be displayed at the same
time.
• You can press the “PREVIEW” buttons to get helpful message.
• When playing JPEG picture, press the Program button to choose the picture
transition mode. There are 17 transition modes available. Press Program
repeatedly to activate the function and choose the desired switch mode. Following transition modes are available :Spread from Left Up to Down, Spread
from Down to Left, spread from Left to Right, Spread from Right to Left,
Spread from Left Up to Right Down, spread from Right UP to Left Down,
Spread Left Down to Right Up, Spread From Right Down to Left Up, Spread
from Center to Up /Down, Fold from Up /Down to Center, old from Left/ Right
to Center, Horizontal Shutter, Vertical Shutter, Fold from the Corners to the
Center, and Play, Off.
32

DVD Player Setup
Press the DVD SETUP button to enter the player's setup menu. Setup
menu is a facility for the owner to adjust the detail setting of the player.
For the detail of Setup menu see "SET UP MENU" of this instruction manual. Various features of the player can be adjusted in the SETUP menu.
1. Press DVD SETUP button SETUP menu appears.
2. Press the UP/DOWN button to highlight the desired menu.
In STOP mode, press DVD SETUP button Highlight SYSTEM SETUP. Press UP/DOWN but-
ton to select the subtitle. Press ENTER button, the screen displays submenu.
• Press UP/DOWN button to highlight the desired time
• Press ENTER confirm your selected item.
Three different global settings are in the Setup
available:
1. System Setup for TV systems, TV Type,
Password, Rating and Default settings.
2. Language Setup for OSD, Audio,
Subtitle, Menu and MPEG-4 Subtitle
settings.
3. Audio Setup for Down mix, Audio Out
and Dual Mono settings.
System Setup:
TV System
There are NTSC/PAL/ PAL 60 / AUTO three modes, and choose one mode according your
TV mode.
If the TV mode is not suitable as the DVD player screen will blink and become colourless.
The default setting: PAL
SCREEN SAVER
This setting activates or deactivates the screen saver. If the screen saver is ON, than appears the screen saver automatically when the playback stops for a longer time or when no
disc is inside.
VIDEO
The setting defines the kind of video output. This setting can not changed, because the
video output is fixed.
English
33

DVD Player Setup
System setup
TV Type
1. 4 : 3 Pan Scan: It is suit to the common size TV.
When playing, the picture will be cut . so that the
TV screen is filled with the picture.
2. 4 : 3 Letter box: when the player connect to the commonly size TV, please select the type. The top and
bottom of TV screen will display black frame.
3. 16 : 9 Wide Screen: When the player connects to the
wide screen TV.
The default setting: 4 : 3 Pan Scan.
English
Password
Move the cursor the PASSWORD item and press ENTER button to confirm and then input
the secret code “0000” (if it is the first use). After confirmation, you are required to input new
secret code and then press ENTER “button” to confirm.
Warning:
Please remember the new secret code, otherwise you will not be able to change the parental control. Please contact the agent or our company if you forget the secret code.
RATING
There are total eight levels of this control. Eight levels as follow:
1. KID-SAFE
2. G
3. PG
4. PG13
5. PG-R
6. R
7. NC-17
8. ADULT
The first level discs are open to people of average and eight level only suitable for the adult .
If you want to change the Parental control setting, enter the user’s age control item and then
enter four digital secret code. The default secret code is 8357(if you are using this player for
the first time, just input this code ). If the input code has been confirmed, the level setting up
menu will appear. Move the cursor to choose the expected level and press ENTER button to
confirm and store it .
Default
This is the factory default setting up . When choose “RESTORE”, the previous setting up, by
the user will be cancelled and the player will come to the factory setting up state .
34

DVD Player Setup
Language Setup
In STOP mode, press DVD SETUP button
and Highlight LANGUAGE.
• Press UP/DOWN button
• Press ENTER button, the screen
displays submenu.
• Press UP/DOWN button to highlight
the desired item in the LANGUAG
menu.
• Press ENTER to confirm your se-
lected item.
• Press SETUP button SETUP to quit.
MPEG4-Lang
Select the a codepage for the MPEG-4 Subtitle:
Central EU: Swedish etc.
Cyrillic: Russian, Serbian etc.
Western EU: German, French etc...
East EU: Polish., Slovene etc.
Video setup
In STOP mode, press DVD SETUP button,
highlight VIDEO SETUP. Press ENTER to
enter next sub-menu.
The sub menu are “Brightness”, “Contrast”,
“Hue”, “Saturation” and “Sharpness”.
Enter into one of the sub menu and change
the settings by using the navigation buttons
UP or DOWN. To save the new setting,
please press the ENTER button.
English
35

DVD Player Setup
SPEAKER SETUP
In STOP mode, press DVD SETUP button
and Highlight SPEAKER SETUP.
• Press UP/DOWN button
• Press ENTER button, the screen
displays submenu.
• Press UP/DOWN button to highlight
the desired item in the LANGUAG
menu.
• Press ENTER to confirm your se-
English
lected item.
• Press SETUP button SETUP to quit.
Downmix
• This setting is suitable for films. If you only need two channels to enjoy music, it’s
recommended to select the second option, Stereo.
• The option VSS produces a “virtual surround sound”.
• LT/RT divided the channels.
FRONT
Adjust the size of the front speaker.
AUDIO setup
The setting “KEY” adjust the bass audio
output.
Positive values for decreasing the bass.
Negative values for increasing the bass.
36

DVD Player Setup
Digital setup
In STOP mode, press DVD SETUP button
and Highlight DIGITAL SETUP.
• Press UP/DOWN button
• Press ENTER button, the screen
displays submenu.
• Press UP/DOWN button to highlight
the desired item in the LANGUAG
menu.
• Press ENTER to confirm your se-
lected item.
• Press SETUP button SETUP to quit.
Dynamic Range
Here you can change the audio compression. If you choose the setting “FULL” than the audio gets the biggest limitation. A kind of “NIGHT MODE”. By using the setting “OFF”, the
audio gets no compression.
Dual Mono
The options here are Stereo, Mono L, Mono R and Miy Mono.
If you have Dolby digital output your amplifier/decoder, you may select stereo, left, right and
mixed sound accordingly.
English
37

Troubleshooting
Our custom service will help you. Did you already read the Troubleshooting pages?
Technical custom service of Xoro/MAS:
• Phone: +49 40 77 11 09 17
• Internet: www.xoro.de/support.htm
Symptom Check and Action
No disc, load a disc.
Disc has been loaded upside down. Place the disc with the label side up.
English
Does not play
No Picture
Disc’s region code does not match to the player.
Disc’s rating level is higher than the player’s rating level setting.
Disc is not correct type for the player.
Disc is damaged or power on for one or two hours.
Moisture may be condensed inside the player. Remove the disc and
leave the unit power on for one or two hours.
Check the system connection is proper and secure.
Check if the connection cables are damaged.
Clean the disc.
Picture
noise/distorted
Picture not full
screen
Problem
message display
on screen
38
The disc is dirty or damaged. Clean the disc or try another disc.
Select the screen format from the player’s SETUP MENU.
See “SETUP MENU” of this manual.
Select the screen format from DVD disc menu.
Following message will display when there is a problem with the loaded
disc”
1. “WRONG REGIONAL DISC
player.
2. “WRONG PASSWORD
level higher than the player’s rating level setting.
3. “WRONG DISC
detection software. When the player detects a problem disc or a
damaged disc, the player may keep playing the disc at lower quality
or stop playing, depending on the damage level of the disc.
”: The player is equipped with automatic disc quality
”: Disc’s region code is not match to the
”: The player refuse to play a disc with rating

Troubleshooting
Symptom Check and Action
Cannot SKIP
or SEARCH
Remote control
des not function
Some discs are programmed that do not allow users to SKIP or
SEARCH a some sections, especially at the beginning WARNING
section
Single Chapter disc cannot apply SKIP function.
Remove the obstacles between the remote control and the player.
Point the remote control towards the remote sensor on the player.
Check if the batteries of the remote control have been loaded with
correct polarities.
Replace the batteries of the remote control.
English
Macrovision
U.S. Patens Nos. 4,631,603; 4,577,216; 4,819,098; 4,907,093; 5,315,448 and 6,516,132
"This product incorporates copyright protection technology that is protected by U.S. patents
and other intellectual property rights. Use of this copyright protection technology must be
authorized by Macrovision, and is intended for home and other limited viewing uses only
unless otherwise authorized by Macrovision. Reverse engineering or disassembly is prohibited."
39

Specification
HTC 1525D HTC 1925 HTC 2225D
Screen Size 39 cm (15,4 inch) 48 cm (19 inch) 56 cm (22 inch)
Display Type TFT LCD
Resolution 1280 x 800 1440 x 900 1680 x 1050
Aspect Ratio 16:10
2
Brightness 200 cd/m
English
Contrast 300:1 1000:1 1000:1
Response Time 25 ms 6,5 ms 5 ms
Viewing Angle 90 ° 160 ° 160 °
TV System PAL BG / DK / I
Stereo NICAM / A2
Interface
CVBS Video 1,0 V p-p 75 Ohm unausgeglichen
S-Video Y: 1,0 V p-p +/- 3 dB
Scart CVBS: 1,0 V p-p 75 Ohm
PC VGA 640 x 480 bei 60 Hz / 800 x 600 bei 60 Hz / 1024 x 768 bei 60 Hz
Antenna RF Antennenanschluss, 75 Ohm
Speaker 2 x 3 Watt 2 x 3 Watt 2 x 5 Watt
Video System PAL / NTSC
300 cd/m2 400 cd/m2
SECAM BG / DK / L / L‘
C: 0,3 V p-p +/- 3 dB
RGB: 1,0 V p-p 75 Ohm
Empfohlen wird immer die native Auflösung.
AC / DC Adapter AC: 110—260 V 50 / 60 Hz
Comsumption
Dimension
(LxTxH)
Weight 5,5 kg 6,5 kg 7,0 kg
40
385 x 175 x 336 mm 465 x 210 x 410 mm 540 x 210 x 460 mm
DC: 12 V bei max. 5 A
60 W / Standby 3 W

English
41


ТРЕБОВАНИЯ БЕЗОПАСНОЙ
Перед началом эксплуатации ЖК телевизора со встроенным DVD
проигрывателем (моноблока), пожалуйста, внимательно прочтите
руководство пользователя!
ЭКСПЛУАТАЦИИ
Электрическая безопасность
Моноблок следует подключать к сети электропитания только с тем
•
напряжением, которое указано на адаптере.
• Для предотвращения перегрузки не используйте одну и ту же розетку
электропитания для нескольких приборов.
• Будьте осторожны, не располагайте шнур электропитания в местах, где
на него можно наступить.
• Обязательно выключайте моноблок, когда он не используется. Если Вы
не планируете использовать моноблок длительное время, отключите его
от электросети.
• Не допускайте попадания жидкости или влаги на моноблок или на ПДУ
(пульт дистанционного управления).
• В случае возникновения любой из перечисленных ниже ситуаций,
необходимо отключить телевизор от электросети и обратиться в
сервисный центр:
− повреждена вилка сетевого шнура или сам шнур;
− внутрь корпуса попала жидкость или прибор подвергся воздействию
влаги;
− посторонний предмет попал в вентиляционное отверстие;
− моноблок функционирует нестабильно.
• Не открывайте корпус устройства. Внутри устройства нет узлов,
требующих обслуживания пользователем. При необходимости
обращайтесь только к квалифицированным специалистам.
• Во избежание протечки удаляйте элементы питания из ПДУ, когда:
− срок службы батареек истек;
− ПДУ не используется в течение длительного времени.
• Не бросайте батарейки в огонь.
Физическая безопасность
Убедитесь, что моноблок расположен на расстоянии не менее 5см от
•
стены или мебели.
• Никогда не стучите по экрану и не расшатывайте его.
• Не допускайте попадания жидкости на ПДУ и никогда не разбирайте ПДУ.
• Чистите моноблок, используя только мягкую, чистую, сухую ткань. Не
допускается использование растворителей.
Русский
1

СОДЕРЖАНИЕ
Требования безопасной эксплуатации
Эклектическая безопасность ...........................................1
Физическая безопасность ..............................................1
Комплектация............................................................................................................... 3
Основные особенности...............................................................................................3
Кнопки управления и разъемы на корпусе устройства
Тыловая панель ....................................................................................................4
Правая боковая панель........................................................................................ 4
Верхняя панель..................................................................................................... 5
Включение/выключение моноблока и выбор источника сигнала ..................... 5
Пульт дистанционного управления
Русский
Подготовка ПДУ к работе.....................................................................................8
Правила использования ПДУ .............................................................................. 8
Расположение кнопок на ПДУ.............................................................................. 9
Основные операции режима ТВ
Принципы работы меню настроек..................................................................... 11
Настройка изображения..................................................................................... 12
Настройка режима компьютерного монитора .................................................. 12
Настройка режима HDMI.................................................................................... 13
Настройка звука.................................................................................................. 14
Настройка телевещания .................................................................................... 14
Общие настройки ............................................................................................... 16
Неисправности телевизора и способы их устранения .................................... 17
Основные операции режима DVB-T
Принципы работы меню настроек..................................................................... 18
Настройка каналов ............................................................................................. 18
Операции со списком каналов .......................................................................... 19
Список любимых каналов .................................................................................. 21
Системные настройки ........................................................................................ 21
Электронная программа передач ..................................................................... 25
Телетекст ............................................................................................................ 26
Дополнительные операции................................................................................ 26
Неисправности приемника DVB-T
Основные операции режима DVD
Загрузка/извлечение DVD диска ....................................................................... 28
Информационная строка режима DVD............................................................. 28
Основные правила управления воспроизведением дисков ........................... 29
Воспроизведение файлов MP3, MPEG-4 и JPEG............................................33
Настройка DVD проигрывателя
Системные настройки ........................................................................................ 35
Настройка языковых параметров...................................................................... 37
Настройка изображения..................................................................................... 38
Настройка звука.................................................................................................. 38
Настройка цифрового аудиовыхода ................................................................. 39
Настройка громкоговорителей .......................................................................... 39
Неисправности DVD проигрывателя и способы их устра нения .................... 40
Технические характеристики....................................................................................42
и способы их устранения ......................... 27
2

КОМПЛЕКТАЦИЯ
При распаковке устройства, пожалуйста, убедитесь, что присутствуют следующие
аксессуары:
• ЖК телевизор со встроенным DVD проигрывателем HTC 1525D/HTC1925D/HTC
2225D
• Пульт дистанционного управления (ПДУ) с батарейками
• Руководство пользователя
• Адаптер электропитания
• Кабель электропитания
• Гарантийный талон
Примечание:
• Если какие-то из аксессуаров отсутствуют, пожалуйста, сразу же обратитесь
к дилеру.
• Сохраняйте упаковку, она может Вам понадобиться в будущем при
транспортировке плеера.
• Всегда транспортируйте или храните проигрыватель в его оригинальной
упаковке.
• Не меняйте и не модифицируйте детали проигрывателя или его аксессуары
Основные особенности
• Высококачественный дисплей
• Большое количество интерфейсов: VGA, RF, Video, S-VIDEO, SCART и HDMI
• Поддержка разрешения до 1080 строк при подключении к источнику
соответствующего сигнала по интерфейсу HDMI . (Относится только к моделям
HTC 1925D и HTC 2225D.)
• Стереовход
• Встроенный тюнер аналогового телевещания
• Встроенный тюнер цифрового наземного телевещания (DVB-T)
• Автоматический и ручной поиск и сохранение телевизионных каналов
• Автоматическое отключение при отсутствии входного сигнала
• Встроенный DVD проигрыватель со щелевой загрузкой дисков
Примечание:
В модели HTC 1525D интерфейс HDMI отсутствует.
Русский
3

КНОПКИ УПРАВЛЕНИЯ И РАЗЪЕМЫ НА
Тыловая панель
Русский
AUDIO IN L / R
PC AUDIO
Примечание:
В модели HTC 1525D интерфейс HDMI отсутствует.
Правая боковая панель
Справа внизу расположены следующие кнопки:
КОРПУСЕ УСТРОЙСТВА
Разъем Функциональное назначение
DC IN
HDMI
VGA
SCART
S-VIDEO
VIDEO
PHONE Разъем для подключения наушников
RF
Кнопка Функциональное назначение
>|| Начало воспроизведения диска и пауза
DVD Щелевой загрузчик дисков
Разъем для подключения адаптера электропитания
Вход для HDMI видеосигнала (только для моделей HTC 1925D и
HTC 2225D)
Вход для VGA видеосигнала от компьютера
Разъем SCART (для подключения DVD проигрывателя или
видеомагнитофона)
Видеовход сигнала S-video (для подключения DVD
проигрывателя или видеомагнитофона)
Видеовход композитного сигнала CVBS (для подключения DVD
проигрывателя или видеомагнитофона)
Аудиовходы правого и левого каналов внешнего
Вход для аудиосигнала от компьютера
Антенный вход для подключения комнатной или внешней антенны
Извлечь диск
Остановка воспроизведения диска
устройства
4

КНОПКИ УПРАВЛЕНИЯ И РАЗЪЕМЫ НА
Верхняя панель
Справа вверху расположены следующие кнопки:
Примечание:
При помощи кнопки SOURCE Вы можете выбрать один из следующих источников
сигнала:TV, SCART, AV, S-VIDEO, PC, HDMI, DVB-T и DVD.
Включение /выключение моноблока и выбор источника сигнала
Подсоедините антенный кабель или другой источник аудио-видиосигналов к
соответствующим разъемам на тыловой панели моноблока (см. таблицу на стр.4).
1. Подсоедините шнур адаптера электропитания к разъему
моноблока.
2. При помощи кабеля электропитания подсоедините адаптер электропитания к
розетке. Индикатор питания LED загорится красным светом.
3. Включите моноблок, нажав кнопку POWER на верхней панели моноблока или на
ПДУ. Индикатор питания LED загорится зеленым светом.
4. Используйте кнопку SOURCE верхней панели моноблока или на ПДУ для выбора
источника сигнала
6. Для быстрого выключения моноблока и перевода его в режим stand-by нажмите
кнопку POWER. Индикатор питания LED загорится красным светом. Для полного
отключения моноблока вытащите шнур электропитания из розетки .
КОРПУСЕ УСТРОЙСТВА
Кнопка Функциональное назначение
Power Включение питания или переход в
Menu Вызов экранного меню настроек
V+ / V- Увеличение/уменьшение громкости
P+ / P- Следующий/предыдущий канал
SOURCE Выбор источника сигнала
:TV, PC-RGB, AV, S-VIDEO, SCART, DVBT или DVD.
A. Тюнер аналогового телевещания (например: антенный кабель):
Нажимайте кнопку SOURCE до тех пор, пока на экране не появится надпись
TV. Моноблок HTC xx25D находится в режиме приема аналогового
телевещания.
B. DVD проигрыватель:
Нажимайте кнопку SOURCE до тех пор, пока на экране не появится надпись
DVD. Моноблок HTC xx25D находится в режиме воспроизведения DVD.
C. Тюнер цифрового
Нажимайте кнопку SOURCE до тех пор, пока на экране не появится надпись
DVB. Моноблок HTC xx25D находится в режиме приема цифрового
наземного телевещания.
режим энергосбережения Standby
DC IN на тыловой панели
наземного телевещания (DVB-T):
Русский
5

ПОДКЛЮЧЕНИЕ ВНЕШНИХ УСТРОЙСТВ
Включение/выключение электропитания
Подсоедините шнур адаптера электропитания к разъему DC
IN на тыловой панели моноблока.
При помощи кабеля электропитания подсоедините адаптер
электропитания к розетке. Индикатор питания LED загорится
красным светом. Моноблок находится в режиме
энергосбережения Stand-By.
Включите моноблок, нажав кнопку POWER на верхней
панели моноблока или на ПДУ. Индикатор питания LED
загорится зеленым светом.
Русский
Подключение антенны
Моноблок имеет встроенные аналоговый и цифровой тюнеры.
Подсоедините антенный кабель к антенному RF разъему на
тыловой панели моноблока.
Для приема аналогового телесигнала Вы можете
использовать внешнюю антенну эфирного вещания или
комнатную антенну платного вещания. Для приема цифрового
телесигнала наземного вещания Вы можете использовать
специальную внешнюю или комнатную антенну. Для
активизации аналогового
SOURCE в качестве источника сигнала TV, а для активации
цифрового тюнера выберите в качестве источника сигнала
DVB.
Примечание:
Для получения максимального качества цифрового вещания используйте
специализированную внешнюю антенну. Если это невозможно, то используйте
комнатную антенну.
Подключение при помощи кабеля SCART
Интерфейс SCART позволяет передавать все аудио-видеосигналы
по одному кабелю. Соедините разъемы SCART на тыловой
панели моноблока и тыловой панели DVD или
видеомагнитофона при помощи кабеля SCART. При помощи
кнопки SOURCE выберите SCART в качестве источника
видеосигнала. После этого моноблок будет готов принимать
аудио-видеосигналы по кабелю SCART.
Подключение при помощи CVBS (AV) кабеля
Если Вы подключаете к моноблоку более одного внешнего
источника сигнала, а разъемы SCART, HDMI и S-Video уже
задействованы, то для подключения очередного устройства Вы
можете использовать стандартный AV кабель. При помощи
аудио-видеокабеля RCA соедините белый и красный разъемы AUDIO IN L/R и желтый разъем VIDEO, расположенные на тыловой
панели моноблока, тыловой панели DVD или видеомагнитофона.
При помощи кнопки SOURCE
6
тюнера выберите при помощи кнопки
выберите AV в качестве источника видеосигнала.

ПОДКЛЮЧЕНИЕ ВНЕШНИХ УСТРОЙСТВ
После этого моноблок будет готов принимать аудио-видеосигналы по AV кабелю.
Подключение при помощи кабеля S-VIDEO
Если Вы подключаете к моноблоку более одного внешнего источника сигнала, а
разъемы SCART, HDMI и AV уже задействованы, то для подключения очередного
устройства Вы можете использовать разъем S-VIDEO.
Соедините разъемы S-VIDEO на тыловой панели моноблока и тыловой панели DVD или
видеомагнитофона при помощи кабеля S-VIDEO, а разъемы AUDIO IN R/L при помощи
RCA аудиокабеля. При помощи кнопки SOURCE выберите S-VIDEO в
видеосигнала.
После этого моноблок будет готов принимать видеосигнал по кабелю S-VIDEO, и
аудиосигналы по RCA стереоаудиокабелю.
Подключение при помощи кабеля HDMI
Интерфейс HDMI, подобно интерфейсу SCART, позволяет
передавать все аудио-видеосигналы по одному HDMI кабелю, но в
цифровом формате с более высоким качеством. Обычно этот
интерфейс используют для подключения игровых консолей PS3
или спутниковых приемников. Соедините разъемы HDMI на
тыловой панели моноблока и тыловой панели DVD,
видеомагнитофона, игровой консоли или спутникового
приемника при помощи кабеля HDMI. При помощи
SOURCE выберите HDMI в качестве источника видеосигнала.
После этого моноблок будет готов принимать аудиовидеосигналы по кабелю HDMI.
Подключение при помощи VGA кабеля
Для использования моноблока в качестве монитора компьютера
соедините разъемы VGA на тыловой панели моноблока и тыловой панели компьютера при
помощи кабеля VGA, а разъем PС AUDIO моноблока с аудиовыходом компьютера при
помощи RCA стереоаудиокабеля. Нажимая кнопку SOURCE на ПДУ, выберите VGA в
качестве источника видеосигнала.
После этого моноблок будет готов принимать видеосигнал по кабелю VGA,
по RCA стереоаудиокабелю.
Примечание:
1. Перед подключением моноблока к компьютеру в качестве монитора,
пожалуйста, установите на компьютере одно из следующих значений
разрешения экрана: 640 x 480, 800 x 600 или 1024 x 768.
2. Не забудьте подключить RCA стереоаудиокабель для передачи
аудиосигналов.
3. Следующие значения разрешения экрана обеспечивают максимальное
качество изображения для соответствующих моделей моноблоков:
• HTC 1525d —> 1280 x 800 точек
• HTC 1925d —> 1440 x 900 точек
• HTC 2225d —> 1680 x 1050 точек
качестве источника
кнопки
и аудиосигнал
Русский
7

ПУЛЬТ ДИСТАНЦИОННОГО
Подготовка ПДУ к работе Правила использования ПДУ
Направьте ПДУ на ИК-сенсор
моноблока (расположен на
фронтальной панели) и нажмите
кнопку, соответствующую необходимой
команде.
Русский
Примечания:
• Направляйте ПДУ на ИК-сенсор,
расположенный на фронтальной
панели моноблока.
• Не роняйте ПДУ.
• Оберегайте ПДУ от попадания
жидкости.
• Не разбирайте ПДУ.
Расстояние между ПДУ и
моноблоком должно быть
не более 5м .
Эффективный угол
«обзора» ИК-сенсора
плеера ±30°.
Примечания по использованию
батареек:
Несоблюдение перечисленных ниже
указаний может привести к утечке
электролита и коррозии батареек:
• При установке батареек соблюдайте
полярность.
• Устанавливаемые батарейки должны
быть одного и того же типа.
• Во время длительных перерывов в
использовании ПДУ вынимайте из
него батарейки.
• При неправильной работе ПДУ
замените батарейки.
• В случае утечки электролита
протрите батарейный отсек и
установите новые батарейки.
• При утилизации батареек
соблюдайте установленные правила.
ПДУ
8

ПУЛЬТ ДИСТАНЦИОННОГО УПРАВЛЕНИЯ
Расположение кнопок на ПДУ
1.
2.
3.
4.
5.
6.
7.
8.
9.
10.
11.
12.
13.
14.
15.
16.
17.
18.
19.
20.
21.
22.
23.
24.
25.
26.
27.
28.
29.
30.
31.
32.
33.
34.
35.
36.
37.
ATV: Аналоговый ТВ тюнер
DVB-T: Цифровой ТВ тюнер
DVD: DVD проигрыватель
1. POWER: включение питания или переход в
режим энергосбережения Standby.
2. PMODE: выбор режима отображения.
3. SMODE: выбор режима звучания.
4. 0—9: выбор канала вещания 0-9.
5. LCD MENU: настройка телевизора.
6. DVD SETUP: настройка DVD проигрывателя.
7. Джойстик режима TV ( ▲/▼/◄/►/OK): кнопки
управления курсором.
8.
ENTER: подтверждение выбранных значений в
экранных меню настроек.
9. VOL- / VOL+: увеличение/уменьшение общей
громкости.
10. ATV: Красная кнопка режима Телетекст;
DVB-T: SUBTITLE: выбор языка субтитров и
красная кнопка режима Телетекст ;
DVD: SUBTITLE: выбор языка субтитров.
11. ATV: NICAM: включение режима NICAM и
зеленая кнопка режима Телетекст;
DVB-T: AUDIO: выбор языка звукового
сопровождения
режима Телетекст;
DVD: AUDIO: выбор языка звукового
12. ATV: индексная кнопка режима Телетекст;
13. ATV: переход к подстранице режима Теле-
14. DVD: OPEN/CLOSE: извлечь диск.
15. DVD: ZOOM: масштабирование изображе-
16. DVD: MENU: экранное меню диска.
17. DVD: TITLE:
18. DVB-T: DVB FAV-: предыдущий любимый
19. DVB-T: DVB FAV: включение режима просмот-
20. MUTE: отключение звука.
21. SOURCE: выбор источника сигнала: TV ¼
22. DISPLAY: вывод на экран информации о
23. SIZE: установка формата экрана 4:3 / 16:9.
24. -/—: переключение режимов ввода
25. RECALL: быстрое переключение между
26. TELETEXT: Включение режима Телетекст для
сопровождения.
DVD: PLAY/PAUSE: воспроизведение/пауза.
текст;
DVD: STOP: остановка воспроизведения.
ния.
разделов).
канал;
DVD: ANGLE: выбор ракурса просмотра.
ра любимых каналов;
DVD: A-B: выбор и повторное воспроизведе ние фрагмента записи от точки А до
точки В.
SCART ¼
DVD ¼ HDMI ¼ TV.
воспроизведении.
однозначного/двухзначного номера канала.
последними двумя ТВ каналами.
аналогового и цифрового вещания.
AV¼ S-VIDEO¼ PC-RGB ¼
и зеленая кнопка
оглавление фильма (меню
Русский
9

ПУЛЬТ ДИСТАНЦИОННОГО
Расположение кнопок на ПДУ
1.
2.
3.
4.
Русский
5.
6.
7.
8.
9.
10.
11.
12.
13.
14.
15.
16.
17.
18.
19.
20.
21.
22.
23.
24.
25.
26.
27.
28.
29.
30.
31.
32.
33.
34.
35.
36.
37.
ATV: Аналоговый ТВ тюнер
DVB-T: Цифровой ТВ тюнер
DVD: DVD проигрыватель
27. DVB-T: DVB MENU: настройка приемника
DVB-T.
28. ATV: CH-/CH+: следующий/предыдущий
канал.
DVB-T: CH-/CH+: следующий/предыдущий
канал.
29. ATV: желтая кнопка режима Телетекст;
DVB-T: EPG: электронная программа пере дач и желтая кнопка режима Теле текст.
30. ATV: синяя кнопка режима Телетекст;
DVB-T: INFO: информация о воспроизводи мом канале и синяя кнопка
Телетекст;
DVD: INFO: информация о воспроизведе нии.
31. ATV: включение режима прозрачного Теле-
текста;
DVD: переход к предыдущей главе/треку.
32. ATV: выход из режима Телетекст;
DVD: переход к следующей главе/треку.
33. DVD: << / >>: ускоренное воспроизведение в
прямом/обратном направлении.
34. DVD: GOTO: переход к другому разделу
фильма
35. DVB-T: EXIT: Выход из настроек цифрового
тюнера.
36. DVB-T: TV/RADIO: переключение между
телевизионными и радиоканалами.
37. DVB-T: DVB FAV+: следующий любимый
канал.
DVD: PROGRAM: программирование после-
довательности воспроизведения.
.
режима
10

ОСНОВНЫЕ ОПЕРАЦИИ РЕЖИМА ТВ
Принципы работы в меню настроек
Большинство кнопок, которые упоминаются ниже, Вы можете найти на верхней и
правой боковой панелях моноблока либо на ПДУ. Для настройки телевизора нажмите
кнопку LCD MENU. В зависимости от выбранного источника сигнала на экране
появится одно из следующих меню:
• VIDEO MENU (Меню настройки изображения), если выбран один из
следующих источников сигнала: TV, AV, S-VIDEO, SCART, DVB-T, DVD.
• PC MENU (Меню настройки компьютерного монитора), если источником
сигнала выбран компьютер (PC).
• HDMI MENU (Меню настройки режима HDMI), если источником сигнала
выбран разъем HDMI.
При каждом следующем нажатии кнопки LCD MENU на экране будут появляться
следующие меню настроек:
• AUDIO MENU (Меню настройки звука)
• TV MENU (Меню настройки телевещания) (только если источником сигнала
является TV).
• GENERAL MENU (Меню настройки общих настроек)
• Следующее нажатие кнопки LCD MENU приведет к выходу из меню настроек
телевизора.
Русский
Выход из меню настроек телевизора осуществляется одним из следующих способов:
• Не нажимайте ни одну из кнопок в течение пятнадцати секунд,
• Нажмите кнопку LCD MENU несколько раз, пока меню не исчезнет с экрана.
11

ОСНОВНЫЕ ОПЕРАЦИИ РЕЖИМА ТВ
Настройка изображения
Если выбран один из следующих источников сигнала TV, AV, S-VIDEO, SCART, DVB-T,
DVD, то при нажатии кнопки LCD MENU Вы попадете в экранное меню настройки
изображения. В этом меню Вы сможете отрегулировать яркость, контрастность,
насыщенность и резкость изображения на экране телевизора.
BRIGHTNESS - Яркость
Используйте кнопки
регулировки яркости
CONTRAST - Контрастность
Используйте кнопки
регулировки контрастности
Русский
COLOUR - Насыщенность
Используйте кнопки
регулировки насыщенности
SHARPNESS—Резкость
Используйте кнопки
Настройка режима компьютерного монитора
Если Ваш моноблок подключен к компьютеру или другому устройству при помощи
кабеля VGA, то при нажатии кнопки LCD MENU Вы попадете в экранное меню
настройки режима компьютерного монитора.
BRIGHTNESS - Яркость
Используйте кнопки
регулировки яркости
CONTRAST - Контрастность
Используйте кнопки
регулировки контрастности
COLOR SETTING - Режимы цветности
Используйте кнопки
выбора одного из трех
предустановленных режимов цветности:
6500k, 9300k или USER.
При выборе значения
появится подменю, в котором при
помощи кнопок
сможете установить требуемое значение
для каждого цвета.
выбранного значения нажмите кнопку MENU .
AUTO CONFIG - Автонастройка
Нажмите кнопку
VOL+ или VOL-
.
VOL+ или VOL-
.
VOL+ или VOL-
.
VOL+ или VOL-
VOL+ или VOL-
.
VOL+ или VOL-
.
VOL+ или VOL-
USER
VOL+ или VOL-
Для подтверждения
VOL+
для выбора режима автонастройки телевизора.
для
для
для
для регулировки резкости изображения
для
для
для
на экране
Вы
.
12

ОСНОВНЫЕ ОПЕРАЦИИ РЕЖИМА ТВ
Настройка режима компьютерного монитора
H.POSITION - Подстройка по горизонтали
Используйте кнопки
горизонтали
V.POSITION - Подстройка по вертикали
Используйте кнопки
PHASE - Фаза развертки
Используйте кнопки
вертикальной синхронизации (H-sync), обеспечивающей стабильное изображение на
экране.
CLOCK - Частота развертки
Используйте кнопки
обеспечивающей вывод изображения на весь экран.
.
Настройка режима HDMI
Если Ваш моноблок подключен к компьютеру или другому устройству при помощи
кабеля HDMI, то при нажатии кнопки LCD
MENU Вы попадете в экранное меню
настройки режима HDMI.
BRIGHTNESS - Яркость
Используйте кнопки
регулировки яркости
CONTRAST - Контрастность
Используйте кнопки
регулировки контрастности
COLOR SETTING - Режимы цветности
Используйте кнопки
выбора одного из трех предустановленных
режимов цветности:
При выборе значения
VOL+ или VOL-
кнопок
Для подтверждения выбранного значения нажмите кнопку MENU .
цвета.
AUTO CONFIG - Автонастройка
Используйте кнопку
H.POSITION - Подстройка по горизонтали
Используйте кнопки
горизонтали
V.POSITION - Подстройка по вертикали
Используйте кнопки
.
VOL+ или VOL-
VOL+ или VOL-
VOL+ или VOL-
VOL+ или VOL-
VOL+ или VOL-
.
VOL+ или VOL-
.
VOL+ или VOL-
6500k, 9300k или USER.
USER
Вы сможете установить требуемое значение для каждого
VOL+
для выбора режима автонастройки телевизора.
VOL+ или VOL-
VOL+ или VOL-
для регулировки изображения по вертикали
на экране появится подменю, в котором при помощи
для регулировки изображения по вертикали
для регулировки изображения по
для регулировки фазы развертки
для регулировки
для
для
для
для регулировки изображения по
тактовой частоты,
сигнала
.
Русский
.
13

ОСНОВНЫЕ ОПЕРАЦИИ РЕЖИМА ТВ
Настройка звука
Для входа в экранное меню настройки звука нажмите кнопку LCD MENU еще раз.
VOLUME - Громкость
Используйте кнопки
регулировки громкости звука
BALANCE - Баланс
Используйте кнопки
регулировки аудиобаланса между
правым и левым динамиками
телевизора
Русский
AUDIO PRESET - Предустановки звука
Используйте кнопки
для выбора одного из предустановленных
режимов звука . Доступны следующие
значения этого параметра: PERSONAL/
VOICE/MUSIC/THEATRE - Пользовательский/Голос/Музыка/Театр.
При выборе значения
следующих параметров
TREBLE - Высокие частоты
Используйте кнопки
BASS - Низкие частоты
Используйте кнопки
.
VOL+ или VOL-
VOL+ или VOL-
VOL+ или VOL–
PERSONAL, Вы сможете
.
VOL+ или VOL-
VOL+ или VOL-
для
.
для
для регулировки уровня высоких частот
для регулировки уровня низких частот.
установить требуемое значение
.
Настройка телевещания
Для входа в экранное меню настройки
телевещания нажмите кнопку LD MENU
еще раз (только если источником сигнала
является TV).
CHANNEL - Канал
Используйте кнопки
увеличения или уменьшения номера
транслируемого канала
SYSTEM - Звуковая система
Используйте кнопки
ыбора звуковой системы. Возможные
в
значения этого параметра:
14
VOL+ или VOL-
.
VOL+ или VOL- для
BG/DK/I/L
для
.
 Loading...