


 Loading...
TL-R600VPN
SafeStreamTM Gigabit Broadband VPN Router
Rev: 1.0.0 1910010557
COPYRIGHT & TRADEMARKS
Specifications are subject to change without notice.  is a registered trademark of TP-LINK TECHNOLOGIES CO., LTD. Other brands and product names are trademarks or registered trademarks of their respective holders.
No part of the specifications may be reproduced in any form or by any means or used to make any derivative such as translation, transformation, or adaptation without permission fromTP-LINK TECHNOLOGIES CO., LTD. Copyright © 2011 TP-LINK TECHNOLOGIES CO., LTD.
All rights reserved.
http://www.tp-link.com

FCC STATEMENT
This equipment has been tested and found to comply with the limits for a Class A digital device, pursuant to part 15 of the FCC Rules. These limits are designed to provide reasonable protection against harmful interference when the equipment is operated in a commercial environment. This equipment generates, uses, and can radiate radio frequency energy and, if not installed and used in accordance with the instruction manual, may cause harmful interference to radio communications. Operation of this equipment in a residential area is likely to cause harmful interference in which case the user will be required to correct the interference at his own expense.
This device complies with part 15 of the FCC Rules. Operation is subject to the following two conditions:
1)This device may not cause harmful interference.
2)This device must accept any interference received, including interference that may cause undesired operation.
Any changes or modifications not expressly approved by the party responsible for compliance could void the user’s authority to operate the equipment.
CE Mark Warning
This is a class A product. In a domestic environment, this product may cause radio interference, in which case the user may be required to take adequate measures.
Package Contents
The following items should be found in your box:
¾One TL-R600VPN SafeStreamTM Gigabit Broadband VPN Router
¾One power cord for TL-R600VPN SafeStreamTM Gigabit Broadband VPN Router
¾One Resource CD for TL-R600VPN SafeStreamTM Gigabit Broadband VPN Router, including:
•This User Guide
•Other Helpful Information
)Note:
1)The provided power cord may be different due to local power specifications.
2)Make sure that the package contains the above items. If any of the listed items are damaged or missing, please contact your distributor.
Conventions
The Router or TL-R600VPN mentioned in this guide stands for TL-R600VPN SafeStreamTM Gigabit Broadband VPN Router without any explanation.
CONTENTS
Chapter 1. Introduction ........................................................................................ |
1 |
|
1.1 |
Overview of the Router .................................................................................................. |
1 |
1.2 |
Features......................................................................................................................... |
1 |
1.3 |
Conventions................................................................................................................... |
1 |
Chapter 2. |
Hardware installation ......................................................................... |
2 |
|
2.1 |
Panel Layout.................................................................................................................. |
2 |
|
|
2.1.1 |
The Front Panel................................................................................................................ |
2 |
|
2.1.2 |
The Rear Panel ................................................................................................................ |
2 |
2.2 |
System Requirements ................................................................................................... |
3 |
|
2.3 |
Installation Environment Requirements ......................................................................... |
3 |
|
2.4 |
Connect to Ground ........................................................................................................ |
3 |
|
2.5 |
Connecting the Router................................................................................................... |
4 |
|
Chapter 3. Quick Installation Guide |
.................................................................... 6 |
||
3.1 |
Configure PC ................................................................................................................. |
6 |
|
3.2 |
Login.............................................................................................................................. |
|
9 |
Chapter 4. Configuring the Router .................................................................... |
13 |
||
4.1 |
Status........................................................................................................................... |
|
13 |
4.2 |
Quick Setup ................................................................................................................. |
15 |
|
4.3 |
Network........................................................................................................................ |
15 |
|
|
4.3.1 |
WAN ............................................................................................................................... |
15 |
|
4.3.2 |
LAN................................................................................................................................. |
24 |
|
4.3.3 |
MAC Clone ..................................................................................................................... |
25 |
4.4 |
DHCP........................................................................................................................... |
|
26 |
|
4.4.1 |
DHCP Settings ............................................................................................................... |
26 |
|
4.4.2 |
DHCP Clients List........................................................................................................... |
27 |
|
4.4.3 |
Address Reservation ...................................................................................................... |
27 |
4.5 |
Forwarding................................................................................................................... |
29 |
|
|
4.5.1 |
Virtual Servers................................................................................................................ |
29 |
|
4.5.2 |
Port Triggering................................................................................................................ |
31 |
|
4.5.3 |
DMZ................................................................................................................................ |
33 |
|
4.5.4 |
UPnP .............................................................................................................................. |
33 |
4.6 |
Security........................................................................................................................ |
34 |
|
|
4.6.1 |
Basic Security................................................................................................................. |
34 |
|
4.6.2 |
Advanced Security ......................................................................................................... |
36 |
|
4.6.3 |
Local Management......................................................................................................... |
37 |
4.7 |
Access Control............................................................................................................. |
37 |
|
|
4.7.1 |
Rule ................................................................................................................................ |
38 |
|
4.7.2 |
Host ................................................................................................................................ |
39 |
|
4.7.3 |
Target ............................................................................................................................. |
40 |
|
4.7.4 |
Schedule ........................................................................................................................ |
41 |
4.8 |
IPsec VPN ................................................................................................................... |
42 |
|
|
4.8.1 |
IKE.................................................................................................................................. |
42 |
|
4.8.2 |
IPsec............................................................................................................................... |
44 |
|
4.8.3 |
SA List ............................................................................................................................ |
48 |
4.9 |
PPTP VPN Server ....................................................................................................... |
49 |
|
|
4.9.1 |
Server Settings............................................................................................................... |
49 |
|
4.9.2 |
Account Settings ............................................................................................................ |
50 |
|
4.9.3 |
Connection Status .......................................................................................................... |
51 |
4.10 |
Static Routing .............................................................................................................. |
51 |
|
4.11 |
Bandwidth Control ....................................................................................................... |
52 |
|
|
4.11.1 |
Control Settings.............................................................................................................. |
52 |
|
4.11.2 |
Rule List.......................................................................................................................... |
53 |
4.12 IP & MAC Binding........................................................................................................ |
54 |
||
|
4.12.1 |
Binding Setting ............................................................................................................... |
54 |
|
4.12.2 |
ARP List.......................................................................................................................... |
56 |
4.13 |
Dynamic DNS .............................................................................................................. |
57 |
|
|
4.13.1 |
Dyndns DDNS ................................................................................................................ |
57 |
|
4.13.2 |
PeanutHull DDNS........................................................................................................... |
58 |
|
4.13.3 |
Comexe DDNS............................................................................................................... |
58 |
|
4.13.4 |
No-IP DDNS ................................................................................................................... |
59 |
4.14 |
System Tools............................................................................................................... |
60 |
|
|
4.14.1 |
Time Settings ................................................................................................................. |
61 |
|
4.14.2 |
Diagnostic Tools............................................................................................................. |
62 |
|
4.14.3 |
Firmware......................................................................................................................... |
62 |
|
4.14.4 |
Factory Defaults ............................................................................................................. |
63 |
|
4.14.5 |
Backup and Restore....................................................................................................... |
64 |
|
4.14.6 |
Reboot............................................................................................................................ |
65 |
|
4.14.7 |
Password........................................................................................................................ |
66 |
|
4.14.8 |
System Log .................................................................................................................... |
66 |
|
4.14.9 |
Remote Management..................................................................................................... |
67 |
|
4.14.10Statistics ......................................................................................................................... |
68 |
|
Appendix A: Specifications................................................................................... |
70 |
||
Appendix B: Preventing Lightning ....................................................................... |
71 |
||
Appendix C: FAQ.................................................................................................... |
72 |
||
Appendix D: Glossary............................................................................................ |
76 |
||

TL-R600VPN SafeStreamTM Gigabit Broadband VPN Router User Guide
Chapter 1.Introduction
1.1Overview of the Router
The TL-R600VPN SafeStreamTM Gigabit Broadband VPN Router from TP-LINK provides multiple VPN protocols and high VPN performance. Abundant security strategies, such as SPI firewall, protect your network against the attacks and Access Control, provide online behavior management. Anymore, web-based management makes the network setup be an easy work. It’s really a cost-effective and reliable VPN solution for chain stores and branch offices.
1.2Features
¾Complies with IEEE 802.3, 802.3u , 802.3x standards
¾Supports Bandwidth Control
¾Built-in NAT and DHCP server supporting static IP address distributing
¾Supports Virtual Server, Port Triggering, and DMZ host
¾Built-in firewall supporting IP address filtering, Domain Name filtering, and MAC address filtering
¾Supports connecting/disconnecting Internet at a specified time of day
¾Supports access control, allowing parents and network administrators to establish restricted access policies based on the time of day for children or staff
¾Supports TCP/IP, PPPoE, DHCP, ICMP, NAT, SNTP
¾Supports UPnP, Dynamic DNS, Static Routing, VPN pass-through
¾Supports Traffic Statistics
¾Supports IP & MAC Binding
¾Supports ICMP-FLOOD, UDP-FLOOD, TCP-SYN-FLOOD filter
¾Ignores Ping packets from WAN or LAN ports
¾Supports firmware upgrade
¾Supports Remote and Web management
¾Supports IPsec VPN and PPTP Server
1.3Conventions
Parameters provided in the pictures are just references for setting up the product, which may differ from the actual situation.
You can set the parameters according to your demand.
1
TL-R600VPN SafeStreamTM Gigabit Broadband VPN Router User Guide
Chapter 2.Hardware installation
2.1Panel Layout
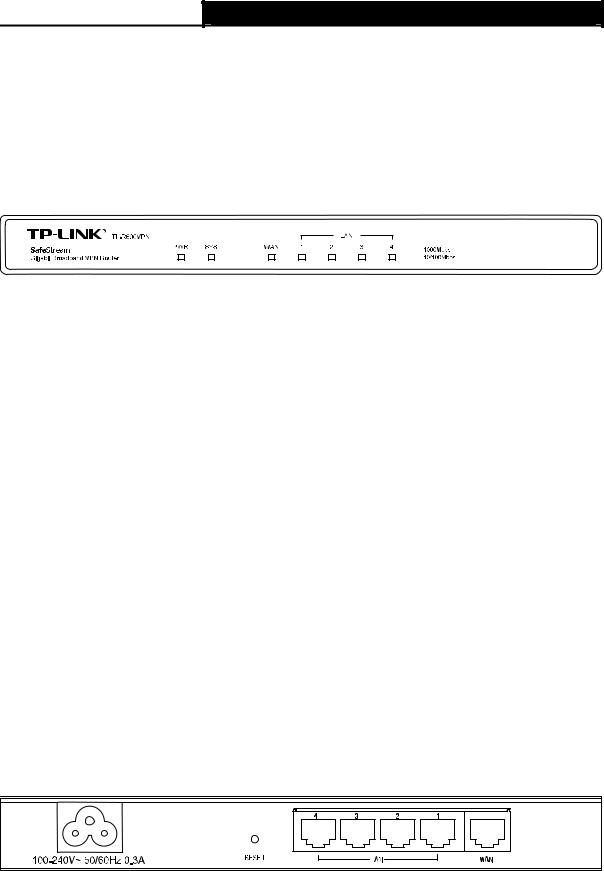
2.1.1The Front Panel
The Router’s LEDs are located on the front panel (Viewed from left to right).
|
|
|
|
|
|
|
|
|
Figure 2-1 |
||
LED Descriptions: |
|
|
|
||
|
|
|
|
||
|
Name |
Status |
Indication |
||
|
PWR |
Not lit |
The router is powered off. |
||
|
|
|
|
|
|
|
Lit up (Green) |
The router is powered on. |
|||
|
|
||||
|
|
|
|
||
|
|
Not lit |
The router has a hardware error. |
||
|
|
|
|
||
|
SYS |
Lit up (Green) |
The router has a hardware error. |
||
|
|
|
|
|
|
|
Flashing |
The router works properly. |
|||
|
|
||||
|
|
(Green) |
|||
|
|
|
|
|
|
|
|
|
|
||
|
|
Not lit |
There is no device linked to the corresponding port. |
||
|
|
|
|
||
|
|
|
There is a device linked to the corresponding port but no |
||
|
|
Lit up |
activity. (Green light indicates the linked device is running at |
||
|
|
(Green/Yellow) |
1000Mbps, and yellow indicates the linked device is running |
||
|
WAN, LAN |
|
at 10/100Mbps.) |
||
|
|
|
|
||
|
|
|
The corresponding port is transmitting or receiving data. |
||
|
|
Flashing |
(Green light indicates the linked device is running at |
||
|
|
(Green/Yellow) |
1000Mbps, and yellow indicates the linked device is running |
||
|
|
|
at 10/100Mbps.) |
||
|
|
|
|
|
|
2.1.2The Rear Panel
The rear panel contains the following features (Viewed from left to right).
Figure 2-2 |
¾AC power receptacle: Connect the female of the power cord head here, and the male head to the AC power outlet.
¾RESET: Use the button to restore the router to the factory defaults.
There are two ways to reset the router:
2

TL-R600VPN SafeStreamTM Gigabit Broadband VPN Router User Guide
Method one: Use the Factory Defaults function on System Tools -> Factory Defaults page in the router's Web-based Utility.
Method two: With the router powered on, use a pin to press and hold the RESET button (about 5 seconds) until the SYS LED lights up and flashes. And then release the button and wait the router to reboot to its factory default settings.
) Note:
1)Please use only the power cord provided with this Router.
2)Ensure the router is powered on before it restarts completely.
¾LAN: Four RJ45 ports for connecting the router to the local PCs.
¾WAN: One RJ45 port for connecting the router to a cable DSL modem or Ethernet.
2.2System Requirements
¾Broadband Internet Access Service (DSL/Cable/Ethernet)
¾One DSL/Cable modem that has an RJ45 connector (It’s not necessary if you connect the router to Ethernet)
¾Each PC on the LAN needs a working Ethernet Adapter and an Ethernet cable with RJ45 connectors
¾Web browser, such as Microsoft Internet Explorer 5.0 or higher, Netscape Navigator 6.0 or higher
2.3Installation Environment Requirements
¾The router should not in direct sunlight or near a heater or heating vent
¾The router should not be cluttered or crowded. There should be at least 2 inches (5 cm) of clear space on all sides of the router
¾The router should be well ventilated (especially if it is in a closet)
¾Operating temperature: 0 ~40 (32 ~104 )
¾Operating Humidity: 10%~90%RH, Non-condensing
) Note:
1)Do not use this product near water, for example, in a wet basement or near a swimming pool.
2)Avoid using this product during an electrical storm. There may be a remote risk of electric shock from lightning.
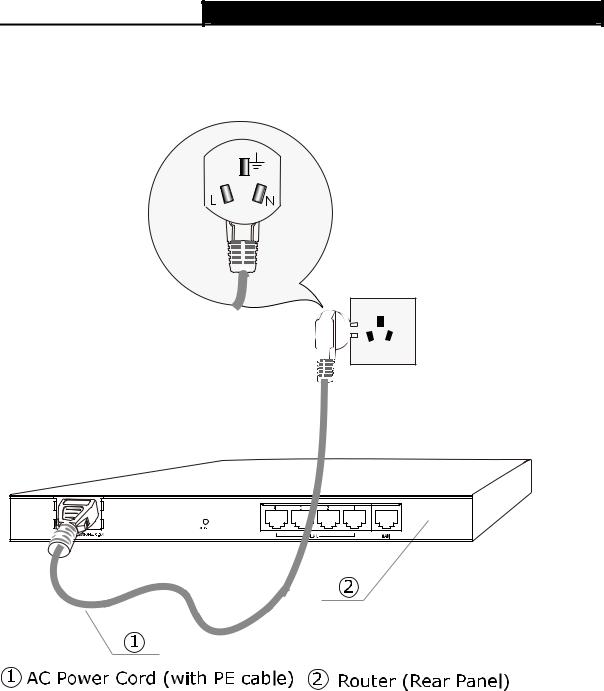
2.4Connect to Ground
Connecting the router to ground is to quickly release the lightning over-voltage and over-current of the router, which is also a necessary measure to protect the body from electric shock. The following will instruct you to connect the Router to the Ground.
Connecting to the Ground via the power supply
The Router can be grounded via the PE Protecting Earth cable of the AC power supply as shown in the following figure.
3
TL-R600VPN SafeStreamTM Gigabit Broadband VPN Router User Guide
) Note:
If you intend to connect the Router to the ground via the PE Protecting Earth cable of AC power cord, please make sure the PE Protecting Earth cable in the electrical outlet is well grounded in advance.
2.5Connecting the Router
Before you install the router, you should connect your PC to the Internet through your broadband service successfully. If there is any problem, please contact your ISP for help. After that, please install the router according to the following steps. Don't forget to pull out the power plug and keep your hands dry.
1.Power off your PC(s), Cable/DSL modem and the router.
4
TL-R600VPN SafeStreamTM Gigabit Broadband VPN Router User Guide
2.Connect the PC(s) and all Switches/Hubs on your LAN to the LAN Ports on the router, shown in Figure 2-3.
3.Connect the DSL/Cable modem to the WAN port on the router, shown in Figure 2-3.
4.Connect the AC power adapter to the AC power socket on the router, and the other end into an electrical outlet. The router will start to work automatically.
5.Power on your PC(s) and Cable/DSL modem.
Figure 2-3
5
TL-R600VPN SafeStreamTM Gigabit Broadband VPN Router User Guide
Chapter 3.Quick Installation Guide
This chapter describes how to configure the basic functions of your TL-R600VPN SafeStreamTM Gigabit Broadband VPN Router. These procedures only take you a few minutes. You can access the Internet via the router immediately after it has been successfully configured.
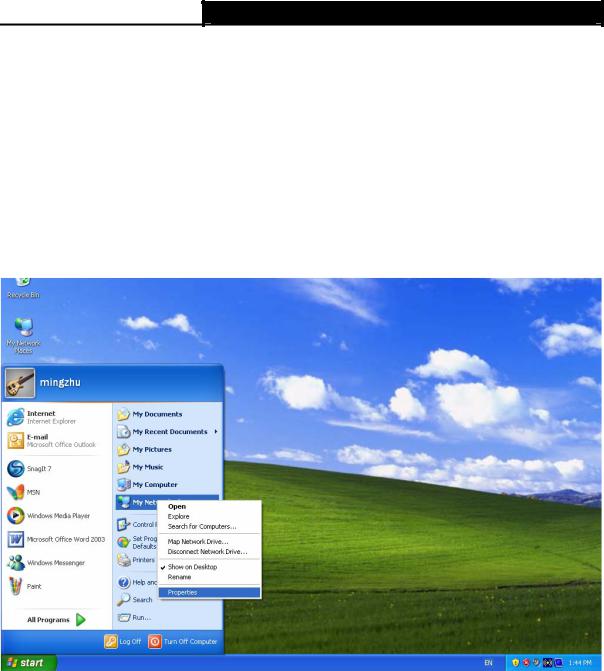
3.1Configure PC
Step 1: Click the Start menu on your desktop, right click My Network Places, and then select Properties (shown in Figure 3-1).
Figure 3-1
Step 2: In the next screen, right click Local Area Connection (LAN), and then select
Properties.
6

TL-R600VPN SafeStreamTM Gigabit Broadband VPN Router User Guide
Figure 3-2
Step 3: In the next screen, select General tab, highlight Internet Protocol (TCP/IP), and then click the Properties button.
Figure 3-3
7
TL-R600VPN SafeStreamTM Gigabit Broadband VPN Router User Guide
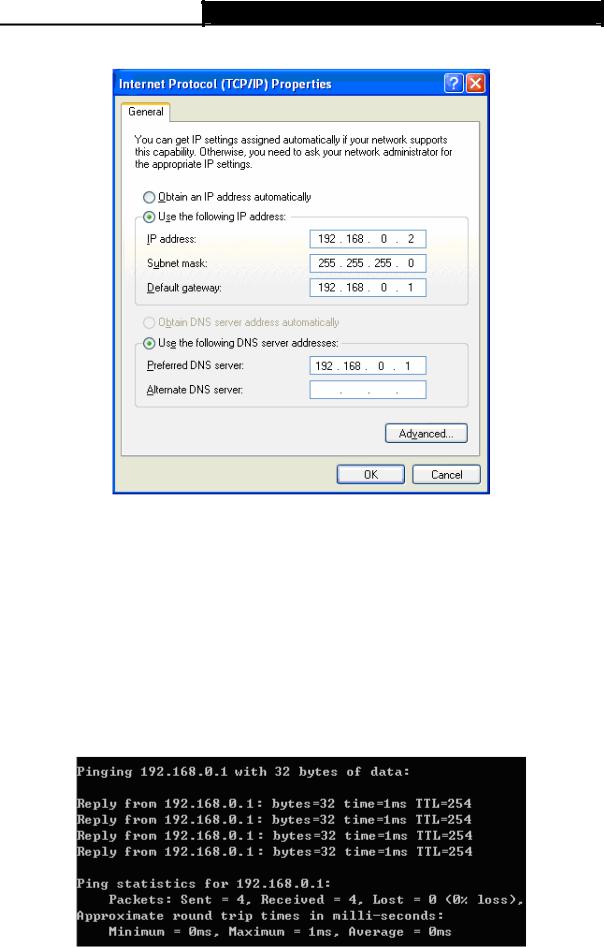
Step 4: Configure the IP address as shown in Figure 3-4. After that, click OK.
Figure 3-4
) Note:
You can configure the PC to get an IP address automatically, select “Obtain an IP address automatically” and “Obtain DNS server address automatically” in the screen above. For Windows 98 OS or earlier, the PC and router may need to be restarted.
Now, you can run the Ping command in the command prompt to verify the network connection. Please click the Start menu on your desktop, select run tab, type cmd in the field, and then type ping 192.168.0.1 on the next screen, and then press Enter.
If the result displayed is similar to the screen below, the connection between your PC and the Router has been established.
Figure 3-5
8

TL-R600VPN SafeStreamTM Gigabit Broadband VPN Router User Guide
If the result displayed is similar to the screen shown below, it means that your PC has not connected to the Router.
Figure 3-6
You can check it follow the steps below:
) Note:
1)Is the connection between your PC and the Router correct?
The LEDs of LAN port which you link to the device and the LEDs on your PC's adapter should be lit.
2)Is the TCP/IP configuration for your PC correct?
If the Router's IP address is 192.168.0.1, your PC's IP address must be within the range of 192.168.0.2 ~ 192.168.0.254, the gateway must be 192.168.0.1.
3.2Login
Once your host PC is properly configured, please proceed as follows to use the Web-based Utility: Start your web browser and type the private IP address of the Router in the URL field: http://192.168.0.1.
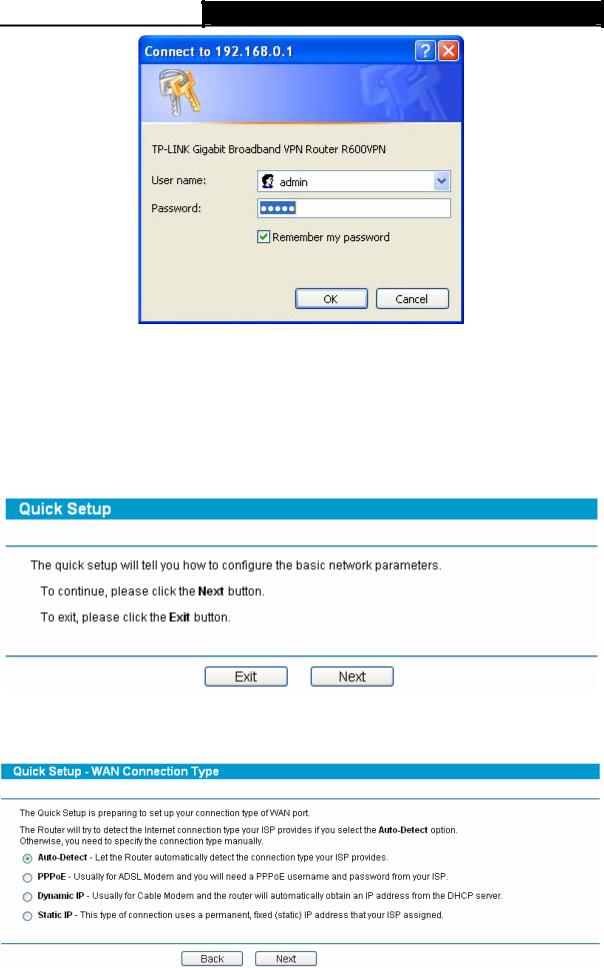
After that, you will see the screen shown below, enter the default User Name admin and the default Password admin, and then click OK to access to the Quick Setup screen. You can follow the steps below to complete the Quick Setup.
9
TL-R600VPN SafeStreamTM Gigabit Broadband VPN Router User Guide
Figure 3-7
) Note:
If the above screen (Figure 3-7) does not prompt, it means that your web-browser may be set to a proxy. Choose Tools menu→Internet Options→Connections→LAN Settings, in the screen that appears, cancel the Using Proxy checkbox, and click OK to finish it.
Step 1: Select the Quick Setup tab on the left of the main menu and the “Quick Setup” screen will appear. Click the Next button.
Figure 3-8
Step 2: Select the connection type to connect to the ISP and then click the Next button.
Figure 3-9
10
TL-R600VPN SafeStreamTM Gigabit Broadband VPN Router User Guide
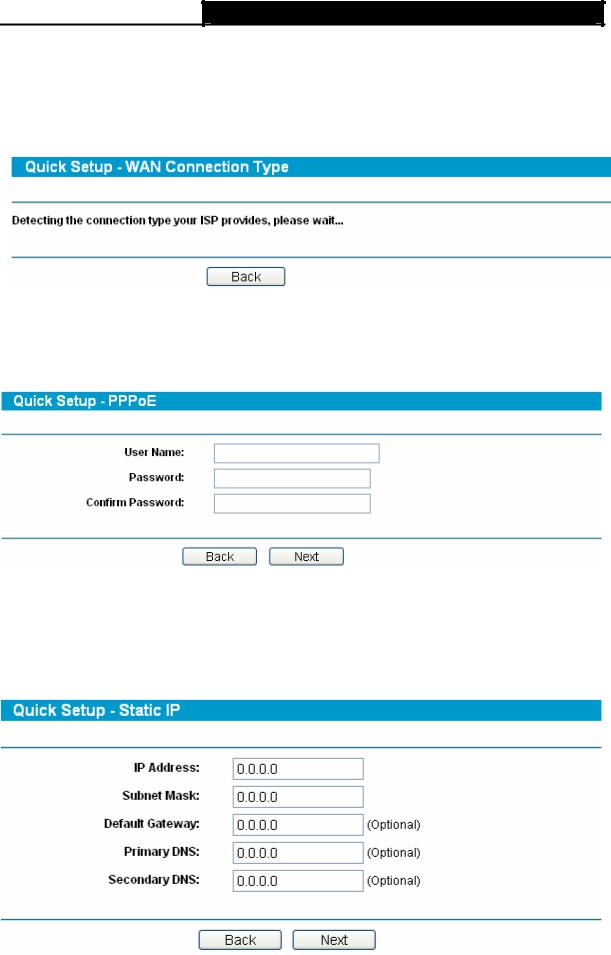
) Note:
Four ways to connect to Internet are provided in Quick Setup. Please select one compatible with your ISP. If you are given another way not listed here, refer to Network→ WAN for detailed list. Step 3: If Auto-Detect is chosen, the router will detect the Internet connection type provided by
your ISP automatically.
Figure 3-10
Step 4: If you choose PPPoE, you will see the screen as shown in Figure 3-11. Enter the Username and Password provided by your ISP. These fields are case sensitive. If you have difficulty with this process, please contact your ISP.
Figure 3-11
Step 5: If you choose Dynamic IP in Figure 3-9, the router will automatically receive the IP parameters from your ISP without needing to enter any parameters.
Step 6: If you Choose Static IP, you should enter the detailed IP information in Figure 3-12. Click the Next button
Figure 3-12
11
TL-R600VPN SafeStreamTM Gigabit Broadband VPN Router User Guide
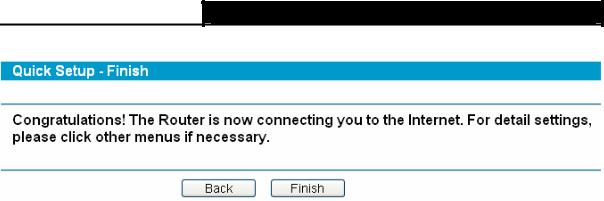
Step 7: After that, you will see the next screen. Click Finish to complete the quick installation.
Figure 3-13
12

TL-R600VPN SafeStreamTM Gigabit Broadband VPN Router User Guide
Chapter 4.Configuring the Router
It is recommended to use the “Quick Installation Guide” for first-time installation. For advanced users, if you want to know more about this device and make use of its functions adequately, you need to read this chapter and configure advanced settings though the Web-based Utility.
After a successful login, you can configure and manage the router. There are main menus on the left of the Web-based Utility. Submenus will be available after you click one of the main menus. On the center of the web-based Utility, you can configure the function. Besides this, you can refer to the help on the right of the Web-based Utility. To apply any settings you have altered on the page, please click the Save button.
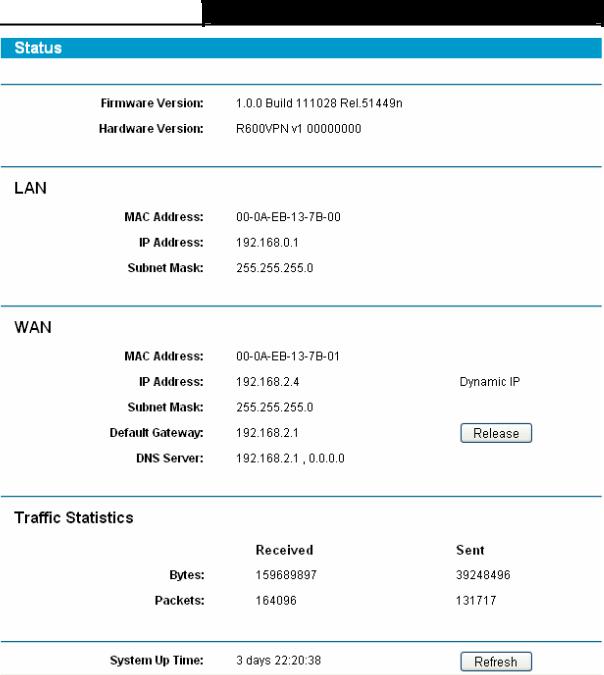
4.1Status
Choose “Status” menu, you can view the router's current status and configuration as shown in Figure 4-1. All information is read-only.
13
TL-R600VPN SafeStreamTM Gigabit Broadband VPN Router User Guide
Figure 4-1
¾LAN - This field displays the current information for the LAN, including the “MAC address”, “IP address” and “Subnet Mask”.
¾WAN - This field displays the parameters applied to the WAN port of the router, including “MAC address”, “IP address”, “Subnet Mask”, “Default Gateway” and so on.
) Note:
If PPPoE/L2TP/PPTP is chosen as the WAN connection type, the Disconnect button will be shown here while you are accessing the Internet. You can also cut the connection by clicking the button. If you have not connected to the Internet, a Connect button will be shown, and you can then establish the connection by clicking the button.
¾Traffic Statistics: This field displays the traffic statistics of WAN ports.
¾System Up Time: This field displays the time of the router running from the time it is powered on or is reset.
14
TL-R600VPN SafeStreamTM Gigabit Broadband VPN Router User Guide
4.2Quick Setup
Please refer to chapter 3"Quick Installation Guide".
4.3Network
Choose menu “Network”, the next submenus are shown below.
Figure 4-2
Click any of them, and you will be able to configure the corresponding function. The detailed explanations for each submenu are provided below.
4.3.1WAN
Choose menu “Network→WAN”, you can configure the IP parameters of the WAN on the screen below.
The Router provides six connection types for WAN to connect to the Internet, they are “Dynamic IP”, “Static IP”, “PPPoE/Russia PPPoE”, ”BigPondCable” , “L2TP/Russia L2TP” and “PPTP/Russia PPTP”. For configuring the WAN, you should select the connection type firstly according to your needs.
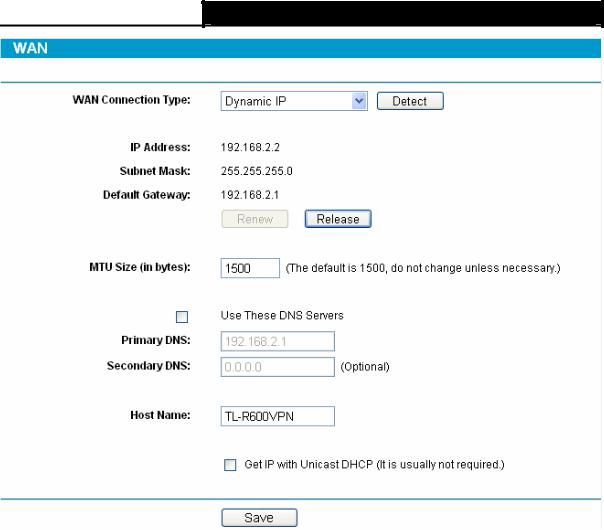
1.Dynamic IP
If you aren’t given any login parameters and IP information, please select Dynamic IP (shown in Figure 4-3), then the router will automatically get IP parameters from your ISP. Click the Renew button to renew the IP parameters from your ISP. Click the Release button to release the IP parameters.
15
TL-R600VPN SafeStreamTM Gigabit Broadband VPN Router User Guide
Figure 4-3
¾MTU Size - The normal MTU (Maximum Transmission Unit) value for most Ethernet networks is 1500 Bytes. For some ISPs you need to reduce the MTU. But this is rarely required, and should not be done unless you are sure it is necessary for your ISP connection.
¾Primary DNS & Secondary DNS - If your ISP gives you one or two DNS addresses, select Use These DNS Servers and enter the primary and secondary addresses into the correct fields. Otherwise, the DNS servers will be assigned dynamically from ISP.
¾Host Name – This option specifies the host name of the router.
) Note:
If you get ‘Address not found' errors when you go to a Web site, it is likely that your DNS servers are set up improperly. You should contact your ISP to get correct DNS server.
¾Get IP with Unicast DHCP: A few ISPs' DHCP servers do not support the broadcast applications. If you can not get the IP address normally, you can choose this option. (You don’t need select this option generally).
16
TL-R600VPN SafeStreamTM Gigabit Broadband VPN Router User Guide
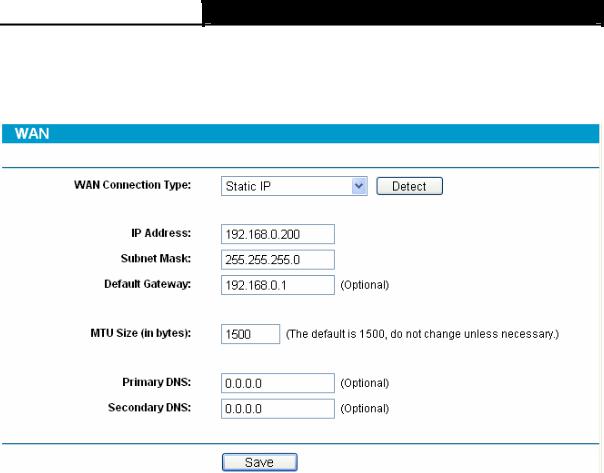
2.Static IP
If you are given a fixed IP (static IP), please select Static IP (shown in Figure 4-4), and then fixed IP parameters specified by your ISP.
Figure 4-4
¾IP Address - Enter the IP address in dotted-decimal notation provided by your ISP.
¾Subnet Mask - Enter the subnet Mask in dotted-decimal notation provided by your ISP, usually is 255.255.255.0.
¾Default Gateway - Enter the gateway IP address in dotted-decimal notation provided by your ISP (Optional).
¾MTU Size - The normal MTU (Maximum Transmission Unit) value for most Ethernet networks is 1500 Bytes. For some ISPs you may need to modify the MTU. But this is rarely required, and should not be done unless you are sure it is necessary for your ISP connection.
¾Primary DNS - Type the DNS address in dotted-decimal notation provided by your ISP (Optional).
¾Secondary DNS - Type another DNS address in dotted-decimal notation provided by your ISP if provided (Optional).
3.PPPoE/Russia PPPoE
If you are given a user name and a password, please select PPPoE/Russia PPPoE (shown in Figure 4-5). If you are not sure which connection type you use currently, please contact your ISP to obtain the correct information.
17

TL-R600VPN SafeStreamTM Gigabit Broadband VPN Router User Guide
Figure 4-5
¾User Name/Password - Enter the User Name and Password provided by your ISP. These fields are case-sensitive.
¾Connect on Demand - You can configure the router to disconnect your Internet connection after a specified period of inactivity (Max Idle Time). If your Internet connection has been terminated due to inactivity, Connect on Demand enables the router to automatically re-establish your connection as soon as you attempt to access the Internet again. If you wish to activate Connect on Demand, check the radio button and click Save to apply.
)Note:
1)If you want your Internet connection to remain active at all times, enter 0 in the Max Idle Time field. Otherwise, enter the number of minutes you want to have elapsed before your Internet connection terminates.
2)Sometimes the connection can not be disconnected although you specify a time to Max Idle Time. This is because there may still be active applications in the background, which may cause fee accounted by your ISP.
¾Connect Automatically - Connect automatically after the router is disconnected. To use this option, click the radio button.
¾Time-based Connecting - You can configure the router to make it connect or disconnect based on time. Enter the start time in HH:MM for connecting and end time in HH:MM for disconnecting in the Period of Time fields.
18
TL-R600VPN SafeStreamTM Gigabit Broadband VPN Router User Guide
) Note:
Only you have set the system time on System Tools→Time screen, will the Time-based Connecting function take effect.
¾Connect Manually - You can configure the router to make it connect or disconnect manually. After a specified period of inactivity (Max Idle Time), the router will disconnect your Internet connection, and not be able to re-establish your connection automatically even though you attempt to access the Internet again. You need click the Connect button manually to connect immediately, or click the Disconnect button manually to disconnect immediately; To use this option, click the radio button. If you want your Internet connection to remain active at all times, enter 0 in the Max Idle Time field. Otherwise, enter the number in minutes that you wish to have the Internet connecting last unless a new link is requested.
)Note:
1)If you want your Internet connection to remain active at all times, enter 0 in the Max Idle Time field. Otherwise, enter the number in minutes that you wish to have the Internet connecting last unless a new link is requested.
2)Sometimes the connection cannot be disconnected although you specify a time to Max Idle Time. This is because there may still be active applications in the background, which may cause fee accounted by your ISP.
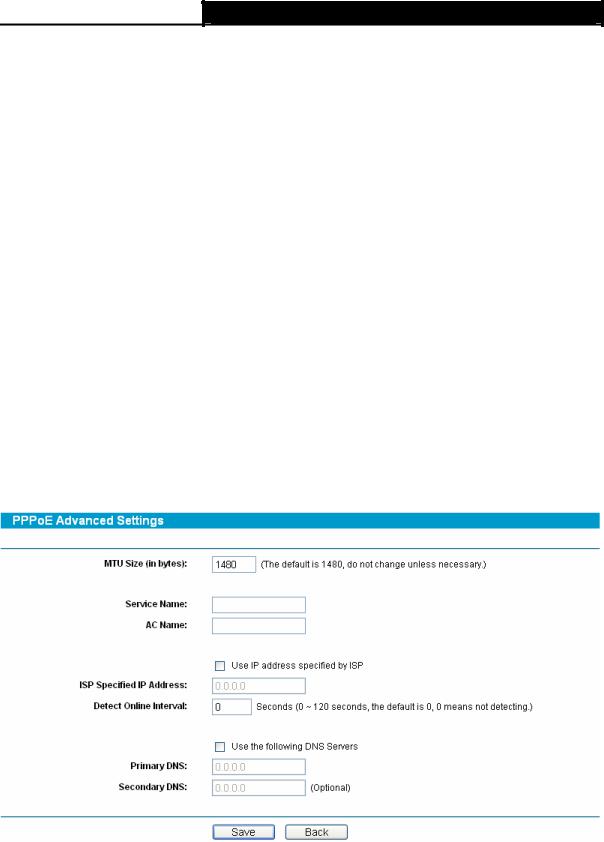
Click the Advanced button to set up the advanced option as shown in Figure 4-6.
Figure 4-6
¾MTU Size- The default MTU size is 1480 bytes, which is usually fine. For some ISPs, you need modify the MTU. This should not be done unless you are sure it is necessary for your ISP.
¾Service Name/AC Name - The service name and AC (Access Concentrator) name should not be configured unless you are sure it is necessary for your ISP.
19
Loading...