


 Loading...
TC-W7960
300Mbps Wireless N DOCSIS 3.0 Cable Modem Router
REV1.0.1
1910011866
COPYRIGHT & TRADEMARKS
Specifications are subject to change without notice.  is a registered trademark of TP-LINK TECHNOLOGIES CO., LTD. Other brands and product names are trademarks or registered trademarks of their respective holders.
No part of the specifications may be reproduced in any form or by any means or used to make any derivative such as translation, transformation, or adaptation without permission from TP-LINK TECHNOLOGIES CO., LTD. Copyright © 2016 TP-LINK TECHNOLOGIES CO., LTD. All rights reserved.
http://www.tp-link.com

CE Mark Warning
This is a class B product. In a domestic environment, this product may cause radio interference, in which case the user may be required to take adequate measures.
RF Exposure Information
This device meets the EU requirements (1999/5/EC Article 3.1a) on the limitation of exposure of the general public to electromagnetic fields by way of health protection.
The device complies with RF specifications when the device used at 20 cm from your body.
Продукт сертифіковано згідно с правилами системи УкрСЕПРО на відповідність вимогам нормативних документів та вимогам, що передбачені чинними законодавчими актами України.
Safety Information
When product has power button, the power button is one of the way to shut off the product; when there is no power button, the only way to completely shut off power is to disconnect the product or the power adapter from the power source.
Don’t disassemble the product, or make repairs yourself. You run the risk of electric shock and voiding the limited warranty. If you need service, please contact us.
Avoid water and wet locations.
Adapter shall be installed near the equipment and shall be easily accessible.
The plug considered as disconnect device of adapter.
 Use only power supplies which are provided by manufacturer and in the original packing of this product. If you have any questions, please don't hesitate to contact us.
The product should be connected to cable distribution system that grounded (earthed) in accordance with ANSI/NFPA 70, the National Electrical Code (NEC), in particular Section 820.93 - Grounding of Outer Conductive Shield of a Coaxial Cable.
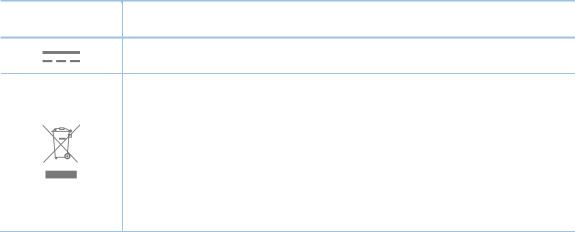
Explanation of the symbols on the product label
Symbol Explanation
DC voltage
RECYCLING
This product bears the selective sorting symbol for Waste electrical and electronic equipment (WEEE). This means that this product must be handled pursuant to European directive 2012/19/EU in order to be recycled or dismantled to minimize its impact on the environment.
User has the choice to give his product to a competent recycling organization or to the retailer when he buys a new electrical or electronic equipment.
|
|
CONTENTS |
|
Package Contents .................................................................................................... |
1 |
||
Chapter 1. Product Overview................................................................................... |
2 |
||
1.1 |
Overview of the Modem Router..................................................................................... |
2 |
|
1.2 |
Main Features............................................................................................................... |
2 |
|
1.3 |
Panel Layout................................................................................................................. |
3 |
|
|
1.3.1 |
The Front Panel ................................................................................................................... |
3 |
|
1.3.2 The Back Panel.................................................................................................................... |
5 |
|
Chapter 2. Connecting to the Network.................................................................... |
6 |
||
2.1 |
System Requirements................................................................................................... |
6 |
|
2.2 |
Installation Environment Requirements......................................................................... |
6 |
|
2.3 |
Connecting the Hardware ............................................................................................. |
6 |
|
Chapter 3. Log into the Modem Router................................................................... |
8 |
||
Chapter 4. Basic Configuration ............................................................................... |
9 |
||
4.1 |
Network Map................................................................................................................. |
9 |
|
4.2 |
Internet ......................................................................................................................... |
9 |
|
4.3 |
Wireless...................................................................................................................... |
12 |
|
4.4 |
Guest Network ............................................................................................................ |
13 |
|
4.5 |
USB Settings .............................................................................................................. |
14 |
|
|
4.5.1 |
Folder Sharing.................................................................................................................... |
14 |
|
4.5.2 |
Print Server ........................................................................................................................ |
16 |
4.6 |
Parental Control.......................................................................................................... |
17 |
|
Chapter 5. Advanced Configuration...................................................................... |
23 |
||
5.1 |
Status ......................................................................................................................... |
23 |
|
5.2 |
Operation Mode .......................................................................................................... |
23 |
|
5.3 |
Network ...................................................................................................................... |
24 |
|
|
5.3.1 WAN................................................................................................................................... |
24 |
|
|
5.3.2 |
LAN Settings ...................................................................................................................... |
29 |
|
5.3.3 |
IPv6 LAN Settings.............................................................................................................. |
31 |
|
5.3.4 Dynamic DNS..................................................................................................................... |
33 |
|
|
5.3.5 Advanced Routing.............................................................................................................. |
34 |
|
5.4 |
Wireless 2.4G ............................................................................................................. |
35 |
|
|
5.4.1 |
Basic Settings .................................................................................................................... |
35 |
|
5.4.2 |
Primary Network................................................................................................................. |
36 |
|
5.4.3 Guest Network ................................................................................................................... |
41 |
|
|
5.4.4 |
MAC Filtering ..................................................................................................................... |
42 |
|
5.4.5 |
Wireless Bridging ............................................................................................................... |
45 |
|
5.4.6 Wireless Advanced ............................................................................................................ |
46 |
|
5.5 |
NAT Forwarding.......................................................................................................... |
47 |
|
|
5.5.1 |
IP Filtering .......................................................................................................................... |
47 |
|
5.5.2 |
MAC Filtering ..................................................................................................................... |
49 |
|
5.5.3 |
Port Filtering....................................................................................................................... |
49 |
|
5.5.4 |
Port Forwarding.................................................................................................................. |
51 |
|
5.5.5 |
Port Triggers ...................................................................................................................... |
52 |
|
5.5.6 DMZ ................................................................................................................................... |
55 |
|
|
5.5.7 |
Options............................................................................................................................... |
55 |
5.6 |
USB Settings .............................................................................................................. |
57 |
|
|
5.6.1 |
Disk Settings ...................................................................................................................... |
57 |
|
5.6.2 |
Folder Sharing.................................................................................................................... |
58 |
|
5.6.3 |
Print Server ........................................................................................................................ |
62 |
5.7 |
Parental Control.......................................................................................................... |
63 |
|
5.8 |
Firewall ....................................................................................................................... |
65 |
|
|
5.8.1 |
Basic .................................................................................................................................. |
66 |
|
5.8.2 |
Local Log............................................................................................................................ |
66 |
|
5.8.3 Remote Log........................................................................................................................ |
67 |
|
5.9 |
System Tools .............................................................................................................. |
69 |
|
|
5.9.1 |
System Information ............................................................................................................ |
69 |
|
5.9.2 |
Device Information ............................................................................................................. |
70 |
|
5.9.3 |
Connection Status.............................................................................................................. |
70 |
|
5.9.4 |
Diagnostic .......................................................................................................................... |
72 |
|
5.9.5 |
Time Settings ..................................................................................................................... |
73 |
|
5.9.6 Backup & Restore .............................................................................................................. |
75 |
|
|
5.9.7 |
Administrator ...................................................................................................................... |
76 |
|
5.9.8 Event Log ........................................................................................................................... |
77 |
|
Appendix A: Specifications ................................................................................... |
78 |
||
Appendix B: Troubleshooting ............................................................................... |
81 |
||

TC-W7960 300Mbps Wireless N DOCSIS 3.0 Cable Modem Router User Guide
Package Contents
The following contents should be found in your package:
One TC-W7960 300Mbps Wireless N DOCSIS 3.0 Cable Modem Router
One Power Adapter for TC-W7960 300Mbps Wireless N DOCSIS 3.0 Cable Modem Router
Quick Installation Guide
One RJ45 cable
Note:
Make sure that the package contains the above items. If any of the listed items are damaged or missing, please contact your distributor.
1

TC-W7960 300Mbps Wireless N DOCSIS 3.0 Cable Modem Router User Guide
Chapter 1. Product Overview
Thank you for choosing the TC-W7960 300Mbps Wireless N DOCSIS 3.0 Cable Modem Router.
1.1Overview of the Modem Router
The TC-W7960 300Mbps Wireless N DOCSIS 3.0 Cable Modem Router integrates DOCSIS 3.0 modem, NAT router, 4-port switch and wireless access point in one device provides a one-stop networking solution.
The modem router provides up to 300Mbps (2.4GHz) wireless connection with other wireless clients. The incredible speed makes it ideal for handling multiple data streams at the same time, which ensures your network stable and smooth. It is compatible with all IEEE 802.11b, IEEE 802.11g and IEEE 802.11n products.
With multiple protection measures, including SSID broadcast control and wireless LAN 64/128 WEP encryption, Wi-Fi protected Access (WPA2-PSK, WPA-PSK), as well as advanced Firewall protections, the TC-W7960 300Mbps Wireless N DOCSIS 3.0 Cable Modem Router provides complete data privacy.
The modem router provides flexible access control, so that parents or network administrators can establish restricted access policies for children or staffs. It also supports Virtual Server and DMZ host for Port Triggering, and then the network administrators can manage and monitor the network in real time with the remote management function.
Since the modem router is compatible with virtually all the major operating systems, it is very easy to manage. Detailed instructions are provided step by step in this user guide. Before installing the modem router, please look through this guide to know all the modem router’s functions.
1.2Main Features
DOCSIS 3.0/EuroDOCSIS 3.0, Compatible with DOCSIS/EuroDOCSIS 2.0/1.1/1.0
8 Downstream Channel bonding, Up to 445 Mbps for Downstream
4 Upstream Channel bonding, Up to 143 Mbps for Upstream
Full Band Capture windows - Utilize any channels in the downstream spectrum.
Dual-core processor – for wonderful performance with Internet, Wi-Fi, Ethernet and USB devices
2 internal antennas provide Omni-directional wireless coverage and reliability
Full gigabit ports ensure ultra fast data transfer speeds
USB Port - easily share printers, files or media with your friends or family locally or over the Internet
Guest Network Access provides secure Wi-Fi access for guests sharing your home or office network
IPv6 supported, meeting the demands for the next generation of Internet
Wi-Fi On/Off Button allows users to turn their wireless radio on or off
Easy one-touch WPA wireless security encryption with the WPS button
2
TC-W7960 300Mbps Wireless N DOCSIS 3.0 Cable Modem Router User Guide
WPA-PSK/WPA2-PSK encryptions provide user networks with active defense against security threats
Parental Controls allow parents or administrators to establish restricted access policies for children or staff
1.3 Panel Layout
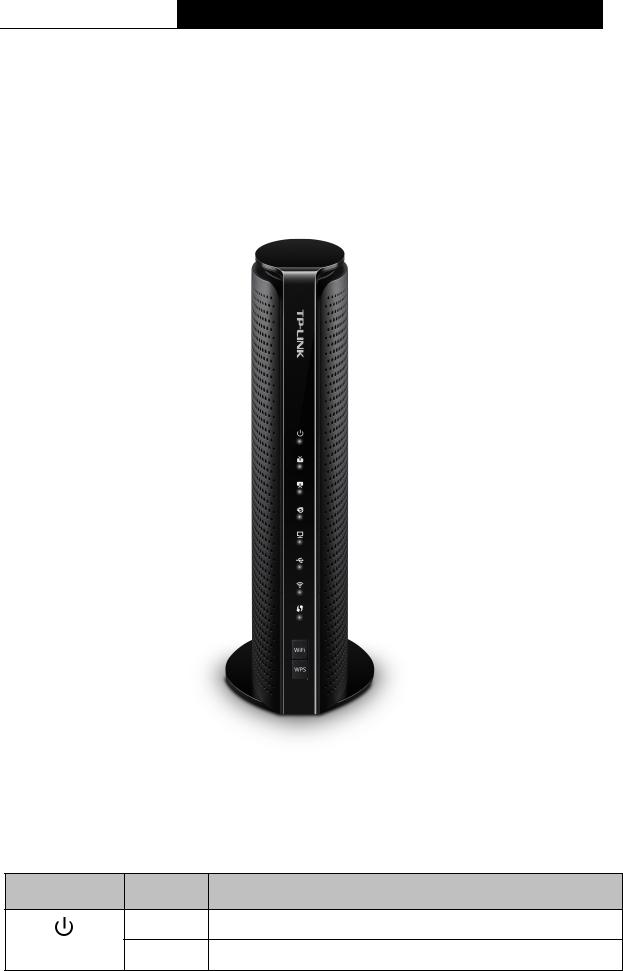
1.3.1 The Front Panel
Figure 1-1
The modem router’s LEDs are located on the side panel (View from top to bottom). They indicate the device’s working status. For details, please refer to LED Explanation.
LED Explanation:
Name |
Status |
Indication |
|
On |
Power is on. |
(Power) |
Off |
Power is off. |
3

TC-W7960 300Mbps Wireless N DOCSIS 3.0 Cable Modem Router User Guide
|
Name |
|
Status |
Indication |
|
|
|
|
|
|
|
|
Green |
The modem router is synchronized with more than one channel. |
|
|
|
|
|
|
|
|
White |
The modem router is synchronized with one channel. |
|
(Downstream) |
|
|
|
|
|
Flashing |
The modem router is scanning for downstream channels. |
|
|
|
|
|
|
|
|
|
Off |
The initialization is not started, or has failed. |
|
|
|
|
|
|
|
|
Green |
The modem router is synchronized with more than one channel. |
|
|
|
|
|
|
|
|
White |
The modem router is synchronized with one channel. |
|
(Upstream) |
|
|
|
|
|
Flashing |
The modem router is synchronizing with upstream channels. |
|
|
|
|
|
|
|
|
|
Off |
The initialization is not started, or has failed. |
|
|
|
|
|
|
|
|
On |
Internet service is available. |
|
|
|
|
|
|
(Internet) |
|
Off |
Internet service is not available. |
|
|
|
|
|
|
|
Flashing |
The modem router is initializing. |
|
|
|
|
||
|
|
|
|
|
|
|
|
On |
At least one LAN port is connected. |
|
(LAN) |
|
|
|
|
|
Off |
No LAN port is connected. |
|
|
|
|
|
|
|
|
|
Off |
No USB device is plugged in to the USB port. |
|
|
|
|
|
|
(USB) |
|
On |
The USB device is detected and ready to use. |
|
|
|
|
|
|
|
Flashing |
The USB device is being detected. |
|
|
|
|
||
|
|
|
|
|
|
|
|
On |
The wireless network is enabled. |
|
(Wireless) |
|
|
|
|
|
Off |
The wireless network is disabled. |
|
|
|
|
|
|
|
|
|
On/Off |
The LED stays on for 5 minutes when a WPS connection is |
|
|
|
established before turns off. |
|
|
|
|
|
|
|
(WPS) |
|
|
|
|
|
Flashing |
WPS connection is in progress. This may take up to 2 minutes. |
|
|
|
|
||
|
|
|
|
|
Buttons: |
|
|
|
|
|
|
|
|
|
|
Name |
|
|
Indication |
|
|
|
|
|
|
WiFi |
|
The switch for the WiFi function. Press it to enable/disable the WiFi function. |
|
|
|
|
|
|
|
WPS |
|
The switch for the WPS function. Press it for 2 seconds to enable the WPS |
|
|
|
function. |
|
|
|
|
|
|
|
|
|
|
|
|
4
TC-W7960 300Mbps Wireless N DOCSIS 3.0 Cable Modem Router User Guide
1.3.2 The Back Panel
Figure 1-2
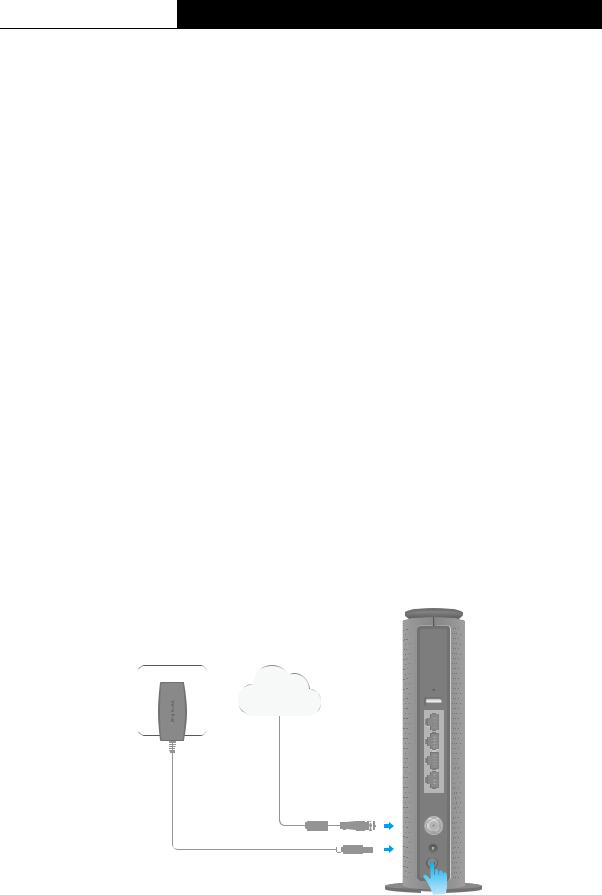
Reset: There are two ways to reset the modem router's factory defaults.
Method one: With the modem router powered on, press and hold the Reset button for approximately 8 seconds until all LEDs turn back on, then release the button.
Method two: Log in to the web management page of the modem router. Go to Advanced > System tools > Backup & Restore and click Reset. The modem router will restore and reboot automatically.
USB: The USB port connects to a USB storage device or a USB printer.
LAN4, LAN3, LAN2, LAN1: Through these ports, you can connect the modem router to your PC or other Ethernet network devices.
Cable: Through this port, you can connect the modem router to coaxial cable.
Power: The power plug where you will connect the power adapter.
ON/OFF: The switch for the power.
5
TC-W7960 300Mbps Wireless N DOCSIS 3.0 Cable Modem Router User Guide
Chapter 2. Connecting to the Network
2.1 System Requirements
Broadband Internet Access Service (Cable).
PCs with a working Ethernet Adapter and an Ethernet cable with RJ45 connectors. TCP/IP protocol on each PC.
Web browser, such as Microsoft Internet Explorer, Mozilla Firefox or Apple Safari.
2.2 Installation Environment Requirements
The product should not be located where it will be exposed to moisture or excessive heat.
Place the Router in a location where it can be connected to the various devices as well as to a power source.
Make sure the cables and power cord are safely placed out of the way so they do not create a tripping hazard.
The Router can be placed on a shelf or desktop.
Keep away from the strong electromagnetic radiation and the device of electromagnetic sensitive.
2.3 Connecting the Hardware
Before installing the device, please make sure your broadband cable service provided by your ISP is available. If there is any problem, please contact your ISP. Before cable connection, cut off the power supply and keep your hands dry, then follow the steps below to install it.
Internet
Power adapter
DC Cable LAN1 LAN2 LAN3 LAN4 USB
Reset
Figure 2-1
Step 1: Connect the coaxial cable and power adapter to the modem router, then power on your modem router.
6
TC-W7960 300Mbps Wireless N DOCSIS 3.0 Cable Modem Router User Guide
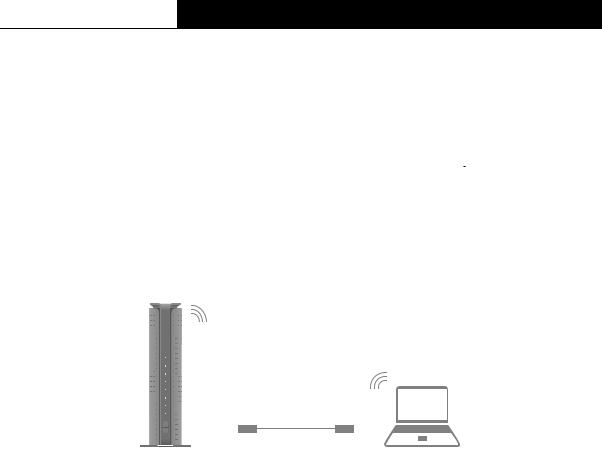
Step 2: Connect your computer to the modem router via a wired or wireless connection. Wired: Connect the computer to the modem router’s LAN port via an Ethernet cable.
Wireless: On your computer, select and connect to the modem router’s wireless network. The default wireless network name (SSID) and password are on the provided Information Card.
Or you can set up a connection via the WPS button  , which is on the front panel of the modem router. If your computer use an adapter that supports WPS, press the WPS button on the adapter. Within 2 minutes, press the WPS
button on the modem router until the WPS LED  starts to flash quickly. The
WPS LED  will stay on for 5 minutes when a WPS connection is established, then turns off.
Figure 2-2
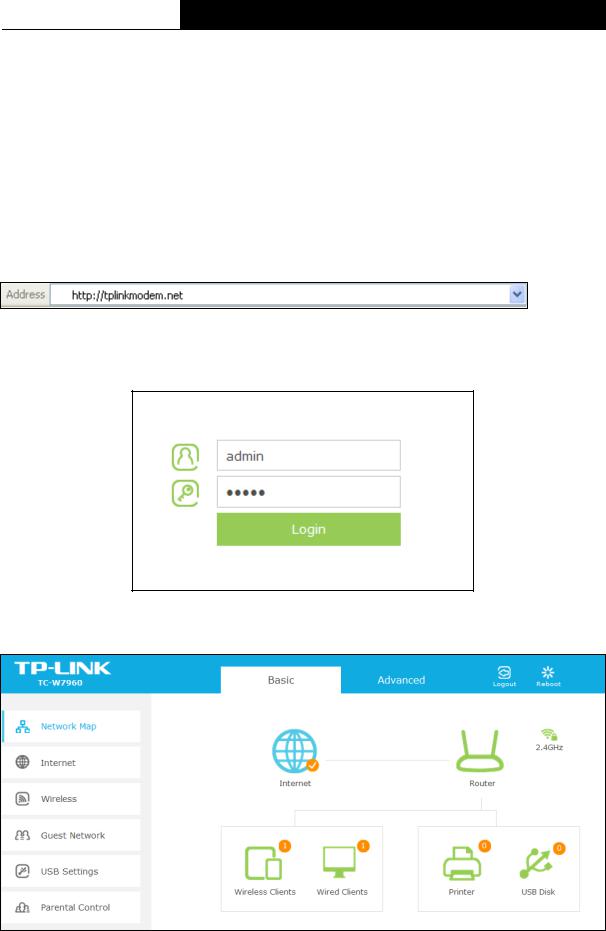
For additional configuration, log into the web-based management at http://tplinkmodem.net or 192.168.1.1, and enter admin (all lowercase) for both username and password.
Safety Information
The product should be connected to cable distribution system that grounded (earthed) in accordance with ANSI/NFPA 70, the National Electrical Code (NEC), in particular Section 820.93 - Grounding of Outer Conductive Shield of a Coaxial Cable.
7
TC-W7960 300Mbps Wireless N DOCSIS 3.0 Cable Modem Router User Guide
Chapter 3. Log into the Modem Router
With a Web-based management page, it is easy to configure and manage the TC-W7960 300Mbps Wireless N DOCSIS 3.0 Cable Modem Router. The Web-based management page can be used on any Windows, Macintosh or UNIX OS with a Web browser, such as Microsoft Internet Explorer, Mozilla Firefox or Apple Safari.
Set up the TCP/IP Protocol in "Obtain an IP address automatically" mode on your PC. If you need instructions as to how to do this, please refer to Appendix B: Trouble shooting.
To access the configuration utility, http://tplinkmodem.net/ or 192.168.1.1
open a web-browser and type the default address in the address field of the browser.
Figure 3-1
After a moment, a login window will appear. Enter admin for the Username and Password, both in lower case letters. Then click the Login button or press the Enter key.
Figure 3-2
After your successful login, you will see the screen as shown below.
Figure 3-3
8
TC-W7960 300Mbps Wireless N DOCSIS 3.0 Cable Modem Router User Guide
Chapter 4. Basic Configuration
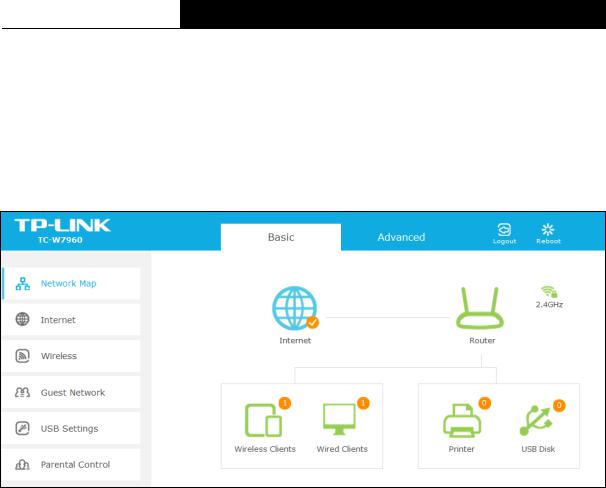
4.1Network Map
Network Map provides a dashboard that lets you see the status of your Internet connection and network at a glance. You can click any of the six sections of the dashboard to view the detailed information. All the information is read-only.
Figure 4-1
Internet – Click the Internet icon to view the ISP settings of your modem router.
Router - Click the Router icon to view the Wireless and Guest Network settings.
Wireless Clients - Click the Wireless Clients icon to view the wireless devices connected to your network.
Wired Clients - Click the Wired Clients icon to view the wired devices connected to your network.
Printer - Click the Printer icon to view the information of the printer connected to your network.
USB Disk - Click the USB Disk icon to view the information of the USB storage device connected to your network.
4.2Internet
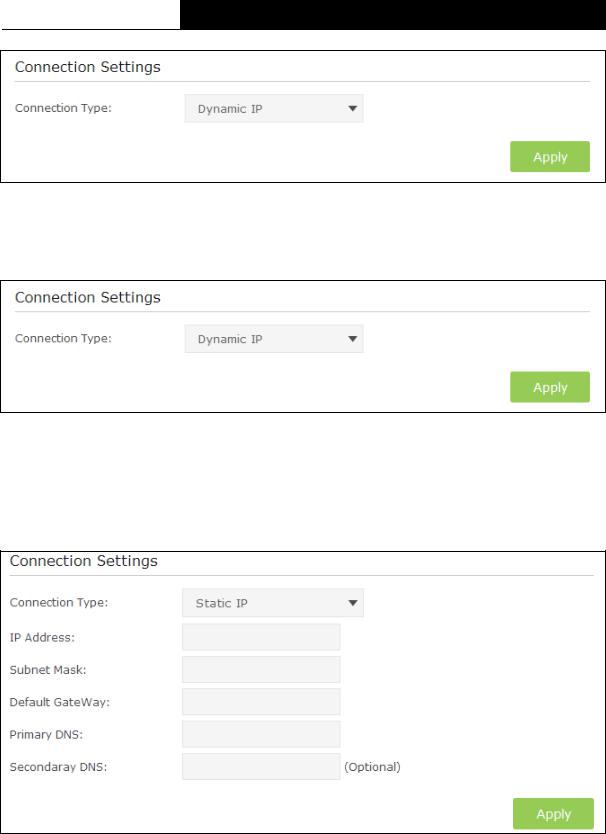
Choose “Basic Internet”, and you can configure the basic settings of the ISP Configuration and the Internet on this page.
There are four different connection types, Dynamic IP, Static IP, L2TP(Dynamic IP) and L2TP(Static). You can select the corresponding type according to your needs.
9
TC-W7960 300Mbps Wireless N DOCSIS 3.0 Cable Modem Router User Guide
Figure 4-2
1)Dynamic IP
Choose Dynamic IP in the drop-down list, the modem router will be able to obtain IP network information dynamically from a DHCP server provided by your ISP.
Figure 4-3
Click the Apply button to save the settings.
2)Static IP
Choose Static IP in the drop-down list if your ISP provides static IP information to you. You should set static IP address, Subnet mask, and gateway address in the screen below.
Figure 4-4
IP Address - Enter the IP address in dotted-decimal notation provided by your ISP.
Subnet Mask - Enter the subnet Mask in dotted-decimal notation provided by your ISP, usually is 255.255.255.0.
Default Gateway - Enter the gateway IP address in dotted-decimal notation provided by your ISP.
10

TC-W7960 300Mbps Wireless N DOCSIS 3.0 Cable Modem Router User Guide
Primary DNS/ Secondary DNS - Here you can set DNS Server (at least one) manually. The Router will use this DNS Server for priority.
Click the Apply button to save the settings.
3)L2TP(Dynamic IP)
Choose L2TP(Dynamic IP) in the drop-down list if your ISP provides L2TP(Dynamic IP) information to you. You should set User name, Password and Server IP Address/Name in the screen below.
Figure 4-5
Username/Password - Enter the Username and Password provided by your ISP. These fields are case-sensitive. If you have difficulty with this process, please contact your ISP.
Server IP Address/Name - Enter the server IP address or domain name provided by your ISP. If you have difficulty with this process, please contact your ISP.
Click the Apply button to save the settings.
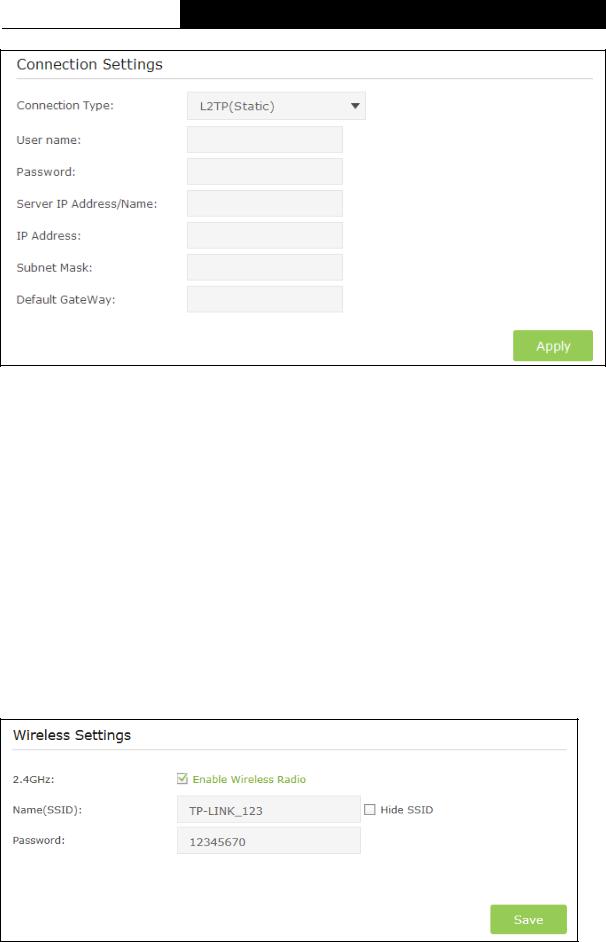
4)L2TP(Static)
Choose L2TP(Static) in the drop-down list if your ISP provides L2TP(Static) information to you. You should set User name, Password, Server IP Address/Name, IP Address, Subnet Mask and Default Gateway in the screen below.
11
TC-W7960 300Mbps Wireless N DOCSIS 3.0 Cable Modem Router User Guide
Figure 4-6
Username/Password - Enter the Username and Password provided by your ISP. These fields are case-sensitive. If you have difficulty with this process, please contact your ISP.
Server IP Address/Name - Enter the server IP address or domain name provided by your ISP. If you have difficulty with this process, please contact your ISP.
IP Address - Enter the IP address in dotted-decimal notation provided by your ISP.
Subnet Mask - Enter the subnet Mask in dotted-decimal notation provided by your ISP, usually is 255.255.255.0.
Default Gateway - Enter the gateway IP address in dotted-decimal notation provided by your ISP.
Click the Apply button to save the settings.
4.3Wireless
Choose menu “Basic” → “Wireless”, you can configure the basic settings for the wireless networks on this page.
Figure 4-7
12
TC-W7960 300Mbps Wireless N DOCSIS 3.0 Cable Modem Router User Guide
Enable Wireless Radio – Check the box to enable the Wireless Radio.
Name(SSID) –Enter a desired wireless network name which is case-sensitive and must not exceed 32 characters. The default SSID is TP-LINK_XXXX (XXXX is the last four numbers of modem router’s MAC address).
Hide SSID – If you want to hide the SSID of your wireless network from the Wi-Fi network, you should check the box.
Password –You can enter ASCII characters between 8 and 63 characters or 8 to 64 Hexadecimal characters. The default password is the same with the default PIN code, which is labeled on the bottom of the modem router.
Click the Save button to save the settings.
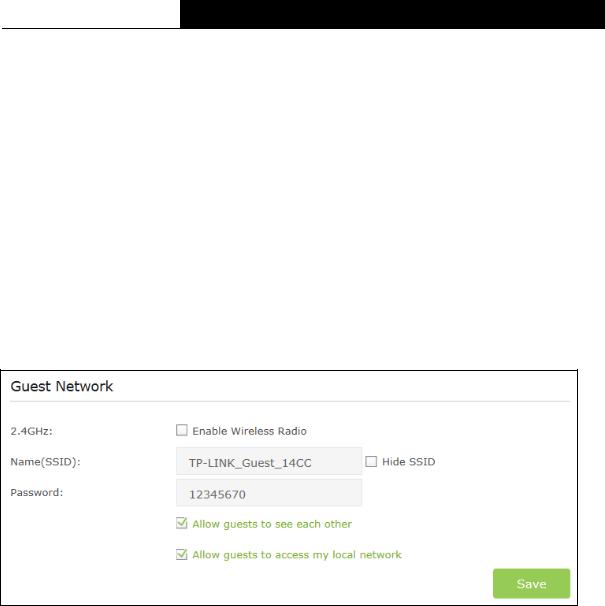
4.4Guest Network
Choose menu “Basic → Guest Network”, and you will see the screen as shown below. This
feature allows you to create a separate network for your guests without allowing them to access your main network and computers connected to it.
Figure 4-8
Enable Wireless Radio – Check the box to enable the Wireless Radio.
Name(SSID) - Create a name for the guest network. When setting up a Guest network, it is strongly recommended to use a name that easily distinguishes it from your primary network. If you want to hide the guest network from the Wi-Fi network, check the Hide SSID.
Password - Create a password for the guest network. The password must have a minimum of 8 characters in length.
Allow guests to see each other - If Allow guests to see each other is selected, anyone who connects to the guest network can access each other.
Allow guests to access my local network - If Allow guests to access my local network is selected, anyone who connects to the guest network has access to your local network, not just Internet access.
Click the Save button to save the settings.
13
TC-W7960 300Mbps Wireless N DOCSIS 3.0 Cable Modem Router User Guide
4.5USB Settings
There are two submenus under the USB Settings menu, Folder Sharing and Print Server. Click any of them, and you will be able to configure the corresponding function.
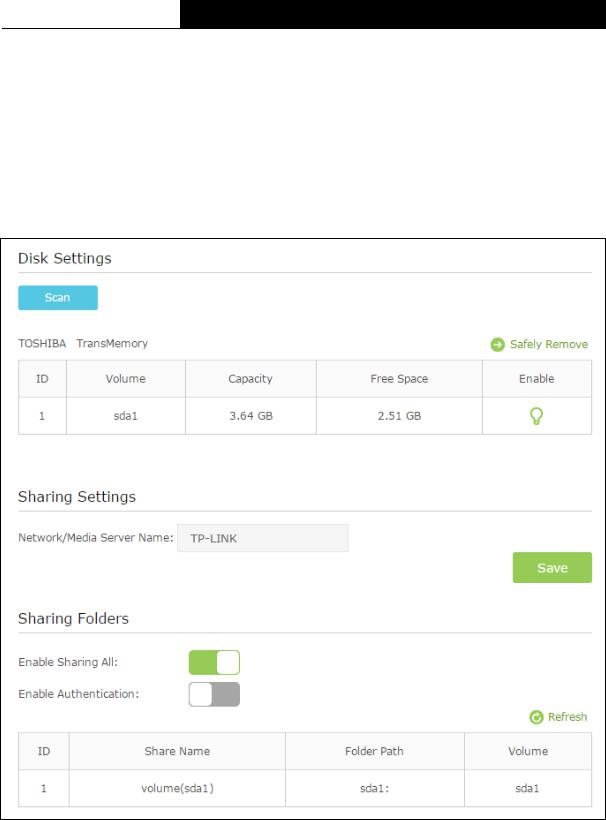
4.5.1 Folder Sharing
Choose menu “Basic → USB Settings → Folder Sharing”, you can view the basic information about the connected USB mass storage, and configure Sharing Folders (Media files, Document files, Compress files and so on.)
Figure 4-9
Disk Settings:
Scan - Click the button to display the information of the USB storage device connected to the modem router.
Volume - The volume name of the USB driver the users have access to.
Capacity - The storage capacity of the USB driver.
14
TC-W7960 300Mbps Wireless N DOCSIS 3.0 Cable Modem Router User Guide
Free Space - The available capacity of the USB driver.
Enable - When the volume is shared, you can click the  icon to stop sharing the volume; when volume is non-shared, you can click the
  icon to share the volume.
Click  Safely Remove button to remove the USB storage device that is connected to USB port.
Note:
Before removing the USB storage device, you should click “ Safely Remove” to make sure that all your data have been saved completely. Removing device directly may cause your USB storage device crashed.
Sharing Settings:
Network/Media Server Name - Show the name of the network/media server. This is the name used to access the USB device connected to the modem router.
Sharing Folders:
Enable Sharing All - The switch for sharing all the folders. If you turn on the switch, the field will become green and all the folders in the USB drive will be shared.
Enable Authentication - If you turn on this switch, the folder sharing needs authentication. The default setting is off.
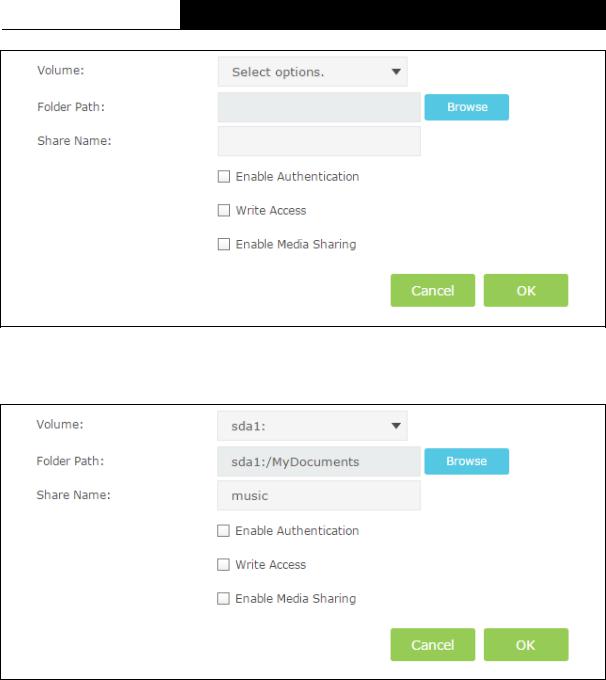
To share the folders you specified, please follow the steps below.
1.Turn off the Enable Sharing All switch and the next screen will pop-up as shown below.
Figure 4-10
2.Click the  Add button and the next screen will pop-up as shown in Figure 4-11.
15
TC-W7960 300Mbps Wireless N DOCSIS 3.0 Cable Modem Router User Guide
Figure 4-11
3.Select the volume desired to share from the Volume drop-down list. Then click the Browse button to select the folder path. You can create a share name, e.g. music.
Figure 4-12
4.Select the checkboxes in Figure 4-12.according to your needs.
Enable Authentication - If this checkbox is selected, then the folder sharing needs authentication.
Write Access - If this checkbox is selected, then the sharing folder is allowed for writing access.
Enable Media Sharing - Select this checkbox to enable media sharing.
Click OK to complete the settings.
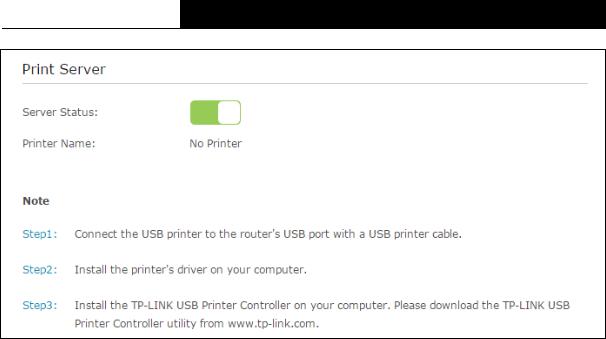
4.5.2 Print Server
Choose menu “Basic→USB Settings→Print Server”, you can enable or disable the print server.Then follow the on-screen steps to share the USB printer among computers on your network.
16
TC-W7960 300Mbps Wireless N DOCSIS 3.0 Cable Modem Router User Guide
Figure 4-13
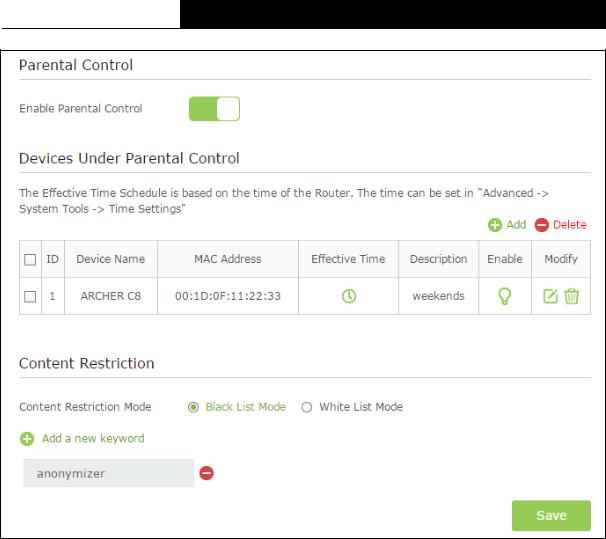
4.6Parental Control
Choose menu “Basic→Parental Control”, and then you can configure the parental control. The Parental Control function can be used to control the internet activities of the child, limit the child to accessing certain websites and restrict the time of surfing.
17
TC-W7960 300Mbps Wireless N DOCSIS 3.0 Cable Modem Router User Guide
Figure 4-14
Parental Control:
Enable Parental Control - The switch for the parental control. If you turn on the switch, the field will become green.
Devices Under Parental Control:
Add - You can click the button to add a new device for the parental control.
Delete - You can click the button to delete the selected entries.
Device Name -The name used for identifying a device.
MAC Address - This field displays the MAC address of the PC that is managing this modem router.
Effective Time - The time period allowed for the PC controlled to access the Internet. You can click the  icon to configure the time period.
Description - Here displays the description about the parental control and this description is unique.
Enable – Click the  icon to enable the function. If this function has taken effect, the icon will become
  .
.
18

TC-W7960 300Mbps Wireless N DOCSIS 3.0 Cable Modem Router User Guide
Modify – Click the  icon to edit the corresponding entry. If you want to delete this entry, you can click the
  icon.
icon.
To add a new entry, please follow the steps below.
1.Click the  Add button and the screen below will pop-up.
Figure 4-15
2.Click View Device button and the screen below will pop-up. You can click the  icon to select a device.
Figure 4-16
3. Click  to create a new schedule.
19

TC-W7960 300Mbps Wireless N DOCSIS 3.0 Cable Modem Router User Guide
Figure 4-17
4.Give a name (e.g. Schedule A) for the entry in the Description field.
Figure 4-18
5.Click OK to complete the settings. Then the information of the new entry will be displayed on the screen as shown below.
20
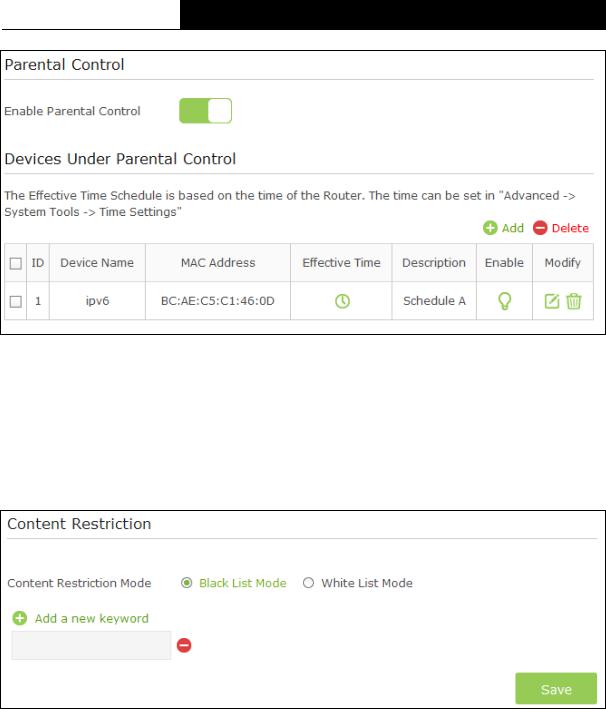
TC-W7960 300Mbps Wireless N DOCSIS 3.0 Cable Modem Router User Guide
Figure 4-19
Content Restriction:
Content Restriction Mode – Select the Black List Mode or White List Mode for this account.
Black List Mode - All webs entered within the Black List will be denied to access. Check the box to enable this mode. You’d like to click  Add a new keyword button and input websites that the child is denied to access.
Figure 4-20
White List Mode - Only the websites entered within the White List will be allowed. Check the box to enable this mode. You can click  Add a new keyword button and input the websites that the child is allowed to access.
21
Loading...