


TL-SC2020N
Wireless N Network Camera
Rev: 1.0.0 1910010671
COPYRIGHT & TRADEMARKS
Specifications are subject to change without notice.  is a registered trademark of TP-LINK TECHNOLOGIES CO., LTD. Other brands and product names are trademarks or registered trademarks of their respective holders.
No part of the specifications may be reproduced in any form or by any means or used to make any derivative such as translation, transformation, or adaptation without permission from TP-LINK TECHNOLOGIES CO., LTD. Copyright © 2012 TP-LINK TECHNOLOGIES CO., LTD.
All rights reserved.
http://www.tp-link.com

FCC STATEMENT
This equipment has been tested and found to comply with the limits for a Class B digital device, pursuant to part 15 of the FCC Rules. These limits are designed to pro-vide reasonable protection against harmful interference in a residential installation. This equipment generates, uses and can radiate radio frequency energy and, if not in-stalled and used in accordance with the instructions, may cause harmful interference to radio communications. However, there is no guarantee that interference will not occur in a particular installation. If this equipment does cause harmful interference to radio or television reception, which can be determined by turning the equipment off and on, the user is encouraged to try to correct the interference by one or more of the following measures:
Reorient or relocate the receiving antenna.
Increase the separation between the equipment and receiver.
Connect the equipment into an outlet on a circuit different from that to which the receiver is connected.
Consult the dealer or an experienced radio/ TV technician for help.
This device complies with part 15 of the FCC Rules. Operation is subject to the following two conditions:
1)This device may not cause harmful interference.
2)This device must accept any interference received, including interference that may cause undesired operation.
Any changes or modifications not expressly approved by the party responsible for compliance could void the user’s authority to operate the equipment.
Note: The manufacturer is not responsible for any radio or TV interference caused by unauthorized modifications to this equipment. Such modifications could void the user’s authority to operate the equipment.
FCC RF Radiation Exposure Statement:
This equipment complies with FCC RF radiation exposure limits set forth for an uncontrolled environment. This device and its antenna must not be co-located or operating in conjunction with any other antenna or transmitter.
“To comply with FCC RF exposure compliance requirements, this grant is applicable to only Mobile Configurations. The antennas used for this transmitter must be installed to provide a separation distance of at least 20 cm from all persons and must not be co-located or operating in conjunction with any other antenna or transmitter.”

CE Mark Warning
This is a class B product. In a domestic environment, this product may cause radio interference, in which case the user may be required to take adequate measures.
National Restrictions
This device is intended for home and office use in all EU countries (and other countries following the EU directive 1999/5/EC) without any limitation except for the countries mentioned below:
Country |
Restriction |
Reason/remark |
|
|
|
|
|
Bulgaria |
None |
General authorization required for outdoor use and |
|
public service |
|||
|
|
Outdoor use limited to
France 10 mW e.i.r.p. within the band 2454-2483.5
MHz
Military Radiolocation use. Refarming of the 2.4 GHz band has been ongoing in recent years to allow current relaxed regulation. Full implementation planned 2012
Italy |
None |
If used outside of own premises, general authorization is |
|
required |
|||
|
|
||
|
|
|
|
Luxembourg |
None |
General authorization required for network and service |
|
supply(not for spectrum) |
|||
|
|
||
|
|
|
|
Norway |
Implemented |
This subsection does not apply for the geographical area |
|
within a radius of 20 km from the centre of Ny-Ålesund |
|||
|
|
||
|
|
|
|
Russian Federation |
None |
Only for indoor applications |
Note: Please don’t use the product outdoors in France.

Industry Canada Statement:
This device complies with RSS-210 of the Industry Canada Rules. Operation is subject to the following two conditions:
1)This device may not cause harmful interference, and
2)This device must accept any interference received, including interference that may cause undesired operation.
IMPORTANT NOTE: Radiation Exposure Statement:
This equipment complies with Canada radiation exposure limits set forth for an uncontrolled environment. This equipment should be installed and operated with minimum distance 20cm between the radiator & your body.
Ce dispositif est conforme à la norme CNR-210 d’Industrie Canada applicable aux appareils radio exempts de licence. Son fonctionnement est sujet aux deux conditions suivantes:
1)Le dispositif ne doit pas produire de brouillage préjudiciable, et
2)Ce dispositif doit accepter tout brouillage reçu,y compris un brouillage susceptible de provoquer un fonctionnement indésirable.
NOTE IMPORTANTE:
Déclaration d’exposition aux radiations:
Cet équipement est conforme aux limites d’exposition aux rayonnements IC établies pour un environnement non contrôlé. Cet équipement doit être installé et utilisé avec un minimum de 20 cm de distance entre la source de rayonnement et votre corps.
Korea Warning Statements:
.
NCC Notice:
率或變更原設計之特性及功能。
機須忍受合法通信或工業、科學及醫療用電波輻射性電機設備之干擾。
Продукт сертифіковано згідно с правилами системи УкрСЕПРО на відповідність вимогам нормативних документів та вимогам, що передбачені чинними законодавчими актами України.

 TP-LINK TECHNOLOGIES CO., LTD
DECLARATION OF CONFORMITY
For the following equipment:
Product Description: Wireless N Network Camera Model No.: TL-SC2020N
Trademark: TP-LINK
We declare under our own responsibility that the above products satisfy all the technical regulations applicable to the product within the scope of Council Directives:
Directives 1999/5/EC, Directives 2004/108/EC, Directives 2006/95/EC, Directives 1999/519/EC, Directives 2011/65/EU
The above product is in conformity with the following standards or other normative documents
ETSI EN 300 328 V1.7.1: 2006
ETSI EN 301 489-1 V1.8.1:2008& ETSI EN 301 489-17 V2.1.1:2009 EN 55022:2010
EN 55024:2010
EN 61000-3-2:2006+A1:2009+A2:2009 EN 61000-3-3:2008
EN60950-1:2006+A11:2009+A1:2010+A12:2011 EN62311:2008
The product carries the CE Mark:
Person is responsible for marking this declaration:
Yang Hongliang
Product Manager of International Business
Date of issue: 2012
TP-LINK TECHNOLOGIES CO., LTD.
Building 24 (floors 1, 3, 4, 5), and 28 (floors 1-4) Central Science and Technology Park,
Shennan Rd, Nanshan, Shenzhen, China
|
CONTENTS |
|
Package Contents.............................................................................................................. |
1 |
|
Chapter 1 Safety Instructions.......................................................................................... |
2 |
|
Chapter 2 Minimum System Requirement & Product Feature...................................... |
3 |
|
2.1 |
System Requirement ........................................................................................................ |
3 |
2.2 |
Product Features .............................................................................................................. |
3 |
2.3 |
Physical Overview ............................................................................................................ |
4 |
|
2.3.1 Front View ............................................................................................................... |
4 |
|
2.3.2 Rear View ................................................................................................................ |
5 |
2.4 |
Mount the Camera ............................................................................................................ |
6 |
|
2.4.1 The Screw Size ....................................................................................................... |
6 |
|
2.4.2 Wall and Ceiling Mount............................................................................................ |
6 |
2.5 |
Hardware Connection ....................................................................................................... |
6 |
|
2.5.1 Wired Connection.................................................................................................... |
7 |
|
2.5.2 Wireless Connection (by WPS) ............................................................................... |
7 |
Chapter 3 Using Camera via Web Browser.................................................................... |
8 |
|
3.1 |
Obtain the IP Address....................................................................................................... |
8 |
3.2 |
Windows Web Browser................................................................................................... |
10 |
Chapter 4 Operating Camera via Mobile Phone........................................................... |
12 |
|
4.1 |
Mobile Phone Viewing .................................................................................................... |
12 |
|
4.1.1 3G Mobile Phone Streaming Viewing .................................................................... |
12 |
|
4.1.2 2.5G Mobile Phone WAP Viewing ......................................................................... |
12 |
|
4.1.3 2.5G Mobile Phone Browser Viewing .................................................................... |
12 |
4.2 |
Using Camera via iPhone ............................................................................................... |
12 |
Chapter 5 Configuration of Main Menu ........................................................................ |
14 |
|
5.1 |
Home .............................................................................................................................. |
14 |
|
5.1.1 Video play buttons ................................................................................................. |
14 |
|
5.1.2 Snapshot ............................................................................................................... |
15 |
|
5.1.3 Digital zoom in/out the image via the monitor window........................................... |
15 |
|
5.1.4 Audio buttons ........................................................................................................ |
15 |
5.2 |
Information...................................................................................................................... |
16 |
5.3 |
Basic setup ..................................................................................................................... |
16 |
|
5.3.1 Account.................................................................................................................. |
16 |
|
5.3.2 Network ................................................................................................................. |
18 |
|
5.3.3 Image Setting ........................................................................................................ |
30 |
|
5.3.4 Video ..................................................................................................................... |
31 |
|
5.3.5 Audio ..................................................................................................................... |
31 |
|
5.3.6 Camera setting ...................................................................................................... |
32 |
|
5.3.7 Events.................................................................................................................... |
32 |
5.4 |
System............................................................................................................................ |
37 |
|
5.4.1 Initialize.................................................................................................................. |
37 |
|
5.4.2 Date Time .............................................................................................................. |
38 |
5.5 |
Language........................................................................................................................ |
39 |
|
i |
|
Appendix ....................................................................................................................... |
40 |
A. Frame-rate and Bitrate Table – Help to set Camera with your network environment to |
|
access Internet. ..................................................................................................................... |
40 |
B. Storage Requirement Table - Help to set Recording Storage System............................... |
40 |
C. System Requirement – Help to setup System .................................................................. |
40 |
Europe – EU Declaration of Conformity......................................................................... |
42 |
Federal Communication Commission Interference Statement .................................... |
45 |
ii
Package Contents
The following items should be found in your package:
TL-SC2020N Wireless N Network Camera
Power Adapter
Mounting Bracket with three screws, a Lock Ring, a Brace and a Base Plate
RJ45 Cable
Quick Installation Guide
Resource CD, including:
This User Guide
Application Guide
Other helpful information
Note:
Make sure that the package contains the above items. If any of the listed items is damaged or missing, please contact your distributor.
1
Chapter 1 Safety Instructions
Before you use this product
This product has been designed with safety in mind. However, the electrical products can cause fires which may lead to serious body injury if not used properly. To avoid such accidents, be sure to heed the following.
Legal Caution
Video and audio surveillance can be forbidden by laws that vary from country to country. Check the laws in your local region before using this product for surveillance purposes.
Don't open the housing of the product
Don't try to open the housing or remove the covers, for it may expose you to dangerous voltage or other hazards.
Don't use the accessories not recommend by the manufacturer
Heed the safety precautions
Be sure to follow the general safety precautions and the “Operation Notice.”
Operation Notice - Operating or storage location
Avoid operating or storing the Camera in the following locations:
Extremely hot or cold places
(Operating temperature: 0 °C to + 40 °C [32 °F to 104°F])
Exposed to direct sunlight for a long time, or close to heating equipment (e.g., near heaters)
Close to water (e.g., near a bathtub, kitchen sink, laundry tub)
Close to sources of strong magnetism
Close to sources of powerful electromagnetic radiation, such as radios or TV transmitters
Locations subject to strong vibration or shock
In case of a breakdown
In case of system breakdown, discontinue use and contact your authorized dealer.
In case of abnormal operation
If the unit emits smoke or an unusual smell,
If water or other foreign objects enter the cabinet, or
If you drop the unit or damage the cabinet: 1. Disconnect the cable and the connecting cables. 2. Contact your authorized dealer or the store where you purchased the product.
Transportation
When transporting the camera, repack it as originally packed at the factory or in materials of equal quality.
Ventilation
To prevent heat buildup, do not block air circulation around the device.
Cleaning
Use a soft, dry cloth to clean the external surfaces of the device. Stubborn stains can be removed using a soft cloth dampened with a small quantity of detergent solution, then wipe dry.
Do not use volatile solvents such as alcohol, benzene or thinners as they may damage the surface.
2
Chapter 2 Minimum System Requirement & Product Feature
2.1 System Requirement
For normal operation and viewing of the network camera, it’s recommended that your system meets these minimum requirements for proper operation:
|
Item |
Requirements |
|
|
|
|
CPU |
Pentium 4 2.8GHz (or equivalent AMD) |
|
|
|
|
Graphic Card |
256 MB RAM graphic cards (or equivalent on-board graphic cards) |
|
|
|
|
RAM |
2 GB RAM |
|
|
|
|
Operating |
Windows 2000 / Windows 2003 / Windows XP / Windows Vista / |
|
System |
Windows 7 |
|
|
|
|
Web Browser |
Internet Explore 8 or higher |
|
|
|
Note: |
|
|
Please keep updating the latest Windows software and service package. (E.g.: Net Framework, Windows Media Player, Enhance ActiveX Security)
2.2 Product Features
These easy-to-follow instructions make it quick and simple for setup and operation, so you’ll also soon be enjoying the benefits of these product features:
|
SYSTEM |
|
|
|
|
Resolutions |
Up to 640 x 480 |
|
|
|
|
Compressing format |
Motion JPEG |
|
|
|
|
Frame Rate |
Up to 30 fps at 640 x 480 |
|
|
|
|
Image settings |
Brightness / Contrast / Saturation / Sharpness/ Exposure |
|
|
||
Overlay capabilities: time, date, text |
||
|
||
|
|
|
Image snapshot |
Yes |
|
|
|
|
Video Recording |
Yes |
|
|
|
|
Full Screen Viewing |
Yes |
|
|
|
|
Digital Zoom |
10x digital |
|
|
|
|
Audio |
One-way with built-in microphone |
|
|
||
Audio compression: G.711 μ law |
||
|
||
|
|
|
Security |
Password Protection / HTTPS encryption |
|
|
|
|
Alarm Buffer |
Recording image and audio file pre-and-post disconnection up to 5 sec. |
|
|
|
|
|
3 |
Supported protocols |
TCP/IP, DHCP, PPPoE, ARP, ICMP, FTP, SMTP, DNS, NTP, UPnP, |
|
RTSP, RTP, RTCP, HTTP, TCP, UDP |
||
|
||
|
|
|
Simultaneous |
Up to 3 users |
|
Connection |
||
|
||
|
|
|
Operating conditions |
0°C ~ 40 (32 ~ 104 ) |
|
|
|
|
|
HARDWARE |
|
|
|
|
Lens |
F 2.4 fixed lens |
|
|
|
|
Audio Output |
1 |
|
|
|
|
Power |
5V DC, 1A |
|
|
|
|
Wireless |
IEEE 802.11b/g/n with WEP/WPA/WPA2. Up to 150 Mbps |
|
|
|
|
WPS |
1 (Wi-Fi Protected Setup) |
|
|
|
2.3 Physical Overview
2.3.1 Front View
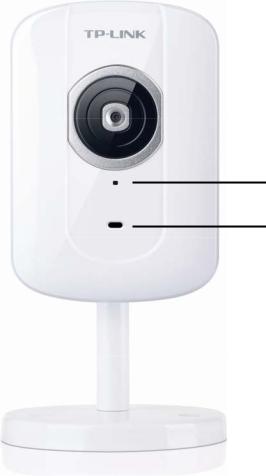
Built-in Microphone
Power LED Indicator
Network LED Indicator: It lights up when the Camera is well connected to the network. It flashes when there are data being transmitted.
Power LED Indicator
Solid Red: The Camera boots up.
Flash Red: The Camera has finished booting up, but it isn’t connected to any network.
4
Solid Blue: The Camera has been connected to a network.
Built-in Microphone: The location where the voice from your partner comes out.
2.3.2 Rear View
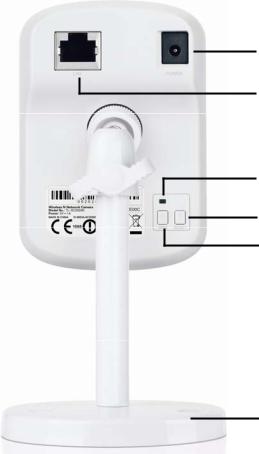
Power Jack
LAN Port
WPS LED Indicator
RESET Button
WPS Button
Base Plate
Power Jack: The power connector is where you connect the power adapter.
RESET: Press the button for more than 15 seconds, and the Camera will be restored to factory defaults.
LAN Port: Through this port, you can connect the Camera to your computer or the other Ethernet network devices.
WPS (Wi-Fi Protected Setup): This button is used to easily set up a wireless connection with the Router supporting WPS.
Step 1. Press the WPS button on the router supporting WPS for 2 seconds. Step 2. Within 2 minutes, press the WPS button on the Camera for 2 seconds.
Lock Ring: It is used to adjust the angle of the Camera.
Base Plate: It is used to support the Camera and can be fixed to a flat surface with the supplied screws.
5
2.4 Mount the Camera
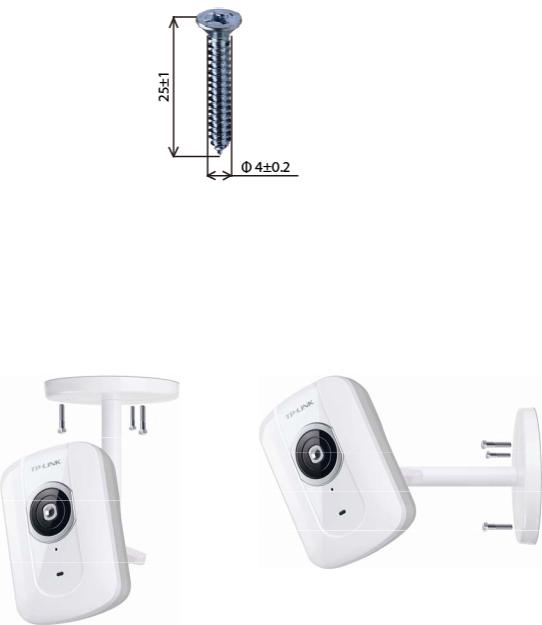
2.4.1 The Screw Size
There are three supplied screws for mounting the Camera. The length of the screws is 25±1 mm and the diameter is 4±0.2 mm.
2.4.2 Wall and Ceiling Mount
There are two ways to mount the Camera. See the following two pictures.
Ceiling Mount |
Wall Mount |
|
|
To mount the Camera, please follow the steps below:
1.Use the three supplied screws to fix the base plate to a flat surface.
2.Loosen the lock ring to adjust the desired angle of the Camera.
3.Tighten the lock ring.
2.5 Hardware Connection
Before proceeding, confirm that your PC is connected to your router and can access the Internet. Make sure that your router’s DHCP feature is enabled. If not, please refer to your router’s instruction to enable it.
For TL-SC2020N, you can set up either a Wired Connection or a Wireless Connection. To set up a wireless connection, if your Router supports WPS (Wi-Fi Protected Setup), please follow 2.5.2 Wireless Connection (by WPS) to finish connection; if your Router doesn’t support WPS, please refer to the
6
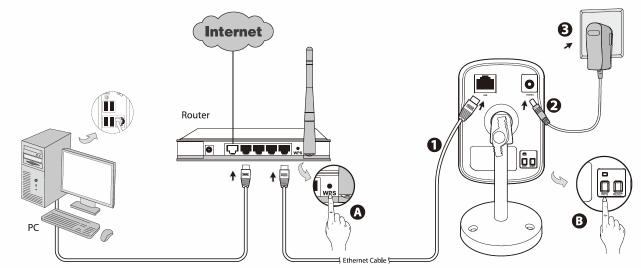
Wireless section of 5.3.2 Network.
Please connect the Camera according to the following steps.
2.5.1 |
Wired Connection |
|
1. |
Connect the Camera to the LAN network (Router or Switch) via Ethernet cable. |
|
2. |
Connect the power adapter cord to the Power Jack. |
|
3. Plug the power adapter into the power outlet. |
||
2.5.2 |
Wireless Connection (by WPS) |
|
Power on the Camera and make sure that the Power LED is flash red. Then take the following steps.
A.Press the WPS button on the Router supporting WPS for 2 seconds.
B.Within 2 minutes, press the WPS button on the Camera for 2 seconds.
After you press the WPS button on the Camera, the WPS LED will turn flash blue. Once the WPS Connection is successfully established, it will turn solid blue.
7

Chapter 3 Using Camera via Web Browser
3.1 Obtain the IP Address
1.Insert the provided CD into your CD-ROM driver. The Setup Wizard will automatically pop up on your computer’s screen as shown in the figure below.
Figure 3-1
2.Choose the Intelligent IP Installer, and then the next screen appears. Click on Intelligent IP Installer to begin the installation.
Figure 3-2
8
 Loading...