


Installation
Note The product model shown in this QIG is TD-W8961ND, as an example.
Note Please use only wired network connections to configure the router.
 Power down all your network devices, including your computer(s) and the Modem Router. If you currently use a modem, disconnect it now - the Modem Router will replace your current modem.
Connect your computer to the
Port labeled “1~4” on the
Router with an Ethernet cable.
Connect the splitter to the wall jack using a telephone line, then use the other telephone line to directly connect it to the ADSL port on the Router and the MODEM port of the splitter, also have the PHONE port of the splitter connected to a telephone.
Note If no telephone is needed, please connect the ADSL port of the Router to the wall jack using the telephone line directly.
1
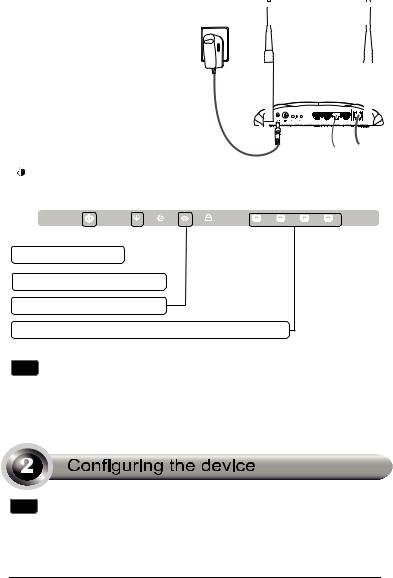
 Plug the provided Power Adapter into the Power jack on the back of the Router and the other end to a standard electrical wall socket.
 Power on all your network devices and then check to see if the LEDs of the Router display normally as the diagram below describes.
POWER: Solid  light
light
ADSL: Solid light or flashing
WLAN: Solid light or flashing
LAN: Solid light if the corresponding port is connected
Note If the LEDs display abnormally, please check to see if all the cable connectors (power adapter, phone line and Ethernet cable) are well connected to your device. With the phone line well connected, if the ADSL LED turns off after flashing, please contact your ISP to ensure that your Internet connection is active.
Note To configure the device, you can either run the setup CD-ROM (method one), or run the Web-based Quick Setup Wizard (method two). TP-LINK strongly recommends that you run the setup CD-ROM.
2

 Insert the provided Resource
CD into your CD-ROM drive.
The Setup Wizard will
automatically pop up on your computer’s screen.
Please select your product model and click Start Setup
Then a flash video will pop up and show you how to connect your devices. After that, the Easy Setup Assistant will start.
Click NEXT, and then follow the step-by-step instructions until you complete the configuration
The configuration has now been completed. Please skip to Step 3 “Testing the Internet Connection”.
3
 Login
Login
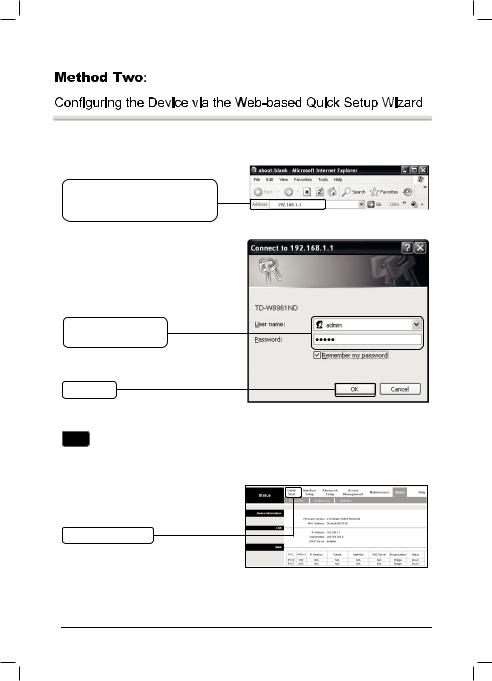
Open your web browser and type 192.168.1.1 in the address bar and press Enter
A dialog box will prompt you for the
User name and Password. Enter the default values and click OK.
User name: admin
Password: admin
Click OK
Note If the dialog box does not pop up, please refer to T3 in the Troubleshooting guide and T2 will give you some help if you forget the password.
The web management page will display after a successful login.
Click Quick Start
4

 Internet Parameters Configuration
This page will then display.
Click RUN WIZARD
Click NEXT
Select the appropriate Time Zone for your location from the drop-down list
Click NEXT
Choose the Connection Type given by your ISP.
If PPPoE/PPPoA is selected, please proceed to A;
If Dynamic IP is selected, please skip to B;
If Static IP is selected please skip to
C;
If Bridge Mode is selected, please skip to D.
Click NEXT
Note Bridge mode is not recommended because multiple computers are not permitted to share Internet access in this mode.
5
A. Configuration for PPPoE/PPPoA
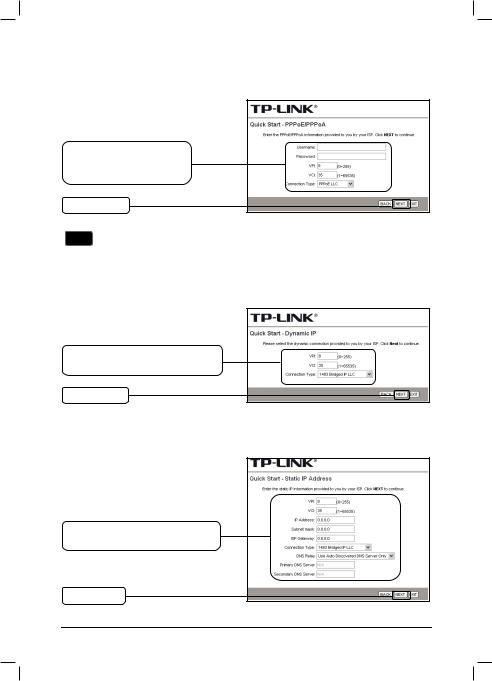
This page will then display.
Enter the PPPoE/PPPoA information provided by your ISP
Click NEXT
Note If you did not get the VPI, VCI and Connection Type information, please contact your ISP for this information.
B. Configuration for Dynamic IP
This page will then display.
Select the dynamic connection provided by your ISP
Click NEXT
C. Configuration for Static IP
This page will then display.
Enter the Static IP information provided by your ISP manually
Click NEXT
6
 Loading...