


 Loading...
 Jump to the table of contents
User’s Guide
PRS-600
Digital Book Reader
©2009 Sony Corporation |
4-153-621-12(1) |

Table of Contents |
|
Introduction |
|
What You Can Do with the Reader................................................. |
5 |
Getting Started |
|
Parts and Controls......................................................................... |
6 |
Turning on the Reader................................................................. 10 |
|
About the Power Management of the Reader............................. |
11 |
Charging the Reader................................................................... |
13 |
About charging............................................................................ |
13 |
Charging the Reader via USB connection.................................. |
13 |
Installing eBook Library............................................................... |
17 |
How to Use the Touch Screen...................................................... 18 |
|
How to Use the Home Menu........................................................ 22 |
|
About the Home menu................................................................ |
24 |
Inserting a Memory Card............................................................. 33 |
|
Importing and Transferring Content |
|
Importing Content........................................................................ |
37 |
Authorizing the Reader and your computer................................. |
37 |
Downloading eBooks from eBook store...................................... |
40 |
Importing content to eBook Library............................................. |
41 |
Transferring Content.................................................................... |
44 |
Transferring content to the Reader.............................................. |
44 |
Transferring content via a memory card...................................... |
48 |
Synchronizing content in Library with the Reader....................... |
52 |
Reading Books |
|
Reading Books............................................................................ |
54 |
Using the Option menu of the book list....................................... |
56 |
Sorting a list............................................................................ |
58 |
Continued

Switching the list display format.............................................. |
61 |
Searching for a book with a keyword....................................... |
62 |
Operations on the book page...................................................... |
69 |
Using the Useful Features........................................................... |
76 |
Embedded dictionaries................................................................ |
76 |
Adjusting the text size................................................................. |
79 |
Zooming in/out............................................................................ |
82 |
Using the Option menu of the book page.................................... |
84 |
Jumping to pages (“Go to Page”)............................................ |
86 |
Going back to previously displayed pages (“History”)............. |
89 |
Searching a book for keywords (“Search”).............................. |
90 |
Creating a bookmark on a book page (“Create/Edit Notes”) |
|
.............................................................................................. |
94 |
Highlighting a word(s) (“Create/Edit Notes”)........................... |
98 |
Marking up a book page by handwriting (“Create/Edit Notes”) |
|
............................................................................................ |
102 |
Adding a comment to a bookmark or highlight...................... |
104 |
Selecting a note (“Create/Edit Notes”).................................. |
109 |
Using the Option menu of the “Notes” List............................. |
111 |
Hiding notes (“Hide Notes”)................................................... |
112 |
Deleting a book (“Delete Book”)............................................ |
112 |
Displaying book information (“Info”)....................................... |
113 |
Switching screen orientation (vertical/horizontal) |
|
(“Orientation”)...................................................................... |
114 |
Creating Drawings and Text Memos |
|
Creating Drawings and Text Memos.......................................... |
116 |
Drawing by handwriting............................................................. |
116 |
Creating a text memo ............................................................... |
121 |
Using the Option menu of the Handwriting and Text Memo lists |
|
................................................................................................ |
125 |
Playing Audio Files |
|
Playing Audio Files.................................................................... |
127 |
Continued

Playing audio files transferred from your computer................... |
127 |
Using the Option menu of Audio............................................... |
131 |
Viewing Pictures |
|
Viewing Pictures........................................................................ |
133 |
Viewing pictures transferred from your computer...................... |
133 |
Using the Option menu of Pictures............................................ |
137 |
Settings |
|
Changing Settings..................................................................... |
139 |
Settings menu items.................................................................. |
141 |
Advanced Settings menu items................................................. |
146 |
Troubleshooting |
|
Troubleshooting......................................................................... |
150 |
Restoring default settings.......................................................... |
163 |
Uninstalling eBook Library......................................................... 166 |
|
Other Information |
|
Updating the Reader Device Software....................................... |
167 |
About Books Pre-installed on the Reader.................................. 168 |
|
Notes on Reader Disposal......................................................... 169 |
|
Precautions............................................................................... |
170 |
On safety................................................................................... |
175 |
On heat build-up........................................................................ |
176 |
On the headphones................................................................... |
176 |
Note on use............................................................................... |
177 |
Notes on memory cards............................................................ |
179 |
On software............................................................................... |
181 |
On Cleaning.............................................................................. |
182 |
On Copyrights............................................................................ 183 |
|
About GNU GENERAL PUBLIC LICENSE............................... |
184 |
Specifications............................................................................ |
186 |
Index.......................................................................................... 188 |
|
Introduction
What You Can Do with the Reader
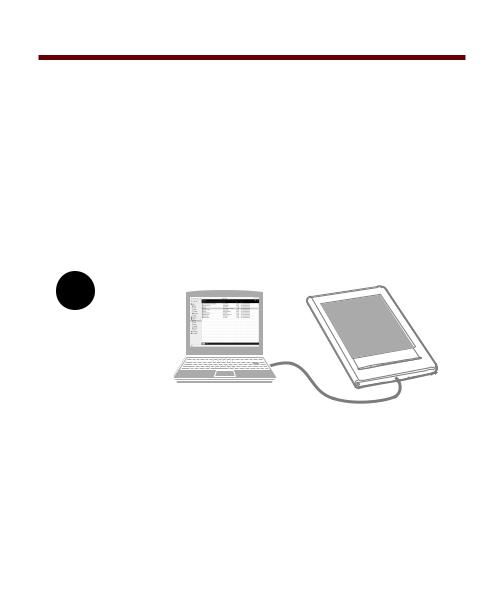
First, read the Quick Start to prepare the Reader for use. Initially after purchase, you need to charge the Reader battery, and install the dedicated software “eBook Library” on your computer.
Once initial preparation is complete, you can transfer content from your computer to the Reader to take anywhere you wish.
Downloaded
eBooks
*1
*2
Transferring eBooks/Audio/
Picture file to the Reader
*1 Online eBook store. An Internet connection is required.
*2 Books/Personal Documents/Audio/Picture files that you already have
Getting Started Charge the Reader, then install eBook Library.
Importing |
Transferring |
Downloaded eBooks from |
Transfer content from your |
eBook store. |
computer to the Reader |
|
using eBook Library. |
Reading/
Playing/Viewing
Enjoy content on the Reader.
Getting Started
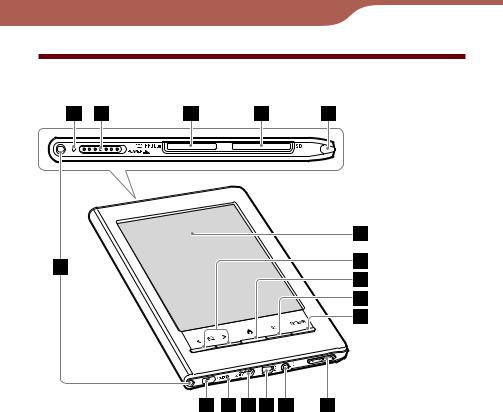
Parts and Controls
Touch screen
The touch screen gives you simple access to the various functions on the Reader ( page 18).
<  > (Page Turn) buttons
Turns the page. You can turn multiple pages by pressing and holding the buttons. You can also turn the page using the touch screen ( page 19).
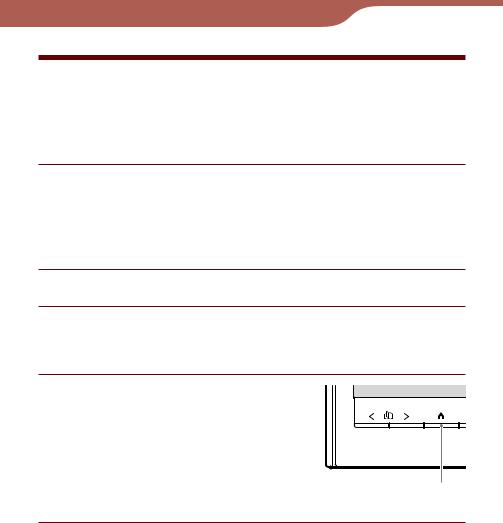
 (Home) button
Displays the Home menu ( page 24).
Continued

Getting Started
 (Size) button
Displays the Size menu ( page 79, 136).
You can adjust the text size and zoom in/out a page or picture from the Size menu.
OPTIONS button
Displays the Option menu ( page 29, 32, 57, 84, 111, 125, 131, 137).
You can use various functions such as creating notes, jumping to a page, etc., from the Option menu.
VOL –/+ button
Adjusts the volume ( page 130).
To mute the sound, press and hold either edge of the VOL –/+ button. To restore the sound, press the VOL –/+ button again.
(Headphones) jack
Used to connect headphones (optional) ( page 127).
USB connector
Used to connect the USB cable (supplied) ( page 13).
DC IN jack
Used to connect the AC Adapter for Reader (ACS5220E) (optional).
Hint
The Reader can be charged by connecting to a computer using the supplied USB cable.
RESET button
Resets the Reader if no operation is possible ( page 150).
Continued

Getting Started
Hole for hand strap
Used to attach the hand strap (optional).
Holes for cover attachment
Used to attach the cover (optional).
Charge indicator
Lights up in red while charging, and goes off when
charging is complete ( page 14).
Flashes in orange when your computer starts accessing the Reader via USB.
POWER switch
Switches the Reader on/off ( page 10).
To shut down the Reader, slide and hold for more than 3 seconds ( page 11).
“Memory Stick Duo” slot
Used to insert a “Memory Stick Duo” Memory Card
(optional) ( page 33).
SD Memory Card slot
Used to insert an SD Memory Card (optional) ( page 33).
Stylus
The stylus enables you to perform drawing or precise operations, such as selecting a word, on the touch screen ( page 9, 18, 150).
Continued
Getting Started
About the serial number
The serial number is for customer registration purposes. The number is on the label on the rear of the Reader. Do not remove the label.
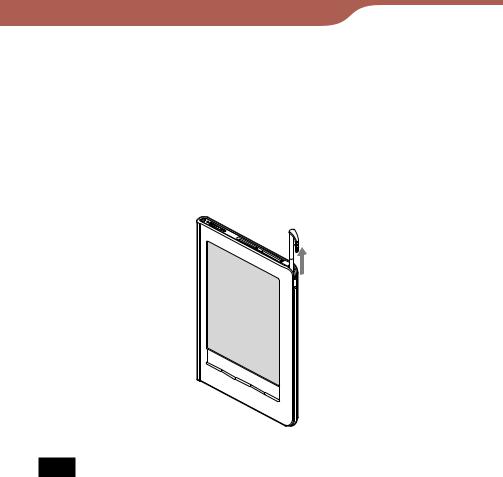
Removing the supplied stylus
The supplied stylus is stored on the top right side of the Reader. Pull it out from the top when you use it.
Note
When you put the supplied stylus back into the holder, make sure to insert it fully to the bottom of the holder.
Getting Started
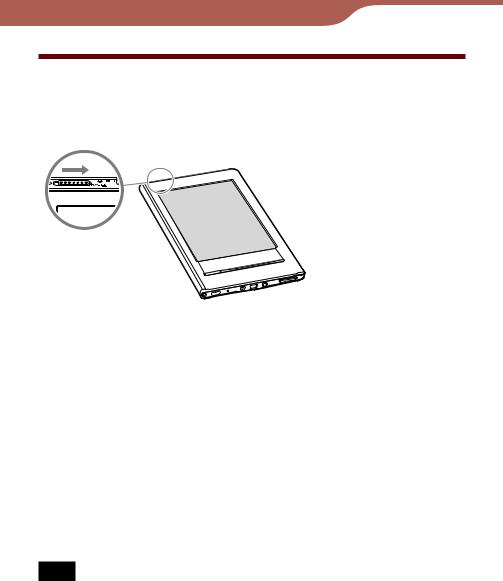
Turning on the Reader
Slide the POWER switch to turn on the Reader. Make sure to turn on the Reader before connecting to your computer.
When you turn on the Reader for the first time after purchase, “Welcome!” screen appears in all four
languages followed by the “Calibrate Touch Screen” ( page 18). After completing the calibration, “Menu Language” screen appears. If you select “English”, the “Keyboard” screen appears. If not, Home menu appears. For details about settings, refer to “Settings menu items” and “Advanced Settings menu items” (
 page 144, 147).
It may take a few moments for the Reader to turn on and the initial setting screen to appear when using it for the
first time, after a reset ( page 150) or shutdown (
 page
page
12), or after the battery has been fully depleted.
Note
If the Reader does not turn on, charging is required. For details, see “Charging the Reader” ( page 13).
Continued 10
Getting Started
To turn off the Reader
Slide the POWER switch again.
The Reader turns off. After turned off, the Reader enters sleep mode.
When turning off the Reader, if you slide the POWER switch and hold it for more than 3 seconds, the Reader shuts down.
Hint
When the “Power Management” setting is set to “On” ( page 142), the Reader enters sleep mode after 60 minutes of inactivity even if you do not turn off manually.
About the Power Management of the Reader
The Reader has a Power Management feature to avoid unnecessary battery consumption. At purchase, the Power Management is activated. The Power Management operates as follows:
After 60 minutes of inactivity, the Reader enters sleep mode automatically while the battery power is consumed slightly.
After 5 days of inactivity, the Reader automatically shuts down and stops consuming the battery power.
If the battery power is at a low level, the Reader will shut down after 60 minutes of inactivity.
Continued 11

Getting Started
Hint
You can activate/deactivate the Power Management from “Power Management” in the “Settings” menu ( page 142).
Note
In the following states, the Reader does not enter sleep mode after 60 minutes of inactivity even if “Power Management” is set to “On.”
–When connected to the computer using the supplied USB cable
–When connected to the AC Adapter for Reader (AC-S5220E) (optional) to charge
–When playing audio files or a slideshow
To shut down the Reader manually
You can shut down the Reader manually in one of the following ways.
Slide the Power switch and hold it for more than
3 seconds.
Use “Device Shutdown” in the “Advanced Settings” menu ( page 149).
12

Getting Started
Charging the Reader
About charging
You need to charge the Reader when using it for the first time, or when the remaining battery power is low. Charge in one of the following ways.
Connect to a computer via USB.
Connect to an AC outlet using the AC Adapter for Reader (ACS5220E) (optional).
It will take approximately 4 hours to fully charge the battery.
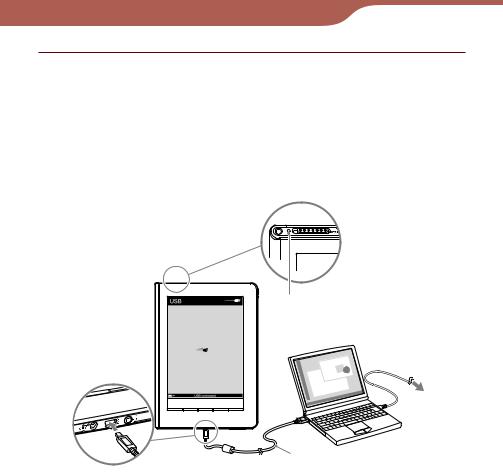
Charging the Reader via USB connection
To charge the Reader via USB connection, follow the steps below.
Make sure your computer is connected to an AC outlet and turned on (not in sleep mode).
Continued 13
Getting Started
Connect the Reader to your computer using the supplied USB cable.
 appears on the Reader and charging starts. (At purchase, the Reader is in the shutdown state,
therefore, it takes 5 minutes or more until  appears. The same applies when the Reader’s battery is fully depleted.)
Charge indicator
To AC outlet
USB cable (supplied)
*The displayed screen during the USB connection varies depending on the using environment.
Hints
If eBook Library has not been installed on your computer, the AutoPlay window appears (Windows only) ( page 17).
To check how much the Reader has been charged, disconnect the Reader from your computer, then check the battery icon
( page 15).
Continued 14
Getting Started
When the Reader is charged fully, the charge indicator (lights up in red while charging) goes off, and the icon indicating that charging is in progress (the bottom left of the touch screen) disappears.
Notes
While charging via USB, you cannot operate the Reader.
Do not leave the Reader connected to a notebook computer which is not connected to an AC outlet for an extended period. It will consume the battery of the notebook computer.
Connection via an extension cable or USB hub is not guaranteed. Connect the USB cable directly to the computer.
While the Reader is connected to your computer, do not turn on, restart, wake up from sleep mode, or shut down the computer. These operations may cause the Reader to malfunction. Disconnect the Reader from the computer before performing these operations.
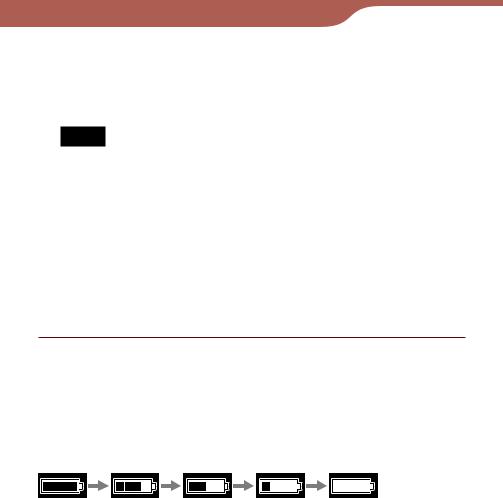
To check the battery status
You can verify the remaining battery power by checking the battery indicator in the bottom left of the screen. Charge the battery when remaining power is low (the fewer black segments indicated, the lower the remaining power).
Continued 15
Getting Started
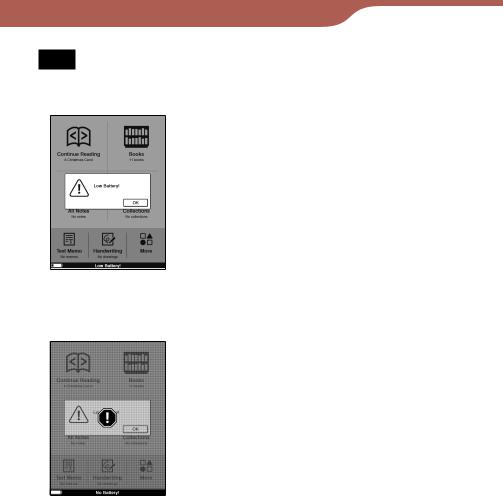
Note
If the remaining battery power is low, the following warning appears. Charge the battery ( page 13).
If you continue to use without charging, the following warning appears, and the Reader will turn off automatically.
Charge the Reader and turn it on again ( page 13).
16

Getting Started
Installing eBook Library
eBook Library is the content management software you use with the Reader.
Notes
An Internet connection is required to install eBook Library.
Your computer needs to meet the minimum system requirements for eBook Library. For details, see “System Requirements”
( page 187).
Make sure the Reader and your computer are turned on, then connect them via USB ( page 14).
The “Installer for Reader” window appears.
Hint
If you have disabled the AutoPlay feature of Windows, start the installation launcher that is stored on the Reader manually. From the Start menu, click “My Computer” (“Computer” in the case of Vista) - “Installer for Reader” - “Windows” - “Setup eBook Library.”
Click “Install eBook Library” in the “Installer for Reader” window, then follow the on-screen instructions.
To install eBook Library in Macintosh
When the Reader is connected to your computer,
“LAUNCHER” appears on the desktop. Click it - “Mac” -
“Setup eBook Library,” and then follow the on-screen instructions.
17
Getting Started
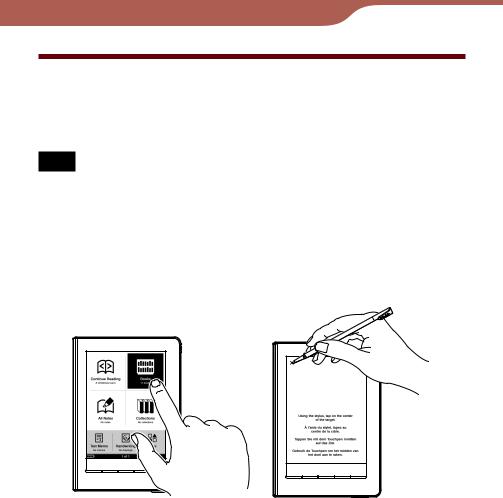
How to Use the Touch Screen
Using the touch screen, you can perform various operations with a finger or with the supplied stylus.
Note
When you use the supplied stylus, make sure to use the pointed end of it for tapping dragging, or drawing on the touch screen. Do not use a ballpoint pen, pencil, or other sharp object.
Tapping
By tapping on the touch screen, you can select an item on the menu or list, etc.
Continued 18
Getting Started
Double-tapping
By tapping twice (double-tap) on the touch screen, you can create bookmarks ( page 94), highlight (
 page 99), search (
 page 90), or look up words (
 page 76), etc.
Dragging
By dragging on the touch screen, you can turn a page ( page 70), drag a magnified page in Zoom mode (
 page 83) or select a word to highlight (
 page 101).
Continued 19

Getting Started
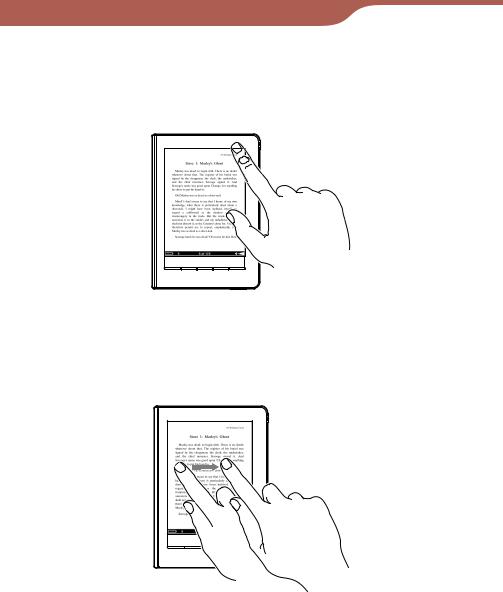
Double-tapping and dragging
By double-tapping and dragging on the touch screen, you can select consecutive words ( page 91, 99).
Dragging and Holding
By holding on the touch screen after dragging, you can turn pages repeatedly ( page 70).
Continued 20
Getting Started
Handwriting
Using the supplied stylus or a finger, you can create drawing on the touch screen ( page 102, 104, 116).
21
Getting Started
How to Use the Home Menu
The Home menu is the starting point to read/play/view content, create a drawing/text memo and configure settings. You can select menu items by tapping them.
In this manual, the operating instructions on the Reader are described as follows.
Example: Reading a book
In the Home menu, tap  (“Books”) desired book.
The actual operation for the example is shown as below:
Press the  (Home) button.
 (Home) button
Continued 22
Getting Started
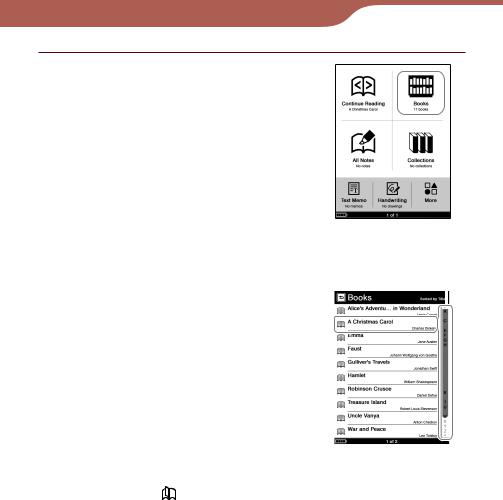
In the Home menu, tap 
(“Books”).
|
|
Home menu |
||
|
|
|
|
|
Tap the desired book on the |
Index bar |
|||
“Books” list. |
|
|
|
|
|
|
|
|
|
If more than 10 books are |
|
|
|
|
|
|
|
|
|
stored, the index bar appears on |
|
|
|
|
the right side of the list. The |
|
|
|
|
books are stored alphabetically. |
|
|
|
|
If your desired book is not |
|
|
|
|
displayed in the list, drag the |
|
|
|
|
index bar until the book appears |
|
|
|
|
or tap the first letter of the book |
|
|
|
|
title in the index bar. You can |
“Books” list |
|||
also turn the list page by |
|
|
|
|
pressing < > (Page Turn) buttons. |
|
|
|
|
|
|
|
|
|
To return to the Home menu
Press the  (Home) button.
Continued 23
Getting Started
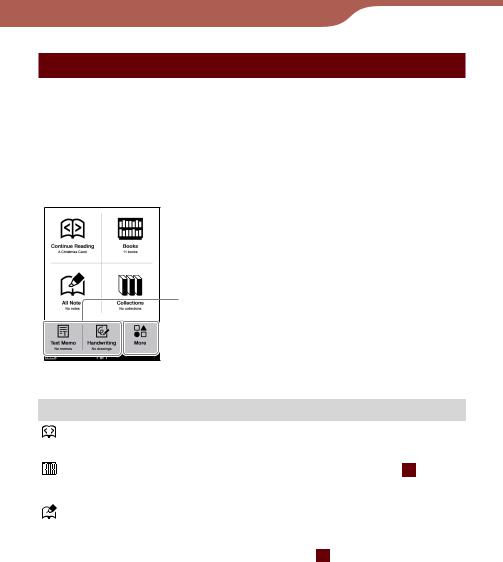
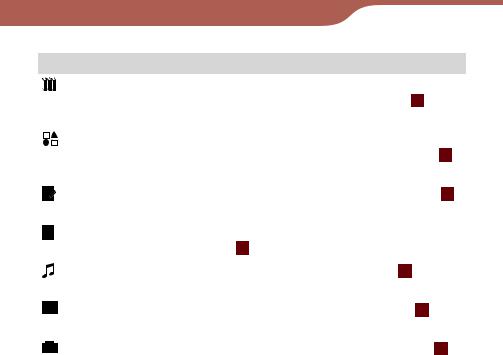
About the Home menu
In the Home menu, frequently used items are arranged by default. To display other items, tap  (“More”). You can change the items in the bottom left of the Home menu in “Customize Home Menu” under “Advanced Settings.”
You can readily display the Home menu by pressing the
 (Home) button.
These items can be rearranged in the “Advanced Settings” menu ( page 31).
Home menu
Menu item |
Description |
|
|
(Continue Reading) |
Displays the page of the last book |
|
being read. |
|
|
(Books) |
Displays the “Books” list ( page |
|
54). |
|
|
(All Notes) |
Displays a list of all the |
|
bookmarks, highlights, and |
|
markups created in books within |
|
the Reader ( page 26). |
|
Refer to page 94 for bookmarks, |
|
98 for highlights and 102 for |
|
markups. |
|
|
Continued 24
Getting Started
Menu item |
Description |
|
|
|
|
(Collections)*1 |
Displays the list of collections |
|
|
created by eBook Library ( |
page |
|
30). |
|
|
|
|
(More) |
Displays items that are not |
|
|
displayed on the Home menu ( |
|
|
page 24). |
|
|
|
|
(Handwriting)*2 |
Displays the “Handwriting” list ( |
|
|
page 116). |
|
|
|
|
(Text Memo)*2 |
Displays the “Text Memo” list |
|
|
( page 121). |
|
|
|
|
(Audio)*2 |
Displays the “Audio” list ( |
page |
|
127). |
|
|
|
|
(Pictures)*2 |
Displays the “Pictures” list ( |
|
|
page 133). |
|
|
|
|
(Settings)*2 |
Displays the “Settings” menu ( |
|
|
page 139). |
|
|
|
|
*1 Collections can only be created in eBook Library. For details on how to create or transfer a collection, refer to the eBook Library Help.
*2 Interchangeable items in “Customize Home Menu” ( page 31).
Using the Option menu in the Home menu
You can display the Option menu by pressing the OPTIONS button. From the Option menu, you can search for a book by title or author ( page 62), display the audio Playback screen (
 page 130), or change the screen orientation (
 page 114).
Continued 25

Getting Started
Searching notes
Using the Reader, you can highlight a word(s), create a bookmark, or mark up a book page. Also, you can add a comment to them.
In this manual, highlights, bookmarks with/without a comment and markups are collectively referred to as “note(s).”
–For details on highlights, refer to page 98.
–For details on bookmarks, refer to page 94.
–For details on markups, refer to page 102.
From  (“All Notes”) in the Home menu, you can search the Reader for notes. The “All Notes” list includes all the notes of all the books stored on the Reader and memory cards.
Hint
You can search the “All Notes” list for a note containing text comment using the on-screen keyboard ( page 29).
Continued 26

Getting Started
In the Home menu, tap  (“All Notes”).
The list of all the bookmarks, highlights and markups on the Reader appears.
Back icon
 Headline
 Scroll bar*
 Annotated date/Book title/Page number
Indicates type of note
“All Notes” list
*The type of bar varies depending on the “Sort” type.
–Sorted “by Date”: Scroll bar
–Sorted “by Type”: Index bar with icons
–Sorted “by Comment”: Alphabetic index bar
For details, refer to “About the index bar and scroll bar” ( page 59).
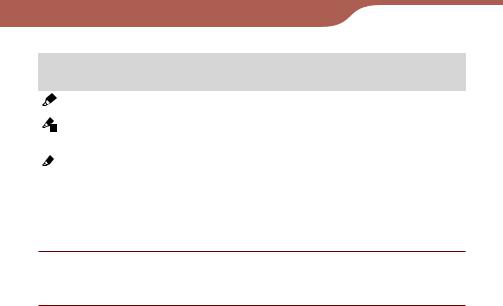
Types of note
Icons |
Descriptions |
Sentences displayed in |
||
|
|
|
|
the headline |
|
|
|
|
|
|
|
|
Bookmark created on a book |
First sentence of a |
|
|
|
||
|
|
|
page. |
bookmarked page. |
|
|
|
|
|
|
|
|
Bookmark containing a text |
Added comment. |
|
|
|
||
|
|
|
comment. |
|
|
|
|
|
|
|
|
|
Bookmark containing a |
First sentence of a |
|
|
|
||
|
|
|
handwritten comment. |
bookmarked page. |
|
|
|
|
|
Continued 27
Getting Started
|
Icons |
Descriptions |
Sentences displayed in |
|||
|
|
|
|
|
|
the headline |
|
|
|
|
|
|
|
|
|
|
|
|
Highlight on a word(s). |
Highlighted word. |
|
|
|
|
|
|
|
|
|
|
|
|
Highlight containing a text |
Added comment. |
|
|
|
|
|
||
|
|
|
|
|
||
|
|
|
|
|
comment. |
|
|
|
|
|
|
|
|
|
|
|
|
|
|
|
|
|
|
|
|
Highlight containing a |
Highlighted word. |
|
|
|
|
|
handwritten comment. |
|
|
|
|
|
|
|
|
|
|
|
|
|
Markup drawn on a book |
First sentence of a |
|
|
|
|
|
||
|
|
|
|
|
page. |
marked page. |
|
|
|
|
|
|
|
Tap a note.
The page that contains the note is displayed.
Hints
You can also create notes (excluding markups and handwritten comments) in eBook Library.
In eBook Library, you can set to merge the notes of the Reader and eBook Library while synchronizing. When merging the notes, any inconsistent note for the same word will be replaced with the latest note.
When you copy a book from eBook Library to the Reader, the notes of the Reader will be replaced with the ones of the eBook Library (or vice versa).
Continued 28

Getting Started
Using the Option menu of the “All Notes” list
Press the OPTIONS button to open the Option menu. (“Now Playing” appears only while a track is playing.)
Option menu
Option item |
Description |
|
|
|
|
Sort |
Sorts the list by date, type, or |
|
|
comment ( |
page 58). |
|
|
|
Search |
Searches a desired note by |
|
|
keyword ( |
page 62). |
Now Playing |
Goes to the audio Playback |
|
|
screen ( |
page 130). |
|
|
|
Orientation |
Switches the screen orientation |
|
|
(vertical/horizontal) ( page 114). |
|
|
|
|
To close the Option menu
Tap , or press the OPTIONS button.
Continued 29

Getting Started
Selecting a book from the “Collections” list
Using eBook Library, you can group books by genre or author, etc., in a folder which is called collection.
In the “Collections” list, you can select and read a book from a folder list of collections.
Hints
For details on how to create or transfer a collection, refer to the eBook Library Help.
You can display the Option menu of the “Collections” folder list by pressing the OPTIONS button. You can switch the screen orientation from the Option menu ( page 114).
You can also display the Option menu of the book list in the
“Collections” folder list by pressing the OPTIONS button ( page 56).
For details on the book list, refer to “Using the Option menu of the book list” ( page 56).
In the Home menu, tap 
 (“Collections”).
The “Collections” folder list appears.
Tap the desired collection on the list.
The book list appears.
Tap the desired book.
Continued 30
Loading...