


 Loading...
3-284-974-12 (1)
Integrated
Remote
Commander
Operating Instructions
RM-VL600T
© 2007 Sony Corporation
Disposal of Old Electrical & Electronic Equipment (Applicable in the European Union and other European countries with separate collection systems)
This symbol on the product or on its packaging indicates that this product shall not be treated as household waste. Instead it shall be handed over to the applicable collection point for the recycling of electrical and electronic equipment. By ensuring this product is disposed of correctly, you will help prevent potential negative consequences for the environment and human health, which could otherwise be caused by inappropriate waste handling of this product. The recycling of materials will help to conserve natural resources. For more detailed information about recycling of this product, please contact your local Civic Office, your household waste disposal service or the shop where you purchased the product.
Disposal of waste batteries (applicable in the European Union and other European countries with separate collection systems)
This symbol on the battery or on the packaging indicates that the battery provided with this product shall not be treated as household waste. By ensuring these batteries are disposed of correctly, you will help prevent potentially negative consequences for the environment and human health which could otherwise be caused by inappropriate waste handling of the battery. The recycling of the materials will help to conserve natural resources.
In case of products that for safety, performance or data integrity reasons require a permanent connection with an incorporated battery, this battery should be replaced by qualified service staff only.
To ensure that the battery will be treated properly, hand over the product at end-of-life to the applicable collection point for the recycling of electrical and electronic equipment.
For all other batteries, please view the section on how to remove the battery from the product safely. Hand the battery over to the applicable collection point for the recycling of waste batteries.
For more detailed information about recycling of this product or battery, please contact your local Civic Office, your household waste disposal service or the shop where you purchased the product.
Features
The RM-VL600T Remote Commander provides centralised control of all your AV components from a single remote commander and saves the trouble of operating different AV components with different remote control devices. The following are its main features.
Centralised control of Sony AV components with this one remote commander
This Commander is preset at the factory to operate Sony brand components, so you can use it out of the box as a control centre for your Sony AV components.
Remote control signals for non-Sony components are also preset
This Commander is preset for most major brands components as well as Sony. You can remote control your non-Sony components by setting the type and code number of each component (page 8).
Learning function for programming various other remote control signals
This Commander has a Learning function, to “learn” the remote control signals needed to operate other non-preset components or functions. (To “teach” such signals to this Commander, use the remote control supplied with the non-preset components.) (page 12)
In addition, the Commander can “learn” remote control signals (infrared signals only) of non-Audio Visual components such as air-conditioners, lights, etc. (Some specific appliances or functions may not be available.) (page 18)
Reassigning new components
You can assign Component Select buttons to freely operate other components. This is useful when you have more than two of the same kind of AV component (only if a Component Select button is free.) (page 24)
You can only assign TVs to the TV Component Select button.
You can only assign an amplifier to the AMP Component Select button.
2

Startup Guide
This guide shows you how to set the Remote Commander to operate your components.
First, find the four-digit component code number for your component, referring to the supplied “Component code numbers.”
If you have the code number
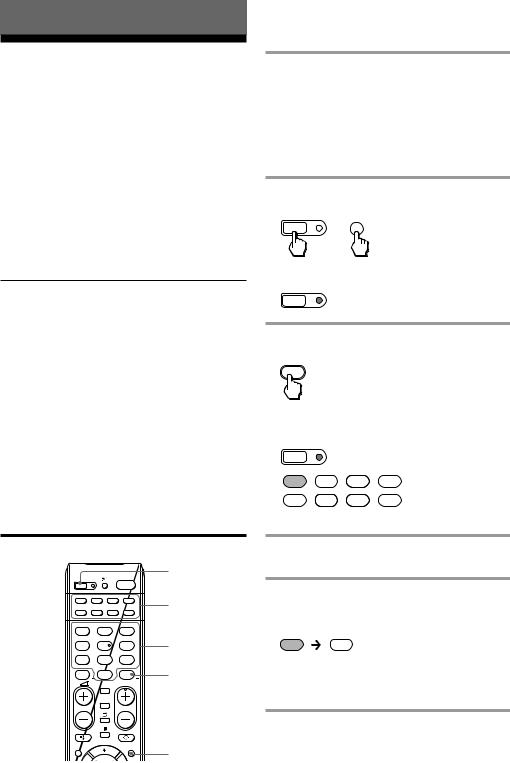
Example: To set up a TV of the code number “8011”
1Set the Remote Commander for code input mode.
MENU
SET +
Press SET and MENU.
2Press the desired Component Select button.
SET |
|
|
|
TV |
DVD |
SAT |
CBL |
VCR |
CD |
TAPE |
AMP |
3 Enter the code number.
8 |
0 |
1 |
1 |
4 Finish setting.
ENT
Press ENT.
If you cannot find the code number
You can search for the component code available for your component.
1Set the Remote Commander for code input mode.
MENU
SET +
Press SET and MENU.
2Press the desired Component Select button.
SET |
|
|
|
TV |
DVD |
SAT |
CBL |
VCR |
CD |
TAPE |
AMP |
3Transmit code number signals in turn.
PROGRAM
1
Press PROGRAM + or PROGRAM –, and then 1. Repeat until your component reacts.
4 Finish setting.
ENT
Press ENT.
For more details, see page 8. |
For more details, see page 10. |
Continued 3
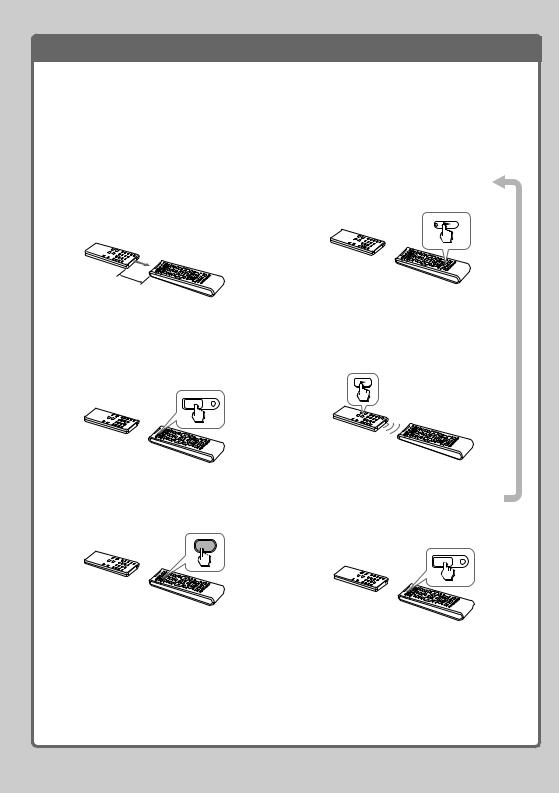
Learning function
If your component does not work as supposed even if the code number is set, make the RMVL600T “learn” the functions of your component’s remote control.
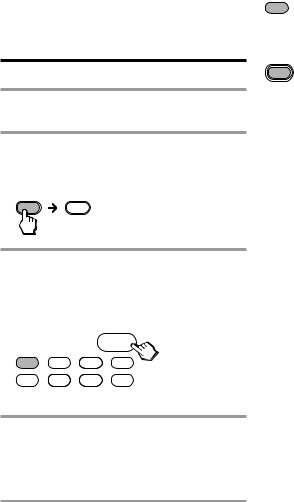
Example: To “teach” the N (play) signal of your video cassette recorder to the VCR N button of the RM-VL600T
1Place the RM-VL600T head to head with your VCR’s remote control.
VCR’s remote control
5 – 10 cm |
|
(2 – 4 inches) |
RM-VL600T |
away (approx.) |
2Set the RM-VL600T for “learning” mode.
Press and hold SET for at least 3 seconds until the SET indicator flashes.
SET
3Press the desired Component Select button.
4Press the button you want to “teach.”
5Press and hold the N (play) button of your VCR’s remote control until the VCR button of the RM-VL600T lights up.
6Repeat Steps 4 and 5 to “teach” other functions.
7Finish setting.
VCR
SET
Press SET.
For more details, see page 12.
4
Table of Contents |
|
Startup Guide .......................................................... |
3 |
Getting Started |
|
Installing the Batteries ............................................ |
6 |
When to replace the batteries ................................... |
6 |
Location of Controls ................................................ |
7 |
Basic Operations |
|
Setting the Code for non-Sony Preset Audio and |
|
Visual Components — Setting component codes |
|
.............................................................................. |
8 |
Setting a component code ......................................... |
8 |
Checking if the code number works ....................... |
9 |
Setting a Component Code by the |
|
Search Function ................................................... |
10 |
Operating Your Components with the Remote |
|
Commander ......................................................... |
11 |
To control the volume .............................................. |
12 |
Programming Signals of Another Remote Control |
|
— Learning Function ........................................... |
12 |
For accurate Learning .............................................. |
14 |
Programming remote control signals to the |
|
Component Select buttons and System |
|
Control buttons ..................................................... |
15 |
Changing or erasing the function of a “learned” |
|
button ...................................................................... |
16 |
Notes on programming the signals for an air- |
|
conditioner ............................................................. |
18 |
Advanced Features |
|
Controlling the Volume of Visual Components |
|
Connected to an Audio System ........................... |
19 |
Adding an Extra Function to the Component |
|
Select Buttons ..................................................... |
20 |
Programming the Power-On command of the |
|
selected component just by pressing that |
|
Component Select button |
|
(for Sony components only) ................................ |
20 |
Executing a Series of Commands |
|
— System Control Functions .............................. |
21 |
To clear programmed commands .......................... |
22 |
Programming a Series of Commands on the |
|
Component Select Buttons ................................. |
23 |
To clear programmed commands .......................... |
24 |
Assigning Other Components to the Component |
|
Select Buttons ..................................................... |
24 |
Using Other Functions |
|
Locking the Controls — Hold Function .................. |
25 |
Erasing All Settings — To reset the Commander |
|
to its factory settings .......................................... |
26 |
Additional Information |
|
Precautions ............................................................ |
27 |
Maintenance .......................................................... |
27 |
Specifications ......................................................... |
27 |
Troubleshooting ..................................................... |
28 |
Appendices |
|
Table of Preset Functions ....................................... |
30 |
TV(ANALOGUE) ..................................................... |
30 |
TV(DIGITAL) ............................................................ |
30 |
VCR ............................................................................ |
31 |
CBL (Cable box) ........................................................ |
31 |
SAT ............................................................................. |
31 |
SAT (No,3201) ........................................................... |
32 |
DVD ........................................................................... |
32 |
CD .............................................................................. |
33 |
MD .............................................................................. |
33 |
DAT ............................................................................ |
33 |
DECK ......................................................................... |
34 |
AMP ........................................................................... |
34 |
Index ...................................................................... |
34 |
5

Getting Started
Installing the Batteries
Slide open the battery compartment lid and insert two R6 (size AA) batteries. Be sure to match up the + and – indications on the batteries with the + and – indications on the battery compartment.
Insert the batteries (negative end first) through the guide clamp within each compartment as shown above.
When to replace the batteries
Batteries for remote control operation (two R6 (size AA) batteries)
Under normal conditions, the batteries will last up to 1 year. If the Commander does not operate properly, the batteries might be drained. When this happens, replace the batteries with new ones.
Note
Do not take more than one hour to replace the batteries. Otherwise, your code number settings (page 8) and “learned” remote control signals (page 12) will be erased.
Notes on batteries
•Do not use an old battery with a new one, or mix different types of batteries together.
•If the electrolyte inside the battery should leak, wipe the contaminated area of the battery compartment with a cloth and replace the old batteries with new ones. To prevent electrolyte from leaking, remove the batteries if you plan not to use the Commander for a long period of time.
•The supplied manganese batteries are for testing purposes.
6
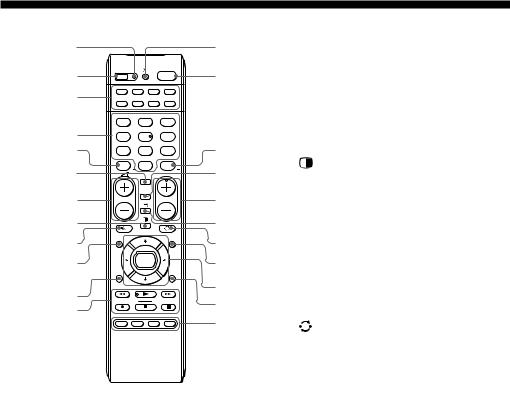
Location of Controls
1qd
2 |
SET |
|
|
1 |
qf |
3 |
TV |
DVD |
SAT |
CBL |
|
VCR |
CD |
TAPE |
AMP |
|
|
|
|
||||
|
VIDEO1 |
VIDEO2 |
AUX |
|
|
|
1 |
|
2 |
3 |
|
4 |
TUNER |
|
CD |
TAPE |
|
4 |
|
5 |
6 |
|
|
5 |
MD |
|
TV |
PHONO |
qg |
7 |
|
8 |
9 |
||
|
-/-- |
1 |
DVD |
2 |
|
|
0 |
|
|||
6 |
|
|
|
ENT |
qh |
|
|
PROGRAM |
|||
|
DIGITAL |
|
|||
|
|
ANALOG |
|
|
|
7 |
|
|
|
|
qj |
8 |
|
|
|
|
qk |
9 |
GUIDE |
|
|
MENU |
ql |
q; |
|
OK |
|
w; |
|
|
|
|
|
||
|
RETURN |
|
|
TOOLS |
|
qa |
|
|
|
|
wa |
|
|
|
|
ws |
|
qs |
|
|
|
|
|
|
SYSTEM CONTROL |
|
|
||
|
|
|
wd |
||
|
A |
B |
C |
D |
|
1SET indicator
2SET button
3Component Select buttons
Light or flash during operation.
4Number buttons
5- button
6DIGITAL button
72 (volume) +/– buttons*
8 (PAP) button
9% (muting) button*
0GUIDE button qaRETURN button
qsPlayer Control buttons qdt (input select) button qf1 (power) button
qgENT (enter) button qhANALOG button
qjPROGRAM +/– buttons qk/ (Teletext) button
ql (recall) button w;MENU button
waCursor Control buttons wsTOOLS button
wdSYSTEM CONTROL buttons
About tactile dots
The number 5 button, the N button and PROGRAM + button each have a tactile dot for ease of use.
* Note on the 2 +/– and % buttons
The Commander controls or mutes the TV’s volume when you select a visual component. The Commander controls or mutes the amplifier’s volume when you select an audio component. You can change this setting (page 19).
Note
The function of the control buttons varies depending on settings/operating modes.
The “Table of Preset Functions” (page 30) shows how the Commander generally operates for each component in the factory preset mode.
7
Basic Operations
Setting the Code for non-Sony Preset Audio and Visual Components
— Setting component codes
The Commander is preset at the factory to operate Sony brand AV components (see the table below). If you are using the Commander with a factory-set Sony components, skip the following procedures. You can use the Commander with other major brand preset AV components also. To use with other AV components, or Sony components which do not function with the Commander, you need to follow the procedures to set the correct codes for each component.
Component Select |
Preset |
Factory setting |
button |
component(s) |
|
TV |
TV |
Sony TV |
|
TV/VCR Combo |
|
DVD |
DVD player |
Sony DVD player |
SAT |
Satellite tuner |
Sony satellite tuner |
CBL |
Cable box |
Analogue cable box |
VCR |
VCR |
Sony VHS VCR |
CD |
CD player |
Sony CD player |
TAPE |
Cassette deck |
Sony cassette deck |
AMP |
Amplifier |
Sony amplifier |
Note
An MD player can be set to any of the above Component Select buttons. You can assign Component Select buttons to freely set signals of your desired components. For further information, see “Assigning Other Components to the Component Select Buttons” (page 24) .
For the functions of buttons as for each component, see “Table of Preset Functions” (page 30).
Example: To set up a Philips’ TV
1See the tables in the supplied “Component code numbers,” and find the four-digit component code number for the desired component.
If more than one code number is listed, use the number that is listed first.
For example, to set up a Philips’ TV, you would use the code number 8086.
2Press and while holding SET, press MENU.
MENU
SET +
The SET indicator lights up.
SET
3Press the Component Select button for the desired component.
TV
The SET indicator and the selected Component Select button light up.
SET
TV DVD SAT CBL
VCR CD TAPE AMP
Setting a component code
SET |
|
|
1 |
TV |
DVD |
SAT |
CBL |
VCR |
CD |
TAPE |
AMP |
VIDEO1 |
VIDEO2 |
AUX |
|
1 |
|
2 |
3 |
TUNER |
|
CD |
TAPE |
4 |
|
5 |
6 |
MD |
|
TV |
PHONO |
7 |
|
8 |
9 |
|
|
DVD |
|
-/-- |
|
0 |
ENT |
1 |
2 |
||
|
|
PROGRAM |
|
|
DIGITAL |
|
|
|
ANALOG |
|
|
GUIDE |
|
|
MENU |
2
3
4
5
2
4Press the Number buttons to enter the four-digit component code number.
5Press ENT.
The SET indicator and the Component Select button light turn off.
TV TV
If the Component Select button flashes five times before turning off, it means that the setup is incomplete. Start over from Step 2.
8
Notes
•If you press a component code number that is not on the table in the supplied “Component code numbers,” or if you press a button in the wrong order, the Component Select button flashes five times, and then turns off. Check the component code number, and try setting it again.
•If you do not input anything into the Commander within 20 seconds between each step, the setup procedure will be cancelled. To set the code, start over from Step 2.
•If you press SET while setting the component code, all code numbers will be lost, and the setup procedure will be cancelled. Start over from Step 2.
To cancel setup, press SET.
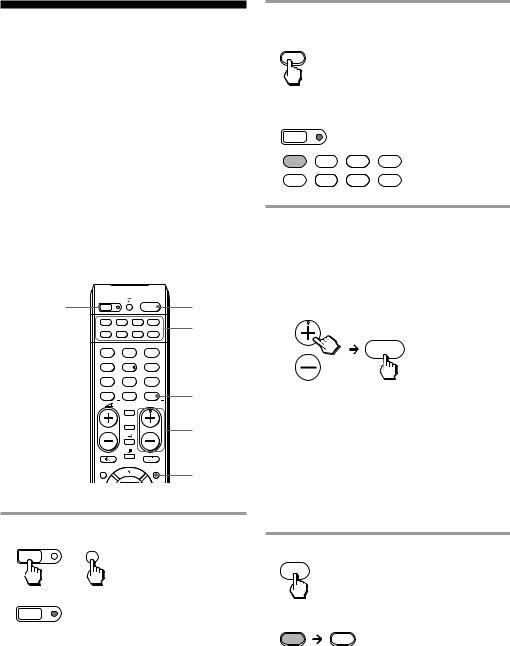
Checking if the code number works
1Power on the component with its power switch.
2Press the corresponding Component Select button for the component you have set up.
The Component Select button lights up when you press it, and turns off when you release it.
TV TV
3Aim the Commander at the component and press 1.
The selected Component Select button lights up when you press a function button, and turns off when you release it.
1
TV DVD SAT CBL
VCR CD TAPE AMP
The component should power off.
4If you have succeeded, check that the Commander is operating the other functions of your component, such as programme and volume control.
See page 11 for details.
If the Commander does not seem to be working
Try repeating the setup procedure using the other codes listed for your component, or try setting the code number using the Search function (page 10).
Note on the 2 +/– and % buttons
When you operate a visual component, the TV button lights up to indicate that the Commander is controlling or muting the TV’s volume.
TV
When you operate an audio component, the AMP button lights up to indicate that the Commander is controlling or muting the amplifier’s volume.
AMP
It is recommended that you first set the TV and AMP codes before setting up any other components.
Note on buttons that have already “learned” remote control signals
If another signal has already been programmed on a button using the Learning function (page 12), that “learned” signal will continue to work even after you set the component code number. To use it as a preset function button, you must first erase its “learned” signal (page 16).
9
Setting a Component Code by the Search Function
You can find a code number available for a component that does not have one in the supplied “Component code numbers.”
Before starting the Search function
Set each component to the following status so that the Search function works effectively.
TV, AMP: Power-on
CD player, MD player*, cassette deck: Power-on with a playback source (disc, cassette tape, etc.) Other components: Power-off
*If any of these components are assigned to any of the Component Select buttons (page 24), you can set a component code using the Search function.
1 |
SET |
|
|
1 |
3 |
|
TV |
DVD |
SAT |
CBL |
2 |
|
VCR |
CD |
TAPE |
AMP |
|
|
VIDEO1 |
VIDEO2 |
AUX |
|
|
|
1 |
|
2 |
3 |
|
|
TUNER |
|
CD |
TAPE |
|
|
4 |
|
5 |
6 |
|
|
MD |
|
TV |
PHONO |
|
|
7 |
|
8 |
9 |
4 |
|
-/-- |
1 |
DVD |
2 |
|
|
0 |
||||
|
|
|
|
ENT |
|
|
|
|
PROGRAM |
||
|
|
DIGITAL |
|
|
|
|
|
ANALOG |
|
3 |
|
|
|
|
|
|
|
|
GUIDE |
|
|
MENU |
1 |
1 Press and while holding SET, press MENU.
MENU
SET +
The SET indicator lights up.
SET
2Press the Component Select button for the desired component.
TV
The SET indicator and the selected Component Select button light up.
SET
TV DVD SAT CBL
VCR CD TAPE AMP
3Press PROGRAM + or PROGRAM –, and then 1 in turn until the component reacts as described in the following.
TV, AMP: Powers off
VCR, CBL, SAT, DVD: Powers on
CD player, MD player, cassette deck: Plays back
PROGRAM
1
Press PROGRAM + to go to the next code number.
Press PROGRAM – to go back to the previous code number.
The Component Select button flashes three times after the numbers have turned one cycle.
One cycle means, for example, the four-digit code numbers beginning from “8” are cycled through.
4 Press ENT.
ENT
The SET indicator and the Component button turn off.
TV TV
If the Component Select button flashes five times before turning off, it means that the setup is incomplete. Start over from Step 1.
10
5Check if the code number works by following the instructions on page 9.
Notes
•If you do not input anything into the Commander within 20 seconds between each step, the setup procedure will be cancelled. To set the code, start over from the beginning.
•If you press any button other than PROGRAM +/– and 1 while setting the component code, all code numbers will be lost, and the setup procedure will be cancelled.
Start over from the beginning.
To cancel setup, press SET.
Operating Your Components with the Remote Commander
When you operate a non-Sony component, make sure you set the component code first (page 8).
SET |
|
|
1 |
|
TV |
DVD |
SAT |
CBL |
1 |
VCR |
CD |
TAPE |
AMP |
|
VIDEO1 |
VIDEO2 |
AUX |
|
|
1 |
|
2 |
3 |
|
TUNER |
|
CD |
TAPE |
|
4 |
|
5 |
6 |
|
MD |
|
TV |
PHONO |
|
7 |
|
8 |
9 |
|
-/-- |
1 |
DVD |
2 |
|
0 |
|
|||
|
|
|
ENT |
|
|
|
PROGRAM |
|
|
|
DIGITAL |
|
|
|
|
ANALOG |
|
|
|
GUIDE |
|
|
MENU |
|
|
OK |
|
|
|
RETURN |
|
|
TOOLS |
|
|
|
|
|
2 |
Example: To operate a video cassette recorder
1Press the desired Component Select button.
The Component Select button lights up when you press it, and turns off when you release it.
VCR
2Press any Player Control button.
See “Table of Preset Functions” (page 30) for the functions of buttons for each component.
Note
The remote control signals may be different for some components or functions. In this case, programme the remote control signals with the Learning function (page 12). Note, however, that components and functions that do not support the remote control of infrared signals will not work with this Commander.
Continued 11
Loading...