


Personal Audio
System
Operating Instructions US
Mode d’emploi |
FR |
|
|
||
Manual de |
ES |
|
|
||
|
||
instrucciones |
|
|
|
|
|
RDP-XA700iPN


Owner’s Record
The model and serial numbers are located on the bottom of the unit. Record these numbers in the space provided below. Refer to them
whenever you call upon your Sony dealer regarding this product.
Model No. RDP-XA700iPN Serial No.
For customers in the USA
Please register this product on line at http://www.sony.com/productregistration Proper registration will enable us to send you periodic mailings about new products, services, and other important announcements. Registering your product will also allow us to contact you in the unlikely event that the product needs adjustment or modification. Thank you.
WARNING
To reduce the risk of fire or electric shock, do not expose this apparatus to dripping or splashing, and do not place objects filled with liquids, such as vases, on the apparatus.
To reduce the risk of fire, do not cover the apparatus with newspapers, tablecloths, curtains, etc.
Do not place the naked flame sources such as lighted candles on the apparatus.
Do not install the appliance in a confined space, such as a bookcase or built-in cabinet.
As the main plug is used to disconnect the unit from the mains, connect the unit to an easily accessible AC outlet. Should you notice an abnormality in the unit, disconnect the main plug from the AC outlet immediately.
Do not expose batteries or apparatus with batteryinstalled to excessive heat such as sunshine, fire or the like.
Battery may explode if mistreated. Do not recharge, disassemble or dispose of in fire.
The unit is not disconnected from the mains as long as it is connected to the AC outlet, even if the unit itself has been turned off.
Keep the lithium battery out of the reach of children. Should the battery be swallowed, immediately consult a doctor.
Dispose of used battery promptly. Keep away from children.
The dating code and the nameplate are located on the bottom exterior.
CAUTION
You are cautioned that any changes or modifications not expressly approved in this manual could void your authority to operate this equipment.
Danger of explosion if battery is incorrectly replaced. Replace only with the same or equivalent type.
Replace the battery with a Sony CR2025 lithium battery.
Use of another battery may present a risk of fire or explosion.
For customers in the United States
Customer Support Information
If you have any questions about this product, you may call; Sony Customer Information Service Center 1-800-222-7669 or http://esupport.sony.com
FOR UNITED STATES CUSTOMERS. NOT APPLICABLE IN CANADA, INCLUDING IN THE PROVINCE OF QUEBEC.
POUR LES CONSOMMATEURS AUX ÉTATSUNIS. PAS APPLICABLE AU CANADA, Y COMPRIS LA PROVINCE DE QUÉBEC.
1US

Declaration of Conformity
Trade Name: |
SONY |
Model No.: |
RDP-XA700iPN |
Responsible Party: |
Sony Electronics Inc. |
Address: |
16530 Via Esprillo, San |
|
Diego, CA 92127 USA |
Telephone No.: |
858-942-2230 |
This device complies with Part 15 of the FCC Rules. Operation is subject to the following two conditions: (1) This device may not cause harmful interference, and (2) this device must accept any interference received, including interference that may cause undesired operation.
NOTE:
This equipment has been tested and found to comply with the limits for a Class B digital device, pursuant to Part 15 of the FCC Rules. These limits are designed to provide reasonable protection against harmful interference in a residential installation. This equipment generates, uses and can radiate radio frequency energy and, if not installed and used in accordance with the instructions, may cause harmful interference to radio communications. However, there is no guarantee that interference will not occur in a particular installation. If this equipment does cause harmful interference to radio or television reception, which can be determined by turning the equipment off and on, the user is encouraged to try to correct the interference by one or more of the following measures:
–Reorient or relocate the receiving antenna.
–Increase the separation between the equipment and receiver.
–Connect the equipment into an outlet on a circuit different from that to which the receiver is connected.
–Consult the dealer or an experienced radio/TV technician for help.
Important Safety Instructions
1)Read these instructions.
2)Keep these instructions.
3)Heed all warnings.
4)Follow all instructions.
5)Do not use this apparatus near water.
6)Clean only with dry cloth.
7)Do not block any ventilation openings. Install in accordance with the manufacturer’s instructions.
8)Do not install near any heat sources such as radiators, heat registers, stoves, or other apparatus (including amplifiers) that produce heat.
9)Do not defeat the safety purpose of the polarized or grounding-type plug. A polarized plug has two blades with one wider than the other. A grounding type plug has two blades and a third grounding prong. The wide blade or the third prong are provided for your safety. If the provided plug does not fit into your outlet, consult an electrician for replacement of the
obsolete outlet.
10)Protect the power cord from being walked on or pinched particularly at plugs, convenience receptacles, and the point where they exit from the apparatus.
11)Only use attachments/accessories specified by the manufacturer.
12)Use only with the cart, stand, tripod, bracket, or table specified by the manufacturer, or sold with the apparatus. When a cart is used, use caution when moving the cart/apparatus combination to avoid injury from tip-over.
13)Unplug this apparatus during lightning storms or when unused for long periods of time.
14)Refer all servicing to qualified service personnel. Servicing is required when the apparatus has been damaged in any way, such as power-supply cord or plug is damaged, liquid has been spilled or objects have fallen into the apparatus, the apparatus has been exposed to rain or moisture, does not operate normally, or has been dropped.
This equipment must not be co-located or operated in conjunction with any other antenna or transmitter.
This equipment complies with FCC/IC radiation exposure limits set forth for an uncontrolled environment and meets the FCC radio frequency (RF) Exposure Guidelines in Supplement C to OET65 and RSS-102 of the IC radio frequency (RF) Exposure rules.
This equipment should be installed and operated keeping the radiator at least 20 cm or more away from person's body (excluding extremities: hands, wrists, feet and ankles).
2US

For customers in Canada
This device complies with Industry Canada licenceexempt RSS standard(s). Operation is subject to the following two conditions: (1) this device may not cause interference, and (2) this device must accept any interference, including interference that may cause undesired operation of the device.
Under Industry Canada regulations, this radio transmitter may only operate using an antenna of a type and maximum (or lesser) gain approved for the transmitter by Industry Canada. To reduce potential radio interference to other users, the antenna type and its gain should be so chosen that the equivalent isotropically radiated power (e.i.r.p.) is not more than that necessary for successful communication.
For the State of California, USA only
Perchlorate Material - special handling may apply, See
www.dtsc.ca.gov/hazardouswaste/perchlorate Perchlorate Material: Lithium battery contains perchlorate.
3US

Table of Contents |
|
Overview of this Personal Audio System ..... |
5 |
Guide to Parts and Controls .......................... |
6 |
Main unit ................................................. |
6 |
Remote control ........................................ |
9 |
Getting Started |
|
Preparing the Unit and the Remote |
|
Control ................................................... |
10 |
Connecting to an AC power source ....... |
10 |
Preparing the remote control ................. |
10 |
Turning on the unit ................................ |
11 |
Connecting Your Network ......................... |
12 |
Connecting to a Wi-Fi network ............. |
12 |
Connecting to a wired network .............. |
12 |
Option 3: Wi-Fi Connection using |
|
Access Point Scan .................................. |
13 |
Enjoying the Audio Content |
|
Listening to iPod ......................................... |
16 |
Listening with the “AirPlay” Function ....... |
17 |
Listening to Other Components .................. |
19 |
Updating the Software ................................ |
19 |
Initializing the Unit ..................................... |
20 |
Additional Information |
|
Troubleshooting .......................................... |
21 |
Specifications ............................................. |
24 |
Compatible iPad/iPhone/iPod Models and |
|
Computers ............................................. |
25 |
System Requirements for the Computer for |
|
Setting up the “AirPlay” Function ......... |
25 |
Precautions ................................................. |
26 |
4US
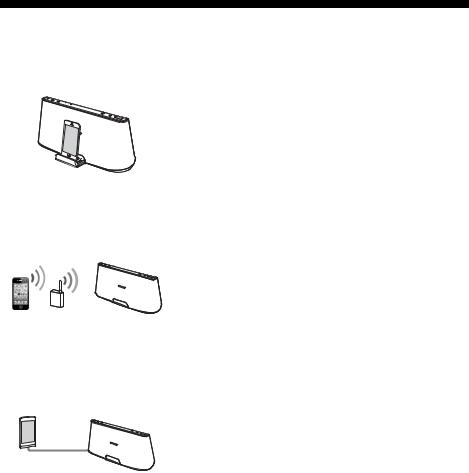
Overview of this Personal Audio System
iPod
You can enjoy sound from an iPod, iPhone or iPad by setting it on the Docking Tray of this unit, while charging it at the same time (page 16).
AirPlay
You can enjoy sound from an iPad/iPhone/iPod touch or iTunes with this unit anywhere in your home (page 17).
You will need to set your iPad/iPhone/iPod touch to a Wi-Fi network, and connect this unit to that network.
Portable Audio Player, etc.
You can listen to sound from an optional component, such as a portable audio player, by connecting it to the AUDIO IN jack of this unit (page 19).
5US
Guide to Parts and Controls
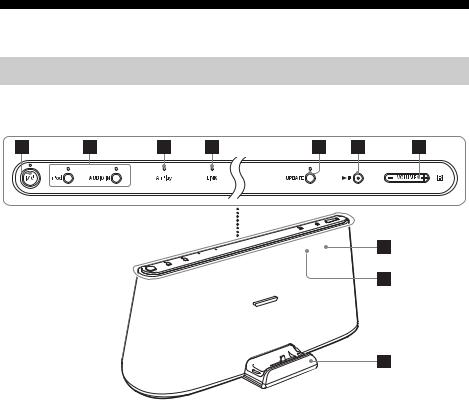
Main unit
Top/Front
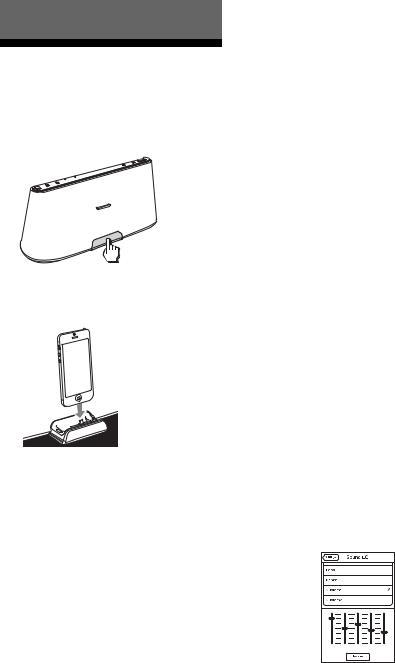
ADocking Tray
Press the Docking Tray on the front of the unit to open or close it.
Set your iPod on the Docking Tray when you want to operate it on the tray or charge it (page 16).
BRemote sensor (inside)
CReaction indicator (inside)
Flashes when the operation is started. Flashes three times when the volume is set to minimum or maximum.
D?/1 (On/Standby) button, indicator
Turns the unit on (page 11), or places in standby/network standby mode.
Indicates the power status of the unit. Green (lit): The unit is turned on.
Green (flashing): The unit is being turned on.
Red: The unit is in the standby mode. Amber: The unit is in the network standby mode.
Tips
•When the unit is in the network standby mode and receives a command to playback on an “AirPlay” device, the unit turns on and starts playback automatically.
•To switch the unit between the standby mode and network standby mode, press and hold the ?/1 button until the color of the ?/1 indicator changes.
6US
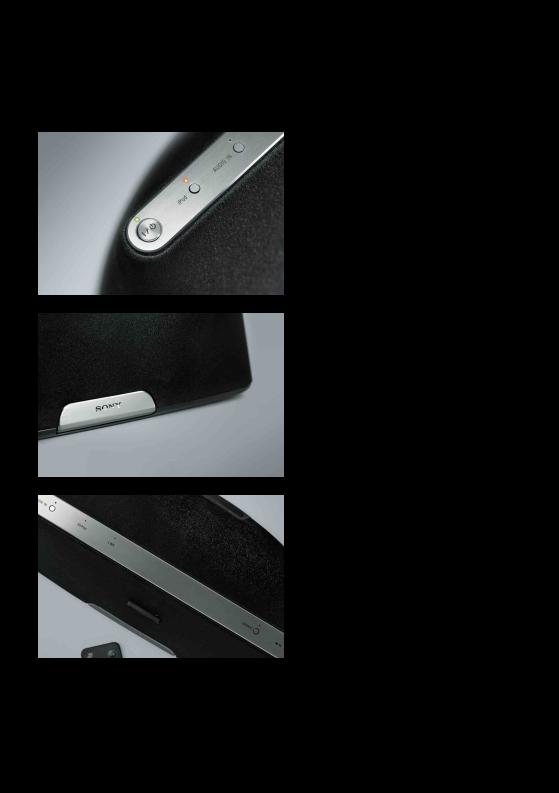
E“iPod,” AUDIO IN buttons, indicators
Selects a source device (page 16, 19).
Lights up amber when the unit is in the iPod/AUDIO IN mode.
F“AirPlay” indicator
Lights up green when the unit is in the “AirPlay” mode.
GLINK indicator
Indicates the connection status of the wired/Wi-Fi network.
Green (lit): Wi-Fi connection has been established.
Green (flashing): Wi-Fi connection is being established.
Amber (lit): Wired connection has been established.
Amber (flashing): Wired connection is being established.
Red (flashing): One of the following has occurred.
–This unit cannot find the wireless LAN router/access point.
–The security method/password selected for the wireless LAN router/access point is wrong.
–An error has occurred.
Not lit: The Wi-Fi network setting process is not finished.
HUPDATE button, indicator
Press and hold to start updating the software of the unit (page 19).
Indicates the update status of the unit. Green (lit): The unit can be updated. Green (flashing): The unit is updating. Not lit: The unit does not need updating.
Iu (Play/Pause) button
Starts playback of the device. Press repeatedly to pause/resume playback.
JVOLUME +/– button
Adjusts the volume.
7US
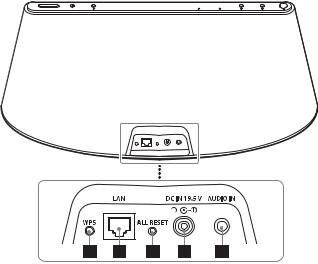
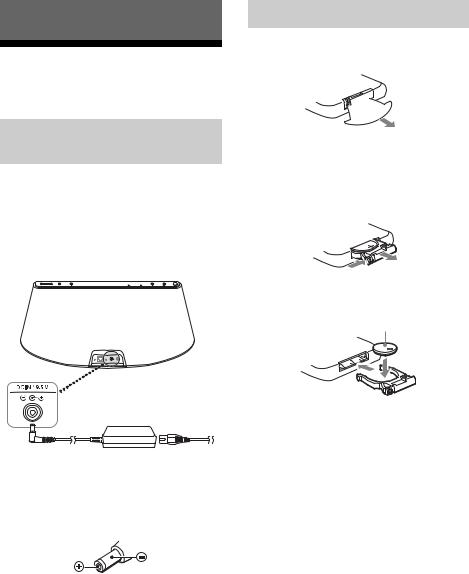
Rear
AWPS button
Use to connect the unit to your Wi-Fi network, refer to the supplied “AirPlay via Wi-Fi Network Setup” for details.
BLAN port
Connect a network (LAN) cable (not supplied, page 12).
CALL RESET button
Press and hold to reset the unit to the factory default settings (the ?/1 indicator starts flashing).
Use a thin object, such as a small pin.
DDC IN 19.5 V jack
Connect the supplied AC adaptor (page 10).
EAUDIO IN jack
Connect to the line output jack of an external component (page 19).
8US
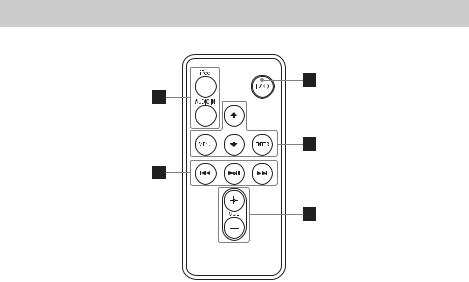
Remote control
A“iPod,” AUDIO IN buttons
Selects a source device (page 16, 19).
Bu (Play/Pause) button
Starts playback of the device. Press repeatedly to pause/resume playback.
> (Forward) button
Go to the next track.
Press and hold to locate a desired point.
. (Backward) button
Go back to the previous track. During playback, this operation returns to the beginning of the current track. To go back to the previous track, press twice.
Press and hold to locate a desired point.
C?/1 (On/Standby) button
Turns the unit on (page 11), or places in standby/network standby mode.
DMENU button
Returns to the previous menu of the iPod on the Docking Tray.
ENTER button
Enters the selected menu item or begin playback.
V (Up)/v (Down) button
Selects a menu item or track for playback.
EVOL (Volume) +/– button
Adjusts the volume.
9US
Preparing the remote control
Getting Started
Before using the remote control for the first
Preparing the Unit and
the Remote Control
time, remove the insulation film.
Connecting to an AC power source
1 Connect the supplied AC power cord to the supplied AC adaptor.
2 Connect the AC adaptor to the DC IN 19.5 V jack on the unit.
Note on the AC adaptor
Use the Sony supplied AC adaptor only. The polarity of the plugs of other manufactures may be different. Failure to use the supplied AC adaptor may cause the unit to malfunction.
3 Plug the AC power cord to a wall outlet (the mains).
To replace the battery of the remote control
If the remote control stops working, replace the battery (CR2025) with a new one.
j
the e side facing up
10US

Turning on the unit
Press the ?/1 button
The ?/1 indicator starts flashing. You can operate the unit when the ?/1 indicator stops flashing and lights up green.
The LINK indicator also starts flashing. You can set up or use the “AirPlay” function when it stops flashing.
It may take a while for these indicators to stop flashing.
Note
After playback of the connected device has finished, if no operation is performed for about 20 minutes, the unit will automatically enter standby/network standby mode.
11US
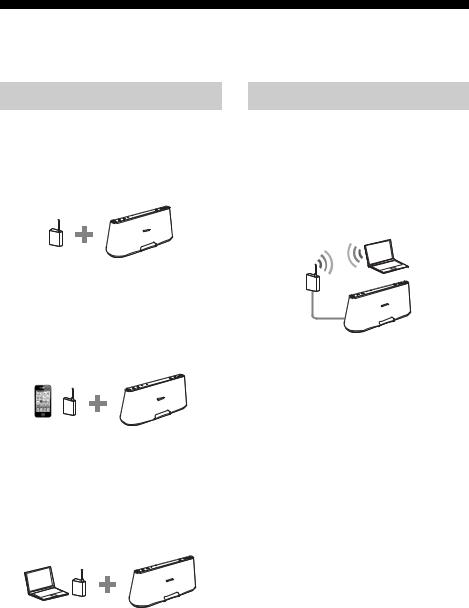
Connecting Your Network
See the following descriptions to determine the correct way to set up.
Connecting to a Wi-Fi network
Option 1: Wi-Fi Connection using WPS Push Button Configuration Method
Setup device: Wireless LAN router/access point
Refer to Ain the supplied “AirPlay via Wi-Fi Network Setup” for details.
Option 2: Wi-Fi Connection using D-Sappli*
Setup device: iPad/iPhone/iPod touch
Refer to Bin the supplied “AirPlay via Wi-Fi Network Setup” for details.
* For details on D-Sappli, see page 16.
Option 3: Wi-Fi Connection using Access Point Scan (page 13)
Setup device: Mac or PC
Connecting to a wired network
Option 4: Wired Connection
Connect the unit and a wireless LAN router/ access point by network (LAN) cable (not supplied). Then turn this unit on.
The LINK indicator lights up amber when the connection is established (about 90 seconds later).
12US
Option 3: Wi-Fi Connection using Access Point Scan
1 Prepare for the following devices.
•This unit
•Mac or PC
•Wireless LAN router/access point
•Network (LAN) cable (not supplied) if needed
2 Have your wireless network name (SSID) and Security Key (if applicable) available for reference.
SSID (Wireless Network Name)
Security Key (WEP or WPA key)
Refer to the operating instructions of the wireless LAN router/access point.
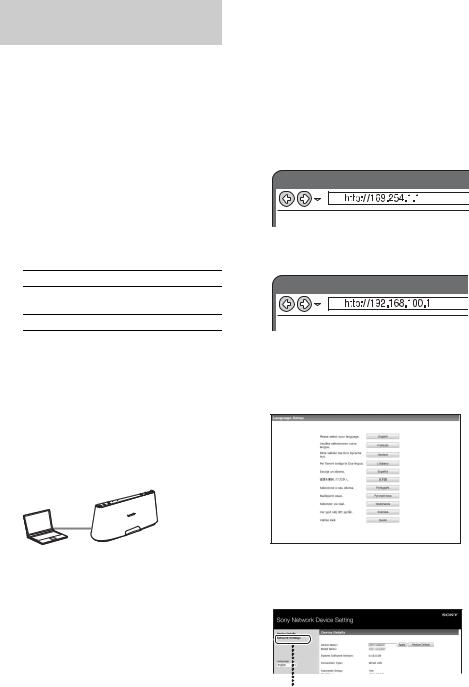
3 Connect the unit and the Mac or PC using a network (LAN) cable (not supplied). Then turn this unit on.
Wait for about 4 minutes until the LINK indicator lights up amber.
For Mac
Start Safari and select [Bonjour] under [Bookmarks], then select [SONY: RDPXA700iPN].
For PC
Start the browser and input either of the following URLs into the browser’s address bar.
• When using a network (LAN) cable
• When connecting wirelessly
5 Select the desired language when the [Language Setup] screen appears.
Tip
You can also perform this procedure wirelessly. See “To connect wirelessly” (page 14).
4 Access the [Sony Network
Device Setting] screen.
6 Select [Network Settings] from the menu.
Network Settings
13US
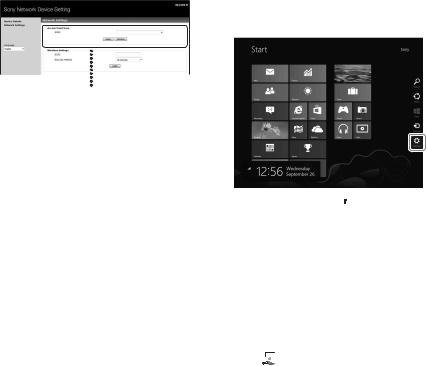
7 Select the SSID of the wireless LAN router/access point, then input the Security Key (if applicable).
SSID
8 Select [Apply].
9 Disconnect the network (LAN) cable from the unit following the on-screen instructions.
The unit restarts automatically, then the LINK indicator lights up green when the connection is established.
To connect wirelessly
Note
Before starting this procedure, be aware that your Wi-Fi network will not be protected until the setting is complete. After the setting is complete, your Wi-Fi network will be protected again when you set a wireless LAN security.
1Turn the unit on.
2Press and hold the ALL RESET button on the rear of the unit with a thin object such as a small pin until the ?/1 indicator starts flashing.
3Turn the unit on again. Then wait for about 70 seconds – 120 seconds until the LINK indicator turns off.
4Connect the unit and a Mac or PC.
For Mac OS X
Turn on Mac.
Click  icon on the top of the screen.
Turn on the Wi-Fi or AirPort. Then select [Open Network Preferences…].
Select [RDP-XA700iPN_Setup] from the network list.
For Windows 8 UI
Turn on PC.
Move the mouse pointer to the top-right (or bottom-right) corner on the Start screen to display the charms, and select [Settings].
With a touch panel, display the charms by swiping from the right end of the Start screen, and select [Settings].
Select or tap the  or
or  icon. Select [RDP-XA700iPN_Setup] from the network list.
For Windows 7/Windows 8
Turn on PC.
Click  icon on the bottom of the screen. Select [RDP-XA700iPN_Setup] from the network list.
For Windows Vista
Turn on PC.
Click 
 icon on the bottom of the screen. Click [Connect to a network].
Select [RDP-XA700iPN_Setup] from the network list.
5Perform steps 4 to 8 above.
The unit restarts automatically, then the LINK indicator lights up green when the connection is established.
6Reconnect the Mac or PC to your network.
Note
This procedure needs to be completed within 10 minutes. If you cannot complete, start over from step 2.
14US
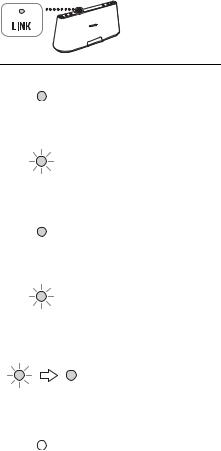
About the LINK indicator
Lights up green.
|
The Wi-Fi network |
|
(Green) |
connection is established. |
|
|
||
|
|
|
Flashes green. |
|
|
|
This unit is in the process of |
|
|
connecting to the Wi-Fi |
|
(Green) |
network. |
|
Please wait. |
||
|
||
|
||
Lights up amber. |
||
|
The wired network |
|
(Amber) |
connection is established. |
|
|
||
|
|
|
Flashes amber. |
|
|
|
This unit is in the process of |
|
|
connecting to the wired |
|
(Amber) |
network. |
|
Please wait. |
||
|
||
|
||
Flashes red k Lights up red |
||
|
An error has occurred. |
|
|
Try again from the |
|
(Red) |
beginning, or adjust your |
|
network settings. |
||
|
||
|
||
The indicator turns off. |
||
|
No connection is |
|
(Nothing) |
established. |
|
|
||
|
|
|
Tips
•You can also connect the unit to your wireless or wired network by other methods including Manual Setup, WPS PIN, etc.
•You can set up Fixed IP, as required.
•You can set up a Proxy Server, as required.
When a problem occurs while you are making the network settings
Press and hold the ALL RESET button on the rear of the unit with a thin object such as a small pin (page 8).
Note
Once you press and hold the ALL RESET button, the settings of the unit are reset to the factory default settings.
15US
Enjoying the Audio Content
Listening to iPod
1 Press the “iPod” button.
2 Press the Docking Tray on the front of the unit to open it.
3 Set your iPod on the Docking Tray.
Tip
If a pop-up message appears on the display of the iPod, refer to “AirPlay via Wi-Fi Network Setup” or see “About D-Sappli” (page 16).
4 Press the u button.
The iPod begins to play back. You can operate the connected iPod via this unit or the iPod itself.
Notes
•Remove the case or cover from your iPod before setting in the Docking Tray if a good connection cannot be ensured.
•When placing or removing the iPod, hold the iPod at the same angle as that of the connector of the Docking Tray. Do not twist or bend the iPod as it may damage the connector.
•Do not carry the unit with an iPod set on the Docking Tray. Doing so may cause a malfunction.
•When placing or removing the iPod, hold the Docking Tray securely.
•Before disconnecting the iPod, pause playback.
•If the battery of your iPod is extremely low, charge it for a while before operation.
•Sony cannot accept responsibility in the event that data recorded to an iPod is lost or damaged when using an iPod connected to this unit.
•For details of environmental conditions for operating your iPod, check the website of Apple Inc.
To use the unit as a battery charger
You can use the unit as a battery charger. The charging status appears in the “iPod” display. For details, see the user's guide of your iPod. When the unit is in standby mode, the battery may not be charged, even if you connect the iPod to the Dock connector. In this case, turn on the unit.
About D-Sappli
A dedicated dock app for iPod touch, iPhone, and iPad available at Apple App Store. Search for “D-Sappli” and download the free app to find out more about the functions.
Features
•D-Sappli can be used to connect the unit to your network. Refer to the supplied “AirPlay via Wi-Fi Network Setup” for details.
•The Sound EQ function allows you to create your own equalizer settings. You can select equalizer presets, or customize settings to your taste.
This function is available only when an iPhone, iPod touch or iPad is set on the Docking Tray.
16US
•D-Sappli includes three timer functions: Music Play Timer, Sleep Timer and Alarm.
The Music Play Timer allows you to play/pause desired music at a desired time. The Sleep Timer allows you to specify a time at which the music playback will stop. The Alarm includes a repeat function and snooze function. You can select iPod or a preset sound as the sound source. These three functions work in combination with the power supply of the unit.
•D-Sappli also includes a clock display enlarge feature.
Notes
•If the App to link with this unit is not downloaded to your iPod, a pop-up message prompting you to download D-Sappli may appear repeatedly.
Deactivate the App’s link function to stop the popup message.
•To deactivate the App’s link function, connect the AC adaptor and the AC power cord, then press the ?/1 button to turn on the unit. Remove your iPod from the Dock connector, and then press and hold the VOLUME – and u buttons simultaneously for more than 2 seconds. (The indicator for iPod flashes rapidly when deactivated.)
•To re-activate the App’s link function, repeat the above steps. The indicator for iPod will flash slowly.
•When you remove the iPod from the Docking Tray, the Sound EQ function setting will return to the default.
•When the sound volume is high, the Sound EQ function may not be effective.
Listening with the “AirPlay” Function
1 Check that the unit and your iPhone, iPod touch, iPad or iTunes are connected to your network.
For details on how to connect the unit to the network, see page 12.
Tips
•Update the software of your iPhone, iPod touch or iPad to the latest version beforehand.
•For details on how to operate iPhone, iPod touch, iPad or iTunes, refer to the operating instructions or the help documentation of your device or software.
2 Tap/click on the  icon at the bottom right of the iPhone, iPod touch or iPad screen or top center of the iTunes window.
iPhone, iPod touch or iPad
iTunes
17US
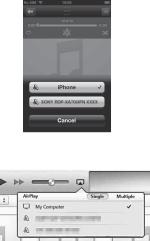
3 Select “SONY: RDP-XA700iPN” on the “AirPlay” menu of iTunes or your iPhone, iPod touch or iPad.
iPhone, iPod touch or iPad


 SONY: RDP-
XA700iPN
iTunes


 SONY: RDP-
XA700iPN
4 Start playing back audio content on the iPhone, iPod touch, iPad or iTunes.
The unit starts playing back automatically.
Tip
If playback does not start, perform the process again from step 1.
To control “AirPlay” playback
You can use the VOLUME +/–, u buttons on the unit and the VOLUME +/–, u, . and > buttons on the remote control.
Operation from the unit and the remote control is active only when the unit is selected as the device for output.
When you use iTunes, set it to accept control from the unit and the remote control when you want to use the unit and the remote control to operate iTunes.
Note
Loud sound may output from the unit if you set the volume too high via the iPhone, iPod touch, iPad or iTunes.
18US

Listening to Other
Components
You can enjoy the sound from an optional component, such as a portable digital music player, through the speakers of this unit. Be sure to turn off the power of each component before making any connections.
1 Firmly connect the line output jack of a portable digital music player (or other component) to the AUDIO IN jack on the rear of the unit, using a suitable audio connecting cable (not supplied).
2 Press the ?/1 button to turn on the unit.
3 Turn the connected component on.
4 Press the AUDIO IN button to select the source.
5 Play the connected component.
The sound from the connected component is output from the speakers of this unit.
Notes
•The audio connecting cable required depends on the component. Make sure the cable is correct for the component to be connected.
•If the volume is low, adjust the volume level on the connected component first. If the volume is still too low, adjust the volume level on the unit.
Updating the Software
When a new update is available, the UPDATE indicator lights up green while the unit is connected to the Internet.
1 Check that the UPDATE indicator lights up green.
2 Press and hold the UPDATE button on the top of the unit.
The unit beeps, then quits or stops all operations automatically and the update starts.
The UPDATE indicator flashes during the update. When the update has completed, the UPDATE indicator turns off.
Notes
•When an error occurred, the UPDATE indicator flashes quickly and all other indicators light up. Then the unit restarts automatically.
•You cannot operate the unit until updating has completed.
•It may take about 20 minutes to update the software. The time required depends on the size of the update content and type of Internet connection you are using.
•Do not disconnect the AC adaptor and the AC power cord during the update.
19US

Initializing the Unit
You can initialize the unit. All settings of the unit are reset to the factory default settings when you initialize the unit.
1 Press the ?/1 button to turn on the unit.
2 Remove the iPod from the Docking Tray.
3 Press and hold the ALL RESET button for at least 2 seconds.
After resetting, the ?/1 indicator flashes for 2 seconds.
20US

Additional Information
Troubleshooting
If you run into any problems using the unit, use the following checklist. Should any problem persist, consult your nearest Sony dealer.
General
The unit does not turn on.
•Make sure the AC adaptor and the AC power cord are connected correctly.
There is no sound.
• Adjust the volume.
There is noise.
•Make sure the unit is not in the vicinity of in-use portable phones, etc.
•If connecting the unit via a device with a built-in radio or tuner, broadcasts may not be received, or sensitivity may be reduced. Locate the unit farther away from the device and check whether you can listen to the broadcasts satisfactorily.
The unit does not turn off.
•The unit enters standby or network standby mode when you turn off the power. If you want to completely turn off the power, disconnect the AC adaptor.
•If you turn the unit to standby mode immediately after turning on it, it may take a while for the unit to enter standby mode.
The unit turns on and starts playback automatically.
•When the unit is in the network standby mode and receives a command to playback on the “AirPlay” device, the unit turns on and starts playback automatically
(page 6).
The unit turns off automatically.
•The unit enters the selected standby mode when it is idle for 20 minutes.
The ?/1 indicator flashes red.
•The unit is in protect mode.
•Disconnect and reconnect the AC adaptor, then turn the unit on again.
If the ?/1 indicator still flashes, consult your nearest Sony dealer.
This unit does not operate if you press the buttons of this unit or those of the remote control.
•Buttons do not work while initializing or starting up.
•Buttons do not work while you are updating the software.
•Buttons other than the ?/1 button do not work in the network standby or standby mode.
The unit and the AC adaptor are getting hot.
• This is not a malfunction.
iPod
There is no sound.
•Make sure the iPod is playing back.
•Make sure the iPod is connected firmly.
•Update the unit and the iPod to use the latest software beforehand.
•Make sure the iPod is compatible.
•Make sure the function for iPod is selected.
Operation is not performed.
• Make sure the iPod is connected firmly.
The iPod does not charge.
•Make sure the iPod is connected firmly.
•Make sure the AC adaptor and the AC power cord are connected firmly.
21US

•When the unit is in standby mode, the battery may not be charged, even if you connect the iPod to the Dock connector. In this case, turn on the unit.
Network
The browser screen does not appear.
•Check the proxy setting of the browser. This unit does not support proxies. Change the browser setting to one connecting this unit without a proxy.
WPS configuration method failed.
•You cannot connect to a network using WPS when the wireless LAN router/ access point is set to WEP (page 27). Set up the network using D-Sappli or Access Point Scan (page 12).
The unit cannot connect to the network. (The unit cannot be found or recognized by other devices that are on the home network.)
•Check that the wireless LAN router/access point is close to the unit.
•Move the unit and the wireless LAN router/access point closer to each other and perform the setup again.
•Make sure that the wireless LAN router/ access point is turned on.
•Turn the unit off and then on again, and reboot the wireless LAN router/access point.
•Devices that use a 2.4 GHz frequency band such as microwave, Bluetooth or digital cordless device, may interrupt the communication. Move this unit away from such devices, or turn off the devices.
The unit cannot connect to the network via a Wi-Fi connection.
•Make sure a network (LAN) cable is not connected to the unit. The unit automatically tries to connect to the network over a wired LAN connection when a network (LAN) cable is connected to the unit.
22US
•Confirm that the wireless LAN router/ access point setting is correct. For details on the wireless LAN router/access point setting, refer to the operating instructions of the wireless LAN router/access point.
Resetting the network settings of the unit (default network setting)
•Press and hold the ALL RESET button on the rear of the unit with a thin object such as a small pin (page 8).
Once you press and hold the ALL RESET button, the settings of the unit are reset to the factory default settings.
AirPlay
The “AirPlay” icon or unit name does not appear on iPad/iPhone/iPod touch or iTunes.
•Make sure the LINK indicator lights up green or amber. See “The unit cannot connect to the network. (The unit cannot be found or recognized by other devices that are on the home network.)” (page 22) if the LINK indicator turns off or lights up red.
•Check that this unit, your iPad/iPhone/ iPod touch, Mac or PC are connected to the same network.
•Update the software version of the unit to the latest version (page 19).
•Check that your iPad/iPhone/iPod touch or iTunes has the latest software version.
•If the problem persists, reboot your iPad/ iPhone/iPod touch or iTunes.
•Check your set-up of the firewall of the security software. Refer to the operating instructions or the help documentation of your device or software for details.

Audio content automatically changed/ started/stopped.
•When the unit is turned on or in the network standby mode, it is under the control of an “AirPlay” device. If you want to reject requests from the “AirPlay” device, turn the unit to the standby mode by pressing and holding ?/1 button until the color of the ?/1 indicator changes.
There is no sound.
•Check that no other iPad/iPhone/iPod touch is set on this unit. If so, remove it from the network.
•If the problem persists, reboot your iPad/ iPhone/iPod touch or iTunes.
The sound is too loud.
•Loud sound may output from the unit if you set the volume too high via the iPhone, iPod touch, iPad or iTunes.
The sound skips.
•The sound may skip depending on factors such as the network environment in which you use the Wi-Fi network.
•Wi-Fi networks are influenced by electromagnetic radiation emitted by microwave ovens and other devices. Move the unit away from these devices.
•The bandwidth of your Wi-Fi network may be too low. Move the unit and the wireless LAN router/access point closer to each other, without any obstacles between them.
This unit cannot be operated.
•Update the software version of the iPhone, iPod touch or iPad to the latest version.
•Update the software version of the unit to the latest version (page 19).
•Make sure another device is not streaming to the “AirPlay” compatible device at the same time.
Buttons such as . and > do not work.
•Make sure that the settings that allow iTunes to accept control from this unit are active.
•The unit is not selected as the remote speaker on the iPhone, iPod touch, iPad or iTunes. Select the unit as the network speaker.
It takes time for the “AirPlay” function to start.
•Use this unit in the network standby mode (page 6). This mode shortens the startup time when using the “AirPlay” function, but increases standby power consumption.
AUDIO IN
There is no sound.
•Make sure the audio connecting cable (not supplied) is connected firmly.
•Make sure the AUDIO IN function is selected.
The sound is low.
•Confirm the volume of the connected external component.
•Confirm the volume level on the unit.
Remote control
The remote control does not function.
•Replace the battery in the remote control with a new one if it is weak.
•Make sure that you are pointing the remote control at the remote sensor on the unit.
•Remove any obstacles in the path of the remote control and the unit.
•Make sure the remote sensor is not exposed to strong light such as direct sunlight or fluorescent lamp light.
•Move closer to the unit when using the remote control.
23US

Specifications
AUDIO POWER
SPECIFICATIONS
POWER OUTPUT AND TOTAL HARMONIC DISTORTION:
Power Output (reference)
15 W + 15 W + 30 W (at no more than 10 % harmonic distortion)
Section for iPod
DC out: 5 V
MAX: 2.1 A
Section for Wireless LAN
Compatible standards
IEEE 802.11 b/g
(WEP 64 bit, WEP 128 bit,
WPA/WPA2-PSK (AES),
WPA/WPA2-PSK (TKIP))
Radio frequency
2.412 GHz – 2.462 GHz
(2.4 GHz ISM Band, 11 Channels) Channel 1 – Channel 11
General
Speakers
Satellite 4.8 cm (1 15/16 inches) dia. 8 Ω Subwoofer 9.0 cm (3 5/8 inches) dia. 4 Ω
AUDIO IN
ANALOG φ 3.5 mm stereo mini jack
Network port
10BASE-T/100BASE-TX (Auto Polarity)
Power requirements
DC IN 19.5 V
Dimensions (w/h/d) (including projecting parts and controls)
Approx. 401 mm × 176 mm × 160 mm (15 7/8 inches × 7 inches × 6 3/8 inches)
Mass
Approx. 3.4 kg (7 lb 8 oz)
Supplied accessories:
Remote control (1) AC adaptor (1) AC power cord (1)
Operating Instructions (this document) (1) AirPlay via Wi-Fi Network Setup (1)
CR2025 lithium battery (1) (Pre-installed in the remote control for trial use)
Warranty card (2)
Design and specifications are subject to change without notice.
24US

Compatible iPad/iPhone/
iPod Models and
Computers
Compatible iPad/iPhone/iPod models and computers are shown below.
Update the software of your iPad/iPhone/iPod to the latest version before using it with this unit.
Compatible iPad/iPhone/iPod Models for the Docking Tray
iPod touch (5th generation) iPod nano (7th generation)* iPhone 5
iPad (4th generation) iPad mini
*The iPod nano (7th generation) cannot be controlled by the remote when the command of “MENU,” “V,” “v,” and “ENTER” is pressed.
Compatible iPad/iPhone/iPod models and computers for the “AirPlay” function
Update the software version of the unit to the latest version.
iPod touch (5th generation) iPod touch (4th generation) iPod touch (3rd generation) iPhone 5
iPhone 4S iPhone 4 iPhone 3GS
iPad (4th generation) iPad mini
iPad (3rd generation) iPad 2
iPad
PC or Mac with iTunes 10.1 or later
System Requirements for the Computer for Setting up the “AirPlay” Function
• Compliant computer:
IBM PC/AT or compatible computers Apple Mac
• Operating systems: Windows 8 Windows 8 Pro
Windows 8 Enterprise Windows RT Windows 7 Ultimate
Windows 7 Professional Windows 7 Home Premium Windows 7 Home Basic Windows 7 Starter Windows Vista Ultimate Windows Vista Business
Windows Vista Home Premium Windows Vista Home Basic
Windows XP Professional (other than 64 bit) Windows XP Home Edition
Mac OS X v10.7 Lion
Mac OS X v10.6 Snow Leopard
Mac OS X v10.5 Leopard
Mac OS X v10.4 Tiger
Mac OS X v10.3 Panther
Mac OS X v10.2 Jaguar
• Suitable browsers Internet Explorer 7 or later
Safari (latest version at the time of Mac OS X v10.2 Jaguar being released, or later)
25US

Precautions
•To disconnect the AC power cord, pull it out by the plug, not the cord.
•Since a strong magnet is used for the speaker, keep credit cards using magnetic coding or spring-wound watches, CRTbased TVs, or projectors, etc., away from the unit to prevent possible damage from the magnet.
•Do not leave the unit in a location near a heat source such as a radiator or airduct, or in a place subject to direct sunlight, excessive dust, mechanical vibration, or shock.
•Allow adequate air circulation to prevent internal heat build-up. Do not place the unit on a surface (a rug, a blanket, etc.) or near materials (a curtain).
•Should any solid object or liquid fall into the unit, unplug the unit and have it checked by qualified personnel before operating it any further.
•Do not handle the unit with wet hands.
•Do not place the unit anywhere near water.
•Properly shielded and grounded cables and connectors must be used for connection to the wireless LAN router/access point in order to comply with the limit for EMC regulations.
Notes on unit placement
•When playing the unit at loud volume, the unit may move due to vibration, depending on where the unit is placed.
•Check that the unit is placed where it will not fall down due to vibration.
NOTES ON LITHIUM BATTERY
•Wipe the battery with a dry cloth to assure a good contact.
•Be sure to observe the correct polarity when installing the battery.
•Do not hold the battery with metallic tweezers, otherwise a short-circuit may occur.
Note
•In the Operating Instructions, “iPod” is used as a general reference to functions on an iPod, iPhone or iPad, unless otherwise specified by the text or illustrations.
If you have any questions or problems concerning your unit, please consult your nearest Sony dealer.
If the TV picture or monitor display is magnetically distorted
This unit is not magnetically shielded, and the picture on nearby TV sets may become magnetically distorted. In this situation, turn off the TV, wait 15 to 30 minutes, and turn it back on. If there is no improvement, move the speakers farther away from the TV.
On copyrights
•AirPlay, iPad, iPhone, iPod, iPod nano and iPod touch are trademarks of Apple Inc., registered in the U.S. and other countries.
•Lightning is a trademark of Apple Inc.
•iTunes, Safari, Mac, and Mac OS X are trademarks of Apple Inc., registered in the U.S. and other countries.
•“Made for iPod,” “Made for iPhone,” and “Made for iPad” mean that an electronic accessory has been designed to connect specifically to iPod, iPhone, or iPad, respectively, and has been certified by the developer to meet Apple performance standards. Apple is not responsible for the operation of this device or its compliance with safety and regulatory standards. Please note that the use of this accessory with iPod, iPhone, or iPad may affect wireless performance.
•Microsoft, Windows, Windows Vista, Windows 7, and Windows 8 are trademarks or registered trademarks of Microsoft Corporation in the United States and/or other countries.
26US
 Loading...