


 Loading...
Solid-State Memory
Camcorder
Operating Guide
4-544-242-13(1)
Table of Contents
Getting Started
Recording
Playback
Editing
Using the Menu
Connecting with another device
Troubleshooting
Additional Information
PXW-X70
Read this first
Before operating this unit, please read this manual thoroughly, and retain it for future reference.
Notes on use
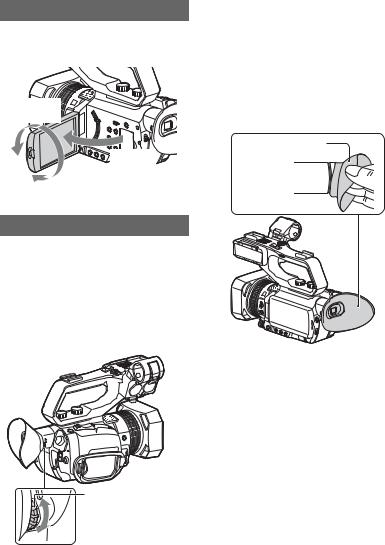
Using the camcorder
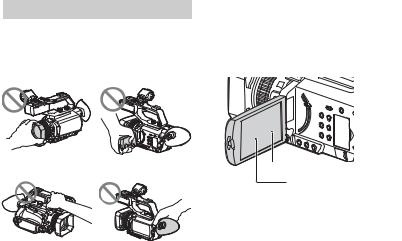
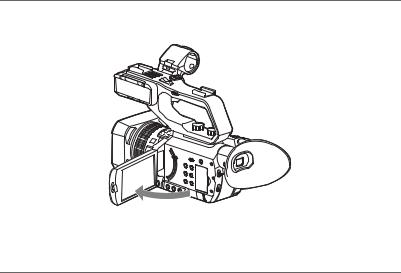
•Do not hold the camcorder by the following parts, and also do not hold the camcorder by the jack covers.
•The LCD screen is manufactured using extremely high-precision technology, so over 99.99% of the pixels are operational for effective use. However, there may be some tiny black points and/or bright points (white, red, blue, or green in color) that appear constantly on the LCD screen. These points are normal results of the manufacturing process and do not affect the recording in any way.
Lens hood |
LCD screen |
Microphone (sold |
Viewfinder |
separately) or |
|
Microphone holder |
|
b Notes
•The camcorder is not dustproof, dripproof or waterproof. See “About handling of your camcorder” (p. 122).
•When connecting the camcorder to another device with communication cables, be sure to insert the connector plug in the correct way. Pushing the plug forcibly into the terminal will damage the terminal and may result in a malfunction of the camcorder.
•Use the camcorder in accordance with the regulations of a place where you use it.
On the LCD screen and lens
•A menu item that is grayed out is not available under the current recording or playback conditions.
White, red, blue or green point
Black point
On sunlight
•Do not record the sun or leave the camcorder under the sun for a long time. The internal parts of the camcorder may be damaged. If sunlight is focused on a nearby object, it may cause a fire.
•Do not expose your camcorder’s viewfinder, lens, or LCD screen to the sun or strong light source for extended periods. Doing so may cause a malfunction of the camcorder.
•Do not attempt to record the sun directly. Doing so may cause a malfunction of the camcorder.
On the temperature of your camcorder and battery pack
Your camcorder has a protective function that disables recording or playback if the temperature of your camcorder or battery pack is beyond the safely operable range. In this case, a message appears on the LCD screen or in the viewfinder (p. 111).
2
On recording
•In order to stabilize memory card operation, it is recommended that you format the memory card when you use it with your camcorder for the first time. All data recorded on the memory card will be erased by formatting, and cannot be recovered. Save important data on the memory card on other media such as a computer, before formatting the memory card.
•Before starting to record, test the recording function to make sure the picture and sound are recorded without any problems.
•Compensation for the loss of the content of recordings or the loss of recording opportunities cannot be provided, even if recording or playback is not possible due to a malfunction of the camcorder, storage media, etc., or even if images or sounds are distorted due to the limits of the capabilities of the camcorder.
•TV color systems differ depending on the countries/regions. To view your recordings on a TV, a TV of the appropriate color system for the country/ region is required.
•Television programs, films, video tapes, and other materials may be copyrighted. Unauthorized recording of such materials may be contrary to the copyright laws.
•Because of the way that the image device (CMOS sensor) reads out image signals, the following phenomena may occur.
–The subjects passing by the frame rapidly might appear crooked depending on the recording conditions. (This phenomenon may be notable in displays having high motion resolution.)
–Horizontal lines appear on the LCD screen during recording under fluorescent lights, sodium lamps or mercury lamps. The phenomena can be reduced by adjusting the shutter speed (p. 40).
Save all your recorded image data
•To prevent your image data from being lost, save all your recorded images on PC periodically.
To handle the recorded images on your computer
Download the “Content Browser” software (p. 19).
Format the recording media using [MEDIA FORMAT] if images are not recorded or played back properly
If you continue recording and deleting images on recording media for a long period of time, the files on that recording media may be fragmented. As a result, you may not be able to record and save images properly. If this happens, save images on a PC, then format the recording media
(p. 78).
About the operation of the camcorder
You can operate the camcorder using the v/V/b/B/EXEC buttons (p. 81), and the touch panel. However, you cannot use the touch panel* to make some settings such as the MENU items.
*Some operations are possible only with the touch panel.
About this manual
•The on-screen displays in each local language are used for illustrating the operating procedures. Change the screen language before using your camcorder if necessary (p. 101).
•Design and specifications of recording media and other accessories are subject to change without notice.
•The value you can set in [REC FORMAT], etc., depends on the [60i/50i SEL] setting. In this manual, the values for both [60i] and [50i] settings are described.
3
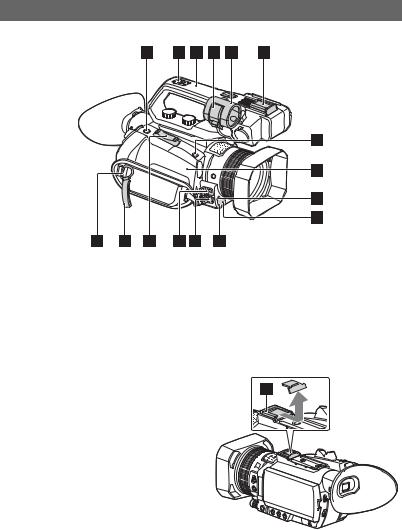
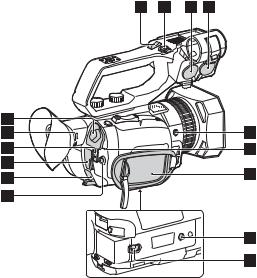
Identifying parts and controls
Body
The numbers in ( ) are reference pages.
AASSIGN4/FOCUS MAGNIFIER button (64)
BAccessory shoe receptacles
CXLR handle unit
DMicrophone fixing clamper
EMicrophone holder
FAccessory shoe
GASSIGN5/IRIS PUSH AUTO button (39)
H  (N mark)
•Touch an NFC-enabled smartphone to the mark to establish a connection with the camcorder.
•Near Field Communication (NFC) is an international standard for short-range wireless communication technology.
IRemote sensor (101)
JRecording lamp (101)
KNIGHTSHOT light (48)
LMulti/Micro USB jack (102) VIDEO OUT jack (73, 90, 103)
MMIC jack (PLUG IN POWER)
NPower zoom lever
OCable clamper
PHook for shoulder strap
QMulti Interface Shoe (45)
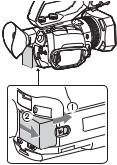
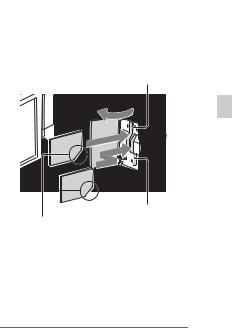
Attaching the XLR handle unit
1 Remove the Multi Interface Shoe cap.
4

2 Remove the handle shoe cap.
3Align the mark on the XLR handle with the one on the camcorder, and insert the XLR handle unit in the direction of the arrow.
4Press and turn the handle mounting screws to tighten them.
z Tips
•When attaching the XLR handle unit, make sure to securely tighten both handle mounting screws.
•If you use the XLR handle unit without securely tightening the mounting screws, it may damage the Multi Interface Shoe or cause the camcorder to detach and fall.
Detaching the XLR handle unit
To detach the XLR handle unit, perform the attachment procedure in reverse.
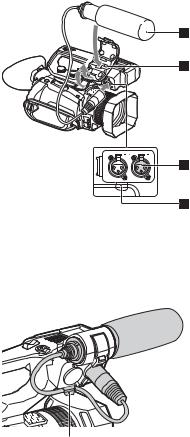
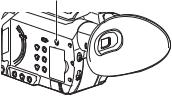
Attaching the microphone (sold separately)
This section explains how to connect an external microphone (sold separately).
Continued , 5
Identifying parts and controls (Continued)
1Place the microphone A into the microphone holder B.
2Connect the plug of the microphone to the INPUT 1 jack C.
3Place the microphone cable into the cable holder D.
Put the cable in the outer cable holder.
6
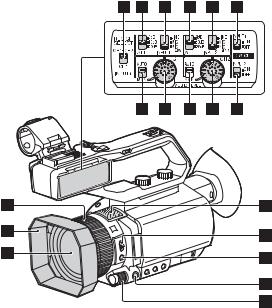
AManual lens ring (33)
BLens hood
CLens (ZEISS lens)
DREC CH SELECT (INPUT1) switch (44)
EATT (INPUT1) switch (44)
FINPUT1 (LINE/MIC/MIC+48V) switch (44)
GATT (INPUT2) switch (44)
HINPUT2 (LINE/MIC/MIC+48V) switch (44)
ILOW CUT (INPUT1) switch (44)
JAUTO/MAN (CH1) switch (44)
KAUDIO LEVEL (CH1) dial (44)
LAUTO/MAN (CH2) switch (44)
MAUDIO LEVEL (CH2) dial (44)
NLOW CUT (INPUT2) switch (44)
OInternal microphone
PZOOM/FOCUS switch (34)
QAF/MF button (34)
RMENU button (81)
SMANUAL dial (39)
Continued , 7

Identifying parts and controls (Continued)
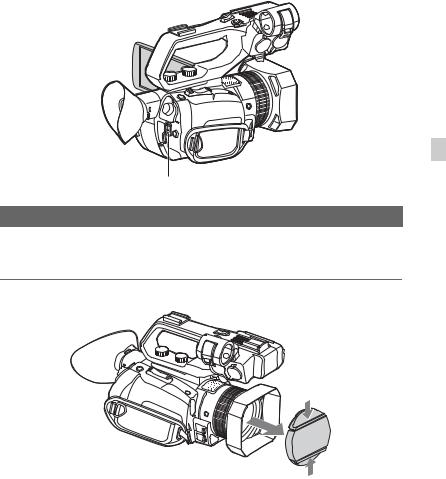
Attaching the lens hood
Align the marks on the lens hood to those on the camcorder, and turn the lens hood in the direction of the arrow 2 until it is locked.
z Tips
•If you attach or remove a 62 mm (2 1/2 in.) PL filter or MC protector, remove the lens hood.
8
ASDI OUT jack (73)
BLens adjustment dial (26)
CSTART/STOP button (29)
DHDMI OUT jack (73)
EDC IN jack (21)
Fv/V/b/B/EXEC button (81)
GHandle zoom lever (33)
HHandle record button (29)
IINPUT2 jack (44)
JINPUT1 jack (44)
KASSIGN6/D.EXTENDER button (64)
LPOWER/CHG lamp (21)
MGrip belt
NTripod receptacles (1/4 inch)
For 1/4-20UNC screws
For attaching a tripod with a screw shorter than 5.5 mm (sold separately).
Some tripods may not be designed to attach in the proper direction.
OBATT release lever (21)
Continued , 9

Identifying parts and controls (Continued)
AHandle zoom switch (33)
BEye sensor
CViewfinder (26)
DLarge eyecup (26)
EAUTO/MANUAL switch (39)
FND FILTER switch (41)
GBattery slot (21)
Hi (headphones) jack
ISHUTTER SPEED button (40)
JGAIN button (40)
KIRIS button (39)
10
ASLOT SELECT button (27)
BTHUMBNAIL button (66)
CLCD screen/touch panel (26)
DMemory card slot A/Memory card access lamp (27)
EMemory card slot B/Memory card access lamp (27)
FDISPLAY button (71)
GASSIGN3/PICTURE PROFILE button (64)
HASSIGN2/STATUS CHECK button (64)
IASSIGN1/LAST SCENE PREVIEW button (64)
JWHT BAL button (42)
K  (on/standby) button (24)
Continued , 11
Identifying parts and controls (Continued)
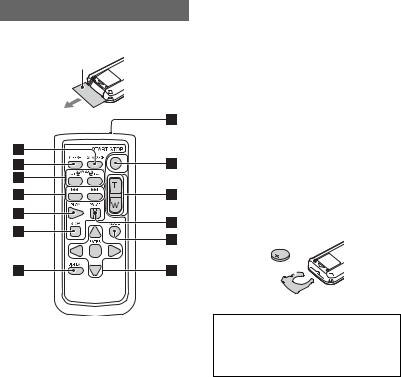
Wireless Remote Commander
Remove the insulation sheet before using the Wireless Remote Commander.
Insulation sheet
•Point the remote sensor away from strong light sources such as direct sunlight or overhead lighting. Otherwise, the Wireless Remote Commander may not function properly.
•When you are operating with the Wireless Remote Commander supplied with your camcorder, your video device may also operate. In that case, select a commander mode other than DVD2 for your video device, or cover the sensor of your video device with black paper.
ADATA CODE button (71)
BTC RESET button (60)
CSCAN/SLOW buttons (66)
D. > (PREV/NEXT) buttons (66)
EPLAY button (66)
FSTOP button (66)
GDISPLAY button (71)
HTransmitter
ISTART/STOP button (29)
JPower zoom lever
KPAUSE button (66)
LMODE button
Mb/B/v/V/ENTER buttons
b Notes
•Aim the Wireless Remote Commander towards the remote sensor to operate your camcorder.
To change the battery of the Wireless Remote Commander
1While pressing on the tab, inset your fingernail into the slit to pull out the battery case.
2Place a new battery with the + side facing up.
3Insert the battery case until it clicks into place.
Tab 


WARNING
Battery may explode if mistreated. Do not recharge, disassemble or dispose of in fire.
•When the lithium battery becomes weak, the operating distance of the Wireless Remote Commander may shorten, or the Wireless Remote Commander may not function properly. In this case, replace the battery with a Sony CR2025 lithium battery. Use of another battery may present a risk of fire or explosion.
12
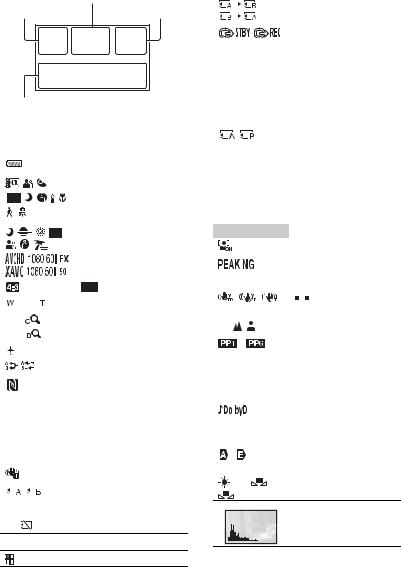
Screen indicators
|
Center |
Upper left |
Upper right |
Bottom
Upper left
Indicator |
|
|
|
|
|
Meaning |
|||
100% |
|
|
|
Remaining battery |
|||||
|
|
|
|
|
|
|
|
|
|
|
|
|
|
. |
|
|
INTELLIGENT AUTO |
||
|
|
|
|
|
|
|
|
|
(face detection/scene |
|
|
|
|
|
|
|
|
|
detection/camera-shake |
|
|
|
|
|
|
|
|
|
detection) (47) |
|
|
|
|
|
|
|
|
|
|
|
|
|
|
|
|
|
|
|
SCENE SELECTION |
|
|
|
|
|
|
|
|
|
(47) |
|
|
|
|
|
|
|
|
|
|
|
|
|
|
|
|
|
|
|
REC FORMAT (37) |
|
|
|
|
|
|
|
|
|
|
|
|
|
|
|
|
|
|
|
|
|
|
|
|
|
|
|
|
|
|
|
|
|
|
|
|
|
|
|
WIDE REC (90) |
|
|
|
|
|
|
|
|
|
|
|
|
|
|
|
|
|
|
|
Optical zoom |
|
|
|
|
|
|
|
|
|
|
|
|
|
|
|
|
|
|
|
|
Z99 |
×1.2 |
|
Clear image zoom |
||||||
Z99 |
×2.3 |
|
Digital zoom |
||||||
|
|
|
|
|
|
|
|
|
|
|
|
|
|
|
|
|
|
|
AIRPLANE MODE (99) |
|
|
|
|
|
|
|
|
|
|
|
|
|
|
|
|
|
|
|
SIMUL/RELAY REC |
|
|
|
|
|
|
|
|
|
|
|
|
|
|
|
|
|
|
|
NFC active |
|
|
|
|
|
|
|
|
|
|
100-0001 |
|
|
|
Playback folder of |
|||||
|
|
|
|
|
|
|
|
|
memory card |
|
|
|
|
|
|
|
|
|
|
Center |
|
|
|
|
|
|
|||
|
|
|
|
|
|
|
|
|
|
Indicator |
|
|
|
|
|
Meaning |
|||
|
|
|
|
|
|
|
|
|
Vibration warning |
|
|
|
|
|
|
|
|
|
|
|
|
|
|
|
|
|
|
|
Recording media |
|
|
|
|
|
|
|
|
|
|
REC STBY |
Recording status (29) |
||||||||
|
|
|
|
|
|
|
|
|
|
E |
|
|
|
|
|
Warning (111) |
|||
NPlayback indicator (66)
Processing
Indicator |
|
Meaning |
||||||||
|
|
|
|
|
|
Relay recording |
||||
|
|
|
|
|
|
|
|
|
|
|
|
|
|
|
|
|
SDI/HDMI REC |
||||
|
|
|
|
|
|
CONTROL |
||||
|
|
|
|
|
|
|
|
|
|
|
Upper right |
|
|
|
|
|
|||||
|
|
|
|
|
|
|
|
|
|
|
Indicator |
|
|
|
Meaning |
||||||
0min |
|
|
|
Estimated remaining |
||||||
|
|
|
|
|
|
|
|
recording time |
||
|
|
|
|
|
|
|
|
|
|
|
|
|
|
|
|
|
|
|
Recording/playback |
||
|
|
|
|
|
|
|
|
media |
||
|
|
|
|
|
|
|
|
|
|
|
00:00:00:00 |
|
|
Time code |
|||||||
|
|
|
|
|
|
|
|
(hour:minute:second: |
||
|
|
|
|
|
|
|
|
frame) |
||
|
|
|
|
|
|
|
|
|
|
|
Bottom |
|
|
|
|
|
|
||||
|
|
|
|
|
|
|
|
|
|
|
Indicator |
|
Meaning |
||||||||
|
|
|
|
|
|
Face detection [ON] |
||||
|
|
|
|
|
|
|
|
|
|
|
|
|
|
|
|
|
PEAKING (94) |
||||
|
|
|
|
|
|
|||||
|
|
|
|
|
|
|
|
|
|
|
|
|
|
|
|
|
ZEBRA (94) |
||||
|
|
|
|
|
|
|||||
|
|
|
|
|
|
|
|
|
|
|
|
|
|
|
|
|
|
|
|
|
STEADY SHOT |
|
|
|
|
|
|
|
|
|
|
|
|
|
|
|
|
|
|
|
(88) |
||
|
|
|
|
|
|
|
|
|
|
|
9 |
|
|
|
Manual focus (34) |
||||||
|
|
|
|
|
|
|
|
|
|
|
|
|
|
– |
|
Picture profile (53) |
|||||
|
|
|
|
|
|
|
|
|
|
|
F5.6 |
|
Iris (39) |
||||||||
|
|
|
|
|
|
|
|
|
|
|
9dB |
|
Gain (40) |
||||||||
|
|
|
|
|
|
|
|
|
|
|
100 180° |
|
Shutter speed (40) |
||||||||
|
|
|
|
|
|
|
|
|
|
|
|
|
|
|
|
|
AVCHD AUDIO |
||||
|
|
|
|
|
|
|||||
|
|
|
|
|
|
FORMAT (92) |
||||
|
|
|
|
|
|
|
|
|
|
|
-2.0EV |
|
AE SHIFT (87) |
||||||||
|
|
|
|
|
|
|
|
|
|
|
/ |
|
|
Auto setting/manual |
|||||||
|
|
|
|
|
|
setting (95) |
||||
|
|
|
|
|
|
|
|
|
|
|
|
|
|
n |
A |
White balance (42) |
|||||
|
|
|
B |
|
|
|
|
|
|
|
HISTOGRAM (93)
Continued , 13
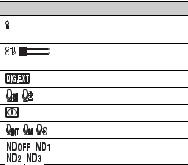
Screen indicators (Continued)
Indicator Meaning
AUTO SLOW
SHUTTER
AUDIO LEVEL
DISPLAY (95)
D.EXTENDER (87)
REC LEVEL MODE
NIGHTSHOT
SELECTED MIC
ND filter (41)
z Tips
•Indicators may look different or appear at different positions.
Data code during recording
The recording date, time and condition are recorded automatically on the recording media. They are not displayed while recording. However, you can check them by selecting  (DISPLAY SET) t [DATA CODE] and choosing the data that you want to display, or by pressing the ASSIGN button to which the DATA CODE function is assigned, during playback
(p. 71).
14

Table of Contents |
|
Read this first ........................................................................................... |
2 |
Identifying parts and controls ................................................................... |
4 |
Body...................................................................................................... |
4 |
Wireless Remote Commander ............................................................ |
12 |
Screen indicators .................................................................................... |
13 |
Getting Started |
|
Step 1: Checking supplied accessories .................................................. |
19 |
Step 2: Charging the battery pack .......................................................... |
21 |
Step 3: Attaching the accessory shoe .................................................... |
23 |
Step 4: Turning on the camcorder and setting the date and time .......... |
24 |
Setting the date and time.................................................................... |
24 |
Step 5: Adjusting the LCD screen and viewfinder .................................. |
26 |
Step 6: Preparing the recording media ................................................... |
27 |
Recording |
|
Recording ............................................................................................... |
29 |
Recording movies ............................................................................... |
29 |
Changing the setting of the START/STOP button and handle record |
|
button .................................................................................................. |
32 |
Adjusting the zoom ............................................................................. |
33 |
Adjusting the focus ................................................................................. |
34 |
Using the Focus magnifier .................................................................. |
35 |
Focusing by touching the LCD screen (Spot focus)........................... |
35 |
Focusing on a detected face (Face detection)................................... |
35 |
Changing the recording setting .............................................................. |
37 |
Selecting the file format and recording format.................................... |
37 |
Setting the DV MODE (DV mode) ....................................................... |
38 |
Adjusting the brightness ......................................................................... |
39 |
Adjusting the iris ................................................................................. |
39 |
Adjusting the gain ............................................................................... |
40 |
Adjusting the shutter speed................................................................ |
40 |
Adjusting the exposure ....................................................................... |
41 |
Adjusting the volume of light (ND filter) .............................................. |
41 |
Adjusting the color tone .......................................................................... |
42 |
Adjusting the white balance................................................................ |
42 |
Audio setup ............................................................................................ |
43 |
Recording sound from the internal microphone ................................. |
43 |
Recording sound from an external audio device................................ |
43 |
Recording sound from a Multi Interface Shoe compatible microphone |
|
(sold separately) ................................................................................. |
45 |
Contents of Table
Continued , 15

Table of Contents (Continued) |
|
Recording sound from an external microphone (sold separately) |
...... 45 |
Adjusting the audio level from the INPUT1 and INPUT2 jacks ........... |
46 |
Adjusting the audio level from the internal microphone or an external |
|
microphone (PLUG IN POWER) .......................................................... |
46 |
Useful functions ..................................................................................... |
47 |
Selecting the suitable setting automatically for the recording situation |
|
(AUTO MODE setting) ......................................................................... |
47 |
Shooting in dark conditions (NIGHTSHOT)......................................... |
48 |
What you can do with the Wi-Fi function of the camcorder................. |
48 |
Downloading “Content Browser Mobile” ............................................. |
48 |
Connecting the camcorder to an Android smartphone equipped with |
|
the NFC function using One-touch...................................................... |
49 |
Using a smartphone as a remote controller ........................................ |
50 |
Connecting without using the NFC function (Android)........................ |
51 |
Connecting without using the NFC function (iPhone/iPad) ................. |
52 |
Customizing the picture quality (Picture profile) ................................. |
53 |
Setting time data ................................................................................. |
60 |
Recording with the Slow & Quick Motion function .............................. |
61 |
Reviewing the most recently recorded scene |
|
(Last Scene Review)............................................................................ |
63 |
Assigning the functions to the ASSIGN buttons ..................................... |
64 |
Playback |
|
Playback ................................................................................................ |
66 |
Playing back movies ........................................................................... |
66 |
Playing back still images..................................................................... |
69 |
Changing/checking the settings in your camcorder ............................... |
71 |
Changing the screen display .............................................................. |
71 |
Displaying recording data (Data code)............................................... |
71 |
Checking the settings in your camcorder (Status check) ................... |
72 |
Connecting a monitor or a TV ................................................................ |
73 |
Editing |
|
Protecting movies and still images (Protect) .......................................... |
76 |
Dividing a movie ..................................................................................... |
76 |
Deleting movies and still images ............................................................ |
77 |
Formatting the recording media ............................................................. |
78 |
Deleting all data from the memory card completely ............................... |
79 |
Repairing the image database file ......................................................... |
80 |
16

Using the Menu |
|
Operating the menu ................................................................................ |
81 |
Menu items ............................................................................................. |
83 |
(CAMERA SET) menu ..................................................................... |
86 |
Settings to adjust your camcorder to the recording conditions ( |
STEADY |
SHOT, etc.) |
|
(REC/OUT SET) menu .................................................................... |
90 |
Recording settings, input and output settings (REC SET/VIDEO OUT, etc.)
(AUDIO SET) menu ........................................................................... |
92 |
Settings for the audio recording (AVCHD AUDIO FORMAT, etc.)
(DISPLAY SET) menu ...................................................................... |
93 |
Display settings (MARKER/DISPLAY OUTPUT, etc.) |
|
(TC/UB SET) menu .......................................................................... |
97 |
Time code settings (TC PRESET/UB PRESET/TC FORMAT, etc.) |
|
(NETWORK SET) menu ................................................................... |
99 |
Settings for the Wi-Fi function (CTRL W/SMARTPHONE, etc.)
(OTHERS) menu ............................................................................ |
100 |
Settings while recording or other basic settings (AREA SET/BEEP, etc.)
Connecting with another device
Creating a standard definition image quality (SD) disc with a recorder, etc.
..................................................................................................103
Troubleshooting |
|
Troubleshooting .................................................................................... |
104 |
Warning indicators and messages ....................................................... |
111 |
Additional Information |
|
Contents of Table
Recording time of movies ..................................................................... |
114 |
Using your camcorder abroad .............................................................. |
116 |
File/folder structure on the recording media ......................................... |
117 |
Maintenance and precautions .............................................................. |
119 |
About the XAVC HD format............................................................... |
119 |
About the AVCHD format .................................................................. |
119 |
About the memory card .................................................................... |
119 |
About the “InfoLITHIUM” battery pack ............................................. |
120 |
About handling of your camcorder ................................................... |
122 |
|
Continued , 17 |
Table of Contents (Continued) |
|
Specifications ....................................................................................... |
125 |
Index .................................................................................................... |
129 |
18
Getting Started
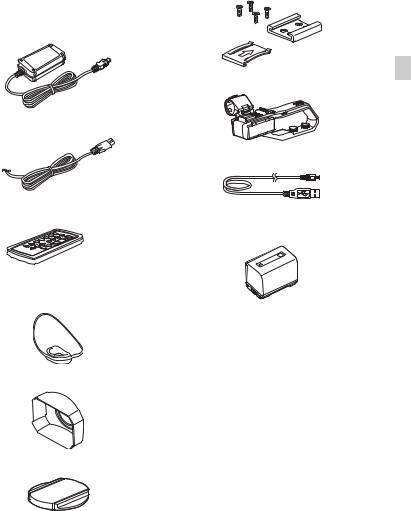
Step 1: Checking supplied accessories
Make sure that you have following items supplied with your camcorder.
The number in the parentheses indicates the number of that item supplied.
Recording media are sold separately.
AC Adaptor (1) (p. 21)
Power cord (mains lead) (1) (p. 21)
Wireless Remote Commander (RMT-845)
(1) (p. 12)
A button-type lithium battery is already installed.
Large eyecup (1) (p. 26)
Lens hood (1) (p. 8)
Lens cap (Attached to lens) (1)
Accessory shoe kit (Accessory shoe (1), Accessory shoe plate (1), screws (4)) (p. 23)
XLR handle unit (1)
USB cable (1)
Rechargeable battery pack (NP-FV70/ FV70A) (1)
CD-ROM “Manuals for Solid-State Memory Camcorder” (1)
Operating Guide (2)
Software Downloads
When the unit is used with a PC connection, download device drivers, plugins, and application software, where applicable, from the Sony Professional products web site.
Sony Professional products web site
homepage: |
|
U.S.A. |
http://pro.sony.com |
Canada |
http://www.sonybiz.ca |
Latin America |
http://sonypro-latin.com |
Europe, Middle East and Africa |
|
|
http://www.pro.sony.eu |
Japan |
http://www.sonybsc.com |
Started Getting
Continued , 19
Step 1: Checking supplied accessories (Continued)
Asia Pacific |
http://pro.sony-asia.com |
Korea |
http://bp.sony.co.kr |
China |
http://pro.sony.com.cn |
Although the data regarding recorded materials are stored over multiple files and folders, you can easily handle the clips without considering its data and directory structure, by using the dedicated application software.
20
Step 2: Charging the battery pack
You can charge the “InfoLITHIUM” battery pack (V series) with the supplied AC Adaptor.
b Notes
•You can use a large capacity battery pack, NPFV100/FV100A (sold separately), with your camcorder. You cannot use NP-FV50/FV50A.
1 Close the LCD screen and store the viewfinder before attaching the battery.
 Battery
DC IN jack

 DC plug
Power cord (mains lead)
AC Adaptor |
To the outlet |
|
•The CHG lamp lights up and charging starts.
•The CHG lamp turns off when the battery is fully charged. Disconnect the AC Adaptor from the DC IN jack.
z Tips
2 Connect the AC Adaptor and power cord from the camcorder to a outlet.
•You can check the remaining battery life with the status check function (p. 72).
Charging time
Approximate time (minute) required when you charge a fully discharged battery pack.
Battery pack |
Full charge time |
|
|
NP-FV70/FV70A 205
Using an outside power source
You can use the AC Adaptor to obtain the AC power. While you are using the AC Adaptor, the battery pack will not lose its charge even when it is attached to your camcorder.
Follow the procedure from 1 to 2 as shown in “Step 2: Charging the battery pack” on page 21.
Started Getting
Continued , 21
Step 2: Charging the battery pack (Continued)
To remove the battery pack
Turn the power off, then slide the BATT release lever to release the battery.
On the battery pack
•Turn the power off before changing the battery pack.
•The CHG lamp flashes during charging, or the Battery Info (p. 72) will not be correctly displayed under the following conditions.
–The battery pack is not attached correctly.
–The battery pack is damaged.
–The battery pack is worn-out.
On the AC Adaptor
•Do not short-circuit the DC plug of the AC Adaptor or battery terminal with any metallic objects. This may cause a malfunction.
To store the battery pack
If the battery pack is not in use for a while, run down the battery and store it (p. 121).
22

Step 3: Attaching the accessory shoe
To mount the accessory shoe
Mount the accessory shoe on the accessory shoe mount as illustrated.
Accessory shoe plate
Accessory shoe
Accessory shoe
Accessory shoe plate
1Lift the edge of the accessory shoe plate and pull it in the direction opposite to that of the arrow on the accessory shoe plate and remove it from the accessory shoe.
2Place the accessory shoe as its protrusions matches recesses of the accessory shoe mount, then fix it to the mount with four screws.
3Insert the accessory shoe plate in the direction of the arrow on the plate surface until the end of the plate engages the end of the shoe.
To remove the accessory shoe
Remove the shoe plate in the same way as step 1 of “To mount the accessory shoe.” Loosen the 4 screws and remove the accessory shoe from the accessory shoe mount.
Started Getting
23
Step 4: Turning on the camcorder and setting the date and time
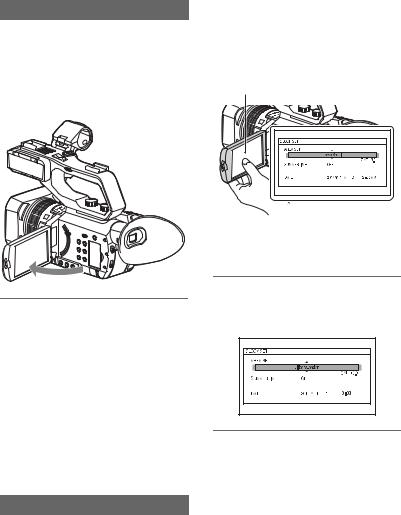
Turning on the camcorder
Open the LCD screen and turn the power on.
You can also turn on the power by extending the viewfinder or by pressing the POWER button.
When you use your camcorder for the first time, the [CLOCK SET] screen appears.
To turn off the power
Close the LCD screen.
If the viewfinder is extended, return it to its original position.
You can also turn off the power by pressing the POWER button.
b Notes
•If warning messages appear on the LCD screen, follow the instructions.
•When recording movies or when connected to another device via USB, the camcorder does not turn off even if the LCD screen is closed and the viewfinder is returned to its original position.
Setting the date and time
Set the date and time when you use your camcorder for the first time.
z Tips
•If you do not use your camcorder for about 3 months, the built-in rechargeable battery gets discharged and the date and time settings may be cleared from the memory. In that case, charge the rechargeable battery and then set the date and time again (p. 124).
LCD screen
When you set the date and time again, press the MENU button, and select
 (OTHERS) t [CLOCK SET].
1 Select your area by pressing the v/V/b/B/EXEC button, then press the button.
2 Set [SUMMERTIME], [Y] (year), [M] (month), [D] (day), hour and minute, by pressing the v/V/b/B/
EXEC button, then press the button.
24
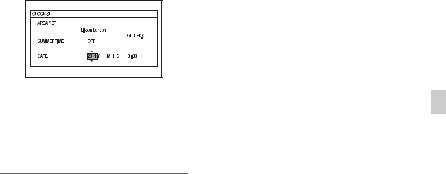
The clock starts.
•Set [SUMMERTIME] to [ON] to move the time forward 1 hour.
•You can set any year up to the year 2037.
•Midnight is indicated as 12:00 AM, and noon as 12:00 PM (when [60i] is selected).
z Tips
•The date and time are automatically recorded on the selected recording media, and can be displayed during playback (ASSIGN button to which [DATA CODE] is assigned, p. 71).
Started Getting
25
Step 5: Adjusting the LCD screen and viewfinder
Using the LCD screen
The LCD screen can be rotated in the range as illustrated below, allowing a person other than the camera operator to see the image.
180 degrees (max.)
Open 90 degrees.
90 degrees (max.)
When the picture in the viewfinder is hard to see
If you cannot see the picture in the viewfinder clearly under bright circumstances, use the supplied large eyecup. To attach the large eyecup, stretch it slightly and fit it over the groove of the eyecup attached to the camcorder. You can attach the large eyecup facing either the right or left side.
Large eyecup (supplied) 
Adjusting the viewfinder
When using the viewfinder, extend it and position your eye near it. If you extend the viewfinder while the LCD
screen is open, the display switches from
the LCD screen to the viewfinder when you position your eye near the viewfinder.
If the viewfinder image appears blurred, turn the lens adjustment dial next to the viewfinder until the image is sharp.
b Notes
• If the viewfinder is extended while the battery pack NP-FV100/FV100A (sold separately) is attached, the large eyecup and battery pack may interfere with each other slightly. However, this does not affect the functionality of the camcorder.
Lens adjustment dial
Move it until the picture becomes clear.
26
Step 6: Preparing the recording media
Types of memory cards you can use in your camcorder
File format |
Types of media |
|
|
|
|
|
|
AVCHD |
SD, SDHC, SDXC memory |
|
|
|
card (Class 4 or faster), |
|
|
|
Memory Stick PRO Duo, |
|
|
|
PRO-HG Duo, XC-HG |
|
|
|
|
|
|
DV |
SD, SDHC, SDXC memory |
|
|
|
card (Class 6 or faster), |
|
|
|
Memory Stick PRO-HG |
|
|
|
Duo, XC-HG |
|
|
|
|
|
|
XAVC HD |
SDXC memory card (Class |
|
|
|
10 or faster, UHS-I), |
|
|
|
Memory Stick XC-HG*1 |
|
|
|
|
|
|
S&Q |
SD, SDHC, SDXC memory |
|
|
|
|||
(AVCHD) |
card (Class 10 or faster) |
|
|
|
|
|
|
S&Q (XAVC |
SDXC memory card (UHS-I |
|
|
HD) |
U3 (UHS-I Speed Class 3)) |
|
|
|
|
|
|
*1 Standard mode only
Open the cover, and insert the memory card with the notched edge in the direction as illustrated until it clicks into place.
Memory card slot A
Started Getting
Memory card slot B
Note the direction of the notched corner.
•If you insert a memory card into the slot in the wrong direction, the memory card, the memory card slot, or image data may be damaged.
b Notes
•Operation with all memory cards is not assured.
•Only “Memory Stick PRO Duo” media, which is half the size of standard “Memory Stick” media, or “Memory Stick XC-HG Duo” media, or standard size SD cards can be used with this camcorder.
•See page 114 for the recordable time of memory cards.
•Movies recorded on “Memory Stick XC-HG Duo” media or SDXC memory cards can be imported to or played back on other equipment, such as a computer or A/V device, by connecting the camcorder to the equipment with the USB cable. However, the equipment must support the exFAT file system used for “Memory Stick XC-HG Duo” media and SDXC memory cards. Confirm in advance that the connecting equipment is supporting the exFAT file system. If you connect equipment not supporting the exFAT file system and the format screen appears, do not perform the format. All the data recorded will be lost.
•Memory card slot A accepts either “Memory Stick PRO Duo” media or an SD card. Memory card slot B accepts an SD card only.
To eject the memory card
Lightly push the memory card once.
b Notes
•If [The image database file is corrupted. The media must be restored to use again.] appears, format the memory card (p. 78).
•When inserting or ejecting the memory card, be careful of the memory card popping out and dropping.
Continued , 27
Step 6: Preparing the recording media (Continued)
Selecting the memory card slot to be used for recording
Press the SLOT SELECT button to change which slot is selected for recording. You can confirm the selected slot on the screen.
SLOT SELECT button
b Notes
•You can only select a slot that already has a memory card inserted.
•While movies are being recorded on the memory card, you cannot switch the slot even if you press the SLOT SELECT button.
z Tips
•When only one slot has a memory card inserted, the slot that has the memory card is selected automatically.
28
Recording
Recording
Handle record button

LCD screen 
START/STOP button
Recording movies
Your camcorder records movies on a memory card. The factory setting of recording movies is XAVC HD. Do the following steps to record movies.
1 Press the latches on both sides of the lens cap and remove it.
Recording
Continued , 29
Recording (Continued)
2 Open the LCD screen, and press the START/STOP button (or the handle record button) to start recording.
The recording lamps light up during recording.
To stop the movie recording, press the START/STOP button or the handle record button again.
b Notes
•When [AUTO] is selected in the [MIC SELECT] menu and the XLR handle unit is connected to the camcorder without a microphone attached to the INPUT1 and INPUT2 jacks, the internal microphone is not selected and no audio is recorded. In this case, select [INT MIC]. Refer to page 92.
•When the access lamp is lit or flashing in red, your camcorder is reading or writing data on recording media. Do not shake or apply strong force to your camcorder, do not turn the power off, and do not remove the recording media, battery pack or the AC Adaptor. The image data may be destroyed.
•See page 114 on the recording time of movies.
•If a movie file size exceeds 2 GB while recording in DV or AVCHD format, the camcorder automatically divides the file and creates a new one.
•The menu settings, picture profile settings, and settings made using the AUTO/MANUAL switch are saved when you close the LCD screen and turn off the camcorder. The POWER/CHG lamp flashes while the settings are being stored.
z Tips
•When recording at a setting other than DV, the aspect ratio is fixed to 16:9. When recording in DV mode, you can switch the aspect ratio to 4:3 ([ WIDE REC], p. 90).
•You can change the screen display during recording (p. 71).
•Indicators displayed on the LCD screen during recording are shown on page 13.
•The recording lamps can be set to stay off ([REC LAMP], p. 101).
30
Loading...