


4-170-639-12 (1)
Integrated
Remote Commander
Operating Instructions
RM-VLZ620
© 2010 Sony Corporation

For the customers in the U.S.A.
WARNING
This equipment has been tested and found to comply with the limits for a Class B digital device, pursuant to Part 15 of the FCC Rules.
These limits are designed to provide reasonable protection against harmful interference in a residential installation. This equipment generates, uses, and can radiate radio frequency energy and, if not installed and used in accordance with the instructions, may cause harmful interference to radio communications. However, there is no guarantee that interference will not occur in a particular installation. If this equipment does cause harmful interference to radio or television reception, which can be determined by turning the equipment off and on, the user is encouraged to try to correct the interference by one or more of the following measures:
—Reorient or relocate the receiving antenna.
—Increase the separation between the device and receiver.
—Connect the equipment into an outlet on a circuit different from that to which the receiver is connected.
—Consult the dealer or an experienced radio/TV technician for help.
You are cautioned that any changes or modifications not expressly approved in this manual could void your authority to operate this equipment.
IMPORTANT
Be sure to place the remote control out of the reach of small children or pets, and lock the controls using the Hold function (page 31).
Devices such as air conditioners, heaters, electric appliances, and electric shutters or curtains receiving an infrared signal can be dangerous if misoperated.

Features
The RM-VLZ620 provides centralized control of all of your Audio Video devices, saving the trouble of operating other A/V devices with different remote controls.
The following are its main features.
You can centralize control of all of your Sony devices (page 10).
The RM-VLZ620 is preset at the factory to operate any Sony device.
You can also control non-Sony devices (page 12).
The RM-VLZ620 can be used to operate major manufacturer’s A/V devices by setting the manufacturer’s code.
You can teach the RM-VLZ620 new functions (page 20).
The RM-VLZ620 can learn infrared signals from devices such as lighting, etc.
You can perform a consecutive procedure by simply pressing one button.
The RM-VLZ620 can assign channel numbers to the number buttons, allowing you to select any channel directly with one button (page 27).
The RM-VLZ620 can program up to 12 consecutive procedures to the SYSTEM CONTROL or Device Select buttons (page 28).
You can control up to eight devices.
The RM-VLZ620 can control devices assigned to any of the eight Device Select buttons.
You can assign the following devices: TV
Projector
Cable set top box Satellite receiver IPTV
DVR (digital video recorder) PVR (personal video recorder) DVD player
DVD recorder Blu-ray Disc player HD-DVD player VCR
CD player Cassette deck
DVD Home Theater Amplifier
Receiver
Audio accessory

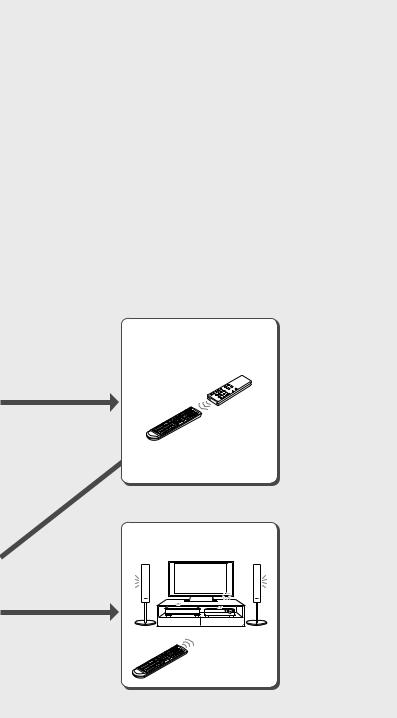
Your RM-VLZ620
Turn on your device by the Device Select button (page 10).
Sony TV
For a Non-Sony Device
Set the manufacturer’s code (page 12).
TV / Téléviseur / TV / TV
|
|
|
Brand |
Code No. |
|
A.R. Systems |
00037, 00556 |
|
Accent |
00037 |
|
Acer |
01339 |
|
Acoustic Solutions |
01037, 01523, 01667 |
|
Action |
00650 |
|
Addison |
00108, 00653 |
|
Admiral |
00463 |
|
AEG |
01037, 01163, 01556 |
|
Aftron |
00891 |
|
Aiko |
00037, 01681 |
|
Aim |
00037, 00706, 00753 |
|
Akai |
00037, 00178, 00208, 00556, |
|
|
00702, 00714, 00753, 00812, |
|
the manufacturer’s cannot be found
Search for the manufacturer’s code (page 15).
Searching...
Operate your device with the preset function (page 36).
Advanced Features
Teach signals (page 20).
If the Manufacturer’s code cannot be found
Program a consecutive procedure (page 28).
For more convenient features

Table of Contents
Features..................................................................................................... |
3 |
Flow Chart for Setting Up Your RM-VLZ620.................................................... |
4 |
Getting Started |
|
Installing the Batteries................................................................................ |
8 |
Location of Controls..................................................................................... |
9 |
Controlling Devices |
|
Controlling Sony Devices with the RM-VLZ620............................................. |
10 |
Setting the Manufacturer’s Code for Non-Sony Devices................................ |
12 |
Setting the manufacturer’s code....................................................................... |
13 |
Searching for the Manufacturer’s Code for Non-Sony Devices........................ |
15 |
Checking the manufacturer’s code you have set............................................. |
16 |
Adjusting the Volume................................................................................ |
17 |
Controlling volume via an amplifier................................................................ |
18 |
Teaching the RM-VLZ620 New Functions (Learning Function)....................... |
20 |
Teaching the Device Select or SYSTEM CONTROL buttons....................... |
24 |
Additional Features |
|
Assigning a Channel to Each Number Button............................................... |
27 |
Programming the RM-VLZ620 Consecutive Procedures................................. |
28 |
Locking the Controls (Hold Function).......................................................... |
31 |
Restoring the Factory Settings................................................................... |
32 |
Other Information |
|
Precautions.............................................................................................. |
33 |
Maintenance............................................................................................. |
33 |
Specifications........................................................................................... |
33 |
Troubleshooting........................................................................................ |
34 |

Table of Preset Functions |
|
TV button................................................................................................. |
37 |
TV......................................................................................................................... |
37 |
Projector.............................................................................................................. |
37 |
DVD button............................................................................................... |
38 |
DVD player/recorder......................................................................................... |
38 |
BD button................................................................................................. |
39 |
Blu-ray Disc/HD-DVD player.......................................................................... |
39 |
CBL (SAT) button........................................................................................ |
40 |
Cable set top box................................................................................................ |
40 |
Satellite receiver.................................................................................................. |
40 |
DVR (PVR) button...................................................................................... |
41 |
Digital video recorder/personal video recorder............................................. |
41 |
VCR button............................................................................................... |
42 |
VCR...................................................................................................................... |
42 |
CD button................................................................................................. |
43 |
CD player............................................................................................................. |
43 |
Cassette deck....................................................................................................... |
43 |
AMP button.............................................................................................. |
44 |
Amplifier/receiver.............................................................................................. |
44 |
DVD Home Theater........................................................................................... |
44 |
Index........................................................................................................ |
46 |
Quick Setup Guide..................................................................................... |
48 |
 Getting Started
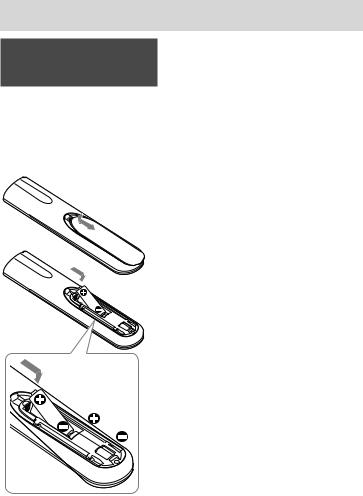
Installing the Batteries
Slide open the battery compartment lid and insert two size AA (R6) dry batteries (not supplied).
Insert the batteries (negative end first) into the battery compartment as shown below.
Note
Even if you replace the batteries, your manufacturer’s code settings or learned/ programmed remote signals remain stored.
Battery life
Under normal conditions, size AA (LR6) alkaline batteries will last up to one year. If the RM-VLZ620 does not operate properly, the batteries might be drained. If this happens, replace both batteries with new ones.
Notes on batteries
Do not use an old battery with a new one, or mix different types of batteries together.
If the electrolyte inside the battery should leak, wipe the contaminated area of the battery compartment with a cloth and replace the old batteries with new ones. To prevent electrolyte from leaking, remove the batteries if you plan not to use the RMVLZ620 for a long period of time.

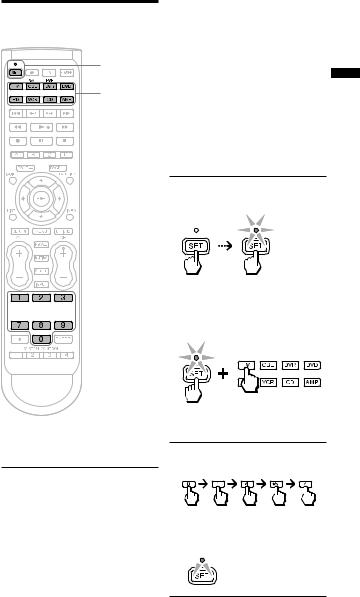
Location of Controls
The function of the buttons varies depending on settings/operating modes.
The “Table of Preset Functions” (page 36) shows how the RMVLZ620 generally operates for each device in the factory preset mode.
1SET indicator
Lights or flashes during settings.
2 SET button
3Device Select buttons
Light with the button press to indicate the current device mode.
4 Player Control buttons
5 A, B, C, D buttons
6 GUIDE button
7 |
buttons |
8 LIST button |
|
9 RETURN button
0 MENU button
qa VOL (volume) +/– buttons qs INPUT button
qd Number buttons qf (dot) button
qg SYSTEM CONTROL buttons qh (open/close) button
qj TV button
Turns the TV on or off. qk POWER button
ql PAGE +/– buttons w; FAVORITES button wa INFO button
ws OPTIONS button wd RECALL button wf MUTING button
wg CH (channel) +/– buttons wh SLEEP button
wj ENTER button
About tactile dots
The number 5, CH +, and buttons each have a tactile dot for ease of use.
Started Getting

 Controlling Devices
Controlling Sony
Devices with the
RM-VLZ620
The RM-VLZ620 is preset at the factory to operate Sony brand A/V devices set to any of the Device Select buttons (see the table below).
Device |
Preset |
Factory |
Select |
device |
setting* |
button |
|
|
TV |
Sony TV |
02473 |
CBL (SAT) |
Cable set top box |
51376 |
|
(non-Sony) |
|
DVR (PVR) |
Sony digital video |
22676 |
|
recorder |
|
DVD |
Sony DVD player |
11033 |
BD |
Sony Blu-ray Disc |
11516 |
|
player |
|
VCR |
Sony VCR |
60032 |
CD |
Sony CD player |
70000 |
AMP |
Sony receiver |
82586 |
*The five-digit code is the preset manufacturer’s code.
Notes
For button functions for each device, see “Table of Preset Functions” (page 36).
The remote control signals may be different for some devices or functions. In this case, teach the remote control appropriate signals to the RM-VLZ620 (page 20).
To control other Sony devices that are not preset at the factory, set the manufacturer’s code for the device (page 12).
Some devices that do not support infrared signals will not work with the RM-VLZ620.
Device Select buttons
Example: To operate a Sony DVD player
1Press the desired Device Select button.
The selected Device Select button lights up when you press it, and turns off when you release it.
2Press any button to control the device.
See “Table of Preset Functions” (page 36) for the functions of buttons for each device.
Note
If the device does not automatically turn on, press POWER to turn it on.
10
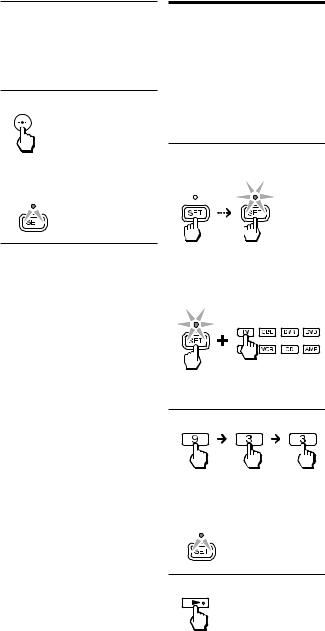
To clear automatic power-on control for a Sony device
SET/SET indicator
Device
Select buttons


 9, 7
9, 7
1Press and hold SET for more than 3 seconds.
While keeping SET held
down, press 
 , then release both buttons.
The SET indicator lights up.
2Enter 9 - 7 - 7.
The SET indicator flashes three times to indicate that the setting mode has been entered.

 3 flashes
3Press the Device Select
button you want to change.
Devices Controlling
The Device Select buttons are preset to automatically turn on the selected device when pressed. To clear auto power-on control, perform the procedure below.
The SET indicator flashes three times, and the indicators turn off.

 3 flashes
To cancel the process
Press SET anytime.
11

To check which Device Select button is set for a Sony device
Press POWER in Step 3 above. The Device Select buttons set for Sony devices will flash in sequence.
Device Select buttons set for nonSony devices will not flash.
To set automatic power-on control again
Perform the same procedure as when you clear the automatic power-on control.
Notes
If you set the manufacturer’s code of a non-Sony device on a Device Select button, you cannot set the automatic power-on control on the button.
If you change to the code of a non-Sony device after setting automatic power-on control, the control will be cleared.
If you attempt automatic power-on control for a non-Sony device, the SET indicator will flash once and turn off (to indicate that you cannot set this control).
If you teach a signal or program a consecutive procedure to a Device Select button to which the automatic power-on control is set, the control will not work. To activate the control, clear the learned signal or programmed consecutive procedure from the Device Select button.
Setting the Manufacturer’s Code for Non-Sony Devices
You can use the RM-VLZ620 for major brand A/V devices. To use with nonSony A/V devices, or Sony devices that are not preset at the factory (see table below for factory setting), you need to set the manufacturer’s code for each device to any of the eight Device Select buttons.
Device |
Preset |
Factory |
Select |
device |
setting* |
button |
|
|
TV |
Sony TV |
02473 |
CBL (SAT) |
Cable set top box |
51376 |
|
(non-Sony) |
|
DVR (PVR) |
Sony digital video |
22676 |
|
recorder |
|
DVD |
Sony DVD player |
11033 |
BD |
Sony Blu-ray Disc |
11516 |
|
player |
|
VCR |
Sony VCR |
60032 |
CD |
Sony CD player |
70000 |
AMP |
Sony receiver |
82586 |
*The five-digit code is the preset manufacturer’s code.
Notes
Only a TV or projector can be assigned to the TV Device Select button. You can assign any device to the other Device Select buttons. For button functions for each device, see “Table of Preset Functions” (page 36).
If no operations are performed for 10 seconds while setting, the setting will be canceled, and must be restarted.
Some devices that do not support infrared signals will not work with the RM-VLZ620.
12
Setting the manufacturer’s code
SET/SET indicator
Device
Select buttons
Device |
Manufacturer’s code |
|
|
TV |
(01454) |
CBL |
|
DVR |
|
DVD |
|
BD |
|
VCR |
|
CD |
|
AMP |
|
Note
If you cannot find the manufacturer’s code, use the Search function (page 15).
Devices Controlling


 Number
buttons
Example: To set up a Philips TV (01454)
1Refer to the supplied “Manufacturer’s Code List,” and find the five-digit manufacturer’s code for the desired device.
If more than one manufacturer’s code is listed, use the code that is listed first.
It is recommended to keep a note of the codes for your devices, for easy reference later.
2Press and hold SET for more than 3 seconds.
The SET indicator lights up.
While keeping SET held down, press the desired Device Select button, then release both buttons.
The selected Device Select button lights up.
3Enter the manufacturer’s code (01454).
The SET indicator flashes three times, and the indicators turn off.

 3 flashes
To cancel the process
Press SET anytime.
13
Note
If the setting is incomplete, the SET indicator flashes once and the indicators turn off. Start again from the beginning.
If you enter a manufacturer’s code that is not listed in the supplied “Manufacturer’s Code List,” the setting will be canceled.
To operate the device
1Press the Device Select button for the device you want to operate. The Device Select button flashes.
2Press POWER to turn on the device.
3Press any button to control the device.
See “Table of Preset Functions” (page 36) for the functions of buttons for each device.
If the RM-VLZ620 does not seem to be working
First, try repeating the setup procedure using another manufacturer’s code (if listed for your device).
Try setting the code number using the Search function (page 15).
The remote control signals may be different for some devices or functions. In this case, teach the remote control appropriate signals to the RM-VLZ620 (page 20).
To clear a manufacturer’s code setting
You can reset the code of any Device Select button to its factory setting.
1Press and hold SET for more than 3 seconds.
The SET indicator lights up. While keeping SET held down, press  .
.
2Enter 9 - 0 - 2.
The SET indicator flashes three times.
3Press the Device Select button you want to reset.
The SET indicator flashes three times and the indicators turn off.
To cancel the process, press SET anytime.
Notes
When you reset a Device Select button, the learned function or programmed consecutive procedure will also be cleared from the button.
To clear all the settings of the RM-VLZ620, see page 32.
14

Searching for the Manufacturer’s Code for Non-Sony Devices
If you cannot find the manufacturer’s code in the supplied “Manufacturer’s Code List,” set the code using the Search function.
Note
If no operations are performed for 10 seconds while setting, the setting will be canceled, and must be restarted.
SET/SET
indicator
Device 
 Select
 buttons


 ,
, 


 ,
,
 9, 2
9, 2
Example: To set the manufacturer’s code for your TV
1 |
Power on the device with its |
|
|
|
power switch. |
|
|
|
Controlling |
||
|
|
|
|
2 |
Aim the RM-VLZ620 at the |
||
|
device you want to set. |
|
|
|
|
|
|
3 |
Press and hold SET for more |
Devices |
|
|
than 3 seconds. |
||
|
|
||
The SET indicator lights up.
While keeping SET held down, press the desired Device Select button, then release both buttons.
The selected Device Select button lights up.
4 Enter 9 - 2 - 2.
The SET indicator flashes three times to indicate that the setting mode has been entered.

 3 flashes
5Press and hold to start searching.
15
6When the device turns off, release the button.
If you overshoot the required code, you can search for the next or previous code using the or button.
7Press  .
.
The SET indicator flashes three times, and the indicators turn off.

 3 flashes
Checking the manufacturer’s code you have set
You can check the manufacturer’s code number you have set.
Example: To check the code number (50831) you have set for the TV
1Press and hold SET for more than 3 seconds.
The SET indicator lights up.
To cancel the process
Press SET anytime.
Notes
While keeping SET held down, press the desired Device Select button, then release both buttons.
If all codes have been cycled through once, the SET indicator and selected Device
Select button flash once and turn off. |
|
|
If the setting is incomplete, the SET |
|
|
indicator flashes once and the indicators |
|
|
turn off. |
|
|
If you still cannot operate the device, even |
The selected Device Select button |
|
after setting the manufacturer’s code using |
||
the Search function, another code may be |
lights up. |
|
available. Repeat the above steps to search |
2 Enter 9 - 3 - 3. |
|
for another code that works for most |
||
functions of your device. |
||
|
The SET indicator flashes three times to indicate that the setting mode has been entered.

 3 flashes
3 Press .
16
 Loading...