


 Loading...
4-231-990-14(1)
Mini Hi-Fi
Component
System
Operating Instructions
Owner’s Record
The model and serial numbers are located on the rear panel. Record the serial number in the space provided below. Refer to them whenever you call upon your Sony dealer regarding this product.
Model No. |
|
Serial No. |
|
MHC-DP700
MHC-DP800AV
© 2001 Sony Corporation

WARNING
To prevent fire or shock hazard, do not expose the unit to rain or moisture.
To avoid electrical shock, do not open the cabinet. Refer servicing to qualified personnel only.
Do not install the appliance in a confined space, such as a bookcase or built-in cabinet.
This appliance is classified as a CLASS 1 LASER product. The CLASS 1 LASER PRODUCT MARKING is located on the rear exterior.
2

Table of Contents |
|
Parts Identification |
|
Main unit ............................................... |
4 |
Remote Control ..................................... |
5 |
digipad operations ................................. |
6 |
Getting Started |
|
Hooking up the system .......................... |
7 |
Inserting two size AA (R6) batteries |
|
into the remote ................................ |
8 |
Setting up your speakers for |
|
Dolby Pro Logic* ............................ |
9 |
Specifying the speaker parameters ...... |
10 |
Setting the time .................................... |
11 |
Saving the power in standby mode ...... |
11 |
CD |
|
Loading a CD ...................................... |
12 |
Playing a CD |
|
— Normal Play/Shuffle Play/ |
|
Repeat Play ................................... |
12 |
Programming the CD tracks |
|
— Program Play ............................ |
13 |
Using the CD display .......................... |
14 |
Tuner |
|
Presetting radio stations ....................... |
15 |
Listening to the radio |
|
— Preset Tuning ........................... |
15 |
Using the Radio Data System (RDS)** . 16 |
|
Tape |
|
Loading a tape ..................................... |
17 |
Playing a tape ...................................... |
17 |
Recording to a tape |
|
— CD Synchro Recording/ |
|
High-Speed Dubbing/Recording |
|
Manually/Program Edit ................. |
18 |
Timer-recording radio programs ......... |
19 |
Sound Adjustment |
|
Adjusting the sound ............................. |
21 |
Selecting the preset effect file ............. |
21 |
Adjusting the sound effects ................. |
21 |
Creating a personal audio effect file |
|
— Personal file .............................. |
22 |
Other Features |
|
Changing the spectrum analyzer |
|
display ........................................... |
23 |
To adjust the brightness of the display ... |
23 |
To listen to multi channel sound ......... |
23 |
Singing along: Karaoke*** ................. |
23 |
About indicators .................................. |
24 |
Falling asleep to music |
|
— Sleep Timer .............................. |
24 |
Waking up to music |
|
— Daily Timer .............................. |
25 |
Hooking Up the Optional |
|
Components |
|
Connecting audio components ............ |
26 |
Additional Information |
|
Precautions .......................................... |
27 |
Troubleshooting ................................... |
28 |
Specifications ...................................... |
30 |
*MHC-DP800AV only.
**European model only.
***Except for North American and European models.
3

Parts Identification
The items are arranged in alphabetical order.
Refer to the pages indicated in parentheses ( ) for details.
Main unit
12 3 4 5
wk |
67 |
|
||
wj |
8 |
|
|
|
wg wh |
9 |
|
||
q; |
wle;eaesedefeg |
|||
wd wf |
qsqa |
|
||
ws |
|
rj |
eh |
|
|
|
|||
|
qd |
rh |
ej |
|
|
qf |
rg |
ek |
|
wa |
rf |
el |
||
qg |
||||
w; |
|
|
||
qh |
|
|
||
|
|
rdrsrar; |
||
|
qj |
|
||
ql |
|
|
||
qk |
|
|
||
2CH/MULTI r; (23) CD wk (8, 12, 13, 18, 19)
CD SYNC HI-DUB qj (18, 19) CLOCK/TIMER SET ea (11, 19,
25)
DECK A Z ql (17) DECK B Z qk (17, 18)
digipad ej (6, 9, 10, 11, 13, 15, 16, 17, 20, 22, 25)
DIGITAL wf (26)
DIGITAL IN (or DIGITAL IN 2) (OPTICAL) jack ws (26)
DIRECTION ed (17, 18, 19) DISC 1–32 (12, 13, 19) DISC SKIP EX-CHANGE 3
(12)
Disc tray 5 (12) DISPLAY wl (11, 14, 16) DOLBY NR ef (17, 18, 19) DSP EDIT rg (21)
EDIT ed (19) EFFECT ra (21, 22)
ENTER ek (9, 10, 11, 13, 15, 16, 19, 20, 22, 23, 25)
FM MODE ef (15) GAME wd (26) GAME MODE rf (21) GROOVE rs (21)
IR receptor qf
KARAOKE PON (Except for North American and European models) e; (23)
MD (VIDEO) wg (26) MIC jack (Except for North
American and European models) w; (23)
MIC LEVEL control (Except for North American and European models) wa (23)
MOVIE MODE eh (21)
MULTI CHANNEL DECODING indicator rj (24)
MUSIC MODE rh (21) P FILE rd (22) PHONES jack qg
PLAY MODE eg (12, 13, 19) PTY (European model only) ed
(16)
REC PAUSE/START qh (18, 19)
REPEAT ef (13) SPECTRUM (North American
and European models only) e; (23)
TAPE A/B wh (17, 18) TIMER SELECT es (20, 25) TOOL MODE el (21) TUNER/BAND wj (15) TUNER MEMORY eg (15) VOLUME control qd
BUTTON DESCRIPTIONS
@/1 (power) 1
Z OPEN/CLOSE (disc tray) 4 nN (play) 6
X (pause) 7 x (stop) 8
. (go back) q; > (go forward) 9 m/– (rewind)qs M/+ (fast forward) qa
4
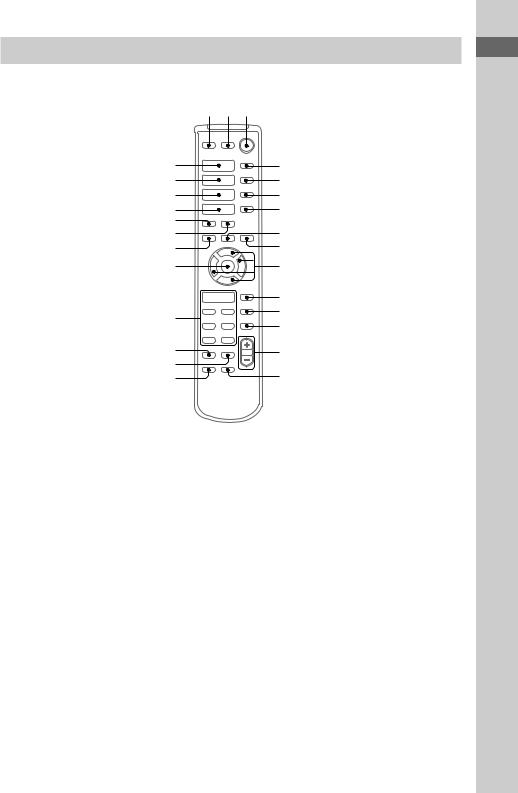
Remote Control
|
1 2 3 |
|
||
wj |
|
|
4 |
|
wh |
|
|
5 |
|
wg |
|
|
6 |
|
wf |
|
|
7 |
|
wd |
|
|
8 |
|
ws |
|
|
||
wa |
|
v |
9 |
|
w; |
b |
B |
q; |
|
|
|
V |
|
|
|
n N |
qa |
||
ql |
. |
> |
qs |
|
m |
M |
qd |
||
|
||||
xX
qk |
qf |
qj |
|
qh |
qg |
2CH/MULTI qh (23) |
P FILE qd (22) |
BUTTON DESCRIPTIONS |
AMP MENU qk (9, 23) |
REPEAT 5 (13) |
|
CD wj (8, 12, 13, 18, 19) |
SLEEP 4 (24) |
@/1 (power) 3 |
CLEAR 6 (13) |
SPEAKER LEVEL qg (10) |
nN (play) ql |
D.SKIP 7 (12) |
SPECTRUM 2 (23) |
X (pause) ql |
DIGITAL wf (26) |
TAPE A/B wg (17, 18) |
x (stop) ql |
DISPLAY 1 (11, 14, 16) |
TOOL MODE qa (21) |
. (go back) ql |
DSP EDIT qs (21) |
TUNER/BAND wh (15) |
> (go forward) ql |
EFFECT ON/OFF qj (21, 22) |
VOL +/–qf |
m (rewind) ql |
ENTER w; (9, 10, 11, 13, 15, 16, |
|
M (fast forward) ql |
19, 20, 22, 23, 25) |
|
v/V/b/B q; |
GAME wd (26) |
|
|
GAME MODE 9 (21) |
|
|
MD (VIDEO) ws (26) |
|
|
MOVIE MODE 8 (21) |
|
|
MUSIC MODE wa (21) |
|
|
5
Identification Parts
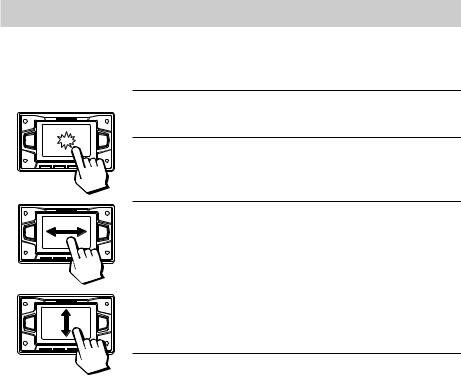
digipad operations
This model is equipped with an unique digipad multi controlling device. You can control various operations with this digipad.
CD, TUNER, TAPE A/B functions
Basic operation |
CD, TUNER, TAPE A/B |
Tap once |
nN (Start playback)* |
|
|
Tap twice |
x (Stop playback) |
* When you tap the digipad while playing a CD, playback pauses. Tap again to resume playback.
Slide from the left |
> (AMS +, preset +)** |
to the right |
|
|
|
Slide from the right |
. (AMS –, preset –)** |
to the left |
|
|
|
|
|
Slide from lower side |
M (Fast forward, tuning +)** |
to upper side |
|
|
|
Slide from upper side |
m (Rewind, tuning –)** |
to lower side |
|
** If you keep on moving, you can operate as pressing and holding these buttons.
Adjusting the equalizer curve in EQ EDIT operations (page 21)
The curve made by sliding the finger is reflected in the display.
Selecting parameters in DSP EDIT and other adjustments (page 21)
Slide in the direction until you reach the value you want (refer to each of the operations).
Notes
•Do not use utensil whose end is sharpened.
•When this unit does not respond to the digipad operations, press the digipad a little harder.
6

Getting Started
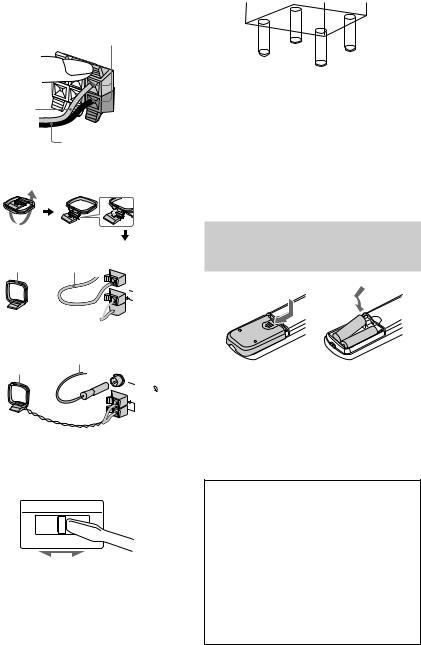
Hooking up the system
Do the following procedure 1 to 6 to hook up your system using the supplied cords and accessories.
|
AM loop antenna |
|
|
FM antenna |
|
Rear speaker* |
|
Rear speaker* |
(Right) |
Center speaker* |
(Left) |
2 |
3 |
2 |
Started Getting
5
4

1 |
2 |
3 |
1 |
|
|
1 |
6 |
Front speaker |
Front speaker |
(Right) |
(Left) |
* MHC-DP800AV only.
1Connect the front speakers.
Connect the speaker cords to the SPEAKER jacks (MHC-DP700) or FRONT SPEAKER jacks (MHC-DP800AV).
Insert only the stripped portion.
R |
L |
|
|
+ |
|
– |
|
Red/Solid (3)
Black/Stripe (#)
2Connect the rear speakers. (MHC-DP800AV only)
Connect the speaker cords to the REAR SPEAKER jacks.
Insert only the stripped portion.
|
+ |
R |
L |
|
|
||
|
|
|
|
|
|
|
+ |
Gray/Solid (3) |
|
|
– |
|
|
|
Black/Stripe (#)
continued
7
Hooking up the system (continued)
3Connect the center speaker. (MHC-DP800AV only)
Connect the speaker cords to the CENTER SPEAKER jacks.
Insert only the stripped portion.
+ |
R |
L |
|
||
|
|
|
|
|
+ |
Gray/Solid (3) |
|
– |
|
|
|
|
|
Black/Stripe (#) |
4Connect the FM/AM antennas.
Set up the AM loop antenna, then connect it.
Jack type A
Extend the FM lead
AM loop antenna antenna horizontally.

 FM75
FM75


 AM
AM
Jack type B
Extend the FM lead antenna horizontally.
AM loop antenna
FM75
COAXIAL
AM
The plug of the FM antenna may vary according to the model you purchased.
5For models with a voltage selector, set VOLTAGE SELECTOR to the position of your local power line voltage.
VOLTAGE SELECTOR
120V 220V 230-240V
6Connect the power cord to a wall outlet.
The demonstration appears in the display. When you press ?/1, the system turns on and the demonstration automatically ends.
If the supplied adaptor on the plug does not fit your wall outlet, detach it from the plug 8 (only for models equipped with an adaptor).
To attach the speaker pads
Attach the supplied speaker pads to the bottom of the speakers to stabilize the speakers and prevent them from slipping.
Notes
•Keep the speaker cords away from the antennas to prevent noise.
•The type of speakers supplied vary according to the model you purchased (see “Specifications” on page 30).
•Do not place the rear speakers on top of a TV. This may cause color distortion in the TV screen.
•For MHC-DP800AV, be sure to connect both left and right rear speakers. Otherwise, the sound will not be heard.
Inserting two size AA (R6)
batteries into the remote
|
] |
|
} |
} |
|
] |
||
|
Tip
When the remote no longer operates the system, replace both batteries with new ones.
Note
If you do not use the remote for a long period of time, remove the batteries to avoid possible damage from battery leakage.
Notice for carrying this system
Do the following to protect the CD mechanism.
1Turn on the system, then press CD.
Make sure that all discs are removed from the unit.
2Hold down CD, then press ?/1 until
“LOCK” appears.
3Release ?/1 first, then release CD.
4Unplug the AC power cord.
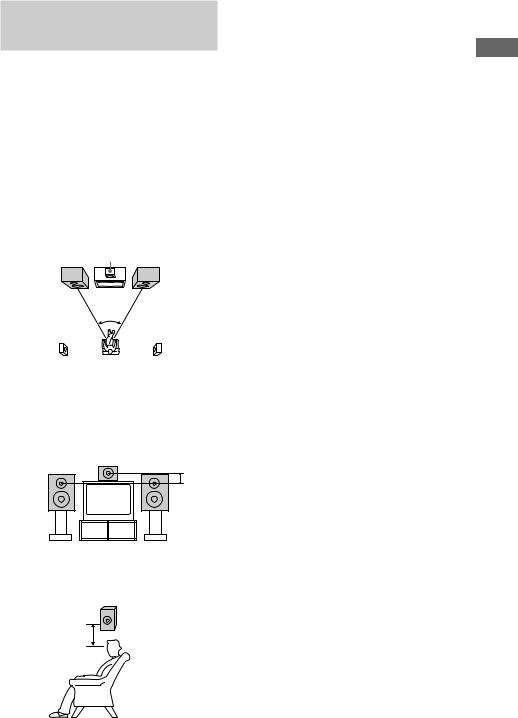
Setting up your speakers
for Dolby Pro Logic
(MHC-DP800AV only)
Dolby Pro Logic Surround improves the sound image by using four separate channels. These channels manipulate the sound to be heard and enhance the action on the screen.
Positioning the speakers
1 Place the front speakers at an angle of
45 degrees from your listening position.
Front |
Center |
Front |
|
speaker |
|||
speaker (L) |
speaker (R) |
||
|
45° |
|
|
Rear |
|
Rear |
|
speaker (L) |
|
speaker (R) |
2 Place the center speaker at about the same height as the front speakers. Align the center speaker with the front speakers or place it slightly behind the front speakers.
3 Place the rear speakers facing each other at about 60 to 90 cm above your listening position.
Rear speaker
60 to 90 cm
Specifying the distance of the speakers
Use the remote for the operation.
1 Press AMP MENU.
2 From your listening position, press v or V repeatedly to select the parameter.
Adjustable parameters are described below.
3 Press b or B repeatedly to select the setting you want.
4 Repeat steps 2 to 3 to set other parameters.
5 Press ENTER.
Tip
You can use the digipad instead of the cursor buttons (v/V/b/B).
Note
If each of the front or rear speakers is not placed at an equal distance from your listening position, set the distance of the closest speaker.
Adjustable parameters
The default settings are in the parentheses.
• FRNT: 1.0 meter to 12.0 meters (2.4 meters) (3 feet to 40 feet (8 feet))*
Front speakers distance.
• CTR: FRNT to 1.5 meters (2.4 meters) (FRNT to 5 feet (8 feet))*
Center speaker distance.
• REAR: FRNT to 4.5 meters (1.5 meters) (FRNT to 15 feet (5 feet))*
Rear speakers distance.
* North American model only.
Note
To enjoy Dolby Pro Logic surround with 2 channel PCM or analog input sources, select “NORMAL SURR” from the sound effect options (see page 21).
Started Getting
9

Specifying the speaker
parameters
Use the remote for the operation.
1 From your listening position, press SPEAKER LEVEL.
Adjustable menus and parameters are described below.
2 Press v or V repeatedly to select the parameter.
3 Press b or B repeatedly to select the setting you want.
4 Repeat steps 2 to 3 to set other parameters.
5 Press ENTER.
Tip
You can use the digipad instead of the cursor buttons (v/V/b/B).
Adjustable parameters
The default settings are in the parentheses.
xBALANCE
• FRNT L___R: (center)
Balance between the front left and right speakers.
• (MHC-DP800AV only) REAR L___R: (center)
Balance between the rear left and right speakers.
Range: 6 dB (L) to 6 dB (R), 13 steps
xLEVEL (MHC-DP800AV only)
•REAR ** dB: (0 dB) Level of the rear speakers.
Range: –6 dB to 6 dB, 1 dB steps
•CTR ** dB: (0 dB)
Level of the center speaker.
Range: –6 dB to 6 dB, 1 dB steps
• SW ** dB: (10 dB) Level of the sub woofer.
Range: –10 dB to 10 dB, 1 dB steps
xLFE
• LFE *****: (0 dB)
Level of the LFE (Low Frequency Effect) channel output.
Range: OFF, –20 dB to 0 dB, 1 dB steps “OFF” cuts the sound of the LFE channel. However, the low frequency sound of the speakers are output from the sub woofer. “–20 dB” to “0 dB” settings allow you to attenuate the LFE signal. “0 dB” outputs the full LFE signal at the mix level determined by the recording engineer.
xD.COMP.
• D.COMP.: (STD)
Dynamic range compression. Range: OFF, 0.1 to 0.9, STD, MAX
“OFF” does not compress the dynamic range. “0.1” to “0.9” settings allow you to compress the dynamic range in small steps. “STD” reproduces the sound track with the dynamic range intended by the recording engineer. “MAX” provides a great compression of the dynamic range.
x T.TONE (MHC-DP800AV only)
• T.TONE: (OFF) Test tone output. Range: OFF, ON
“ON” outputs the test tone from each speaker in sequence. Adjust the LEVEL and BALANCE parameters so that the volume level of the test tone from each speaker sounds the same using the remote from your listening position. Select “OFF” to turn off the test tone.
Notes
•When you adjust the level of the sub woofer, set T.TONE to “OFF”.
•Dynamic range compression is possible with Dolby Digital sources only.
10
Loading...