


4-296-931-12(1)
Multi Disc Player |
Operating Instructions US |
|
Owner’s Record
The model and serial numbers are located on the bottom of the unit. Record the serial number in the space provided below.
Refer to these numbers whenever you call upon your Sony dealer regarding this product.
Model No. MEX-DV1707U/DV1700U Serial No.
MEX-DV1707U/DV1700U

Be sure to install this unit in the dashboard of the car for safety. For installation and connections,
see the supplied installation/connections manual.
Warning
To prevent fire or shock hazard, do not expose the unit to rain or moisture. To avoid electrical shock, do not open
the cabinet. Refer servicing to qualified personnel only.
This equipment has been tested and found to comply with the limits for a Class B digital device, pursuant to Part 15 of the FCC Rules.
These limits are designed to provide reasonable protection against harmful interference in a residential installation. This equipment generates, uses, and can radiate radio frequency energy and, if not installed and used in accordance with the instructions, may cause harmful interference to radio communications. However, there is no guarantee that interference will not occur in a particular installation. If this equipment does cause harmful interference to radio or television reception, which can be determined by turning the equipment off and on, the user is encouraged to try to correct the interference by one or more of the following measures:
–Reorient or relocate the receiving antenna.
–Increase the separation between the equipment and receiver.
–Connect the equipment into an outlet on a circuit different from that to which the receiver is connected.
–Consult the dealer or an experienced radio/TV technician for help.
You are cautioned that any changes or modifications not expressly approved in this manual could void your authority to operate this equipment.
CAUTION
The use of optical instruments with this product will increase eye hazard. As the laser beam used in this CD/DVD player is harmful to eyes, do not attempt to disassemble the cabinet.
Refer servicing to qualified personnel only.
Except for U.S. models
This label is located on the bottom of the chassis.
For the State of California, USA only
Perchlorate Material – special handling may apply, See www.dtsc.ca.gov/hazardouswaste/perchlorate Perchlorate Material: Lithium battery contains perchlorate
Note on the lithium battery
Do not expose the battery to excessive heat such as direct sunlight, fire or the like.
Warning if your car’s ignition has no ACC position
Be sure to set the Auto Off function (page 46).
The unit will shut off completely and automatically in the set time after the unit is turned off, which prevents battery drain.
If you do not set the Auto Off function, press and hold until the
display disappears each time you turn the ignition off.
To cancel the demonstration (DEMO) display, see page 47.
On safety
• Comply with the traffic laws in your country.
2
•For your safety, the monitor connected to the VIDEO OUT turns off automatically when the parking brake is not applied.
Preventing an accident
Pictures appear only after you park the car and set the parking brake.
If the car starts moving during video playback, pictures from the VIDEO OUT automatically disappear after displaying the following caution.
The pictures on the screen are turned off, but audio source can be heard.
Video blocked for your safety.
Do not operate the unit or watch the monitor while driving.
Copyrights
This product incorporates copyright protection technology that is protected by U.S. patents and other intellectual property rights. Use of this copyright protection technology must be authorized by Macrovision, and is intended for home and other limited viewing uses only unless otherwise authorized by Macrovision. Reverse engineering or disassembly is prohibited.
US and foreign patents licensed from Dolby Laboratories.
Manufactured under license from Dolby Laboratories. “Dolby” and the double-D
symbol are trademarks of Dolby Laboratories.
“DVD VIDEO,” “DVD-R,” “DVD-RW,” “DVD+R,” and “DVD+RW” are trademarks.
All other trademarks are trademarks of their respective owners.
SiriusXM subscriptions and Satellite Radio Tuner module sold separately. www.siriusxm.com.
Sirius, XM and all related marks and logos are trademarks of Sirius XM Radio Inc. and its subsidiaries. All other marks and logos are the property of their respective owners. All rights reserved.
ZAPPIN and Quick-BrowZer are trademarks of Sony Corporation.
Windows Media is either a registered trademark or trademark of Microsoft Corporation in the United States and/or other countries.
This product contains technology subject to certain intellectual property rights of Microsoft. Use or distribution of this technology outside of this product is prohibited without the appropriate license(s) from Microsoft.
iPhone®, iPod®, iPod classic®, iPod nano®, and iPod touch® are
trademarks of Apple Inc., registered in the U.S. and other countries.
MPEG Layer-3 audio coding technology and patents licensed from Fraunhofer IIS and Thomson.
THIS PRODUCT IS LICENSED UNDER THE MPEG-4 VISUAL PATENT PORTFOLIO LICENSE FOR THE PERSONAL AND NON-COMMERCIAL USE OF A CONSUMER FOR DECODING MPEG-4 VIDEO THAT WAS ENCODED BY A CONSUMER ENGAGED IN A PERSONAL AND NON-COMMERCIAL ACTIVITY AND/OR WAS OBTAINED FROM A VIDEO PROVIDER LICENSED BY MPEG LA TO PROVIDE MPEG-4 VIDEO. NO LICENSE IS GRANTED OR SHALL BE IMPLIED FOR ANY OTHER USE. ADDITIONAL INFORMATION
INCLUDING THAT RELATING TO
3
PROMOTIONAL, INTERNAL AND COMMERCIAL USES AND LICENSING MAY BE OBTAINED FROM MPEG LA, LLC. SEE HTTP://WWW.MPEGLA.COM
4

Table of contents
Copyrights . . . . . . . . . . . . . . . . . . . . . . . . . . . . . . . . . . . . . . . . . . . . . . . . . . . . . . . . . . . . . . . 3 Playable discs and symbols used in this manual . . . . . . . . . . . . . . . . . . . . . . . . . . . . . . . 7
Location and function of controls . . . . . . . . . . . . . . . . . . . . . . . . . . . . . . . . . . . . . 8 Getting Started . . . . . . . . . . . . . . . . . . . . . . . . . . . . . . . . . . . . . . . . . . . . . . . . . . . . 12
Performing initial setup. . . . . . . . . . . . . . . . . . . . . . . . . . . . . . . . . . . . . . . . . . . . . . . . . . .12 Detaching the front panel . . . . . . . . . . . . . . . . . . . . . . . . . . . . . . . . . . . . . . . . . . . . . . . . .12
Basic Operations. . . . . . . . . . . . . . . . . . . . . . . . . . . . . . . . . . . . . . . . . . . . . . . . . . . 13
Listening to the radio . . . . . . . . . . . . . . . . . . . . . . . . . . . . . . . . . . . . . . . . . . . . . . . . . . . . .13 Playing video discs . . . . . . . . . . . . . . . . . . . . . . . . . . . . . . . . . . . . . . . . . . . . . . . . . . . . . . .14 Playing audio discs . . . . . . . . . . . . . . . . . . . . . . . . . . . . . . . . . . . . . . . . . . . . . . . . . . . . . . .16 Playing a USB device . . . . . . . . . . . . . . . . . . . . . . . . . . . . . . . . . . . . . . . . . . . . . . . . . . . . .17 Playing an iPod . . . . . . . . . . . . . . . . . . . . . . . . . . . . . . . . . . . . . . . . . . . . . . . . . . . . . . . . . .19
Advanced Operations — Radio . . . . . . . . . . . . . . . . . . . . . . . . . . . . . . . . . . . . . . 21
Storing and receiving stations. . . . . . . . . . . . . . . . . . . . . . . . . . . . . . . . . . . . . . . . . . . . . .21 RDS. . . . . . . . . . . . . . . . . . . . . . . . . . . . . . . . . . . . . . . . . . . . . . . . . . . . . . . . . . . . . . . . . . . .21
Advanced Operations — Discs. . . . . . . . . . . . . . . . . . . . . . . . . . . . . . . . . . . . . . . 23
Playing JPEG files . . . . . . . . . . . . . . . . . . . . . . . . . . . . . . . . . . . . . . . . . . . . . . . . . . . . . . . .23 Using PBC functions — Playback control . . . . . . . . . . . . . . . . . . . . . . . . . . . . . . . . . . .23 Using play mode menu . . . . . . . . . . . . . . . . . . . . . . . . . . . . . . . . . . . . . . . . . . . . . . . . . . .24 Viewing time/text information of the disc . . . . . . . . . . . . . . . . . . . . . . . . . . . . . . . . . . .25 Configuring audio settings . . . . . . . . . . . . . . . . . . . . . . . . . . . . . . . . . . . . . . . . . . . . . . . .26 Magnifying pictures . . . . . . . . . . . . . . . . . . . . . . . . . . . . . . . . . . . . . . . . . . . . . . . . . . . . . .28 Adjusting the picture quality — Picture EQ. . . . . . . . . . . . . . . . . . . . . . . . . . . . . . . . . .28 Repeat and shuffle play . . . . . . . . . . . . . . . . . . . . . . . . . . . . . . . . . . . . . . . . . . . . . . . . . . .30 Direct search play . . . . . . . . . . . . . . . . . . . . . . . . . . . . . . . . . . . . . . . . . . . . . . . . . . . . . . . .31 Listing up tracks/images/video files — Quick-BrowZer. . . . . . . . . . . . . . . . . . . . . . . .32 Viewing audio disc information. . . . . . . . . . . . . . . . . . . . . . . . . . . . . . . . . . . . . . . . . . . .33
Advanced Operations — USB Devices . . . . . . . . . . . . . . . . . . . . . . . . . . . . . . . . 33
Display items during playback . . . . . . . . . . . . . . . . . . . . . . . . . . . . . . . . . . . . . . . . . . . . .33 Repeat and shuffle play . . . . . . . . . . . . . . . . . . . . . . . . . . . . . . . . . . . . . . . . . . . . . . . . . . .34 Searching a track by listening to track passages — ZAPPIN™ . . . . . . . . . . . . . . . . . . .34
Advanced Operations — iPod . . . . . . . . . . . . . . . . . . . . . . . . . . . . . . . . . . . . . . . 35
Display items during playback . . . . . . . . . . . . . . . . . . . . . . . . . . . . . . . . . . . . . . . . . . . . .35 Setting the play mode. . . . . . . . . . . . . . . . . . . . . . . . . . . . . . . . . . . . . . . . . . . . . . . . . . . . .35 Operating an iPod directly — Passenger control. . . . . . . . . . . . . . . . . . . . . . . . . . . . . .36
Sound Adjustment . . . . . . . . . . . . . . . . . . . . . . . . . . . . . . . . . . . . . . . . . . . . . . . . . 36
Adjusting the sound characteristics — SOUND . . . . . . . . . . . . . . . . . . . . . . . . . . . . . .36 Enjoying sophisticated sound functions . . . . . . . . . . . . . . . . . . . . . . . . . . . . . . . . . . . . .37 Adjusting the speaker volume . . . . . . . . . . . . . . . . . . . . . . . . . . . . . . . . . . . . . . . . . . . . .40
5
Settings . . . . . . . . . . . . . . . . . . . . . . . . . . . . . . . . . . . . . . . . . . . . . . . . . . . . . . . . . . 41
Visual setup. . . . . . . . . . . . . . . . . . . . . . . . . . . . . . . . . . . . . . . . . . . . . . . . . . . . . . . . . . . . . 41 System setup . . . . . . . . . . . . . . . . . . . . . . . . . . . . . . . . . . . . . . . . . . . . . . . . . . . . . . . . . . . . 45
Using Optional Equipment . . . . . . . . . . . . . . . . . . . . . . . . . . . . . . . . . . . . . . . . . 50
Auxiliary equipment . . . . . . . . . . . . . . . . . . . . . . . . . . . . . . . . . . . . . . . . . . . . . . . . . . . . . 50 SiriusXM tuner (U.S. models only) . . . . . . . . . . . . . . . . . . . . . . . . . . . . . . . . . . . . . . . . . 51
Additional Information. . . . . . . . . . . . . . . . . . . . . . . . . . . . . . . . . . . . . . . . . . . . . 52
Precautions . . . . . . . . . . . . . . . . . . . . . . . . . . . . . . . . . . . . . . . . . . . . . . . . . . . . . . . . . . . . . 52 Maintenance . . . . . . . . . . . . . . . . . . . . . . . . . . . . . . . . . . . . . . . . . . . . . . . . . . . . . . . . . . . . 55 Specifications . . . . . . . . . . . . . . . . . . . . . . . . . . . . . . . . . . . . . . . . . . . . . . . . . . . . . . . . . . . 56 Troubleshooting . . . . . . . . . . . . . . . . . . . . . . . . . . . . . . . . . . . . . . . . . . . . . . . . . . . . . . . . . 57 Language code/area code list . . . . . . . . . . . . . . . . . . . . . . . . . . . . . . . . . . . . . . . . . . . . . . 62
6

Playable discs and symbols used in this manual
This unit can play various video/audio discs.
The following chart helps you to check if a disc is supported by this unit, as well as what functions are available for a given disc type.
|
Disc symbol in manual |
Disc format |
||
|
|
|
|
|
|
|
|
|
DVD VIDEO |
|
|
|
|
|
|
|
|
|
DVD-R*1 / DVD-R DL*1 / DVD-RW*1 |
|
|
|
|
|
VIDEO |
|
|
|
(Video mode/VR mode) |
|
|
|
||
|
|
|
|
|
|
|
|
DVD+R*1 / DVD+R DL*1 / DVD+RW*1 |
|
|
|
|
|
|
|
|
|
|
Video CD |
|
|
|
|
|
AUDIO |
|
|
|
(Ver. 1.0/1.1/2.0) |
|
|
|
||
|
|
|
|
|
|
|
|
CD-ROM*2 / CD-R*2 / CD-RW*2 |
|
|
|
|
|
Audio CD |
|
|
|
|
|
|
|
|
|
|
*1 Audio files can also be stored. |
|
|||
*2 Video/image files can also be stored. |
|
|||
Note
“DVD” may be used in this manual as a general term for DVD VIDEOs, DVD-Rs/DVD-RWs, and DVD+Rs/DVD+RWs.
The following chart shows the supported compression formats and their file types. Available functions differ depending on the format, regardless of disc type. The format symbols below appear next to the description of functions available for that format.
Format symbol in manual |
File type |
|
|
|
MP3 audio file |
|
|
|
WMA audio file |
|
|
|
AAC audio file |
|
|
|
JPEG image file |
|
|
|
Xvid video file |
|
|
MPEG-4 |
MPEG-4 video file |
|
|
Tip
For details on compression formats, see page 54.
Note
Even compatible discs may not be playable on this unit, depending on their recorded condition.
7
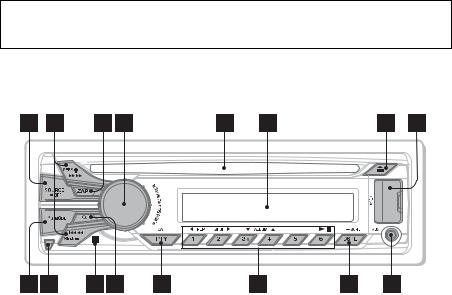
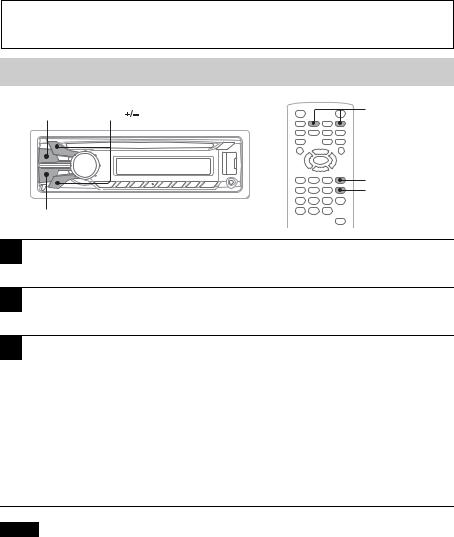
Location and function of controls
Main unit
Refer to the pages listed for details.
SOURCE/OFF button*1 page 12, 13, 14, 16, 18, 19
Press to turn on the power/change the source (Radio/Disc/USB/AUX).
Press for 1 second to turn off the power. Press for more than 2 seconds to shut off completely.
SEEK +/– buttons page 13, 15, 17, 23
Disc*3/USB:
Press to skip a chapter/track/scene/file. Press and hold momentarily to reverse/ fast-forward disc.
Press and hold to reverse/fast-forward track.
Radio:
Press to tune in stations automatically. Press and hold to find a station manually.
ZAP button page 34
To enter the ZAPPIN™ mode.
Control dial/SOUND/ENTER button page 12, 20, 21, 34
Rotate to adjust the volume/adjust a setting.
Press to open the sound menu/apply a setting.
Press and hold to open the system setup menu.
Disc slot page 14, 16
Display window
(eject) button page 14, 16
USB connector page 18, 19
8

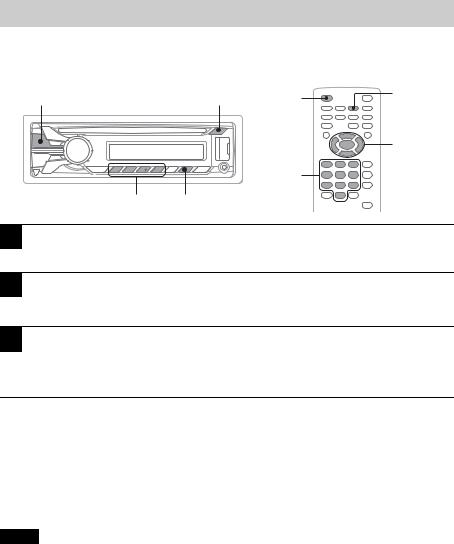
 (BACK)/MODE*1 button page 13, 19, 21, 32, 35, 36, 50
Press to return to the previous display/ move to the upper level/exit the system setup menu or sound menu/select the radio band (FM/AM)/select an auxiliary device connected to the AUX input jack (front) or AUX IN terminal (rear)/select the play mode of iPod.
Press and hold to enter/cancel the passenger control.
Front panel release button page 12
Receptor for the card remote commander
 (BROWSE) button page 20, 32
To enter the Quick-BrowZer mode.*4
PTY (program type)/CAT*5 button page 21
To select PTY in RDS.
Number buttons
Disc/USB:
: REP page 14, 15, 30, 34, 35: SHUF page 14, 15, 30, 34, 35
*2/ : ALBUM ( / ) page 14, 15, 17, 23, 35
Press to skip an album or folder/move the cursor.
Press and hold to skip albums or folders
continuously.
: (Play/Pause) page 14, 15, 16, 17, 23
Radio:
Press to receive stored stations. Press and hold to store stations.
DSPL (display)/SCRL (scroll) button page 25, 33, 50
Press to change display items.
Press and hold to scroll the display item.
AUX input jack page 50
To connect a portable audio/video*6 device.
*1 If a SiriusXM tuner is connected (U.S. models only): When is pressed, the
connected device (“SIRIUSXM”) will appear on the display. Furthermore, if is pressed, you can switch the SiriusXM tuner band.
*2 This button has a tactile dot.
*3 Operation differs depending on the disc (page 15, 17).
*4 When a CD/MP3/WMA/AAC/JPEG/Xvid/
MPEG-4 is played.
*5 When the SiriusXM tuner is connected (U.S. models only).
*6 iPod with video only.
Note
When ejecting/inserting a disc, keep any USB devices disconnected to avoid damage to the disc.
9
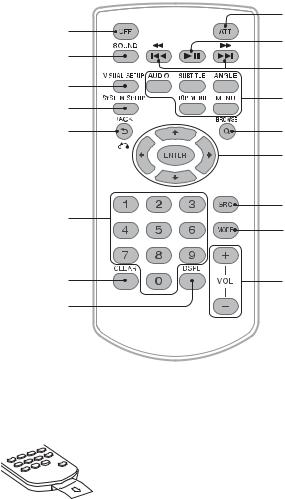
Card remote commander RM-X168
9
1 |
0 |
|
2 |
||
qa |
||
|
||
3 |
qs |
|
4 |
||
|
||
5 |
qd |
|
|
qf |
|
6 |
qg |
|
qh |
||
|
||
7 |
qj |
|
8 |
|
•Refer to the pages listed for details.
•Remove the insulation film before use.
OFF button page 14, 16, 18, 19
Press to turn off/stop the source. Press and hold to shut off completely.
SOUND button page 36, 38
To open the sound menu.
VISUAL SETUP button page 23, 27, 28, 29, 30, 31, 38, 41
To open the play mode/visual setup menu.
SYSTEM SETUP button page 21, 28, 39, 40, 45, 50, 51
To open the system setup menu.
 (BACK)/ button page 23, 24, 32, 36, 39, 41
To return to the previous display/move to the upper level/exit the system setup menu or sound menu/return to the menu on a VCD*1.
10
Number buttons page 14, 15, 21, 23, 24, 31, 32
Disc/USB:
To locate a title/chapter/track.
Radio:
Press to receive stored stations. Press and hold to store stations.
CLEAR button page 32
To delete an entered number.
DSPL (display) button page 25, 33, 50
ATT (attenuate) button
To attenuate the sound (to cancel, press again).
(play/pause) button page 14, 15, 16, 17, 23
/ buttons page 13, 15, 17, 23
Disc*2/USB:
Press to skip a chapter/track/scene/file. Press and hold momentarily to reverse/ fast-forward disc.
Press and hold to reverse/fast-forward track.
Radio:
Press to tune in stations automatically. Press and hold to find a station manually.
DVD playback setting buttons
: page 15, 26
To change the audio language/format. (For VCD/CD/MP3/WMA/AAC/ MPEG-4/Xvid, to change the audio
channel.)
: page 15
To change the subtitle language.
: page 15
To change the viewing angle.
: page 15
To open the top menu on a DVD.
: page 15
To open the menu on a disc.
 (BROWSE) button page 20, 32
To enter the Quick-BrowZer mode.*3
/ / / (cursor)/ENTER buttons
To move the cursor and apply a setting.
SRC (source) button*4 page 13, 18, 19, 21, 51
To turn on; change the source (Radio/ Disc/USB/AUX).
MODE button*4 page 13, 19, 21, 35, 36, 50
Press to select the radio band (FM/ AM)/select an auxiliary device connected to the AUX input jack (front) or AUX IN terminal (rear)/select the play mode of iPod.
Press and hold to enter/cancel the passenger control.
VOL (volume) +/– buttons page 19
*1 When playing with PBC function.
*2 Operation differs depending on the disc (page 15, 17).
*3 When a CD/MP3/WMA/AAC/JPEG/Xvid/
MPEG-4 is played.
*4 If a SiriusXM tuner is connected (U.S. models only): When is pressed, the connected device (“SIRIUSXM”) will appear on the display. Furthermore, if is pressed, you can switch the SiriusXM tuner band.
Note
If the unit is turned off and the display
disappears, it cannot be operated with the card remote commander unless on
the main unit is pressed, or a disc is inserted to activate the unit first.
11
Getting Started
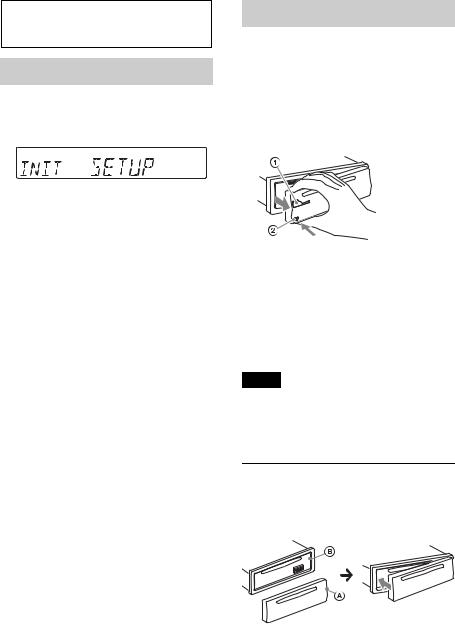
Performing initial setup
When you first turn on the unit after purchasing it, the display for initial speaker setup appears.
Be sure to set correctly following the procedure below to enjoy the various sound functions of this unit.
To skip the initial setup, press, or insert a disc.
1Press the control dial in the initial setup display.
2Rotate the control dial to set the audio output, then press it.
If a subwoofer is connected, select “SUB OUT.”
If a power amplifier is connected, select “REAR OUT.”
If neither subwoofer or power amplifier is connected, you can select either “SUB OUT” or “REAR OUT.”
3Rotate the control dial to select your listening position, then press it.
Select “FRONT L” if your listening position is front left, or select “FRONT R” if front right.
The clock display appears when the setting is complete.
With the card remote commander
Press / instead of rotating the control dial, press instead of pressing the
control dial.
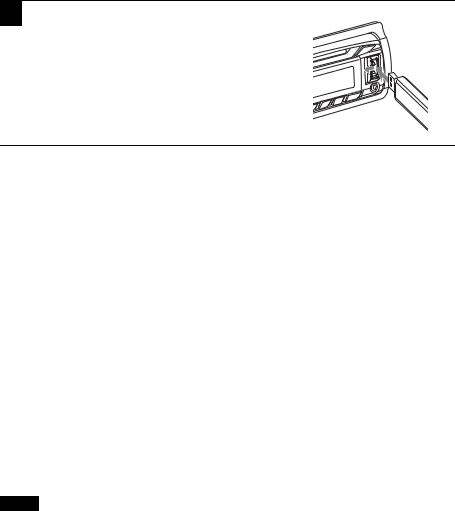
Detaching the front panel
You can detach the front panel of this unit to prevent theft.
1Press and hold .
The unit is turned off.
2Press the front panel release button , then pull it off towards you.
Caution alarm
If you turn the ignition switch to the OFF position without detaching the front panel, the caution alarm will sound for a few seconds. The alarm will only sound if the built-in amplifier is used.
Note
Do not subject the front panel to heat/high temperature or moisture. Avoid leaving it in a parked car or on a dashboard/rear tray.
Attaching the front panel
Engage part of the front panel with partof the unit, as illustrated, and push the left side into position until it clicks.
12
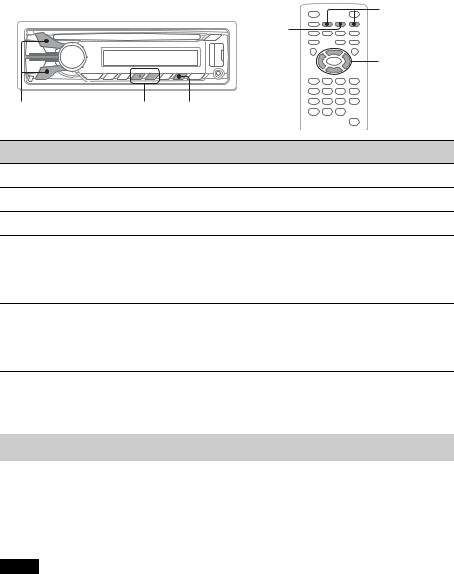
Basic Operations
Listening to the radio
.m/M>
SOURCE/OFF SEEK
SRC
MODE
MODE
1Press repeatedly until “TUNER” appears.
2Press repeatedly until the desired band (FM1, FM2, FM3, AM1 or AM2) appears.
3Perform tuning.
To tune automatically
Press +/–.
Scanning stops when the unit receives a station. Repeat this procedure until the desired station is received.
To tune manually
Press and hold +/– to locate the approximate frequency, then press+/– repeatedly to fine adjust to the desired frequency.
Tip
For details on other radio functions, see “Advanced Operations — Radio” on page 21.
With the card remote commander
Use instead of , and / instead of –/+.
13
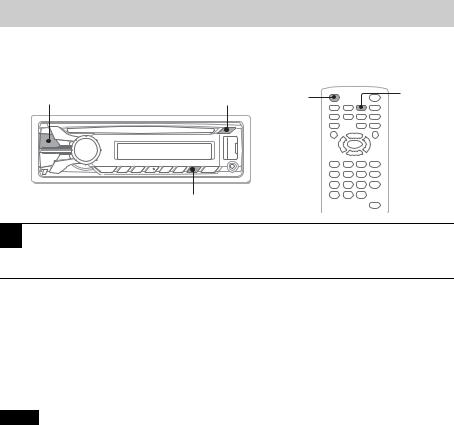
Playing video discs
Depending on the disc, some operations may be different or restricted. Refer to the operating instructions supplied with your disc.
SOURCE/OFF |
Z |
OFF |
u |
|
</M/m/,
ENTER
Number buttons
b/B/V/v u
1Turn on your monitor, then select the input source on your monitor corresponding to this unit.
2Insert the disc (label side up).
Playback starts automatically.
If playback does not start automatically, press .
3If the DVD menu appears, press ( )/ ( )/ ( )/ ( ) to move the cursor, then press ( ) to confirm.
With the card remote commander, press the / / / /number buttons to move the cursor, then press to confirm.
To stop playback
Press for 1 second.
With the card remote commander, press .
To eject the disc
Press .
Note
Discs in DTS format are not supported. The sound is not output if the DTS format is selected.
About the DVD menu
A DVD is divided into several sections, which make up a picture or music feature. These sections are called “titles.” When you play a DVD that contains several titles, you can select a desired title using the DVD’s top menu. For DVDs that allow you to select items such as subtitle/sound language(s), select these items using the DVD menu.
14

Other playback operations
ALBUM |
.m/M> |
u |
SUBTITLE |
AUDIO |
ANGLE |
TOP MENU |
MENU |
|
</M/m/, |
|
ENTER |
Number |
|
buttons |
|
.m/M> b/B/V/v u |
|
To |
Press |
|
|
pause/resume play after pause |
|
|
|
skip a chapter/track/scene/file |
/ |
|
|
reverse/fast-forward disc |
and hold / momentarily; and then |
|
repeatedly to switch the speed (FF1 FF2 FF3 |
|
FF1…) |
|
|
cancel reverse/fast-forward |
|
|
|
show the DVD menu*1 |
Remote: |
|
or |
|
|
select items in the DVD menu*1 |
Main unit: |
|
( )/ ( )/ ( )/ ( ) to move the cursor, |
|
then press ( ) to confirm |
|
Remote: |
|
/ / / /number buttons to move the cursor, then |
|
press to confirm |
|
|
change audio language/format/channel Remote: |
|
(page 26)*1 |
repeatedly until the desired item appears |
|
|
turn off/change the subtitle language*1 |
Remote: |
|
repeatedly until the desired item |
|
appears*2 |
|
|
change the viewing angle*1 |
Remote: |
|
repeatedly until the desired angle number |
|
appears |
|
|
skip an album (folder)*3 |
Main unit: |
|
(ALBUM)/ (ALBUM) |
|
|
skip albums (folders) continuously*3 |
Main unit: |
|
and hold (ALBUM)/ (ALBUM) |
|
|
*1 Unavailable depending on the disc.
15
*2 When the 4-digit input prompt appears, input the language code (page 62) for the desired language.
*3 When a Xvid/MPEG-4 is played.
Note on Xvid/MPEG-4 playback
If a disc contains multiple file types, only the selected file type (audio/video/image) can be played. To play Xvid/MPEG-4 video files of such a disc, press  during playback, select “LIST UP VIDEO FILES,” then select the desired file (page 32).
Playing audio discs
Depending on the disc, some operations may be different or restricted. Refer to the operating instructions supplied with your disc.
SOURCE/OFF |
Z |
OFF |
u |
|
u
1 Insert the disc (label side up).
Playback starts automatically.
If playback does not start automatically, press .
To stop playback
Press for 1 second.
With the card remote commander, press .
To eject the disc
Press .
Note
Discs in DTS format are not supported. The sound is not output if the DTS format is selected.
16
Other playback operations
.m/M>
|
|
u |
|
|
</M/m/, |
.m/M> |
ALBUM |
u |
To |
|
Press |
pause/resume play after pause |
|
|
skip a track |
|
( )/ ( ) |
reverse/fast-forward track |
|
and hold / |
skip an album* |
|
Main unit: |
|
|
(ALBUM)/ (ALBUM) |
|
|
Remote: |
|
|
/ |
skip albums continuously* |
|
Main unit: |
|
|
and hold (ALBUM)/ (ALBUM) |
Remote:
and hold /
* When an MP3/WMA/AAC is played.
Playing a USB device
•DRM (Digital Rights Management) files may not be played.
•MSC (Mass Storage Class) and MTP (Media Transfer Protocol) type USB devices compliant with the USB standard can be used.
•Corresponding codec is MP3 (.mp3), WMA (.wma), AAC (.m4a), JPEG (.jpg), Xvid (.avi) and MPEG-4 (.mp4).
•Backup of data in a USB device is recommended.
Notes
•Connect the USB device after starting the engine.
Depending on the USB device, malfunction or damage may occur if it is connected before starting the engine.
•A large-sized file may take time to start playing back.
17
1Open the USB cover, then connect the USB device to the USB connector with its USB.
Playback starts automatically.
If a USB device is already connected, to start playback, press repeatedly until
“USB” appears.
With the card remote commander
Use instead of .
To stop playback
Press for 1 second.
With the card remote commander, press .
To disconnect the USB device
Stop playback, then disconnect.
Do not disconnect during playback, as data in the USB device may be damaged.
About the Quick-BrowZer function
The Quick-BrowZer function allows you to easily search for an item in a USB device containing many albums/tracks. For details, see “Listing up tracks/images/video files — QuickBrowZer” on page 32.
About the ZAPPIN function
The ZAPPIN function allows you to easily search for a track, for example, in shuffle or shuffle repeat mode. For details, see “Searching a track by listening to track passages — ZAPPIN™” on page 34.
Notes
•Do not use USB devices so large or heavy that they may fall down due to vibration, or cause a loose connection.
•Do not detach the front panel during playback of the USB device, otherwise the data may be damaged.
•This unit cannot recognize USB devices via a USB hub.
•If a USB device contains multiple file types, only the selected file type (audio/video/image) can be played.
To play Xvid/MPEG-4 video files or JPEG image files of such a device, press  during playback, select the desired file type (video/image) to list up, then select the desired file (page 32).
18

Playing an iPod
In this manual, “iPod” is used as a general reference for the iPod functions on the iPod and iPhone, unless otherwise specified by the text or illustrations.
SOURCE/OFF Control dial |
OFF |
|
ENTER |
|
M/m |
|
SRC |
|
MODE |
MODE |
VOL |
1Connect the iPod to the USB connector.
Use of the optional USB connection cable RC202IPV is recommended.*1
The following display appears on the iPod screen*2,
then playback starts from the item last played.
If an iPod is already connected, to start playback, press repeatedly until “USB”
appears. (“IPD” appears when iPod is recognized.)
*1 To play videos of iPod with video, use of the RC-202IPV is required. *2 May not appear in the case of an iPod touch or iPhone being
connected, or that iPod was last played back using passenger control.
2Press repeatedly until the desired play mode appears.
The mode changes as follows:
RESUMING*1 ALBUM TRACK GENRE PLAYLIST ARTIST
PODCAST*2
*1 Appears only when the iPod currently playing is connected. *2 May not appear depending on the iPod setting.
3Adjust the volume by rotating the control dial.
With the card remote commander
Use instead of , +/– instead of the control dial.
To stop playback
Press for 1 second.
With the card remote commander, press .
19

To play videos of iPod with video
1 Press  during playback.
2 Rotate the control dial to select “VIDEO,” then press it.
3 Rotate the control dial to select the desired play mode, then press it.
4 Rotate the control dial to select the desired video, then press it.
With the card remote commander, press / instead of rotating the control dial, pressinstead of the control dial.
To disconnect the iPod
Stop playback, then disconnect.
Do not disconnect during playback, as data in the iPod may be damaged.
About the resuming mode
When the iPod currently playing is connected to the dock connector, the mode of this unit changes to resuming mode and playback starts in the mode set by the iPod.
In resuming mode, (REP) and (SHUF) do not function.
About the Quick-BrowZer function
The Quick-BrowZer function allows you to easily search for an item in an iPod containing many categories/tracks. For details, see “Listing up tracks/images/video files — QuickBrowZer” on page 32.
Caution for iPhone
When you connect an iPhone via USB, telephone volume is controlled by iPhone itself. In order to avoid sudden loud sound after a call, do not increase the volume on the unit during a telephone call.
Notes
•An auxiliary device connected to the AUX input jack (front) cannot be selected with an iPod connected to the USB connector.
•Do not detach the front panel during playback of the iPod, otherwise data may be damaged.
•This unit cannot recognize iPod via a USB hub.
Tips
•When the ignition key is turned to the ACC position with the unit on, the iPod will be recharged.
•If the iPod is disconnected during playback, “NO DEV” appears in the display of the unit.
20
 Loading...