


Player Disc Multi
2-581-681-24 (1)
Multi Disc Player
Operating Instructions |
|
|
GB |
|
|
|
|
||
Manual de instrucciones |
|
ES |
||
|
|
|||
|
|
|
|
|
|
|
|
|
CT |
|
|
|
|
|
For installation and connections, see the supplied installation/connections manual.
Para obtener información sobre la instalación y las conexiones, consulte el manual de instalación/conexiones suministrado.
MEX-R1
MEX-R5
© 2005 Sony Corporation

Warning
To prevent fire or shock hazard, do not expose the unit to rain or moisture.
To avoid electrical shock, do not open the cabinet. Refer servicing to qualified personnel only.
CAUTION
The use of optical instruments with this product will increase eye hazard. As the laser beam used in this CD/DVD player is harmful to eyes, do not attempt to disassemble the cabinet.
Refer servicing to qualified personnel only.
This label is located on the bottom of the chassis.
CAUTION :CLASS 1M VISIBLE/INVISIBLE LASER RADIATION WHEN OPEN AND INTERLOCKS DEFEATED. DO NOT VIEW DIRECTLY WITH OPTICAL INSTRUMENTS.
This label is located on the drive unit’s internal chassis.
Warning if your car’s ignition has no ACC position
After turning the ignition off, be sure to press and hold (OFF) on the unit until the display disappears.
Otherwise, the display does not turn off and this causes battery drain.
2

Table of Contents
Welcome! . . . . . . . . . . . . . . . . . . . . . . . . . . . 4 Precautions . . . . . . . . . . . . . . . . . . . . . . . . . . 5 Playable discs . . . . . . . . . . . . . . . . . . . . . . . . 5
Getting Started
Resetting the unit . . . . . . . . . . . . . . . . . . . . . . 8 Setting the clock . . . . . . . . . . . . . . . . . . . . . . 8 DEMO mode . . . . . . . . . . . . . . . . . . . . . . . . . 8 Detaching the front panel . . . . . . . . . . . . . . . 8 Inserting the disc in the unit . . . . . . . . . . . . . 9 Location of controls and basic
operations . . . . . . . . . . . . . . . . . . . . . . . . 10 Menu displays . . . . . . . . . . . . . . . . . . . . . . . 13
Player
Playing discs . . . . . . . . . . . . . . . . . . . . . . . . 15 Resuming playback
— Resume play. . . . . . . . . . . . . . . . . . . . 17 Viewing the disc information
— Time/text information . . . . . . . . . . . . 17 Searching a specific point on a disc
— Scan . . . . . . . . . . . . . . . . . . . . . . . . . . 18 Using the menus on DVDs . . . . . . . . . . . . . 19 Using PBC functions
— PBC (Playback control) . . . . . . . . . . . 19 Playing in various modes
— Repeat play/Shuffle play/
Search play . . . . . . . . . . . . . . . . . . . . . . . 20
Various DVD operations
Changing the audio channels. . . . . . . . . . . . 22 Changing the angles . . . . . . . . . . . . . . . . . . 23 Displaying the subtitles . . . . . . . . . . . . . . . . 24 Magnifying pictures. . . . . . . . . . . . . . . . . . . 24 Changing the picture quality
— Picture EQ . . . . . . . . . . . . . . . . . . . . . 25 Locking discs
— Parental control . . . . . . . . . . . . . . . . . 26
Settings and Adjustments
Using the Setup menu . . . . . . . . . . . . . . . . . 28 Setting the display language or sound track
— Language setup . . . . . . . . . . . . . . . . . 29 Setting the screen
— Screen setup . . . . . . . . . . . . . . . . . . . . 30 Custom settings
— Custom setup . . . . . . . . . . . . . . . . . . . 31 Audio settings
— Audio setup . . . . . . . . . . . . . . . . . . . . 32
Radio
Storing automatically
— BTM . . . . . . . . . . . . . . . . . . . . . . . . . 33 Storing manually. . . . . . . . . . . . . . . . . . . . . 33 Receiving the stored stations . . . . . . . . . . . 33 Tuning automatically . . . . . . . . . . . . . . . . . 33 Receiving a station through a list
— list-up. . . . . . . . . . . . . . . . . . . . . . . . . 33
Other functions
Adjusting the sound characteristics . . . . . . 34 Adjusting the equalizer curve
— EQ7 Tune . . . . . . . . . . . . . . . . . . . . . 34 Labelling a station/disc . . . . . . . . . . . . . . . . 35 Adjusting unit menu items
— SYSTEM MENU . . . . . . . . . . . . . . . 35 Using optional equipment . . . . . . . . . . . . . . 37 Switching the front/rear output
— Zone × Zone . . . . . . . . . . . . . . . . . . . 39
Additional Information
Maintenance . . . . . . . . . . . . . . . . . . . . . . . . 39 Removing the unit. . . . . . . . . . . . . . . . . . . . 40 Notes on discs . . . . . . . . . . . . . . . . . . . . . . . 41 About MP3 files . . . . . . . . . . . . . . . . . . . . . 41 Note on wireless transmission
(MEX-R5 only) . . . . . . . . . . . . . . . . . . . 41 Specifications . . . . . . . . . . . . . . . . . . . . . . . 42 Troubleshooting . . . . . . . . . . . . . . . . . . . . . 43 Error displays/Messages . . . . . . . . . . . . . . . 46 Glossary . . . . . . . . . . . . . . . . . . . . . . . . . . . 47 Language code list . . . . . . . . . . . . . . . . . . . 49 Index . . . . . . . . . . . . . . . . . . . . . . . . . . . . . . 50
3

Welcome!
Thank you for purchasing this Sony Multi Disc Player. Before operating this unit, read this manual thoroughly and retain it for future reference.
FEATURING:
•DVD, CD, VCD playback compatibility
–Compatible with various disc formats, such as DVD-R/-RW, DVD+R/DVD+RW, etc. DVD-RW: compatible with Video mode and VR mode (various editing available) DVD+RW: compatible with +VR mode (various editing available)
–Plays back up to 1,000 tracks*1 recorded on DVD-R/-RW, DVD+R/+RW or CD-R/-RW in MP3 file format
•2 video outputs (front and rear)*2, 1 Zone × Zone audio output *3, and 1 digital output provided
•Wireless transmission*4: without complicated connections, audio/video signals can be transmitted to the optional monitor XVM-F65WL.
•Zone × Zone : You can listen to the radio, or music from a CD/MD changer (if connected) in the front, and simultaneously output DVD to the rear.
•Picture EQ: You can select desired picture tone from preset settings according to the car interior/ambient light.
•DVD level adjustment: balances the output level differences between PCM, Dolby Digital and DTS, and the volume level differences between disc and source.
•EQ7: You can select an equalizer curve for 7 music types.
•DSO (Dynamic Soundstage Organizer): creates a more ambient sound field, using virtual speaker synthesis, to enhance the sound of speakers, even if they are installed low in the door.
•Optional CD/MD units (both changers and players)*5.
*1 Depends on track length
*2 1 front video output for MEX-R5
*3 MEX-R1 only
*4 MEX-R5 only
*5 This unit works with Sony products only.
About this manual
•Instructions in this manual describe the controls on the card remote commander. You can also use the controls on the unit if they have the same or similar names to those on the card remote commander.
•In this manual, “DVD” is used as the general term for DVD-R/-RW and DVD+R/+RW.
•The meaning of the icons used in this manual is described below:
Icon Meaning
Functions available for DVD VIDEOs, DVD-Rs/DVD-RWs, or DVD+Rs/DVD+RWs in Video mode
Functions available for Video
CDs or CD-Rs/CD-RWs in video
CD format
Functions available for music CDs or CD-Rs/CD-RWs in music CD format
Functions available for files in
MP3 format stored on CD-
ROMs/CD-Rs/CD-RWs/DVD-
Rs/DVD-RWs/DVD+Rs/
DVD+RWs
Functions available for files in
JPEG format stored on CD-
ROMs/CD-Rs/CD-RWs/DVD-
Rs/DVD-RWs/DVD+Rs/
DVD+RWs
4

Precautions
•Do not use the custom functions while driving, or perform any other function which could divert your attention from the road.
•If your car has been parked in direct sunlight, allow the unit to cool off before operating it.
•Power aerial will extend automatically while the unit is operating.
On safety
•Comply with the Traffic Laws in your country.
•For your safety, the monitor connected to the FRONT VIDEO OUT turns off automatically when the parking brake is not applied.
Preventing an accident
The pictures appear only after you park the car and set the parking brake.
When the car starts moving, the pictures coming from the FRONT VIDEO OUT automatically disappear after displaying the following caution.
The monitor connected to the REAR VIDEO OUT is available while the car is in motion. The pictures on the screen are turned off, but CD/MP3 sound can be heard.
For your safety,
the video is blocked.
Do not operate the unit or watch the monitor while driving.
Moisture condensation
On a rainy day or in a very damp area, moisture condensation may occur inside the lenses and display of the unit. Should this occur, the unit will not operate properly. In such a case, remove the disc and wait for about an hour until the moisture has evaporated.
To maintain high sound quality
Be careful not to splash juice or other soft drinks onto the unit or discs.
Playable discs
Format of discs
DVD VIDEO
DVD-R* (MP3/JPEG)
DVD-RW*
Video mode/VR mode (MP3/JPEG)
DVD+R* (MP3/JPEG)
DVD+RW* (MP3/JPEG)
Video CD
Audio CD
CD-R* (MP3/JPEG)
CD-RW* (MP3/JPEG)
* Discs that are not finalized cannot be played.
“DVD VIDEO,” “DVD-R,” “DVD-RW,” “DVD+R,” and “DVD+RW” are trademarks.
DVD
A DVD contains both audio and visual data. A 12 cm disc can hold 7 times the amount of data contained in a CD-ROM, which equals to 4 consecutive hours of playing time (8 hours for double-sided discs). DVDs are divided into 4 types: single sided single layer, single sided double layer, double sided single layer, and double sided double layer.
continue to next page t
5

Video CD (VCD)
A Video CD can contain both audio and visual data on a disc the same size as a regular Audio CD. The playing time is 74 minutes for a standard 12 cm CD.
Audio CD
An Audio CD containing audio data. The playing time is 74 minutes for a standard 12 cm CD.
CD-Recordable (CD-R)
With a CD-R, you can edit audio data. You can write information on a CD-R only once.
CD-Rewritable (CD-RW)
With a CD-RW, you can edit audio data. You can write information on a CD-RW again and again.
CD-Extra
A CD-Extra has two sections (sessions) for audio and data respectively. You can only play the section of audio on this unit.
Notes
•For customers in the region code 3 areas
This unit conforms to the PAL colour system. A disc recorded in a colour system other than PAL, such as NTSC or SECAM, cannot be played.
•For customers in the region code 4 areas
This unit conforms to the NTSC colour system. A disc recorded in a colour system other than NTSC, such as PAL or SECAM, cannot be played.
•You can play DVD-Rs/DVD-RWs, DVD+Rs/ DVD+RWs and CD-Rs/CD-RWs designed for audio with this unit. However, depending on the recorded conditions, you cannot play some discs.
•You cannot play CD-Rs/CD-RWs, DVD-Rs/DVD- RWs or DVD+Rs/DVD+RWs that are not finalized.
•Discs created in Packet Write format cannot be played.
•Recordable discs may not play back correctly if the ambient temperature is high.
•The discs listed below cannot be played on this unit:
–8 cm discs
–CD-ROM (the data other than the MP3 or JPEG files)
–CD-G
–Photo-CD
–VSD (Video single disc)
–DVD-ROM (the data other than the MP3 or JPEG files)
–DVD-RAM
–DVD-Audio
–DVD+R DL (Dual Layer)
–Active-Audio (Data)
–CD-Extra (Data)
–Mixed CD
–SVCD (Super Video CD)
–CDV
–SACD (Super Audio CD)
Note on transparent discs
12 cm discs containing of only an inner 8 cm data portion (the rest is transparent) cannot be played on this unit.
Music discs encoded with copyright protection
This unit is designed to play back discs that conform to the Compact Disc (CD) standard. Recently, various music discs encoded with copyright protection are marketed by some record companies. Please be aware that among those discs, there are some that do not conform to the CD standard and may not be playable and recordable by this product.
6

Region code
This system is used to protect software copyrights.
The region code is located on the bottom of the unit, and only DVDs labelled with an identical region code can be played on this unit.
Region code 
DVDs labelled ALL can be also played on this unit.
If you try to play any other DVD, the message “Cannot play this disc.” will appear on the monitor screen. Depending on the DVD, no region code may be labelled even though playing the DVD is prohibited by area restrictions.
Note on playback operations of DVDs and VCDs
Some playback operations of DVDs and VCDs may be intentionally set by software producers. Since this unit plays DVDs and VCDs according to the disc contents the software producers designed, some playback features may not be available. Also, refer to the instructions supplied with the DVDs or VCDs.
Copyrights
This product incorporates copyright protection technology that is protected by U.S. patents and other intellectual property rights. Use of this copyright protection technology must be authorized by Macrovision, and is intended for home and other limited viewing uses only unless otherwise authorized by Macrovision. Reverse engineering or disassembly is prohibited.
Manufactured under license from Dolby Laboratories.
“Dolby” and the double-D symbol are trademarks of Dolby Laboratories.
“DTS” and “DTS 2.0 + Digital Out” are trademarks of Digital Theater Systems, Inc.
7

Getting Started
Resetting the unit
Before operating the unit for the first time, or after replacing the car battery or changing the connections, you must reset the unit.
Detach the front panel and press the RESET button with a pointed object, such as a ballpoint pen.
RESET button
Note
Pressing the RESET button will erase the clock setting and some stored contents.
Setting the clock
The clock uses a 12-hour digital indication.
|
|
|
ATT |
DVD |
|
OFF |
|
|
|
|
SRC |
MODE |
|
|
|
|
TOP MENU |
+ |
MENU |
ENTER |
SOUND |
|
|
M/m |
SETUP |
|
|
||
|
|
|
ENTER |
|
SYSTEM |
SYSTEM |
LIST |
– |
</, |
MENU |
|
|
||
|
|
|
||
MENU |
Z × Z |
PICTURE |
|
|
|
EQ |
DSO |
EQ7 |
|
|
AUDIO |
SUBTITLE |
ANGLE |
|
1 Press (SYSTEM MENU).
The setup display appears.
2 Press M/m repeatedly until “CLOCK-
ADJ” appears.
3 Press (ENTER).
The hour indication flashes.
4 Press M/m to set the hour and minute.
To move the digital indication, press </,.
5 Press (ENTER).
The clock starts.
To display the clock during playback/reception, set “CLOCK-ON” (page 36).
DEMO mode
When the unit is turned off, the clock is displayed first, then demonstration (DEMO) mode starts the demonstration display.
To cancel the DEMO mode, set “DEMO-OFF” in setup (page 36) while the unit is turned off.
Detaching the front panel
You can detach the front panel of this unit to prevent theft.
Caution alarm
If you turn the ignition switch to the OFF position without detaching the front panel, the caution alarm will sound for a few seconds. The alarm will only sound if the built-in amplifier is used.
1 Press (OFF).
The unit is turned off.
2 Press  , then pull it off towards you.
 (OFF)
(OFF)
Notes
•Do not drop or put excessive pressure on the front panel and display window.
•Do not subject the front panel to heat/high temperature or moisture. Avoid leaving it in a parked car or on a dashboard/rear tray.
Tip
When carrying the front panel, use the supplied front panel case.
8

Attaching the front panel |
Ejecting the disc |
Engage part A of the front panel with part B of the unit, as illustrated, and push the left side into position until it clicks.
A
B
1
2
Open the shutter.
Press Z.
Note
Do not put anything on the inner surface of the front panel.
Inserting the disc in the unit
1 Open the shutter.
2 Insert the disc with the playback side down.
Playback starts. (Depending on the disc, press DVD u to start playback.)
3 Close the shutter.
x
The disc is ejected.
Note
While inserting or ejecting the disc, do not close the shutter. The disc may be caught and damaged.
Tip
The disc can be played with the shutter open or closed.
9
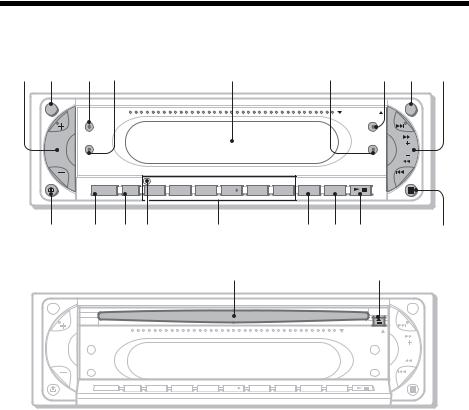
Location of controls and basic operations
Main unit
1 2 3 4 |
5 |
6 |
7 8 9 |
ATT |
|
|
OPEN/CLOSE |
|
|
|
|
Z × Z |
|
|
DSO |
SOUND |
|
|
EQ7 |
REP |
SHUF |
- ALBM + |
DVD |
SOURCE |
MODE |
1 |
2 |
3 |
4 |
5 |
6 |
DSPL |
SCRL |
|
|
|
|
|
0 qa qsqd |
qf |
qg qh qj |
||
OPEN/CLOSE shutter opened |
|
|
||
OFF
SEEK
MEX-R1
MEX-R5 qk
|
ql |
w; |
|
|
|
|
|
|
ATT |
|
|
|
|
|
OFF |
|
|
|
|
|
OPEN/CLOSE |
|
Z × Z |
|
|
|
|
DSO |
SEEK |
SOUND |
|
|
|
|
EQ7 |
|
REP |
SHUF |
- |
ALBM |
+ |
DVD |
|
SOURCE |
MODE |
1 |
2 |
3 |
4 |
5 |
6 |
DSPL |
SCRL |
Refer to the pages listed for details.
a Volume +/– button 34 b ATT (attenuate) button c Z×Z (Zone × Zone) button d SOUND button
e Display window
f EQ7 (equalizer) button g DSO button
h OFF button 8
iSEEK +/– button
Radio:
To tune in stations automatically (press); find
a station manually (press and hold). DVD/CD:
To skip chapters/tracks (press); fast-forward/ reverse a chapter/track (press and hold).
j  (front panel release) button 8 k SOURCE button 39
l MODE button
mRESET button (located behind the front panel) 8
nNumber buttons
Radio:
To receive stored stations (press); store stations (press and hold).
CD/MD*1:
(1): REP 20, 37
(2): SHUF 20, 37
(3)/(4): ALBM –/+*2
To skip albums (press); skip albums
continuously (press and hold). o DSPL button
p SCRL button
To scroll the display items.
q DVD u (play/pause) button
rReceptor for the card remote commander
s Disc slot 9
t Z (eject) button 9
*1 When an MD changer is connected.
*2 When an MP3/JPEG is played and a changer is not connected. If the changer is connected, the operation is different, see page 37.
10
Card remote commander RM-X702
1 |
|
|
|
|
0 |
qj |
2 |
|
|
ATT |
DVD |
qa |
qk |
|
|
|
||||
3 |
OFF |
|
|
|
||
|
|
|
|
qs |
ql |
|
4 |
SRC |
MODE |
|
|
||
+ |
|
|
||||
|
TOP MENU |
MENU |
qd |
w; |
||
5 |
SOUND |
|
|
|
||
SETUP |
|
|
|
|
wa |
|
6 |
|
|
ENTER |
|
qf |
|
SYSTEM |
LIST |
– |
|
|
||
|
|
|
|
|||
7 |
MENU |
|
|
|
|
|
|
PICTURE |
|
|
|
|
|
|
|
|
|
|
|
|
8 |
Z × Z |
EQ |
DSO |
EQ7 |
qg |
ws |
AUDIO |
SUBTITLE |
ANGLE |
|
|||
9 |
1 |
2 |
3 |
|
qh |
|
|
|
|
|
|||
|
4 |
5 |
6 |
+ |
|
|
SYSTEM |
LIST |
– |
|
MENU |
|
|
|
|
PICTURE |
|
|
Z × Z |
EQ |
DSO |
EQ7 |
AUDIO |
SUBTITLE |
ANGLE |
|
1 |
2 |
3 |
|
4 |
5 |
6 |
+ |
7 |
8 |
9 |
VOL |
CLEAR |
|
DSPL |
– |
|
0 |
|
wd wf
wg
wh
wj
a OFF button 15, 17, 19
To power off/stop the source. b MODE button 33, 37
To select the radio band (FM/AM)/select the unit*1.
cSRC (SOURCE) button
To power on/change the source (Radio/DVD/
CD/MD*2/AUX*3).
d TOP MENU button 19
To display the top menu on a DVD. e SOUND button 34
To select sound items. f ENTER button
To complete a setting.
gSETUP button
To display the Setup menu and Play mode
menu.
h SYSTEM MENU button
To enter the unit menu. i LIST button 33, 37
To list up.
jATT (attenuate) button
To attenuate the sound. To cancel, press again.
kDVD u (play/pause) button 9, 15, 16, 17
To start/pause playback.
l./> (previous/next; reverse/fastforward; station tuning) buttons
m MENU button 19
To display the menu on a disc. n </, (cursor) buttons
To move the cursor, or turn the pages. o O (RETURN) button 19, 28, 29
To return to the previous display, or previous operation.
p M/m (cursor) buttons q PICTURE EQ button 25
r Z×Z (Zone × Zone) button 39
To switch the front/rear output. s AUDIO button 22
To change the audio output. t SUBTITLE button 24
To change the subtitle language. u Number buttons
continue to next page t
11

v CLEAR button 21
To cancel entered numbers.
wDSO button 4
To select the DSO mode (1, 2, 3 or OFF). The larger the number, the more enhanced the effect.
xEQ7 (equalizer) button
To select an equalizer type (XPLOD,
VOCAL, CLUB, JAZZ, NEW AGE, ROCK, CUSTOM or OFF).
y ANGLE button 23
To change the viewing angle. z VOL (volume) +/– button
To adjust the volume.
wj DSPL button 15, 17, 18, 35
To change display items.
*1 When a CD/MD changer is connected.
*2 When an MD changer is connected.
*3 When an optional Sony portable device is connected.
Note
If the unit is turned off and the display disappears, it cannot be operated with the card remote commander unless (SOURCE) on the main unit is pressed, or a disc is inserted to activate the unit first.
Tip
For details on how to replace the battery, see “Replacing the lithium battery of the card remote commander” on page 39.
12
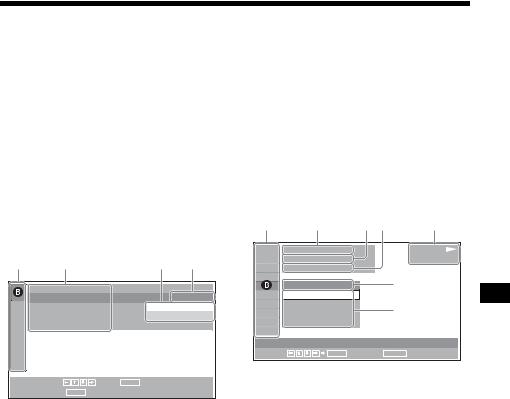
Menu displays
Use the menus of this unit to adjust the various functions and settings for playback.
The displaying menu differs depending on the status of the unit.
Setup menu
Appears when pressing (SETUP) while playback is stopped.
To select the item
Press </M/m/,, then press (ENTER).
To turn off the Setup menu
Press (SETUP).
Example: When “LANGUAGE SETUP” is selected.
A |
C |
D |
E |
|
LANGUAGE SETUP |
|
|
|
OSD : |
|
ENGLISH |
|
MENU : |
|
JAPANESE |
|
AUDIO : |
|
ENGLISH |
|
SUBTITLE : |
|
ENGLISH |
To set, press |
, then ENTER . |
|
|
To quit, press SETUP . |
|
|
|
ASetup items
BSelected item
CSetting items
DOptions
ECurrent setting
Play mode menu 


Appears when pressing (SETUP) during playback.
To select the item
Press </M/m/,, then press (ENTER).
To turn off the Play mode menu
Press (SETUP).
Note
The items on the menu, and the operation procedures differ depending on the disc.
Example: When playing a DVD
A |
C |
D E |
F |
12(67) |
|
PLAY |
|
018(034) |
|
DVDVIDEO |
|
T |
1:35:55 |
|
|
1;ENGLISH |
G |
|
|
OFF |
|
|
|
1:ENGLISH |
H |
|
|
2:FRENCH |
|
||
3:SPANISH |
|
|
|
SUBTITLE |
|
|
|
Select : |
ENTER |
Cancel RETURN |
|
APlay mode items BSelected item
CTitle number*1/Total title number*1
DChapter number*2/Total chapter number*2 EElapsed playback time
FPlayback status (NPLAY, XPAUSE, etc.)/ Disc format
GCurrent setting HOptions
*1 Displays the track number for VCDs, album number for JPEG files. When playing VCD with the PBC function on, no indication is displayed.
*2 Displays the image number for JPEG files.
Notes
•While playing back CD/MP3, the Play mode menu cannot be displayed.
•While playing back JPEG files, (SETUP) is active only when the image is fully displayed.
continue to next page t
13

Operation message
Menu operations differ depending on the item selected, and the buttons to be used appear on the bottom of the menu display to assist your operations.
To set, press 


 , then ENTER .
To quit, pressSETUPSETUP .
Selected item name and/or operation massages appear.
Tip
“Operation not possible” appears when the function is not available.
Setup items
LANGUAGE SETUP (page 29)
Switches the languages.
SCREEN SETUP (page 30)
Selects the screen modes.
CUSTOM SETUP (page 31)
Sets the playback operations.
AUDIO SETUP (page 32)
Adjusts the output sound.
RESET (page 29)
Resets all setup items.
Play mode items
 TITLE, TRACK (page 21)
Selects the title, or track to be played.
 CHAPTER (page 21)
Selects the chapter to be played.
 ALBUM (JPEG) (page 21)
Selects the image album to be displayed.
 IMAGE (page 21)
Selects the image to be displayed.
 TIME/TEXT (page 17, 21)
Checks the elapsed time and the remaining playback time. Inputs the time code for picture searching.
Displays DVD text.
 AUDIO (page 22)
Changes the audio setting.
 SUBTITLE (page 24)
Displays the subtitles. Changes the subtitle language.
 ANGLE (page 23)
Changes the angle.
 CENTER ZOOM (page 24)
Magnifies the picture.
 REPEAT (page 20)
Plays the entire disc (all titles/all tracks/ all albums) repeatedly, or one chapter/ track/album repeatedly.
 SHUFFLE (page 20)
Plays titles/chapters/tracks in random order.
 PICTURE EQ (page 25)
Selects the picture quality.
Tip
When “REPEAT” or “SHUFFLE” is activated, or “ANGLE” is available, its check-box lights up in green (e.g.  t
t  ). However, you may not be able to change the angle depending on the scene, even if the check-box is lit in green.
14

Player
Playing discs 


Depending on the disc, some operations may be different or restricted.
Refer to the operating instructions supplied with your disc.
OFF |
|
|
ATT |
DVD |
OFF |
|
|
DVD |
|
|
|
|
|
u |
|
SRC |
MODE |
|
|
|
|
TOP MENU |
+ |
MENU |
|
SOUND |
|
|
</, |
|
SETUP |
|
|
|
|
|
|
ENTER |
|
|
SYSTEM |
LIST |
– |
|
|
MENU |
|
|
|
|
|
PICTURE |
|
|
|
Z × Z |
EQ |
DSO |
EQ7 |
|
AUDIO |
SUBTITLE |
ANGLE |
|
|
1 |
2 |
3 |
|
|
4 |
5 |
6 |
+ |
|
7 |
8 |
9 |
VOL |
|
CLEAR |
|
DSPL |
DSPL |
0 –
–
1Turn on your monitor, then select the input source on your monitor corresponding to this unit.
2Insert a disc.
Playback side down
Playback starts automatically. (Depending on the disc, press DVD u to start playback.) A menu may appear on the screen when a DVD or VCD is inserted.
For details on these menus, see page 19 for DVDs, and page 19 for VCDs.
When “MP3/JPEG” on “CUSTOM SETUP” is set to “JPEG,” a slide show starts automatically if JPEG files are on the disc (page 31).
Each time you press </,, the image rotates every 90º.
Notes
•If a large-size image is rotated, it may take longer to display.
•A JPEG file is designed to be optimally displayed at 640 x 480 pixels. A file in another size may not be displayed correctly, or picture shift (to the left or right) may occur.
•Progressive JPEG files cannot be displayed.
When the disc is inserted
Press DVD u to start playback.
To stop playback/to turn off the unit
Press (OFF).
Tip
You cannot insert a disc while the unit is turned off.
Display items on the CD/MP3 playback
AB
1 |
1 |
0 : 4 2 |
PLAY |
REP |
|
160k |
MP3 |
 : ALBUM NAME 001
  : TRACK NAME 001
  : ID3 INFORMATION
C D
AAlbum number*1/Track number/
Elapsed playback time
BPlayback mode/Bit rate*1*2
CDisc name*3/Album name*1/Track name/ ID3 tag information*1
DPlayback status (NPLAY, XPAUSE, etc.)/ Disc format
*1 Appears only when MP3 files are played.
*2 No indication when VBR (Variable bit rate) is applied.
*3 “NO DISC NAME” or “NO TRACK NAME” appears when the disc or track has no name.
To scroll the text information
Press (DSPL).
Note
“  ” appears in place of the letters other than the alphabet and numbers.
Notes on DVDs with a DTS sound track
DTS audio signal is output at all times; a loud noise may come out from the speakers if you connect the unit to the audio equipment without a DTS decoder. This may cause damage to the speakers, or affect your hearing.
continue to next page t
15

Playback order of MP3 files
MP3 |
Folder |
(album) |
|
|
MP3 file |
|
(track) |
Notes
•The playback order may differ depending on the writing software.
•The unit can play up to 1,000 tracks and 256 albums. Tracks beyond the first 1,000 and albums beyond the first 256 cannot be recognized.
Tips
•If you add numbers (01, 02, 03, etc.) to the front of the track names, the tracks in each folder will be played in numerical order.
•Since a disc with many trees takes longer to start playback, it is recommended that you create albums of no more than two tree levels.
•For details on MP3 files, see “About MP3 files” on page 41.
Additional operations
|
|
ATT |
DVD |
DVD |
OFF |
|
|
|
|
|
|
|
u |
|
|
|
|
|
|
SRC |
MODE |
+ |
|
./> |
|
TOP MENU |
MENU |
|
|
SOUND |
|
|
|
M/m |
SETUP |
|
|
|
|
|
|
ENTER |
|
|
SYSTEM |
LIST |
– |
|
</, |
MENU |
|
|
|
|
|
|
|
|
|
|
PICTURE |
|
|
|
Z × Z |
EQ |
DSO |
EQ7 |
|
AUDIO |
SUBTITLE |
ANGLE |
|
|
To |
Operation |
Pause |
Press DVD u |
|
|
Resume play after |
Press DVD u |
pause |
|
|
|
Go to the next chapter, |
Press > (,) |
track, or scene in |
|
continuous play mode |
|
|
|
Go back to the |
Press . (<) |
previous chapter, |
|
track, or scene in |
|
continuous play mode |
|
|
|
Go to the next album |
Press M* |
|
|
Go to the previous |
Press m* |
album |
|
|
|
Stop play and remove |
Press Z after opening |
the disc |
the shutter of the unit |
|
(page 9) |
|
|
* Available only when MP3 or JPEG files are played.
16
Resuming playback
— Resume play 

The unit stores the point where you stopped playback for up to 20 discs, and starts resuming playback even after the unit is turned off, or the disc being played is ejected.
OFF |
|
|
ATT |
DVD |
OFF |
|
|
DVD |
|
|
|
|
|
u |
|
SRC |
MODE |
|
|
|
|
TOP MENU |
+ |
MENU |
|
SOUND |
|
|
|
|
SETUP |
|
|
|
|
|
|
ENTER |
|
|
SYSTEM |
LIST |
– |
|
|
MENU |
|
|
|
|
|
PICTURE |
|
|
|
Z × Z |
EQ |
DSO |
EQ7 |
|
AUDIO |
SUBTITLE |
ANGLE |
|
Viewing the disc information
— Time/text information
You can check the playing time and remaining time of the current title, chapter, or track. You can also check text information, such as name of title, chapter, file, etc.
AUDIO SUBTITLE ANGLE
1 |
2 |
3 |
|
4 |
5 |
6 |
+ |
7 |
8 |
9 |
VOL |
CLEAR |
|
DSPL |
– |
|
0 |
|
DSPL
1 During playback, press (OFF) to stop.
2 Press DVD u to resume playback.
Playback starts from the point stopped in step 1.
To play from the beginning
After setting “MULTI-DISC RESUME” in “CUSTOM SETUP” to “OFF” (page 31), press Z to eject the disc, then insert the disc again. Select the desired chapter on the DVD menu or the Top menu depending on the disc.
Notes
•MP3 playback will start from the beginning of the last track that was played.
•To use resume playback, make sure that “MULTIDISC RESUME” in “CUSTOM SETUP” is set to “ON” (page 31).
•When storing a resume point for the 21st disc, the stored resume point for the 1st disc is cleared automatically.
•Resume playback is cancelled when the setting for the parental controls is changed.
•Depending on the disc or scene, you cannot use the resume playback.
•If parental control is applied, the resume playback will not work. In this case, playback starts from the beginning of the disc when it is inserted.
Tip
When CD, MP3 files, or JPEG files are played, the unit temporarily stores the resume point for the disc being played. Once the unit is turned off or the disc is ejected, the stored resume point for the disc is cleared.
1 During playback, press (DSPL).
The current playback information appears.
Time information
T 1:01:57
NO TEXT
Text information*
*“NO TEXT” appears when there is no text information.
continue to next page t
17
2 Press (DSPL) repeatedly to switch the time information.
Time information differs depending on the disc as follows:
DVD:
“T **:**:**” - Elapsed playing time of the current title
“T-**:**:**” - Remaining time of the current title
“C **:**:**” - Elapsed playing time of the current chapter
“C-**:**:**” - Remaining time of the current chapter
VCD (without PBC functions):
“T **:**” - Elapsed playing time of the current track
“T-**:**” - Remaining time of the current track
“D **:**” - Elapsed playing time of the current disc
“Ddisc-**:**” - Remaining time of the current
JPEG:
Album number
Image number
Searching a specific point on a disc
— Scan 
You can quickly locate a specific point on a disc by monitoring the picture.
|
|
ATT |
DVD |
OFF |
|
|
|
SRC |
MODE |
+ |
./> |
|
TOP MENU |
MENU |
|
SOUND |
|
|
|
SETUP |
|
|
|
|
|
ENTER |
|
SYSTEM |
LIST |
– |
|
MENU |
|
|
|
|
PICTURE |
|
|
Z × Z |
EQ |
DSO |
EQ7 |
AUDIO |
SUBTITLE |
ANGLE |
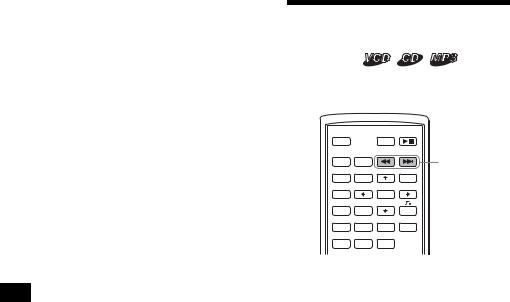
|
During playback, press and hold ./ >, and release at the desired point.
If you press and hold the button, searching speed increases.
Note
While searching, audio is not output, and subtitles are not displayed.
18

Using the menus on DVDs
With some DVDs, you can use their original menu(s), such as the Top menu or DVD menu. If the DVD contains several titles of tracks and scenes, you can use the Top menu to select the desired title, and start playing.
If the DVD contains more comprehensive menu items, such as the audio and subtitle languages, titles, chapters, etc., you can use the DVD menu to select the desired item, and start playing.
ATT |
DVD |
OFF |
|
TOP |
SRC |
MODE |
|
|
|
MENU |
|
|
|||
|
TOP MENU |
+ |
MENU |
||
ENTER |
SOUND |
|
|
MENU |
|
SETUP |
|
|
M/m |
||
|
|
|
ENTER |
||
|
|
|
|
||
|
SYSTEM |
LIST |
– |
</, |
|
|
MENU |
|
|
||
|
|
|
|
||
|
|
PICTURE |
|
|
|
|
Z × Z |
EQ |
DSO |
EQ7 |
|
|
AUDIO |
SUBTITLE |
ANGLE |
|
|
|
1 |
2 |
3 |
|
|
Number |
4 |
5 |
6 |
+ |
|
buttons |
|||||
|
|
|
|
||
|
7 |
8 |
9 |
VOL |
|
|
CLEAR |
|
DSPL |
– |
|
|
|
0 |
|
1 During DVD playback, press
(TOP MENU) or (MENU).
The DVD menu or Top menu appears.
The contents of the menu differ depending on the disc.
2 Press </M/m/,, or the number buttons to select the desired item, then press (ENTER).
Note
The items on the menu, and the operation procedures differ depending on the disc.
Using PBC functions
— PBC (Playback control) 
The PBC menu assists your operation interactively while a PBC compatible VCD is played.
OFF |
|
|
ATT |
DVD |
|
OFF |
|
|
|
||
|
SRC |
MODE |
|
|
|
|
|
TOP MENU |
+ |
MENU |
|
|
SOUND |
|
|
ENTER |
|
|
SETUP |
|
|
||
|
|
|
ENTER |
|
|
|
SYSTEM |
LIST |
– |
|
|
|
MENU |
|
|
O |
|
|
|
PICTURE |
|
|
|
|
Z × Z |
EQ |
DSO |
EQ7 |
|
|
AUDIO |
SUBTITLE |
ANGLE |
|
|
|
1 |
2 |
3 |
|
|
Number |
4 |
5 |
6 |
+ |
|
buttons |
|||||
|
|
|
|
||
|
7 |
8 |
9 |
VOL |
|
|
CLEAR |
|
DSPL |
– |
|
|
|
0 |
|
1 Start playing a PBC compatible VCD.
The PBC menu appears.
2 Press the number buttons to select the desired item, then press (ENTER).
3 Follow the instructions in the menu for interactive operations.
To return to the previous display
Press O.
Playing without the PBC function
1 During playback, press (OFF).
2 Press the number buttons to select the desired item, then press (ENTER).
“Play without PBC” appears and playback starts.
The PBC menu does not appear during playback.
Notes
•The items on the menu, and the operation procedures differ depending on the disc.
•During PBC playback, the track number, playback time, etc., are not displayed in the Play mode menu.
Tip
To resume PBC playback, stop playback by pressing (OFF), then press DVD u. PBC playback starts.
19
Playing in various modes
— Repeat play/Shuffle play/Search play
You can set the following play modes:
•Repeat play (page 20)
•Shuffle play (page 20)
•Search play (page 21)
Notes
•The selected play mode is cancelled when the disc being played is ejected or the unit is turned off.
•When playing a VCD with the PBC function on, Repeat play or Shuffle play is not available.
Playing repeatedly
— Repeat play 


The unit can repeat a title, chapter, or track when the item being played reaches the end.
The following repeat options are available:
•TITLE (Title Repeat) - to repeat the current title.
•CHAPTER (Chapter Repeat) - to repeat the current chapter.
•TRACK (Track Repeat) - to repeat the current track/image.
•ALBUM (Album Repeat) - to repeat the tracks/ images in the current album.
Note
When setting Repeat play for CD/MP3, operate with the main unit by pressing (1) (REP) repeatedly.
|
|
|
ATT |
DVD |
|
OFF |
|
|
|
|
SRC |
MODE |
|
|
|
|
TOP MENU |
+ |
MENU |
ENTER |
SOUND |
|
|
|
SETUP |
|
|
M/m |
|
|
|
|
ENTER |
|
|
|
|
|
|
SETUP |
SYSTEM |
LIST |
– |
|
|
MENU |
|
|
|
|
|
PICTURE |
|
|
|
Z × Z |
EQ |
DSO |
EQ7 |
|
AUDIO |
SUBTITLE |
ANGLE |
|
1 During playback, press (SETUP).
The Play mode menu appears.
2 Press M/m to select  (REPEAT), then press (ENTER).
The Play mode options appear.
3 Press M/m to select the desired option, then press (ENTER).
Repeat play starts.
To return to normal play
Select “OFF” in step 3.
To turn off the Play mode menu
20 Press (SETUP).
Tips
•The repeat options differ depending on the disc.
•You can also set Repeat play by pressing (1) (REP) on the main unit repeatedly.
Playing in random order
— Shuffle play 


The unit can play titles, chapters or tracks in random order.
The following shuffle options are available:
•TITLE (Title Shuffle) - to play chapters in the current title in random order.
•DISC (Disc Shuffle) - to play tracks/images in the current disc in random order.
•ALBUM (Album Shuffle) - to play tracks/ images in the current album in random order.
Note
When setting Shuffle play for CD/MP3, operate with the main unit by pressing (2) (SHUF) repeatedly.
|
|
|
ATT |
DVD |
|
OFF |
|
|
|
|
SRC |
MODE |
|
|
|
|
TOP MENU |
+ |
MENU |
ENTER |
SOUND |
|
|
|
SETUP |
|
|
M/m |
|
|
|
|
ENTER |
|
|
|
|
|
|
SETUP |
SYSTEM |
LIST |
– |
|
|
MENU |
|
|
|
|
|
PICTURE |
|
|
|
Z × Z |
EQ |
DSO |
EQ7 |
|
AUDIO |
SUBTITLE |
ANGLE |
|
1 During playback, press (SETUP).
2 Press M/m to select  (SHUFFLE), then press (ENTER).
The Play mode options appear.
3 Press M/m to select the desired option, then press (ENTER).
Shuffle play starts.
To return to normal play
Select “OFF” in step 3.
To turn off the Play mode menu
Press (SETUP).
Notes
•Title shuffle play for DVD will be cancelled after it is played once.
•Title shuffle play for DVD will be cancelled if . or > is pressed during playback.
Tips
•The shuffle options differ depending on the disc.
•You can also set Shuffle play by pressing (2) (SHUF) on the main unit repeatedly.
Starting playback from a selected point
— Search play 


You can quickly locate a desired point by specifying the title, chapter, elapsed time of the title (using the time code), or track.
The following search options are available depending on the disc:
DVD:
• TITLE starts playing from the selected title.
• CHAPTER starts playing from the selected chapter.
• TIME/TEXT starts playing from the point according to the input time code.
VCD:
•  TRACK starts playing from the selected track.
CD:
• TRACK starts playing from the selected track.
MP3:
• TRACK starts playing from the selected track.
JPEG:
• ALBUM starts playing from the selected album.
• IMAGE starts playing from the selected image.
Note
When locating a track for CD/MP3, press the number buttons to enter track number, then press (ENTER).
|
|
|
ATT |
DVD |
|
|
OFF |
|
|
|
|
|
SRC |
MODE |
|
|
|
|
|
TOP MENU |
+ |
MENU |
|
ENTER |
SOUND |
|
|
|
|
SETUP |
|
|
M/m |
||
|
|
|
ENTER |
||
|
|
|
|
||
SETUP |
SYSTEM |
LIST |
– |
|
|
|
MENU |
|
|
|
|
|
|
PICTURE |
|
|
|
|
Z × Z |
EQ |
DSO |
EQ7 |
|
|
AUDIO |
SUBTITLE |
ANGLE |
|
|
Number |
1 |
2 |
3 |
|
|
4 |
5 |
6 |
+ |
||
buttons |
|||||
|
7 |
8 |
9 |
VOL |
|
CLEAR |
CLEAR |
|
DSPL |
– |
|
|
0 |
|
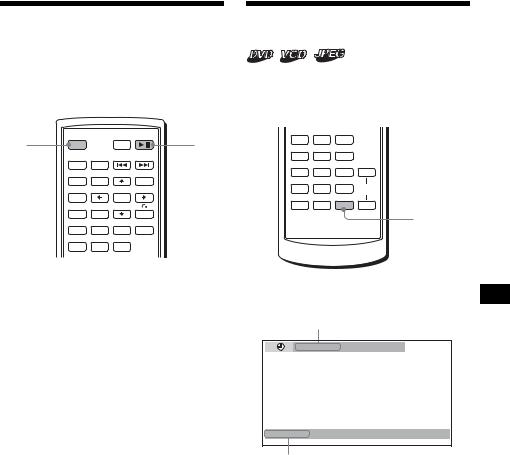
1 During playback, press (SETUP).
The Play mode menu appears.
2 Press M/m to select the desired search item, then press (ENTER).
The search items differ depending on the disc.
12(67) |
|
PLAY |
018(034) |
|
DVDVIDEO |
T 1:35:55 |
|
|
1 |
|
|
The number in parentheses indicates the total number of items selected.
3 Press the number buttons to enter title number, chapter number, track number, or the elapsed time of the title.
For example, to find a desired point at 2 hours, 10 minutes, and 20 seconds after the beginning, just enter “2:10:20.”
To clear the numbers already input, press
(CLEAR).
4 Press (ENTER).
Playback starts from the selected point.
To turn off the Play mode menu
Press (SETUP).
21

Various DVD operations
Changing the audio channels
When playing a DVD recorded in multiple audio formats (PCM, Dolby Digital, or DTS), you can change the audio format. If the DVD is recorded with multilingual tracks, you can also change the language.
With VCDs, you can select the sound from the right or left channel and listen to the sound of the selected channel through both the right and left speakers. For example, when playing a disc containing a song with the vocals on the right channel and the instruments on the left channel, you can hear the instruments from both speakers by selecting the left channel.
|
|
|
ATT |
DVD |
|
OFF |
|
|
|
|
SRC |
MODE |
|
|
|
|
TOP MENU |
+ |
MENU |
ENTER |
SOUND |
|
|
|
SETUP |
|
|
M/m |
|
SETUP |
|
|
ENTER |
|
|
|
|
||
SYSTEM |
SYSTEM |
LIST |
– |
</, |
MENU |
|
|
||
|
|
|
||
MENU |
Z × Z |
PICTURE |
|
|
|
EQ |
DSO |
EQ7 |
|
|
AUDIO |
SUBTITLE |
ANGLE |
|
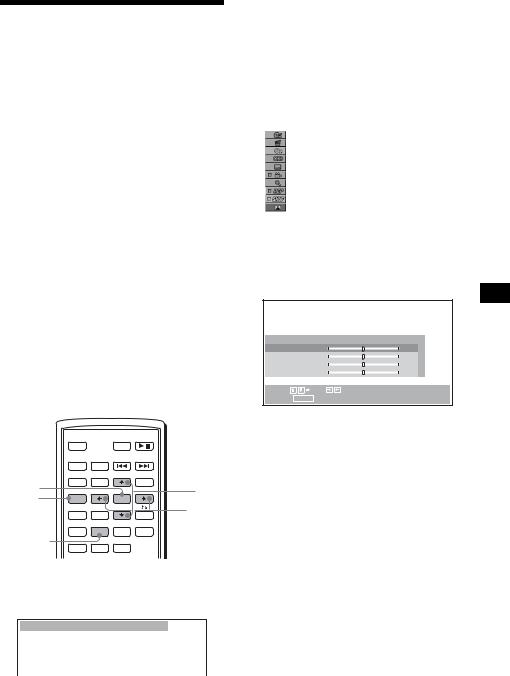
AUDIO
During playback, press (AUDIO) repeatedly to select the desired audio channels.
 1:ENGLISH DolbyD
Audio sound settings differ depending on the disc as follows:
DVD:
The audio language switches among the available languages.
When 4 digits appear, input the language code corresponding to the desired language
(page 49).
When the same language is displayed two or more times, the DVD is recorded in multiple audio formats.
VCD:
STEREO*: Standard stereo sound 1/L: Left channel sound (monaural) 2/R: Right channel sound (monaural)
* The default setting
Note
You may not be able to change the audio channels depending on disc.
Tip
You can also change the settings by selecting “AUDIO” in the Play mode menu (page 13).
Checking the program format 
You can check the number of channels and component position on the DVD being played.
1 During playback, press (SETUP).
The Play mode menu appears.
2 Press M/m to select  (AUDIO), then press (ENTER).
The program format appears.
|
|
Current audio format*1 |
|||||
|
|
|
|
|
|
|
|
|
12(67) |
|
|
|
|
PLAY |
|
|
018(034) |
|
|
|
|
DVDVIDEO |
|
|
T 01:35:55 |
|
|
|
|
|
|
|
1: ENGLISH |
|
PROGRAMFORMAT |
|
|||
|
|
|
DOLBY DIGITAL 3 / 2. 1 |
|
|||
|
|
|
|
L |
|
C R |
|
|
|
|
|
|
|
||
|
|
|
|
|
|
LFE |
|
|
|
|
|
LS |
RS |
|
|
|
|
|
|
|
|
|
|
|
|
|
|
|
|
|
|
Current program format*2
The letters in the program format display represent the following sound components and its positions:


 : Front (left)


 : Front (right)


 : Centre

 : Rear (left)
: Rear (right)


 : Rear (monaural): The rear component of the Dolby Surround processed signal and the Dolby Digital signal


 : Low Frequency Effect signal
22

When “DOLBY DIGITAL” is applied, the program format name and channel numbers appear as follows:
Example: Dolby Digital 5.1 ch
Rear component × 2
DOLBY DIGITAL 3 / 2 . 1
Front component × 2 + |
LFE component × 1 |
Center component × 1 |
|
*1 “PCM,” “DTS,” or “DOLBY DIGITAL” appears depending on the disc.
*2 Appears only when the “DOLBY DIGITAL” format is applied.
To turn off the Play mode menu
Press (SETUP).
Tip
For Dolby Digital and DTS, “LFE” is always enclosed in a solid line regardless of the LFE signal component being output.
Adjusting the audio output level
— DVD level adjustment 

The audio output level for DVD video differs depending on the recorded audio format (PCM, Dolby Digital, or DTS). You can adjust the output level of PCM, Dolby Digital or DTS separately to reduce the volume level differences between disc and source.
1 Press (SYSTEM MENU).
2 Press M/m repeatedly to select “DVD LVL,” then press (ENTER).
3 Press , to set to “ADJ-ON,” then press (ENTER).
4 Press </, to select “DOLBY,” “DTS” or “PCM.”
5 Press M/m to adjust the output level, then press (ENTER).
Note
You can adjust the output level only when a disc is inserted in the unit.
Tip
The output level is adjustable from –6 dB to +6 dB.
Changing the angles 
You can change the viewing angle if various angles (multi-angles) for a scene are recorded on a DVD.
|
|
ATT |
DVD |
OFF |
|
|
|
SRC |
MODE |
|
|
|
TOP MENU |
+ |
MENU |
SOUND |
|
|
|
SETUP |
|
|
|
|
|
ENTER |
|
SYSTEM |
LIST |
– |
|
MENU |
|
|
|
PICTURE
Z × Z EQ DSO EQ7
AUDIO SUBTITLE ANGLE
ANGLE
Press (ANGLE) repeatedly to select the desired angle number.
 2(2)
2(2)
The angle changes.
Note
Depending on the DVD, you may not be able to change the angles, even if multi-angles are recorded.
Tip
You can also change the viewing angle by selecting “ANGLE” in the Play mode menu (page 13).
23
Displaying the subtitles 
You can turn the subtitles on or off, or change the subtitle language if more are recorded on the DVD.
|
|
ATT |
DVD |
OFF |
|
|
|
SRC |
MODE |
|
|
|
TOP MENU |
+ |
MENU |
SOUND |
|
|
|
SETUP |
|
|
|
|
|
ENTER |
|
SYSTEM |
LIST |
– |
|
MENU |
|
|
|
PICTURE
Z × Z EQ DSO EQ7
AUDIO SUBTITLE ANGLE
SUBTITLE
1 During playback, press (SUBTITLE).
The subtitle language appears.
2 Press (SUBTITLE) repeatedly to select the desired language.
 1:ENGLISH
Available languages will vary, depending on the disc.
When 4 digits appear, input the language code corresponding to the desired language
(page 49).
To turn off the subtitles
Press (SUBTITLE) repeatedly to select “OFF.”
Note
Depending on the DVD, you may not be able to change (or turn off) the subtitles, even if multilingual subtitles are recorded.
Tip
You can also change the subtitle language by selecting “SUBTITLE” on the Play mode menu (page 13), or the DVD menu (page 19).
Magnifying pictures
You can magnify pictures.
|
|
|
ATT |
DVD |
|
OFF |
|
|
|
|
SRC |
MODE |
|
|
|
|
TOP MENU |
+ |
MENU |
ENTER |
SOUND |
|
|
M/m |
SETUP |
|
|
||
SETUP |
|
|
ENTER |
|
|
SYSTEM |
LIST |
– |
</, |
|
MENU |
|
|
|
|
|
|
|
|
|
|
PICTURE |
|
|
|
Z × Z |
EQ |
DSO |
EQ7 |
|
AUDIO |
SUBTITLE |
ANGLE |
|
1 During playback, press (SETUP).
The Play mode menu appears.
2 Press M/m to select  (CENTER ZOOM), then press (ENTER).
The current option appears.
3 Press M/m to select the desired option (ZOOM×1, ×2*, ×4*), then press
(ENTER).
The picture is magnified.
* The picture becomes grainy.
To shift the frame position
After magnifying the picture, press </M/m/,.
To restore the original scale
Select “ZOOM×1” in step 3.
To turn off the Play mode menu
Press (SETUP).
Notes
•Depending on the DVD, you may not be able to change the magnification.
•If you resume playback, the picture returns to its original scale.
24
Changing the picture quality
— Picture EQ 

You can select picture quality suitable for the interior brightness of the car.
You can set “PICTURE EQ” to “LIGHT OFF,” “LIGHT ON,” or “AUTO” in “CUSTOM SETUP” (page 31). The options (below) for each setting differ. If you set “PICTURE EQ” to “AUTO,” the available options switch automatically depending on whether the light is on or off.
The following setting options are available.
•NORMAL - normal picture quality.
•Daytime*1 - suitable in a bright place.
•Sunset*1 - suitable when it gets little dark.
•Shine*1 - suitable in a very bright place (e.g. when sunlight reflects on the monitor).
•Night*2 - darkens the monitor to not distract your driving at night.
•Midnight*2 - darkens the monitor more than the “Night” setting.
•Theater*2 - brightens the monitor; suitable when you want to enjoy a bright monitor at night.
•CUSTOM - user-adjustable settings.
*1 Available when “PICTURE EQ” in “CUSTOM SETUP” is set to “LIGHT OFF,” or “AUTO” and the light is off.
*2 Available when “PICTURE EQ” in “CUSTOM SETUP” is set to “LIGHT ON,” or “AUTO” and the light is on.
Adjusting the custom settings
You can store your own user-adjustable settings for different picture tones.
1 During playback, press (SETUP).
The Play mode menu appears.
2 Press M/m to select  (PICTURE EQ), then press (ENTER).
The setting items appear.
|
|
|
|
|
|
1 |
|
|
PLAY |
|
001 |
|
|
DVDVIDEO |
|
002:35 |
|
|
|
|
|
|
|
|
|
Daytime |
|
|
|
|
Sunset |
|
|
|
|
Shine |
|
|
|
|
CUSTOM |
|
|
|
|
NORMAL |
|
|
|
|
NORMAL |
|
|
|
|
|
|
|
|
3 Press M/m to select “CUSTOM,” then press (ENTER).
4 Press M/m to select the setting item, then press </, to adjust the level.
USER CUSTOM SETUP
Color |
|
|
0 |
|
|||
|
|
||
Bright |
|
|
0 |
|
|
||
|
|||
Contrast |
|
|
0 |
|
|
||
|
|||
Tint |
|
|
0 |
|
|
||
|
|||
Select: |
Set: |
||
Cancel: RETURN
|
|
|
|
|
5 Press (ENTER). |
|
|
|
ATT |
DVD |
Tip |
|
OFF |
|
|
|
|
|
|
|
|
|
Adjustments for “LIGHT OFF” and “LIGHT ON” can be |
|
SRC |
MODE |
+ |
|
stored separately. |
|
|
TOP MENU |
MENU |
|
|
ENTER |
SOUND |
|
|
|
M/m |
SETUP |
|
|
|
||
SETUP |
|
|
ENTER |
|
|
|
SYSTEM |
LIST |
– |
|
</, |
|
MENU |
|
|
|
|
|
|
|
|
|
|
|
|
PICTURE |
|
|
|
|
Z × Z EQ DSO EQ7 |
|
|||
PICTURE |
AUDIO |
SUBTITLE |
ANGLE |
|
|
EQ |
|
|
|
|
|
During playback, press (PICTURE EQ) repeatedly to select the desired setting.
 Daytime
Tip
You can also change the picture quality by selecting “PICTURE EQ” in Play mode menu (page 13).
25

Locking discs
— Parental control 
You can lock a disc, or set playback restrictions according to a predetermined level such as viewer age. Restricted playback scenes are blocked or replaced with different scenes when a parental control compatible DVD is played.
Setting the parental control on
|
|
|
ATT |
DVD |
|
|
OFF |
|
|
|
|
|
SRC |
MODE |
|
|
|
|
|
TOP MENU |
+ |
MENU |
|
ENTER |
SOUND |
|
|
M/m |
|
SETUP |
|
|
|||
SETUP |
|
|
ENTER |
|
|
|
SYSTEM |
LIST |
– |
</, |
|
|
MENU |
|
|
||
|
|
|
|
||
|
Z × Z |
PICTURE |
|
O |
|
|
EQ |
DSO |
EQ7 |
||
|
AUDIO |
SUBTITLE |
ANGLE |
|
|
|
1 |
2 |
3 |
|
|
Number |
4 |
5 |
6 |
+ |
|
buttons |
|||||
|
|
|
|
||
|
7 |
8 |
9 |
VOL |
|
|
CLEAR |
|
DSPL |
– |
|
|
|
0 |
|
1 Press (SETUP) while playback is stopped.
The set up menu appears.
2 Press M/m to select  (CUSTOM SETUP), then press (ENTER).
The setting items appear.
3 Press M/m to select “PARENTAL CONTROL,” then press (ENTER).
The parental control options appear.
CUSTOM SETUP
PARENTAL CONTROL : |
OFF |
MUTI–DISC RESUME : |
ON |
MP3/JPEG : |
OFF |
SLIDE SHOW TIME : |
PLAYER |
PLAY LIST PLAY : |
PASSWORD |
PICTURE EQ : |
AUTO |
4 Press M/m to select “ON t,” then press (ENTER).
The password setting display appears.
PARENTAL CONTROL
Enter a new 4–digit password, then press ENTER .
PASSWORD
5 Press the number buttons to enter your password, then press (ENTER).
The conformation display appears.
6 To confirm, press the number buttons to enter your password again, then press (ENTER).
Parental control is set.
To turn off the Setup menu
Press (SETUP).
Setting the parental control off
1 Press (SETUP) while playback is stopped.
The set up menu appears.
2 Press M/m to select  (CUSTOM SETUP), then press (ENTER).
The setting items appear.
3 Press M/m to select “PARENTAL CONTROL,” then press (ENTER).
The parental control options appear.
4 Press M/m to select “OFF t,” then press (ENTER).
The display to enter your password appears.
PARENTAL CONTROL
Enter password, then press ENTER .
PASSWORD
5 Press the number buttons to enter your password, then press (ENTER).
“Parental control is canceled” appears.
If a wrong number is entered, press < to move the cursor and enter the number again.
26

Changing the area and its movie rating level
You can set the restriction levels depending on the area and its movie ratings.
1 Press (SETUP) while playback is stopped.
The set up menu appears.
2 Press M/m to select  (CUSTOM SETUP), then press (ENTER).
The setting items appear.
3 Press M/m to select “PARENTAL CONTROL,” then press (ENTER).
The parental control options appear.
4 Press M/m to select “PLAYER t,” then press (ENTER).
When the parental control is already set to on, the display to enter your password appears. To change the settings, enter your password number, then press (ENTER).
If a wrong number is entered, press < to move the cursor and enter the number again.
5 Press M/m to select “STANDARD,” then press (ENTER).
The standard options appear.
CUSTOM SETUP
LEVEL : |
8: |
STANDARD : |
USA |
|
USA |
|
OTHER |
6 Press M/m to select the desired area to apply its movie ratings, then press
(ENTER).
The area is selected.
When you want to select the standard on the “Area code list” (page 27), select “OTHERS t,” then enter its code number using the number buttons.
7 Press M/m to select “LEVEL,” then press (ENTER).
The rating options appear.
CUSTOM SETUP
LEVEL : |
8: |
|
STANDARD : |
8: |
|
|
|
|
|
7: |
NC17 |
|
6: |
R |
|
5: |
|
|
4: |
PG13 |
The lower the number, the stricter the restriction level.
8 Press M/m to select the desired rating, then press (ENTER).
Parental control setting is complete.
To turn off the Setup menu
Press (SETUP).
Note
When you play discs which do not have the parental control, playback cannot be restricted on this unit.
Area code list
Standard |
Code number |
Argentina |
2044 |
|
|
Australia |
2047 |
|
|
Austria |
2046 |
|
|
Belgium |
2057 |
|
|
Brazil |
2070 |
|
|
Canada |
2079 |
|
|
Chile |
2090 |
|
|
China |
2092 |
|
|
Denmark |
2115 |
|
|
Finland |
2165 |
|
|
France |
2174 |
|
|
Germany |
2109 |
|
|
India |
2248 |
|
|
Indonesia |
2238 |
|
|
Italy |
2254 |
|
|
Japan |
2276 |
|
|
Korea |
2304 |
|
|
Malaysia |
2363 |
|
|
continue to next page t
27

|
|
Standard |
Code number |
|
|
Mexico |
2362 |
|
|
|
|
|
|
Netherlands |
2376 |
|
|
|
|
|
|
New Zealand |
2390 |
|
|
|
|
|
|
Norway |
2379 |
|
|
|
|
|
|
Pakistan |
2427 |
|
|
|
|
|
|
Philippines |
2424 |
|
|
|
|
|
|
Portugal |
2436 |
|
|
|
|
|
|
Russia |
2489 |
|
|
|
|
|
|
Singapore |
2501 |
|
|
|
|
|
|
Spain |
2149 |
|
|
|
|
|
|
Sweden |
2499 |
|
|
|
|
|
|
Switzerland |
2086 |
|
|
|
|
|
|
Thailand |
2528 |
|
|
|
|
|
|
United Kingdom |
2184 |
|
|
|
|
|
|
|
|
Changing the password
1 Press (SETUP) while playback is stopped.
The Setup menu appears.
2 Press M/m to select  (CUSTOM SETUP), then press (ENTER).
The setting items appear.
3 Press M/m to select “PARENTAL CONTROL,” then press (ENTER).
The parental control options appear.
4 Press M/m to select “PASSWORD t,” then press (ENTER).
The display to enter your password appears.
5 Press the number buttons to enter your 4-digit password, then press
(ENTER).
When a wrong number is entered, press < to move the cursor and enter the number again.
6 Press the number buttons to enter a new 4-digit password, then press
(ENTER).
7 To confirm, press the number button to enter your new 4-digit password again, then press (ENTER).
To return to the previous display
Press O.
To turn off the Setup menu
Press (SETUP).
Settings and Adjustments
Using the Setup menu
By using the Setup menu, you can make various adjustments to items, such as picture and sound. You can also set a language for the subtitle and the on-screen display, among other things. For details on each setup items, see pages from 29 to 32.
Note
Playback settings stored in the disc take priority over the Setup menu settings, and not all the functions described may work.
|
|
|
ATT |
DVD |
|
OFF |
|
|
|
|
SRC |
MODE |
|
|
|
|
TOP MENU |
+ |
MENU |
ENTER |
SOUND |
|
|
M/m |
SETUP |
|
|
||
SETUP |
|
|
ENTER |
|
|
SYSTEM |
LIST |
– |
|
|
MENU |
|
|
O |
|
|
PICTURE |
|
|
|
Z × Z |
EQ |
DSO |
EQ7 |
|
AUDIO |
SUBTITLE |
ANGLE |
|
Basic operation
Example: When you want to change the aspect ratio (“MONITOR TYPE”) to “4:3 PAN SCAN.”
1 Press (SETUP) while playback is stopped.
The Setup menu appears.
LANGUAGE SETUP
OSD : |
ENGLISH |
MENU : |
ENGLISH |
AUDIO : |
ORIGINAL |
SUBTITLE : |
AUDIO FOLLOW |
28

2 Press M/m to select  (SCREEN SETUP), then press (ENTER).
The setup display appears.
|
SCPEEN SETUP |
|
|
MONITOR TYPE : |
16:9 |
|
SCREEN SAVER : |
ON |
|
|
|
|
|
|
|
|
|
|
|
|
3 Press M/m to select “MONITOR TYPE,” then press (ENTER).
The monitor type options appear.
|
SCPEEN SETUP |
|
|
MONITOR TYPE : |
16:9 |
|
SCREEN SAVER : |
16:9 |
|
|
4:3 LETTER BOX |
|
|
4:3 PAN SCAN |
|
|
|
|
|
|
|
|
|
4 Press M/m to select “4:3 PAN SCAN,” then press (ENTER).
The setting is applied and setup is complete.
To return to the previous display
Press O.
To turn off the Setup menu
Press (SETUP).
To reset all the setting items
— Reset 
1 Select  (RESET) in step 2, then press (ENTER).
2 Press M to select “YES,” then press
(ENTER).
All the settings* on the Setup menu return to the default settings.
* Excluding parental control settings.
To cancel resetting
Select “NO” in step 2.
Note
Do not turn off the unit while resetting the Setup menu item as it takes a few seconds to complete.
Setting the display language or sound track
— Language setup 
“LANGUAGE SETUP” allows you to set the desired language for the on-screen display or sound track accordingly.
Select  (LANGUAGE SETUP) in the Setup menu, then select the desired setting item.
For details on the setup procedures, see “Using the Setup menu” on page 28.
OSD (On-Screen Display)
Switches the display language on the screen.
MENU 
Switches the language for the menu on the disc.
AUDIO 
Switches the language of the sound track. When you select “ORIGINAL,” the language given priority in the disc is selected.
SUBTITLE 
Switches the language of the subtitle recorded on the disc.
When you select “AUDIO FOLLOW,” the language for the subtitles changes according to the language you selected for the sound track.
Note
When you select a language in “MENU,” “SUBTITLE,” or “AUDIO” that is not recorded on the disc, one of the recorded languages will be automatically selected.
Tip
If you select “OTHERS t” in “MENU,” “SUBTITLE,” or “AUDIO,” select and enter a language code from “Language code list” (page 49) using the number buttons.
29

Setting the screen
— Screen setup 
“SCREEN SETUP” allows you to adjust the setting for the connected monitor.
Select  (SCREEN SETUP) in the Setup menu, then select the desired setting item.
For details on the setup procedures, see “Using the Setup menu” on page 28.
Setting items with “*” in the tables below are the default settings.
MONITOR TYPE
Selects the aspect ratio of the connected monitor (4:3 standard or wide).
16:9* |
Displays the wide picture. |
||
|
|
|
Select this when you connect a |
|
|
|
wide-screen monitor or a monitor |
|
|
|
with a wide mode function. |
|
|
|
|
4:3 |
Displays a wide picture with |
||
|
|
LETTER |
bands on the upper and lower |
|
|
BOX |
portions of the screen. |
|
|||
|
|
|
Select this when you connect a |
|
|
|
4:3 screen monitor. |
|
|
|
|
4:3 |
Displays a wide picture on the |
||
|
|
PAN SCAN |
entire screen and automatically |
|
|
|
cuts off the portions that do not |
|
|
|
fit. |
Select this when you connect a 4:3 screen monitor.
16:9
SCREEN SAVER
Turns the screen saver on and off. The screen saver image appears when you leave the system in stop mode for 5 minutes. The screen saver will help prevent your display device from becoming damaged (afterimage). Press DVD u to turn off the screen saver.
ON |
Turns on the screen saver. |
|
|
OFF* |
Turns off the screen saver. |
|
|
4:3 LETTER BOX
4:3 PAN SCAN
Note
Depending on the DVD, “4:3 LETTER BOX” may be selected automatically instead of “4:3 PAN SCAN,” and vice versa.
30
 Loading...