


 Loading...
3-858-293-21(1)
MiniDisc Deck
Operating Instructions
MDS-S37
© 1996 by Sony Corporation
WARNING
To prevent fire or shock hazard, do not expose the unit to rain or moisture.
To avoid electrical shock, do not open the cabinet. Refer servicing to qualified personnel only.
The laser component in this product is capable of emitting radiation exceeding the limit for Class 1.
This symbol is intended to alert the user to the presence of uninsulated “dangerous voltage” within the product’s enclosure that may be of sufficient magnitude to constitute a risk of electric shock to persons.
This symbol is intended to alert the user to the presence of important operating and maintenance (servicing) instructions in the literature accompanying the appliance.
INFORMATION
This equipment has been tested and found to comply with the limits for a Class B digital device, pursuant to Part 15 of the FCC Rules. These limits are designed to provide reasonable protection against harmful interference in a residential installation. This equipment generates, uses, and can radiate radio frequency energy and, if not installed and used in accordance with the instructions, may cause harmful interference to radio communications.
However, there is no guarantee that interference will not occur in a particular installation. If this equipment does cause harmful interference to radio or television reception, which can be determined by turning the equipment off and on, the user is encouraged to try to correct the interference by one or more of the following measures:
–Reorient or relocate the receiving antenna.
–Increase the separation between the equipment and receiver.
–Connect the equipment into an outlet on a circuit different from that to which the receiver is connected.
–Consult the dealer or an experienced radio/TV technician for help.
CAUTION
You are cautioned that any changes or modification not expressly approved in this manual could void your authority to operate this equipment.
Owner’s Record
The model and serial numbers are located on the rear of the unit. Record the serial number in the space provided below. Refer to them whenever you call upon your Sony dealer regarding this product.
Model No. MDS-S37
Serial No.
IN NO EVENT SHALL SELLER BE LIABLE FOR ANY DIRECT, INCIDENTAL OR CONSEQUENTIAL DAMAGES OF ANY NATURE, OR LOSSES OR EXPENSES RESULTING FROM ANY DEFECTIVE PRODUCT OR THE USE OF ANY PRODUCT.
Precautions
On safety
•The use of optical instruments with this product will increase eye hazard.
•Should any solid object or liquid fall into the cabinet, unplug the deck and have it checked by qualified personnel before operating it any further.
On power sources
•Before operating the deck, check that the operating voltage of the deck is identical with your local power supply. The operating voltage is indicated on the nameplate at the rear of the deck.
•If you are not going to use the deck for a long time, be sure to disconnect the deck from the wall outlet. To disconnect the AC power cord, grasp the plug itself; never pull the cord.
On operation
If the deck is brought directly from a cold to a warm location, or is placed in a very damp room, moisture may condense on the lenses inside the deck. Should this occur, the deck may not operate properly. In this case, remove the MD and leave the deck turned on for about an hour until the moisture evaporates.
On the MiniDisc cartridge
•Do not open the shutter to expose the MD.
•Do not place the cartridge where it will be subject to extremes of sunlight, temperature, moisture or dust.
On cleaning
Clean the cabinet, panel and controls with a soft cloth slightly moistened with a mild detergent solution. Do not use any type of abrasive pad, scouring powder or solvent such as alcohol or benzine.
If you have any questions or problems concerning your deck, please consult your nearest Sony dealer.
2
Welcome!
Thank you for purchasing the Sony MiniDisc Deck. Before operating the deck, please read this manual thoroughly and retain it for future reference.
About This Manual
Conventions
∙Controls in the instructions are those on the deck; these may, however, be substituted by controls on the remote that are similarly named or, when different, appear in the instructions within brackets.
∙The following icons are used in this manual:
Indicates a procedure that requires use of the remote.
Indicates tips for making the task easier and hints.
TABLE OF CONTENTS
Getting Started |
|
Unpacking .............................................................................................. |
4 |
Hooking Up the System ....................................................................... |
4 |
Recording on an MD................................................................................. |
6 |
Playing an MD .............................................................................................. |
8 |
Recording on MDs |
|
Notes on Recording ............................................................................. |
9 |
Useful Tips for Recording .................................................................. |
9 |
Recording Over Existing Tracks ........................................................ |
11 |
Adjusting the Recording Level .......................................................... |
11 |
Marking Track Numbers While Recording (Track Marking) ...... |
12 |
Starting Recording With 2 Seconds of Prestored Audio Data |
|
(Time Machine Recording) ................................................................. |
12 |
Synchro-Recording With Audio Equipment of Your Choice....... |
13 |
Synchro-Recording With a Sony CD Player .................................... |
14 |
Playing MDs |
|
Using the Display................................................................................. |
15 |
Locating a Specific Track .................................................................... |
16 |
Locating a Particular Point in a Track .............................................. |
17 |
Playing Tracks Repeatedly ................................................................. |
17 |
Playing in Random Order (Shuffle Play) ......................................... |
18 |
Creating Your Own Program (Program Play) ................................ |
19 |
Useful Tips When Recording From MDs to Tape .......................... |
20 |
Editing Recorded MDs |
|
Notes on Editing .................................................................................. |
20 |
Erasing Recordings (Erase Function) ............................................... |
20 |
Dividing Recorded Tracks (Divide Function)................................. |
22 |
Combining Recorded Tracks (Combine Function) ........................ |
23 |
Moving Recorded Tracks (Move Function)..................................... |
24 |
Labeling Recordings (Title Function) ............................................... |
24 |
Undoing the Last Edit (Undo Function) .......................................... |
27 |
Additional Information |
|
Display Messages ................................................................................. |
28 |
System Limitations .............................................................................. |
28 |
Troubleshooting ................................................................................... |
29 |
Specifications ........................................................................................ |
30 |
Beep Output During Operations ....................................................... |
31 |
Guide to the Serial Copy Management System .............................. |
32 |
Index ................................................................................................................. |
33 |
3

Getting Started
Unpacking
Check that you received the following items:
•Audio connecting cords (2)
•Remote commander (remote) RM-D7M (1)
•Sony SUM-3 (NS) batteries (2)
Inserting batteries into the remote
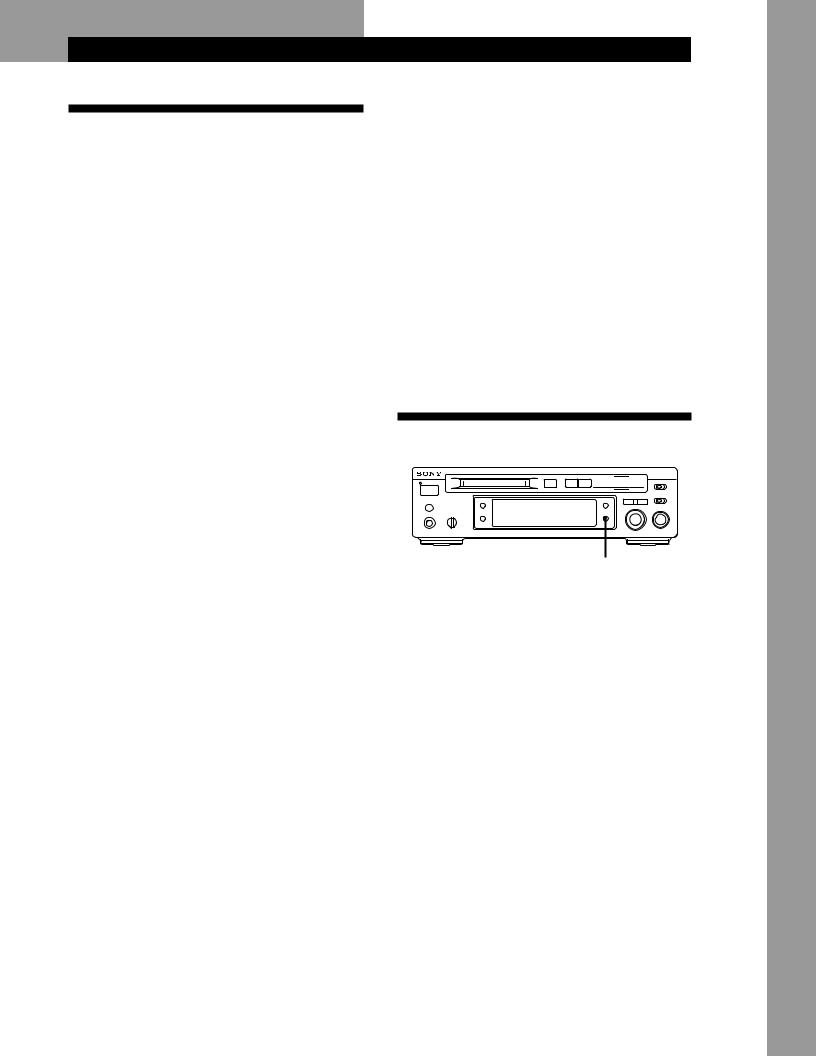
You can control the deck using the supplied remote. Insert two R6 (size-AA) batteries by matching the + and – on the batteries. When using the remote, point it at the remote sensor gon the deck.
When to replace batteries
With normal use, the batteries should last for about six months. When the remote no longer operates the deck, replace all the batteries with new ones.
Notes
∙Do not leave the remote near an extremely hot or humid place.
∙Do not drop any foreign object into the remote casing, particularly when replacing the batteries.
∙Do not expose the remote sensor to direct sunlight or lighting apparatuses. Doing so may cause a malfunction.
∙If you don’t use the remote for an extended period of time, remove the batteries to avoid possible damage from battery leakage and corrosion.
Hooking Up the System
Overview
This section describes how to hook up the MD deck to an amplifier or other components such as a CD player or DAT deck. Be sure to turn off the power of each component before connection.
|
LINE |
DIGITAL |
BEEP |
|
|
(ANALOG) |
|
|
|
IN |
OUT |
|
|
|
|
IN |
OUT |
|
|
|
L |
|
ON OFF |
|
|
R |
|
|
|
• |
• |
|
|
to a wall outlet |
|
• |
• ‚ |
|
|
REC |
TAPE |
Connect only |
||
OUT |
IN |
|||
|
|
|
one digital |
|
|
|
|
component at |
|
|
Amplifier |
a time |
|
|
|
|
|
DIGITAL |
|
|
|
|
OUT |
|
|
|
CD player |
|
|
|
|
|
DIGITAL |
DIGITAL |
|
|
|
OUT |
IN |
DAT deck or
MD deck, etc.
•: Signal flow
What cords will I need?
• Audio connecting cords (supplied) (2)
White |
White |
(L) |
(L) |
Red |
Red |
(R) |
(R) |
• Optical cable (not supplied) (2)
4

Getting Started
Hookups
•Connecting the deck to an amplifier
Connect the amplifier to the LINE (ANALOG) IN/OUT jacks using the audio connecting cords (supplied), making sure to match the color-coded cords to the appropriate jacks on the components: red (right) to red and white (left) to white. Be sure to make connections firmly to prevent hum and noise.
MD deck
LINE (ANALOG) IN OUT

 L
L 
 R
R
Amplifier
•TAPE / MD
OUT IN
L
R
‚
•: Signal flow
•Connecting the deck to a digital component such as a CD player, DAT deck, digital amplifier, or another MD deck
Connect the component through the DIGITAL IN/OUT connectors with two optical cables (not supplied). Take the caps off the connectors before plugging in the cables.
MD deck |
Digital component |
DIGITAL
IN OUT
•
‚
DIGITAL
OPTICAL
IN OUT
•: Signal flow
zAutomatic conversion of digital sampling rates during recording
A built-in sampling rate converter automatically converts the sampling frequency of various digital sources to the 44.1 kHz sampling rate of your MD deck. This allows you to record sources such as 32and 48kHz DAT or satellite broadcasts, as well as compact discs and other MDs.
Notes
•If “Din Unlock” or “Cannot Copy” appears in the display, recording through the digital connector is not possible. In this case, record the program source through the LINE (ANALOG) IN jacks with INPUT set to ANALOG.
•When recording through the DIGITAL IN connector, you cannot adjust the recording level.
Connecting the AC power cord
Connect the AC power cord to a wall outlet.
5

Basic Operations
Recording on an MD
2 |
|
|
3 |
|
8 |
|
6 |
5 |
|||
|
|
|
¤ |
0 ) |
Ḡ|
p |
r |
REC MODE |
|||
|
|
|
|
|
|
|
|||||
POWER |
|
|
|
|
|
|
|
|
• |
• |
|
|
|
|
|
|
|
|
|
STEREO |
MONO |
||
|
|
|
|
|
|
NO |
YES |
|
INPUT |
|
|
|
|
|
REPEAT |
|
PLAY MODE |
EDIT |
|
|
|
|
|
|
|
|
|
|
|
|
AMS |
|
• |
• |
|
|
|
|
|
|
|
|
DIGITAL |
ANALOG |
|||
|
|
|
|
|
|
- |
± |
REC LEVEL |
|||
|
|
|
|
|
DISPLAY |
• |
• |
• |
|||
HEADPHONES |
LEVEL |
SCROLL |
|
/CHAR |
|
|
• |
|
|
• |
|
|
|
|
|
|
|
|
|
||||
|
|
|
|
|
|
|
|
• |
|
|
• |
|
|
|
|
|
|
|
|
• |
|
|
• |
|
MIN |
MAX |
|
|
|
PUSH |
|
|
• |
|
• |
|
|
|
|
ENTER |
|
0 |
|
10 |
|||
|
|
|
|
|
|
|
|
|
|||
Monitor audio during recording
Even if you set REC MODE to MONO, the monitor signal does not become monaural.
|
4 |
7 |
1 |
Turn on the amplifier and play the program source you want |
|
to record. |
|
|
|
|
|
2 |
Press POWER. |
|
The POWER indicator turns off. |
|
|
|
|
|
3 |
Insert a recordable MD. |
|
With the label side up
With the arrow pointing this way
If the MD has a recorded material on it, the deck will automatically start recording from the end of the last recorded track.
4 |
Set INPUT to the corresponding input connector. |
|||
|
To record through |
Set INPUT to |
||
|
|
DIGITAL IN |
DIGITAL |
|
|
|
|
|
|
|
|
LINE (ANALOG) IN |
ANALOG |
|
|
|
|
|
|
|
|
|
|
|
5 |
Set REC MODE to the mode you want to record in. |
||
|
|
|
|
|
To record in |
Set REC MODE to |
|
|
|
Stereo sound |
STEREO |
|
|
|
|
|
|
Monaural sound* |
MONO |
*In the monaural recording, you can record about two times longer than in the stereo recording.
6

Basic Operations
When ”TOC“ flashes in the display
The deck is currently updating the Table Of Contents (TOC).
Do not move the deck or pull out the AC power cord. Changes to an MD made through recording are saved only when you update the TOC by ejecting the MD or changing the deck to standby by pressing POWER.
6 |
Press r. |
The deck becomes ready to record. |
|
|
|
7 |
When recording the analog input signal, adjust the recording |
level with REC LEVEL. |
|
|
The fourth dot is satisfactory for most purposes. For details, |
|
refer to “Adjusting the Recording Level” on page 11. |
|
|
8 |
Press ß(or á). |
Recording starts. |
|
|
|
9 |
Start playing the program source. |
|
|
Do not disconnect the deck from the power source immediately after recording
If you do, recorded material may not be saved to the MD. To save the material, after recording, press ¤to take out the MD or change the deck to standby by pressing POWER. “TOC” will flash in the display at this time.
After “TOC” stops flashing and goes out, you can pull out the AC power cord.
To |
Press |
|
|
Stop recording |
p |
|
|
Pause recording* |
ß(or P). Press the button again to |
|
resume recording. |
|
|
Take out the MD |
¤after stopping recording |
|
|
*Whenever you pause recording, the track number increases by one. For example, if you paused recording while recording on track 4, the track number increases by one and recording continues on the new track when restarted.
To protect an MD against accidental erasure
To make it impossible to record on an MD, slide the tab in the direction of arrow, opening the slot. To allow recording, close the slot.
Rear of the disc
Record-protect tab
Slide the tab in
the direction of arrow
Note
If you switch REC MODE during recording or recording pause, recording stops.
Operations Basic
7

Basic Operations
Playing an MD
2 |
|
|
3 |
|
4 |
|
|
|
|
|
|
|
|
¤ |
0 ) |
Ḡ|
p |
r |
REC MODE |
||
|
|
|
|
|
|
|||||
POWER |
|
|
|
|
|
|
|
• |
• |
|
|
|
|
|
|
|
|
|
STEREO |
MONO |
|
|
|
|
|
|
|
NO |
YES |
INPUT |
|
|
|
|
|
REPEAT |
|
PLAY MODE |
EDIT |
|
|
|
|
|
|
|
|
|
|
|
AMS |
• |
• |
|
|
|
|
|
|
|
|
DIGITAL |
ANALOG |
||
|
|
|
|
|
|
- |
± |
REC LEVEL |
||
|
|
|
|
|
DISPLAY |
• |
• |
• |
||
HEADPHONES |
LEVEL |
SCROLL |
|
/CHAR |
|
|
• |
|
• |
|
Connect the |
|
|
|
|
|
|
|
• |
|
• |
|
|
|
|
|
|
|
|
|
• |
|
headphones. |
|
|
|
|
|
|
|
• |
|
|
MIN |
MAX |
|
|
|
PUSH |
|
0 • |
|
• |
|
|
|
|
ENTER |
|
|
10 |
||||
Adjust the |
|
|
|
|
|
|
|
|
|
|
headphone |
|
|
|
|
|
|
|
|
|
|
volume. |
|
|
|
|
|
|
|
|
|
|
You can locate and play back a track while the deck is stopped
1Turn AMS (or press = or +) until the number of the track you want to play appears.
2Press AMS or ß(or á).
To use headphones
Connect them to HEADPHONES jack. Use HEADPHONES LEVEL to adjust the volume.
1 |
Turn on the amplifier and set the source selector to the position |
for MD deck. |
|
2 |
Press POWER. |
The POWER indicator turns off. |
|
|
|
3 |
Insert an MD. |
With the label side up
With the arrow pointing this way
4 |
Press ß(or á). |
|
The deck starts playing. Adjust the volume on the amplifier. |
||
|
|
|
|
|
|
To |
|
Do the following: |
|
|
|
Stop playing |
Press p. |
|
|
|
|
Pause playing |
Press ß(or P). Press the button again |
|
|
|
to resume playing. |
|
|
|
Go to the next track |
Turn AMS clockwise (or press +on |
|
|
|
the remote). |
|
|
|
Go to the preceding track |
Turn AMS counterclockwise (or press |
|
|
|
= on the remote). |
|
|
|
Take out the MD |
Press ¤after stopping playing. |
|
|
|
|
8
Recording on MDs
Notes on Recording
If “Protected” appears in the display
TheMDisrecord-protected.Closetheslottorecordonthe disc(see“ToprotectanMDagainstaccidentalerasure”on page7).
If “Din Unlock” flashes in the display
Recording on MDs
The MD deck uses the SCMS (Serial Copy Management System on page 32)
MDsrecordedthroughdigitalinputconnectorcannotbe copiedontootherMDsorDATtapesthroughthedigital outputconnector.
When recording digital signals that have been emphasized (in the higher frequencies)
Thesignalisautomaticallyde-emphasized(withattenuation proportionaltothedegreeofemphasis)andthelevelofthe
•Thedigitalprogramsourceisnotconnectedasyouset de-emphasizedsignalisindicatedonthepeaklevelmeters. withINPUTinStep4onpage6.
Tocontinue,connecttheprogramsourceproperly.
• Theprogramsourceisnoton. |
When the deck is recording or in recording pause, digital |
|
signals input through DIGITAL IN are output to DIGITAL |
||
Turnontheprogramsource. |
||
OUT with the same sampling rate. |
||
|
Depending on source being recorded, track numbers are marked in following ways:
•WhenrecordingfromaCDorMDwithINPUTat DIGITALandthesourceconnectedthroughDIGITALIN: Thedeckautomaticallymarkstracknumbersinthesame sequenceastheoriginal.If,however,atrackisrepeated twoormoretimes(e.g.bysingle-trackrepeatplay)ortwo ormoretrackswiththesametracknumber(e.g.from differentMDsorCDs)areplayed,thetrackortracksare recordedaspartofasingle,continuoustrackwithasingle tracknumber. IfthesourceisanMD,tracknumbersmaynotbemarked fortracksoflessthan4seconds.
•WhenrecordingfromsourceconnectedthroughLINE (ANALOG) IN with INPUT at ANALOG, and “LEVELSYNC”doesnotlightup(see“MarkingTrackNumbers WhileRecording”onpage12)orwhenrecordingfrom DATorsatellitebroadcastsconnectedthroughDIGITAL
IN with INPUT at DIGITAL: Thesourcewillberecordedasasingletrack.Youcan dividethetrackafterwardsusingtheDivideFunction(see “DividingRecordedTracks”onpage22)ormarktrack numbersduringrecordingbyusingtheTrackMarking Functiononpage12. If“LEVEL-SYNC”appearsinthedisplay,thedeck automaticallymarkstracknumberswhenrecording analogsourceordigitalrecordingofDATorsatellite broadcasts(see“Markingtracknumbersautomatically” onpage12).
•WhenrecordingfromDATorsatellitebroadcastswith INPUTatDIGITAL,thedeckautomaticallymarksatrack numberwheneverthesamplingfrequencyoftheinput signalchanges.
When “TOC” flashes in the display
ThedeckiscurrentlyupdatingtheTableOfContents(TOC). DonotmovethedeckorpullouttheACpowercord. ChangestoanMDmadethroughrecordingaresavedonly whenyouupdatetheTOCbyejectingtheMDorchanging thedecktostandbybypressingPOWER.
Tochangethedigitalinputsignaltoanothersamplingrate foroutput(withoutrecordingittoanMD),useInput MonitorFunction(seepage10).
Useful Tips for Recording
¤ 0 ) 
• |
• |
|
• |
• |
|
• |
• |
• |
• |
|
• |
• |
|
• |
• |
|
• |
• |
|
• |
DISPLAY/CHAR
Checking the remaining recordable time on the MD
•When you press DISPLAY/CHAR while recording, the remaining recordable time on the MD appears.
•When you press DISPLAY/CHAR repeatedly while the deck is stopped, the display changes as follows: total recorded time, remaining recordable time on the MD, disc name (see page 15).
(Continued)
Operations Basic
9

Recording on MDs
Monitoring the input signal (Input Monitor)
Before starting recording, you can monitor the selected input signal through the deck’s output connectors.
1Press ¤to remove the MD.
2Set INPUT according to the input signal you want to monitor.
When INPUT is at ANALOG
TheanalogsignalinputthroughLINE(ANALOG)INis
outputtoDIGITALOUTafterA/Dconversion,and
thentotheLINE(ANALOG)OUTconnectorsand
HEADPHONESjackafterD/Aconversion.
When INPUT is at DIGITAL
ThedigitalsignalinputthroughDIGITALINisoutput toDIGITALOUT,andthentotheLINE(ANALOG) OUTconnectorsandHEADPHONESjackafterD/A conversion.
Note
EvenifyousetRECMODEtoMONO,themonitor
signaldoesnotbecomemonaural.
3Press r.
If INPUT is at ANALOG, “AD-DA” appears in the display.
If INPUT is at DIGITAL, “-DA”appears in the display.
If “Auto Cut” appears in the display (Auto Cut)
There has been no sound input for 30 seconds while INPUT is set to DIGITAL and the source is connected through DIGITAL IN. The 30 seconds of silence are replaced by a blank of about 3 seconds and the deck changes to recording pause.

 You can turn off the Auto Cut Function
Fordetails,see“If“SmartSpace”appearsinthe
display”below.
If “Smart Space” appears in the display (Smart Space)
There has been an extended silence of 4 to 30 seconds in length when INPUT is set to DIGITAL and the source is connected through DIGITAL IN. The silence is replaced with a blank of about 3 seconds and the deck continues recording.
To turn off the Smart Space Function and Auto Cut Function
1Duringrecordingpause,pressEDIT/NOrepeatedlyuntil
“S.Space?”appearsinthedisplay.
2PressYES.
3PressEDIT/NOtodisplay“S.SpaceOFF.”
To turn on the Smart Space Function and Auto Cut Function again
1Duringrecordingpause,pressEDIT/NOrepeatedlyuntil
“S.Space?”appearsinthedisplay.
2PressYEStwicetodisplay“S.SpaceON”.
Notes
•WhenyouturnofftheSmartSpaceFunction,theAutoCut
Functionisalsoturnedoffautomatically.
•TheSmartSpaceFunctionandAutoCutFunctionare factorysettoon.
•TheSmartSpaceFunctiondoesnotaffecttheorderofthe tracknumbersbeingrecorded,eveniftheblankspace occursinthemiddleofatrack.
•IfyouturnoffthedeckordisconnecttheACpowercord,
thedeckwillrecallthelastsetting(onoroff)oftheSmart SpaceandAutoCutFunctionsthenexttimeyouturnon thedeck.
Playing back tracks just recorded
Do this procedure to immediately play back tracks that have just been recorded.
Press ß(or á) immediately after stopping recording.
Playback starts from the first track of the material just recorded.
To play from the first track of the MD after recording
1 Press pagainafterstoppingrecording.
2 Press ß(or á). PlaybackstartsfromthefirsttrackoftheMD.
10
Recording Over Existing Tracks
Follow the procedure below to record over existing material just as you would on an analog cassette tape.
6
¤ 0 ) Ḡp r
• |
• |
|
• |
• |
|
• |
• |
• |
• |
|
• |
• |
|
• |
• |
|
• |
• |
|
• |
-AMS ±
á P p
=/+ = + r
= + r
0 )
1Do Steps 1 to 5 in “Recording on an MD” on page 6.
2Turn AMS (or press = or +) until the number of the track to be recorded over appears.
3To record from the start of the track, continue from Step 6 in “Recording on an MD” on page 7.
While “TRACK” flashes in the display
Thedeckisrecordingoveranexistingtrack,andstops flashingwhenitreachestheendoftherecorded portion.
To record from the middle of the track
1 AfterStep2above,press |
ß(or á)tostart |
playback.
2 Press ß(or P)whereyouwanttostartrecording.
3ContinuefromStep6in“RecordingonanMD”on
page7.
Note
Youcannotrecordfromthemiddleofanexistingtrackwhen the“PROGRAM”or“SHUFFLE”ison.
Recording on MDs
Adjusting the Recording Level
When recording with INPUT at ANALOG and the signal input through LINE (ANALOG) IN jacks, use REC LEVEL to adjust the recording level before starting recording.
You cannot adjust the recording level during digital recording.
¤ 0 ) Ḡp r
• |
• |
|
• |
• |
|
• |
• |
• |
• |
|
• |
• |
|
• |
• |
|
• |
• |
|
• |
REC LEVEL
1Do Steps 1 to 6 in “Recording on an MD” on pages 6 and 7.
2Play the portion of the program source with the strongest signal level.
3While monitoring the sound, turn REC LEVEL to adjust the recording level so that the peak level meters reach their highest point without turning on the OVER indication. Occasional lighting of “OVER” is acceptable.
4 Stop playing the program source.
5 To start recording, do the procedure starting from Step 8 in “Recording on an MD” on page 7.
11
Loading...