


3-862-874-16(1)
Cordless Stereo
Headphone System
Operating Instructions page 2
Mode d’emploi page 14
Bedienungsanleitung seite 26
Manual de instrucciones página 38 
MDR-IF330RK
© 1998 by Sony Corporation
3
WARNING
To prevent fire or shock hazard, do not expose the unit to rain or moisture.
To avoid electrical shock, do not open the cabinet. Refer servicing to qualified personnel only.
WARNING
You are cautioned that any changes or modifications not expressly approved in this manual could void your authority to operate this equipment.
Owner’s Record
The model number is located in front of the transmitter and on the headphone housing. The serial number is located at the bottom of the transmitter and the inner side of the headband.
Record these numbers in the spaces provided below. Refer to them whenever you call upon your Sony dealer regarding this product.
Model No. MDR-IF330RK
Transmitter TMR-IF330R
Headphones MDR-IF330R
Serial No.
Transmitter
Headphones
This information is valid for Russian model only.
БВТФ У‚У‰М‡я ТЛТЪВП‡ „УОУ‚М˚ı ЪВОВЩУМУ‚ С‰ВО‡МУ ‚ КУ Вя
ИÁ„ÓÚÓ‚ËÚeθ: СÓÌË KÓ ÔÓ eÈ¯Ì A‰ ec: 6-7-35 KËÚa¯ËÌa„a‚a, ШËÌa„a‚a -
ÍÛ, ToÍËo 141-0001, ЯÔÓÌËя
For the customers in the U.S.A. and Canada
RECYCLING NICKEL-CADMIUM BATTERIES
Nickel Cadmium batteries are recyclable. You can help preserve our environment by returning your unwanted batteries to your nearest point for collection, recycling or proper disposal.
Note: In some areas the disposal of nickel cadmium batteries in household or business trash may be prohibited.
RBRC (Rechargeable Battery Recycling Corporation) advises you about spent battery collection by the following phone number.
Call toll free number: 1-800-822-8837 (United States and Canada only)
Caution: Do not handle damaged or leaking nickel-cadmium batteries.
2

Welcome!
Thank you for purchasing the Sony MDR-IF330RK Cordless Stereo Headphone System. Before operating the unit, please read this manual thoroughly and retain it for future reference.
Some features are:
•Cordless system that allows you to listen to a program free from the restriction of a cord.
•Broad horizontal listening area that gives you superb sound virtually anywhere in the room.
•Self-adjusting headband for fitting your head perfectly.
•The power of the headphones turns on and off automatically every time you put the headphones on and off (Auto power on/off function).
•The VOL control adjusts the volume level of both channels.
•Audio input selector available on transmitter.
•The power source of the headphone can be selected from either a supplied rechargeable battery or a commercially available R6 (size AA) dry battery.
Table of contents |
|
Getting started |
|
Unpacking .................................................. |
4 |
Setting up the transmitter ........................ |
4 |
Charging the headphones’ battery ......... |
6 |
Operating the system |
|
Listening to a program .............................. |
8 |
The effective areas of the transmitter ...... |
9 |
Replacing the ear pads ............................ |
10 |
Additional information |
|
Precautions ............................................... |
10 |
Troubleshooting ....................................... |
11 |
Specifications ............................................ |
12 |
3
( Getting started
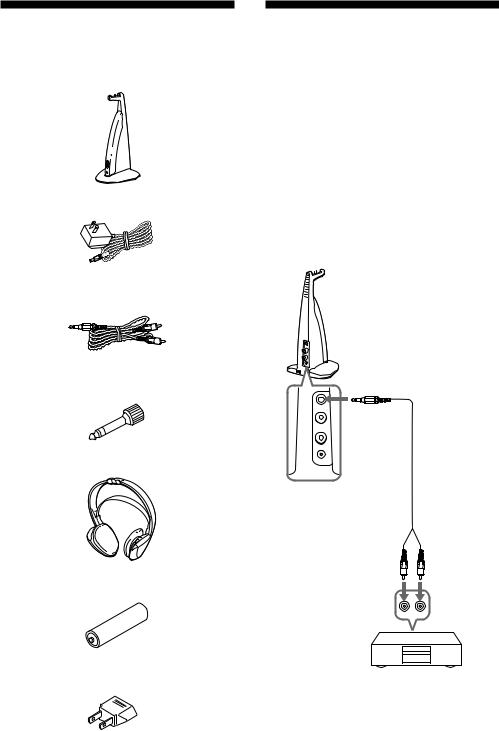
Unpacking
Check that you have the following items:
• The transmitter
•AC power adaptor
•Connecting cord
(phono plugs ˜stereo mini plug)
•Unimatch plug adaptor
(stereo mini jack nstereo phone plug)
•The headphones
•Ni-Cd rechargeable battery NC-AA (HJ)
•AC plug adaptor (tourist model only)
Setting up the transmitter
This unit has two types of input jack: PHONES IN (A) and LINE IN (B). PHONES IN (A) is for input from a headphone jack and LINE IN (B) is for input from LINE OUT jack.
1 Connect the transmitter to audio/video equipment.
aWhen connecting the transmitter to LINE OUT or REC OUT jacks. Connect to LINE IN (B) jack only.
Transmitter
to LINE IN (B) jack
Connecting  cord (supplied)
Left |
Right |
channel |
channel |
(white) |
(red) |
to LINE OUT |
|
or REC OUT |
|
Stereo system,
TV, VCR, etc.
4
Note
If your audio/video equipment has a stereo mini jack (LINE OUT), connect the stereo mini jack (LINE OUT) to LINE IN (B) of the transmitter by using optional connecting cord RK-G136HG. Connecting the LINE OUT jack of your audio/ video equipment to PHONES IN (A) of the transmitter will cause low or muffled sound. To connect to PHONES IN (A) of the transmitter with the supplied cord, use a headphones jack on the audio/video equipment.
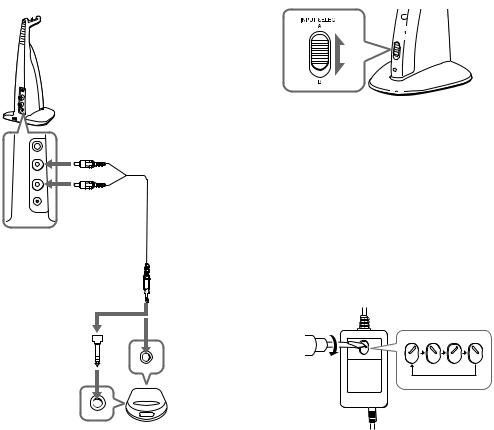
bWhen connecting the transmitter to a headphones jack.
Connect to PHONES IN (A) jack only.
Transmitter
to PHONES IN (A) jacks
Left channel (white)
Right channel (red)
Connecting cord  (supplied)
Unimatch plug 


 adaptor
(supplied)
to headphones jack (stereo phone plug)
 to headphones jack (stereo mini plug)
Discman, WALKMAN*, TV, VCR, etc.
When connecting two audio/video equipment to the transmitter at the same time
This transmitter can be connected to two different audio sources at the same time using both inputs, PHONES IN (A) and LINE IN (B).
Select position A or B on the transmitter to select transmitter input. Audio/video equipment connected to PHONES IN (A) will be output when in position A, and audio/video equipment connected to LINE IN (B) will be output when in position B.
Note
If you connect two pieces of audio/video equipment to this unit at the same time, use the supplied cord and optional connecting cord RK-G129 or RK-G136HG.
2 If your AC power adaptor is equipped with a voltage selector, before connecting the AC power adaptor to an AC outlet, set it to the operating voltage in your area with a screw driver.
AC power adaptor (supplied)
220V |
|
|
|
|
VOLTAGE SELECT |
240V |
220V |
110V |
120V |
(Continue to next page)
5
3 Connect the transmitter to a power source.
Transmitter
 to an AC outlet
AC power  adaptor (supplied)
to DC IN 9 V jack
Notes
•Use only the supplied AC power adaptor. Do not use any other AC power adaptor.
Polarity of the plug
•If the plug of the AC power adaptor does not fit in the AC outlet, use the supplied AC plug adaptor. (tourist model only)
•When you connect the connecting cord directly to an earphone jack, the audio signal will not be output through the right channel. In such a case, use the separately sold PC-236HG plug adaptor.
*WALKMAN is a registered trademark of Sony Corporation.
Charging the headphones’ battery
Using the headphones for the first time
The headphones are powered by either a supplied rechargeable battery
NC-AA (HJ) or a commercially available R6 (size AA) battery.
When you use the headphones with the supplied rechargeable battery
NC-AA (HJ) for the first time, charge the battery in the following manner. NC-AA (HJ) is applicable only for Sony cordless/wireless headphone systems. Never use for any other purpose.
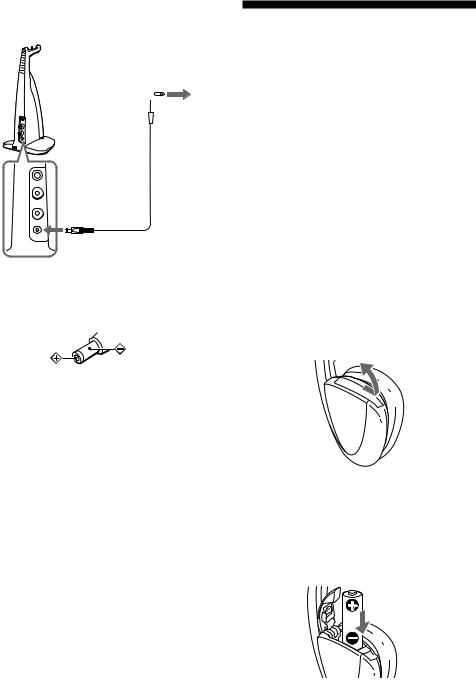
1 Open the battery compartment lid on top of the left housing.
2 Insert the supplied rechargeable battery into the battery compartment by matching the ]on the battery to the ] terminal on the lid.
Do not use a rechargeable battery other than the supplied one.
6

3 Close the battery compartment lid.
4 Connect the supplied AC power adaptor to the transmitter.
Transmitter
to an AC outlet
AC power  adaptor
to DC IN  (supplied) 9 V jack
5 Rest the headphones on the transmitter so that the contact pins fit into the contact holes on the headphones. The charging indicator lights.
Notes
•Use only the supplied rechargeable battery NC-AA (HJ).
•You cannot recharge other R6 (size AA) rechargeable battery (NC-AA etc.) with this unit.
When the indicator is not lit
Check the connection to make sure that the contact pins are properly fitted into the contact holes on the headphones, or if the headphones are rested on the transmitter correctly.
To recharge the headphones’ battery after use
To charge the battery, follow steps 4 and 5. Since little electric current is used for charging, there is no need to worry about overcharging.
Charging and using hours
Approx. charging |
|
Approx. using |
hours |
|
hours* |
|
|
|
1 |
1.5 |
|
|
|
|
24** |
30 |
|
*at 1 kHz, 1 mW+1 mW output
**the hours required to fully charge an empty battery
Using the headphones with a commercially available R6 (size AA) dry battery
Install the battery in the same manner as described in steps 1 through 3 of “Charging the headphones’ battery.”
When a R6 (size AA) dry battery is installed, the battery charge function is not activated.
Battery life* |
|
|
|
|
|
Battery |
|
Approx. hours |
|
|
|
Sony alkaline battery |
100 |
|
LR 6 (SG) |
|
|
|
|
|
Sony battery R6P (SR) |
50 |
|
|
|
|
* at 1 kHz, 1 mW+1 mW output
(Continue to next page)
7
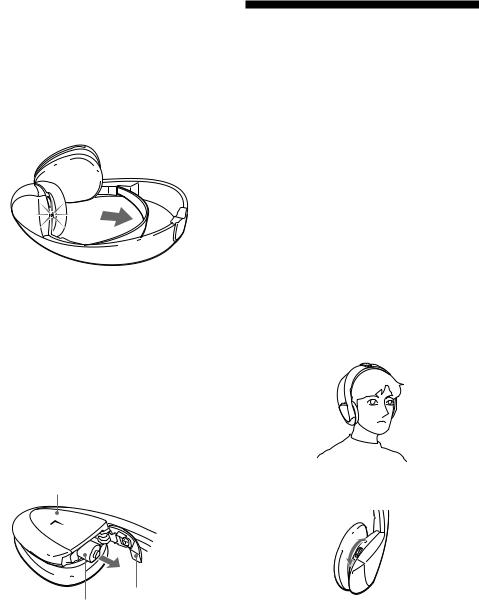
Check the remaining power of the headphones’ battery
Pull up the self adjusting band, and check that the headphones’ power indicator lights in red. You can now use the headphones. Charge the battery or install a new dry battery, if the power indicator light is weak or turned off and the sound becomes distorted or has a lot of noise.
Notes
•During recharging, the transmitter is turned off automatically.
•When the life of the rechargeable battery is shortened by half even after a proper recharging, take the headphone set to a Sony dealer and have the old rechargeable battery replaced by a new one.
Removing the battery
1Open the battery compartment lid.
2Remove the battery from the battery compartment.
Housing (left)
Battery
Battery compartment lid
( Operating the system
Listening to a program
1 Turn on the audio/video equipment connected to the transmitter.
When the audio signal is input, the transmitter turns on automatically and the infrared emitters glow. If the transmitter is connected to the headphone jack, set the volume control of the audio source equipment as high as possible but not so high that the audio signal gets distorted. (Around level 5 or 6 on the volume control should be appropriate.)
2 Put on the headphones and the power turns on automatically.
The power indicator glows red when the power turns on.
3 Adjust the volume.
8

Auto power on/off function
When you remove the headphones, the power turns off automatically. Do not pull up the self adjusting band when not using the headphones, otherwise the headphones will be switched on.
Mute function
If a hissing noise is heard when the infrared rays are obstructed, or the headphones are used outside of the effective range (see the next section), the mute function will be activated and the sound will not be heard from the headphones. To restore the sound, move nearer toward the transmitter or remove the obstruction.
If no audio signal is received at the transmitter for more than approximately five minutes, the transmitter turns off automatically.
After listening to a program, take the headphones off before the transmitter turns off and rest them on the transmitter.
Otherwise you may hear some noise when the infrared rays are suddenly cut off.
Note
The infrared emitters light up when the transmitter is turned on. The brightness of the emitters may not be uniform, however, this is not a malfunction.
The effective areas of the transmitter
The illustration below shows the approximate area covered by the infrared rays emitted from the transmitter.
Transmitter |
Infrared ray |
|
|
||
Approx. 3 m |
|
|
(118 1/8 |
in.) |
Approx. 7 m |
|
|
|
|
|
(23 ft.) |
Approx. 3 m |
|
|
(118 1/8 |
in.) |
|
Notes
•If you use the headphones at too great a distance from the transmitter, you may hear a hissing noise and if there is an object between the receiver and the transmitter, the sound may be interrupted. These phenomena are inherent to infrared ray communication and do not mean that there is a problem with the unit itself.
•Do not cover the infrared sensors with your hands or hair.
•The infrared rays will not penetrate walls or opaque glass, therefore, be sure to stay within sight of the transmitter.
•When you use the headphones inside the area illustrated in the diagrams, the transmitter can be placed in the front, behind or by the side of the listener.
9
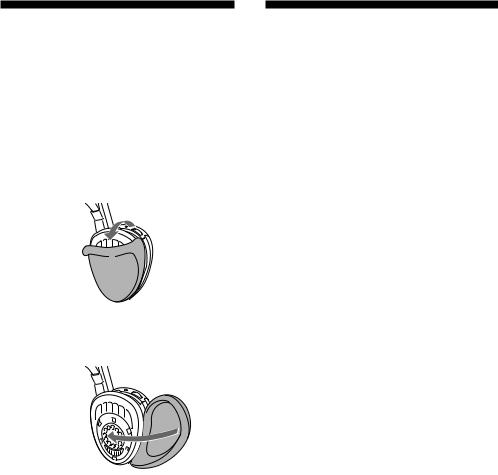
Replacing the ear pads
When the ear pads become dirty or damaged, you can get replacements from your Sony dealer. Replace them as illustrated below.
1 Remove the old ear pad by pulling it off from the driver unit.
2 Place the new ear pad around the driver unit as illustrated.
( Additional information
Precautions
•The CE mark on the unit is valid only for products marketed in the European Union.
•When the transmitter is not to be used for a long period of time, disconnect the AC power adaptor from the AC outlet holding the plug. Do not pull on the cord.
•Do not leave the cordless stereo headphone system in a location subject to direct sunlight, heat or moisture.
Notes on headphones Preventing hearing damage
Avoid using headphones at high volume. Hearing experts advise against continuous, loud and extended play. If you experience a ringing in your ears, reduce the volume or discontinue use.
Caring for others
Keep the volume at a moderate level. This will allow you to hear outside sounds and to be considerate to the people around you.
If you have any questions or problems concerning the system that are not covered in this manual, please consult the nearest Sony dealer.
Be sure to bring the headphones and the transmitter to the Sony dealer when requiring repair work.
10
Troubleshooting
No sound/Muffled sound
/Turn on the transmitter first, then put on the headphones.
/Check the connection of the audio/video equipment or the AC power adaptor.
/Check that the input select switch position is correct.
/Check that the audio/video equipment is turned on.
/Turn up the volume on the connected audio/video equipment, if the transmitter is connected to the headphones jack. (Around level 5 or 6 on the volume control should be appropriate.)
/The mute function is activated.
•Check if there is any object between the transmitter and the headphones.
•Use the headphones near the transmitter.
•Change the position and angle of the transmitter.
/The headphones’ power indicator light is weak or turned off.
•Charge the rechargeable battery because the headphones’ battery is weak, or if the power indicator is still off after charging the battery. Take the headphones to a Sony dealer for a replacement of the rechargeable battery.
•If you are using the conventional dry battery, replace it with a new one.
/When the LINE OUT jack of your audio/ video equipment is connected to PHONES IN (A) of the transmitter, the sound will be low. Connect the LINE OUT jack to the LINE IN (B) as described in “Setting up the transmitter.”
Distortion
/If the transmitter is connected to the headphones jack, turn down the volume of the connected audio/video equipment. (Around level 5 or 6 on the volume control should be appropriate.)
/The headphones’ power indicator light is weak or turned off.
•Charge the rechargeable battery because the headphones’ battery is weak, or if the power indicator is still off after charging the battery. Take the headphones to a Sony dealer for a replacement of the rechargeable battery.
•If you are using the conventional dry battery, replace it with a new one.
/When the headphones jack output is connected to the LINE IN (B) of the transmitter, increasing the volume of the connected audio/video equipment may cause distortion. Connect the headphones jack output instead to PHONES IN (A) as described in “Setting up the transmitter.”
Loud background noise
/Move closer to the transmitter. As you move away from the transmitter, more noise is likely to be heard. This is inherent to infrared ray communication and does not mean that there is a problem with the unit itself.
/Check that there is no object between the transmitter and the headphones.
/Check that the infrared sensors are not covered with your hands or hair.
/Change the position or angle of the transmitter.
•The headphones are used by a window where the sunlight is too strong.
n Draw the curtains/blind to shut out the direct sunlight, or use the headphones away from the sunlight.
/If the transmitter is connected to the headphones jack, turn up the volume of the connected audio/video equipment. (Around level 5 or 6 on the volume control should be appropriate.)
/The headphones’ power indicator light is weak or turned off.
•Charge the rechargeable battery because the headphones’ battery is weak, or if the power indicator is still off after charging the battery. Take the headphones to a Sony dealer for a replacement of the rechargeable battery.
•If you are using the conventional dry battery, replace it with a new one.
(Continue to next page)
11

The battery cannot be charged
/Check if the charging indicator lights on. If not, put the headphones on the transmitter correctly so that the charging indicator lights on.
/The dry battery is installed.
•Install the supplied rechargeable battery.
/The rechargeable battery that is not supplied is installed.
•Install the supplied rechargeable battery.
Specifications
General
Modulation system
Frequency modulation
Carrier frequency
Right 2.8 MHz
Left 2.3 MHz
Frequency response
|
18 – 22,000 Hz |
|
Transmitter TMR-IF330R |
||
Power source |
DC IN 9 V jack accepts power |
|
|
supplied from the AC power |
|
|
adaptor for use on the following |
|
|
voltages: |
|
|
|
|
Where purchased |
Operating |
|
|
|
voltage |
|
|
|
U.S.A./Canada |
|
120 V AC, 60 Hz |
|
|
|
U.K. |
|
230 – 240 V AC, 50 Hz |
|
|
|
European countries |
220 – 230 V AC, 50 Hz |
|
|
|
|
Other countries |
|
110 – 120 V/220 – |
|
|
240 V AC, 50/60 Hz |
|
|
|
Audio input |
Phono jacks/stereo mini jack |
|
Dimensions |
Approx. 106 × 217 × 110 mm |
|
|
(4 1/4 × 8 5/8 × 4 3/8 in.) |
|
|
(w/h/d) |
|
Mass |
Approx. 125 g (4.4 oz) |
|
Headphone MDR-IF330R |
||
Power source |
Supplied Ni-Cd rechargeable |
|
|
battery NC-AA (HJ) or |
|
|
commercially available |
|
|
R6 (size AA) dry battery |
|
Mass |
Approx. 180 g (6.4 oz) including |
|
|
battery |
|
12
Supplied Ni-Cd rechargeable battery
Model name |
NC-AA (HJ) |
Type |
Ni-Cd |
Voltage |
1.2 V |
Capacity |
600 mAh |
Optional accessories
Plug adaptor PC-236HG
(stereo mini jack ˜monaural mini plug) Connecting cords
RK-G136HG
(stereo mini plug ˜stereo mini plug) RK-G129HG
(stereo mini plug ˜phono plug × 2)
Design and specifications are subject to change without notice.
13

AVERTISSEMENT
Afin d’éviter tout risque d’incendie ou d’électrocution, ne pas exposer cet appareil à la pluie ou à l’humidité.
Afin d’écarter tout risque d’électrocution, garder le coffret fermé. Ne confier l’entretien de l’appareil qu’à un personnel qualifié.
AVERTISSEMENT
Avant la mise en service de cet appareil, prière de lire attentivement ce mode d’emploi que l’on conservera pour toute référence ultérieure.
Pour les utilisateurs aux Etats-Unis et au Canada
RECYCLAGE DES BATTERIES AU NICKEL-CADMIUM
Les batteries au nickel-cadmium sont recyclables. Vous pouvez contribuer à préserver l’environnement en rapportant les batteries usées dans un point de ramassage, recyclage ou retraitement.
Remarque: Dans certain pays, il est interdit de jeter les batteries au nickel-cadmium avec les ordures ménagères ou dans les poubelles de bureau.
Questionnez chez RBRC (Rechargeable Battery Recycling Corporation) pour les batteries usées.
Le numéro est: 1-800-822-8837 (EtatsUnis et Canada uniquement)
Avertissement: Ne pas utiliser des batteries au nickel-cadmium qui sont endommagées ou qui fuient.
14

Bienvenue!
Nous vous félicitons pour l’achat de ce système de casque stéréo infrarouge Sony MDR-IF330RK. Avant la mise en service de cet appareil, prière de lire attentivement ce mode d’emploi et de le conserver pour toute référence ultérieure.
Cet appareil offre, entre autres, les caractéristiques suivantes:
•Système de casque infrarouge permettant d’écouter un programme sans être gêné par un cordon.
•Portée horizontale étendue assurant un son superbe pratiquement n’importe où dans la pièce.
•Serre-tête auto-ajustable s’adaptant parfaitement à la forme de la tête.
•Mise sous et hors tension automatique du casque quand vous mettez et enlevez le casque (fonction de mise sous et hors tension automatique).
•Commande VOL permettant de régler le volume des deux canaux.
•Sélecteur d’entrée audio sur le transmetteur.
•La pile rechargeable fournie ou une pile sèche R6 (format AA), en vente dans le commerce, peuvent être utilisées comme source d’alimentation du casque.
Table des matières
Préparatifs |
|
Déballage .................................................. |
16 |
Raccordement du transmetteur ............ |
16 |
Recharge de la pile du casque ................ |
18 |
Utilisation du système |
|
Ecoute d’un programme ......................... |
20 |
Portée du transmetteur ........................... |
21 |
Remplacement des oreillettes ................ |
22 |
Informations complémentaires |
|
Précautions ............................................... |
22 |
Guide de dépannage ............................... |
23 |
Spécifications ............................................ |
24 |
15

( Préparatifs
Déballage
Vérifiez que tous les éléments suivants se trouvent dans l’emballage:
• Transmetteur
•Adaptateur secteur
•Cordon de liaison (fiches cinch ˜ minifiche stéréo)
•Adaptateur de fiche universel (minijack stéréo nfiche 6,35 stéréo)
•Casque
•Pile rechargeable au nickel-cadmium NC-AA (HJ)
•Adaptateur de fiche secteur
(modèle pour les touristes seulement)
Raccordement du transmetteur
Cet appareil a deux types de prise d’entrée: PHONES IN (A) et LINE IN (B).
PHONES IN (A) est destinée au raccordement d’un casque et LINE IN (B) au raccordement à une prise LINE OUT.
1 Raccordez le transmetteur à un appareil audio/vidéo.
aLors du raccordement du transmetteur aux prises LINE OUT ou REC OUT: Raccordez seulement la prise LINE IN
(B).
Transmetteur
vers la prise LINE IN (B)
Cordon de  liaison (fourni)
Canal gauche |
Canal droit |
(blanc) |
(rouge) |
vers LINE OUT |
|
ou REC OUT |
|
Chaîne stéréo, téléviseur, magnétoscope, etc.
16
 Loading...