


3 |
Coffee Maker
KOMPERNASS GMBH · BURGSTRASSE 21 · D-44867 BOCHUM www.kompernass.com
ID-Nr.: KH1115-05/09-V2
KH 1115
Coffee Maker
Operating instructions
Kahvinkeitin
Käyttöohje
Kaffebryggare
Bruksanvisning
Kaffemaskine
Betjeningsvejledning
Καφετιέρα Οδηγίες χρήσης
Kaffeemaschine
Bedienungsanleitung
KH 1115
q
w
e r
t y
i
u
o
a
s
CONTENT |
PAGE |
Safety information |
2 |
Items supplied |
3 |
Correct usage |
3 |
Appliance description |
3 |
Technical data |
3 |
Before the First Use |
3 |
Placement |
3 |
Using the thermal jug |
4 |
Opening / Closing the lid ............................................................................................................... |
4 |
Pouring coffee................................................................................................................................... |
4 |
Preparing coffee |
4 |
Cleaning and care |
5 |
Cleaning the lid ................................................................................................................................ |
5 |
Scale removal |
6 |
Troubleshooting |
6 |
The coffee maker is not working:.................................................................................................... |
6 |
The coffee is too strong/too weak: ................................................................................................ |
6 |
Disposal |
6 |
Warranty & Service |
6 |
Importer |
7 |
Read the operating instructions carefully before using the appliance for the first time and preserve this booklet for later reference. Pass the manual on to whomsoever might acquire the appliance at a later date.
- 1 -

COFFEE MAKER
KH 1115
Safety information
 Danger of electric shock!
•Connect the appliance only to correctly installed and earthed mains sockets.
•Remove the plug from the wall socket when you move the appliance, fill it with water, if it malfunctions, before cleaning it and when it is not in use.
•NEVER submerse the appliance in liquids. Should liquids nonetheless permeate into the appliance housing, immediately remove the plug from the wall socket. Arrange for it to be repaired by qualified specialists.
•NEVER grasp the appliance, power cable or power plug with wet hands.
•To disconnect, always pull the plug itself out of the power socket, do not pull on the power cable.
•Do not fold or crush the power cable.
•Arrange for defective power plugs and/or cables to be replaced at once by qualified technicians or our Customer Service Department.
 Risk of fire!
•Do not leave the appliance unattended when in use.
•Never operate the appliance without water.
•Never place the appliance near sources of heat.
•Do not use extension cables. In the event of danger, the plug must be quickly and easily accessible.
 Risk of personal injury!
•NEVER use the thermal jug of the appliance in a microwave oven.
•DO NOT allow children to use the appliance without adult supervision. Explain to children the potential dangers of the device.
•Lay the power cable in such a way that no one can tread on or trip over it.
•Do not insert sharp or hard objects into the thermal jug. Do not put your hand into the thermal jug. These actions could cause damage to the appliance or personal physical injury.
•This appliance is not intended for use by individuals (including children) with restricted physical, physiological or intellectual abilities or deficiences in experience and/or knowledge unless they are supervised by a person responsible for their safety or receive from this person instruction in how the appliance is to be used.
•Children should be supervised to ensure that they do not play with the appliance.
•Do not use an external timing switch or a separate remote control system to operate the appliance.
 Risk of scalding!
•Never open the filter container during the brewing process.
•Do not handle the hot filter bag. Remove the filter bag first when the coffee has drained away and it has cooled down.
•Do not hold your hands in the rising steam.
•Never move/transport the appliance during the brewing process.
•Remove the thermal jug first when the brewing process is complete and the filter has fully drained itself.
•Always close the filter container before switching on, there exists a risk of scalds from steam and hot water.
- 2 -
To avoid damage to the appliance!
•Fill the water tank of the appliance exclusively with freshly drawn mains water.
Items supplied
•Coffee Maker KH 1115
•Thermal jug with lid
•Measuring spoon
•Operating Instructions
Before taking the appliance into use check to ensure that all of the items listed have been supplied and that there are no visible signs of damage.
Technical data
Mains voltage: |
220 - 240 V~ 50 Hz |
Power consumption: |
1000 W |
Coffee filter bags: |
Size 1x 4 |
Before the First Use
Before the first use, pass a volume equal to 8 large cups of water through the appliance twice. Do not insert a filter bag and do not use any coffee powder.
Clean the appliance (see chapter "Cleaning and care").
Correct usage
The coffee maker is intended exclusively for brewing coffee. This coffee maker is intended exclusively for use in private households. Do not use it commercially.
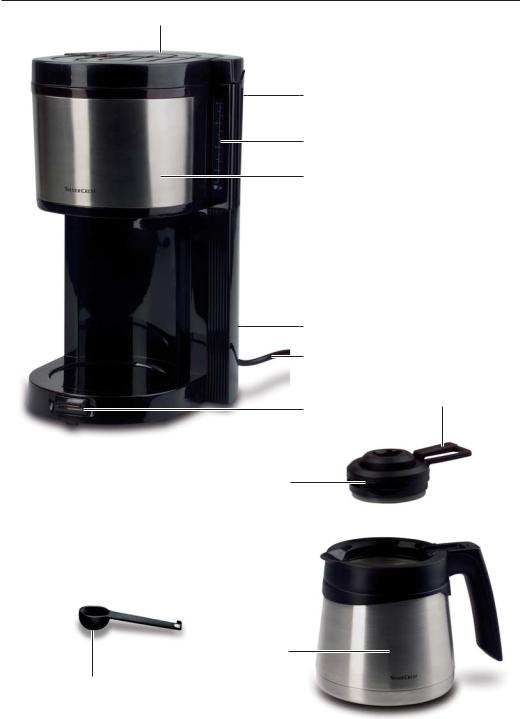
Appliance description
1 Water tank
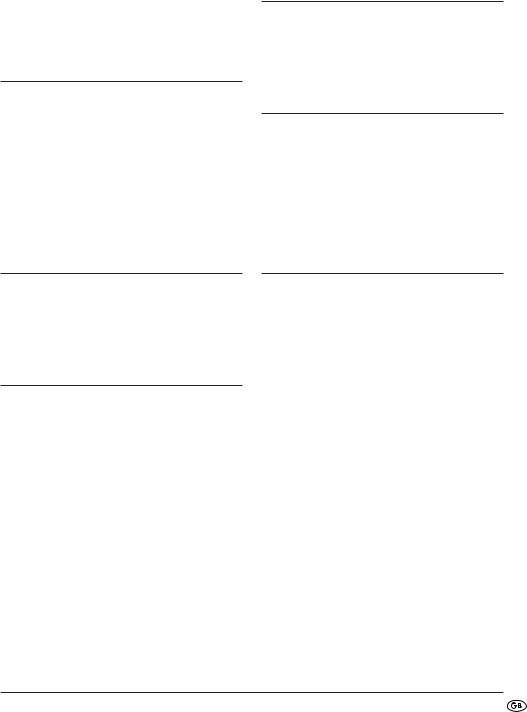
2 Measuring spoon holder
3 Scale
4 Filter holder
5 Cable shaft
6 Power cable with power plug
7 Switch with integrated indicator lamp
8 Pouring lever
9 Lid
0 Thermal jug
q Measuring spoon
Placement
Position the coffee maker on a dry and level surface.
Connect the plug 6 with a wall power socket. Ensure that the plug 6 is easily accessible in an emergency.
 Note:
Note:
Should the coffee maker, after its connection with the power source, be found to be switched on, wait for ca. 45 seconds. It will switch itself off.
Hang the measuring spoon q from the measuring spoon holder 2. It will then always be at hand.
- 3 -
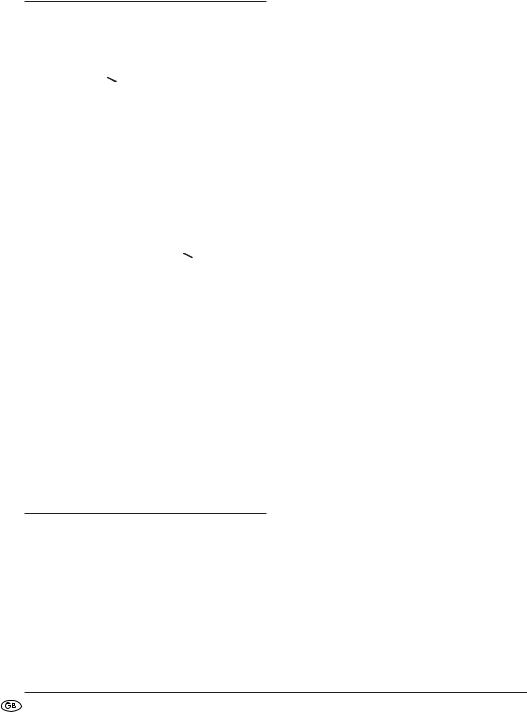
Using the thermal jug
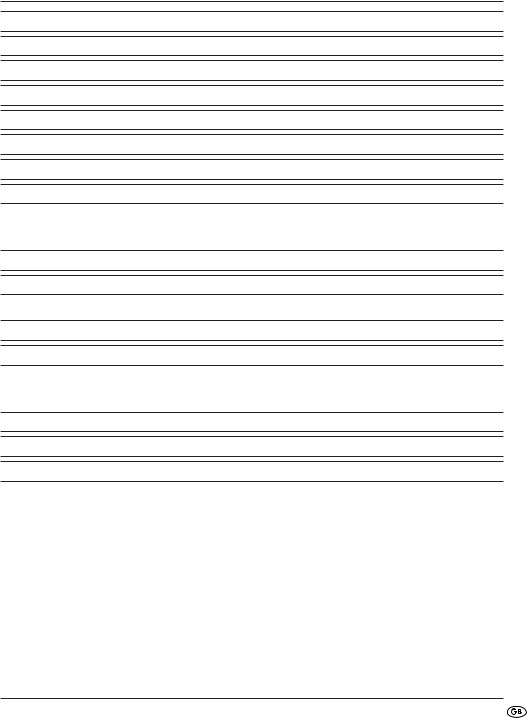
Opening / Closing the lid
To open the thermal jug 0, turn the lid 9 so far to the side that the arrow on the lid 9 points to the symbol  . You can now lift the lid 9 upwards.
 Risk of personal injury!
Should you want to remove the lid 9 directly after the brewing process, ensure that you hold the lid 9 so that the hot condensed water, which can collect on the lid 9, is not able to run onto your hand. Risk of scalding!
To close the lid 9, place it so that the arrow on the lid 9 points to the symbol  . Then turn it
so far back that the arrow on the lid 9 points to the symbol  . The lid 9 is now secured and
cannot fall off.
Pouring coffee
You do not have to remove the lid 9 from the thermal jug 0 to pour coffee.
With the lid 9 secured, press on the pouring lever 8 
 and hold it down. You can now pour out the coffee.
When you have finished pouring, release the pouring lever 8 
 .
.
Preparing coffee
Swing out the filter holder 4 and insert a filter bag (Size 1x4) with the sides folded. Put coffee powder into it (medium to fine ground). For one cup of coffee you will require about one measuring spoon q of coffee powder. Subject to taste, the amount of coffee powder can vary.
Fill the water tank 1 with the required amount of water.
For this, use the scale 3 on the water tank 1.
 Note:
Note:
•Never fill it with water for more than 10 large cups/ 15 small cups. Pay heed to the Max marking in the water tank. The appliance can overflow. Before use, check to ensure that the thermal jug 0 is empty.
•Before every brewing process, rinse the thermal jug 0 with hot mains water. This will ensure that the coffee remains hot for longer.
Place the thermal jug 0 in the coffee machine.
Press the switch 7 to start the brewing process. The red indicator lamp glows.
The coffee maker switches itself off automatically when the brewing process has ended.
 Note:
Note:
You cannot stop the brewing process manually. All of the water that is in the water tank 1 passes through the coffee maker. Should you wish to stop the brewing process you must disconnect the plug 6 from the power socket.
You can extract the thermal jug 0 and serve the coffee when the red indicator light has extinguished.
 Tip:
Tip:
Should you wish to keep the coffee warm in the thermal jug 0 for an extended period, remove the thermal jug 0 from the coffee maker when the brewing process is finished. When the thermal jug 0 is standing in the coffee maker the lid 9, due to the brewing mechanism, is pressed down. As soon as the brewing process is complete, hot air escapes through the lid 9. The coffee cools faster. When the thermal jug 0 is removed from the coffee maker, the lid 9 closes itself automatically. The coffee stays hot for longer.
- 4 -
 Note:
Note:
After you pour water in the water tank 1 for further brewing processes, allow the coffee machine to cool down for approx. 1 minute.
Cleaning and care
Always remove the plug 6 from the power socket before cleaning the appliance.
 Risk of electric shock!
Before you clean the coffee maker you MUST remove the plug 6 from the power socket.
NEVER submerge the Coffee Maker in water. The appliance could become damaged!
 Risk of burns!
Always wait until the coffee maker has cooled down before cleaning it.
For cleaning, remove the lid 9 from the thermal jug 0 (see chapter "Using the thermal jug").
Do not use household detergents or sharp/pointed objects to remove soiling. These could damage the appliance.
Wipe the housing of the coffee maker and the thermal jug 0 with a soft cloth lightly moistened with a soapy solution.
After every brewing process remove the filter bag from the filter bag holder 4.
Remove the filter and rinse the filter bag holder and the thermos jug 0 under running water.
If you do not intend to use the coffee maker for an extended period, pack the power cable into the cable shaft 5.
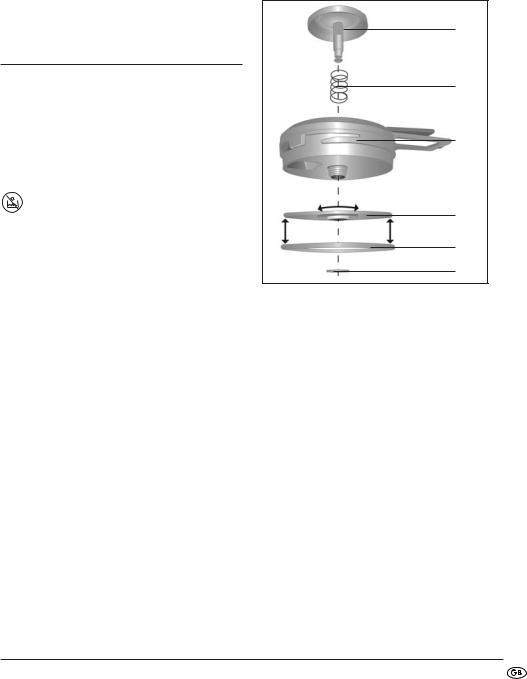
Cleaning the lid
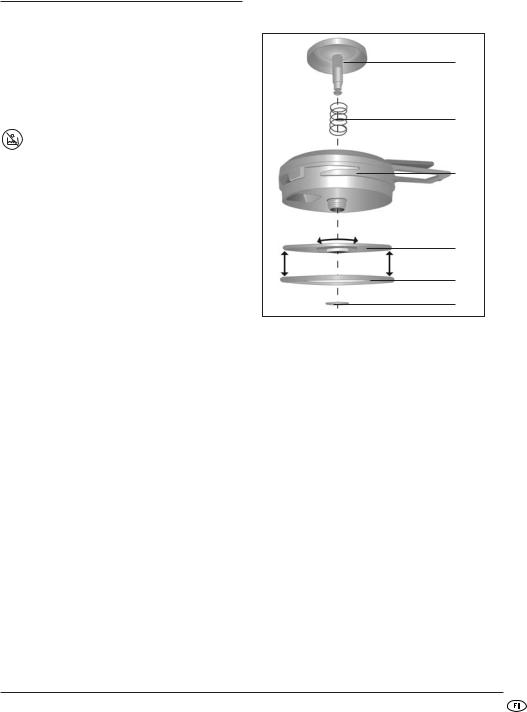
To clean the lid 9, it must be dismantled:
Carefully pull the silicon disc from the lower part of the inflow lid . Hold the inflow lid firmly, as this will be pressed up by the spring .
You can now remove the inflow lid and the spring .
Unscrew the securing disc from the lid .
Release the silicon ring from the securing disc .
Clean all parts in a mild soapy solution and dry them well.
To reassemble the lid 9 proceed in the reverse order.
 Note:
Note:
On reassembly, ensure that the side on the securing disc with the two ribs points towards the lid .
- 5 -
Scale removal |
|
Disposal |
Regularly remove scale from the coffee maker, subject to the local water quality and appliance usage. Use only descaling agents that are suitable for coffee makers.
Place the scale removal product in the water tank 1.
Fill it with enough water for max. 8 large cups.
Press the switch 7 to start the descaling process. The red indicator lamp glows.
Wait until the solution has completely run through the Coffee Maker.
After descaling, rinse the coffee maker through twice, each time using 8 large cups of clean water.
Do not dispose of the appliance in your normal domestic waste. This product is subject to the European guideline 2002/96/EC.
Dispose of the appliance through an approved disposal centre or at your community waste facility. Observe the currently applicable regulations.
In case of doubt, please contact your waste disposal centre.
Dispose of all packaging materials in an environmentally responsible manner.
Troubleshooting |
|
Warranty & Service |
The coffee maker is not working:
The appliance is not switched on. Press the switch 7 to switch the appliance on.
The plug 6 is not inserted into a power socket. Connect the appliance with the mains. Push the power plug into the wall socket.
The appliance is defective. In this case, contact Customer Services.
The coffee is too strong/too weak:
There is too little/too much water in the water tank 1. Fill it with the correct amount of water.
It is filled with too much/too little coffee powder. Fill it with less/more coffee powder.
The coffee powder is too finely/too coarsely ground. Select a different grade of grinding for your coffee powder.
The warranty for this appliance is for 3 years from the date of purchase. This appliance has been manufactured with care and meticulously examined before delivery. Please retain your receipt as proof of purchase date. Should a claim need to be made under the warranty, please make contact by telephone with our service department. Only in this way can a post-free despatch for your goods be assured.
The warranty covers ONLY claims for material and maufacturing defects, not for wearing or consumable or for damage to fragile components. This product is for private use only and is not intended for commercial applications.
The warranty will become void in the event of abusive and improper handling, use of force and internal tampering not carried or approved by our authorized service branch. Your statutory rights are not restricted in any way by this warranty.
- 6 -
DES Ltd
Units 14-15
Bilston Industrial Estate Oxford Street
Bilston WV14 7EG
Tel.: 0870/787-6177
Fax: 0870/787-6168
e-mail: support.uk@kompernass.com
Kompernass Service Ireland
Tel: 1850 930 412 (0,082 EUR/Min.)
Standard call rates apply. Mobile operators may vary.
e-mail: support.ie@kompernass.com
Importer
KOMPERNASS GMBH BURGSTRASSE 21
44867 BOCHUM, GERMANY
www.kompernass.com
- 7 -

- 8 -
SISÄLLYSLUETTELO |
SIVU |
Turvaohjeet |
10 |
Toimituslaajuus |
11 |
Määräystenmukainen käyttö |
11 |
Laitteen kuvaus |
11 |
Tekniset tiedot |
11 |
Ennen ensimmäistä käyttöä |
11 |
Pystytys |
11 |
Termoskannun käyttö |
12 |
Kannen avaaminen / sulkeminen ................................................................................................. |
12 |
Kahvin kaataminen ........................................................................................................................ |
12 |
Kahvin valmistaminen |
12 |
Puhdistus ja hoito |
13 |
Kannen puhdistaminen .................................................................................................................. |
13 |
Kalkinpoisto |
14 |
Vikojen korjaus |
14 |
Kahvinkeitin ei toimi: ...................................................................................................................... |
14 |
Kahvi on liian vahvaa / mietoa:................................................................................................... |
14 |
Hävittäminen |
14 |
Takuu & huolto |
15 |
Maahantuoja |
15 |
Säilytä käsikirja myöhempää käyttöä varten. Jos myyt laitteen, anna käsikirja uudelle omistajalle!
- 9 -
KAHVINKEITIN
KH 1115
Turvaohjeet
 Sähköiskun aiheuttama vaara!
•Liitä laite ainoastaan määräysten mukaisesti asennettuun ja maadoitettuun pistorasiaan
•Irrota pistoke pistorasiasta, kun siirrät tai täytät laitetta, kun laitteessa ilmenee häiriö, ennen kuin ryhdyt puhdistamaan laitetta tai kun et tarvitse laitetta!
•Älä koskaan upota laitetta nesteisiin. Jos laitteen koteloon kuitenkin sattuu pääsemään nestettä, irrota laitteen verkkopistoke välittömästi pistorasiasta. Anna pätevien ammattihenkilöiden korjata laite.
•Älä koske laitteeseen, virtajohtoon tai -pistokkee- seen koskaan märillä käsillä.
•Irrota laite verkkovirrasta ainoastaan pistokkeesta vetämällä. Älä vedä johdosta.
•Älä taivuta tai purista sähköjohtoa.
•Anna vaurioitunut verkkopistoke tai virtajohto heti valtuutetun ammattihenkilöstön tai huoltopalvelun vaihdettavaksi vaarojen välttämiseksi.
 Tulipalon vaara!
•Älä jätä laitetta käytön aikana ilman valvontaa.
•Älä käytä laitetta koskaan ilman vesijohtovettä.
•Älä koskaan aseta laitetta lämmönlähteiden lähelle.
•Älä käytä jatkojohtoa. Verkkopistokkeen on oltava vaaratilanteessa nopeasti käsillä.
 Loukkaantumisvaara!
•Älä koskaan käytä laitteen termoskannua mikroaaltouunissa.
•Älä koskaan anna lasten käyttää laitetta ilman aikuisen valvontaa. Kerro lapsille vaaroista, joita laite voi aiheuttaa.
•Sijoita verkkojohto siten, että sen päälle ei voi astua tai ettei siihen voi kompastua.
•Älä työnnä termoskannuun mitään teräviä tai kovia esineitä. Älä koske termoskannun sisäpintaan. Se saattaa vaurioittaa laitetta ja johtaa loukkaantumisiin.
•Tätä laitetta ei ole tarkoitettu sellaisten henkilöiden (mukaan lukien lapset) käyttöön, joiden rajoitetut, fyysiset, aistilliset tai henkiset kyvyt tai kokemuksen ja/tai tiedon puute ovat esteenä käytölle, lukuun ottamatta tilanteita, joissa heitä valvoo turvallisuudesta vastaava henkilö tai joissa he ovat saaneet tältä ohjeita laitteen käytöstä.
•Lapsia on valvottava ja on varmistettava, etteivät he leiki laitteella.
•Älä käytä laitetta ulkoisen ajastimen tai erillisen kauko-ohjatun järjestelmän avulla.
Varoitus palovammoista!
•Älä koskaan avaa suodatinpidikettä kahvinkeiton aikana.
•Älä koske kuumaan suodatinpussiin. Poista suodatinpussi vasta, kun neste on valunut pois ja suodatinpussi on jäähtynyt.
•Älä pidä käsiäsi laitteesta nousevassa vesihöyryssä.
•Älä koskaan liikuta laitetta keittotapahtuman aikana.
•Poista termoskannu vasta, kun keittotapahtuma on päättynyt ja suodatin on valunut tyhjäksi.
•Sulje laitteen suodatinpidike aina ennen laitteen päällekytkemistä. Nouseva höyry ja kuuma vesi voivat aiheuttaa palovamman vaaran.
- 10 -
Näin vältät laitteen vaurioitumisen!
•Täytä laitteen vesisäiliöön ainoastaan puhdasta vesijohtovettä.
Toimituslaajuus
•Kahvinkeitin KH 1115
•Termoskannu ja kansi
•Mittalusikka
•Käyttöohje
Tarkasta ennen käyttöönottoa toimituksen täydellisyys ja tarkasta laite mahdollisten vaurioiden varalta.
Tekniset tiedot
Verkkojännite: |
220 - 240 V~ 50 Hz |
Nimellisteho: |
1000 W |
Suodatinpussi: |
koko 1x4 |
Ennen ensimmäistä käyttöä
Anna 8 suuren vesikupillisen valua laitteen läpi kahdesti ennen ensimmäistä käyttöä. Älä aseta laitteeseen suodatinpussia äläkä käytä kahvijauhetta.
Puhdista laite (katso luku "Puhdistus ja hoito").
Määräystenmukainen käyttö |
|
Pystytys |
Kahvinkeitintä käytetään ainoastaan kahvin valmis- |
|
Aseta kahvinkeitin kuivalle ja tasaiselle alustalle. |
tukseen. Tämä kahvinkeitin on tarkoitettu ainoastaan |
|
Liitä verkkopistoke 6 verkkopistorasiaan. Varmista, |
käytettäväksi kotitalouksissa. Älä käytä sitä kaupalli- |
|
että verkkopistokkeeseen 6 on hätätapauksessa |
seen tarkoitukseen. |
|
helppo päästä käsiksi. |
Laitteen kuvaus |
|
Ohje: |
|
Jos kahvinkeitin on päällä, kun olet liittänyt sen |
|
|
|
sähköverkkoon, odota n. 45 sekuntia. Se sammuu |
1 Vesisäiliö |
|
sitten itsestään. |
2 Mittalusikanpidike |
|
|
3 Asteikko |
|
Ripusta mittalusikka q mittalusikan pidikkeeseen 2. |
4 Suodatinpidike |
|
Näin se on aina käsillä. |
5 Johdon säilytyslokero |
|
|
6 Virtajohto ja verkkopistoke |
|
|
7 Käynnistyspainike ja integroitu merkkivalo |
|
|
8 Kaatovipu |
|
|
9 Kansi |
|
|
0 Termoskannu |
|
|
q Mittalusikka |
|
|
- 11 -
Termoskannun käyttö
Kannen avaaminen / sulkeminen
Avaa termoskannu 0 kääntämällä kantta 9 niin pitkälle sivuun, että kannessa 9 oleva nuoli osoittaa symboliin  . Nyt voit irrottaa kannen 9 nostamalla sitä ylöspäin.
 Loukkaantumisvaara!
Jos poistat kannen 9 välittömästi keittotapahtuman jälkeen, varmista, että pidät kantta 9 niin, että kanteen 9 tiivistynyt kuuma vesi ei voi valua kädellesi. Palovammavaara!
Sulje kansi 9 asettamalla se niin, että kannen 9 nuoli osoittaa symbolia  . Kierrä sitä sen
verran takaisin, että kannessa 9 oleva nuoli osoittaa symbolia  . Kansi 9 on nyt lukittu
eikä voi pudota.
Kahvin kaataminen
Kantta 9 ei tarvitse ottaa termoskannusta 0 halutessasi kaataa kahvia.
Paina kannen 9 ollessa lukittuna kaatovipua 8

 ja pidä sitä painettuna. Nyt voit kaataa kahvia.
Kun olet lopettanut kaatamisen, vapauta kaatovipu 8 
 .
.
Kahvin valmistaminen
Käännä suodatinpidike 4 ulos ja aseta suodatinpussi (koko 1x4) sivut käännettyinä paikoilleen. Täytä kahvijauheella (keskikarkeasta hienoksi jauhettua). Yhteen kahvikupilliseen tarvitset noin yhden mittalusikallisen q kahvijauhetta. Määrä voi vaihdella maun mukaan.
Täytä vesisäiliöön 1 haluamasi määrä vettä. Käytä tähän vesisäiliössä 1 olevaa asteikkoa 3.
 Ohje:
Ohje:
•Älä koskaan täytä säiliöön enempää vettä, kuin mitä 10 suureen kupilliseen / 15 pieneen kupilliseen tarvitaan. Huomaa vesisäiliön Maxmerkintä. Vesi voi vuotaa laitteesta yli. Varmista ennen jokaista käyttöä, että termoskannu 0 on tyhjä.
•Huuhtele termoskannu 0 ennen jokaista keittotapahtumaa kuumalla vesijohtovedellä. Näin kahvi pysyy kauemmin kuumana.
Aseta termoskannu 0 kahvinkeittimeen.
Paina käynnistyspainiketta 7 käynnistääksesi keittotapahtuman. Punainen merkkivalo syttyy.
Kahvinkeitin sammuu keittotapahtuman jälkeen automaattisesti.
 Ohje:
Ohje:
Keittotapahtumaa ei voi sammuttaa käsin. Koko vesisäiliössä 1 sijaitseva vesi virtaa kahvinkeittimen läpi. Jos haluat keskeyttää keittotapahtuman, sinun on vedettävä verkkopistoke 6 verkkopistorasiasta.
Voit ottaa termoskannun 0 ja tarjoilla kahvin, kun punainen merkkivalo on sammunut.
 Vinkki:
Jos haluat pitää kahvin lämpimänä termoskannussa 0 pidempään, ota termoskannu 0 kahvinkeittimestä keittotapahtuman jälkeen. Kun termoskannu 0 on kahvinkeittimessä, keittomekanismi painaa kantta 9 alas. Heti kun keittotapahtuma on päättynyt, kannen 9 kautta poistuu kuumaa ilmaa. Kahvi jäähtyy nopeammin. Kun termoskannu 0 otetaan kahvinkeittimestä, kansi 9 sulkeutuu automaattisesti. Kahvi pysyy pidempään kuumana.
 Ohje:
Ohje:
Kun olet täyttänyt vettä vesisäiliöön 1 seuraavaa keittotapahtumaa varten, anna kahvinkeittimen jäähtyä n. 1 minuutin ajan.
- 12 -
Puhdistus ja hoito
Irrota verkkopistoke 6 pistorasiasta ennen jokaista puhdistuskertaa.
 Sähköiskun vaara!
Verkkopistoke 6 on aina irrotettava pistorasiasta ennen kahvinkeittimen puhdistusta.
Älä koskaan upota kahvinkeitintä veteen. Laite voi vaurioitua korjauskelvottomaksi.
 Palovammojen vaara!
Odota, että kahvinkeitin on viilentynyt, ennen kuin puhdistat sen.
Poista kansi 9 termoskannusta 0 puhdistusta varten (ks. luku "Termoskannun käyttö").
Älä käytä kotitalouspuhdistusaineita tai teräviä esineitä lian poistoon. Ne saattavat vahingoittaa kahvinkeitintä.
Pyyhi kahvinkeittimen runko ja termoskannu 0 pehmeällä, saippualiuoksella kostutetulla pyyhkeellä.
Poista suodatinkori jokaisen käytön jälkeen suodatinpidikkeestä 4.
Poista suodatin ja huuhtele suodatinkori ja termoskannu 0 juoksevan vesijohtoveden alla.
Jos et käytä kahvinkeitintä pidempään, säilytä johtoa säilytyslokerossa 5.
Kannen puhdistaminen
Pura kansi 9 sen puhdistamista varten.
Vedä silikonilevy varovasti irti sisäänvirtauskannen alaosasta. Pidä sisäänvirtauskannestalujasti kiinni, koska jousi työntää sitä ylös.
Nyt voit irrottaa sisäänvirtauskannen ja jousen .
Kierrä sulkulevy irti kannesta .
Irrota silikonirengas sulkulevystä .
Puhdista kaikki osat saippualiuoksella ja kuivaa ne hyvin.
Kokoa kansi 9 päinvastaisessa järjestyksessä.
 Ohje:
Ohje:
Varmista kootessasi, että sulkulevyn kahdella raidalla varustettu puoli osoittaa kanteen .
- 13 -
 Loading...