


ELECTRICAL SOCKETS
ELECTRICAL SOCKETS |
RADIOSTYREDE STIKDÅSER |
Operation and Safety Notes |
Brugsog sikkerhedsanvisninger |
IAN 91210
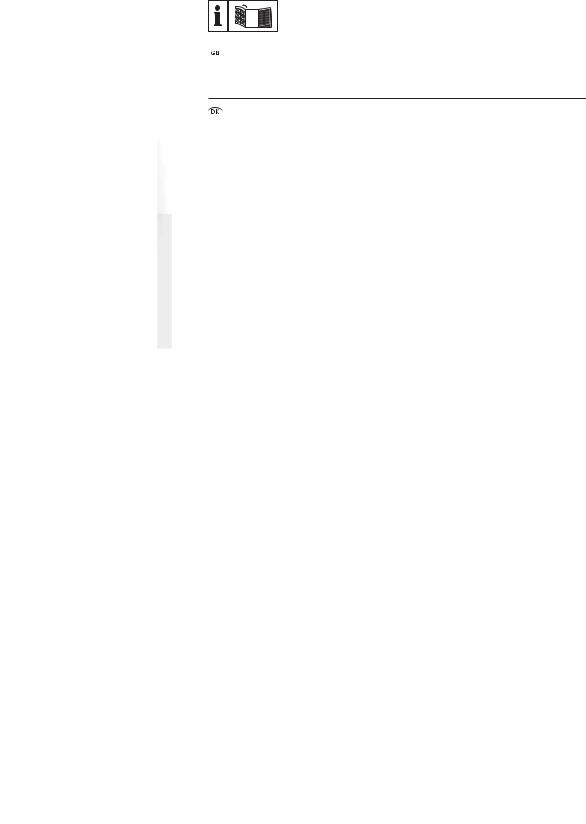
Before reading, unfold the page containing the illustrations and familiarise yourself with all functions of the device.
Før du læser, vend siden med billeder frem og bliv bekendt med alle apparatets funktioner.
GB |
Operation and Safety Notes |
Page |
5 |
DK |
Brugsog sikkerhedsanvisninger |
Side |
13 |

A 

|
|
1 |
|
A |
|
|
B |
|
|
C |
2 |
|
D |
|
|
Master |
|
|
|
3 |
4 |
ON |
OFF |
|
|
|
B |
5 |
6 |
7 |
|
ON/OFF |
|
LEARN |
8

Table of contents
Introduction |
|
|
Proper handling ........................................................................................... |
Page |
6 |
Scope of supply ........................................................................................... |
Page |
6 |
Control elements .......................................................................................... |
Page |
6 |
Technical data.............................................................................................. |
Page |
6 |
Safety |
|
|
Safety advice ............................................................................................... |
Page |
7 |
Setting up |
|
|
Preparing the remote control ...................................................................... |
Page |
7 |
Setting up the remotecontrolled socket ................................................... |
Page |
8 |
Setting-up operation |
|
|
Using the radio-controlled socket............................................................... |
Page |
9 |
Using the remotecontrol ............................................................................ |
Page |
9 |
Trouble-shooting .......................................................................................... |
Page |
9 |
Cleaning .................................................................................................... |
Page 10 |
|
Disposal..................................................................................................... |
Page 11 |
|
Guarantee and service |
|
|
Guarantee .................................................................................................... |
Page |
11 |
Service address ........................................................................................... |
Page |
11 |
Declaration of conformity ........................................................................... |
Page |
11 |
Manufacturer ............................................................................................... |
Page 12 |
|
GB 5

Introduction
Electrical Sockets
Introduction
Proper handling
The radio-controlled socket set is suitable for switching electrical equipment on and o by remote control. Any alterations to this device are not in accordance with regulations and could represent significant risk of accidents. The manufacturer does not accept liability for any damage caused through the device not being used in accordance with the regulations. This device is not intended for commercial use.
Remote-controlled socket (fig. B):
5 Manual ON / OFF button
6 LED power indicator
7 LEARN button
8Child protection socket
Technical data
Remote control
RCS AAA3680-A IP20:
Batteries: 2 x AAA, each 1.5V Transmission
frequency:
Licensing:
Scope of supply |
Range: |
After you have unpacked this set, please check to make sure all the contents are complete.
4 Remote controlled sockets
1 4-channel remote control
2 Batteries AAA (for remote control)
1 Set of operating instructions
Control elements
Remote control (fig. A):
1 Power indicator light
2Channel ON / OFF button Channel A, B, C, D
3 Master ON / OFF switch
4 Battery compartment lid
6 GB
Radio-controlled sockets RCE AAA3680-A IP20 DK:
Rated voltage: 230 V~ 50 Hz Breaking capacity: 15,7A 3.600 W Standby power
consumption:
Transmission frequency:
Advice: The radio-controlled sockets each have a child protection socket 8 ,
which significantly increases safety at home. The contacts are protected in such a way that children cannot stick
Introduction / Safety / Setting up
needles or other sharp objects into them and thus get an electric shock. Nevertheless, please keep the device out of the reach of children at all times.
Safety
Safety advice
Read these operating instructions and safety advice carefully. Look at the diagram page and familiarise yourself with all functions of the device before starting it up for the first time.
Avoid danger to life from electric shock!
Only connect the radio-controlled
sockets to earthed 230 V~ domestic sockets.
At all costs, avoid exposure to damp and extreme temperatures.
Only use the radio-controlled sockets in enclosed spaces. They are not suitable for outdoor use.
Despite the child protection socket
8 , please keep the device out of the reach of children at all times.
Avoid overloading the device. Overloading can cause a fire hazard or damage to the device. The maximum capacity is approx. 3.600 W per radio-controlled socket.
Please contact the service department immediately operational faults arise.
Do not open the device on any account. All necessary repairs should only be carried out by the service
department or a specialist electrical workshop.
Before cleaning always disconnect the device from the mains supply. In this case always remove the radiocontrolled electrical outlet socket from the mains wall socket and remove all plugs from the device.
Do not have one radio-controlled electrical outlet socket inserted behind the other.
Do not use any additional child protection devices for the radiocontrolled sockets. The connection between the plug and the radiocontrolled socket could be impaired and risk from overheating then arises. The radio-controlled sockets already have a child protection device which prevents children from putting any objects into the socket.
Make sure that the connected radio-controlled electrical outlet sockets are freely accessible and not covered by other objects.
If the device malfunctions, switch it o immediately.
These instructions are a component of the device. If you pass the device on to a third party, these instructions must also be handed on.
Setting up
Preparing the remote control (fig. A)
1.Open the battery compartment on the back of the remote control by
GB 7
 Loading...