


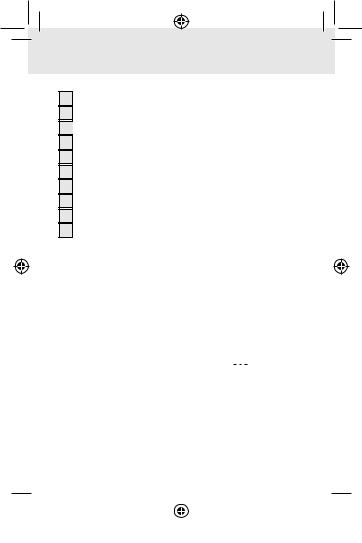
Table of Contents
|
|
|
Introduction |
|
|
|
Page |
7 |
Proper Use..................................................................................... |
||
|
Page |
8 |
Supply Scope................................................................................ |
||
|
Page |
8 |
Description of Parts....................................................................... |
||
|
Page |
9 |
Technical Data.............................................................................. |
||
Safety Instructions.................................................................... |
Page 10 |
|
Before you start......................................................................... |
Page 15 |
|
|
|
|
Set the time.................................................................................... |
Page 16 |
|
Operation |
|
|
|
Page 17 |
|
Connecting the electrical appliance to be tested....................... |
||
|
Page 17 |
|
Current measurement.................................................................... |
||
|
Page 18 |
|
Maximum current.......................................................................... |
||
|
Page 19 |
|
Measure power consumption...................................................... |
||
|
Page 19 |
|
Maximum power consumption..................................................... |
||
|
Page 20 |
|
Delete maximum values................................................................ |
||
|
Page 20 |
|
Set the overload warning value................................................... |
||
|
Page 21 |
|
Measure mains voltage................................................................ |
||
|
Page 22 |
|
Measure mains frequency............................................................ |
||
|
Page 22 |
|
Show power factor....................................................................... |
||
|
Page 23 |
|
Set electricity rate 1 and 2........................................................... |
||
Set electricity flat-rate.................................................................... |
Page |
25 |
Total energy consumption............................................................ |
Page 27 |
|
|
Page 28 |
|
Time measurement function.......................................................... |
||
|
Page 29 |
|
Show energy costs........................................................................ |
||
|
|
|
Set the Energy consumption / Time measurement function / |
|
|
Total cost display to 0................................................................... |
Page 30 |
|
|
Page 30 |
|
Changing the batteries................................................................. |
||
|
Page 31 |
|
Restore delivery condition............................................................ |
||
Cleaning and Care.................................................................... |
Page 32 |
|
Disposal.......................................................................................... |
Page 32 |
|
Warranty and Service |
|
|
|
Page 34 |
|
Warranty Declaration................................................................... |
||
|
Page 34 |
|
Service Address............................................................................. |
||
|
Page |
35 |
Declaration of Conformity............................................................ |
||
|
Page 35 |
|
Manufacturer................................................................................. |
||
GB 3
|
|
|
|
|
|
|
|
|
|
|
|
|
|
|
|
|
|
|
|
|
|
|
|
|
|
|
|
|
|
|
|
|
|
|
|
|
|
|
56861_ |
|
Energiekostenmessgeraet_Content_GB-PL-CZ-SK.indd 3 |
26.11.10 |
|
10:12 |
|||||||
|
|
|||||||||||

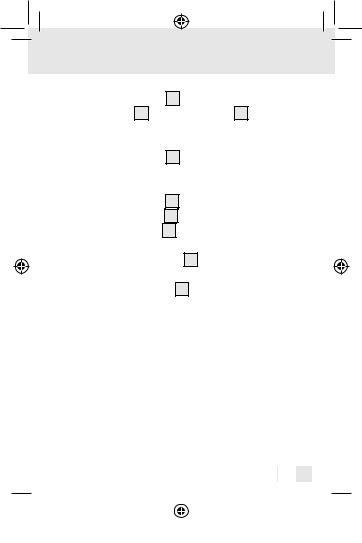
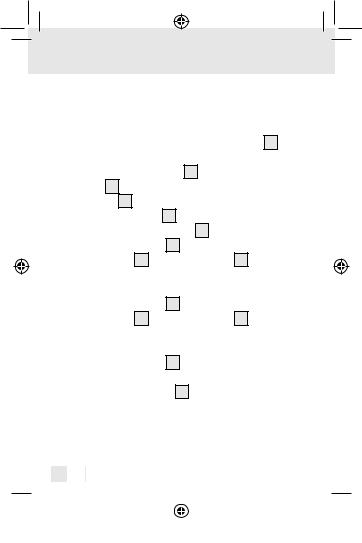
1
|
|
UP |
DOWN |
PRICE |
SET |
|
6 |
5 |
4 |
3 |
2 |
A |
|
|
|
|
|
|
18 |
|
|
|
|
|
20 |
|
|
|
7 |
|
|
|
|
|
8 |
|
|
|
|
|
9 |
|
19 |
|
|
|
10 |
|
18 |
|
|
|
|
|
|
|
|
11 |
|
|
17 |
|
|
|
|
|
|
|
|
12 |
|
|
16 |
kWh |
|
|
|
|
|
|
13 |
||
|
|
|
|
||
|
|
|
|
|
|
|
|
15 14 |
|
|
|
4 |
GB |
|
|
|
|
|
|
|
|
|
|
|
|
|
|
|
|
|
|
|
|
|
|
|
|
|
|
|
|
|
|
|
|
|
|
|
|
|
|
|
|
|
|
|
56861_ |
|
Energiekostenmessgeraet_Content_GB-PL-CZ-SK.indd 4 |
26.11.10 |
|
10:12 |
|||||||
|
|
|||||||||||
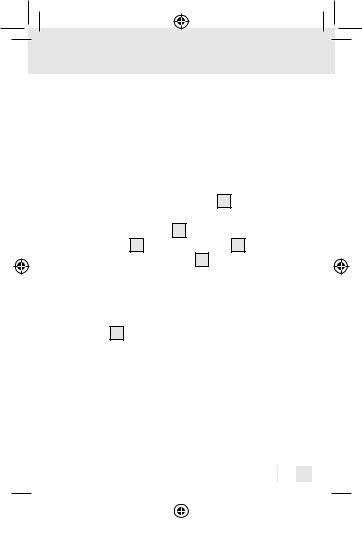
B |
21 |
22 |
GB 5
|
|
|
|
|
|
|
|
|
|
|
|
|
|
|
|
|
|
|
|
|
|
|
|
|
|
|
|
|
|
|
|
|
|
|
|
|
|
|
56861_ |
|
Energiekostenmessgeraet_Content_GB-PL-CZ-SK.indd 5 |
26.11.10 |
|
10:12 |
|||||||
|
|
|||||||||||
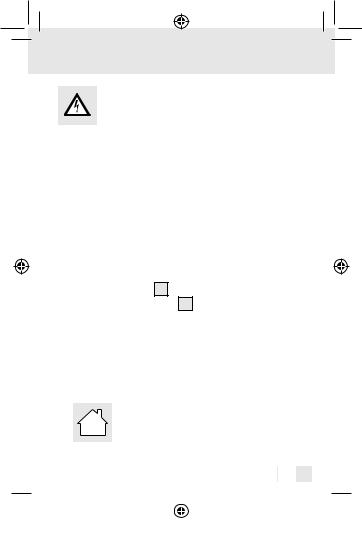
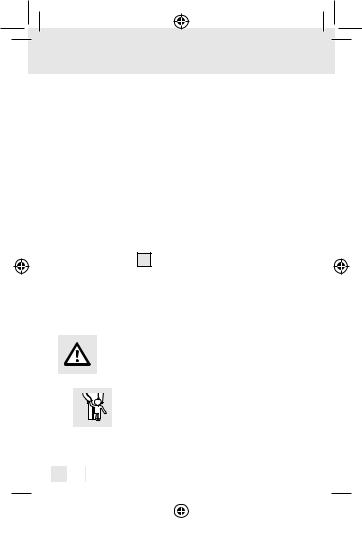
Introduction
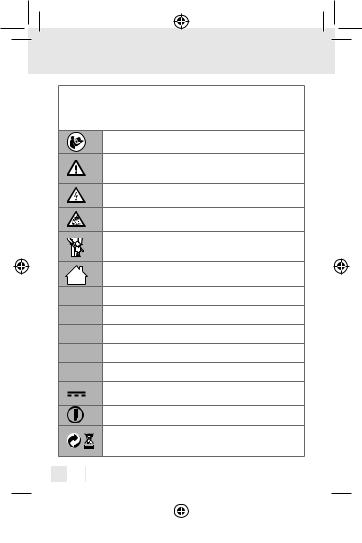
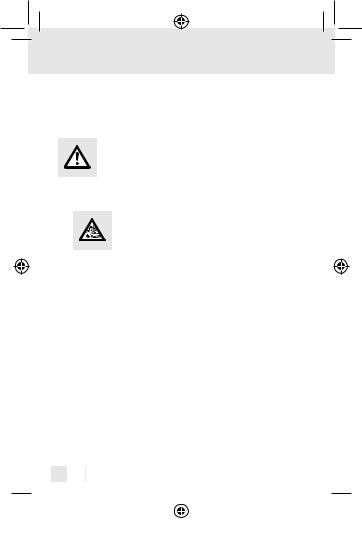
The following pictograms are used in these operating instructions / on the device:
|
Read instruction manual! |
|
|
Observe caution and safety notes! |
|
|
Caution – electric shock! Danger to life! |
|
|
Risk of explosion! |
|
|
Keep children away from electrical devices! |
|
V ~ |
For use in dry rooms only. |
|
Volt (AC) |
||
|
||
W |
Watts (Effective power) |
|
Hz |
Hertz (mains frequency) |
|
A |
Amp |
|
kWh |
Kilowatt hour |
|
|
Direct current (Type of current and voltage) |
|
|
Proper procedure and handling. |
|
|
Dispose packaging and appliance in an |
|
|
environmentally-friendly way! |
6 GB
|
|
|
|
|
|
|
|
|
|
|
|
|
|
|
|
|
|
|
|
|
|
|
|
|
|
|
|
|
|
|
|
|
|
|
|
|
|
|
56861_ |
|
Energiekostenmessgeraet_Content_GB-PL-CZ-SK.indd 6 |
26.11.10 |
|
10:12 |
|||||||
|
|
|||||||||||
Introduction
Energy Monitor
Q Introduction
Familiarise yourself with the product before using it for the first time. Please read the following
operating manual and safety instructions carefully. Always use the instrument only as described and for the stated areas of use. Keep this manual in a safe place. Make sure that all documents accompany the instrument if you pass it on to anyone else.
Q Proper Use
The appliance is designed to measure the power consumption of electrical appliances and to calculate electricity and operating costs. Any other use or modification of the instrument constitute improper use and carry a serious risk of accident. The manufacturer is not liable for damage caused by improper use. The instrument is not intended for commercial use.
GB 7
|
|
|
|
|
|
|
|
|
|
|
|
|
|
|
|
|
|
|
|
|
|
|
|
|
|
|
|
|
|
|
|
|
|
|
|
|
|
|
56861_ |
|
Energiekostenmessgeraet_Content_GB-PL-CZ-SK.indd 7 |
26.11.10 |
|
10:12 |
|||||||
|
|
|||||||||||
Introduction
Q Supply Scope
1 x wattmeter
2 x round cell batteries (Alkaline LR44, 1.5 V 

 ) 1 x operating manual
1 x warning labels for the battery compartment cover in other languages
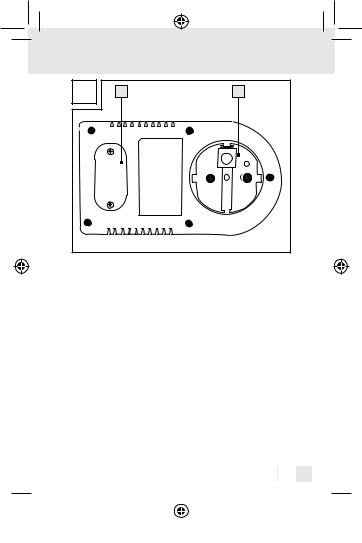
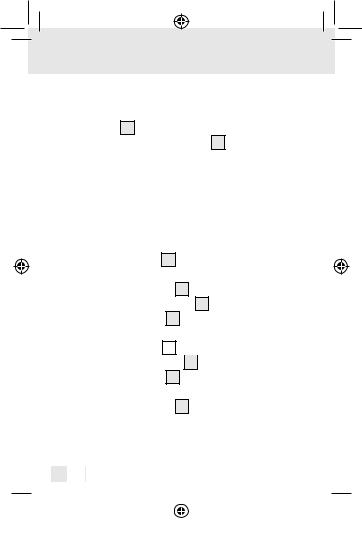
Q Description of Parts
1LC display
2SET button
3PRICE button
4DOWN button
5UP button
6Socket
7OVERLOAD / overload symbol
8Watt symbol / overload warning value power consumption (W)
9Ampere symbol / overload warning value current consumption (A)
10Volt symbol
11Hz / mains frequency symbol
12TIME / time symbol
8 GB
|
|
|
|
|
|
|
|
|
|
|
|
|
|
|
|
|
|
|
|
|
|
|
|
|
|
|
|
|
|
|
|
|
|
|
|
|
|
|
56861_ |
|
Energiekostenmessgeraet_Content_GB-PL-CZ-SK.indd 8 |
26.11.10 |
|
10:12 |
|||||||
|
|
|||||||||||
Introduction
13€ / cost symbol
142nd electricity tariff
15
 symbol (setting the time)
16Total symbol
17Kilowatt-hours symbol
18Power factor / power factor symbol
19PRICE kWh / price per kWh symbol
20Max symbol
21Battery compartment cover
22Plug
Technical Data |
|
|
|
|
|
Q |
|
|
|
|
|
Model: |
EM 240-A FR |
|
|||
Input voltage: |
230 V ~, 50 Hz |
|
|||
Max. permissible load: |
16 A ~, 3500 W |
|
|||
Type of battery: |
2 x LR.44 (Alkaline) |
|
|||
Lower limit range |
1.5 V |
|
|
|
|
|
|
||||
|
|
|
|
|
|
for current measurements: |
0.005 A |
|
|||
Ampere indicating range: |
0.00 - 16 A |
|
|||
Volt indicating range: |
190 - 276 V ~ |
|
|||
Watt indicating range: |
0 - 3500 W |
|
|||
Kilowatt hour indicating range: |
0.00 - 9999 kWh |
|
|||
|
|
|
|
|
|
|
|
|
GB |
9 |
|
|
|
|
|
|
|
|
|
|
|
|
|
|
|
|
|
|
|
|
|
|
|
|
|
|
|
|
|
|
|
|
|
|
|
|
|
|
|
|
56861_ |
|
Energiekostenmessgeraet_Content_GB-PL-CZ-SK.indd 9 |
26.11.10 |
|
10:12 |
|||||||
|
|
|||||||||||
Introduction / Safety Instructions
Mains frequency indicating range: 40 - 70 Hz
Resolution: |
0.5 W |
Enviromental conditions: |
|
Altitude: |
max. 2000 m |
Temperature: |
+ 5 °C - + 40 °C |
Relative humidity: |
max. 90 % |
Tolerance range: |
|
in volts: |
± 3 % |
in amperes: |
± 3 %, ± 0.01 A |
in watts: |
± 3 %, ± 2 W |
Dimensions of LCD: |
3.2 x 3.2 cm (W x H) |
 Safety Instructions
 Warning! Please read all the safety information and instructions. Failure to observe the safety information and instructions can result in electric shock, fire and / or serious injury.
PLEASE RETAIN ALL SAFETY INFORMATION AND INSTRUCTIONS FOR FUTURE REFERENCE.
10 GB
|
|
|
|
|
|
|
|
|
|
|
|
|
|
|
|
|
|
|
|
|
|
|
|
|
|
|
|
|
|
|
|
|
|
|
|
|
|
|
56861_ |
|
Energiekostenmessgeraet_Content_GB-PL-CZ-SK.indd 10 |
26.11.10 |
|
10:12 |
|||||||
|
|
|||||||||||
Safety Instructions
How to avoid fatal injury by electric shock!
JInspect the wattmeter, additional equipment and the electrical appliances you wish to test before every use to ensure that they are intact. Damaged electrical appliances and buckled / kinked mains leads or bare wires increase the risk of an electric shock.
JDo not operate the wattmeter if mains leads or mains plugs on the electrical appliances you wish to test are damaged.
CAUTION! Damaged mains leads pose a risk of fatal injury by electric shock.
JThe connector plug 22 of the wattmeter must fit into the outlet. The connector plug 22 must not be modified in any way. Do not use adapter plugs in conjunction with earthed electrical appliances. Using unmodified mains plugs and proper outlets reduces the risk of an electric shock.
JAvoid physical contact with earthed surfaces such as those
of pipes, heaters, ovens and fridges. There is an increased risk of an electric shock if your body is earthed.
J Keep the wattmeter away from rain and moisture. If water enters the wattmeter there is an increased risk of an electric shock.
GB 11
|
|
|
|
|
|
|
|
|
|
|
|
|
|
|
|
|
|
|
|
|
|
|
|
|
|
|
|
|
|
|
|
|
|
|
|
|
|
|
56861_ |
|
Energiekostenmessgeraet_Content_GB-PL-CZ-SK.indd 11 |
26.11.10 |
|
10:12 |
|||||||
|
|
|||||||||||
Safety Instructions
JOnly operate the wattmeter in dry clothing and preferably shoes with a rubber sole or standing on an insulating mat.
JOnly measure voltages of over 25 V ~ in compliance with the relevant safety instructions for the electrical appliance you wish to test.
JNever under any circumstances open up the housing of the wattmeter. If the wattmeter does not work properly or is damaged, please have it repaired immediately by a specialist.
JDo not operate the wattmeter outdoors.
JAlways remove the electrical appliances you are testing from the socket 6 directly by the mains plug and never using the mains lead.
JRemove the wattmeter from the outlet when you have finished using it.
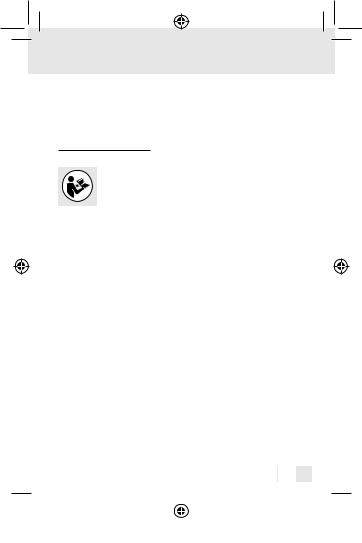
How to avoid personal injury and damage to the product!
J |
RISK OF FATAL INJURY AND ACCIDENTS |
|
FOR INFANTS AND CHILDREN! Never |
|
leave children unattended with the packaging |
materials or the product. The packaging material carries |
|
a risk of suffocation and there is a risk of fatal injury by |
|
12 |
GB |
|
|
|
|
|
|
|
|
|
|
|
|
|
|
|
|
|
|
|
|
|
|
|
|
|
|
|
|
|
|
|
|
|
|
|
|
|
|
|
56861_ |
|
Energiekostenmessgeraet_Content_GB-PL-CZ-SK.indd 12 |
26.11.10 |
|
10:12 |
|||||||
|
|
|||||||||||
Safety Instructions
electric shock. Children often underestimate dangers. Always keep children away from the product.
J CAUTION! DANGER OF EXPLOSION!
Never operate the wattmeter where there is any risk of explosion, i.e. close to inflammable
liquids or gases.
JNever exceed the stated maximum input voltage.
JAvoid strong vibrations or shocks.
JNever expose the wattmeter to extreme temperatures, extreme sunlight, humidity or moisture.
JNever expose the wattmeter to extreme temperature fluctuations. Do not use the wattmeter until it has become adjusted to the ambient temperature.
JNever operate the wattmeter close to strong magnetic fields such as motors, transformers or similar.
JDo not place the wattmeter face down on workbenches or working surfaces. This helps to prevent damage to the operating elements and the LCD 1 .
JRemove the batteries from the wattmeter if you do not intend to use if for any length of time.
JDo not connect after each other.
JUse the power cost meter only in buildings equipped under Installation Category II (CAT II) according to IEC 664. The maximum peak voltage must not exceed 2500 V ~.
GB 13
|
|
|
|
|
|
|
|
|
|
|
|
|
|
|
|
|
|
|
|
|
|
|
|
|
|
|
|
|
|
|
|
|
|
|
|
|
|
|
56861_ |
|
Energiekostenmessgeraet_Content_GB-PL-CZ-SK.indd 13 |
26.11.10 |
|
10:12 |
|||||||
|
|
|||||||||||
Safety Instructions
The main electricity supply for residential buildings usually falls under Installation Category II.
Safety Instructions for Batteries!
JRemove batteries that have not been used for any length of time from the instrument.
J CAUTION! DANGER OF EXPLOSION!
Never recharge batteries.
JMake sure when inserting the batteries that the polarity is correct. This is indicated in the battery compartment.
JIf necessary, clean the battery and instrument contacts before inserting the batteries.
JRemove spent batteries from the instrument immediately on account of the increased risk of leakage.
JBatteries must not be disposed of in household waste.
JConsumers are under a legal obligation to dispose of batteries properly.
JKeep batteries out of the reach of children, do not dispose of them in fire, do not short-circuit them, and do not take them apart.
JFailure to observe these instructions may result in the batteries discharging beyond their end voltage, which
14 GB
|
|
|
|
|
|
|
|
|
|
|
|
|
|
|
|
|
|
|
|
|
|
|
|
|
|
|
|
|
|
|
|
|
|
|
|
|
|
|
56861_ |
|
Energiekostenmessgeraet_Content_GB-PL-CZ-SK.indd 14 |
26.11.10 |
|
10:12 |
|||||||
|
|
|||||||||||
Safety Instructions / Before you start
carries a risk of leakage. If the batteries in your instrument have leaked, remove them immediately to prevent damage to the instrument.
JAvoid contact with skin, eyes and mucous membrane. In the event of contact with battery acid, rinse the affected area with plenty of water and / or consult a doctor.
JUnplug the appliance before changing the batteries.
JThe battery compartment cover 21 must be completely inserted before bring into operation.
Q Before you start
Note: first stick the enclosed label onto the battery compartment cover 21 .
Note: two round cell batteries (Alkaline LR44, 1.5 V 

 ) are already inserted in the wattmeter on delivery.
jRemove the battery compartment cover 21 by unscrewing the two screws with a suitable screwdriver.
jRemove the isolating strip from between the two round cell batteries (Alkaline LR44, 1.5 V 

 ) on the back of the battery compartment cover 21 .
jClose the battery compartment by replacing the battery compartment cover 21 . Please make sure that you
GB 15
|
|
|
|
|
|
|
|
|
|
|
|
|
|
|
|
|
|
|
|
|
|
|
|
|
|
|
|
|
|
|
|
|
|
|
|
|
|
|
56861_ |
|
Energiekostenmessgeraet_Content_GB-PL-CZ-SK.indd 15 |
26.11.10 |
|
10:12 |
|||||||
|
|
|||||||||||
Before you start
retighten the two screws firmly.
Note: Make sure that you replace the battery compartment cover 21 the right way round. The rounded corners of the battery compartment cover 21 must fit into the rounded recesses in the battery compartment.
j The wattmeter is now ready for operation.
Q Set the time
The time is displayed as soon as the isolating strip has been removed. The symbol 15 also appears.
jPress the “PRICE” button 3 until the time appears in the bottom third of the LC display 1 .
jPress the “SET” button 2 for approx. 3 seconds. The time display flashes.
j |
Press the “UP” button |
|
to set the hours. |
||
5 |
|||||
j |
Press the “DOWN” button |
|
|
|
|
|
4 to set the minutes. |
||||
jPress the “SET” button 2 to switch between 12 and 24-hour format.
jPress the “PRICE” button 3 to confirm your setting.
16 GB
|
|
|
|
|
|
|
|
|
|
|
|
|
|
|
|
|
|
|
|
|
|
|
|
|
|
|
|
|
|
|
|
|
|
|
|
|
|
|
56861_ |
|
Energiekostenmessgeraet_Content_GB-PL-CZ-SK.indd 16 |
26.11.10 |
|
10:12 |
|||||||
|
|
|||||||||||
Operation
QOperation
QConnecting the electrical appliance to be tested
c CAUTION! RISK OF FATAL INJURY BY ELECTRIC SHOCK! Only measure voltages of over 25 V ~ in compliance with the relevant safety instructions for the electrical appliance you wish to test.
m CAUTION! RISK OF INJURY! Never exceed the stated maximum input voltage.
jPlug the wattmeter into a suitable outlet.
jNow plug the mains plug of the electrical appliance you wish to test into the socket 6 of the wattmeter.
Q Current measurement
jPress the “UP” button 5 until the Ampere symbol 9 appears in the top third of the LC display 1 .
Note: the “Current measurement” function is the standard setting for the wattmeter. As soon as the isolating strip between the two round cell batteries is removed, the wattmeter is automatically in this mode.
GB 17
|
|
|
|
|
|
|
|
|
|
|
|
|
|
|
|
|
|
|
|
|
|
|
|
|
|
|
|
|
|
|
|
|
|
|
|
|
|
|
56861_ |
|
Energiekostenmessgeraet_Content_GB-PL-CZ-SK.indd 17 |
26.11.10 |
|
10:12 |
|||||||
|
|
|||||||||||

Operation
jThe LCD 1 now indicates the present current in A (Ampere) required for use of the electrical appliance. Note: you can also call up the current reading when the wattmeter has been removed from the outlet or when the electrical appliance you are testing is no longer connected to the wattmeter. As soon as you take a new measurement, the old current is overwritten.
Q Maximum current
jPress the “UP” button 5 until the Max symbol 20 and the Ampere symbol 9 appear in the top third of the LC display 1 .
jThe LCD 1 now indicates the maximum required current in A (Ampere) measured with the wattmeter so far. Note: you can also call up the maximum current reading when the wattmeter has been removed from the outlet or when the electrical appliance you are testing is no longer connected to the wattmeter.
Note: the maximum current value is saved until a higher value is measured. The old value is then overwritten by the new measurement.
18 GB
|
|
|
|
|
|
|
|
|
|
|
|
|
|
|
|
|
|
|
|
|
|
|
|
|
|
|
|
|
|
|
|
|
|
|
|
|
|
|
56861_ |
|
Energiekostenmessgeraet_Content_GB-PL-CZ-SK.indd 18 |
26.11.10 |
|
10:12 |
|||||||
|
|
|||||||||||

Operation
Q Measure power consumption
jPress the “UP” button 5 until the Watt symbol 8 appears in the top third of the LC display 1 .
jThe LCD 1 now indicates the present power consumption in W (Watt) required for use of the electrical appliance. Note: the power consumption is calculated according to the following formula: power = voltage x current x power factor.
Q Maximum power consumption
jPress the “UP” button 5 until the Max symbol 20 and the Watt symbol 8 appear in the top third of the LC display 1 .
jThe LCD 1 now indicates the maximum power consumption in W (Watt) measured by the wattmeter so far. Note: you can also call up the maximum power consumption reading when the wattmeter has been removed from the outlet or when the electrical appliance you are testing is no longer connected to the wattmeter.
Note: the maximum power consumption is saved until a higher value is measured. The old value is then overwritten by the new measurement.
GB 19
|
|
|
|
|
|
|
|
|
|
|
|
|
|
|
|
|
|
|
|
|
|
|
|
|
|
|
|
|
|
|
|
|
|
|
|
|
|
|
56861_ |
|
Energiekostenmessgeraet_Content_GB-PL-CZ-SK.indd 19 |
26.11.10 |
|
10:12 |
|||||||
|
|
|||||||||||
Operation
Q Delete maximum values
jUse the “UP” button 5 to select one of the two maximum values (see “Maximum current”, “Maximum power consumption”).
j Keep the “SET” button 2 pressed for approx. 3 seconds to set the maximum value to 0.
Q Set the overload warning value
Note: in this mode you have a choice between two overload warning values. You can set an overload warning value for the current (A) and an overload warning value for the power consumption (W).
Note: the overload warning value for power consumption
(W) 8 is set by default to 0,0 W on delivery.
Proceed as follows:
1.Press the “UP” button 5 until the overload symbol 7 (“OVERLOAD”) appears in the top third of the LC display 1 .
2.Now press the “SET” button 2 . The ampere symbol 9 starts to flash.
3.Press the “UP” 5 or “DOWN” button 4 to select either
20 GB
|
|
|
|
|
|
|
|
|
|
|
|
|
|
|
|
|
|
|
|
|
|
|
|
|
|
|
|
|
|
|
|
|
|
|
|
|
|
|
56861_ |
|
Energiekostenmessgeraet_Content_GB-PL-CZ-SK.indd 20 |
26.11.10 |
|
10:12 |
|||||||
|
|
|||||||||||
Operation
the overload warning value for power consumption (W) 8 or the overload warning value for current (A) 9 .
4.Press the “SET” button 2 . The first digit flashes.
5.Press the “UP” 5 or “DOWN” button 4 to set the required value.
6.Press the “SET” button 2 to move to the next digit.
7.Repeat steps 5 and 6 until you have set the required overload warning value.
8.When you have set the value for the last digit, press the “PRICE” button 3 to confirm your entry.
Note: as soon as the entered overload warning values are exceeded by any connected electrical appliance you are testing, the overload symbol 7 flashes and a warning signal sounds.
Q Measure mains voltage
jPress the “DOWN” button 4 until the Volt symbol 10 appears in the centre of the LC display 1 .
Note: the “Measure mains voltage” function is the standard setting for the wattmeter. As soon as the isolating strip between the two round cell batteries is removed, the wattmeter is automatically in this mode.
GB 21
|
|
|
|
|
|
|
|
|
|
|
|
|
|
|
|
|
|
|
|
|
|
|
|
|
|
|
|
|
|
|
|
|
|
|
|
|
|
|
56861_ |
|
Energiekostenmessgeraet_Content_GB-PL-CZ-SK.indd 21 |
26.11.10 |
|
10:12 |
|||||||
|
|
|||||||||||
Operation
j The LCD 1 now indicates the present mains voltage in V (volts).
Q Measure mains frequency
jPress the “DOWN” button 4 until the power frequency symbol 11 (Hz) appears in the centre of the LC display 1 .
j The LCD 1 now indicates the present mains frequency in Hz (Hertz).
Note: the wattmeter indicates mains frequencies in a range of 40 to 70 Hz. In Europe a frequency of 50 Hz is used for the general power supply system.
Q Show power factor
jPress the “DOWN” button 4 until the power factor symbol 18 (“Power Factor”) appears in the centre of the LC display 1 .
jThe LC display 1 now indicates the power factor. Note: the power factor expresses the ratio of real (active) to theoretical (apparent) power consumed by an electrical device. The power factor can be between 0 and 1. Ideally, the power factor is 1.
22 GB
|
|
|
|
|
|
|
|
|
|
|
|
|
|
|
|
|
|
|
|
|
|
|
|
|
|
|
|
|
|
|
|
|
|
|
|
|
|
|
56861_ |
|
Energiekostenmessgeraet_Content_GB-PL-CZ-SK.indd 22 |
26.11.10 |
|
10:12 |
|||||||
|
|
|||||||||||
Operation
Q Set electricity rate 1 and 2
Note: the price per kWh is set to 0 on delivery.
Note: you can set two different electricity rates (e.g. daytime and night-time rate) for the power cost meter. In order to use this function, you must set the starting times for electricity rate 1 and 2.
IMPORTANT! Electricity rate 1 is automatically the rate that was programmed first.
 Tip! You can obtain details of the current price per kWh from your electricity provider.
Note: please make sure that the top third of the LC display 1 shows the standard display (see “Display current”).
Proceed as follows:
1.Press the “DOWN” button 4 until the price per kWh symbol 19 (“PRICE KWh”) appears in the centre of the LC display 1 .
2.Press the “UP” button 5 so that four digits appear in the
bottom third of the LC display 1 . The symbol 15 also appears.
3.Now press the “SET” button 2 . The first digit starts to flash.
4.Press the “UP” 5 or “DOWN” button 4 to set the units digit before the decimal point of the current price
GB 23
|
|
|
|
|
|
|
|
|
|
|
|
|
|
|
|
|
|
|
|
|
|
|
|
|
|
|
|
|
|
|
|
|
|
|
|
|
|
|
56861_ |
|
Energiekostenmessgeraet_Content_GB-PL-CZ-SK.indd 23 |
26.11.10 |
|
10:12 |
|||||||
|
|
|||||||||||
Operation
per kWh in Euro (€) for electricity rate 1. Example: 1.000
5.Press the “SET” button 2 to move to the next digit.
6.Press the “UP” 5 or “DOWN” button 4 to set the hundreds digit of the current price per kWh in Eurocent (€) for electricity rate 1. Example: 1.100
7.Press the “SET” button 2 to move to the next digit.
8.Repeat step 6 in order to set the tens and units digit. Example: 1.111
9.Press the “SET” button 2 . The time display starts to flash in the bottom third of the LC display 1 .
10.Press the “UP” button 5 to set the starting time for electricity rate 1 in hours.
11.Press the “DOWN” button 4 to set the starting time for electricity rate 1 in minutes.
12.Press the “PRICE” button 3 to confirm your entry. The power cost meter begins measuring the cost of energy consumed in electricity rate 1 at the set starting time.
13.Press the “PRICE” button 3 . The price per kWh symbol 19 (“PRICE KWh”) and “2” appear in the centre of the
LC display 1 . The display for the 2nd electricity tariff 14 appears in the bottom third of the LC display 1 .
14.Press the “SET” button 2 . The first digit starts to flash.
15.Press the “UP” 5 or “DOWN” button 4 to set the units digit before the decimal point of the current price per kWh in Euro (€) for electricity rate 2. Example: 1.000
24 GB
|
|
|
|
|
|
|
|
|
|
|
|
|
|
|
|
|
|
|
|
|
|
|
|
|
|
|
|
|
|
|
|
|
|
|
|
|
|
|
56861_ |
|
Energiekostenmessgeraet_Content_GB-PL-CZ-SK.indd 24 |
26.11.10 |
|
10:12 |
|||||||
|
|
|||||||||||
Operation
16.Press the “SET” button 2 to move to the next digit.
17.Press the “UP” 5 or “DOWN” button 4 to set the hundreds digit of the current price per kWh in Eurocent (€) for electricity rate 2. Example: 1.100
18.Press the “SET” button 2 to move to the next digit.
19.Repeat step 17 to set the tens and units digit. Example: 1.111
20.Press the “SET” button 2 . The time display in the bottom third of the LC display 1 starts to flash.
21.Press the “UP” button 5 to set the starting time for electricity rate 2 in hours.
22.Press the “DOWN” button 4 to set the starting time for electricity rate 2 in minutes.
23.Press the “PRICE” button 3 to confirm your entry. The power cost meter begins measuring the cost of energy consumed in electricity rate 2 at the set starting time.
Note: These settings affect the “Display energy costs” function.
Q Set electricity flat-rate
If your electricity provider does not offer different electricity rates (day / night), you can set a flat rate for electricity. The
GB 25
|
|
|
|
|
|
|
|
|
|
|
|
|
|
|
|
|
|
|
|
|
|
|
|
|
|
|
|
|
|
|
|
|
|
|
|
|
|
|
56861_ |
|
Energiekostenmessgeraet_Content_GB-PL-CZ-SK.indd 25 |
26.11.10 |
|
10:12 |
|||||||
|
|
|||||||||||
Operation
power cost meter then works on the basis of this flat rate round the clock.
Note: make sure that the standard display (see “Display current”) appears in the top third of the LC display 1 .
1.Press the “DOWN” button 4 until the price per KWh symbol 19 (“PRICE KWh”) appears in the centre of the LC display 1 .
2.Press the “UP” button 5 so that “- -:- -” appears in the bottom third of the LC display 1 .
3.Press the “SET” button 2 . The first digit begins to flash.
4.Press the “UP” 5 or “DOWN” button 4 to set the units digit before the decimal point of the current price per kWh in Euro (€). Example: 1.000
5.Press the “SET” button 2 to move to the next digit.
6.Press the “UP” 5 or “DOWN” button 4 to set the hundreds digit of the current price per kWh in Eurocent (€). Example: 1.100
7.Press the “SET” button 2 to move to the next digit.
8.Repeat step 6 to set the tens and units digit. Example: 1.111
9.Press the “PRICE” button 3 to confirm your entry.
Note: the setting made here affects the “Display energy costs” function.
26 GB
|
|
|
|
|
|
|
|
|
|
|
|
|
|
|
|
|
|
|
|
|
|
|
|
|
|
|
|
|
|
|
|
|
|
|
|
|
|
|
56861_ |
|
Energiekostenmessgeraet_Content_GB-PL-CZ-SK.indd 26 |
26.11.10 |
|
10:12 |
|||||||
|
|
|||||||||||
Operation
Q Total energy consumption
Note: this mode displays the accumulated total energy in kWh consumed by connected electrical devices since the start of measurement.
Note: Check that standard displays (see “Measuring the current“ and “Measuring the mains voltage“) appear in the top and middle thirds of the LC display 1 .
jPress the “PRICE” button 3 repeatedly until the kilowatthours symbol 17 and the total symbol 16 appear in the
bottom third of the LC display 1 .
Note: the “Total power consumption” function is the standard setting for the wattmeter. As soon as the isolating strip between the two round cell batteries is removed, the wattmeter is automatically in this mode.
jThe LCD 1 now indicates the total amount of energy consumed in kWh (kilowatt hours).
Note: the measuring range of the wattmeter is between 0.00 and 9999.99 kWh.
GB 27
|
|
|
|
|
|
|
|
|
|
|
|
|
|
|
|
|
|
|
|
|
|
|
|
|
|
|
|
|
|
|
|
|
|
|
|
|
|
|
56861_ |
|
Energiekostenmessgeraet_Content_GB-PL-CZ-SK.indd 27 |
26.11.10 |
|
10:12 |
|||||||
|
|
|||||||||||

Operation
Q Time measurement function
Note: this mode displays the amount of time in hours / minutes / seconds or hours / minutes format during which all connected electrical devices consumed energy. The power cost meter and the devices you wish to monitor must all be switched on for time measurement.
Note: Check that standard displays (see “Measuring the current“ and “Measuring the mains voltage“) appear in the top and middle thirds of the LC display 1 .
jPress the “PRICE” button 3 repeatedly until the time symbol 12 and the total symbol 16 appear in the bottom third of the LC display 1 .
jThe LCD 1 now indicates the amount of time in which connected electrical appliances consumed energy. Note: as soon as the counter reaches 99:59:59, the display switches to hours/minutes format. The maximum time is 9999:59.
Note: you can also call up the total time when the wattmeter has been removed from the outlet or when the electrical appliance you are testing is no longer connected to the wattmeter.
28 GB
|
|
|
|
|
|
|
|
|
|
|
|
|
|
|
|
|
|
|
|
|
|
|
|
|
|
|
|
|
|
|
|
|
|
|
|
|
|
|
56861_ |
|
Energiekostenmessgeraet_Content_GB-PL-CZ-SK.indd 28 |
26.11.10 |
|
10:12 |
|||||||
|
|
|||||||||||

Operation
Note: as soon as the wattmeter indicates that the current is too weak (0.00 A in “Measure current” mode), the time measurement function stops.
Note: the time measurement function stops as soon as you unplug the electrical appliance you are testing from the socket 6 of the wattmeter. As soon as you plug another electrical appliance into the wattmeter, the time measurement function resumes.
Q Show energy costs
Note: the total cost of the consumed energy is shown in € (Euro). Note: the total cost of the consumed energy is calculated on the basis of the set price per kWh (See “Set electricity rate 1 and 2”, “Set electricity flat-rate”).
Note: Check that standard displays (see “Measuring the current“ and “Measuring the mains voltage“) appear in the top and middle thirds of the LC display 1 .
jPress the “PRICE” button 3 until the cost symbol 13 (“TOTAL €”) appears in the bottom third of the LC display 1 .
jThe LCD 1 now indicates the energy costs incurred for use of the electrical appliance.
GB 29
|
|
|
|
|
|
|
|
|
|
|
|
|
|
|
|
|
|
|
|
|
|
|
|
|
|
|
|
|
|
|
|
|
|
|
|
|
|
|
56861_ |
|
Energiekostenmessgeraet_Content_GB-PL-CZ-SK.indd 29 |
26.11.10 |
|
10:12 |
|||||||
|
|
|||||||||||
Operation
Note: you can also call up the total cost when the wattmeter has been removed from the outlet or when the electrical appliance you are testing is no longer connected to the wattmeter.
Note: the energy cost calculator stops as soon as you unplug the electrical appliance you are testing from the socket 6 of the wattmeter. As soon as you plug another electrical appliance into the wattmeter, the energy cost calculator resumes.
QSet the Energy consumption / Time measurement function / Total cost display to 0
jKeep the “PRICE” button 3 pressed for approx. 5 seconds to set the counter to 0.
Q Changing the batteries
Note: as soon as you remove the round cell batteries from the wattmeter, all the saved values are automatically deleted.
30 GB
|
|
|
|
|
|
|
|
|
|
|
|
|
|
|
|
|
|
|
|
|
|
|
|
|
|
|
|
|
|
|
|
|
|
|
|
|
|
|
56861_ |
|
Energiekostenmessgeraet_Content_GB-PL-CZ-SK.indd 30 |
26.11.10 |
|
10:12 |
|||||||
|
|
|||||||||||
Operation
Proceed as follows:
jRemove the battery compartment cover 21 by unscrewing the two screws with a suitable screwdriver.
jRemove the two round cell batteries from the holder on the back of the battery compartment cover 21 .
jInsert two new batteries (Alkaline LR44, 1.5 V 

 ) in the holder on the back of the battery compartment cover 21 . Note: make sure when inserting the batteries that the polarity is correct. This is indicated in the battery compartment.
jClose the battery compartment by replacing the battery compartment cover 21 . Please make sure that you retighten the two screws firmly.
Note: make sure that you replace the battery compartment cover 21 the right way round. The rounded corners of the battery compartment cover 21 must fit into the rounded recesses in the battery compartment.
Q Restore delivery condition
Malfunctions may occur if the device is exposed to a strong electromagnetic, high-frequency field. If malfunctions occur, e.g. the buttons no longer respond or there are irregularities in the display, please return the device to delivery condition. To do this, remove the batteries for several minutes and then
GB 31
|
|
|
|
|
|
|
|
|
|
|
|
|
|
|
|
|
|
|
|
|
|
|
|
|
|
|
|
|
|
|
|
|
|
|
|
|
|
|
56861_ |
|
Energiekostenmessgeraet_Content_GB-PL-CZ-SK.indd 31 |
26.11.10 |
|
10:12 |
|||||||
|
|
|||||||||||
Operation / Cleaning and Care / Disposal
place them back in the device (see “Changing the batteries”). If malfunctions persist, change the position of the device. IMPORTANT! Please note that all data will be deleted.
Q Cleaning and Care
 Warning! RISK OF FATAL INJURY BY ELECTRIC SHOCK! Keep the wattmeter away from rain and moisture. If water enters the wattmeter there is an increased risk of an electric shock.
 Warning! RISK OF FATAL INJURY BY ELECTRIC SHOCK! Before carrying out any work on the product or on an electrical appliance connected to it, remove the wattmeter from the outlet.
j Clean the wattmeter with a dry, non-fluffing cloth.
Q Disposal
The packaging is made entirely of recyclable materials, which you may dispose of at your local recycling facilities.
32 GB
|
|
|
|
|
|
|
|
|
|
|
|
|
|
|
|
|
|
|
|
|
|
|
|
|
|
|
|
|
|
|
|
|
|
|
|
|
|
|
56861_ |
|
Energiekostenmessgeraet_Content_GB-PL-CZ-SK.indd 32 |
26.11.10 |
|
10:12 |
|||||||
|
|
|||||||||||
 Loading...