


40-7277
RLM140HP/RLM140SP
F |
TONDEUSE À GAZONTHERMIQUE 45CM |
MANUEL D’UTILISATION |
1 |
GB |
45CM PETROL MOWER |
USER’S MANUAL |
11 |
D |
45CM RASENMÄHER BENZINBETRIEB |
BEDIENUNGSANLEITUNG |
21 |
E |
CORTACÉSPED DE GASOLINA DE 45CM |
MANUAL DE UTILIZACIÓN |
31 |
I |
TOSAERBA A BENZINA 45CM |
MANUALE D’USO |
41 |
P |
CORTA RELVA A GASOLINA DE 45CM |
MANUAL DE UTILIZAÇÃO |
51 |
NL |
45CM BENZINEMAAIER |
GEBRUIKERSHANDLEIDING |
61 |
S |
45CM BENSINDRIVEN GRÄSKLIPPARE |
INSTRUKTIONSBOK |
71 |
DK |
45CM GRÆSSLÅMASKINE |
BRUGERVEJLEDNING |
81 |
N |
45CM BENSINDREVET GRESSKLIPPER |
BRUKSANVISNING |
89 |
FIN |
45CM POLTTOAINEKÄYTTÖINEN RUOHONLEIKKUR |
KÄYTTÄJÄN KÄSIKIRJA |
98 |
GR |
45CM ΒΕΝΖΙΝΟΚΊΝΗΤΗ ΜΗΧΑΝΉ ΚΟΥΡΈΜΑΤΟΣ |
ΟΔΗΓΙΕΣ ΧΡΗΣΗΣ |
107 |
HU |
45CM BENZINMOTOROS FŰNYÍRÓ |
HASZNÁLATI ÚTMUTATÓ |
119 |
CZ |
BENZÍNOVÁ SEKAČKA TRÁVY 45CM |
NÁVOD K OBSLUZE |
128 |
RU |
45CМ БЕНЗИНОВАЯ КОСИЛКА |
кмдйЗйСлнЗй ий щдлигмДнДсаа |
137 |
RO |
MAŞINĂ DE TUNS GAZON CU MOTOR PE BENZINĂ DE 45CM MANUAL DE UTILIZARE |
147 |
|
PL |
KOSIARKA SPALINOWA 45CM |
INSTRUKCJA OBSŁUGI |
156 |
SLO |
45CM BENCINSKA KOSILNICA |
UPORABNIŠKI PRIROČNIK |
166 |
HR |
45CM MOTORNA KOSILICA |
KORISNI»KI PRIRU»NIK |
175 |
TR |
45CM PETROLLÜ ÇİM BİÇME MAKİNESİ |
KULLANMA KILAVUZU |
184 |
EST |
45CM BENSIINIMOOTORIGA MURUNIIDUK |
KASUTAJAJUHEND |
194 |
LT |
45CM BENZININĖ ŽOLIAPJOVĖ |
NAUDOJIMO VADOVAS |
203 |
LV |
45CM BENZĪNA PĻĀVĒJS |
LIETOTĀJA ROKASGRĀMATA |
212 |
SK |
45CM BENZÍNOVÁ KOSAČKA |
NÁVOD NA POUŽITIE |
221 |
BG |
45СМ БЕНЗИНОВА КОСАЧКА |
кцдйЗйСлнЗй бД мийнкЦЕД |
231 |
|
RLM140HP |
RLM140SP |
|
Important! It is essential you read the instructions in this manual before starting and operation with this machine.
RLM140HP-25lgs 09Jun11.indd AI |
6/11/09 3:29:41 PM |
F GB D E I P NL S DK N FIN GR HU CZ RU RO PL SLO HR TR EST LT LV SK BG
Français
Nous vous remercions d’avoir acheté une tondeuse à gazon Ryobi.
Votre nouvelle tondeuse à gazon a été conçue et fabriquée selon les hauts standards de qualité Ryobi afin de vous offrir fiabilité, sécurité et facilité d’utilisation. Si vous lui procurez l’entretien nécessaire, elle vous donnera des années d’utilisation sans problème.
AVERTISSEMENT
Pour réduire les risques de blessures, l’utilisateur doit lire et comprendre le mode d’emploi.
AVERTISSEMENT
Ne tentez pas d’utiliser cette tondeuse avant d’avoir bien lu et compris toutes les instructions, règles de sécurité, etc. contenues dans ce mode d’emploi. Si vous ne le faites pas vous pourriez provoquer des accidents entraînant des incendies ou de graves blessures corporelles. Conservez le mode d’emploi et reportez-vous y fréquemment pour continuer de travailler en toute sécurité et donner des conseils aux autres utilisateurs éventuels.
LISEZ TOUT LE MODE D’EMPLOI.
DESCRIPTION
Reportez-vous à la figure 1.
1.Poire d’Amorçage
2.Bouchon d’Huile/Jauge
3.Bouchon d’Essence
4.Poignée de Lanceur
5.Bouton de Guidon
6.Filtre à Air
7.Contrôleur de Présence de l’Opérateur
8.Bac de Ramassage
9.Levier de Réglage de Hauteur de Coupe
10.Embrayage (Modèle RLM140SP uniquement)
11.Trappe d’Éjection
12.Antiparasite
13.Bouton de Guidage de la Cordelette du Lanceur
RÈGLES GÉNÉRALES DE SÉCURITÉ
■Cette machine coupante est capable de sectionner les mains et les pieds et de projeter des objets. Le non respect de toutes les règles de sécurité est susceptible d’entraîner de graves blessures ou la mort.
■Ne laissez jamais les enfants ou les personnes non familiarisées avec ce mode d’emploi utiliser la tondeuse. Les lois locales peuvent imposer un âge
minimum à l’opérateur.
■Eloignez visiteurs, enfants et animaux de la zone de tonte. Arrêtez la tondeuse si quiconque s’approche.
■De tragiques accidents peuvent se produire si l’opérateur n’est pas conscient de la présence d’enfants. Les enfants sont souvent attirés par la machine et par le déroulement de la tonte. Ne considérez jamais comme acquis qu’un enfant restera là où vous l’avez vu pour la dernière fois.
■Eloignez les enfants de la zone de tonte et faites en sorte qu'ils soient surveillés par une autre personne que l'opérateur.
■Soyez vigilant et arrêtez la tondeuse si un enfant pénètre dans la zone de tonte.
■Ne laissez jamais un enfant utiliser la tondeuse.
■Soyez particulièrement vigilant à l'approche des angles morts, buissons, arbres, ou autres objets susceptibles de masquer la présence d'un enfant.
■Gardez à l’esprit que l’opérateur est responsable des accidents qui arrivent aux autres personnes présentes dans sa propriété.
■N’utilisez pas la tondeuse pieds nus ou si vous portez des sandales ou autres chaussures légères. Portez des chaussures solides et antidérapantes afin d’améliorer votre appui sur les surfaces glissantes.
■Ne portez pas de bijoux ou de vêtements amples. Ils pourraient se prendre dans les parties mobiles.
■Portez toujours des lunettes de sécurité avec protections latérales. Les lunettes classiques n’ont d’antichoc que leurs verres. Ce ne sont PAS des lunettes de sécurité. Le respect de cette règle réduira les risques de blessures. Portez un masque anti poussières si l’opération est poussiéreuse.
■Portez des lunettes de sécurité ou un masque lors de l’utilisation de ce produit.
■Utilisez un outil adapté. N’utilisez pas cette tondeuse
àgazon pour un autre usage que celui prévu à la base.
■Nettoyez la zone de tonte avant chaque utilisation. Retirez tous les objets tels que les pierres, bouts de bois, câbles, os, jouets ou autres qui pourraient être projetés par la lame. Restez derrière le guidon lorsque le moteur tourne.
■Remplacez les échappements défectueux.
■Avant chaque utilisation, procédez à une vérification visuelle de la tondeuse pour vous assurer que la lame, les boulons de la lame, et l’ensemble de coupe ne sont ni usés ni endommagés.
■Ne faites pas tourner le moteur dans un lieu confiné où le monoxyde de carbone pourrait s’accumuler.
■N’utilisez la tondeuse qu’à la lumière du jour ou sous une lumière artificielle de qualité.
■Restez vigilant, prenez garde à ce que vous faites et utilisez votre bon sens lors de l’utilisation de cette
1
RLM140HP-25lgs 09Jun11.indd Sec1:1 |
6/11/09 3:29:54 PM |

F GB D E I P NL S DK N FIN GR HU CZ RU RO PL SLO HR TR EST LT LV SK BG
English
SYMBOLS
Thank you for buying a Ryobi lawn mower.
Your new lawn mower has been engineered and manufactured to Ryobiʼs high standard for dependability, ease of operation, and operator safety. Properly cared for, it will give you years of rugged, trouble-free performance.
WARNING
To reduce the risk of injury, the user must read and understand the operatorʼs manual.
WARNING
Do not attempt to operate this mower until you have read thoroughly and understood completely all instructions, safety rules, etc. contained in this manual. Failure to comply may result in accidents involving fire or serious personal injury. Save operatorʼs manual and review frequently for continuing safe operation and instructing others who may use this tool.
READ ALL INSTRUCTIONS.
DESCRIPTION
Please refer to figure 1.
1.Primer Bulb
2.Oil Cap/Dipstick
3.Fuel Cap
4.Starter Grip
5.Handle Knob
6.Air Filter
7.Operator Presence Control
8.Grass Catcher
9.Height Adjustment Lever
10.Drive Control (Model RLM140SP Only)
11.Rear Discharge Door
12.Spark Plug Boot
13.Rope Guide Knob
11
RLM140HP-25lgs 09Jun11.indd Sec1:11 |
6/11/09 3:30:01 PM |

F GB D E I P NL S DK N FIN GR HU CZ RU RO PL SLO HR TR EST LT LV SK BG
English
GENERAL SAFETY RULES
This cutting machine is capable of amputating hands and feet and throwing objects. Failure to observe all safety instructions could result in serious injury or death.
Never allow children or people unfamiliar with these instructions to operate the mower. Local regulations can restrict the age of the operator.
Keep the area clear of all bystanders, children, and pets while mowing. Stop machine if anyone enters the area.
Tragic accidents can occur if the operator is not alert to the presence of children. Children are often attracted to the machine and the mowing activity. Never assume that children will remain where you last saw them.
•Keep children out of the mowing area and under the watchful care of a responsible adult other than the operator.
•Be alert and turn mower off if a child enters the area.
•Never allow children to operate the machine.
•Use extra care when approaching blind corners, shrubs, trees, or other objects that may block your view of a child.
Keep in mind that the operator or user is responsible for accidents or hazards occurring to other people or their property.
Do not operate the equipment while barefoot or when wearing sandals or similar lightweight footwear. Wear protective footwear that will protect your feet and improve your footing on slippery surfaces.
Do not wear loose clothing or jewelry. They can be caught in moving parts.
Always wear safety glasses with side shields. Everyday glasses have only impact resistant lenses. They are NOT safety glasses. Following this rule will reduce the risk of eye injury. Use face mask if operation is dusty.
Wear safety glasses or goggles when operating this product.
Use the right appliance. Do not use the lawn mower for any job except that for which it is intended.
Clear the work area before each use. Remove all objects such as rocks, sticks, wire, bones, toys, or other objects which can be thrown by the blade. Stay behind the handle when the engine is running.
Replace faulty mufflers.
Before each use, visually inspect the lawn mower to ensure blades, blade bolts, and cutter assembly are not worn or damaged.
Do not operate the engine in a confined space where dangerous carbon monoxide fumes can collect.
Operate the lawn mower only in daylight or good artificial light.
12
Stay alert, watch what you are doing, and use common sense when operating the lawn mower. Do not operate the mower while tired or under the influence of drugs, alcohol, or medication. A moment of inattention while operating the lawn mower may result in serious personal injury.
Do not use the lawn mower in damp or wet conditions or operate in the rain.
Keep firm footing and balance. Do not overreach. Overreaching can result in loss of balance.
Mow across the face of slopes, never up and down. Exercise extreme caution when changing direction on slopes.
Do not mow on wet grass or excessively steep slopes. Poor footing could cause a slip and fall accident. Walk, never run.
Do not mow near drop-offs, ditches, or embankments.
Do not pull the mower backward unless absolutely necessary. If you must back the mower away from a wall or obstruction, first look down and behind to avoid tripping.
Stop the engine if the lawnmower has to be tilted for transportation when crossing surfaces other than grass, and when transporting the lawnmower to and from the area to be mowed.
Do not operate the mower without the entire grass catcher, discharge guard, rear guard, or other safety protective devices in place and working.
Do not change the engine governor settings or overspeed the engine.
Start the engine carefully according to instructions and with feet well away from the blade.
Do not tilt the lawnmower when starting the engine.
Do not start the engine when standing in front of the discharge chute.
Keep hands and feet away from cutting area. Keep clear of the discharge opening at all times.
Never pick up or carry a lawnmower while the engine is running.
Do not leave the mower unattended while running.
Avoid holes, ruts, bumps, rocks, or other hidden objects. Uneven terrain could cause a slip and fall accident.
Plan your mowing pattern to avoid discharge of material toward roads, sidewalks, bystanders, and the like. Also, avoid discharging material against a wall or obstruction, which may cause the material to ricochet back toward the operator.
Use extra care when approaching blind corners, shrubs, trees, or other objects that may block your view.
RLM140HP-25lgs 09Jun11.indd Sec1:12 |
6/11/09 3:30:02 PM |
F GB D E I P NL S DK N FIN GR HU CZ RU RO PL SLO HR TR EST LT LV SK BG
English
GENERAL SAFETY RULES
Never direct discharged material toward anyone. Avoid discharging material against a wall or obstruction. Material may ricochet back toward the operator.
Objects struck by the lawn mower blade can cause severe injuries to persons. The lawn should always be carefully examined and cleared of all objects prior to each mowing.
Stop the engine, disconnect the spark plug wire, and wait until the blade comes to a complete stop before removing the grass catcher or unclogging the discharge chute. The cutting blade continues to rotate for a few seconds after the engine is shut off. Never place any part of the body in the blade area until you are sure the blade has stopped rotating.
Stop the engine and wait until the blade comes to a complete stop before cleaning the lawn mower, removing the grass catcher, or unclogging the discharge guard.
If the lawn mower strikes a foreign object, follow these steps:
•Stop the mower and disconnect the spark plug wire.
•Thoroughly inspect the mower and grass catcher for any damage.
•Repair any damage before restarting and continuing to operate the mower.
If the mower should start to vibrate abnormally, stop the engine, disconnect the spark plug wire, and check immediately for the cause. Vibration is generally a warning of trouble. Check the condition of the blade, as an unevenly worn or damaged blade can cause abnormal vibration. Unevenly worn or damaged blades should be replaced immediately to avoid the risk of serious injury.
Allow engine to cool before storing in any enclosure.
To reduce the risk of fire, keep the engine, muffler, and petrol storage area free of grass, leaves, and excessive grease.
Check the grass catcher frequently for wear or deterioration.
Keep machine in good working condition. Keep blades sharp and guards in place and in working order.
Check all nuts, bolts, and screws at frequent intervals for proper tightness to be sure the equipment is in safe working condition.
When not in use, mower should be stored in a wellventilated, dry, locked up place—out of the reach of children.
Follow manufacturer’s instructions for proper operation and installation of accessories. Only use accessories approved by the manufacturer.
If the fuel tank has to be drained, this should be done outdoors.
Disconnect the spark plug wire before making any adjustments, changing accessories, transporting, or storing the lawn mower. Such preventive safety measures reduce the risk of starting the product accidentally.
Service on the product must be performed by qualified repair personnel only. Service or maintenance performed by unqualified personnel could result in injury to the user or damage to the product.
Use only identical replacement parts when servicing the product. Use of unauthorized parts may create a risk of serious injury to the user, or damage to the product.
Save these instructions. Refer to them frequently and use them to instruct others who may use this product. If you loan someone this tool, loan them these instructions also.
13
RLM140HP-25lgs 09Jun11.indd Sec1:13 |
6/11/09 3:30:05 PM |
F GB D E I P NL S DK N FIN GR HU CZ RU RO PL SLO HR TR EST LT LV SK BG
English
SYMBOLS
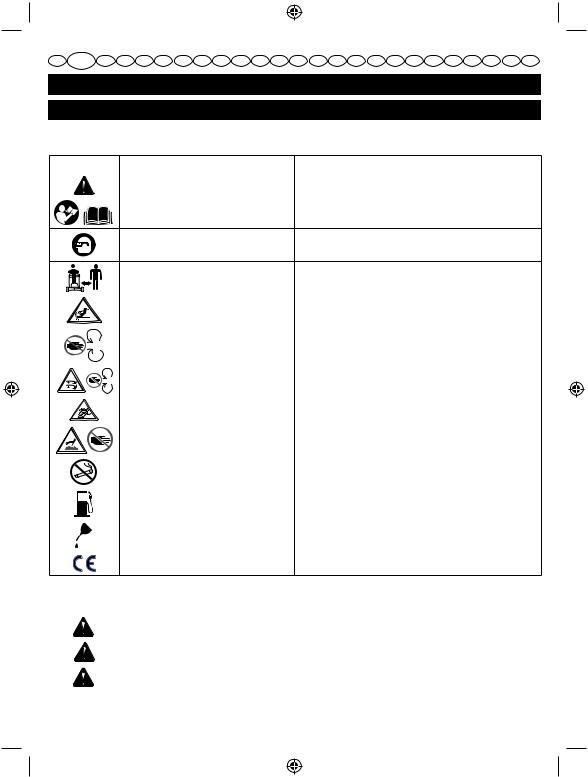
Important: Some of the following symbols may be used on this product. Please study them and learn their meaning. Proper interpretation of these symbols will allow you to operate the product better and safer.
SYMBOL |
NAME |
EXPLANATION |
|
|
|
|
Safety Alert |
Precautions that involve your safety. |
|
|
|
|
Read The Operator’s Manual |
To reduce the risk of injury, user must read and understand |
|
operator’s manual before using this product. |
|
|
|
Always wear safety goggles or safety glasses with side Eye Protection shields and, as necessary, a full face shield when operating
this product.
|
|
|
Keep Bystanders Away |
Keep all bystanders at least 15 m away. |
|
|
|
|
|
|
|
|
Belt Entanglement Hazard |
Keep all body parts and and clothing clear of any belts |
|
|
|
or other moving parts. |
|
|
|
|
|
|
|
|
|
|
|
|
|
|
Moving Parts |
To avoid injury, stay away from moving parts at all |
|
|
|
times. |
|
|
|
|
|
|
|
|
|
|
|
|
|
|
Keep Hands and Feet Away |
Danger. Keep hands and feet away. |
|
|
|||
|
|
|
|
|
|
|
|
Ricochet |
Thrown objects can ricochet and result in personal |
|
|
|
injury or property damage. |
|
|
|
|
|
|
|
|
|
|
|
|
|
|
Hot Surface |
To reduce the risk of injury or damage, avoid contact |
|
|
|
with any hot surface. |
|
|
|
|
|
|
|
|
|
|
|
|
|
|
No Smoking |
Do not smoke and stay away from open flames and |
|
|
|
sparks when filling fuel tank or when handling fuel. |
|
|
|
|
|
|
|
|
|
|
|
|
|
|
Petrol |
Use unleaded gasoline intended for motor vehicle use |
|
|
|
with an octane rating of 87 ([R+M]/2) or higher. |
|
|
|
|
|
|
|
|
|
|
|
|
|
|
Oil |
Use SAE 30 or 10W30 API-SJ weight oil. |
|
|
|
|
|
|
|
|
|
Conforms to all regulatory standards in the country in |
|
|
|
|
the EU where the product is purchased. |
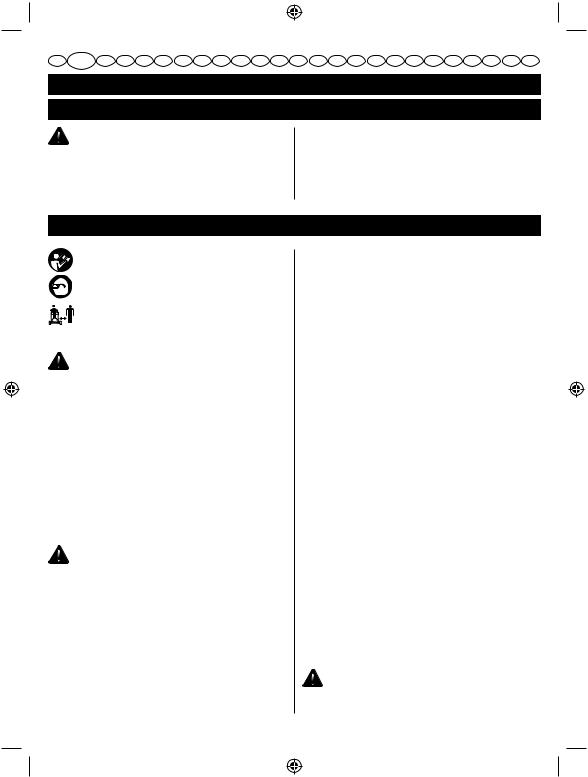
The following signal words and meanings are intended to explain the levels of risk associated with this product.
|
SYMBOL |
SIGNAL |
|
MEANING |
|
|
|
|
|
|
|
|
|
DANGER: |
|
Indicates an imminently hazardous situation, which, if not avoided, will result in |
|
|
|
|
death or serious injury. |
|
|
|
|
|
|
|
|
|
|
WARNING: |
|
Indicates a potentially hazardous situation, which, if not avoided, could result in |
|
|
|
|
death or serious injury. |
|
|
|
|
|
|
|
|
|
|
CAUTION: |
|
Indicates a potentially hazardous situation, which, if not avoided, may result in |
|
|
|
|
minor or moderate injury. |
|
|
|
|
|
|
|
|
|
|
CAUTION: |
|
(Without Safety Alert Symbol) Indicates a situation that may result in property |
|
|
|
|
damage. |
|
|
|
|
|
|
|
|
|
|
|
|
14 |
|
RLM140HP-25lgs 09Jun11.indd Sec1:14 |
6/11/09 3:30:06 PM |
||||

F GB D E I P NL S DK N FIN GR HU CZ RU RO PL SLO HR TR EST LT LV SK BG
English
SYMBOLS
SERVICE
Servicing requires extreme care and knowledge and should be performed only by a qualified service technician. For service we suggest you return the product to your nearest
AUTHORIZED SERVICE CENTER for repair. When servicing, use only identical replacement parts.
WARNING:
To avoid serious personal injury, do not attempt to use this product until you read thoroughly and understand completely the operatorʼs manual. If you do not understand the warnings and instructions in the operatorʼs manual, do not use this product. Call Ryobi customer service for assistance.
WARNING:
The operation of any power tool can result in foreign objects being thrown into your eyes, which can result in severe eye damage. Before beginning power tool operation, always wear safety goggles or safety glasses with side shields and, when needed, a full face shield. We recommend Wide Vision Safety Mask for use over eyeglasses or standard safety glasses with side shields. Always use eye protection which is marked to comply with ANSI Z87.1.
SAVE THESE INSTRUCTIONS AND PASS THEM ON IF THE MOWER IS TO BE USED BY ANOTHER PERSON
|
SPECIFICATIONS |
|
Engine............................................................................................................................................................... |
140cc OHV |
|
Drive System |
|
|
RLM140HP .............................................................................................................................................................. |
Push |
|
RLM140SP............................................................................................................................ |
Rear Wheel Self-Propelled |
|
No-load Speed ........................................................................................................................... |
2,700-2,800 r/min. (RPM) |
|
Cutting Path .................................................................................................................................................. |
45 cm (18 in.) |
|
Height Adjustments ................................................................................................ |
7 positions, 19 mm −76 mm (.75−3 in.) |
|
Wheel Size............................................................................................................ |
17.8 cm (7 in.) front, 20.3 cm (8 in.) rear |
|
Grass Bag Capacity .................................................................................................................................. |
1.8 bu / 55 liters |
|
Sound Power........................................................................................................................................... |
95 (LWAm) dB (A) |
|
Sound Pressure.......................................................................................................................................... |
80 (LpA) dB (A) |
|
Vibration Level........................................................................................................................................................ |
3.6 m/s2 |
|
Weight |
|
|
RLM140HP ............................................................................................................................................... |
30 kg (66 lbs.) |
|
RLM140SP............................................................................................................................................. |
32 kg (70.5 lbs.) |
|
|
|
|
|
ASSEMBLY |
|
|
|
|
WARNING
If any parts are damaged or missing do not operate this product until the parts are replaced. Operation of this product with damaged or missing parts could result in serious personal injury.
WARNING
Do not attempt to modify this product or create accessories not recommended for use with this product. Any such alteration or modification is misuse and could result in a hazardous condition leading to possible serious personal injury.
15
WARNING
To prevent accidental starting that could cause serious personal injury, always disconnect the engine spark plug wire from the spark plug when assembling parts.
WARNING
Never attach or adjust any accessory while the mower is running. Failure to stop the engine may cause serious personal injury.
RLM140HP-25lgs 09Jun11.indd Sec1:15 |
6/11/09 3:30:09 PM |
F GB D E I P NL S DK N FIN GR HU CZ RU RO PL SLO HR TR EST LT LV SK BG
English
ASSEMBLY
WARNING
Never operate the mower without properly working safety devices in place and working. Never operate the mower with damaged safety devices. Operation of the mower without properly working safety devices can result in serious personal injury.
Please refer to figure 2.
■Place handles in correct operating position and tighten handle knobs to secure.
■Loosen rope guide knob, place starter rope in guide on handle, then retighten knob to secure.
■Install grass catcher.
OPERATION
Read the operation manual and follow all warnings and safety instructions.
Wear eye protection.
Keep all bystanders, especially children and pets, at least 15 m from the operating area.
FUELING AND REFUELING
WARNING
Always handle petrol with care; it is highly flammable.
■Store petrol in containers specifically designed for this purpose.
■Always refuel outdoors where there are no sparks and flames. Do not inhale petrol vapors. Do not smoke while while refueling or handling fuel.
■Do not let petrol or oil come in contact with your skin.
■Keep petrol and oil away from the eyes. If petrol or oil comes in contact with the eyes, wash them immediately with clean water. If irritation is still present, see a doctor immediately.
■Clean up spilled petrol immediately.
FILLING THE TANK (Fig. 3)
WARNING
Always shut off engine before fueling. Never remove the cap of the fuel tank or add petrol to a machine with a running or hot engine. Move at least 9 m from refueling site before starting engine. Do not smoke! Failure to follow this warning could result in serious personal injury.
■Clean surface around fuel cap to prevent contamination.
■Loosen fuel cap slowly to release pressure and to keep petrol from escaping around the cap. Rest the cap on a clean surface.
■Carefully pour petrol into the tank. Avoid spillage.
16
■Clean and inspect the gasket, then replace all fuel and container caps securely.
■Wipe up any petrol spillage. Move 9 m away from refueling site before starting engine.
NOTE: It is normal for smoke to be emitted from a new engine during first use.
ADDING/CHECKING ENGINE OIL (Fig. 3)
 oil has a major influence on engine performance and service life. For general, all-temperature use, SAE 10W-30 is recommended. Always use a 4-cycle motor oil that meets or exceeds the requirements for API service classification SJ.
NOTE: Non-detergent or 2-cycle engine oils will damage the engine and should not be used.
To add engine oil:
■Be sure mower is level and area around oil cap/dipstick is clean.
■Unscrew the oil cap/dipstick and remove.
■Slowly add oil. Fill to the “Full” line on dipstick. Do not overfill.
NOTE: When checking the oil level, seat the dipstick in the oil fill hole but do not screw in.
■Reinstall the oil cap/dipstick and secure.
To check engine oil:
■Be sure mower is level and area round oil cap/dipstick is clean.
■Remove the oil cap/dipstick. Wipe clean and reseat in oil fill hole but do not screw in.
■Remove the oil cap/dipstick again and check oil level. Add oil as needed.
STARTING/STOPPING THE MOWER (Fig. 3)
WARNING
Never start or run the engine inside a closed or poorly ventilated area; breathing exhaust fumes can kill.
RLM140HP-25lgs 09Jun19.indd Sec1:16 |
6/19/09 5:06:17 PM |

F GB D E I P NL S DK N FIN GR HU CZ RU RO PL SLO HR TR EST LT LV SK BG
English
OPERATION
STARTING THE ENGINE
Firmly push the primer bulb 3 times.
NOTE: This step is not usually necessary when starting an engine that has already run for a few minutes.
Hold the operator presence control bar down against the handle.
Pull the starter cord until the engine runs. Release the starter cord slowly so the rope does not snap back.
NOTE: It may be necessary to repeat priming steps in cooler weather. In warmer weather, overpriming may cause flooding and engine will not start. If you do flood the engine, wait a few minutes before attempting to start and DO NOT repeat priming steps.
STOPPING THE ENGINE
Release the operator presence control bar and allow the engine comes to a complete stop.
SETTING BLADE HEIGHT (Fig. 4)
When shipped, the wheels on the mower are set to a low-cutting position. Before using the mower for the first time, adjust the cutting position to the height best suited for your lawn. The average lawn should be between 1-1/2 in. to 2 in. during cool months and between 2 in. and 3 in. during hot months.
To set the blade height:
To raise the blade height, grasp the height adjustment lever and move it toward the back of the mower.
To lower the blade height, grasp the height adjustment lever and move it toward the front of the mower.
SETTING HANDLE HEIGHT (Fig. 5)
The height of the handle can be easily adjusted for operator preference.
To adjust the handle height:
Remove the handle knob.
Slide out the handle bolt and adjust the height to the other opening.
Reinstall the handle bolt and knob. Tighten the knob securely.
Repeat on the other side of the handle.
MOWING TIPS
Make sure the lawn is clear of stones, sticks, wires, and other objects that could damage the lawn mower blades or engine. Such objects could be accidentally thrown by the mower in any direction and cause serious personal injury to the operator and others.
For rear discharge of grass clippings, do not install the grass catcher. To improve discharging performance, raise the blade height setting.
For best performance, always cut off one-third or less of the total height of the grass.
When cutting long grass, reduce walking speed to allow for more effective cutting and a proper discharge of the clippings.
Do not cut wet grass. It will stick to the underside of the deck and prevent proper bagging or discharge of the grass clippings.
New or thick grass may require a narrower cut path.
Clean the underside of the mower deck after each use to remove grass clippings, leaves, dirt, and any other accumulated debris.
SLOPE OPERATION (Fig. 6)
Slopes are a major factor related to slip and fall accidents that can result in severe injury. Operation on slopes requires extra caution. If you feel uneasy on a slope, do not mow it. For your safety, do not attempt to mow slopes greater than 15 degrees.
Mow across the face of slopes, not up and down. Exercise extreme caution when changing direction on slopes.
Watch for holes, ruts, rocks, hidden objects, or bumps which can cause you to slip or trip. Tall grass can hide obstacles. Remove all objects such as rocks, tree limbs, etc., which could be tripped over or thrown by the blade.
Always be sure of your footing. A slip and fall can cause serious personal injury. If you feel you are losing your balance, release operator presence control immediately.
Do not mow near drop-offs, ditches, or embankments; you could lose your footing or balance.
EMPTYING THE GRASS CATCHER (Fig. 7)
Stop the mower and wait for the blade to come to a complete stop.
Lift the rear discharge door.
Grasp grass catcher by its handle and lift to remove from mower.
Empty grass clippings.
Lift the rear discharge door and reinstall the grass catcher.
17
RLM140HP-25lgs 09Jun11.indd Sec1:17 |
6/11/09 3:30:12 PM |
F GB D E I P NL S DK N FIN GR HU CZ RU RO PL SLO HR TR EST LT LV SK BG
English
MAINTENANCE
WARNING
When servicing, use only identical replacement parts. Use of any other parts may create a hazard or cause product damage.
WARNING
Always wear safety goggles or safety glasses with side shields during power tool operation or when blowing dust. If operation is dusty, also wear a dust mask.
GENERAL MAINTENANCE
Avoid using solvents when cleaning plastic parts. Most plastics are susceptible to damage from various types of commercial solvents and may be damaged by their use. Use clean cloths to remove dirt, dust, oil, grease, etc.
Periodically check all nuts and bolts for proper tightness to ensure safe operation of the mower.
Remove any buildup of grass and leaves on or around the engine and engine cover. Wipe the mower clean with a dry cloth occasionally. Do not use water.
LUBRICATION
All of the bearings in this product are lubricated with a sufficient amount of high grade lubricant for the life of the unit under normal operating conditions. Therefore, no further bearing lubrication is required.
WARNING
Always protect hands by wearing heavy gloves and/or wrapping the cutting edges of the blade with rags and other material when performing blade maintenance. Improper handling of blade could result in serious personal injury.
WARNING
Before performing any maintenance, stop the mower, allow the blade to come to a complete stop, and disconnect the spark plug wire from the spark plug. Failure to follow this warning could result in serious personal injury.
REPLACING THE CUTTING BLADE (Fig. 8)
For best results, the mower blade must be kept sharp. Replace a bent or damaged blade immediately.
WARNING
Only use replacement blades approved by the manufacturer of your mower. Using a blade not approved by the manufacturer of your mower is hazardous and could result in serious injury, damage your mower, and void your warranty.
Stop the engine and disconnect the spark plug wire. Allow the blade to come to a complete stop.
Turn the mower on its side (carburetor facing up).
Wedge a block of wood between the blade and mower deck to prevent the blade from turning.
Using a 9/16-in. wrench or socket (not provided), loosen the blade bolt by turning the bolt in a counterclockwise direction as viewed from the bottom of the mower.
Remove the blade bolt, lock washer, flat washer, and blade.
Place the new blade on the shaft. Make sure it is installed with the curved ends pointing up toward the mower deck and not down toward the ground.
Replace the flat washer, lock washer, and blade bolt on the shaft. Finger tighten the bolt by turning in a clockwise direction as viewed from the bottom of the mower.
NOTE: Make certain all parts are replaced in the exact order in which they were removed.
Torque the blade bolt down using a torque wrench (not provided) to ensure the bolt is properly tightened. The recommended torque for the blade bolt is 48–55 Nm (35–40 ft.lb.).
NOTE: We do not recommend sharpening the blade, but if you do, be sure the blade is balanced before reinstalling.
REPLACING WHEELS (Fig. 9) To replace a wheel:
Stop the engine and disconnect the spark plug wire. Allow the blade to come to a complete stop.
Remove the nut from the wheel axle, then remove the wheel.
Replace with new wheel and reinstall nut to secure.
CLEANING AIR FILTER (Fig. 10)
For proper performance and long life, keep the air filter clean.
Remove the air filter cover by pushing in on the latch with your thumb while gently pulling on the cover.
Remove the air filter and clean it in warm soapy water. Rinse and let dry completely.
Apply a light coat of engine oil to the air filter, then squeeze it out using an absorbent cloth or paper towel.
Reinstall the air filter into the air filter base.
Replace and secure the air filter cover.
NOTE: The filter should be replaced annually for best performance.
18
RLM140HP-25lgs 09Jun11.indd Sec1:18 |
6/11/09 3:30:14 PM |
F GB D E I P NL S DK N FIN GR HU CZ RU RO PL SLO HR TR EST LT LV SK BG
English
MAINTENANCE
FUEL CAP
WARNING:
A leaking fuel cap is a fire hazard and must be replaced immediately.
The fuel cap contains a non-serviceable filter and a check valve. A clogged fuel cap will cause poor engine performance. If performance improves when the fuel cap is loosened, check valve may be faulty or clogged. Replace fuel cap if required.
CHANGING ENGINE OIL (Fig. 11)
Engine oil should be changed after every 25 hours of use. Change the oil while the engine oil is still warm, but not hot. This allows the oil to drain quickly and completely.
Remove the oil fill cap/dipstick.
Tip mower onto its side and allow oil to drain from the oil fill hole into an approved container.
Place mower upright and refill with oil following the instructions in the Adding/Checking Oil section.
NOTE: Used oil should be disposed of at an approved disposal site. See your local oil retailer for more information.
SPARK PLUG MAINTENANCE (Fig. 12)
The spark plug must be properly gapped and free of deposits in order to ensure proper engine operation. To check:
Remove spark plug boot.
Clean any dirt from around base of spark plug.
Remove spark plug using a 13/16 in. spark plug socket (not provided).
Inspect spark plug for damage, and clean with a wire brush before reinstalling. If insulator is cracked or chipped, spark plug should be replaced.
NOTE: If replacing, use the following recommended spark plugs or equivalent: Torch F6RTC or NGK BPR6ES.
Measure plug gap. The correct gap is .028−.031 in. To widen gap, if necessary, carefully bend the ground (top) electrode. To lessen gap, gently tap ground electrode on a hard surface.
Seat spark plug in position; thread in by hand to prevent cross-threading.
Tighten with wrench to compress washer. If spark plug is new, use 1/2 turn to compress washer appropriate amount. If reusing old spark plug, use 1/8 to 1/4 turn for proper washer compression.
NOTE: An improperly tightened spark plug will become very hot and could damage the engine.
Reinstall spark plug boot.
DRIVE GEAR MAINTENANCE (Fig. 13)
To ensure smooth operation of wheels, the wheel assembly should be cleaned before storage.
Remove the nut and wheel and set aside.
Remove dust cover, e-ring, washer, pins, and wheel gear. Clean any dirt from these items and the end of the drive shaft by wiping with a dry cloth. If necessary, rubbing alcohol may be used to remove any stubborn dirt.
WARNING
Do not lubricate any of the wheel components Lubrication may cause the wheel components to fail during use, which could result in mower damage and/or serious personal injury to the operator.
Reinstall wheel gear with the arrows facing the front of the mower. Reinstall pins, washer, e-ring, and dust cover.
Reinstall wheel and nut. Tighten nut to secure.
STORING THE MOWER
When storing the mower for 30 days or more:
If using fuel stabilizer, follow stabilizer manufacturer’s directions to add stabilizer to petrol in fuel tank. Run engine at least 10 minutes after adding stabilizer to allow the stabilizer to reach the carburetor.
WARNING
Do not store the lawn mower with petrol in the tank inside a building where fumes may reach an open flame or spark.
If not using fuel stabilizer, allow the engine to run until the mower is completely out of petrol.
Once the engine has stopped, allow the blade to come to a complete stop and disconnect the spark plug wire.
Turn mower on its side (with carburetor facing up) and clean grass clippings that have accumulated on the underside of the mower deck.
Wipe the mower clean with a dry cloth. Do not use a garden hose or pressure washer to clean the mower.
Check all nuts, bolts, knobs, screws, fasteners, etc., for tightness.
Inspect moving parts for damage, breakage, and wear. Have repairs made on any damaged or missing parts.
Store the mower in a well-ventilated area that is clean, dry, and out of the reach of children.
Do not store near corrosive materials such as fertilizer or rock salt.
19
RLM140HP-25lgs 09Jun11.indd Sec1:19 |
6/11/09 3:30:16 PM |
F GB D E I P NL S DK N FIN GR HU CZ RU RO PL SLO HR TR EST LT LV SK BG
English
MAINTENANCE
To lower the handle before storing (Fig. 14):
Loosen the starter rope guide knob. Remove starter rope from guide and allow to retract into engine.
Fully loosen the handle knobs on the sides of the handle and fold the upper handle down.
Push inward on each side of the lower handle, and lift the sides of the lower handle past the edges of the handle mounting brackets.
Fold the lower handle forward, making sure not to bend or kink the control cables.
TROUBLESHOOTING
Problem |
Possible Cause |
Solution |
|
|
|
Handle not in cor- |
Handle positioned incorrectly. |
Check to be sure that lower part of handle is pushed |
rect position. |
|
fully back and snapped into proper position. |
|
Handle knobs not tightened. |
Tighten handle knobs. |
|
|
|
Mower not starting. |
No spark. |
Use spark tester to check for proper spark plug |
|
|
operation. |
|
No petrol. |
Fill mower with petrol. If mower still does not start, |
|
|
contact a servicing dealer. |
|
Engine is flooded. |
Wait 15 minutes, then try starting mower again. Do not |
|
|
prime before attempting to start. |
|
Starter rope pulls harder now than |
Contact a servicing dealer. |
|
when new. |
|
|
|
|
M o w e r h a rd t o |
High grass, rear of mower housing and |
Raise cutting height. |
push. |
blade dragging in heavy grass, or cut- |
|
|
ting height too low. |
|
|
Wheel assembly needs cleaning. |
Clean wheel assembly. See Drive Gear Mainte- |
|
|
nance. |
|
|
|
Mower vibrating at |
Blade is unbalanced. |
Replace blade. |
higher speed. |
Bent motor shaft. |
Stop the engine, disconnect the spark plug wire from |
|
||
|
|
the spark plug, and inspect for damage. Have repaired |
|
|
by an authorized service center before restarting. |
|
|
|
20
RLM140HP-25lgs 09Jun11.indd Sec1:20 |
6/11/09 3:30:19 PM |
F GB D E I P NL S DK N FIN GR HU CZ RU RO PL SLO HR TR EST LT LV SK BG
Deutsch
Vielen Dank, dass Sie eine Ryobi Rasenmäher gekauft haben.
Ihre Rasenmäher wurde hergestellt und auf Zuverlässigkeit, Funktionalität und Sicherheit des Benutzers geprüft um einen hohen Standard zu garantieren. Sie ist robust und schenkt bei richtiger Pflege jahrelangen, störungsfreien Betrieb.
WARNUNG!
Um das Risiko von Verletzungen zu minimieren, muss der Benutzer vor Inbetriebnahme des Geräts das Betriebshandbuch gründlich durchlesen und die Sicherheitsvorschriften verstehen und beachten.
WARNUNG!
Um das Risiko von Verletzungen zu minimieren, muss der Benutzer vor Inbetriebnahme des Geräts das Betriebshandbuch gründlich durchlesen und die Sicherheitsvorschriften verstehen und beachten. Befolgen Sie alle Hinweise. Sollten Sie die folgenden Hinweise nicht beachten, könnte dies einen schweren persönlichen Schaden hervorrufen. Bewahren Sie die Gebrauchsanleitung auf, um darauf bei Bedarf Zugriff zu haben und weitere Personen einzulernen.
LESEN SIE ALLE ANWEISUNGEN
BESCHREIBUNG
Abbildung 1
1.Kaltstartvorrichter Primer Bulb
2.Öleinfülldeckel
3.Kraftstoffdeckel
4.Startgriff
5.Handgriff
6.Luftfilter
7.Bediener-Gleichgewichtskontrolle
8.Grasfangsack
9.Höheneinstellungshebel
10.Antriebsregelung (nur Modell RLM140SP)
11.Hecköffnung zum entleeren
12.Zündkerzenauslöser
13.Seilführungsgriff
ALLGEMEINE SICHERHEITSMASSNAHMEN
■Durch die Bedienung dieser Maschinen können Amputationen von Füßen und Händen durch umherfliegende Gegenstände entstehen. Sollten Sie diese Hinweise nicht einhalten, so kann dies schwere Personenschäden hervorrufen bis hin zum Tod.
21
■Erlauben Sie Kindern oder nicht ausgebildeten Personen nicht das Gerät zu benutzen. Die lokale Gesetzgebung regelt das Mindestalter des Benutzers.
■Halten Sie alle Umstehenden, Kinder und Haustiere von der Umgebung der Rasenmäher entfernt, wenn Sie in Betrieb ist. Stoppen Sie die Maschine wenn Sie jemand dem Bereich nähert.
■Es können schwere Unfälle entstehen, wenn der Benutzer die Anwesenheit der Kinder nicht beachtet. Kinder fühlen sich oft angezogen von der Maschine und der Aktivität. Nehmen Sie nicht an, dass Kinder sich dort aufhalten werden, wo Sie sie zuletzt gesehen haben.
■Halten Sie die Kinder entfernt von der Mähumgebung und unter Aufsicht eines Erwachsenen jemand anderes als den Benutzer.
■Seien Sie vorsichtig und schalten Sie die Rasenmäher aus, wenn sich ein Kind nähert.
■Erlauben Sie Kindern nicht die Maschine zu benutzen.
■Seien Sie vorsichtig, wenn Sie sich blinden Ecken, Sträuchern, Bäumen oder anderen Objekten nähern, die Ihre Sicht beeinträchtigen könnten.
■Vergessen Sie nie, dass der Benutzer verantwortlich ist für Unfälle und Gefahren die an Eigentum Fremder oder an anderen Personen entstehen könnte
■Tragen Sie bitte keine leichte Kleidung, Shorts,
Sandalen und gehen Sie auf keinen Fall barfuss. Tragen Sie schützende Schutze, so dass Sie keiner Rutschgefahr ausgesetzt sind, egal welche Oberfläche.
■Tragen Sie keinerlei Schmuck. Diese können Teile der Rasenmäher anziehen.
■Tragen Sie eine Schutzoder Sicherheitsbrille mit Seitenschutz. Alltägliche Brillen haben keinen guten Schutz. Das sind KEINE Sicherheitsbrillen. Sollten Sie diesen Hinweis befolgen, so wird das Risiko der Gefahr gemindert. Benutzen Sie bei Staub eine Gesichtsmaske.
■Tragen Sie bei der Nutzung des Gerätes eine Schutzoder Sicherheitsbrille.
■Benutzen Sie das richtige Gerät. Benutzen Sie den Rasenmäher nur für die vorgeschriebenen Ausgaben.
■Säubern Sie den Arbeitsbereich. Kabel, Gartenzäune, Steine, Mauern, Bäume, Büsche Bordsteine, Baumrinden, Verkleidungen und Zaunpfosten können durch das Schneideelement in die Luft geschleudert werden. Stehen Sie hinter der Rasenmäher bei Motorbeginn.
■Wechseln Sie beschädigte Teile aus.
■Vor jedem Gebrauch sollten Sie die Rasenmäher begutachten, so dass alle Schneideelemente, Messer nicht beschädigt sind.
■Arbeiten Sie mit dem Rasenmäher nicht in Räumen, wo
RLM140HP-25lgs 09Jun11.indd Sec1:21 |
6/11/09 3:30:20 PM |

F GB D E I P NL S DK N FIN GR HU CZ RU RO PL SLO HR TR EST LT LV SK BG
Svenska
SYMBOLER
Viktigt: Några av dessa symboler kan användas i samband med denna produkt. Studera dem och lär dig dess betydelser. Korrekt tolkning av dessa symboler låter dig använda produkten bättre och säkrare.
SYMBOL |
NAMN |
FÖRKLARING |
|
Var vaksam |
Förebyggande åtgärder som involverar din säkerhet. |
|
|
|
|
|
För att minska risken för skada så måste användare läsa, |
|
|
|
|
Läs användningsmanualen |
och förstå, användningsmanualen innan användning av |
|
|
|
|
|
denna produkt. |
|
|
|
|
|
|
|
|
|
|
|
Bär alltid säkerhetsglasögon eller säkerhetsglas med |
|
|
|
|
Ögonskydd |
sidoglas och, om nödvändigt, ett ansiktsskydd, när du |
|
|
|
|
|
använder denna produkt. |
|
|
|
|
|
|
|
|
|
|
Håll åskådare på avstånd |
Håll alla åskådare på minst 15 m avstånd. |
|
|
|
|
|
|
|
|
|
|
Risk att fastna |
Håll alla kroppsdelar och alla kläder borta från bälten och |
|
|
|
|
andra rörliga delar. |
|
|
|
|
|
|
|
|
|
|
|
|
|
|
|
|
|
Rörliga delar |
För att undvika skada, håll dig alltid borta från rörliga |
|
|
|
|
delar. |
|
|
|
|
|
|
|
|
|
|
|
|
|
|
|
|
|
Håll händer och fötter borta |
Fara. Håll händer och fötter borta. |
|
|
|
|
|
|
|
|
|
|
|
|
|
|
|
|
Rikoschett |
Ivägkastade föremål kan studsa tillbaka vilket kan |
|
|
|
|
resultera i personeller egendomsskada. |
|
|
|
|
|
|
|
|
|
|
|
|
|
|
|
|
|
Varm yta |
För att minska risken för skador, undvik kontakt med |
|
|
|
|
varma ytor. |
|
|
|
|
|
|
|
|
|
|
|
|
|
|
|
|
|
Ingen rökning |
Rök inte och håll dig borta från öppna lågor och gnistor |
|
|
|
|
när du fyller bränsletanken eller när du hanterar bränsle. |
|
|
|
|
|
|
|
|
|
|
|
|
|
|
|
|
|
Bensin |
Använd blyfri bensin, avsedd för bilar, med en oktanhalt |
|
|
|
|
på minst 87 ([R+M]/2) |
|
|
|
|
|
|
|
|
|
|
|
|
|
|
|
|
|
Olja |
Använd SAE 30eller 10W30 API-SJ-olja |
|
|
|
|
|
|
|
|
|
|
|
Följer alla regleringsstandarder i det EU-land där |
|
|
|
|
|
produkten köps. |
73
RLM140HP-25lgs 09Jun11.indd Sec1:73 |
6/11/09 3:31:02 PM |
F GB D E I P NL S DK N FIN GR HU CZ RU RO PL SLO HR TR EST LT LV SK BG
Svenska
Följande signalord och betydelser är tänkta att förklara de olika risknivåerna som är associerade med denna produkt.
SYMBOL |
SIGNAL |
BETYDELSE |
|
|
|
|
FARA: |
Indikerar en överhängande farlig situation som kan, om den inte |
|
undviks, resultera i dödsfall eller allvarlig skada. |
|
|
|
|
|
|
|
|
VARNING: |
Indikerar en potentiellt farlig situation som kan, om den inte |
|
undviks, resultera i dödsfall eller allvarlig skada. |
|
|
|
|
|
|
|
|
FÖRSIKTIGHET |
Indikerar en potentiellt farlig situation som kan, om den inte |
|
undviks, resultera i mindre eller medelstora skador. |
|
|
|
|
|
|
|
|
FÖRSIKTIGHET |
(Utan säkerhetssymbolen) Indikerar en situation som kan leda till |
|
egendomsskada. |
|
|
|
|
|
|
|
SERVICE
Att serva produkten kräver extrem försiktighet och kunskap och bör endast utföras av en kvalificerad servicetekniker. Vi rekommenderar att du returnerar produkten till ditt närmsta AUKTORISERADE SERVICECENTER för reparation. Använd endast identiska utbytesdelar när produkten servas.
VARNING:
För att undvika allvarlig personskada, försök inte att använda denna produkt innan du har läst igenom, och förstått, varningarna och instruktionerna i användningsmanualen. Om du inte förstår varningarna och instruktionerna i användningsmanualen, använd inte denna produkt. Ring Ryobis kundtjänst för assistans.
VARNING:
Användning av kraftverktyg kan resultera i att främmande föremål kastas upp i ögonen
vilket |
kan leda till allvarlig ögonskada. Bär |
|||
alltid |
skyddsglasögon med |
breda |
sidoglas, |
|
eller |
ett |
helt ansiktsskydd |
när det |
behövs, |
innan |
du |
börjar använda |
kraftverktyget. Vi |
|
rekommenderar användning av en ansiktsmask över skyddsglasögon eller standardskyddsglas med breda sidoglas. Använd alltid ögonskydd som är märkta i enlighet med EN 166.
SPARA DESSA INSTRUKTIONER OCH BIFOGA DEM OM GRÄSKLIPPAREN SKA ANVÄNDAS AV EN ANNAN PERSON
74
SPECIFIKATIONER
Motor………….................................................140cc OHV
Drivningssystem |
|
RLM140HP................................................................. |
Tryck |
RLM140SP.................................. |
Bakhjulsdriven självgång |
Hastighet utan |
|
belastning............................... |
2,700 – 2,800 r/min. (RPM). |
Klippningsbredd…....................................................45 cm
Höjdjusteringar..................... |
7 positioner, 19 mm – 76 mm |
|
Hjulstorlek................................ |
|
17,8 cm fram, 20,3 cm bak |
Gräsuppsamlarens kapacitet |
......................1,8 bu / 55 liter |
|
Ljudeffekt............................................... |
|
95 (LWAm) dB (A) |
Ljudtryck.................................................... |
|
80 (LpA) dB (A) |
Vibrationsnivå……................................................3,6 m/s2
Vikt |
|
RLM140HP................................................................ |
30 kg |
RLM140SP……….....................................................32 kg
MONTERING
VARNING
Om några delar är skadade eller saknas, använd inte denna produkt innan delarna har bytts ut. Användning av denna produkt med skadade eller saknade delar kan resultera i allvarlig personskada.
VARNING
Försök inte att modifiera denna produkt, eller skapa tillbehör till den som inte är rekommenderade att användas med den. Sådana modifikationer anses som felanvändning och det kan resultera i en farlig situation som kan leda till allvarlig personskada.
VARNING
För att undvika oavsiktlig start som kan leda till
RLM140HP-25lgs 09Jun11.indd Sec1:74 |
6/11/09 3:31:03 PM |
F GB D E I P NL S DK N FIN GR HU CZ RU RO PL SLO HR TR EST LT LV SK BG
Svenska
allvarliga personskador, ta alltid bort tändkabeln vid montering av delar.
VARNING
Montera, eller justera, aldrig ett tillbehör när gräsklipparen är igång. Att inte stanna motorn kan orsaka allvarlig personskada.
VARNING
Användaldriggräsklipparenutankorrektfungerande säkerhetsanordningar på plats. Använd aldrig gräsklipparen med skadade säkerhetsanordningar. Användning av gräsklipparen utan ordentligt fungerande säkerhetsanordningar kan resultera i allvarlig personskada.
Se figur 2.
■Placera handtagen i korrekt användningsposition och dra åt handtagsvreden.
■Lossa snörhållarens vred, placera startsnöret i hållaren på handtaget och dra åt vredet.
■Montera gräsuppsamlaren.
ANVÄNDNING
Läs användningsmanualen och följ alla varningar 
 och säkerhetsinstruktioner.
 Bär ögonskydd.
Håll alla åskådare, speciellt barn och djur, på minst 15 meters avstånd från arbetsområdet.
TANKNING OCH PÅFYLLNING VARNING
Hantera alltid bensin med försiktighet. Det är väldigt brännbart.
■Förvara bensin i behållare som är godkända för denna typ av förvaring.
■Fyll alltid på bränsle utomhus där det inte finns några gnistor eller lågor. Andas inte in bensinångorna. Rök inte under påfyllning eller hantering av bränsle.
■Låt inte bensin och olja komma i kontakt med din hud.
■Håll bensin och olja borta från ögonen. Om bensin eller olja kommer i kontakt med ögonen, skölj dem genast med rent vatten. Om irritation fortfarande kvarstår, kontakta omedelbart en läkare.
■Torka upp spilld bensin omedelbart.
FYLLA TANKEN (Fig. 3)
VARNING
Stäng alltid av motorn innan tankning. Ta aldrig bort bränslelocket, eller tanka, en maskin som har
motorn igång, eller som har en varm motor. Flytta minst 9 m bort från tankningsplatsen när du startar motorn igen. Rök inte! Att inte följa denna varning kan resultera i allvarliga personskador.
■Rengör området runt bränslelocket för att förhindra kontaminering.
■Lossa bränslelocket långsamt för att släppa ut trycket och för att förhindra att bränsle läcker ut runt om locket. Lägg locket på en ren yta.
■Häll försiktigt i bensin i tanken. Undvik att spilla.
■Rengör och inspektera packningen. Sätt sedan tillbaka alla bränsleoch behållarlock ordentligt.
■Torka upp eventuell spilld bensin. Flytta minst 9 m bort
från tankningsplatsen innan du startar motorn. NOTERA: Det är normalt för en motor att utveckla rök vid första användningen.
FYLLA PÅ / KONTROLLERA MOTOROLJA (Fig. 3)
Motorolja har en stor inverkan på motorprestandan och livstiden. För generell användning, vid alla temperaturer, rekommenderas SAE 10W-30. Använd alltid en motorolja för 4-taktsmotorer som uppfyller, eller överträffar, kraven för API-serviceklassifikationen SJ.
NOTERA: Icke-rengörande olja, eller motorolja avsedd för 2-taktsmotorer, kommer att skada motorn och ska inte användas.
Fylla på motorolja:
■Kontrollera att gräsklipparen är plan och att området runt oljelocket/mätstickan är rent.
■Ta bort locket och förseglingen från oljeflaskan som medföljer.
■Skruva bort oljelocket/mätstickan och ta bort.
■Fyll långsamt på olja. Fyll till ”Full”-sträcket på mätstickan. Överfyll inte.
NOTERA: Vid kontroll av oljenivå, placera mätstickan i oljehålet, men skruva inte fast den.
■Sätt tillbaka oljelocket/mätstickan igen och kontrollera oljenivån. Fyll på mer olja om det behövs.
Kontrollera motoroljan:
■Kontrollera att gräsklipparen är plan och att området runt oljelocket/mätstickan är rent.
■Ta bort oljelocket/mätstickan. Torka rent och sätt tillbaka i oljehålet, men skruva inte i den.
■Ta bort oljelocket/mätstickan igen och kontrollera oljenivån. Fyll på olja om det behövs.
STARTA/STANNA GRÄSKLIPPAREN (Fig. 3) VARNING
Starta, och kör, aldrig motorn i ett tillstängt, eller dåligt ventilerat, område. Att inandas avgasångor kan döda.
75
RLM140HP-25lgs 09Jun11.indd Sec1:75 |
6/11/09 3:31:05 PM |

F GB D E I P NL S DK N FIN GR HU CZ RU RO PL SLO HR TR EST LT LV SK BG
Svenska
STARTA MOTORN
■Tryck ordentligt på primer-knappen 3 gånger. NOTERA: Detta steg är oftast inte nödvändigt vid start av en motor som redan har körts i några minuter.
■Håll in greppkontrollen mot handtaget.
■Dra i startsnöret tills motorn startar. Släpp tillbaka snöret långsamt så att repet inte rycks tillbaka.
NOTERA: Det kan vara nödvändigt att repetera primerstegen i kallt väder. I varmare väder kan överanvändning av primer-knappen orsaka flödning av motorn och den kommer inte att starta. Om du flödar motorn, vänta i några minuter innan du försöker att starta den igen och upprepa INTE primer-stegen.
STANNA MOTORN
■ Släpp greppkontrollen och låt motorn stanna helt.
STÄLL IN BLADHÖJD (Fig. 4)
Vid leverans är hjulen på gräsklipparen inställda i en låg klippningsposition. Justera klippningspositionen till en som bäst passar din gräsmatta innan första användningen. En normal gräsmatta bör vara 3 – 5 cm hög under kalla månader och 5 – 7,5 cm hög under varma månader.
Ställ in bladhöjden:
■Greppa höjdjusteringsspaken och flytta den mot bakre delen av gräsklipparen för att höja bladhöjden.
■ Greppa höjdjusteringsspaken och flytta den mot den främre delen av gräsklipparen för att sänka bladhöjden.
STÄLLA IN HANDTAGSHÖJDEN (Fig. 5)
Handtagets höjd kan enkelt justeras som användaren föredrar.
Justera handtagshöjden:
■Ta bort handtagsvredet.
■Dra ut handtagsbulten och justera höjden till den andra öppningen.
■Sätt tillbaka handtagsbulten och –vredet. Dra åt vredet ordentligt.
■Upprepa samma procedur på den andra sidan av handtaget.
GRÄSKLIPPNINGSTIPS |
|
|
■ Kontrollera att gräsmattan är |
fri från |
stenar, |
pinnar, ståltråd och andra föremål som kan skada |
||
gräsklipparbladen eller motorn. |
Sådana |
föremål |
kan oavsiktligt kastas iväg av gräsklipparen i vilken riktning som helst och orsaka allvarlig personskada på användaren eller andra.
■För utkastning bakåt av klippt gräs, montera inte gräsuppsamlaren. Höj bladhöjden för att öka utkastningsprestandan.
■För bästa prestanda, klipp alltid av maximalt 1/3 av gräsets totala höjd.
■Minska gånghastigheten vid klippning av långt gräs för att öka klippningsprestandan och för att få ordentligt utkast av gräset.
■Klipp inte blött gräs. Det kommer att fastna på undersidan av gräsklipparen och förhindra ordentlig uppsamling eller utkastning av gräset.
■Nytt eller tjockt gräs kan kräva smalare klippområde.
■Rengör undersidan av gräsklipparen efter varje användning för att ta bort gräsrester, löv, smuts och annat ansamlat skräp.
SLUTTNINGSANVÄNDNING (Fig. 6)
■Sluttningar är en stor bidragande orsak vid halkolyckor och kan resultera i allvarlig skada. Användning i sluttningar kräver extra försiktighet. Klipp inte en sluttning om du känner dig osäker. För din säkerhets skull, försök inte att klippa sluttningar med en vinkel överstigande 15 grader.
■Klipp rakt över sluttningar, aldrig uppåt eller nedåt. Var extremt försiktig när du byter riktning i en sluttning.
■Var uppmärksam på hål, hjulspår, dolda föremål och ojämnheter som kan få dig att halka eller ramla. Högt gräs kan dölja hinder. Ta bort alla föremål, såsom stenar, trädgrenar, etc. som du kan snubbla på eller som kan kastas iväg av bladet.
■Var alltid säker på ditt fotfäste. En halkolycka kan orsaka allvarlig skada. Om du känner att du håller på att tappa balansen, släpp greppkontrollen omedelbart.
■Klipp inte i närheten av stup, diken eller vallar. Du kan tappa fotfästet eller balansen.
TÖMMA GRÄSUPPSAMLAREN (Fig. 7)
■Stanna gräsklipparen och vänta på att bladet stannar helt.
■Lyft upp den bakre utkastningsdörren.
■Ta tag i gräsuppsamlaren i dess handtag och lyft upp den för att ta bort den från gräsklipparen.
■Töm ut gräsresterna.
■Lyft upp den bakre utkastningsdörren och sätt tillbaka gräsuppsamlaren.
UNDERHÅLL
VARNING
Använd endast identiska utbytesdelar vid service. Användning av andra delar kan skapa en fara eller orsaka produktskada.
VARNING
Bär alltid skyddsglasögon eller skyddsglas med breda sidoglas under användning av verktyget. Om användandet är dammigt, bär även ett
76
RLM140HP-25lgs 09Jun11.indd Sec1:76 |
6/11/09 3:31:06 PM |
F GB D E I P NL S DK N FIN GR HU CZ RU RO PL SLO HR TR EST LT LV SK BG
Svenska
inandningsskydd.
GENERELLT UNDERHÅLL
■Undvik att använda lösningsmedel vid rengöring av plastdelar. De flesta plasterna är mottagliga för skador från olika varianter av kommersiella lösningsmedel och kan skadas om sådana används. Använd rena trasor för att ta bort smuts, damm, smörjmedel, fett, etc.
■ Kontrollera regelbundet alla muttrar och bultar så att de är ordentligt åtdragna för att säkerställa säker användning av gräsklipparen.
■Ta bort ansamlingar av gräs och löv på och runt om motorn och motorskyddet. Torka rent gräsklipparen med en torr trasa då och då. Använd inte vatten.
SMÖRJNING
Alla lager i denna produkt är smörjda med en tillräcklig mängd högkvalitativt smörjmedel för att räcka hela dess livstid under normala användningsförhållanden. Därför krävs ingen extra lagersmörjning.
VARNING
Skydda alltid händerna genom att använda kraftiga handskar och/eller genom att linda in de vassa delarna av bladet med en trasa och andra material vid bladunderhåll. Felaktig hantering av bladet kan resultera i allvarlig personskada.
VARNING
Stanna gräsklipparen, låt bladen stanna helt och koppla bort tändkabeln innan du utför något underhåll. Att inte följa denna varning kan resultera i allvarlig personskada.
BYTA UT KLIPPNINGSBLADET (Fig. 8)
För bästa resultat måste gräsklipparbladet hållas vasst. Byt ut ett böjt eller skadad blad omedelbart.
VARNING
Använd endast utbytesblad som har blivit godkända av tillverkaren av din gräsklippare. Användning av ett icke godkänt blad innebär en fara och kan resultera i allvarlig skada på dig och din gräsklippare och det ogiltigförklarar din garanti.
■Stanna motorn och koppla bort tändkabeln. Låt bladen stanna helt.
■Lägg gräsklipparen på dess sida (förgasaren riktad uppåt).
■Tryck in en träbit mellan bladet och gräsklippardäcket för att förhindra att bladen rör sig.
■Använd en 9/16-tums skiftnyckel eller hylsa (inte inkluderad) för att lossa bladbulten genom att
vrida bulten motsols (sett från undersidan av gräsklipparen).
■Ta bort bladbulten, låsbrickan, den platta brickan och bladet.
■Placera det nya bladet på axeln. Kontrollera att det är monterat med de svängda delarna riktade uppåt mot gräsklippardäcket och inte nedåt mot marken.
■Sätt tillbaka den platta brickan, låsbricka och bladbulten på axeln. Dra åt bulten medsols med fingrarna (sett från undersidan av gräsklipparen). NOTERA: Kontrollera att alla delar sätts tillbaka på exakt samma sätt som dem togs bort på.
■Dra åt bladbulten genom att använda en momentdragare (inte inkluderad) för att försäkra dig om
att bulten är ordentligt åtdragen. Det rekommenderade åtdragningsmomentet för bladbulten är 48-55 Nm.
NOTERA: Vi rekommenderar inte att du slipar bladet. Men om du gör det, kontrollera att det är balanserat innan du sätter tillbaka det.
BYTA HJULEN (Fig. 9)
Byta ett hjul:
■Stanna motorn och koppla bort tändkabeln. Låt bladet stanna helt.
■Ta bort muttern från hjulaxeln och ta sedan bort hjulet.
■Byt ut det mot ett nytt hjul och sätt tillbaka muttern för att fästa det.
RENGÖRA LUFTFILTRET (Fig. 10)
Håll luftfiltret rent för korrekt prestanda och lång livstid.
■Ta bort luftfilterkåpan genom att trycka in flikarna med din tumme samtidigt som du försiktigt drar i kåpan.
■Ta bort luftfiltret och rengör det i varmt såpvatten. Skölj ur och låt det torka ordentligt.
■Lägg på ett tunt lager motorolja på luftfiltret och tryck sedan ut det med ett uppsugande tyg eller en pappersduk.
■Sätt tillbaka luftfiltret i luftfilterbasen.
■Sätt tillbaka, och dra åt, luftfilterkåpan.
NOTERA: Filter ska bytas ut årligen för bästa prestanda.
BRÄNSLELOCK
VARNING:
Ett läckande bränslelock är en brandfara och måste bytas ut omedelbart.
Bränslelocket innehåller icke-reparerbara filter och en backventil. Ett igensatt bränslefilter orsakar dålig motoreffekt. Om effekten blir bättre när bränslelocket lossas, så kan backventilen vara trasig, eller så är filtret igensatt. Byt ut bränslelocket om det behövs.
BYTA UT MOTOROLJAN (Fig. 11)
Motoroljan ska bytas ut var 25:e användningstimme. Byt
77
RLM140HP-25lgs 09Jun11.indd Sec1:77 |
6/11/09 3:31:07 PM |

F GB D E I P NL S DK N FIN GR HU CZ RU RO PL SLO HR TR EST LT LV SK BG
Svenska
olja medan motorn fortfarande är varm, men inte het. Detta gör att oljan kan tömmas ut fortare och mer fullständigt.
■Ta bort oljelocket/mätstickan.
■Lägg gräsklipparen på dess sida och låt oljan rinna ut från påfyllningshålet in i en godkänd behållare.
■Placera gräsklipparen upprätt och fyll på olja genom
att följa instruktionerna i sektionen Fylla på/Kontrollera motorolja.
NOTERA: Använd olja ska kastas på en lämplig återvinningsstation. Besök din lokala återförsäljare för mer information.
TÄNDSTIFTSUNDERHÅLL (Fig. 12)
Tändstiftet måste ha korrekt gnistgap och vara rent för att säkerställa korrekt motorfunktion. För att kontrollera:
■Ta bort tändstiftsskyddet.
■Ta bort smuts runt basen på tändstiftet.
■Ta bort tändstiftet genom att använda en 13/16-tums tändstiftshylsa (inte inkluderad).
■Kontrollera så att tändstiftet inte har några skador och rengör det med en stålborste innan du sätter tillbaka
det. Om isolatorn är spräckt eller kantstött så ska tändstiftet bytas ut.
NOTERA: Om du byter ut tändstiftet, använd något av följande rekommenderade tändstift, eller motsvarande: Torch F6RTC eller NGK BPR6ES.
■Mät gnistgapet. Det korrekta gnistgapet är 71 – 78 mm. För att öka gapet, om nödvändigt, bänd försiktigt den översta elektroden. För att minska gapet, stöt försiktigt den nedre elektroden mot en hård yta.
■Montera tändstiftet i korrekt position. Gänga i det för hand för att förhindra korsdragning.
■Dra åt med skiftnyckel för att trycka ihop brickan.
Om tändstiftet är nytt, använd ett halvt varv för att trycka ihop brickan lämpligt mycket. Om du återanvänder ett gammalt tändstift, använd 1/8- till 1/4-dels varv för korrekt brickkompression. NOTERA: Ett felaktigt åtdraget tändstift blir väldigt varmt och kan skada motorn.
■ Sätt tillbaka tändstiftsskyddet.
DRIVHJULSUNDERHÅLL (Fig. 13)
För att säkerställa mjuk användning av hjulen så måste hjulupphängningen rengöras innan förvaring.
■Ta bort muttern och hjulet och lägg åt sidan.
■Ta bort dammskyddet, e-ringen, brickan, pins och hjulväxeln. Ta bort eventuell smuts från dessa föremål och från änden på drivaxeln genom att torka med en torr trasa. Om nödvändigt kan upplösande sprit användas för att ta bort fastsatt smuts.
VARNING
Smörj inte några av hjuldelarna. Smörjning kan
göra så att hjuldelarna slutar att fungera under användning, vilket kan resultera i skada på gräsklipparen och/eller allvarlig personskada på användaren.
■Sätt tillbaka hjulväxeln med pilarna riktade mot den främre delen av gräsklipparen. Sätt tillbaka pins, brickan, e-ringen och dammskyddet.
■Sätt tillbaka hjulet och muttern. Dra åt muttern.
FÖRVARA GRÄSKLIPPAREN
Vid förvaring i 30 dagar eller längre:
■Om du använder en bränslestabilisator, följ tillverkarens instruktioner för att tillsätta bränslestabilisatorn till bränsletanken. Kör motorn minst 10 minuter efter tillsats av bränslestabilisatorn för att låta den nå förgasaren.
VARNING
Förvara inte gräsklipparen med bensin i tanken inuti en byggnad där ångor kan nå en öppen låga eller en gnista.
■Om du inte använder en bränslestabilisator, låt motorn köra tills gräsklipparen är helt tom på bensin.
■När motorn har stannat, låt bladen stanna helt och koppla bort tändkabeln.
■Lägg gräsklipparen på dess sida (med förgasaren riktad uppåt) och rengör gräsrester som har ansamlats på undersidan av gräsklippardäcket.
■Torka rent gräsklipparen med en torr trasa. Använd inte en trädgårdsslang eller trycksatt vatten för att rengöra gräsklipparen.
■Kontrollera alla muttrar, bultar, vred, skruvar, fästanordningar, etc. så att de är åtdragna ordentligt.
■Kontrollera rörliga delar så att de inte har några skador eller förslitningar. Låt eventuella skadade delar repareras och byt ut saknade delar.
■Förvara gräsklipparen i ett välventilerat område som är rent, torrt och utom räckhåll för barn.
■Förvara inte i närheten av frätande material, såsom gödningsmedel eller saltsten.
Sänka handtaget innan förvaring (Fig. 14):
■Lossa snörhållarvredet. Ta bort startsnöret från hållaren och låt det dras in i motorn.
■Lossa helt handtagsvreden på sidorna på handtaget och vik ned det övre handtaget.
■Tryck inåt på båda sidorna om det nedre handtaget och lyft sidorna på det nedre handtaget förbi kanterna på handtagets fäste.
■Vik det nedre handtaget framåt och kontrollera så att det inte böjs eller klämmer kontrollkablarna.
78
RLM140HP-25lgs 09Jun11.indd Sec1:78 |
6/11/09 3:31:08 PM |
 Loading...