


RESV1300
ELECTRIC MULCHINATOR BLOWER / VACUUM
OPERATOR’S MANUAL
FOR QUESTIONS, CALL 1-800-345-8746 in U.S. or 1-800-668-1238 in CANADA
www.RyobiOutdoor .com
SAVE THESE INSTRUCTIONS DO NOT THROW AWAY

INTRODUCTION
THANK YOU
Thank you for buying this quality product. This modern outdoor power tool will provide many hours of useful service. You will find it to be a great labor-saving device. This operator’s manual provides you with easy-to- understand operating instructions. Read the whole manual and follow all the instructions to keep your new outdoor power tool in top operating condition.
PRODUCT REFERENCES, ILLUSTRATIONS AND SPECIFICATIONS
All information, illustrations and specifications in this manual are based on the latest product information available at the time of printing. We reserve the right to make changes at any time without notice.
Copyright© 2003 MTD SOUTHWEST INC All Rights Reserved.
SERVICE INFORMATION
Service on this unit both within and after the warranty period should be performed only by an authorized and approved service dealer.
Dial:
• Call 1-800-345-8746 in the United States or 1-800-668-1238 in Canada, to obtain a listing of authorized service dealers near you.
or
• Go to www.RyobiOutdoor.com on the World Wide Web for a listing of service dealers near you
DO NOT RETURN THE UNIT TO THE RETAILER.
NOTE: PROOF OF PURCHASE WILL BE REQUIRED FOR WARRANTY SERVICE.
Make sure you carefully read and understand this manual before starting or operating this equipment.
THIS PRODUCT IS COVERED BY ONE OR MORE US PATENTS, OTHER PATENTS PENDING.
TABLE OF CONTENTS
I. Rules for Safe Operation . . . . . . . . . . . . . . . . . . . . . 3-6 A. Important Safety Information . . . . . . . . . . . . . . . . . 3 B. Safety and International Symbols . . . . . . . . . . . . . 5 C. Know Your Unit . . . . . . . . . . . . . . . . . . . . . . . . . . . 6
II. Assembly Instructions . . . . . . . . . . . . . . . . . . . . . . . 7-8 A. Attaching and Removing the Blower/Vacuum Tube . . 7 B. Attaching and Removing the Vacuum Bag . . . . . . 8 C. Installing the Shoulder Harness . . . . . . . . . . . . . . . 8
III. Operating Instructions . . . . . . . . . . . . . . . . . . . . . 9-13 A. Connecting the Power Cord . . . . . . . . . . . . . . . . . 9 B. Starting/Stopping Instructions . . . . . . . . . . . . . . . . 9 C. Holding the Blower/Vacuum . . . . . . . . . . . . . . . . 10 D. Air Vents . . . . . . . . . . . . . . . . . . . . . . . . . . . . . . . . 10 E. Operating as a Blower . . . . . . . . . . . . . . . . . . . . . 11 F. Operating as a Vacuum . . . . . . . . . . . . . . . . . . . . 12 G. Clearing a Blocked Impeller . . . . . . . . . . . . . . . . . .13 H. Empty the Vacuum Bag . . . . . . . . . . . . . . . . . . . . 13
IV. Maintenance and Repair Instructions . . . . . . . . . . . 14 A. Servicing Double-Insulated Units . . . . . . . . . . . . 14 B. Cleaning the unit . . . . . . . . . . . . . . . . . . . . . . . . . 14 C. Cleaning the Vacuum Bag . . . . . . . . . . . . . . . . . . 14 D. Storage . . . . . . . . . . . . . . . . . . . . . . . . . . . . . . . . 14 E. Inspecting Extension Cords . . . . . . . . . . . . . . . . . 14 F. Accessories/Replacement Parts . . . . . . . . . . . . . .14
V. Specifications . . . . . . . . . . . . . . . . . . . . . . . . . . . . . . 15
VI. Troubleshooting . . . . . . . . . . . . . . . . . . . . . . . . . . . . |
15 |
VII. Warranty . . . . . . . . . . . . . . . . . . . . . . . . . . . . . . . . . . 18
VII. Parts List . . . . . . . . . . . . . . . . . . . . . .Inside Back Cover
CONTENTS OF CARTON
This unit includes the following:
•Blower/Vacuum Model RESV1300
•Blower/Vacuum Tube
•Shoulder Strap
•Vacuum bag
•Hardware Pack
•Operator’s Manual
•Owner’s Registration Card
Examine all parts to make certain that nothing is missing and no breakage has occurred during shipping. Damaged or missing parts must be replaced before using this unit.
2

RULES FOR SAFE OPERATION
The purpose of safety symbols is to attract your attention to possible dangers. The safety symbols, and their explanations, deserve your careful attention and understanding. The safety warnings do not by themselves eliminate any danger. The instructions or warnings they give are not substitutes for proper accident prevention measures.
SYMBOL MEANING
SAFETY ALERT: Indicatesdanger, warning or caution. Attention is required in order to avoid serious personal injury. May be used in conjunction with other symbols or pictographs.
NOTE: Advises you of information or instructions vital to the operation or maintenance of the equipment.
SYMBOL MEANING
DANGER: Failure to obey a safety warning will
result in serious injury to yourself or to others. Always follow the safety precautions to reduce the risk of fire, electric shock and personal injury.
WARNING: Failure to obey a safety warning can
result in injury to yourself and others. Always follow the safety precautions to reduce the risk of fire, electric shock and personal injury.
CAUTION: Failure to obey a safety warning may
result in property damage or personal injury to yourself or to others. Always follow the safety precautions to reduce the risk of fire, electric shock and personal injury.
• IMPORTANT SAFETY INSTRUCTIONS •
READ ALL INSTRUCTIONS
BEFORE OPERATING
WARNING: When using the unit, you must follow the
safety rules. Please read these instructions before operating the unit in order to ensure the safety of the operator and any bystanders. Please keep these instructions for later use.
•Read the instructions carefully. Be familiar with the controls and proper use of the unit.
•Do not operate this unit when tired, ill or under the influence of alcohol, drugs or medication.
•Children and teens under the age of 15 must not use the unit, except for teens guided by an adult.
•Before each use, thoroughly inspect your unit for loose or damaged parts. Do not use until adjustments or repairs are made.
•All guards and safety attachments must be installed properly before operating the unit.
•Inspect the area before starting the Blower/ Vacuum. Remove all debris and hard or sharp objects such as glass, wire, etc.
DANGER: When using electric gardening appliances,
basic safety precautions should always be followed to reduce the risk of fire, electric shock and personal injury. Carefully read and understand the entire operator's manual before using your unit. Pay close attention to the operating instructions and safety warnings.
•Use the unit only in daylight or good artificial light.
•Keep all bystanders, especially children and pets, at least 50 feet (15 m) away from the unit while operating.
ELECTRICAL SAFETY WARNINGS
•Since the tool is double-insulated, a 2-wire extension cord (an extension cord without a ground) may be used. A 3-wire extension cord (an extension cord with a ground) that uses a NEMA type connector (parallel blade, U ground) is recommended. Extension cords are available from your local retailer. Use only roundjacketed extension cords approved for outdoor use.
•This tool is double-insulated. Repair or replace damaged cords.
WARNING: To reduce the risk of electrical shock, use
only SW-A, SOW-A, STW-A, STOW-A, SJW-A, SJOW-A, SJTW-W or SJTOW-A cord types.
•To reduce the risk of electrical shock, this unit has a polarized plug (one blade is wider than the other). This unit will fit with a polarized plug in one way only. If the plug does not fit fully into the unit, reverse the plug. If it still does not fit, use a cord with the correct connection. Do not modify the unit in any way.
MINIMUM WIRE SIZE FOR EXTENSION CORDS FOR 120 VOLT APPLIANCES USING 0-12 AMPS*
Cord length (ft.) |
25 |
50 |
100 |
150 |
|
|
|
|
|
Wire size (AWG)* |
16 |
16 |
16 |
14 |
|
|
|
|
|
*The wire size (AWG) for appliances using 12 to 16 amps is 14 AWG for 25 feet, 12 AWG for 50 feet, and not recommended for 100 or 150 feet.
3

RULES FOR SAFE OPERATION
•CORD SETS: Make sure your cord set is in good condition, with a cord that is heavy enough to carry the current that your unit will draw. An undersized cord set will cause a drop in line voltage resulting in a loss of power, as well as overheating. The table shown above illustrates the correct size to use depending on the cord length and nameplate amperage rating. If in doubt, use the next heavier size line gauge. The smaller the gauge number, the heavier the cord. To prevent the cord from disconnecting from the unit, use the cord hook shown in the Operating Instructions.
•Ground Fault Circuit Interrupter (GFCI) protection should be provided on the circuit(s) or outlet(s) that will be used for the unit. Use receptacles with built-in GFCI protection for an extra measure of safety.
•A nameplate on your unit indicates the voltage used. Never connect the unit to an AC voltage that differs from this voltage.
•Inspect all extension cords and the unit power connection periodically. Look closely for deterioration, cuts or cracks in the insulation. Also inspect the connections for damage. Repair or replace the cords if any defects appear.
•Avoid dangerous environments. Never operate your unit in damp or wet conditions. Moisture is a shock hazard.
•Do not use the unit in the rain.
•Do not handle the plug or the unit with wet hands.
WHILE OPERATING
•Wear safety glasses or goggles that are marked as meeting ANSI Z87.1-1989 standards. Also wear ear/hearing protection when operating this unit. Wear a face or dust mask if the operation is dusty. Long sleeve shirts are recommended.
•Wear heavy, long pants, boots and gloves. Do not wear loose clothing, jewelry, short pants, sandals or go barefoot. Secure hair above shoulder level.
•Avoid accidental starting. Do not carry around a unit that is plugged in with your finger on the trigger switch. Be sure the switch is in the off position when plugging in the unit.
•Do not set unit on any surface except a clean, hard area while engine is running. Debris such as gravel, sand, dust, grass, etc. could be picked up by the air intake and thrown out by the discharge opening, damaging unit, property, or causing serious injury to bystanders or operator.
•Use the right tool. Only use this tool for the purpose intended.
•Do not overreach. Always keep proper footing and balance. Do not operate from unstable surfaces like ladders, trees, slopes or rooftops.
•Do not abuse the power cord. Do not pull or carry the unit by the cord, use the cord as a handle, close a door on the cord, or pull the cord around sharp edges or corners. Keep the cord away from heated surfaces, oil and sharp edges.
•Do not unplug by pulling on the cord. To unplug, grasp the plug, not the cord.
•Always remain alert. Use common sense. To prevent injury to yourself and others, do not operate this unit if you are fatigued.
•Do not operate the unit while under the influence of drugs, alcohol or medication.
•Do not leave the Blower/Vacuum plugged in when not in use, changing tubes, or while being
serviced.
•Do not put any object into openings. Do not use with any opening blocked; keep free of dirt, debris and anything that may reduce the air flow.
•Keep hair, loose clothing, fingers, and all parts of body away from openings and moving parts.
•Use only Genuine Factory Parts™ replacement parts when servicing this unit. These parts are available from your authorized service dealer. Do not use unauthorized parts, accessories, or attachments for this unit. Doing so could lead to serious injury to the user, or damage to the unit, and void your warranty.
•Do not force unit. It will do the job better and with less likelihood of injury at a rate for which it was designed.
•Never use the Blower/Vacuum without the blower/vacuum tube and vacuum bag attached.
•Turn off all controls before unplugging.
•Unplug the Blower/Vacuum before attempting to install or remove the blower/vacuum tube or vacuum bag. The unit must be unplugged, and the impeller blades stopped to avoid contact with the rotating blades.
WHILE OPERATING UNIT AS A BLOWER
•Never point the blower in the direction of people or pets, or in the direction of windows. Always direct the blowing debris away from people, animals, and windows. Use extra caution when blowing debris near solid objects such as trees, automobiles, walls, etc.
WHILE OPERATING UNIT AS A VACUUM
•Avoid situations that could catch the vacuum bag on fire. Do not operate near an open flame. Do not vacuum warm ash from fireplaces, barbecue pits, brush piles, etc. Do not vacuum discarded cigars or cigarettes unless the cinders are completely cool.
•The unit is designed to pickup dry material such as leaves, grass, small twigs, and bits of paper. Do not attempt to vacuum wet debris and/or standing water as this may result in damage to the blower/ vacuum. To avoid severe damage to the impeller, do not vacuum metal, broken glass, etc.
OTHER SAFETY WARNINGS
•Be sure to secure the unit while transporting.
•Store the unit in a dry area, locked up to prevent unauthorized use or damage, and stored in a high place out of the reach of children.
•Never douse or squirt the unit with water or any other liquid. Keep handles dry, clean and free from debris. Clean after each use. See the Cleaning and Storage instructions.
•Keep these instructions. Refer to them often and use them to instruct other users. If you loan someone this unit, also loan them these instructions.
SAVE THESE INSTRUCTIONS
4

RULES FOR SAFE OPERATION
SAFETY AND INTERNATIONAL SYMBOLS
This operator's manual describes safety and international symbols and pictographs that may appear on this product. Read the operator's manual for complete safety, assembly, operating and maintenance and repair information.
SYMBOL MEANING
•SAFETY ALERT SYMBOL
Indicates danger, warning, or caution. May be used in conjunction with other symbols or pictographs.
•WARNING - READ
OPERATOR'S MANUAL
Read the Operator’s Manual(s) and follow all warnings and safety instructions. Failure to do so can result in serious injury to the operator and/or bystanders.
• WEAR EYE AND HEARING PROTECTION
WARNING: Thrown
objects and loud noise can cause severe eye injury and hearing loss. Wear eye protection meeting ANSI Z87.1-1989 standards and ear protection when operating this unit. Use a full face shield when needed.
SYMBOL MEANING
• DO NOT USE IN THE RAIN
WARNING: Avoid
dangerous environments. Never operate your unit in the rain, or in damp or wet conditions. Moisture is a shock hazard.
• BLOWERS – ROTATING IMPELLER BLADES CAN CAUSE SEVERE INJURY
WARNING: Stop the
engine and allow the impeller to stop before opening the vacuum door, installing or changing tubes or bag, or before cleaning or performing any maintenance.
• BLOWER/VACUUM MODE |
CHANGE-OVER LEVER |
A - Vacuum mode
B - Blower mode
•THROWN OBJECTS AND ROTATING CUTTER CAN CAUSE SEVERE INJURY
WARNING: Keep clear of blower outlet. Never point the blower at yourself or others. Objects can be thrown from blower. Do not operate unit without proper attachments and guards in place.
• KEEP BYSTANDERS AWAY
WARNING: Keep all
bystanders, especially children and pets, at least 50 feet (15 m.) from the operating area.
5

RULES FOR SAFE OPERATION
KNOW YOUR UNIT
APPLICATION
As a blower:
•Cleaning of yards, garages, driveways, porches, patios, around walls, fences, etc.
As a vacuum:
• Picking up leaves, light debris, etc.
Latch Support
Blower/Vacuum Tube
Vacuum Inlet
Power/Speed Switch
Motor Air Vents
Blower Outlet
Vacuum Bag Hook
Cord
Receptacle
Vacuum Bag
Blower/Vacuum Mode
Change-Over Lever
 Vacuum Bag Zipper
6

ASSEMBLY INSTRUCTIONS
ATTACHING AND REMOVING THE BLOWER/VACUUM TUBE
WARNING: To avoid serious personal injury, the
blower/vacuum tube and vacuum bag must be used when operating this unit.
Attaching
NOTE: The Blower/Vacuum Tube comes unassembled on this unit. Installation is required to provide safe and easy use for the operator.
WARNING: To prevent serious injury, make sure the
unit is in the off position, it is unplugged, and the impellers have stopped before attaching or removing tubes.
1.Remove the screws and nuts provided from the hardware pack.
2.Insert the blower/vacuum tube all the way into the opening on the motor housing until the holes in the tabs on the blower/vacuum tube align with the screw holes in the housing (Fig. 1).
3.Insert the 2 (two) 8-32 x 3/4” slotted T20 Torx screws into the right side of the motor housing and the 2 (two) nuts into the left side of the motor housing (Fig. 1).
Motor Housing
 Nut
Nut
Blower/Vacuum
Tube
Screw
Self-Tapping Screw
Fig. 1
4.Tighten the screws firmly. Do not over-tighten.
5.Install the 2 (two) remaining self-tapping 8-16 x 3/4” slotted T20 Torx screws into the holes on either side of the housing (Fig. 1). Tighten until snug, do not over-tighten.
Removing
NOTE: It may be necessary to remove the
Blower/Vacuum Tube to clear a blocked tube or impeller.
WARNING: To prevent serious injury, make sure the
unit is in the off position, it is unplugged, and the impellers have stopped before attaching or removing tubes.
1.Remove the 2 (two) self-tapping screws from either side of the housing.
2.Remove the 2 (two) screws and nuts holding the blower/vacuum tube on the housing (Fig. 2).
NOTE: Keep the hardware in a safe place for future use.
Screw |
Self Tapping |
and Nut |
Screw |
|
Screw and Nut |
Fig. 2
3.Remove the blower/vacuum tube from the motor housing.
4.Replace Blower/Vacuum Tube before use.
7

ASSEMBLY INSTRUCTIONS
ATTACHING AND REMOVING THE VACUUM BAG
Attaching
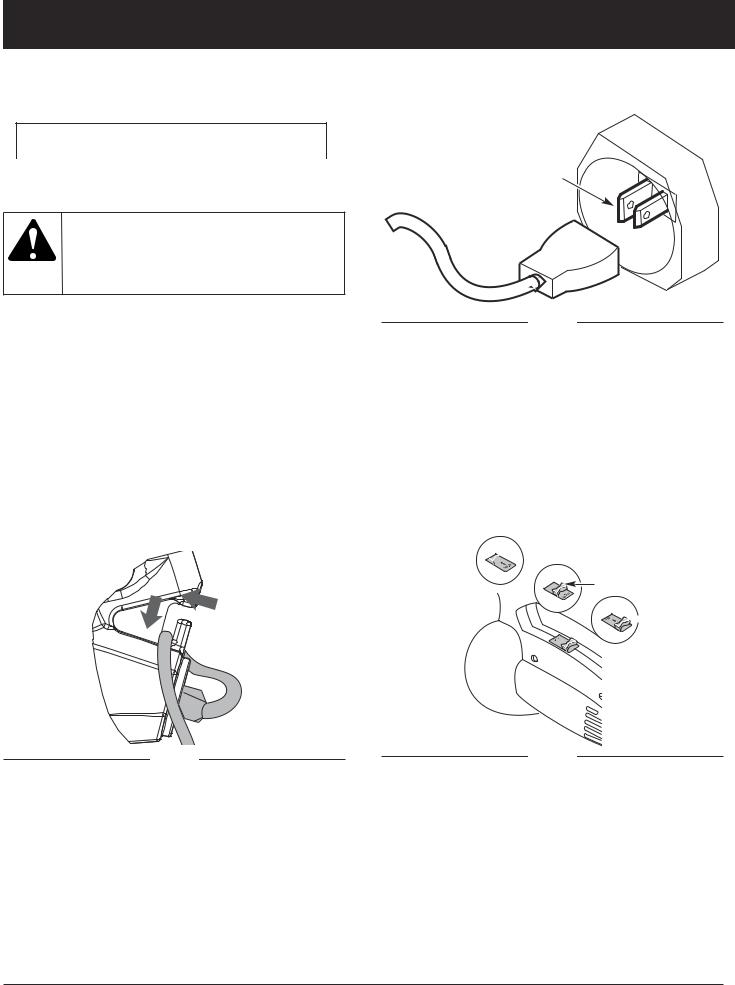
1.Attach the vacuum bag to the vacuum bag hook on the blower/vacuum tube (Fig. 3).
INSTALLING THE SHOULDER HARNESS
1.Push the strap through the center of the buckle.
2.Pull the strap over the cross bar and down through the slot in the buckle (Fig. 6).
 Vacuum Bag Hook
Fig. 3
2.Slide the vacuum bag tube over the debris exhaust tube on the housing. Push the tube until the latching tabs on both sides click into place, securing the bag on the unit (Fig. 4).
Latching Tabs


 Debris Exhaust Tube
 Vacuum Bag Tube
 Vacuum Bag
 Zipper
Fig. 4
Removing
1.Press the latching tabs on both sides of the vacuum bag tube and pull the vacuum bag down from the unit (Fig. 5).
2.Detach the vacuum bag from the vacuum bag hook.
Latching Tabs
PRESS IN
PRESS IN
Clip
Fig. 6
3. Snap the clip on to the support fitting (Fig. 7).
Support Fitting
Clip
Fig. 7
4.While standing in the operating position adjust length to fit the operator’s size. Pull tab to lengthen, pull strap to shorten (Fig 8).
Fig. 8
Fig. 5
8
OPERATING INSTRUCTIONS
CONNECTING THE POWER CORD
Use a minimum 25 foot (7.6 m.) long, 16AWG, outdoor electrical cord when using this unit. Other sizes include:
MINIMUM WIRE SIZE FOR EXTENSION CORDS FOR 120 VOLT APPLIANCES USING 0-12 AMPS
Cord length (ft.) |
25 |
50 |
100 |
150 |
|
|
|
|
|
Wire size (AWG) |
16 |
16 |
16 |
14 |
|
|
|
|
|
WARNING: To reduce the risk of electrical shock, this
unit has a polarized plug (one blade is wider than the other) and will require the use of a polarized extension cord.
This unit plug will only fit into a polarized extension cord in one orientation. If the plug does not fully fit into the extension cord, reverse the plug. If the plug still does not fit, obtain a correct polarized extension cord.
A polarized extension cord will require the use of a polarized wall outlet. This plug will only fit into a polarized wall outlet in a specific orientation. If the plug does not fit fully into the wall outlet, reverse the plug. If the plug still does not fit, contact a qualified electrician to install the proper wall outlet. Do not change the unit plug, extension cord receptacle, or extension cord plug in any way.
1.Secure the extension cord to the motor housing as shown (Fig. 9). This prevents accidental removal of the electrical cord.
2.Plug the female end of the electrical cord into the receptacle at the back of the unit (Fig. 10).
Receptacle
Fig. 10
STARTING/STOPPING INSTRUCTIONS
This unit is equipped with a three-way (OFF/ LOW/ HIGH) switch (Fig. 11):
•Slide the switch all the way down for OFF.
•Slide the switch up to the first click for LOW.
•Slide the switch up to the second click for HIGH.
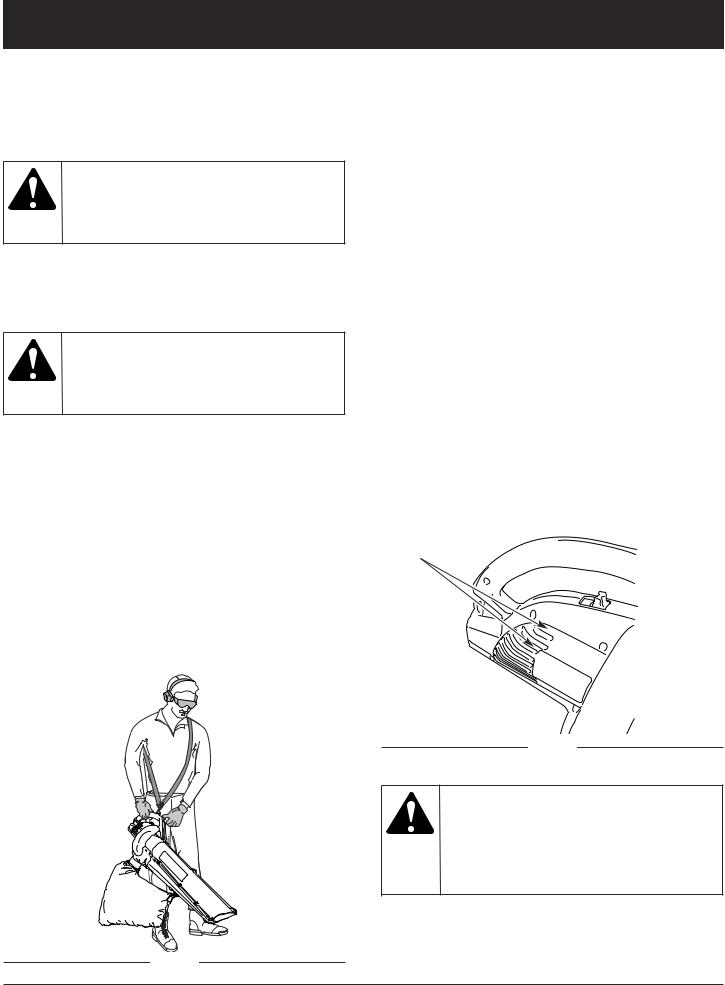
Once the unit is plugged in, stand in the operating position (Fig. 12). Slide the power/speed switch to LOW or HIGH to start the unit. To stop the unit, slide the switch to OFF (Fig. 11).

 HIGH
HIGH
LOW
 OFF
OFF
Fig. 9 |
Fig. 11 |
9
OPERATING INSTRUCTIONS
HOLDING THE BLOWER/VACUUM
Before operating the unit, stand in the operating position. (Fig. 12). Check for the following:
•Operator is wearing proper clothing, such as boots, safety glasses or goggles, ear/hearing protection, gloves, long pants and long sleeve shirt
WARNING: To avoid serious personal injury,
wear goggles or safety glasses at all times when operating this unit. Wear a face mask or dust mask in dusty locations.
•If the conditions are dusty, the operator is wearing a dust mask or face mask
•The unit is in good working condition
•The tubes and bag are in place and secure
WARNING: To prevent serious personal injury or
damage to the unit, make sure blower tubes or vacuum tubes and the vacuum bag are in place before you operate the unit.
•The vacuum bag is installed and zipped closed (when used as a vacuum)
OPERATING TIPS
•Be sure the vacuum bag is zipped closed before operating the unit.
•Assure the unit is not directed at anybody or any loose debris before starting the unit.
•Verify that the unit is in good working condition. Make sure the tubes and guards are in place and secure.
•Always hold the unit with both hands when operating. Keep a firm grip on both the front and rear handle or grips.
•To reduce the risk of hearing loss associated with sound level(s), hearing protection is required.
•Operate power equipment only at reasonable hours— not early in the morning or late at night when people might be disturbed. Comply with times listed in local ordinances. Usual recommendations are 9:00 am to 5:00 pm, Monday through Saturday.
•To reduce noise levels, limit the number of pieces of equipment used at any one time.
•To reduce noise levels, operate power blowers at the lowest possible speed to do the job.
•Use rakes and brooms to loosen debris before blowing.
•In dusty conditions, slightly dampen surfaces or use a mister attachment when water is available.
•Conserve water by using power blowers instead of hoses for many lawn and garden applications, including areas such as gutters, screens, patios, grills, porches, and gardens.
•Watch out for children, pets, open windows or freshly washed cars, and blow debris safely away.
•Clean up after using blowers and other equipment. Dispose of debris appropriately.
AIR VENTS
Never cover air vents. Keep them free from obstructions and debris. They must always remain clear for proper motor cooling (Fig. 13).
Air Vents
Fig. 13
WARNING: To avoid serious personal injury, do
not wear loose fitting clothing or articles such as scarves, strings, chains, ties, etc. that could get drawn into the air vents. To make sure long hair does not get drawn into the air vents secure hair above shoulder level.
Fig. 12
10
OPERATING INSTRUCTIONS
OPERATING AS A BLOWER
Converting to a Blower
1.Place the shoulder harness over your head, onto your shoulder and adjust it if necessary. Refer to
Installing the Shoulder Harness.
2.Start the unit. See Starting/Stopping Instructions.
3.Set the blower/vacuum mode change-over lever to the up position (Blower Mode) (Fig. 14).
NOTE: Never use the unit with the lever in a position half way between either mode.
|
Vacuum |
Change-over lever |
Blower |
|
Fig. 14
Blower Operating Procedures
Hold the blower as shown in Figures 15, 16 and 17. Sweep from side to side with the nozzle several inches above the ground or floor. Slowly advance the unit, keeping the accumulated pile of debris in front of you.
Most dry blowing operations are better suited to low speeds, rather than high. High speed blowing is a better way to move heavier items like large debris or gravel.
1Use the blower for trees, shrubs, flower beds and hard-to-clean areas (Fig. 15).
2.Use the unit around buildings and for other normal cleaning procedures (Fig. 16).
3.Use the blower around walls, overhangs, fences and screens (Fig. 17).
Fig. 15
Fig. 16
Fig. 17
11
OPERATING INSTRUCTIONS
OPERATING AS A VACUUM
Converting to Vacuum
1.Place the shoulder harness over your head, onto your shoulder and adjust it if necessary. Refer to
Installing the Shoulder Harness.
2.Start the unit. See Starting/Stopping Instructions.
3.Set the blower/vacuum mode change-over lever to the down position (Vacuum Mode) (Fig. 18).
NOTE: Never use the unit with the lever in a position half way between either mode.
Vacuum
Mode
Blower
Mode
Change-over lever 
Fig. 18
WARNING: To prevent serious personal injury or
damage to the unit, always install vacuum tubes, the vacuum bag and make sure the vacuum bag is completely zipped closed when operating this unit as a vacuum.
Vacuum Operation Procedures
Check for the following before operating the unit:
•Operator is wearing proper clothing, such as boots, safety glasses or goggles, ear/hearing protection, gloves, long pants and long sleeve shirt
•If the conditions are dusty, operator is equipped with a dust mask or face mask
•The unit is in good working condition-- the vacuum tubes and vacuum bag are in place and secure.
•The vacuum bag harness is in place and correctly adjusted
Use the unit for vacuuming up light debris like leaves and paper.
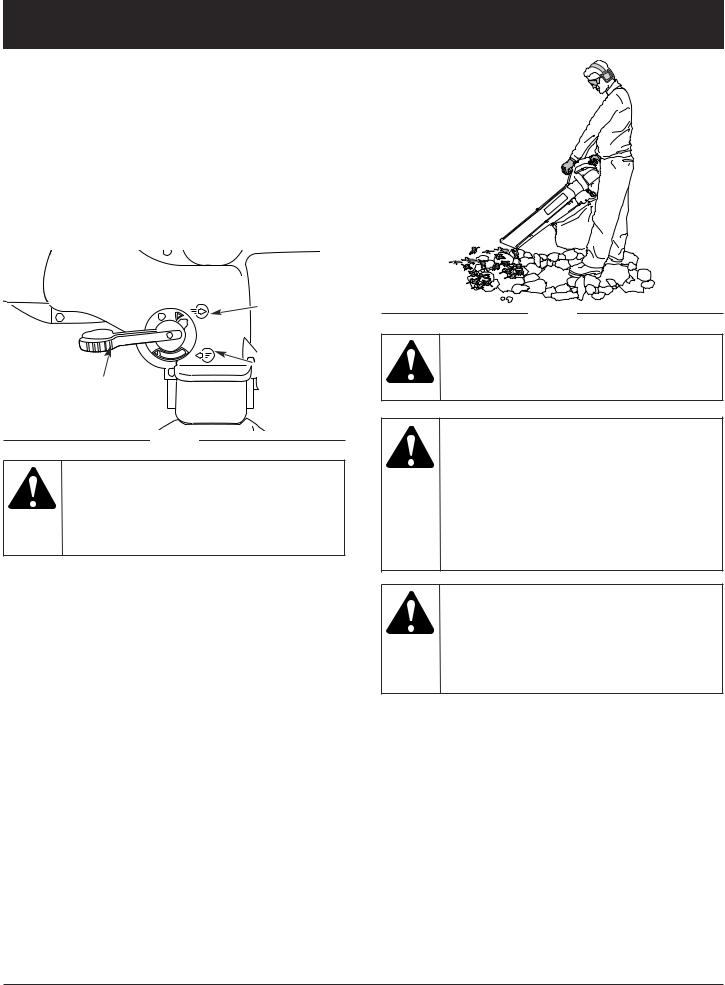
Hold the vacuum, tilting the suction tube slightly (2-4 in or 50-100 mm), and use a sweeping action to collect light debris (Fig. 19). The debris will flow into the vacuum bag. Items such as small leaves and small twigs will be mulched as they pass through the fan housing, allowing the vacuum bag to hold more debris.
When the bag is full, suction will noticeably decrease. Turn off the unit and allow the impeller to stop before you unzip the bag. Unzip the bag and empty the contents before continuing. Refer to Emptying the Vacuum Bag.
Fig. 19
WARNING: To avoid serious personal injury,
never unzip the vacuum bag without stopping the unit first.
WARNING: As a vacuum, the unit is designed to
pick up dry material such as leaves, grass, small twigs and bits of paper. To avoid serious personal injury, do not attempt to vacuum wet debris and/or standing water as this may result in damage to the blower/ vacuum. To avoid severe damage to the impeller, do not vacuum metal, broken glass or similar items.
WARNING: Avoid situations that could catch the
vacuum bag on fire. Do not operate near an open flame. Do not vacuum warm ash from fireplaces, barbecue pits, brush piles, etc.
Do not vacuum discarded cigars or cigarettes unless the cinders are completely cool.
NOTE: Empty the bag after each use to avoid deterioration and obstructing air flow, which will reduce the performance of the vacuum
12

OPERATING INSTRUCTIONS
CLEARING A BLOCKED TUBE / IMPELLER
WARNING: To avoid serious personal injury, be
sure the unit is off and unplugged before clearing the impeller.
WARNING: To avoid serious personal injury,
always wear gloves to protect yourself from the impeller blades or other sharp objects.
1.Slide the Power/Speed switch down in the OFF position until the unit comes to a complete stop (Fig. 11).
2.Unplug the unit.
3.Remove the vacuum bag and then the blower/vacuum tube.
4.Carefully remove material blocking the tube or impeller. Inspect the blades to assure no damage has occurred. Rotate the impeller blades by hand to assure the blockage is completely cleared.
5.Reinstall the blower/vacuum tube and the vacuum bag.
6.Plug the unit back into the power supply.
EMPTYING THE VACUUM BAG
WARNING: To avoid serious personal injury,
never unzip or remove the vacuum bag without first turning the unit off.
NOTE: Empty the bag after each use to avoid deterioration and obstructing air flow, which will reduce the performance of the vacuum.
1.Unplug the unit.
2.While pressing the latching tabs on both sides of the vacuum bag tube, pull the vacuum bag down off the unit (Fig. 20).
WARNING: Wear eye protection and a dust mask
when emptying the vacuum bag.
3. Detach the vacuum bag from the vacuum bag hook.
Latching tabs
PRESS IN
PRESS IN
Fig. 20
4.Unzip the bag and empty the contents into a garbage bag or container.
5.Turn the bag inside out after initial emptying and vigorously shake out dust and debris.
6.Return the bag to outside in, zip the bag closed and reinstall vacuum bag.
7.Plug the unit back into the power supply.
13

MAINTENANCE AND REPAIR INSTRUCTIONS
SERVICING DOUBLE INSULATED UNITS
This unit is double-insulated. In a double-insulated unit, two systems of insulation are provided instead of grounding. There is no grounding provided and no means of grounding should be added to this unit.
Extreme care and knowledge of the system is required when servicing a double-insulated unit. Service should be performed by qualified service personnel only.
Replacement parts for a double-insulated unit must be identical to the parts they replace. Refer any repair to an authorized service dealer. A double-insulated unit is marked with the words “double insulation” or “double insulated.”
CLEANING THE UNIT
WARNING: To avoid serious personal injury,
always turn your unit off and unplug it before you clean or service it.
Use a small brush to clean off the outside of the unit. Do not use strong detergents. Household cleaners that contain aromatic oils such as pine and lemon, and solvents such as kerosene, can damage plastic housing or handle. Wipe off any moisture with a soft cloth.
CLEANING THE VACUUM BAG
1.Empty the bag after each use to avoid deterioration and obstructing air flow, which will reduce the performance of the vacuum.
2.Wearing eye protection and a dust mask, clean the bag as needed. Turn the bag inside out after initial emptying and vigorously shake out dust and debris.
3.Wash the bag once a year or more often if needed:
a.Remove the vacuum bag.
b.Turn bag inside out.
c.Hang it up.
d.Hose it down thoroughly.
e.Hang to dry.
f.Turn bag right-side out and reinstall.
STORAGE
•Store the unit locked up to prevent unauthorized use or damage.
•Store the unit in a dry, well-ventilated area.
•Store the unit out of the reach of children.
INSPECT EXTENSION CORDS
Inspect all extension cords periodically. Look closely for deterioration, cuts or cracks in the insulation. Inspect the connectors for damage. Replace cords if defective or damaged.
ACCESSORIES/ REPLACEMENT PARTS
Vacuum Bag . . . . . . . . . . . . . . . . . . . . . . . . . . . . .182416
Blower/Vacuum Tube Assembly . . . . . . . . . . . . .182415
Shoulder Harness . . . . . . . . . . . . . . . . . . . . . . . .682075
For specific replacement parts, refer to the parts list located on the inside back cover of this manual.
14

|
SPECIFICATIONS |
|
|
Motor Amperage.................................................................................................................................................... |
12 Amps |
Blower Air Output ...................................................................................................................... |
up to 160 mph (257.5 kmh) |
Vacuum Air Flow............................................................................................................................. |
up to 424 cfm (12 cmm) |
Mulching Ratio...................................................................................................................................................... |
up to 10:1 |
Operating Weight ........................................................................................................................................... |
10 lb (4.5 kg) |
Vacuum Bag Capacity .......................................................................................................................... |
.75 bushels (26.4 L) |
TROUBLESHOOTING |
|
|
|
|
|
|
|
|
UNIT WILL NOT BLOW OR VACUUM |
|
|
C A U S E |
A C T I O N |
|
Bag full |
Empty bag, as described in Empty the Vacuum Bag |
|
Blocked tube |
Clear the blockage as described in Clearing a Blocked |
|
|
Tube/ Impeller |
|
Blocked impeller |
Clear the blockage as described in Clearing a Blocked |
|
|
Tube/ Impeller |
|
Damaged impeller |
Take the unit to an authorized service dealer |
|
Dirty bag |
Clean the vacuum bag |
|
Torn bag |
Replace the vacuum bag |
|
Bag unzipped |
Zip up the vacuum bag |
|
Unit unplugged |
Plug into an outlet or an extension cord |
|
|
|
|
UNIT WILL NOT START |
|
|
C A U S E |
A C T I O N |
|
Unit is unplugged |
Check cord to make sure it is plugged into an electrical outlet |
|
Power/Speed switch is in the OFF position |
Slide switch to HIGH or LOW |
|
|
|
|
If further assistance is required, contact your authorized service dealer.
15

NOTES
16

NOTES
17
 Loading...