


20-433
PRO-433 1,000 ch Trunking Desktop/Mobile Scanner
Thank you for purchasing your PRO-433 1,000 Channel Trunking Desktop/Mobile Scanner from RadioShack. Your scanner is one of a new generation of scanners designed to track Motorola® Type I, Type II, hybrid analog, and many other systems.
Quick Start
p. 4- 10
Scanner |
AC adapter |
DC cable with fuse |
Antenna |
DIN sleeve |
Removal keys (2) |
Mounting bracket |
Knobs (2) |
Lock washers (2) |
Screws (2) |
Rubber feet (4) |
User’s guide |
Preprogrammed frequency sheet |
|
Please read this user’s guide before installing, setting up and using your new scanner.
www.radioshack.com

Contents
quick start |
4 |
step 1: installing your scanner |
4 |
step 2: power your scanner |
5 |
step 3: connect your scanner |
6 |
step 4: setting up your scanner |
8 |
step 5: monitoring and scanning |
10 |
the basics |
11 |
your scanner’s controls |
12 |
your scanner’s display |
13 |
replacing the fuse |
15 |
beyond the basics |
16 |
channel-storage banks |
16 |
priority channels |
16 |
chain search |
17 |
service bank search |
18 |
weather search and alert |
18 |
FIPS codes |
19 |
Skywarn |
20 |
Signal Stalker I |
21 |
data skip |
22 |
keytones |
23 |
delay |
23 |
memory lock |
23 |
trunking operations |
24 |
programming trunked frequencies |
24 |
talk group ID |
25 |
AFS Format |
28 |
talk group ID search range (EDACS) |
28 |
Status Bit (S-Bit) Ignore |
29 |
trunk search and scan |
30 |
2

Contents
type I and hybrid trunked systems |
30 |
programming base and offset frequencies |
33 |
Motorola disconnect tone detect function |
34 |
special features |
35 |
PC programming |
35 |
scanner cloning |
35 |
care |
37 |
troubleshooting |
37 |
resetting the scanner |
38 |
service and repair |
38 |
specifications |
39 |
RF emissions information |
40 |
limited one-year warranty |
40 |
3

Quick Start
quick start
step 1: installing your scanner
You can mount your scanner as a base station or in your vehicle. If you are unsure how to install your scanner in your vehicle, consult your automobile manufacturer, dealer, or a qualified installer.
base station
Attach the four protective rubber feet to the mounting bracket when you use the scanner as a base station on a flat surface such as a desk, shelf, or table. Because the speaker is on the bottom of the scanner, you can use the mounting bracket to elevate your scanner off the surface for better sound.
vehicle mounting
To mount your scanner under or over the dashboard, use the mounting bracket. Before installing, confirm that your scanner fits in the desired mounting area and you have all the necessary materials to complete the task.
IMPORTANT: AVOID AIRBAG DEPLOYMENT ZONES. This can prevent the airbag from performing properly and result in injury.
1. Use the supplied mounting bracket as a template to mark positions for the two mounting screws.
2. At the marked positions, drill holes slightly smaller than the screws. When drilling holes, be sure to avoid obstructions and wires behind the mounting surface.
3. Attach the mounting bracket to the surface using the supplied screws.
4. Slide the scanner into the bracket, aligning the scanner’s holes with the holes in the bracket, and then screw the mounting knobs into the scanner.
4

Quick Start
Your scanner requires a 2 x 7-1/8 x 5-5/16 inch (50 x 180 x 135 mm) mounting area. Allow an additional 2-3/8 inch (60 mm) space behind the scanner for connectors and wires.
1. Remove the four rear screws that secure the outer metal case and pull off the case with care.
2. Insert the DIN sleeve into the opening in your dashboard, lip facing out.
3. Push out the top and bottom tabs to hold the sleeve firmly in place.
4. Slowly slide the scanner into the sleeve until it locks in place.
•When mounting in your dashboard, you will need to
NOTES |
connect an external antenna and an external speaker. |
•To remove your scanner from the DIN sleeve, insert the two removal keys straight into the scanner’s front panel and pull the scanner out.
step 2: power your scanner
You can power your scanner from a wall outlet, through your vehicle’s ignition, or from your vehicle’s cigarette lighter or power port. You must use a Class 2 power source that supplies 12V DC and delivers at least 500mA. Its center tip must be set to positive and its plug must fit the scanner’s DC 12V jack. Using an adapter that does not meet these specifications could damage the scanner or the adapter.
|
DC 12V |
wall outlet |
Power source connection. |
To prevent electric shock, do not use the AC adapter’s polarized plug with an extension cord, receptacle, or other outlet unless you can fully insert the blades.
1. Connect the tip of the supplied AC adapter to the DC 12V jack.
2. Plug the AC adapter into your wall outlet.
5

Quick Start
vehicle cigarette lighter or power port
To power your scanner from your vehicle’s 12V power source, use a 12V DC cigarette-lighter adapter (not supplied, available at
RadioShack).
If you use a cigarette-lighter adapter, you might hear some NOTE electrical interference from your engine while scanning.
This is normal.
vehicle ignition (negative ground only)
NOTE |
If you are not experienced in connecting accessories to |
|
the vehicle fuse box, use a certified installer. |
||
|
1. Disconnect the cable from the negative (-) terminal of your vehicle’s battery.
2. Ground the black wire of the supplied DC power cord to your vehicle’s chassis. The grounding screw must make complete contact with the metal frame of your vehicle.
3. Connect the red wire of the supplied DC power cord to a voltage source that turns on and off with the ignition switch, such as a spare accessory terminal in your vehicle’s fuse box.
4. Insert the adapter’s barrel plug into the scanner’s DC 12V jack.
5. Reconnect the cable to the negative (-) terminal of your vehicle’s battery.
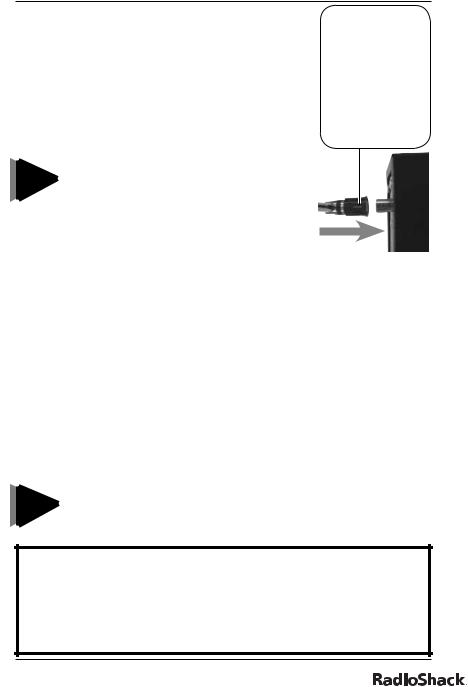
step 3: connect your scanner
ANT |
EXT SP |
Antenna connection. |
External speaker connection. |
6
Quick Start
antenna
Expand the antenna according to the frequencies you want to montitor:
Frequency ..................................... |
Antenna Length |
25-174 MHz ..................... |
Extend fully (4 segments) |
400-512 MHz ................... |
Extend half (2 segments) |
806-1300 MHz ................ |
Collapse fully (1 segment) |
The scanner’s ANT jack supports a variety of antennae (available at RadioShack).
ANT Match the antenna connector arrow to the ANT
jack’s upper projection.
• An external antenna is optional if
NOTES you use your scanner as a base station. If you mount your scanner
in your vehicle, you will need to connect an external antenna.
•The antenna should be as high as possible and vertical for best performance.
•Keep the antenna and cable as far as possible from sources of electrical noise, such as appliances or other radios.
Always use 50-ohm coaxial cable, such as RG-58 or RG-8, to connect an outdoor antenna. For lengths over 50 feet, use RG-8 low-loss dielectric coaxial cable. You also may need a BNC adapter (not supplied).
external speaker
To use an external speaker (available at your local RadioShack store), plug the speaker’s 1/8 inch (3.5 mm) plug into the scanner’s
EXT SP jack.
NOTE |
Connecting an external speaker mutes the scanner’s |
|
internal speaker. |
||
|
CAUTION: Use extreme caution when installing or removing an outdoor antenna. If the antenna starts to fall, let it go! If the antenna touches a power line, touching the antenna, mast, cable, or guy wires can cause electrocution and death. Call the
power company to remove the antenna. Do not attempt to do so yourself.
7

Quick Start
step 4: setting up your scanner
turning on your scanner
To turn on your scanner, turn the VOLUME knob clockwise until it clicks. To set the squelch, turn the SQUELCH knob fully
counterclockwise, then rotate it clockwise until the hissing sound stops.
storing frequencies in channels
Your scanner comes with 150 preprogrammed frequencies. You
can manually store frequencies using a frequency guide such as the “RadioShack Police Call Guide including Fire and Emergency Services, and Official Aeronautical Frequency Directory.”
1. Press E/PGM. PGM appears in the display.
2 Enter the channel number where you want to store a frequency.
3. Press SCAN/MANUAL.
4. Enter the frequency including the decimal point.
5. Press E/PGM to store the frequency. The scanner automatically rounds the entered number to the nearest valid frequency. For example, 151.473 (MHz) becomes 151.475.
If you entered a frequency that is already saved on NOTE another channel, the scanner beeps and displays the
channel. Press . /CLR /DELAY to exit, or press E/PGM to store the frequency on both channels.
copying / moving frequencies
To copy or move a frequency, complete the following steps:
1. Press  or
or  to select the channel that contains the frequency, and press E/PGM.
2. Press and hold E/PGM. The scanner copy/move menu appears.
3. Press  or
or  to select Copy or Move, then press E/PGM.
8

Quick Start
4. Select the target bank. The smallest empty channel number
|
flashes over the frequency. |
5. |
Press or to access the target channel. |
6. |
Press E/PGM. If there is no empty channel, the scanner |
|
automatically selects the first channel of the bank. |
To cancel the copy or move, press . /CLR /DELAY.
searching for frequencies
You can search for frequencies up or down using direct search.
1. Press and hold SRCH. SRCH appears in the display.
2. (Optional) To set a starting frequency, press HOLD and enter the frequency.
3. Press  or
or  to begin searching up or down the frequencies.
4. (Optional) To avoid unwanted frequencies, you can skip up to 200 specified frequencies during a search. To skip a frequency, press L/O when the scanner finds the frequency.
|
• You cannot skip frequencies during a weather service |
NOTES |
search. |
• If you skip all frequencies within the search range, the |
|
|
scanner cannot search. |
|
• If you try to skip more than 200 frequencies, the |
|
scanner will stop skipping the earliest skipped |
|
frequencies. |
To clear a skipped frequency, complete the following steps:
1. Press HOLD/RESUME to stop the search.
2. Select the frequency. L/O appears.
3. Press L/O. L/O disappears.
4. (Optional) To clear all the skipped frequencies, press HOLD/ RESUME, then hold down L/O until the scanner beeps twice.
9

Quick Start
step 5: monitoring and scanning
monitoring
To monitor a channel, press SCAN/MANUAL while the scanner is pausing on the channel, or stop the scanning by pressing SCAN/ MANUAL, enter the channel number, and press SCAN/MANUAL.
scanning
To scan, press SCAN/MANUAL. When the scanner finds a transmission, it monitors the transmission until it ends.
•If you have not stored frequencies into any channels, NOTES the scanner cannot scan.
•If the scanner picks up weak transmissions, turn SQUELCH clockwise to decrease the scanner’s sensitivity to these signals. To listen to a weak or distant station, turn SQUELCH counterclockwise.
Press SCAN/MANUAL to stop scanning, or press HOLD/RESUME to pause the scan without losing your position.
earphones / headphones
For private listening, you can plug earphones or headphones into your scanner’s headphone jack. Do not use headphones with your scanner when operating a motor vehicle in or near traffic. Doing so can create a traffic hazard and could be illegal in some areas. Some headphones let you hear some outside sounds when listening at normal volume levels, but they still can present a traffic hazard.
To protect your hearing, follow these guidelines for headphones.
•Do not listen at extremely high volume levels. Extended highvolume listening can lead to permanent hearing loss.
•Set the volume to the lowest setting before you begin listening, then adjust the volume to a comfortable level.
•After you set the volume, do not increase it. Over time, your ears adapt to the volume level, so a volume level that does not cause discomfort might still damage your hearing.
10
The Basics
the basics
A frequency is the tuning location of a station. A channel is a programmable memory location for storing frequencies that you can scan for activity. Channels are grouped into 10 channel-
storage banks, each of which contains 100-channels. Service banks are preset channel-storage banks of frequencies used by HAM operators, marine, aircraft, and police (fire/emergency) services. For example, many amateur radio frequencies are located in the HAM service bank.
Your scanner provides many features that help you locate, monitor, and organize useful transmissions in your area, including frequencies used by police and fire departments, ambulance services, government agencies, private companies, amateur radio services, military operations, pager services, and wireline (telephone and telegraph) service providers.
This scanner is designed to prevent reception of illegal transmissions, in compliance with laws that require that scanners be manufactured to not be easily modifiable to pick up those transmissions. Do not open your scanner’s case to make any modifications that could allow it to pick up transmissions that it is not legal to listen to. Doing so could subject you to legal penalties.
It is legal to listen to almost every transmission your scanner can receive. However, there are some transmissions you should never intentionally listen to. These include:
•telephone conversations (cellular, cordless, or other private means of telephone signal transmission)
•pager transmissions
•any scrambled or encrypted transmissions
According to the Electronic Communications Privacy Act (ECPA), as amended, you are subject to fines and possible imprisonment for intentionally listening to, using, or divulging the contents of such a transmission unless you have the consent of a party to the communication (unless such activity is otherwise illegal).
We encourage responsible, legal scanner use.
11
The Basics
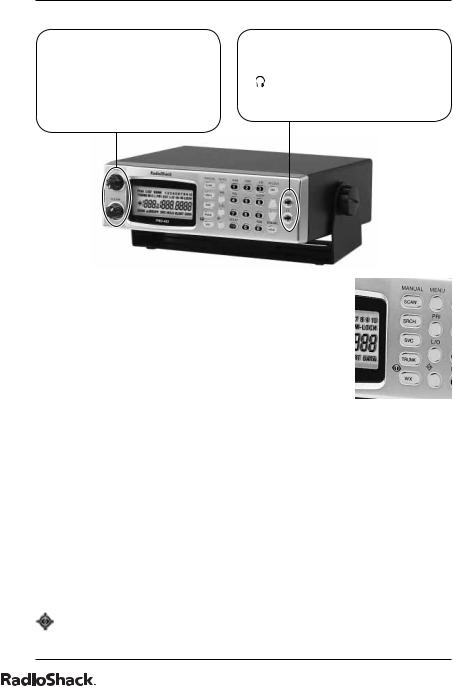
your scanner’s controls
SQUELCH |
PC/IF |
Adjusts the squelch. |
PC interface cable connection. |
VOLUME |
|
Turns on the scanner and |
Headphone connection. |
adjusts the volume. |
|
SCAN/MANUAL
Starts and stops channel scans, or lets you directly enter a frequency or channel number.
SRCH
Searches for frequencies, or active talk group IDs.
SVC
Starts a service bank search.
TRUNK
Accesses trunk tracking and stores trunked frequencies.
WX / 
Controls weather searches and activates the Skywarn function.
MENU
Accesses the scanner menu, which appears in the display.
PRI
Activates and sets the priority features.
L/O
Locks out selected channels, skips specified talk group IDs and frequencies during a search.
Accesses the Signal Stalker I function.
12
 Loading...