Radio Shack Pro-71 User Manual

Cat. No. 20-311A
OWNER’S MANUAL
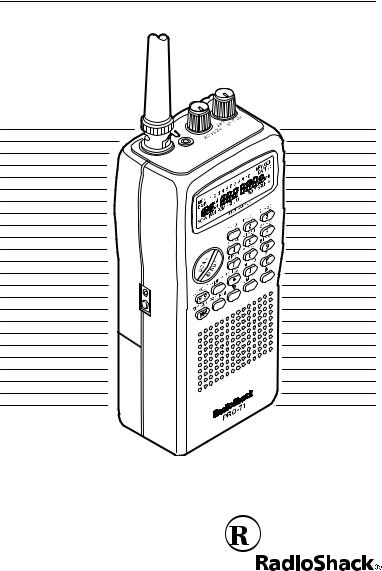
PRO-71 VHF/UHF/Air
Handheld Scanner
Please read before using this equipment.

FEATURES
Your new RadioShack PRO-71 VHF/UHF/Air Handheld Scanner lets you in on all the action! This scanner gives you direct access to 23,000 exciting frequencies that include police department, fire department, ambulance, aircraft, amateur radio, and transportation services. You can select up to 100 channels for your scanner to scan and you can change your selection at any time.
The secret to your scanner’s ability to scan so many frequencies is its custom-designed microprocessor — a tiny, built-in computer. Your scanner also has these special features:
Large Liquid-Crystal Display — lets you easily see displayed information.
Search Skip — lets you select up to 20 frequencies for the scanner to skip during a limit or direct search to avoid unwanted frequencies.
Frequency Search — scans through every available frequency.
Ten Channel-Storage Banks — let you store 10 channels in each of ten banks to group frequencies and help you identify calls.
Monitor Memories — let you temporarily save up to ten channels you locate during a frequency search.
Two-Second Automatic Scan Delay — delays scanning for 2 seconds before moving to another channel, so you can hear more replies.
Memory Backup — keeps the channel frequencies stored in memory for up to 1 hour during a power loss.
Lock-Out Function — keeps channels you select from being scanned.
Priority Channel — lets you specify your most important channel and check it every 2 seconds so you don’t miss important calls.
Weather Band Key — scans seven preprogrammed weather frequencies so you can hear about current weather conditions.
Display Backlight — makes the scanner easy to read in low light situations.
ã 1999 Tandy Corporation.
All Rights Reserved.
RadioShack is a registered trademark used by Tandy Corporation.
2

Your scanner can receive all of these bands:
Frequency |
|
Range (MHz) |
Transmission |
29–29.7 |
10-Meter Amateur Radio |
29.7–50 |
VHF Lo |
50–54 |
6-Meter Amateur Radio |
108–136.975 |
Aircraft |
137–144 |
Government |
144–148 |
2-Meter Amateur Radio |
148–174 |
VHF Hi |
406–420 |
Government |
420–450 |
70-cm Amateur Radio |
450–470 |
UHF Standard |
470–512 |
UHF “T” Band |
In addition, your scanner is preprogrammed with the following weather service channels:
Frequency (MHz)
162.400
162.425
162.450
162.475
162.500
162.525
162.550
This Owner’s Manual also includes the section “A Guide to the Action Bands,” which lets you target services in your area by giving you frequency ranges to search. You can then store any of these frequencies into memory for easy scanning.
We recommend you record your scanner’s serial number here. The number is on the back panel.
Serial Number: ___________________________
3

FCC NOTICE
Your scanner might cause TV or radio interference even when it is operating properly. To determine whether your scanner is causing the interference, turn off your scanner. If the interference goes away, your scanner is causing it. Try to eliminate the interference by:
•moving your scanner away from the receiver
•connecting your scanner to an outlet that is on a different electrical circuit from the receiver
•contacting your local RadioShack store for help
If you cannot eliminate the interference, the FCC requires that you stop using your scanner.
Note: Mobile use of this scanner is unlawful or requires a permit in some areas. Check the laws in your area.
SCANNING LEGALLY
Your scanner covers frequencies used by many different groups including police and fire departments, ambulance services, government agencies, private companies, amateur radio services, military operations, pager services, and wireline (telephone and telegraph) service providers. It is legal to listen to almost every transmission your scanner can receive. However, there are some transmissions you should never intentionally listen to. These include:
•telephone conversations (cellular, cordless, or other private means of telephone signal transmission)
•pager transmissions
•any scrambled or encrypted transmissions
According to the Electronic Communications Privacy Act (ECPA), you are subject to fines and possible imprisonment for intentionally listening to, using, or divulging the contents of such a transmission unless you have the consent of a party to the communication (unless such activity is otherwise illegal).
4

This scanner has been designed to prevent reception of illegal transmissions. This is done to comply with the legal requirement that scanners be manufactured so as to not be easily modifiable to pick up those transmissions. Do not open your scanner’s case to make any modifications that could allow it to pick up transmissions that it is not legal to listen to. Doing so could subject you to legal penalties.
We encourage responsible, legal scanner use.
5

CONTENTS |
|
Preparation ....................................................................................... |
8 |
Power Sources ............................................................................ |
8 |
Installing Batteries ....................................................................... |
8 |
Important Information About the External Power Jacks .............. |
9 |
Using Standard AC Power ......................................................... |
10 |
Using Vehicle Battery Power ..................................................... |
11 |
Charging Nickel-Cadmium Batteries ......................................... |
12 |
Connecting the Antenna ........................................................... |
13 |
Connecting an Optional Antenna ....................................... |
13 |
Connecting an Earphone/Headphones ..................................... |
14 |
Listening Safely .................................................................. |
14 |
Traffic Safety ...................................................................... |
14 |
Connecting an Extension Speaker ............................................ |
15 |
Using the Belt Clip ..................................................................... |
15 |
Understanding Your Scanner ........................................................ |
16 |
A Look at the Keypad ................................................................ |
16 |
A Look at the Display ................................................................ |
17 |
Banks and Memories ..................................................................... |
19 |
Channel-Storage Banks ............................................................ |
19 |
Monitor Memories ..................................................................... |
19 |
Operation ........................................................................................ |
20 |
Turning On the Scanner and Setting Squelch ........................... |
20 |
Storing Frequencies .................................................................. |
20 |
Searching For and Temporarily Storing |
|
Active Frequencies .................................................................... |
21 |
Limit Search ....................................................................... |
22 |
Direct Search ..................................................................... |
23 |
Listening to Monitor Memories .................................................. |
24 |
Moving a Frequency from a Monitor Memory |
|
to a Channel .............................................................................. |
24 |
Manually Selecting a Channel ................................................... |
25 |
Special Features ............................................................................. |
26 |
Using the Keylock ...................................................................... |
26 |
Locking Out Channels ............................................................... |
26 |
Turning Channel-Storage Banks On and Off ............................. |
27 |
Search Skip Memory ................................................................. |
27 |
Priority ....................................................................................... |
28 |
Using the Display Backlight ....................................................... |
28 |
Listening to the Weather Band .................................................. |
29 |
6

A General Guide to Scanning ........................................................ |
30 |
Guide to Frequencies ................................................................ |
30 |
National Weather Frequencies ........................................... |
30 |
Canadian Weather Frequencies ......................................... |
30 |
Guide to the Action Bands ......................................................... |
31 |
Band Allocation ......................................................................... |
32 |
Avoiding Image Frequencies ..................................................... |
37 |
Frequency Conversion ............................................................... |
37 |
Troubleshooting .............................................................................. |
38 |
Resetting the Scanner ............................................................... |
39 |
Care and Maintenance ................................................................... |
40 |
Specifications ................................................................................. |
41 |
7

PREPARATION
POWER SOURCES
You can power your scanner from any of three sources:
•internal batteries
•standard AC power (using an optional AC adapter)
•vehicle battery power (using an optional DC adapter)
INSTALLING BATTERIES
Your scanner requires 4 AA batteries (not supplied) for power. For the best performance and longest life, we recommend alkaline batteries. Or, you can use rechargeable nickel-cadmium batteries. Both types of batteries are available at your local RadioShack store.
Warning: The scanner has a built-in circuit that lets you recharge nickel-cadmium batteries inside the battery compartment. However, you must never use this circuit when you have installed nonrechargeable batteries in the scanner. Be sure to read “Important Information About the External Power Jacks” on Page 9 and “Charging Nickel-Cadmium Batteries” on Page 12.
Cautions:
•Use only fresh batteries of the required size and recommended type.
•Do not mix old and new batteries, different types of batteries (standard, alkaline, or rechargeable), or rechargeable batteries of different capacities.
1.Press down the tab on the battery compartment cover, and lift open the compartment.
8

2.Install two batteries in the compartment and two in the cover as indicated by the polarity symbols (+ and –) marked inside each location.
3. Replace the cover.
When BATT.Lo flashes and the scanner beeps every 15 seconds, immediately replace or recharge all four batteries.
Cautions:
•If you do not plan to use the scanner with batteries for a month or more, or if you plan to use only an AC or DC adapter, remove the batteries. Batteries can leak chemicals that can destroy electronic parts.
•Dispose of old batteries promptly and properly. Do not burn or bury them.
IMPORTANT INFORMATION ABOUT THE EXTERNAL POWER JACKS
POWER Jack 
CHARGE Jack 
The scanner has two external power jacks — POWER and CHARGE. It is important that you understand the purpose of each jack before you connect any adapter to the scanner.
9

The POWER jack powers the scanner and disconnects the internal batteries. You can use this jack to connect an external power source (AC or DC adapter), regardless of the type of batteries you install.
The CHARGE jack supplies power to operate the scanner and also charges the internal batteries. Use the CHARGE jack only when you have installed rechargeable nickel-cadmium batteries.
Warning: Never use the CHARGE jack when you have installed nonrechargeable batteries. If you try to recharge non-rechargeable batteries, they become very hot and could explode.
Remove the plastic plug from the CHARGE jack before you use it, then replace the plug when you finish.
CHARGE Jack
USING STANDARD AC POWER
To power the scanner from AC power, you need an AC adapter such as RadioShack Cat. No. 273-1665. Plug the adapter’s 3.4 mm outer diameter/1.3 mm inner diameter barrel plug into the scanner’s POWER jack. Then plug the adapter’s power module into a standard AC outlet.


Warning: Do not use an AC adapter’s polarized plug with an extension cord, receptacle, or other outlet unless the blades can be fully inserted to prevent blade exposure.
10

Cautions:
•You must use an AC adapter that supplies 9 volts and delivers at least 300 mA. Its center tip must be set to negative and its plug must fit the scanner’s POWER jack. The recommended adapter meets these specifications. Using an adapter that does not meet these specifications could damage the scanner or the adapter.
•When you finish using the AC adapter, disconnect it from the AC outlet first. Then disconnect it from the scanner.
USING VEHICLE BATTERY POWER
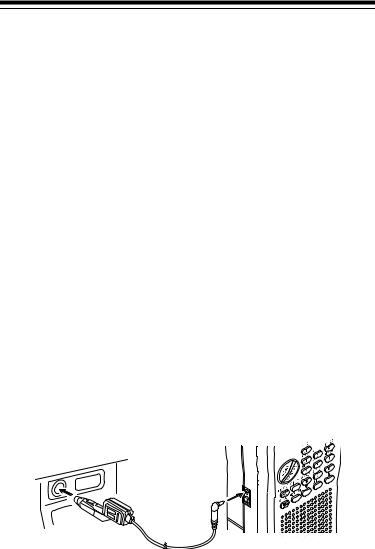
You can power the scanner from your vehicle’s battery power using an optional DC adapter, such as Cat. No. 273-1810.
Cautions:
•You must use a DC adapter that supplies 9 volts (regulated) and delivers at least 300 mA of DC automotive power. Its center tip must be set to negative and its plug must fit the scanner’s POWER jack. Both of the recommended adapters meet these specifications. Using an adapter that does not meet these specifications could damage the scanner or the adapter.
•To protect your vehicle’s electrical system, always plug the adapter into the scanner before you plug it into your vehicle’s cigarettelighter socket. Always unplug the adapter from the vehicle’s ciga- rette-lighter socket before you unplug it from the scanner.
∼


1.Connect the DC adapter’s 3.4 mm outer diameter/1.3 mm inner diameter barrel-plug to the adapter’s cable, with the tip set to –.
2.Set the adapter’s voltage switch to 9V.
3.Insert the barrel plug into the scanner’s POWER jack.
11

4.Plug the other end of the adapter into your vehicle’s cigarettelighter socket.
Note: If the scanner does not operate properly when you use a DC adapter, unplug the adapter from the cigarette-lighter socket and clean the socket to remove ashes and other debris.
CHARGING NICKEL-CADMIUM BATTERIES
The scanner has a built-in charging circuit that lets you recharge nickelcadmium batteries while they are in the scanner. To charge the batteries, remove the plug from the scanner’s CHARGE jack and connect an optional AC adapter or DC adapter to the jack (see “Using Standard AC Power” on Page 10 or “Using Vehicle Battery Power” on Page 11).
Warning: Do not connect an adapter to the scanner’s CHARGE jack if you installed non-rechargeable batteries (standard, extra-life, or alkaline). Non-rechargeable batteries become hot and could explode if you try to recharge them.
It takes about 14 to 16 hours to recharge batteries that are fully discharged. You can operate the scanner while recharging the nickelcadmium batteries, but charging takes longer.
Note: Nickel-cadmium batteries last longer and deliver more power if you occasionally let them fully discharge. To do this, simply use the scanner until it begins beeping every 15 seconds and BATT.LO appears. Then fully charge the batteries.
Important: At the end of a rechargeable battery’s useful life, it must be recycled or disposed of properly. Contact your local, county, or state hazardous waste management authorities for information on recycling or disposal programs in your area. Some options that might be available are: municipal curb-side collection, drop-off boxes at retailers such as your local RadioShack store, recycling collection centers, and mailback programs.
12

CONNECTING THE ANTENNA
Follow these steps to attach the supplied flexible antenna to the connector on the top of your scanner.
1. Align the slots around the antenna’s connector with the tabs on the jack.
2. Press the antenna down over the jack and rotate the antenna’s base clockwise until it locks into place.
Connecting an Optional Antenna
The antenna connector on your scanner makes it easy to use the scanner with a variety of antennas. Instead of the supplied antenna, you can attach an external mobile antenna or outdoor base antenna (for example). Your local RadioShack store sells a variety of antennas.
Always use 50-ohm coaxial cable, such as RG-58 or RG-8, to connect an outdoor antenna. For lengths over 50 feet, use RG-8 low-loss dielectric coaxial cable. If your antenna’s cable does not have a BNC connector, you will also need a BNC adapter (available at your local RadioShack store).
Warning: When you install an outdoor antenna, use extreme caution. If the antenna starts to fall, let it go! It could contact overhead power lines. If the antenna touches the power line, contact with the antenna, mast, cable, or guy wires can cause electrocution and death. Call the power company to remove the antenna. Do not attempt to remove it yourself!
13

CONNECTING AN EARPHONE/
HEADPHONES
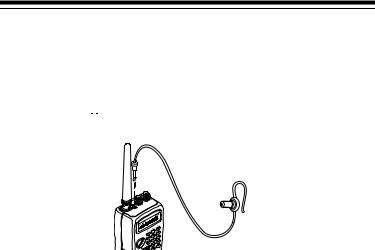
For private listening, you can plug an earphone or mono headphones (not supplied) with a 1/8-inch (3.5-mm) plug (such as Cat. No. 33-177 or 20-210) into the 
 jack on top of your scanner. This automatically disconnects the internal speaker.
Listening Safely
To protect your hearing, follow these guidelines when you use an earphone or headphones.
•Set the volume to the lowest setting before you begin listening. After you begin listening, adjust the volume to a comfortable level.
•Do not listen at extremely high volume levels. Extended highvolume listening can lead to permanent hearing loss.
•Once you set the volume, do not increase it. Over time, your ears adapt to the volume level, so a volume level that does not cause discomfort might still damage your hearing.
Traffic Safety
Do not use an earphone or headphones with your scanner when operating a motor vehicle or riding a bicycle in or near traffic. Doing so can create a traffic hazard and could be illegal in some areas.
If you use an earphone or headphones with your scanner while riding a bicycle, be very careful. Do not listen to a continuous broadcast. Even though some earphones or headphones let you hear some outside sounds when listening at normal volume levels, they still can present a traffic hazard.
14
 Loading...