


PRO-82

© 2002 RadioShack Corporation.
All Rights Reserved.
Hypersearch, Hyperscan, Adaptaplug,
RadioShack, and RadioShack.com are trademarks
used by RadioShack Corporation.
20-315
OWNER’S MANUAL — Please read before using this equipment.
One-Touch Search Banks
— let you se arch preset
frequencies in separate
marine, fire/police, aircraft,
ham, and weather banks, to
make it easy to locate
specific types of calls.
Supplied Flexible Antenna with
BNC Connector
— provides good
reception of strong local signals. You can
connect an external antenna with a BNC
connector to the scanner for improved
reception of distant/weaker signals.
Liquid-Crystal Display
—
makes it easy to view and
change programming
information. The display
backlight also makes the
scanner easy to read in low-
light situations.
Tune
— lets you tune
for new and unlisted
frequencies starting
from a specified
frequency.
Priority Channel
— lets
you program a c hannel as
the priority channel. As
the scanner scans, it
checks the priority
channel every 2 seconds
so you do not miss
transmissions on that
channel.
241/:4"
422/%JCPPGN"8*(1#KT17*(
*CPFJGNF"5ECPPGT

Introduction
2
+0641&7%6+10
Your new RadioShack PRO-82
200 Channel VHF/Air/UHF
Handheld Scanner lets y ou scan
conventional tran smissions, a nd is
preprogrammed with search
banks for convenience. By
pressing a one touch search key,
you can quickly search th ose
frequencies most commonly used
by public service and other
agencies without tedious and
complicated programming.
This scanner gives you direct
access to over 25,000 exciting
frequencies, including those used
by police and fire departments,
ambulance services, aircraft, and
amateur radio services, and you can
change your selection at any time.
Your scanner also has these
special features:
Ten Channel-Storage Banks
—
you can store 20 chan nels i n each
bank (200 total channels), letting
you group channels so you can
more easily identify calls.
Weather Alert
— the scanner
automatically sounds an alert
when it receives a weath er
emergency signal, providing more
complete information about
weather conditions in your
immediate area.
HyperSearch
™
and
HyperScan
™
— let you set the
scanner to search at up to 50
steps per second (in frequency
bands with 5 kHz steps) and scan
at up to 25 channels per second,
to help you quickly find interesting
broadcasts.
%106'065
Introduction ............ 2
The FCC Wants You
to Know ................. 4
Scanning
Legally .............. 5
Preparation ............ 7
Installing
Batteries ........... 7
Charging
Rechargeable
Batteries ........... 8
Using
AC Power ......... 9
Using Vehicle
Battery
Power ............. 10
Connecting the
Supplied
Antenna .......... 10
Connecting an
Earphone/
Headphones ... 11
Connecting an
Extension
Speaker .......... 12
Using the
Belt Clip .......... 12
About Your
Scanner ............... 13
A Look at the
Keypad ................ 14
A Look at the
Display ................. 15
#
"+/2146#06"#
If an icon appears at
the end of a
paragraph, go to the
box on that page with
the corresponding
icon for pertinent
information.
Rý
—
Warning
#
—
Important
.
..
.
—
Caution
°
°°
°
—
Hint
±
— Note

Introduction
3
Lockout Function
— lets you set
your scanner to skip over sp ecified
channels or frequencies when
scanning or searching.
Memory Backup
— keeps the
channel frequencies stored in
memory for about an hour in the
event of a power loss.
Wired Programming
— you can
connect your scanner to a
personal computer and program
frequencies into it using an
optional cable and software.
±
Scan Delay
— delays scanning
for about 2 seconds b efore moving
to another channel, so you can
hear more replies that are
transmitted on the same channel.
Duplicate Channel Alert
—
warns you when the frequency
you are storing already exist s in
memory.
Manual Access
— you can
directly access any stored channel
by entering that channel's number.
Key Lock
— lets you lock the
scanner's keys to prevent
accidentally changing the
scanner's pr ogramming.
Key Confirmation Tones
— the
scanner sounds a confirmation
tone when you perform an
operation correctly, and an error
tone if you make an error.
Three Power Options
— you can
power the scanner from internal
(rechargeable or non-
rechargeable batteries ) or external
AC or DC power (using an opt ional
AC or DC adapter).
±
"016'"
±
"
You can get the
cable, software, and
additional information
about using your
personal computer to
program your scanner
from your local
RadioShack store.
%106'065
(Continued)
Understanding
Banks .................. 20
Channel Storage
Banks .............. 20
One Touch
Banks .............. 20
Operation ............. 24
Turning On the
Scanner/Setting
Volume and
Squelch ........... 24
Storing Known
Frequencies Into
Channels ........ 24
Searching the
One Touch
Banks .................. 25
Using Tune ..... 27
Scanning the
Stored
Channels ........ 28
Turning Channel-
Storage Banks Off
and On ............ 29
Monitoring a
Stored
Channel .......... 29
Clearing a Stored
Channel .......... 30
Listening to the
Marine Bank ... 30
Listening to the
Weather
Band ............... 31
(Continued)

The FCC Wants You to Know
4
Your PRO-82 scanner ca n receiv e
these bands:
±
6*'"(%%"9#065"
;17"61"-019
This equipment has been tested
and found to comply w ith the lim its
for a scanning receiver, pursuant
to Part 15 of the
FCC Rules
.
These limits are designed to
provide reasonable pr otection
against harmful interference in a
residential installation. This
equipment generates, uses and
can radiate radio frequency
energy and, if not installed and
used in accordance with the
instructions, may cause harmful
interference to radio
communications.
However, there is no guarantee
that interference will n ot occu r in a
(TGSWGPE["
4CPIG"*/*\+
6[RGU"QH"
6TCPUOKUUKQPU
29
–
54 10-Meter
Ham Band,
VHF Lo,
6-Meter
Ham Band
108
–
136.9875 Aircraft
137
–
174 Military Land
Mobile,
2-Meter
Ham Band,
VHF Hi
380
–
512 UHF Aircraft,
Federal
Government,
70-cm
Ham Band,
UHF
Standard Band,
UHF “T” Band
%106'06 5
(Continued)
Special
Features .............. 33
Delay .............. 33
Locking Out
Channels or
Frequencies .... 34
Using
Priority ............ 36
Using the Display
Backlight ......... 36
Turning the
Key T one
On and Off ...... 37
Using the
Key Lock ......... 37
Avoiding Image
Frequencies .... 38
Resetting/
Initializing the
Scanner .......... 38
Wired
Programming .. 39
A General Guide to
Scanning ............. 41
Guide to
Frequencies .... 41
Guide to the
Action Bands .. 43
Band
Allocation ........ 44
Frequency
Conversion ..... 50
Troubleshooting ... 51
Care ..................... 52
Service and
Repair .................. 52
Specifications ...... 53
±
"016'"
±
"
See “Specifications”
on Page 53 for more
information about the
scanner's frequency
steps.

The FCC Wants You to Know
5
particular installation. If this
equipment does cause harmful
interference to radio or television
reception, which can be
determined by turning the
equipment off and on, the user is
encouraged to try to correct the
interference by one or more of the
following measures:
• Reorient or relocate the
receiving antenna.
• Increase the separation
between the equipment and
receiver.
• Connect the equipment into
an outlet on a circuit different
from that to which the receiv er
is connected.
This device complies with Part 15
of the
FCC Rules
. Operation is
subject to the following two
conditions:
1. This device may not cause
harmful interference.
2. This device must accep t any
interference received,
including interference that
may cause undesired
operation.
5ECPPKPI".GICNN["
Your scanner covers frequencies
used by many different groups
including police and fire
departments, ambula nce services,
government agencies, private
companies, amateur radio
services, military operations,
pager services, and wireline
(telephone and telegraph) service
providers. It is legal to listen to
almost every transmission your

The FCC Wants You to Know
6
scanner can receive. However,
there are some transmissions you
should never intenti onally list en to.
These include:
• Telephone conversations
(cellular, cordless, or other
private means of telephone
signal transmission)
• Pager transmissions
• Any scrambled or encrypted
transmissions
According to the Electronic
Communications Privacy Act
(ECPA), you are subject to fines
and possible imprisonment for
intentionally listening to, using, or
divulging the contents of such a
transmission unless you have the
consent of a party to the
communicati on (unless such
activity is otherwise illegal).
This scanner has been designed
to prevent reception of illegal
transmissi ons. This is done to
comply with the legal requirement
that scanners be manufac tured so
as to not be easily modifiable to
pick up those transmissions. Do
not open you r scanner's case to
make any modifications that could
allow it to pick up transmissions
that it is not legal to listen to. Doing
so could subj ect you to legal
penalties.
We encourage responsible, legal
scanner use.
Mobile use of this scanner is
unlawful or requires a permit in
some areas. Check the laws in
your area.

Preparation
7
24'2#4#6+10
You can power your scanner from
any of three sources:
±
• internal non-rechargeable
batteries or rechargeable
batteries (not supplied
–
see
“Installing Batteries”).
• standard AC power (with an
optional AC adapter - see
“Using AC Power” on
Page 9).
• vehicle power (with an
optional DC adapter
–
see
“Using Vehicle Battery Power”
on Page 10).
+PUVCNNKPI"$CVVGTKGU
Your scanner uses four AA
batteries (not supplied) for power.
You can use either the supplied
non-rechargeable battery holder
(black), or the supplied
rechargeable battery holder
(yellow) to install the batteries.
Rý
If you install the rechargeable
battery holder, you can operate
the scanner and recharge the re-
chargeable batteries at the same
time. See “Charging
Rechargeable Batteries” on
Page 8.
For the best performance and
longest life, we recommend
RadioShack batteri es.
.
..
.
Follow these steps to install
batteries.
1. Press in on the battery
compartment cover on the
back of the scanner and slide
the cover down to remove it.
.
"%#76+10"
.
"
• The battery holder
fits only one way.
Do not force it.
• Use only fresh
batteries of the
required size and
recommended
type.
• Do not mix old
and new batteries,
different types of
batteries
(standard,
alkaline, or
rechargeable), or
rechargeable
batteries of
different
capacities.
±
"016'"
±
"
Connecting an AC or
DC adapter to the
scanner disconnects
internal batteries
when you use the
supplied non-
rechargeable battery
holder, but it does not
disconnect internal
batteries when you
use the supplied
rechargeable battery
holder.
R
"9#40+0)"
R
"
Never install non-
rechargeable
batteries in the
rechargeable yellow
battery holder. Non-
rechargeable
batteries can get hot
or explode if you try
to recharge them.

Preparation
8
2. Pull the battery holder out of
the battery compartment.
3. If you are using non-
rechargeable batteries, place
them into the black holder, as
indicated by the polarity
symbols (+ and
–
) marked on
the holder . O r , if you are usi ng
rechargeable batteries, place
them into the yellow holder,
as indicated by the polarity
symbols (+ and
–
) marked on
the holder.
4. Place the battery holder into
the battery compartment.
5. Replace the cover.
When
8
88
8
appears and the scanner
beeps or the scanner stops
operating properly, replace or
recharge the batteries.
Rý
.#
.#.#
.#
If the scanner stops working prop-
erly after connecting it to power,
try resetting it. See “Resetting the
Scanner” on Page 39.
±
%JCTIKPI"
4GEJCTIGCDNG"$CVVGTKGU"
Your scanner has a built-in
charging circuit that lets you
charge nickel-metal hydride (Ni-
MH) or nickel cadmium (Ni-CD)
rechargeable batteries (not
supplied) while they are in the
scanner. To charge rechargeable
batteries, you need to use a 9V
AC adapter (RadioShack Cat. No.
273-1767) or 10V DC adapter
(Cat. No. 273-1830) and a size C
Adaptaplug™ adapter (neither
supplied). Both are available at
your local Radi oShack store.
.#
.#.#
.#
±
R
"9#40+0)"
R
"
Dispose of old
batteries promptly
and properly. Do not
burn or bury them.
.
"%#76+10"
.
"
If you do not plan to
use the scanner with
batteries for a month
or more, remove the
batteries. Batteries
can leak chemicals
that can destroy
electronic parts.
±
"016'"
±
"
Installing
Batteries
You must charge
rechargeable
batteries before you
use them the first
time. See “Charging
Rechargeable
Batteries”.
Charging
Rechargeable
Batteries
It takes about 15
hours to recharge fully
discharged 1500mAh
Ni-MH rechargeable
batteries. You can
operate the scanner
while recharging the
rechargeable
batteries, but charging
takes longer.

Preparation
9
Connect a size C Adaptaplug to
the adapter's cable with the tip set
to positive then insert the
Adaptaplug into the scanner’s
PWR DC 9V
jack. For best results,
we recommend RadioShack
rechargeable nickel-metal hydride
(Ni-MH) 1500mAh batteries.
±
The scanner can also charge Ni-
Cd batteries. 600mAh batteries
require 6 hours and 850mAh
batteries require 8 hours to
charge.
Rechargeable ba tteries last l onger
and deliver more power if you let
them fully discharge once a
month. To do this, us e the scann er
until
8
88
8
appears. Then fully charge
the rechargeable batteries.
7UKPI"#%"2QYGT
You can power the scanner using
a 9V, 300 mA AC adapter (Cat.
No. 273-1767) and a size C
Adaptaplug™ adapter (neither
supplied). Both are available at
your local RadioShack store.
.
..
.
To power the scanner us ing an AC
adapter, attach the Adaptaplug to
the AC adapter so the tip reads
positive (+), then insert the
Adaptaplug into the scanner's
PWR DC 9V
jack. Then conne ct the
other end of the adapter to a
standard AC outlet.
.
"%#76+10"
.
"
You must
use a
Class 2
power source that
supplies 9V DC
and delivers at
least 300 mA. Its
center tip must be
set to positive and
its plug must fit the
scanner's
PWR
DC 9V
jack. Using
an adapter that
does not meet
these specifica-
tions could dam-
age the scanner
or the adapter.
• Always connect
the AC adapter to
the scanner
before you
connect it to AC
power. When you
finish, disconnect
the adapter from
AC power before
you disconnect it
from the scanner.
!
±
"016'"
±
"
When you charge Ni-
Cd batteries, pay
attention not to over
charge. Overcharging
shortens battery life.

Preparation
10
7UKPI"8GJKENG"$CVVGT["
2QYGT
You can power the scanne r from a
vehicle’s 12V power source (such
as a cigarette-lighte r socket) us ing
a 9V, 300 mA DC adapter and a
size C Adaptaplug™ adapter
(neither supplied). Both are
available at your local RadioSh ack
store.
.
..
.
To power the scanner using a DC
adapter, attach the Adaptaplug to
the DC adapter so the tip reads
positive (+) and set the adapter's
voltage switch to 9V. Next, insert
the Adaptaplug into the scanner's
PWR DC 9V
jack. Plug the other
end of the DC adapter into your
vehicle's cigare tte-lighter socket.
±
%QPPGEVKPI"VJG"
5WRRNKGF"#PVGPPC
To attach the supplied flexible
antenna to the antenna jack on top
of your scanner, align the slots
around the antenna's connector
with the tabs on the antenna jack.
Press the antenna down over the
jack and turn the antenna's bas e
clockwise until it locks into place.
%100'%6+0)"#0"
1
76&114"#06'00#
The antenna connector on your
scanner makes it easy to use the
scanner with a variety of
antennas, such as an external
mobile antenna or outdoor base
station antenna. Your local
RadioShack store sells a variety of
antennas.
.
"%#76+10"
.
"
Always connect the
DC adapter to the
scanner before you
connect it to the
power source. When
you finish, disconnect
the adapter from the
power source before
you disconnect it
from the scanner.
±
"016'"
±
"
If you use a cigarette-
lighter power cable
and your vehicle's
engine is running, you
might hear electrical
noise from the engine
while scanning. This
is normal.

Preparation
11
Always use 50 Ohm coaxi al cable,
such as RG-58 or RG-8, to
connect an outdoor antenna. For
lengths over 50 feet, use RG-8
low-loss dielectric coaxial cable. If
the antenna cable's connector
does not have a BNC connector,
you will also need a BNC adapter
(not supplied, available at your
local RadioShack store).
Follow the installation instructions
supplied with the antenna, route
the antenna cable to the scanner,
then connect it to the antenna
jack.
Rý
%QPPGEVKPI"CP"'CTRJQPG1
*GCFRJQPGU
For private listening, you can plug
a
1
/
8
-inch (3.5-mm) mini-plug
earphone or headphones (not
supplied), available at your local
RadioShack store, into on the
top of the scanner. This auto-
matically disconnects the internal
speaker.
.+56'0+0)"5#('.;
To protect your hearing, follow
these guidelines when you use an
earphone or headphones.
• Set the volume to the lowest
setting before you begin
listening. After you begin
listening, adju st the volu me to
a comforta ble level.
• Do not listen at extremely
high volume levels. Extended
high-volume listening can
lead to permanent hearing
loss.
R
"9#40+0)"
R
"
Use extreme caution
when installing or
removing an outdoor
antenna. If the
antenna starts to fall,
let it go! It could
contact overhead
power lines. If the
antenna touches a
power line, contact
with the antenna,
mast, cable, or guy
wires can cause
electrocution and
death. Call the power
company to remove
the antenna. DO
NOT attempt to do
so yourself.

Preparation
12
• Once you set the volume, do
not increase it. Over time,
your ears adap t to the volum e
level, so a volume level that
does not cause discomfort
might still damage your
hearing.
64#((+%"5#('6;
Do not use an earphone or
headphones with your scanner
when operating a motor vehicle or
riding a bicycle in or near traffic.
Doing so can create a traffic
hazard and could be illegal in
some areas.
If you use an earphone or
headphones with your scanner
while riding a bicycle, be very
careful. Do not listen to a
continuous broadcast. Even
though some earphones/
headphones let you hear some
outside sounds when listening at
normal volume levels, they still
can present a traffic hazard.
%QPPGEVKPI"CP"'ZVGPUKQP"
5RGCMGT
In a noisy area, an amplified
extension speaker (not supplied)
available at your local RadioSh ack
store, might provide more
comfortable listening. Plug the
speaker cable's
1
/
8
inch (3.5 mm)
mini-plug into .
±ý
7UKPI"VJG"$GNV"%NKR
You can use the belt clip attached
to the back of the scanner for
hands-free carrying wh en you are
on the go. Slide the belt clip over
your belt or waistband.
±
"016'"
±
"
You must use an
amplified speaker with
this scanner. Non-
amplified speakers do
not provide sufficient
volume for
comfortable listening.

About Your Scanner
13
#$176";174"
5%#00'4
Once you understand a few simple
terms used in this manual and
familiarize yourself with your
scanner's features, you can put
the scanner to work for you. You
simply determine the type of
communicati ons you want to
receive, then set the scanner to
scan them.
A
frequency
is the receiving signa l
location (expressed in kH z or
MHz). To find active frequencies,
you can use the search function.
You can also search the One
Touch Search Banks, which are
preset groups of frequencies
categorized by type of service.
When you find a frequency, you
can store it into a programmable
memory location ca lled a channel,
which is grouped with other
channels in a channel-st orag e
bank. You can then scan the
channel-storage banks to see if
there is activity on the frequencies
stored there. Each time the
scanner finds an activ e fr equenc y,
it stays on that channel until the
transmission ends.
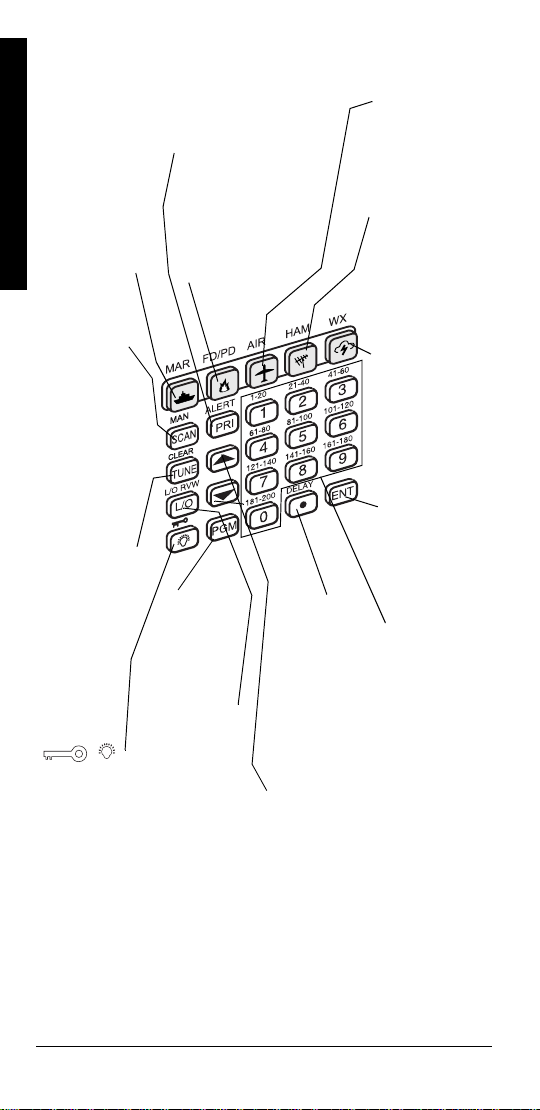
A Look at the K eypad
14
#".11-"#6"6*'"-';2#&
FD/PD
Lets you
search the
scanner's
preprogrammed
fire/police band.
AIR
Lets you
search the
scanner's
preprogrammed
aircraft band.
HAM
Lets you
search the
scanner's
preprogrammed
amateur radio
band.
WX
Lets you search
the scanner's
preprogrammed
weather
channels.
SCAN/MAN
Scans any
preprogrammed
channels; stops
scanning and
lets you directly
enter a channel
number.
PRI/ALERT
Turns the priority feature
and WX alert mode on and off.
Number Keys
Each key has a
single digit (0 to
9) and a range
of numbers.
Use the range
of numbers
above the key
(21-40 for
example) to
select the
channel in a
channel-
storage bank.
See
“Understanding
Banks” on
Page 20.
TUNE/CLEAR
Lets you tune
a frequency
along with
H
or
G
; clears
an incorrect
entry.
ENT
(enter)
Enters
frequencies
into channels.
DELAY
/
´
Programs a 2-
second delay
for the
selected
channel;
enters a
decimal point.
PGM
Programs
frequencies
into
channels.
H
or
G
Searches up or
down for active
frequencies or
selects the
direction when
scanning
channels.
L/O RVW/L/O
Reviews
locked-out
frequencies;
lets you lock
out selected
channels or
frequencies.
/
Locks (and
unlocks)
the keypad
to prevent
accidental
entries;
turns the
backlight
on and off.
MAR
Lets you
search the
scanner's
preprogrammed
marine band.
15
A Look at the Display
#".11-"#6"6*'"&+52.#;
The display has indicators that show the scanner's
current operating stat us. This quick loo k at the display will
help you understand how your scanner operates.
87DA
87DA87DA
87DA
Appears with
numbers (1-10)
to indicate th e
scan bank.
Bank numbers
with a bar under
them show
which banks are
turned on for
scanning (see
“Understanding
Banks” on
Page 20).
Appears when you lock the keypad.
C7H
C7HC7H
C7H
Indicates that the scanner is searching
the marine bank (see “Listening to the
Marine Bank” on Page 30).
MN
MNMN
MN
Indicates that the scanner is
searching the weather channels.
<:%F:
<:%F:<:%F:
<:%F:
Indicates that the
scanner is searching
the fire/police bank.
7?H
7?H7?H
7?H
Indicates that
the scanner is
searching the
aircraft bank.
>7C
>7C>7C
>7C
Indicates that the
scanner is
searching the
amateur radio
bank.
H
or
G
Indicates the search
or scan direction.
IH9>
IH9>IH9>
IH9>
Appears during service
bank searches.
9>
9>9>
9>
Appears with
digits (1-200)
or
F
FF
F
to show
which
channel the
scanner is
tuned to.
C7D
C7DC7D
C7D
Appears when you
manually select a
channel.

A Look at the Display
16
8
88
8
Appears when the batteries are
low.
B%E
B%EB%E
B%E
(lockout)
Appears when you manually
select a channel that was
previously locked out during
scanning or when you review a
locked-out frequency.
I97D
I97DI97D
I97D
Appears when the scanner scans
channels.
F=C
F=CF=C
F=C
Appears when you program
frequencies into the scanner's
channels.
FH?
FH?FH?
FH?
Appears when the priority feature
is turned on.
:BO
:BO:BO
:BO
Appears when you program a 2-
second delay.
7BBý9>ýBe$#ekj
7BBý9>ýBe$#ekj7BBý9>ýBe$#ekj
7BBý9>ýBe$#ekj
Appears when you lock out the all
marine channel.
XýNý#<KBB
XýNý#<KBBXýNý#<KBB
XýNý#<KBB
Appears when you try to enter a
frequency during a search when
all displayed banks channels are
full.
#ZKFB#
#ZKFB##ZKFB#
#ZKFB#
Appears when you try to store a
frequency that is already stored in
another channel.
:;<7KBj
:;<7KBj:;<7KBj
:;<7KBj
Appears when you remove all the
lock-outs from the FD/PD, AIR, or
HAM bank frequencies.

A Look at the Display
17
:#;hheh
:#;hheh:#;hheh
:#;hheh
Appears when the scanner
receives a data error during wired
programming.
;dZ
;dZ;dZ
;dZ
Appears when the scanner has
finished wired programming.
;hheh
;hheh;hheh
;hheh
Appears when you make an entry
error.
<Beý7BB#9B
<Beý7BB#9B<Beý7BB#9B
<Beý7BB#9B
Appears when you remove all the
locked-out frequencies during a
FD/PD, AIR, or HAM bank or tune
search.
<Be#<KBB
<Be#<KBB<Be#<KBB
<Be#<KBB
Appears when you try to lock out a
frequency during a tune when 50
frequenci es are already locked
out.
<ýB#ekj
<ýB#ekj<ýB#ekj
<ýB#ekj
Appears when you start a tune
from a locked-out frequency.
B#h
B#hB#h
B#h
Appears when you review locked-
out frequencies.
e<<ýjed;
e<<ýjed;e<<ýjed;
e<<ýjed;
Appears when you turn the key
tone off.
edýjed;
edýjed;edýjed;
edýjed;
Appears when you turn the key
tone on.
F
FF
F
Appears when the scanner is
tuned to the priority channel.
Ij7hj
Ij7hjIj7hj
Ij7hj
Appears when the scanner starts
wired programming.
 Loading...