


20-418.fm Page 1 Wednesday, August 4, 1999 12:42 PM
Cat. No. 20-418
OWNER’S MANUAL
PRO-2045
200-Channel Weather Alert Home Scanner
Please read before using this equipment.

20-418.fm Page 2 Wednesday, August 4, 1999 12:42 PM
FEATURES
Your RadioShack PRO-2045 200Channel Weather Alert Home Scanner lets you in on all the action! This scanner gives you direct access to over 49,500 exciting frequencies used by police and fire departments, ambulance and transportation services, amateur radio, as well as aircraft communications, Citizen’s Band, and commercial FM and television broadcasts.
You can select up to 200 channels for your scanner to scan, and you can change your selections at any time. Its rotary tuning control lets you easily select frequencies and channels. Plus, when you turn on the weather alert function, the scanner sounds an alarm if the weather service transmits a weather alert tone.
The secret to your scanner’s ability to scan so many frequencies is its cus- tom-designed microprocessor — a tiny, built-in computer.
Your scanner has these features:
WX Alert — warns you of serious weather conditions by sounding an alarm if the weather service transmits a weather alert tone.
Weather Band Auto Scan — scans the preprogrammed weather frequencies so you can stay informed about current weather conditions.
Hyperscan — scans programmed channels at up to 50 channels per second.
Hypersearch — lets you set the scanner to search at up to 300 steps per second.
Rotary Tuner — lets you easily tune and select frequencies or channels.
Auto Sort — lets you scan the channels stored in a bank, in order from lowest to highest frequency, to increase scanning speed.
Auto Store — quickly finds and automatically stores active frequencies into the selected banks (but does not store the frequency if it is already stored in another channel).
Ten Channel-Storage Banks — let you store 20 channels in each of 10 banks to group frequencies so you can easily identify calls.
Frequency Transfer — lets you easily organize your frequencies by transferring them from one channel to another.
Monitor Memories — let you store up to 10 frequencies you locate during a frequency search.
Limit Search — lets you search for transmissions within a set range.
©1996 Tandy Corporation. All Rights Reserved.
RadioShack is a trademark used by Tandy Corporation.
Hyperscan and Hypersearch are registered trademarks used by Tandy Corporation.
2

20-418.fm Page 3 Wednesday, August 4, 1999 12:42 PM
Direct Search — lets you search for transmissions starting from a frequency you specify.
Count Feature — lets you keep track of how many times your scanner has stopped on a channel.
Search Skip — lets you select up to 50 frequencies for the scanner to skip during a search, so you can avoid frequencies you have already discovered or that have a continuous transmission.
Two-Second Scan Delay — delays scanning for 2 seconds before moving to another channel, so you can hear more replies.
Data Skip — skips data signals (nonmodulated signals such as preamble signals for pagers) during scan, limit search, and direct search.
Lock-Out Function — prevents channels you select from being scanned.
Priority Channels — checks 10 specified channels every 2 seconds so you do not miss important calls.
Automatic Modulation Mode — selects the modulation method — nar- row-band frequency modulation (NFM) or amplitude modulation (AM)
— most often used for each band, and lets you manually override the preset mode.
Attenuator — reduces the scanner’s sensitivity to help limit reception to strong, nearby transmitters.
Memory Backup — keeps stored channel frequencies in memory for up to 3 days during a power loss.
CTCSS Option — with an optional CTCSS tone circuit board, you can use the Continuous Tone Coded Squelch System (CTCSS) to selectively listen to some business band and amateur radio transmissions.
Backlit Display — lets you easily see the indicators on the scanner’s display, even at night.
We recommend you record your scanner’s serial number here. The number is on the scanner’s back panel.
Serial Number: _________________
Your scanner has the following preprogrammed weather channels:
•162.4000 MHz (NFM)
•162.4250 MHz (NFM)
•162.4500 MHz (NFM)
•162.4750 MHz (NFM)
•162.5000 MHz (NFM)
•162.5250 MHz (NFM)
•162.5500 MHz (NFM)
3

20-418.fm Page 4 Wednesday, August 4, 1999 12:42 PM
Your scanner can receive all of these bands:
Range |
Step |
Mode |
|
(MHz) |
(kHz) |
||
|
|||
|
|
|
|
|
|
|
|
29–54 |
5 |
NFM |
|
|
|
|
|
108–136.975 |
12.5 |
AM |
|
|
|
|
|
137–174 |
5 |
NFM |
|
|
|
|
|
216–224.9875 |
12.5 |
NFM |
|
|
|
|
|
225–399.9875 |
12.5 |
AM |
|
|
|
|
|
400–512 |
12.5 |
NFM |
|
|
|
|
|
806–823.9375 |
12.5 |
NFM |
|
|
|
|
|
851–868.9375 |
12.5 |
NFM |
|
|
|
|
|
896.1125–1,000 |
12.5 |
NFM |
|
|
|
|
FCC NOTICE
Your scanner might cause radio or TV interference even when it is operating properly. To determine if your scanner is causing the interference, turn off your scanner. If the interference goes away, your scanner was causing it. Try to eliminate the interference by:
•Moving your scanner away from the receiver
•Connecting your scanner to an outlet that is on a different electrical circuit from the receiver
•Contacting a RadioShack store for help
If you cannot eliminate the interference, the FCC requires that you stop using your scanner.
4
SCANNING LEGALLY
Your scanner covers frequencies used by many different groups including police and fire departments, ambulance services, government agencies, private companies, amateur radio services, military operations, pager services, and wireline (telephone and telegraph) service providers. It is legal to listen to almost every transmission your scanner can receive. However, there are some transmissions you should never intentionally listen to. These include:
•Telephone conversations (either cellular, cordless, or other private means of telephone signal transmission)
•Pager transmissions
•Any scrambled or encrypted transmissions
According to the Electronic Communications Privacy Act (ECPA), you are subject to fines and possible imprisonment for intentionally listening to, using, or divulging the contents of such a transmission unless you have the consent of a party to the conversation (unless such activity is otherwise illegal). RadioShack encourages responsible, legal scanner use.
20-418.fm Page 5 Wednesday, August 4, 1999 12:42 PM
CONTENTS |
|
Preparation . . . . . . . . . . . . . . . . . . . . . . . . . . . . . . . . . . . . . . . . . . . . . . . . . . . . . |
. 7 |
Connecting Power . . . . . . . . . . . . . . . . . . . . . . . . . . . . . . . . . . . . . . . . . . . . . . |
7 |
Using Standard AC Power . . . . . . . . . . . . . . . . . . . . . . . . . . . . . . . . . . . . |
7 |
Using Vehicle Battery Power . . . . . . . . . . . . . . . . . . . . . . . . . . . . . . . . . . |
7 |
Connecting an Antenna . . . . . . . . . . . . . . . . . . . . . . . . . . . . . . . . . . . . . . . . . |
8 |
Telescoping Antenna . . . . . . . . . . . . . . . . . . . . . . . . . . . . . . . . . . . . . . . . |
8 |
Optional Outdoor Antenna . . . . . . . . . . . . . . . . . . . . . . . . . . . . . . . . . . . . |
8 |
Resetting the Scanner . . . . . . . . . . . . . . . . . . . . . . . . . . . . . . . . . . . . . . . . . . |
9 |
Using the Feet . . . . . . . . . . . . . . . . . . . . . . . . . . . . . . . . . . . . . . . . . . . . . . . . . |
9 |
Testing Alert Operation . . . . . . . . . . . . . . . . . . . . . . . . . . . . . . . . . . . . . . . . . |
10 |
Testing Alert Reception . . . . . . . . . . . . . . . . . . . . . . . . . . . . . . . . . . . . . . |
10 |
Testing the Weather Alert . . . . . . . . . . . . . . . . . . . . . . . . . . . . . . . . . . . . |
11 |
Connecting an Earphone . . . . . . . . . . . . . . . . . . . . . . . . . . . . . . . . . . . . . . . |
11 |
Listening Safely . . . . . . . . . . . . . . . . . . . . . . . . . . . . . . . . . . . . . . . . . . . |
11 |
Traffic Safety . . . . . . . . . . . . . . . . . . . . . . . . . . . . . . . . . . . . . . . . . . . . . . |
12 |
Connecting an Amplified Extension Speaker . . . . . . . . . . . . . . . . . . . . . . . . |
12 |
Installing an Optional CTCSS Tone Board . . . . . . . . . . . . . . . . . . . . . . . . . . |
12 |
Understanding Your Scanner . . . . . . . . . . . . . . . . . . . . . . . . . . . . . . . . . . . . . . |
14 |
A Look at the Keyboard . . . . . . . . . . . . . . . . . . . . . . . . . . . . . . . . . . . . . . . . |
14 |
A Look at the Display . . . . . . . . . . . . . . . . . . . . . . . . . . . . . . . . . . . . . . . . . . |
16 |
Understanding Channel-Storage Banks . . . . . . . . . . . . . . . . . . . . . . . . . . . . |
18 |
Channel-Storage Banks . . . . . . . . . . . . . . . . . . . . . . . . . . . . . . . . . . . . . |
18 |
Monitor Memories . . . . . . . . . . . . . . . . . . . . . . . . . . . . . . . . . . . . . . . . . . |
18 |
Operation . . . . . . . . . . . . . . . . . . . . . . . . . . . . . . . . . . . . . . . . . . . . . . . . . . . . . . 19
Turning On the Scanner/Setting Volume and Squelch . . . . . . . . . . . . . . . . . 19 Using the Rotary Control . . . . . . . . . . . . . . . . . . . . . . . . . . . . . . . . . . . . . . . . 19 Storing Frequencies . . . . . . . . . . . . . . . . . . . . . . . . . . . . . . . . . . . . . . . . . . . 19 Searching For and Temporarily Storing Active Frequencies . . . . . . . . . . . . . 20 Limit Search . . . . . . . . . . . . . . . . . . . . . . . . . . . . . . . . . . . . . . . . . . . . . . 20 Direct Search . . . . . . . . . . . . . . . . . . . . . . . . . . . . . . . . . . . . . . . . . . . . . 21 Search Skip . . . . . . . . . . . . . . . . . . . . . . . . . . . . . . . . . . . . . . . . . . . . . . 22 Automatically Storing Frequencies . . . . . . . . . . . . . . . . . . . . . . . . . . . . . . . . 23 Listening to Monitor Memories . . . . . . . . . . . . . . . . . . . . . . . . . . . . . . . . . . . 24 Moving a Frequency from a Monitor Memory to a Channel . . . . . . . . . . . . . 24 Scanning Channels . . . . . . . . . . . . . . . . . . . . . . . . . . . . . . . . . . . . . . . . . . . . 24 Turning Channel-Storage Banks On and Off . . . . . . . . . . . . . . . . . . . . . 24 Locking Out Channels . . . . . . . . . . . . . . . . . . . . . . . . . . . . . . . . . . . . . . 25 Manually Selecting a Channel . . . . . . . . . . . . . . . . . . . . . . . . . . . . . . . . . . . 25 Scanning the Weather Band . . . . . . . . . . . . . . . . . . . . . . . . . . . . . . . . . . . . . 26 Weather Alert . . . . . . . . . . . . . . . . . . . . . . . . . . . . . . . . . . . . . . . . . . . . . 26 Using the Weather Alert Standby Mode . . . . . . . . . . . . . . . . . . . . . . . . . 26
5

20-418.fm Page 6 Wednesday, August 4, 1999 12:42 PM
Special Features . . . . . . . . . . . . . . . . . . . . . . . . . . . . . . . . . . . . . . . . . . . . . . . . |
27 |
Delay . . . . . . . . . . . . . . . . . . . . . . . . . . . . . . . . . . . . . . . . . . . . . . . . . . . . . . . |
27 |
Priority . . . . . . . . . . . . . . . . . . . . . . . . . . . . . . . . . . . . . . . . . . . . . . . . . . . . . . |
27 |
Changing Search Speeds . . . . . . . . . . . . . . . . . . . . . . . . . . . . . . . . . . . . . . . |
28 |
Using the Programmable Attenuator . . . . . . . . . . . . . . . . . . . . . . . . . . . . . . . |
28 |
Using Auto Sort . . . . . . . . . . . . . . . . . . . . . . . . . . . . . . . . . . . . . . . . . . . . . . . |
29 |
Skipping Data Signals . . . . . . . . . . . . . . . . . . . . . . . . . . . . . . . . . . . . . . . . . . |
29 |
Turning On or Off the Key Tone . . . . . . . . . . . . . . . . . . . . . . . . . . . . . . . . . . . |
29 |
Changing the Modulation Mode . . . . . . . . . . . . . . . . . . . . . . . . . . . . . . . . . . . |
29 |
Transferring a Frequency to Another Channel . . . . . . . . . . . . . . . . . . . . . . . |
30 |
Transferring to an Empty Channel . . . . . . . . . . . . . . . . . . . . . . . . . . . . . |
30 |
Transferring to a Channel that has a Stored Frequency . . . . . . . . . . . . . |
30 |
Exchanging Frequencies Between Two Programmed Channels . . . . . . |
30 |
Using the Count Feature . . . . . . . . . . . . . . . . . . . . . . . . . . . . . . . . . . . . . . . . |
31 |
Using CTCSS . . . . . . . . . . . . . . . . . . . . . . . . . . . . . . . . . . . . . . . . . . . . . . . . |
31 |
CTCSS Tone Frequencies . . . . . . . . . . . . . . . . . . . . . . . . . . . . . . . . . . . |
31 |
Assigning a CTCSS Tone Frequency to a Channel . . . . . . . . . . . . . . . . |
32 |
Changing or Deleting a CTCSS Tone Frequency for a Channel . . . . . . . |
32 |
A General Guide to Scanning . . . . . . . . . . . . . . . . . . . . . . . . . . . . . . . . . . . . . . |
33 |
Guide to Frequencies . . . . . . . . . . . . . . . . . . . . . . . . . . . . . . . . . . . . . . . . . . 33 National Weather Service Frequencies . . . . . . . . . . . . . . . . . . . . . . . . . . 33 Ham Radio Frequencies . . . . . . . . . . . . . . . . . . . . . . . . . . . . . . . . . . . . . 33 Birdie Frequencies . . . . . . . . . . . . . . . . . . . . . . . . . . . . . . . . . . . . . . . . . 34 Guide to the Action Bands . . . . . . . . . . . . . . . . . . . . . . . . . . . . . . . . . . . . . . . 35 Typical Band Usage . . . . . . . . . . . . . . . . . . . . . . . . . . . . . . . . . . . . . . . . 35 Primary Usage . . . . . . . . . . . . . . . . . . . . . . . . . . . . . . . . . . . . . . . . . . . . 36 Specified Intervals . . . . . . . . . . . . . . . . . . . . . . . . . . . . . . . . . . . . . . . . . . 37 Band Allocation . . . . . . . . . . . . . . . . . . . . . . . . . . . . . . . . . . . . . . . . . . . . . . . 38 Frequency Conversion . . . . . . . . . . . . . . . . . . . . . . . . . . . . . . . . . . . . . . . . . 41
Troubleshooting . . . . . . . . . . . . . . . . . . . . . . . . . . . . . . . . . . . . . . . . . . . . . . . . . 42
Care and Maintenance . . . . . . . . . . . . . . . . . . . . . . . . . . . . . . . . . . . . . . . . . . . . 43
Specifications . . . . . . . . . . . . . . . . . . . . . . . . . . . . . . . . . . . . . . . . . . . . . . . . . . . 44
6
20-418.fm Page 7 Wednesday, August 4, 1999 12:42 PM
PREPARATION
CONNECTING POWER
You can power your scanner from a standard AC outlet using the supplied AC adapter or from your vehicle’s battery using an optional DC power cord.
If a power failure occurs or if the power cord is disconnected, the scanner’s memory backup circuit keeps information in memory for up to 3 days.
Note: The memory backup circuit begins to protect memory within a few minutes after you plug in the scanner.
Follow these steps to use AC power.
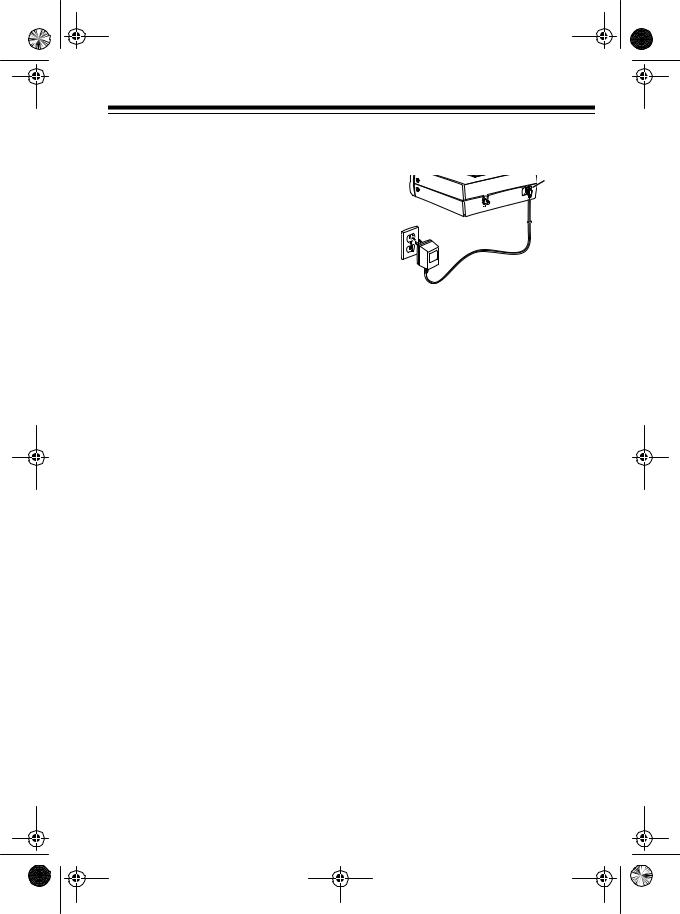
DC 12V
1.Insert the supplied AC adapter’s barrel plug into the scanner’s DC 12V jack.
2.Plug the adapter’s power module into a standard AC outlet.
Using Standard AC Power
Warning: Do not use the AC adapter with an extension cord unless the blades can be fully inserted.
Cautions:
•The supplied AC adapter supplies 12 volts and delivers 500 milliamps. Its center tip is set to positive, and its plug properly fits the scanner’s DC 12V jack. Using an AC adapter that does not meet these specifications could damage the scanner or the adapter.
•Connect the adapter to the scanner before you connect it to an AC outlet. Disconnect the adapter from the AC outlet before you disconnect it from the scanner.
•If you have difficulty inserting the AC adapter’s plug, do not force it. Turn it over and reinsert it.
Using Vehicle Battery Power
Use a DC power cord (not supplied), such as RadioShack Cat. No. 2701533, to power your scanner in your vehicle.
Cautions:
•The DC power cord you select must supply 12 volts and deliver at least 500 mA. Its center tip must be positive, and its plug must fit the scanner’s DC 12V jack. The recommended power cord meets these specifications. Using a power cord that does not meet these specifications could damage the scanner or power cord.
•Connect the power cord to the scanner before you plug it into your vehicle. Disconnect the power cord from the vehicle before you disconnect it from the scanner.
7
20-418.fm Page 8 Wednesday, August 4, 1999 12:42 PM
•If you use your scanner in your vehicle with the engine running, you might hear electrical noise from the scanner. This is normal.
Note: Mobile use of this scanner is unlawful or requires a permit in some areas. Check the laws in your area.
Follow these steps to use vehicle battery power.
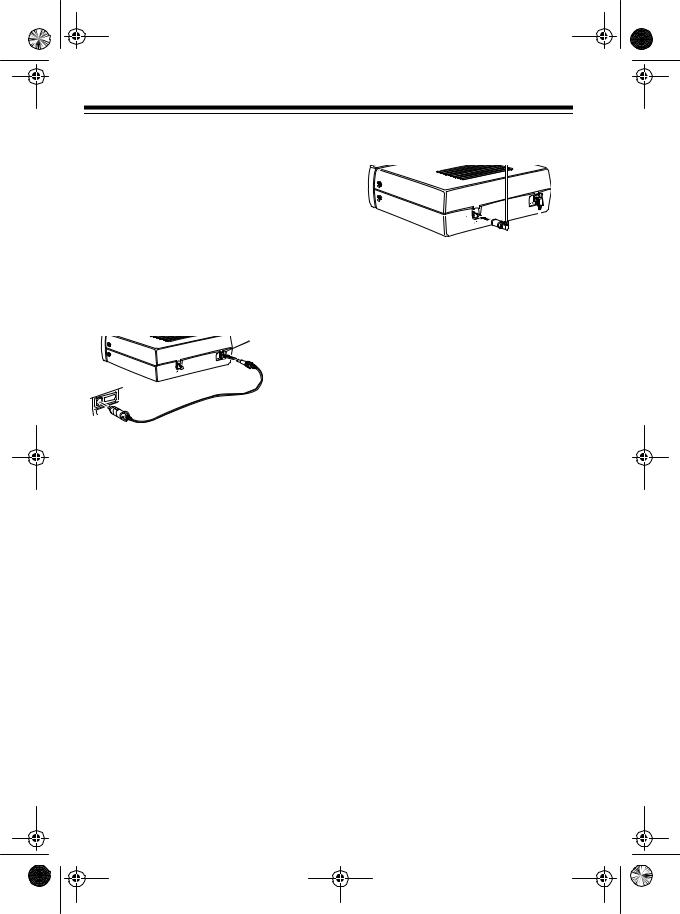
DC 12V
1.Insert the DC power cord’s barrel plug into the scanner’s DC 12V jack.
2.Plug the DC power cord’s ciga- rette-lighter plug into your vehicle’s cigarette-lighter socket.
CONNECTING AN
ANTENNA
You can connect either the supplied telescoping antenna or an optional antenna to your scanner.
Telescoping Antenna
The supplied telescoping antenna helps your scanner receive strong local signals. Follow these steps to install the supplied antenna.
8
ANT 
1. Hold the antenna so it stands straight up.
2. Gently push the antenna’s plug onto the ANT jack on the scanner’s back panel.
The antenna’s length affects reception. Adjust the antenna’s length as follows for the best results.
29–150 MHz |
Extend fully |
|
|
150–174 MHz |
Extend only 3 seg- |
|
ments |
|
|
216–406 MHz |
Extend only 2 seg- |
|
ments |
|
|
406–1000 MHz |
Collapse Fully (only |
|
1 segment extended) |
|
|
Optional Outdoor Antenna
The supplied antenna is usually good for strong, local signals. However, for the best results in receiving weaker, more distant signals on all bands, you can attach an optional outdoor antenna (not supplied), such as a mobile, telescoping, multi-band, or outdoor base antenna.
Warning: When installing or removing an outdoor antenna, follow all cautions and warnings included with the antenna.
20-418.fm Page 9 Wednesday, August 4, 1999 12:42 PM
Note: Always use 50-ohm coaxial cable to connect an outdoor antenna to your scanner. For lengths under 50 feet, use RG-58 or RG-8/M coaxial cable. For lengths over 50 feet, use RG- 8, low-loss coaxial cable. If the coaxial cable’s connector does not fit the ANT jack, you might also need an adapter. Your local RadioShack store sells a complete line of outdoor antennas, adapters, BNC connectors, and mounting hardware.
For the best performance, consider the following when deciding on an outdoor antenna and its location:
•The location of the external antenna should be as high as possible.
•The external antenna and antenna cable should be as far away as possible from sources of electrical noise (appliances, other radios, and so on).
•The external antenna should be vertical.
Mount the antenna following the instructions supplied with the antenna and its mounting hardware, then route the antenna cable to the scanner and connect it to the ANT jack on the back of the scanner.
ANT


RESETTING THE
SCANNER
If the scanner’s display locks up or does not work properly after you connect power or after a power surge, you might need to reset the scanner.
Caution: This procedure clears all the information you have programmed into the scanner. Use this procedure only when you are sure your scanner is not working properly.
1.Turn off the scanner.
2.While you press and hold down 2 and 9, turn on the scanner.
USING THE FEET
To tilt the display for the best viewing angle and to provide the best traction, pull down on the scanner’s feet so they lock into place.
9
20-418.fm Page 10 Wednesday, August 4, 1999 12:42 PM
TESTING ALERT
OPERATION
For your scanner’s weather alert function to be effective, you must place the scanner:
•Where it can receive an emergency alert broadcast (see “Testing Alert Reception” on this page)
•Where you can hear its alert tone (See “Testing the Weather Alert” on Page 11).
Once you determine a location that meets these two conditions, leave the scanner there for the best protection.
Testing Alert Reception
The fact that you get clear voice reception or that the tone sounds when you test the weather alert does not guarantee that an emergency alert broadcast will trigger your scanner’s alert tone. Also, if you are in a fringe area, your scanner might be triggered by a broadcast in one area, but not be triggered if you place it somewhere else (even close by).
To test for actual reception, your radio must receive a test or emergency alert broadcast. The National Weather Service (NWS) broadcasts a test alert every week on Wednesday between 11 AM and 12 Noon. To find out the specific test schedule in your area, contact your local National Oceanic and Atmospheric Administration (NOAA) or National Weather Service office.
10
These offices are usually listed in the telephone book under “US Government, Department of Commerce.”
To verify that your scanner receives the test alert properly, set the scanner to the weather alert standby mode (see “Using the Weather Alert Standby Mode” on Page 25) during the time when the test alert is broadcast in your area.
If the test alert broadcast does not trigger your scanner’s tone, you are out of range of the broadcast.
Note: If you use your scanner’s weather alert feature when you travel, you cannot guarantee that an emergency alert broadcast will trigger the scanner in all areas.
Notes for Weather Alerts:
•To ensure your scanner will sound the alert tone when it receives an emergency signal, keep the antenna fully extended at all times.
•If severe weather threatens, do not wait for an alert tone; turn on your scanner and monitor the latest weather information.
20-418.fm Page 11 Wednesday, August 4, 1999 12:42 PM
Testing the Weather Alert
Follow these steps to test the weather alert — to hear how it sounds and ensure that the circuitry is working.
Note: This test does not ensure that your scanner will sound an alert when the weather service transmits an emergency signal (see “Weather Alert” on Page 25). Proper operation is affected by the strength of the weather service’s signal.
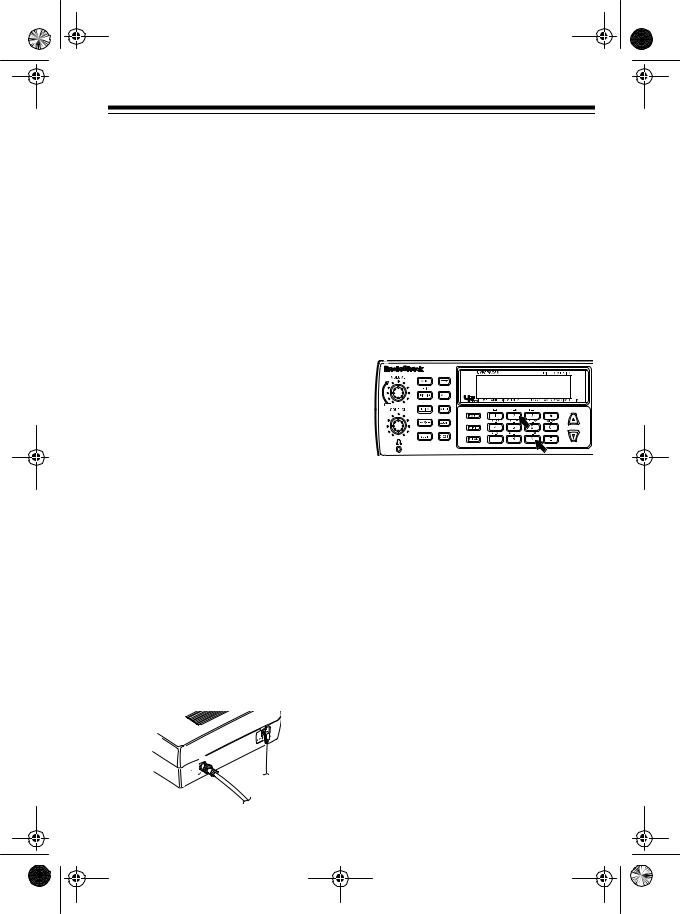
1.Press WX.
2.When the scanner stops on a weather channel, press ALERT. ALERT appears on the display.
3.Press and hold PRIORITY for more than 2 seconds until the scanner sounds a loud alarm.
To turn off the alarm, press ALERT or
WX.
CONNECTING AN
EARPHONE
For private listening, plug an earphone or mono headphones’ 1/8-inch plug into the 
 jack on the front of the
scanner. This disconnects the internal speaker.
Note: Your local RadioShack store has a wide selection of earphones and headphones.
Listening Safely
To protect your hearing, follow these guidelines when you use an earphone or headphone.
•Do not listen at extremely high volume levels. Extended high-vol- ume listening can lead to permanent hearing loss.
•Set the volume to the lowest setting before you begin listening. After you begin listening, adjust the volume to a comfortable level.
•Once you set the volume, do not increase it. Over time, your ears adapt to the volume level, so a volume level that does not cause discomfort might still damage your hearing.
11

20-418.fm Page 12 Wednesday, August 4, 1999 12:42 PM
Traffic Safety
Do not wear an earphone or headphones while operating a motor vehicle. This can create a traffic hazard and can be illegal in some areas.
Even though some earphones and headphones let you hear some outside sounds when listening at normal volume levels, they still can present a traffic hazard.
CONNECTING AN AMPLIFIED EXTENSION SPEAKER
In a noisy area, an amplified extension speaker might provide more comfortable listening. Plug the speaker cable’s 1/8-inch (3.5 mm) mini plug into the scanner’s 
 jack. This disconnects the internal speaker.
Note: RadioShack stores sell an amplified communications extension speaker.
12
INSTALLING AN
OPTIONAL CTCSS
TONE BOARD
The scanner’s CTCSS (Continuous Tone Control Squelch System) feature lets you choose to listen only to transmissions that transmit one of 38 standard CTCSS tones. To use CTCSS, you must install an optional CTCSS tone board (Cat. No. 20-0031).
Cautions:
•Make sure the scanner is off and disconnect the power before you install a CTCSS tone board.
•Discharge static electricity buildup by touching a metal object before you open the scanner.
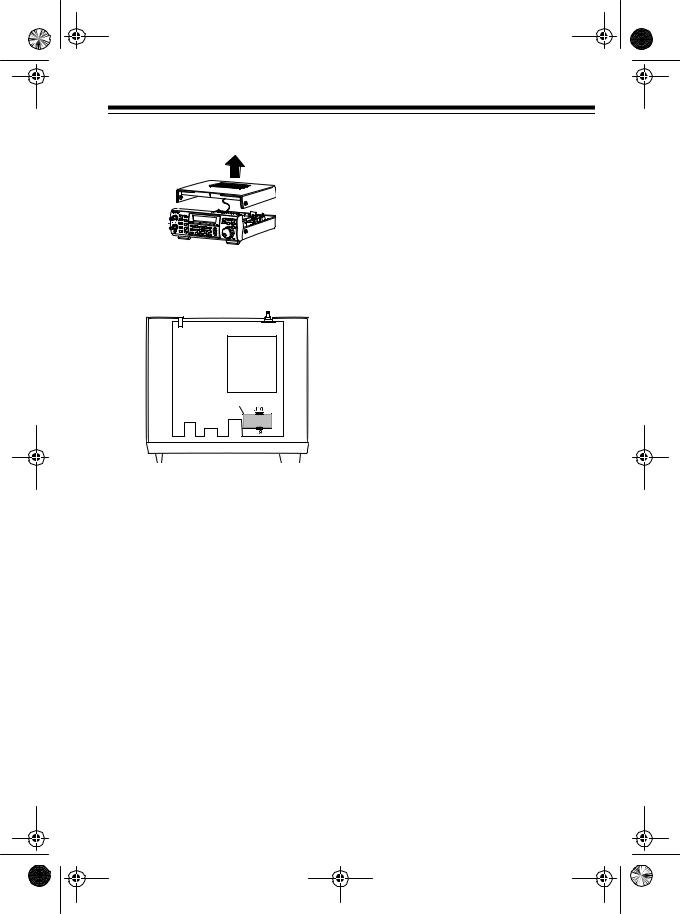
1.Use a Phillips screwdriver to remove the two side screws on the scanner’s top cover and three screws on the bottom.
Caution: The scanner’s speaker is attached to the top cover and the circuit board. Use care when you remove the top cover to not damage the speaker or its connector.
20-418.fm Page 13 Wednesday, August 4, 1999 12:42 PM
2. Remove the scanner’s top cover.
3.Gently plug the CTCSS board into sockets J9 and J10 on the top of the scanner’s circuit board.
CTCSSSS Board
BORD
4.Replace the scanner’s top cover, then replace the two side screws and three bottom screws.
Note: For information about using
CTCSS, see “Using CTCSS” on
Page 30.
13

20-418.fm Page 14 Wednesday, August 4, 1999 12:42 PM
UNDERSTANDING YOUR SCANNER
A LOOK AT THE KEYBOARD
A quick glance at this section should help you understand each key’s function(s).
VOLUME — rotate to turn the scanner on or off and adjust the volume.
SQUELCH — rotate to adjust the squelch.
AUTO — lets you automatically program frequencies into banks; sets the the scanner to scan banks from the lowest to the highest frequency.
H/S-PRIORITY — sets and turns on and off priority for a particular channel; turns on and off Hypersearch.
REVIEW — lets you review locked-out channels or search skip memory.
TRANSFER — transfers the contents of a channel to an empty or desired channel, or exchanges the contents of two channels.
MODE — selects the modulation mode (AM and FM) function.
DATA — turns on or off data skip.
ATT — turns on or off the attenuator to let you limit reception to strong, local transmitters.
ALERT — sets the scanner to the weather alert mode.
COUNT — sets the scanner to display the number of times the scanner detected a transmission on a channel since you turned the scanner on.
CTCSS — lets you use the optional CTCSS mode if you installed a CTCSS tone board.
WX — starts scanning the weather frequencies.
LIMIT — starts a limit search.
CLEAR — clears an incorrect entry.
14
 Loading...