


Triple Trunking |
20-164 |
Handheld Radio Scanner
Thank you for purchasing your Triple Trunking Handheld Radio Scanner from RadioShack. Your scanner scans conventional frequencies and trunked systems. Please read this user’s guide before installing, setting up and using
your new scanner.
What’s Included
Scanner
Antenna
Belt Clip
Non-rechargeable Battery
Holder
Rechargeable Battery
Holder
Preprogrammed Frequency
Addendum
User’s Guide
www.radioshack.com

Contents |
|
Your Scanner................................... |
4 |
Connecting the Antenna........................... |
5 |
Attaching the Belt Clip............................. |
5 |
Powering Your Scanner............................. |
6 |
Headphones and Speakers....................... |
9 |
Keytones and Keylock............................ |
10 |
Backlight and Contrast........................... |
10 |
Squelch and Attenuator.......................... |
11 |
Delay..................................................... |
13 |
Scanner Setup............................... |
13 |
Defining a Channel................................. |
14 |
Copying a Frequency.............................. |
15 |
Deleting Saved Frequencies.................... |
16 |
CTCSS AND DCS.................................... |
16 |
Scanner Cloning..................................... |
17 |
Searching...................................... |
18 |
Seek Search............................................ |
18 |
Search Banks.......................................... |
19 |
Zeromatic............................................... |
20 |
Programming a Search Range................. |
21 |
Signal Stalker II...................................... |
21 |
Locking Out Frequencies......................... |
23 |
Saving Found Frequencies...................... |
24 |
Scanning....................................... |
25 |
Locking Out Channels............................. |
25 |
Priority Scanning.................................... |
26 |
Weather Alerts....................................... |
27 |
SAME Standby Mode................................ |
28 |
Skywarn................................................. |
30 |
Monitoring.................................... |
31 |

|
Contents |
Trunking Setup.............................. |
32 |
Defining a Trunking Bank..................... |
32 |
Trunking Modes..................................... |
33 |
Motorola Trunking Setup........................ |
33 |
EDACS Trunking Setup............................ |
36 |
LTR Trunking Setup................................. |
37 |
Searching for Talk Group IDs.................. |
38 |
Saving a Talk Group ID........................... |
38 |
Deleting Talk Group IDs.......................... |
39 |
Saving Trunking Channels....................... |
40 |
Trunk Scanning............................. |
41 |
Trunking Delay....................................... |
42 |
Locking Out Talk Group IDs.................... |
42 |
Turning Off Sub-Banks............................ |
43 |
Talk Group ID Hold................................ |
44 |
Scanner Maintenance................... |
44 |
Text Tags................................................. |
44 |
Troubleshooting..................................... |
46 |
Birdie Frequencies.................................. |
48 |
Initializing the Scanner........................... |
49 |
Service and Repair................................. |
49 |
Scanning Legally.................................... |
40 |
FCC Notice............................................. |
51 |
References.................................... |
52 |
Appendix A: Glossary............................. |
52 |
Appendix B: Search Banks...................... |
52 |
Appendix C: CTCSS and DCS Codes........ |
56 |
Appendix D: Signal Stalker II Bands....... |
57 |
Appendix E: Talk Group ID Formats........ |
59 |
Appendix F: Specifications...................... |
60 |
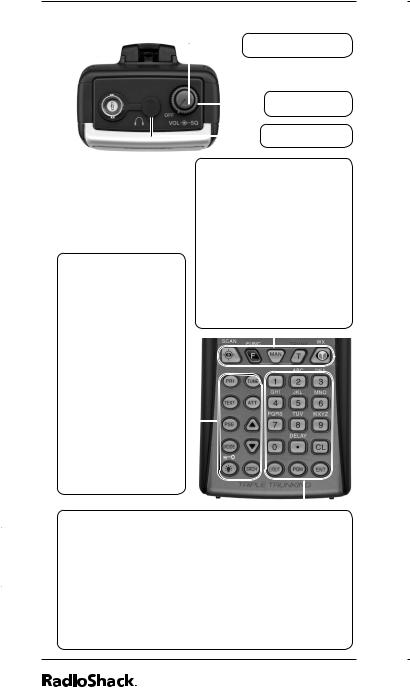
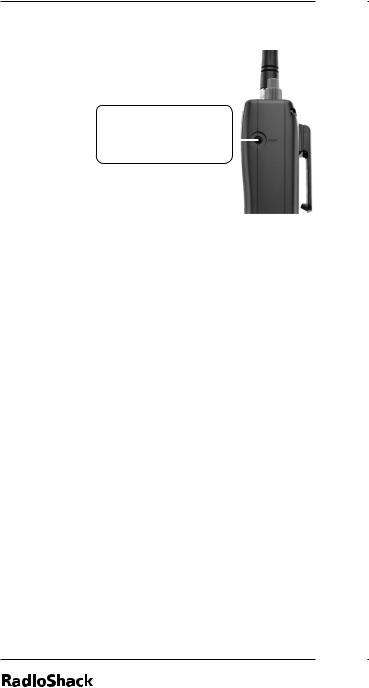
Your Scanner
VOLUME / OFF
Squelch
Headphones
PRI – Priority
TEXT – Activates text buttons.
PSE – Pause
MODE – Changes receive mode.
KEY/LIGHT – Keypad lock and backlight.
TUNE – Enters Tune mode.
ATT – Attenuator.
– Navigates functions.
SRCH – Search.
 — Signal Stalker. SCAN — Starts a scan. FUNC — Function
MAN — Manually select a channel or enter a channel number.
TRUNK — Accesses trunking functions.
WX/  — Weather search and Skywarn.
1-9 / A-Z– Numbers and letters. Zero enters special characters.
./DELAY – Decimal point, space, delay functions. CL – Clear.
L/OUT – Locks out channels, frequencies, or Talk Group IDs.
PGM – Program. ENT – Enter.
t a c s c
c
s
l
t
s
c c
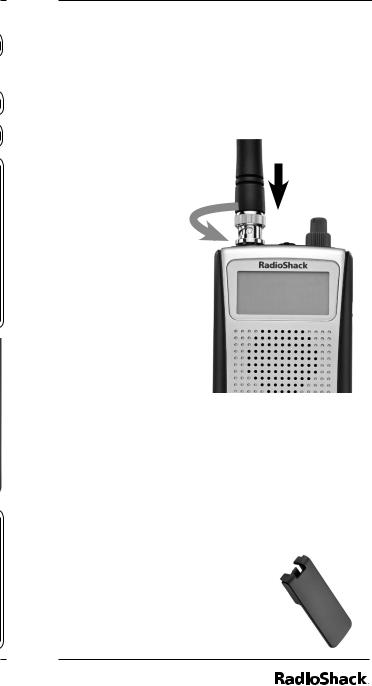
Connecting the Antenna
To connect an external antenna, always follow the installation instructions supplied with the antenna. Use 50-ohm, RG-58, or RG-8, coaxial cable. If the antenna is over 50 feet from the scanner, use RG-8 low-loss dielectric coaxial cable. If necessary, RadioShack carries a variety of adapters.
To attach the supplied antenna:
1.Align the antenna slots with the tabs on the scanner, and slide the antenna into place.
2.Turn while pushing down until the antenna locks into place.
Warning: Use extreme caution when installing
or removing an outdoor antenna. If the antenna starts to fall, let it go! It could contact overhead power lines. If the antenna touches a power line, touching the antenna, mast, cable, or guy wires can cause electrocution and death. Call the power company to remove the antenna. DO NOT attempt to do so yourself.
Attaching the Belt Clip
To carry your scanner, slide the supplied belt clip down on the back of the scanner. To remove the belt clip, pull the tab out and slide the clip upward.
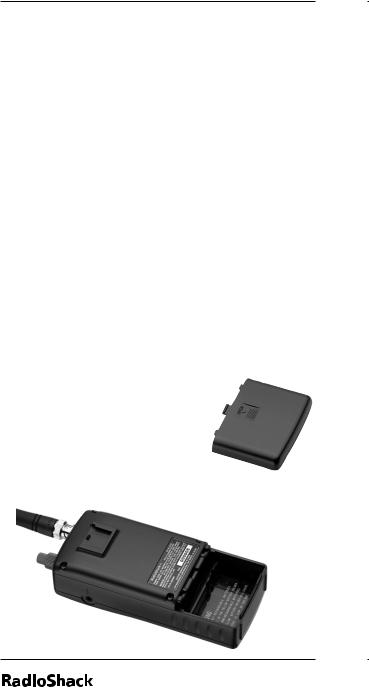
Powering Your Scanner
You can power your scanner with four AA batteries (not supplied), or an external power source.
Batteries
When battery power is low, battery symbol flashes and the scanner beeps every 30 seconds. When battery power is depleted, the scanner turns itself off.
For the longest operation and best performance, use alkaline batteries, available at your local
RadioShack store, or use RadioShack 1600 mAh nickel-metal hydride (Ni-MH) rechargeable batteries.
Rechargeable batteries last longer and deliver more power if you let them fully discharge once a month. To do this, use the scanner until battery symbol flashes.
Warning: Never install nonrechargeable batteries in the yellow rechargeable battery holder. Non-rechargeable batteries can get hot or explode if you try to recharge them.

To install batteries:
1.Slide open the battery compartment cover on the back of the scanner.
2.Place 4 AA batteries into the correct battery holder matching polarity symbols (+ / -):
•Black – Alkaline (non-rechargeable)
•Yellow – Rechargeable.
3.Place the battery holder into the battery compartment and replace the cover.
To charge batteries: |
|
|
|||
, 1. |
Install rechargeable batteries. |
||||
2. |
Connect an external power source to the |
||||
|
PWR DC 9V jack. Using the scanner while |
||||
|
charging will increase charge time. |
||||
|
|
|
|
|
|
|
Battery |
|
Current |
Charge Time |
|
|
|
|
|
|
|
|
Ni-MH |
|
1600 mAh |
16 hours |
|
|
|
|
|
|
|
|
Ni-Cd |
|
600 mAh |
6 hours |
|
|
|
|
|
|
|
|
Ni-Cd |
|
850 mAh |
8 hours |
|
|
|
|
|
|
|
|
Do not overcharge batteries. Overcharging |
||||
|
shortens battery life. |
|
|
||
• Each battery holder fits only one way. Do |
|||||
|
not force it. |
|
|
|
|
• |
Use only fresh batteries of the required size |
||||
|
and recommended type. Do not mix old |
||||
|
and new batteries, different types (alkaline |
||||
|
or rechargeable), or rechargeable batteries |
||||
|
of different capacities. |
|
|
||
• Remove old or weak batteries. If you will not use the scanner with batteries for a month, remove the batteries. Batteries can leak chemicals that destroy electronic circuits.
• Always dispose of old batteries promptly and properly. Do not bury or burn them.
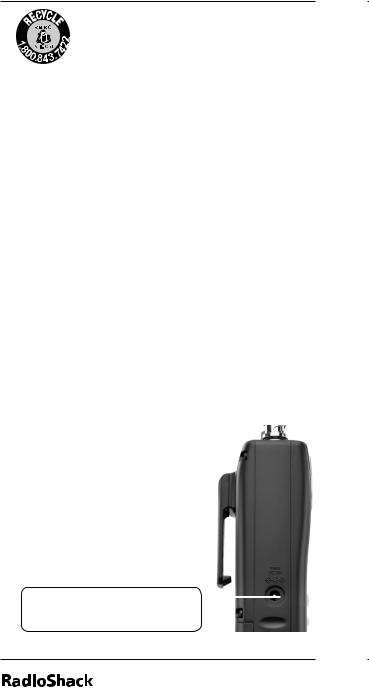
The EPA certified RBRC© Battery |
I |
|
Recycling Seal on the nickel-cadmium |
r |
|
(Ni-Cd) battery indicates RadioShack |
|
|
voluntarily participates in an industry |
|
|
program to collect and recycle these batteries |
|
|
at the end of their useful life, when taken out |
|
|
of service in the United States or Canada. |
t |
|
The RBRC program provides a convenient |
||
|
||
alternative to placing used Ni-Cd batteries into |
a |
|
the trash or the municipal waste stream, which |
||
j |
||
may be illegal in your area. Please call 1-800- |
||
s |
||
THE-SHACK (1-800-843-7422) for information |
||
a |
||
on Ni-Cd battery recycling and disposal |
||
|
||
band/restrictions in your area. RadioShack’s |
|
|
involvement in this program is part of the |
|
|
company’s commitment to preserving our |
|
|
environment and conserving our natural |
s |
|
resources. |
||
External Power |
s |
|
|
You can power your scanner using a 9V, 400mA AC/DC adaptor and size C adaptaplugTM (neither
supplied). a t
To use an external power source:
1.Always connect the adapter (not supplied) to the scanner first.
2.Plug the adapter into the power source.
3.To disconnect, unplug the adapter from the power source first.
POWER DC 9V — External power source (not included).

If you use an external power source for regular operation, install alkaline batteries for emergencies. Rechargeable batteries will self-
discharge, even when not used, and could have no usable power.
Caution: You must use a Class 2 power source that supplies 9V DC and delivers at least .
400 mA. Its center tip must be set to positive and its plug must fit the scanner’s PWR DC 9V jack. Using an adaptor that does not meet these specifications could damage the scanner or the adaptor.
Headphones and Speakers
You can plug headphones or an amplified speaker (neither included) into your scanner’s headphone jack. This automatically mutes the scanner’s speaker.
Even though some earphones/headphones let you hear some outside sounds when listening at normal volume levels, they still can present a traffic hazard.
To protect your hearing, follow these earphone or headphones guidelines:
•Do not listen at extremely high volume levels. Extended high-volume listening can lead to permanent hearing loss.
•Set the volume to the lowest setting before listening. Turn on the scanner, and adjust the volume to a comfortable level.
•After you set the volume, do not increase it. Over time, your ears adapt to the volume level, so a volume level that does not cause discomfort might still damage your hearing.


Keytones and Keylock
The scanner sounds a tone each time you press a key. To prevent accidental changes, you can lock the keypad.
To set the keytone:
1.Turn on the scanner. “Multi-system Trunking Scanner” appears.
2.While “Multi-system Trunking Scanner” appears, press 1 to turn on the keytone or 2 to turn it off.
To lock the keypad:
1.Press FUNC then KEY/LIGHT. “Key locked” appears briefly and the keypad is locked.
When locked, the only controls that operate are FUNC, LIGHT/KEY, SQ, and VOL.
2.To unlock the keypad, press FUNC then KEY/LIGHT again. “Key unlocked” appears.
Backlight and Contrast
Your scanner features a backlit keypad and display for easy viewing. You can select from three backlight modes:
Normal – Press LIGHT to activate the backlight.
Keypress – Press any key on the keypad to activate the backlight.
Ignore – Keypress mode, but the scanner ignores the function of the first key pressed to activate the backlight.
The light remains on for a set time after the last button is pressed.
s c s
10
To turn on the backlight:
1.Hold down LIGHT until the light turns on.
2.To turn off the backlight, press LIGHT.
To change the backlight mode:
1. |
Turn on the scanner. “Multi-system Trunking |
||||
|
Scanner” appears. |
|
|
||
2. |
While “Multi-system Trunking Scanner” |
||||
|
appears, press LIGHT. |
|
|
||
3. |
Press or to select a backlight mode |
||||
|
and duration (seconds). |
|
|
||
|
|
|
|
|
|
|
|
Normal |
Keypress |
Ignore |
|
|
|
|
|
|
|
|
|
3 |
K3 |
I3 |
|
|
|
|
|
|
|
|
|
5 |
K5 |
I5 |
|
|
|
|
|
|
|
|
|
10 |
K10 |
I10 |
|
|
|
|
|
|
|
|
|
20 |
K20 |
I20 |
|
|
|
|
|
|
|
4. |
Press ENT. |
|
|
|
|
To change the display contrast:
1.Press MAN.
2.Press FUNC then 9.
3.Press or to select the contrast.
4.Press ENT.
Squelch and Attenuator
The squelch and attenuator help you control your scanner’s sensitivity. If you hear a hissing sound, the scanner will remain on an active channel, even after a disconnect tone or a stopped transmission.
11

If you set the squelch precisely at the threshold where the hissing sound stops, the scanner may pick up unwanted, partial, or very weak transmissions. To prevent this, most users prefer a position a bit past the threshold.
With the attenuator on, the scanner might not receive weak signals. You can reduce interference using two attenuator modes:
•Global – (Default) The attenuator setting is applied to all channels, bands, or groups.
•Normal – Lets you set the attenuator in each channel, band, or group.
To set squelch:
1.Turn off the scanner and turn SQUELCH fully counterclockwise.
2.Turn on the scanner. You should hear a hissing sound.
3.Turn the SQUELCH clockwise to decrease the scanner’s sensitivity, turn
counterclockwise to increase its sensitivity.
To set the attenuator mode:
1.To set Global mode, press FUNC and then ATT. On the display “G” appears.”
2.To set the attenuator for each channel, press
FUNC and then ATT. On the display “G” disappears. To turn the attenuator on or off for each channel:
•On – Press ATT. “A” appears.
•Off – Press ATT again. “A” disappears.”
You cannot set the attenuator while scanning.
r c a
t
c
s c
12

Delay
Some conversations might take several seconds between transmissions. To avoid missing a reply, a delay is automatically set for each channel. The scanner stops for 2 seconds after a transmission stops before it resumes scanning or searching.
To turn the delay on / off:
1.Press ./DELAY. DLY appears if the delay is on.
2.To turn on the delay, press ./DELAY again. “dly” appears if the delay is off.
Scanner Setup
A frequency, expressed in kHz or MHz, is the tuning location of a station.
Your scanner saves frequencies to channels and groups the channels into banks. The scanner’s 10 banks each hold 100 channels (1,000 channels total).
The scanner is preset to the most common AM or FM receive modes for each frequency range. However, some amateur transmissions may operate in a different mode. If the transmission sounds weak or distorted, you may have the channel set to the wrong receive mode:
AM – Amplitude Modulation, primarily used for aircraft, military, some amateur and government transmissions.
FM – Frequency Modulation, used for most public safety transmissions,
broadcast, business, and amateur radio transmissions.
13

CT – FM transmissions with Continuous Tone Coded Squelch System (CTCSS)
DC – FM transmissions with Digital Coded Squelch (DCS)
MO – Motorola Trunking System
ED – EDACS Trunking System LT – LTR Trunking System
If you change the receive mode using MODE key, the scanner shows the receive mode for small caps (ex. fm, am, ct, or dc). If you want to change the default setting, press FUNC then press MODE.
Defining a Channel
Go to www.radioreference.com for the latest frequency references.
To define a channel: |
|
1. Press MAN. |
c |
2.Enter the bank (0-9) and channel number (00-99) where you want to store the frequency (Example: 101 for Bank 1, Channel 1).
3.Press MAN again. M and the bank and channel number appear.
4.Press PGM. M changes to P.
5.Use the number keys to enter the frequency (including the decimal point). If you make a mistake, press CL to delete a single digit or hold CL about 2 seconds to start over.
Your scanner automatically rounds to the nearest valid frequency. For example, if you enter 151.553, your scanner rounds to 151.550.
14

6.If necessary, press MODE to change the receiving mode.
7.Press ENT.
If the frequency is already stored in the bank, “Dupl.Freq. ChXXX” appears. To copy the duplicate frequency anyway, press ENT or press CL to cancel.
If you made a mistake in Step 5, “Invalid
Freq.” briefly appears and the scanner beeps when you press ENT. Go back to step 5 again.
8.Press MAN again. M and the bank and channel number appear.
For information about adding text tags to a channel or bank, see “Text Tags” on Page 44.
Copying a Frequency
When you copy a frequency, all the channel conditions, including mode, are also copied.
To copy a frequency:
1.Press TUNE.
2.Tune the frequency you want to copy.
3.If necessary, press MODE to change the receiving mode.
4.Press FUNC then ENT. “Bank 9 Store?” appears.
5.To select a new bank, press the bank number.
6.Press ENT. “Channel Stored!” appears briefly.
15

If the frequency is already stored in the bank, “Dupl.Freq. ChXXX” appears. To copy the duplicate frequency anyway, press ENT or press CL to cancel.
7. Press MAN.
Deleting Saved Frequencies
To delete a saved frequency:
1.Press MAN.
2.Use the number keys to enter the frequency’s channel number.
3.Press MAN.
4.Press PGM. M changes to P.
5.Press FUNC.
6.Press CL. “0.0000” appears.
sTo delete all saved frequencies in a bank:
1.Press PGM. M changes to P.
2.Press FUNC.
3.Use the number keys to enter the bank number.
4.Press FUNC then CL. “Clear entire bank?” appears.
5.Press 1 to clear all. Any other key aborts.
CTCSS AND DCS
CTCSS and DCS allow multiple users to share a single radio frequency without hearing each other’s transmissions. Your scanner features an advanced, DSP-based CTCSS and DCS decoder that displays CTCSS or DCS codes when available.
CTCSS, DCS, and digital voice
f
s s
a
16

transmissions operate independently of each other. Your scanner will not decode digital voice transmissions for CTCSS or DCS channels. Use FM mode for mixed analog and digital voice transmissions.
To define a channel’s CTCSS or DCS code:
1.Press PGM. M changes to P.
2.Navigate to the channel.
3.Enter a conventional frequency.
4.Press MODE until the desired mode (CT or DC) appears with the default search code value.
5.Press FUNC, then MODE.
6.Use the or to select the desired CTCSS or DCS code.
You can enter the code manually. The scanner automatically fills in the code.
See Appendix B for a list of codes.
6. Press ENT.
To save a CTCSS or DCS code:
Press ENT while the code appears.
Scanner Cloning
You can transfer the programmed data to and from another PRO-164 (or PRO-163) scanner using a connecting cable which has 1/8-inch stereo (TRS) phone plugs on both ends (not supplied).
You can also upload or download the programmed data to or from a PC using an optional USB cable and application software available through your local RadioShack store.
17
The application software is also available online at www.starrsoft.com and www.scancat.com.
To clone the scanner data:
1. Turn on both scanners.
PC/IF — PC interface cable for use with your computer.
2.Connect the connecting cable to each scanner’s PC/IF jack. ** CLONE MODE ** appears.
3.Press . “Confirm to send data?” appears.
4.Press 1 to send the data to the other unit or press any other key to cancel.
5.To exit the clone mode, remove the cable.
“CLONE MODE Incorrect Model” appears if you connect a scanner other than a PRO-164 (or PRO-163).
Searching
You can search for transmissions using the preprogrammed search bank, which is divided into eight search bands.
Seek Search
When Seek Search is active, the scanner stops on active frequencies for five seconds and then resumes searching automatically.
To activate Seek Search:
1.Press FUNC then 7. “Seek Search ON” appears briefly and “S” appears on the
18

display.
2.To turn off Seek Search, press FUNC then 7 again. “Seek Search OFF” appears briefly.
Search Banks
To search preprogrammed search banks:
1. Press SRCH repeatedly to select a bank.
Bank |
Band |
|
|
SR0 |
Marine |
|
|
SR1 |
CB |
|
|
SR2 |
FRS/GMRS/MURS |
|
|
SR3 |
Public Safety |
|
|
SR4 |
Aircraft |
|
|
SR5 |
Amateur Bands |
|
|
SR6 |
Railroad |
|
|
SR7 |
Limit search (User changeable) |
|
|
For SR0-SR2, you can directly select a channel or search through the band.
SR3 to SR5 banks contain several groups. To turn off a group, press the group number; the group number disappears. To turn the group back on, press the group number again.
2.Adjust the Squelch. After the set delay, the scanner starts searching. When the scanner finds an active frequency, it stops searching.
3.To pause while searching, press PSE. The scanner stops searching and *** PAUSED
***appears. To resume, press PSE again.
4. If the scanner stops on an unwanted frequency, you can press L/OUT to lock out the frequency.
19

To search banks SR0-SR2:
1.Press SRCH repeatedly to select SR0, SR1, or SR2.
2.To search the entire band, press FUNC then SRCH. “MAN” (Manual select) or “SRCH” (searches through the band) appears. The scanner starts searching while “SRCH” appears on the display. When the scanner finds an active frequency, it stops searching.
Press FUNC then SRCH again to return to the previous mode.
3.To select a channel while “MAN” appears on the display, press a channel number or use or .
4.Adjust the Squelch.
5. If the scanner stops on an unwanted frequency, you can press L/OUT to lock out the frequency. For more information, see Locking Out Frequencies....
6.To pause while searching, press PSE. The scanner stops searching and *** PAUSED
***appears. To resume, press PSE again.
Zeromatic
While searching, the scanner stops if a transmission triggers the squelch setting. A narrow-band FM transmission can have a deviation of +/- 5 Khz, and the actual total bandwidth, including the tails of the sidebands, can be even greater. However, search intervals smaller than that can stop your scanner short of the correct (center) frequency.
The Zeromatic function allows the scanner to find the correct center frequency for search banks SR3, SR4, SR5, SR6 and SR7. When active, Zeromatic automatically tunes to the
f t
r
f
20
frequency that is the closest step increment to the correct center frequency.
To activate Zeromatic:
1.Press FUNC then 0. “Zeromatic ON.” appears briefly, then ZM appears.
2.To turn Zeromatic off, press FUNC then 0 again. “ZM” changes to “zm.”
.
Programming a Search Range
To program the search range of Bank SR7:
1.Repeatedly press SRCH to select SR7.
2.Press PGM then SRCH. “Enter SR7 Search Range Limits” appears. L blinks for the lower-limit of the range.
3.Use the number keys to enter the lower-limit frequency (including the decimal point).
4.Press ENT. U appears.
5.Use the number keys to enter the upperlimit frequency (including the decimal point), then press ENT.
If either entered frequency is incorrect,
“Invalid Freq” appears briefly.
6.Press SRCH to start searching.
7.Adjust the Squelch. After the set delay, the scanner starts searching. When the scanner finds an active frequency, it stops searching.
Signal Stalker II
Signal Stalker II provides a powerful tool to rapidly detect, monitor and save frequencies of nearby or high-power transmissions. Signal Stalker II resembles more expensive portable frequency counters, but provides many
21
 Loading...