


20-106/20-197 |
PRO-106/PRO-197
Digital Trunking
Radio Scanner
V-Scanner
Preprogrammed
Data
The Preprogrammed Data is Copyright 2008 RadioReference.com LLC and is used with permission.

Contents |
|
Introduction................................................. |
3 |
Important Copyright Notice ....................... |
3 |
About the Preprogrammed Data ............... |
3 |
Receiving More Traffic on a Trunked Radio |
|
System........................................................... |
5 |
About Talkgroup Names ............................. |
6 |
Using the Preprogrammed Data................. |
7 |
Monitoring Networked Motorola and P25 |
|
Systems....................................................... |
10 |
Monitoring Networked EDACS Systems . 11 |
|
Preprogrammed Data Directory ............... |
13 |
VS 1 – National Capital Region, DC-MD-VA14 |
|
VS 2 – North Florida .............................. |
16 |
VS 3 – South Florida .............................. |
18 |
VS 4 – Virginia Other ............................. |
20 |
VS 5 – California Desert......................... |
22 |
VS 6 – California Other .......................... |
24 |
VS 7 – WA, OR, NV and UT ................... |
26 |
VS 8 – AZ, NM, CO, KS, OK .................. |
28 |
VS 9 – North Texas................................. |
30 |
VS 10 – South Texas, Louisiana ............. |
32 |
VS 11 – MS, AL, AR ................................ |
34 |
VS 12 – TN, GA, MO.............................. |
36 |
VS 13 – WI, IL.......................................... |
38 |
VS 14 – MI, IN......................................... |
40 |
VS 15 – North Ohio, PA ......................... |
42 |
VS 16 – South Ohio................................ |
44 |
VS 17 – DE, MD, Shore, NJ Shore ........ |
46 |
VS 18 – North New Jersey, New Yoke .. |
48 |
VS 19 – KY, NC, SC................................. |
50 |
VS 20 – CT, MA, NH, ME ....................... |
52 |

 Introduction
Introduction
Important Copyright Notice
The preprogrammed trunked radio system data contained within your Advanced Digital Scanner was provided by RadioReference.com LLC and is subject to copyright. We ask that you respect this copyright by adhering to the following guidelines:
•The preprogrammed data is intended for your personal use only.
•You may transfer the contents of the preprogrammed data to a personal computer that you own for the purpose of archiving the data for later use.
•Do not post the information contained in the preprogrammed data on web sites.
•Do not convert the preprogrammed data into formats for use with other scanning receivers.
About the Preprogrammed Data
Your RadioShack PRO-106/PRO-197 Digital Trunking Radio Scanner features 21 “V-Scanner” folders used for storing special non-volatile memory within the scanner. V-Scanner makes it possible to store and recall complete scanner configuration data. 20 of these folders (1-20) are intended for use as folder storage locations. One location (00) is intended for use as a temporary storage location, or scratchpad, so you can easily move V-Scanner data around in the scanner. For more information on V-Scanner operations, refer to the “V-Scanner Storage” section of your User’s Guide.
2 |
3 |
 Introduction


 Introduction

For your convenience, the 20 V-Scanner folder storage locations (01-20) are preprogrammed with the frequencies, talkgroups, and configuration data for approximately 350 trunked radio systems in the United States. The scanner’s working memory and V-Scanner folder “00” are not preprogrammed with any data.
Each V-Scanner folder can hold up to 1800 “scannable objects,” grouped in up to 20 Scan Lists. Each V-Scanner folder can contain approximately 20 individual trunked radio systems, or sites within networked systems, leaving room to spare for your own custom programming.
The preprogrammed data in your scanner contains the top public safety trunked radio systems in the United States, those that are most likely to carry local radio traffic that is of interest to many users. Non-public safety systems, airport systems, transit systems, federal systems, military systems, and large statewide trunked radio networks are not included in the preprogrammed data.
The preprogrammed data contains the talkgroups that are used for day-to-day public safety dispatch, response, and operations activities. Administrative talkgroups and talkgroups unrelated to public safety are not included in the preprogrammed data.
RadioShack acknowledges RadioReference.com, LLC for providing this trunked radio system configuration data. For more information
on conventional and trunked radio systems worldwide, please visit: www.radioreference.com.
Note: The accuracy of the preprogrammed talkgroup and system configuration data is subject to system configuration changes and possible errors in the user-submitted data reported to RadioReference.com. For accurate and up-do-date information, be sure to visit www.radioreference.com frequently.
Receiving More Traffic on a Trunked Radio System
It is not possible to include every trunked radio system and talkgroup in the United States in the preprogrammed data. If the systems in your area are not present, you may find it useful to visit www.radioreference.com to find your local system so that you can add it to the radio’s
programming. You can also program a “wildcard” talkgroup that will allow you to hear all activity on the trunked radio systems that you monitor.
The easiest way to add a wildcard talkgroup is to duplicate a talkgroup that is already programmed for the system, change the pertinent data for that talkgroup (in this case, the ID and the Tag), then save the duplicated (and changed) talkgroup as a new object.
1.Press PGM (PROG), then use the S T W X keys to navigate to any talkgroup on the system where you wish to add a talkgroup or wildcard.
2.Press the EDIT softkey, then press the DUPE softkey. A duplicate of the selected object is created in memory.
3.Scroll to the ID: field and press the Dflt softkey, which will set the ID field to
“Wildcard.”
4 |
5 |
 Introduction


 Introduction

4.Scroll the Tag: field and press the X key. Enter a new name for your duplicated object using the text entry method described in “Appendix C” of your User’s Guide. Press ENT or the Done softkey when you are finished.
5.Press the Save softkey to save your work. You now have a new object that has all of the attributes of the object you first duplicated, except for the changes that you made before saving.
The DUPE feature may also be used to add specific talkgroups to the preprogrammed data. For more information on the DUPE feature, refer to the “Duplicate (DUPE)” section of your User’s Guide.
About Talkgroup Names
The RadioReference database includes two fields that are used for naming talkgroups. The “Display” field is an abbreviated talkgroup name designed to fit into radio displays. The “Description” field is a longer text description of the talkgroup.
Your scanner is capable of displaying a maximum of 16 characters for the talkgroup name. If the RadioReference database included “Display” data for a talkgroup, we utilized it. However, if a talkgroup has no “Display” data associated with it, we used the contents of the “Description” field, which may not fit into the display space available on your scanner’s LCD display.
Using the Preprogrammed Data
There are four basic steps that are required in order for you to use the preprogrammed data in your scanner.
1.Examine the “Preprogrammed Data Directory” to see if your system is included.
2.Identify the V-Scanner folder that contains the desired system.
3.Load the appropriate V-Scanner folder into your scanner’s working memory.
4.Enable or disable Scan Lists as needed to select the system or systems that you wish to monitor.
Before proceeding, you may want to save the contents of the scanner’s working memory, which otherwise will be erased when you load a V-Scanner folder. Skip this section if you do not need to save the working memory.
To save the contents of your working memory:
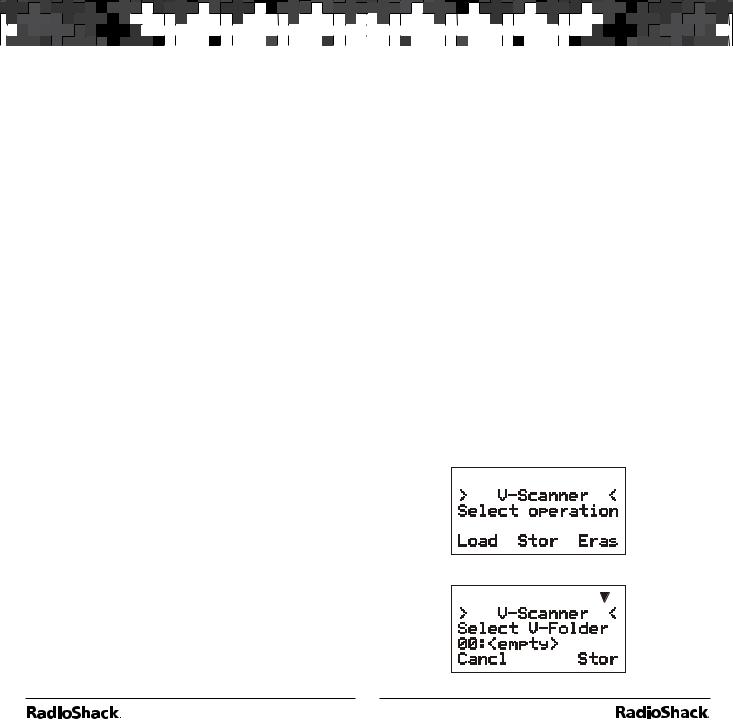
1.Press FUNC PGM (PROG). The scanner will display the V-Scanner menu:
2.Press the Stor softkey. The scanner will display:
6 |
7 |

 Introduction


 Using the Preprogrammed Data

3.V-Scanner folder 00 should already be selected by default, or use the S T keys to scroll to the desired location. You can save your work to an empty folder or overwrite the contents of a programmed folder.
4.Press the Stor softkey. If the folder is not empty, you are prompted to confirm the operation, which will erase the current V-Scanner folder contents. Press YES to confirm and overwrite, or NO to cancel. The scanner will display:
5.Enter a name for the V-Scanner using the Standard Text Entry Method and press OK. The scanner displays the following screen while storing the contents of working memory to the selected V-Folder:
6.Press the Cancl softkey to return to the main V-Scanner menu.
To Load a V-Scanner folder into Working Memory:
1.Press FUNC PGM (PROG) to open the V-Scanner menu.
2.Press the Load softkey.
3.Use the S T keys to select the V-Scanner folder for your location.
4.Press the Load softkey.
5.The scanner will prompt you with a warning:
“Really overwrite main memory?” Press
the YES softkey to proceed, or press NO if you don’t want to erase your working memory contents. (See the previous section if you need to save your working memory.)
6.After pressing the YES softkey, the scanner loads the V-Folder (example shows Folder #3 for South Florida):
7.After the loading operation is complete, press the SCAN key. The scanner will reboot and begin scanning.
8.While the radio is scanning, turn off the Scan Lists except the one for your area. Use the
1 – 0 keys to toggle Scan lists 1-10 on and off, and FUNC 1 – FUNC 0 to toggle Scan Lists 11-20 on and off. If your were to turn off all but Scan List 5, the display would appear as follows while scanning:
8 |
9 |

 Using the Preprogrammed Data


 Using the Preprogrammed Data

Monitoring Networked Motorola and P25
Systems
Some of the systems that are preprogrammed in your scanner are networked, multi-site Motorola systems, such as Smartzone, OmniLink, and networked P25 systems. These systems are designed to cover very large areas by using multiple networked transmitter sites, each with its own set of frequencies.
Your Advanced Digital Scanner includes a Multisite feature that can enhance the operation of the scanner when monitoring Multi-site systems. Multi-site can be enabled by editing the trunking system (TSYS) parameters for the system. Multisite can be set to Off, Stat (Stationary), or Roam. By default, Multi-site is set to Off.
To activate Multi-site mode on a preprogrammed Motorola or P25 networked system:
1.Press PGM (PROG), then navigate to a talkgroup on the networked multi-site system using the S T W X keys.
2.Press the EDIT softkey, then press the CURR softkey.
3.Scroll down to the TSYS item and press the SEL key to edit the TSYS parameters.
4.Scroll to Multi-site. Use the W X keys to select Off, Stat, or Roam. When set to Off, the scanner will find the first usable control channel in the control channel list and use
it until it is no longer usable. When set to Stat, the scanner will track the system using any control channel in the list that is usable. When set to Roam, the scanner will attempt
to locate and use the best possible control channel and ignore others, until the control channel is no longer usable, then it will locate a new “best control channel” to use. Roam decisions are made using the Threshold
Hi and Threshold Lo settings. For more information on Multi-site, please see “MultiSite Mode On Networked Systems” in your User’s Guide.
5.Press the SAVE softkey to save your changes to the TSYS parameters, then press the SAVE softkey again to use the scanner.
6.You should experiment with different Multisite modes and threshold settings to find a combination that works best for your location. Keep in mind that the threshold settings
are only available when Multi-site Roam is selected.
7.Multi-site functionality is not available in
EDACS or LTR trunking.
Monitoring Networked EDACS Systems
Some of the systems that are preprogrammed in your scanner are networked, multi-site EDACS networks. Like Motorola and P25 networked systems, these EDACS systems are designed
to cover very large areas by using multiple networked transmitter sites, each with its own set of frequencies.
EDACS trunking is quite different from Motorola and P25 trunking. With Motorola and P25 trunking, the subscriber radios on the system (and your scanner) get all of the system channel frequency information from the control channel, which simplifies wide-area networked system scanning. In EDACS, it is necessary to program
10 |
11 |

 Using the Preprogrammed Data


 Using the Preprogrammed Data

every frequency for each site in the network as a separate trunked radio system.
You will find that networked EDACS systems are configured in the preprogrammed data in one of three different ways, depending on the space available in the V-Scanner where the networked EDACS system can be found, and depending on the type of system and size of the jurisdiction where it is deployed. The “Preprogrammed Data Directory” lists these as Methods 1, 2, and 3.
Where a networked EDACS system has been configured using Method 1, we have assigned individual sites to individual Scan Lists. By turning all of the Scan Lists on (for every site in the networked EDACS system), you should be able to achieve a sort of “Roaming” functionality, as described above in the section above regarding Motorola and P25 Multi-site systems. You can toggle the scan lists on and off to exclude certain sites in the network from scan operation.
Where a networked EDACS system has been configured using Method 2, we have assigned one or more sites to the same Scan Lists. Typically, these sites will be located in rural areas, and the scanner should find and use the best site in the group for scanning. If necessary, you can lock out the TSYS objects associated with systems that you do not want to scanner to monitor.
Where a networked EDACS system has been configured using Method 3, we have assigned all of the sites in the network to the same Scan List. The scanner should find and use the best site in the group for scanning. If necessary, you can lock out the TSYS objects associated with systems that you do not want to scanner to try and monitor.
Preprogrammed Data Directory
The following pages provide a directory of the preprogrammed contents of the V-Scanner folders as shipped from the factory. The columns are defined as follows:
RR System |
The System Name as listed on |
Name |
RadioReference.com |
|
|
VS Name |
Name of the V-Scanner file |
|
|
VS |
The V-Scanner number where the |
|
system can be found |
|
|
SL |
The Scan List number that the |
|
system is assigned to |
|
|
System |
The system name as displayed by |
Name |
the radio |
|
|
State |
The state where the system is |
|
located |
|
|
User Type |
State wide, County, City, or |
|
Regional (Regional = more than |
|
one city or County) |
|
|
System |
Motorola: an analog or mixed |
Type |
mode Motorola system using a |
|
3600 baud control channel |
|
|
|
Project 25: Any APCO Project 25 |
|
system |
|
|
|
EDACS W: EDACS Wide (9600CC) |
|
|
|
EDACS N: EDACS Narrow (4800CC) |
|
|
|
Net EDACS W/N 1, 2, or 3: A |
|
networked EDACS system stored |
|
using Method 1, 2, or 3 (see the |
|
“Monitoring Networked EDACS Systems” |
|
section above) |
|
|
|
LTR: a Logic Trunked Radio (LTR) |
|
system |
|
|
12 |
13 |
|
|
VS 1 – National Capital Region, DC-MD-VA |
|
|
|
|
|
|
||
|
|
|
|
|
|
|
|
|
|
|
|
|
RR System Name |
VS Name |
|
VS |
SL |
System Name |
State |
User Type |
System Type |
|
|
|
|
|
|
|
|
|
|
|
|
|
Washington DC 800 |
NCR-DC-MD-VA |
|
1 |
1 |
DCFD800 |
DC |
City |
Motorola |
|
|
|
|
|
|
|
|
|
|
|
|
|
Washington DC UHF |
NCR-DC-MD-VA |
|
1 |
2 |
DCMPDUHF |
DC |
City |
Motorola |
|
|
|
|
|
|
|
|
|
|
|
|
|
Anne Arundel Co. |
NCR-DC-MD-VA |
|
1 |
3 |
Anne Arundel |
MD |
County |
Motorola |
|
|
|
|
|
|
|
|
|
|
|
|
|
Baltimore City |
NCR-DC-MD-VA |
|
1 |
4 |
BaltCity |
MD |
City |
Motorola |
|
|
|
|
|
|
|
|
|
|
|
14 |
|
Baltimore Co. Public Safety |
NCR-DC-MD-VA |
|
1 |
5 |
BaltCounty |
MD |
County |
Motorola |
|
|
|
|
|
|
|
|
|
|
|
|
Calvert Co. |
NCR-DC-MD-VA |
|
1 |
6 |
Calvert |
MD |
County |
Motorola |
|
|
|
|
|
|
|
|
|
|
|
|
|
|
Carroll Co. |
NCR-DC-MD-VA |
|
1 |
7 |
Carroll |
MD |
County |
Motorola |
|
|
|
|
|
|
|
|
|
|
|
|
|
Charles Co. |
NCR-DC-MD-VA |
|
1 |
8 |
Charles |
MD |
County |
Motorola |
|
|
|
|
|
|
|
|
|
|
|
|
|
Frederick Co. |
NCR-DC-MD-VA |
|
1 |
9 |
Frederick |
MD |
County |
Motorola |
|
|
|
|
|
|
|
|
|
|
|
|
|
Harford Co. |
NCR-DC-MD-VA |
|
1 |
10 |
Harford |
MD |
County |
Motorola |
|
|
|
|
|
|
|
|
|
|
|
|
|
Howard Co. |
NCR-DC-MD-VA |
|
1 |
11 |
Howard |
MD |
County |
Motorola |
|
|
|
|
|
|
|
|
|
|
|
|
|
Montgomery Co. |
NCR-DC-MD-VA |
|
1 |
12 |
Montgomery |
MD |
County |
Motorola |
|
|
|
|
|
|
|
|
|
|
|
|
|
Alexandria |
NCR-DC-MD-VA |
|
1 |
13 |
Alexandria |
VA |
City |
Motorola |
|
|
|
|
|
|
|
|
|
|
|
|
|
|
|
|
|
|
|
|
|
|
Arlington Co. |
NCR-DC-MD-VA |
1 |
14 |
Arlington |
VA |
County |
Motorola |
|
|
|
|
|
|
|
|
Fairfax Co. Public Safety |
NCR-DC-MD-VA |
1 |
15 |
FairfaxSafety |
VA |
County |
Motorola |
|
|
|
|
|
|
|
|
Fauquier Co./Culpeper Co. |
NCR-DC-MD-VA |
1 |
16 |
FauquierCulpeper |
VA |
Regional |
Motorola |
|
|
|
|
|
|
|
|
Loudoun Co. |
NCR-DC-MD-VA |
1 |
17 |
Loudoun |
VA |
County |
Motorola |
|
|
|
|
|
|
|
|
Manassas/Manassas Park |
NCR-DC-MD-VA |
1 |
18 |
Manassas |
VA |
City |
Motorola |
|
|
|
|
|
|
|
|
Prince William Co. |
NCR-DC-MD-VA |
1 |
19 |
PrinceWilliam |
VA |
County |
Motorola |
|
|
|
|
|
|
|
|
Spotsylvania Co. |
NCR-DC-MD-VA |
1 |
20 |
Spotsylvania |
VA |
County |
EDACS W |
|
|
|
|
|
|
|
|
15

 VA-MD-DC Region, Capital National – 1 VS

|
|
VS 2 – North Florida |
|
|
|
|
|
|
|
|
|
|
|
|
|
|
|
|
|
|
|
RR System Name |
VS Name |
VS |
SL |
System Name |
State |
User Type |
System Type |
|
|
|
|
|
|
|
|
|
|
|
|
Bay Co. |
FL North |
2 |
1 |
Bay |
FL |
County |
Motorola |
|
|
|
|
|
|
|
|
|
|
|
|
Citrus Co. |
FL North |
2 |
2 |
Citrus |
FL |
County |
Motorola |
|
|
|
|
|
|
|
|
|
|
|
|
Clearwater |
FL North |
2 |
3 |
Clearwater |
FL |
City |
EDACS W |
|
|
|
|
|
|
|
|
|
|
|
|
Gainesville/Alachua Co. |
FL North |
2 |
4 |
GainesvlAlachua |
FL |
Regional |
Motorola |
|
|
|
|
|
|
|
|
|
|
16 |
|
Hernando Co. |
FL North |
2 |
5 |
Hernando |
FL |
County |
Motorola |
|
|
|
|
|
|
|
|
|
|
|
Hillsborough Co. |
FL North |
2 |
6 |
HillsboroughEast |
FL |
County |
Net EDACS W 1 |
|
|
|
|
|
|
|
|
|
|
|
|
|
Hillsborough Co. |
FL North |
2 |
7 |
HillsboroughWest |
FL |
County |
Net EDACS W 1 |
|
|
|
|
|
|
|
|
|
|
|
|
Jacksonville City Public Safety |
FL North |
2 |
8 |
Jacksonville |
FL |
City |
Motorola |
|
|
-First Coast Radio |
|||||||
|
|
|
|
|
|
|
|
|
|
|
|
|
|
|
|
|
|
|
|
|
|
Manatee Co. |
FL North |
2 |
9 |
ManateeEast |
FL |
County |
Net EDACS W 1 |
|
|
|
|
|
|
|
|
|
|
|
|
Manatee Co. |
FL North |
2 |
10 |
ManateeWest |
FL |
County |
Net EDACS W 1 |
|
|
|
|
|
|
|
|
|
|
|
|
Orlando/Orange Co. |
FL North |
2 |
11 |
Orlando-Orange |
FL |
Regional |
Motorola |
|
|
|
|
|
|
|
|
|
|
|
|
Osceola Co. |
FL North |
2 |
12 |
Osceola |
FL |
County |
Motorola |
|
|
|
|
|
|
|
|
|
|
|
|
|
|
|
|
|
|
|
|
|
|
|
|
|
|
|
|
|
|
|
|
Pasco Co. |
FL North |
2 |
13 |
Pasco |
FL |
County |
EDACS W |
|
|
|
|
|
|
|
|
|
|
|
|
Pinellas Co. |
FL North |
2 |
14 |
Pinellas |
FL |
County |
Motorola |
|
|
|
|
|
|
|
|
|
|
|
|
Sarasota Co. Public Safety |
FL North |
2 |
15 |
Sarasota |
FL |
County |
Motorola |
|
|
|
|
|
|
|
|
|
|
|
|
Seminole Co. |
FL North |
2 |
16 |
Seminole |
FL |
County |
Motorola |
|
|
|
|
|
|
|
|
|
|
|
|
Tallahassee/Leon Co. |
FL North |
2 |
17 |
TallahasseeLeon |
FL |
Regional |
Motorola |
|
|
|
|
|
|
|
|
|
|
|
|
Volusia Co. Public Safety |
FL North |
2 |
18 |
Volusia1 |
FL |
County |
Net EDACS W 1 |
|
|
|
|
|
|
|
|
|
|
|
|
Volusia Co. Public Safety |
FL North |
2 |
19 |
Volusia2 |
FL |
County |
Net EDACS W 1 |
|
|
|
|
|
|
|
|
|
|
17 |
|
Volusia Co. Public Safety |
FL North |
2 |
20 |
Volusia3 |
FL |
County |
Net EDACS W 1 |
|
|
|
|
|
|
|
|
|
|
|
|
|
|
|
|
|
|
|
|
|
|
|
|
|
|
|
|
|
|

 Florida North – 2 VS
 Loading...