


 Loading...
2000652 / PRO-652
User’s Guide
Desktop/MOBILE Radio
Scanner
Thank you for purchasing your Desktop/Mobile Radio Scanner from RadioShack. Please read this user’s guide before setting up and using your new scanner.
This user’s guide is available in Spanish at www.radioshack.com.
Esta guía del usuario está disponible en español en www.radioshack.com.
www.radioshack.com

Contents |
|
Introduction .......................................... |
4 |
What is Object Oriented Scanning? ................... |
4 |
Features ............................................................ |
5 |
Package Contents ............................................. |
5 |
Scanning Legally ............................................... |
6 |
FCC Statement ................................................. |
7 |
Setup ..................................................... |
8 |
Antenna ........................................................... |
8 |
External Antenna ............................................. |
9 |
Desktop Operation ......................................... |
10 |
Mount Installation ........................................... |
10 |
Headphones and Speakers ............................. |
11 |
Listening Safely ............................................... |
11 |
AC Adapter ..................................................... |
12 |
DC Power Cable ............................................. |
13 |
Understanding the Keypad ............................ |
14 |
Turning on the Scanner .................................. |
16 |
Understanding the Display Icons .................... |
17 |
Programming ...................................... |
18 |
Programming Cables ...................................... |
18 |
RadioReference.com ........................... |
19 |
Scanner Cloning ............................................. |
20 |
Text Entry ........................................................ |
22 |
Scanning ............................................. |
24 |
Objects and Scan Lists ................................... |
24 |
Monitoring ..................................................... |
26 |
Scanning ........................................................ |
28 |
Priority Scan ................................................... |
30 |
Favorites Scan List .......................................... |
31 |
Object Lockout .............................................. |
32 |
Multi-Site Mode (Motorola and P25) ............. |
34 |
Home Repeater AutoMove (LTR) ................... |
35 |
Searching ............................................ |
36 |
Limit Search Object (LMIT) ............................ |
38 |
Service Search Object (SRVC) ........................ |
40 |
Signal Stalker II Object (STLK) ....................... |
42 |
Weather Features ................................ |
44 |
SAME Standby .............................................. |
44 |
Configuring ......................................... |
47 |
Using V-Scanner Storage ............................... |
50 |
Initializing Global Settings ............................. |
52 |
Initializing to Factory Defaults ........................ |
53 |
Configuration Shortcuts ................................. |
54 |
Manual Programming Guide ............... |
55 |
Conventional Objects (CONV) ....................... |
56 |
Trunking System (TSYS) Object ...................... |
58 |
Talkgroup (TGRP) Object ............................... |
60 |
Duplicating Objects ....................................... |
62 |
No Scan List ................................................... |
62 |
Deleting Objects ............................................ |
63 |
Memory Usage ............................................... |
63 |
Hit Counter .................................................... |
64 |
Specifications ...................................... |
65 |
Maintenance ....................................... |
69 |
Birdie Frequencies ......................................... |
69 |
Limited Warranty ........................................... |
70 |
2 |
3 |

Introduction
Scanning technology has changed dramatically over the years. The Pro-652 scanner with Object Oriented User Interface is designed to help the hobbyist build a collection of channels to scan:
•Start small and expand
•Organize channels and talkgroups
•Remove unwanted channels and talkgroups
What is Object Oriented Scanning?
Programming scanning receivers can be challenging, but object-oriented programming simplifies the process by using common conventions for scanning concepts that have common characteristics.
A Scannable Object is any defined item that can be scanned or monitored, including:
•Conventional, non-trunked radio frequencies
•Talkgroups used on a trunked radio system
•Radio services
•Defined searches
Because scannable objects are defined by the same basic elements, the Object Oriented User Interface (OOUI) is designed to simplify scanning by managing all scannable objects similarly. When you learn how to program one type of object, you can program other types of scannable objects as well.
Features
•Intuitive Object Oriented User Interface
•Context Sensitive Help
•Scan List
•V-Scanner Technology - Save complete backup radio configurations, up to 21 versions.
•SKYWARN™ Storm Spotter Function
•SAME and All Hazards Weather Alerting
•Multi-System Trunking
•Exclusive Automatic Adaptive Digital Tracking - Adapts to multipath or fading for P25 digital systems
•Exclusive Digital AGC
•LTR Home Repeater AutoMove
•Subaudible Squelch Decoder
•Signal Stalker II – Advanced feature for finding active frequencies.
•Zeromatic – Enhances the scanner’s ability to lock on to the actual center frequency of a search hit instead of an adjacent frequency.
•P25 NAC Functionality
•Alert LED and Audible alarms
•High Speed USB PC Interface
•Real-time Signal Strength Indicator
•Upgradeable CPU and DSP Firmware
Package Contents
•Screws (2)
•Mounting bracket
•DIN sleeve
•Keys (2)
•Rubber washers (2)
•Lock washers (2)
•Rubber feet (5)
•Knobs (2)
•AC adapter
•Antenna
•DC cable with fuse
•User’s Guide
4 |
5 |

Scanning Legally
Your scanner covers frequencies used by many different groups including police and fire departments, ambulance services, government
agencies, private companies, amateur radio services, military operations, pager services, and wireline (telephone and telegraph) service providers. It is legal to listen to almost every transmission your scanner can receive. However, there are some transmissions you should never intentionally listen to.
These include:
•Telephone conversations (cellular, cordless, or other means of private telephone signal transmission)
•Paging transmissions
•Any intentionally decoded scrambled or encrypted transmissions
According to the Electronic Communications Privacy Act (ECPA), you are subject to fines and possible imprisonment for intentionally listening to, using, or divulging the contents of such a transmission unless you have the consent of a party to the communication (unless such activity is otherwise illegal). This scanner has been designed to prevent reception of illegal transmissions. This is done to comply with the legal requirement that scanners be manufactured so as to not be easily modifiable to pick up those transmissions. Do not
open your scanner’s case to make any modifications that could allow it to pick up transmissions that are illegal to monitor. Doing so could subject you to legal penalties. We encourage responsible, legal scanner use. In some areas, mobile use of this scanner is unlawful or requires a permit. Check the laws in your area. It is also illegal in many areas to interfere with the duties of public safety officials by traveling to the scene of an incident without authorization.
FCC Statement
This equipment has been tested and found to comply with the limits for a scanning receiver, pursuant to Part 15 of the FCC Rules. These limits are designed to provide reasonable protection against harmful interference in a residential installation. This equipment generates, uses
and can radiate radio frequency energy and, if not installed and used in accordance with the instructions, may cause harmful interference to radio communications. However, there is no guarantee that interference will not occur in a
particular installation. If this equipment does cause harmful interference to radio or television reception, which can be determined by turning the equipment off and on, the user is encouraged to try to correct the interference by one or more of the following measures:
•Reorient or relocate the receiving antenna.
•Increase the separation between the equipment and receiver.
•Connect the equipment into an outlet on a circuit different from that to which the receiver is connected.
This device complies with Part 15 of the FCC Rules. Operation is subject to the following two conditions:
1.) This device may not cause harmful interference.
2.) This device must accept any interference received, including interference that may cause undesired operation.
6 |
7 |

Setup
Antenna
You scanner's antenna connects easily, or you can use a variety of antennas, such as an external mobile antenna or outdoor base station antenna.
To connect an external antenna, follow the installation instructions supplied with the antenna. Always use 50-ohm coaxial cable, such as RG-58 or RG-8 low-loss dielectric coaxial cable. You may also need a BNC adapter.
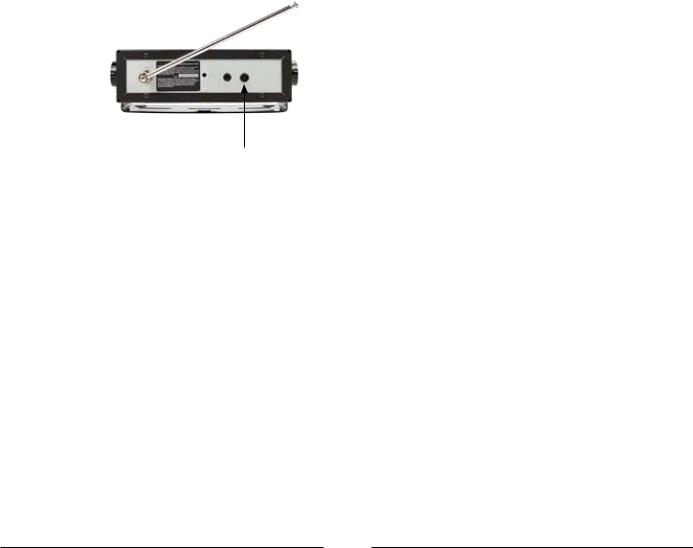
To connect the included antenna:
1.Align the slots.
2.Rotate connector.
Your scanner’s frequency sensitivity depends on its location and the antenna length. For best reception, adjust the antenna’s length as follows:
FREQUNCY |
ANTENNA LENGTH |
|
|
25-54 MHz |
Extend fully |
|
|
108-174 MHz |
Extend 4 segments |
|
|
216-225 MHz |
Extend 3 segments |
|
|
225-406 MHz |
Extend 2 segments |
|
|
406-1300 MHz |
Collapse fully |
|
|
WARNING: Use extreme caution when installing or removing an outdoor antenna. If the antenna starts to fall, let it go! It could contact overhead power lines. If the antenna touches a power line, touching the antenna, mast, cable, or guy wires can cause electrocution and death. Call the power company to remove the antenna. DO NOT attempt to do so yourself.
WARNING: Outdoor antennas must be properly grounded to prevent static buildup and lightning damage. Article 810 of the National Electrical Code, ANSI/NFPA 70, provides information about proper grounding of the antenna mast, connection of coaxial cable to an lightning arrestor, size of grounding conductors, location of the lightning
arrestor and connection of grounding conductors to grounding electrodes.
Additionally, disconnect your radio from the outdoor antenna during electrical storm activity to prevent damage. The diagram below provides an example of a proper antenna grounding system.
8 |
9 |

Desktop Operation
The mounting bracket works as a desktop stand when attached underneath the radio. Use the provided rubber feet to prevent sliding or scratching. Do not use the rubber feet if mounting permanently to a fixed surface. Extra pads are provided for additional stability.
1.Attach the adhesive rubber feet to the mounting bracket.
2.Attach the two adhesive rubber washers over the mounting holes, between the mounting bracket sides and the scanner’s side holes.
3.Position the bracket with the two recessed fee toward the front of the scanner.
4.Use the two provided knobs to secure the scanner within the mounting bracket.
Mount Installation
Attach the bracket over the radio to suspend the scanner from above. Attach the bracket underneath the scanner to mount it on top of a flat surface. Your PRO-652 also fits into the included DIN-E compatible sleeve for existing dashboard openings.
NOTE: In some cases, installation requires specialized tools and skills. If in doubt, seek assistance from a local car audio electronics installation shop, or a local two-way radio dealer.
Select a location that does not interfere with driving or with the deployment of your vehicle’s air bags. Do not mount this or any other equipment where deployment of the air bags might cause it to be propelled towards passengers. If necessary, seek advice from your automotive dealer or service shop.
10
Use the mounting bracket as a template to mark the locations for the two mounting screws.
Drill holes that are slightly smaller than the screws. Use caution not to damage wiring or components that are located behind the mounting surface.
Using the provided screws and lock washers, attach the mounting bracket to your vehicle.
Headphones and Speakers
You can plug headphones (not supplied) or an amplified speaker (not supplied) with a 1/8-inch (3.5 mm) mini-plug earphone or in the headphone jack on top of your scanner. This automatically disconnects the internal speaker.
NOTE: Use an amplified speaker with this scanner; Non-amplified speakers do not provide sufficient volume for comfortable listening.
Listening Safely
To protect your hearing, follow these guidelines when you use headphones:
Set the volume to zero before putting on headphones. With the headphones on, adjust the volume to a comfortable level.
Avoid increasing the volume after you set it. Over time, your sensitivity to a volume level decreases, so volume levels that do not cause discomfort might damage your hearing.
Avoid or limit listening at high-volume levels. Prolonged exposure to high-volume levels can cause permanent hearing loss.
Wearing headphones while operating a motor vehicle can create a traffic hazard and is illegal in most areas. Even though some headphones let you hear some outside sounds when listening at normal volume levels, they still can present a traffic hazard. Exercise extreme caution!
11
AC Adapter
You must use a power source that supplies 12-14.4 VDC and is rated for 600 mA. Its center tip must be set to positive and its plug must fit the scanner’s DC 13.8V jack. The supplied DC power adapter meets these specifications. Using a DC adapter that does not meet these specifications could damage the scanner or the adapter.
To Connect the AC Adapter
1.Plug the supplied AC adapter into the DC 13.8V jack.
2.Plug the AC
adapter into your wall outlet.
WARNING: To prevent electric shock, do not use the AC adapter’s polarized plug with an extension cord, receptacle, or other outlet unless you can fully insert the blades to prevent blade exposure.
DC Power Cable
Connect the supplied DC power cable to a vehicle power source:
1. Disconnect your battery's negative (-) terminal.
NOTE: Disconnecting your battery may reset some devices in your vehicle, such as automotive audio systems, navigation systems, or alarm systems.
2.Route the suppled DC power cord between a power source and the mounting location for your scanner.
3.Ground the power cord's black wire to your vehicle’s chassis.
NOTE: The grounding screw must make complete contact with the metal frame of your vehicle.
4.Connect the power cord's red wire to a voltage source that turns on and off with the ignition switch, such as a spare accessory terminal in your vehicle’s fuse box.
5.Insert the power plug into the DC power jack on the rear of the radio.
6.Reconnect the cable to the negative (-) terminal of your vehicle’s battery.
NOTE: If your vehicle’s engine is running, you might hear electrical noise from the engine while scanning. This is normal.
WARNING: The DC power cord is equipped with an inline fuse. This fuse protects your scanner and your vehicle from damage in case of equipment malfunction or a short circuit. Do not remove the inline fuse holder from the DC power cord. If the
fuse blows, replace it with a 2A fuse and apply power again. If the fuse blows again, check all wiring for short circuits, and check the radio for a malfunction.
12 |
13 |
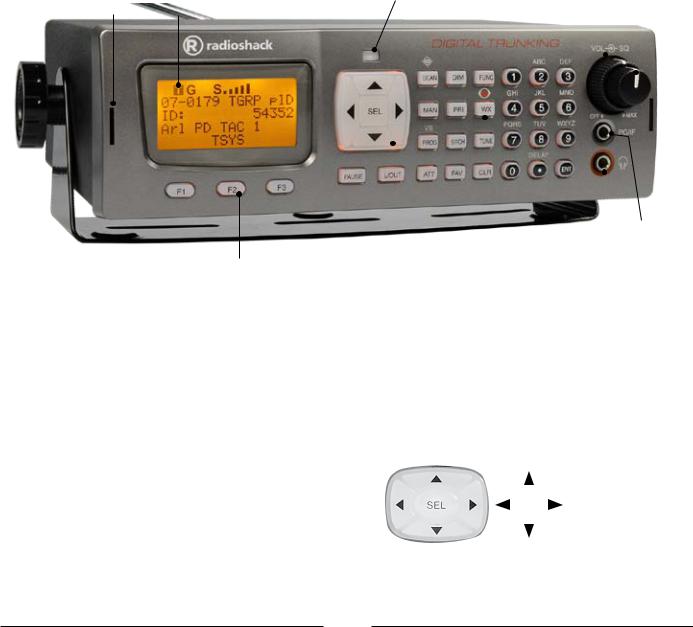
Understanding the Keypad
Your PRO-652 features an easy-to understand backlit keypad.
DIN Keyslot LCD Display
|
Softkeys |
|
|
F1 |
Referred to as "softkeys;" These keys activate |
F2 |
functions currently displayed immediately |
F3 |
above them. |
|
|
FUNC |
Function. Press and release the FUNC key |
|
first, and then press the next key. |
|
|
DIM |
Backlight, (FUNC+ DIM locks the keypad) |
|
|
MAN |
Manual Mode monitors single objects. |
|
|
SCAN |
Scan Mode, (FUNC + SCAN launches Signal |
|
Stalker II) |
|
|
TUNE |
Direct tuning of any valid frequency, |
|
(FUNC + TUNE loads the most recently |
|
scanned frequency) |
|
|
SRCH |
Search Mode for service and conventional |
|
frequencies |
|
|
ATT |
Attenuator On/Off, (FUNC + ATT sets Global |
|
Attenuator On/Off) |
|
|
PRI |
Priority setting for current object, (FUNC + PRI |
|
Sets Priority Mode On/Off) |
|
|
14
|
Volume Control |
||
Alert LED |
Squelch Control |
|
|
|
|
|
|
|
|
|
|
|
|
|
|
|
|
|
|
PC/IF |
|
|
|
|
|
|
|
|
|
|
|
|
|
|
|
|
|
|
|
|
|
|
|
|
|
Headphone Jack |
|
Four |
-direction Operations |
|||||||
keypad |
Keys |
Connector |
||||||
|
|
|||||||
|
|
|
|
|
|
|||
|
|
FAV |
Favorites Scan Mode, FUNC + FAV adds the |
|||||
|
|
|
current object to the Favorites Scan List. |
|||||
|
|
|
|
|
|
|||
|
|
WX |
Weather scan, (FUNC + WX activates |
|||||
|
|
|
Skywarn) |
|
|
|||
|
|
|
|
|
||||
|
PROG |
Program objects, (FUNC + PROG accesses |
||||||
|
|
|
V-Scanner) |
|
|
|||
|
|
|
|
|
||||
|
L/OUT |
Temporary Lockout (FUNC + L/OUT |
||||||
|
|
|
permanent lockout). |
|
|
|||
|
|
|
|
|
|
|
|
|
|
|
ENT |
Enter |
|
|
|||
|
|
|
|
|
|
|
||
|
PAUSE |
Pauses scanning. |
|
|
||||
|
|
|
|
|
|
|
|
|
|
|
|
|
|
Scroll |
|
|
|
|
|
|
|
|
|
|
Change |
|
|
|
|
|
|
|
|
||
|
|
|
|
|
|
|
Setting |
|
|
|
|
|
|
|
|
|
|
Four-direction keypad – Used to navigate through objects and menu items. For some menu items, the side buttons can be used to change settings. Press SEL to select the highlighted item.
15
Turning on the Scanner
The squelch and attenuator control scanner sensitivity. If squelch is set too low, the scanner may stop on noise or silence.
Note: Make sure the scanner’s antenna is connected before you turn it on.
1.Turn the SQUELCH knob to about mid-position.
2.Turn the VOLUME knob to turn on the radio.
3.Turn SQUELCH down (counterclockwise) until you hear noise.
4.Turn SQUELCH up (clockwise) a little past where the noise stops. The higher the squelch is set, the stronger the signal required to break the squelch.
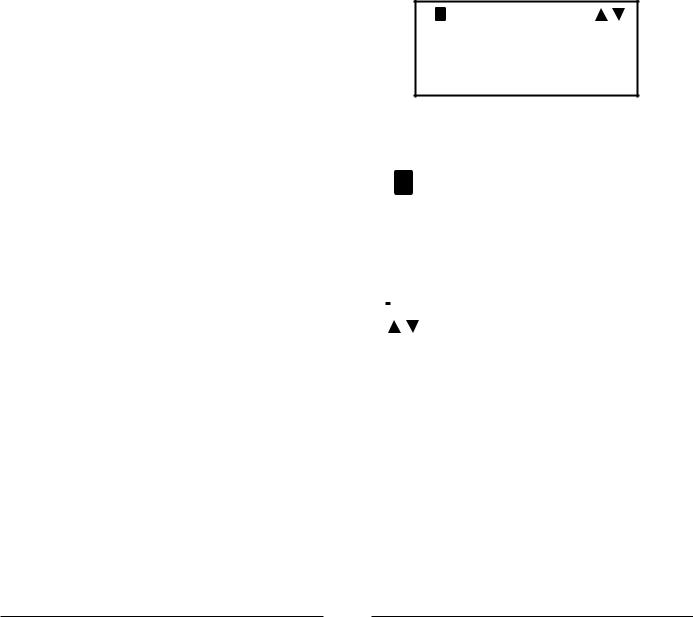
Understanding the Display Icons
Your PRO-652 features a high contrast, backlit Liquid Crystal Display (LCD).
F T GA |
S |
|
|
|
|
|
|
|
|
|
|
|
|
|
|
|
|
|
|
|
|
||
Srch |
Limit |
ZD |
|||||||||
FM |
154.935000 |
||||||||||
154.00155.00
FrL/O Mode Stor
The scanner uses the following top row of icons:
F |
|
|
The Function Key ( FUNC) has been pressed. |
||||
|
|
This acts as a “Shift” key. |
|||||
T |
|
|
The scanner is currently receiving trunking |
||||
|
|
control channel data. |
|||||
G |
|
|
The attenuator is set for Global mode. |
||||
A |
|
|
The attenuator is currently active. |
||||
S |
|
|
The radio’s squelch circuit is open. |
||||
|
|
|
|
|
|
|
Signal meter indicating signal strength. |
|
|
|
|
|
|
|
|
|
|
|
|
|
|||
|
|
|
|
|
|
|
Indicate scan or search direction. |
16 |
17 |

Programming
Programming Cables
The simplest method for programming a new scanner is using a USB synch cable, which is available at your local RadioShack store. The cable lets you use software provided by RadioReference.com and their constantly updated database to program your new scanner quickly and easily. RadioReference.com also provides a range of resources to help improve your overall scanning experience.
Manual Programming
Modern radio systems can be complex and challenging to program. If you choose to program your scanner manually, refer to the "Manual Programming Guide" on page 55.
RadioReference.com
18 |
19 |
Scanner Cloning
If you have access to a compatible scanner that is already programmed for your area, you can transfer that scanner's programming using a standard stereo patch cord (not included), terminated with 1/8” male stereo plugs at each end.
The PRO-652 is compatible with the following scanner models: PRO-106,
PRO-197, PRO-651, PRO-652, GRE PSR-500, PSR600, Whistler WS1040, and WS1065.
To clone a scanner:
1.Connect the two scanners at their PC/IF ports.
2.Turn on both scanners.
3.On the source scanner, press PROG.
4.Press the GLOB softkey.
5.Use the 4-direction keypad to locate the Clone Send option.
6.Press SEL to transfer data.
NOTE: Working memory and global settings are transferred but not V-Scanner folders. The target scanner's working memory will be overwritten.
In some cases, the CCDump output may interfere with cloning.
To turn off CCDump:
1.Press PROG.
2.Press FUNC and then the GLOB softkey.
3.Use the 4-direction keypad to locate the CCDump option and change the setting.
4.Press the Save softkey.
20 |
21 |

Text Entry
Your scanner uses several text parameters, such as the tags that identify objects.
To enter a letter in a text field, press the number key below the letter, then press the number key that corresponds with the position of the letter.
For example: K = 5 2 |
|
|
|
|
Letter Position |
|||||
|
|
|
|
|
|
|
|
|||
Uppercase is the |
|
|
|
|
|
|
|
|
||
default; use the |
|
|
|
|
|
Letter Key |
||||
FUNC key as a |
|
|
|
|
|
|||||
|
|
|
|
|
||||||
shift key to type |
|
|
|
|
|
|
|
|
||
lowercase letters. |
|
|
|
|
|
|
|
|
||
For punctuation, refer to the following list. |
|
|||||||||
|
|
|
|
|
|
|
|
|
|
|
Char |
Press |
Char |
Press |
Char |
|
Press |
|
Char |
Press |
|
|
|
|
|
|
|
|
|
|
|
|
A |
21 |
a |
2 (F) 1 |
1 |
|
11 |
|
|
$ |
01 |
B |
22 |
b |
2 (F) 2 |
2 |
|
12 |
|
|
% |
02 |
C |
23 |
c |
2 (F) 3 |
3 |
|
13 |
|
|
! |
03 |
D |
31 |
d |
3 (F) 1 |
4 |
|
14 |
|
|
^ |
04 |
E |
32 |
e |
3 (F) 2 |
5 |
|
15 |
|
|
( |
05 |
F |
33 |
f |
3 (F) 3 |
6 |
|
16 |
|
|
) |
06 |
G |
41 |
g |
4 (F) 1 |
7 |
|
17 |
|
|
? |
07 |
H |
42 |
h |
4 (F) 2 |
8 |
|
18 |
|
|
-> |
08 |
I |
43 |
i |
4 (F) 3 |
9 |
|
19 |
|
|
‘ |
09 |
J |
51 |
j |
5 (F) 1 |
0 |
|
10 |
|
|
<- |
00 |
K |
52 |
k |
5 (F) 2 |
|
|
|
|
|
. |
0(F)1 |
L |
53 |
l |
5 (F) 3 |
|
|
|
|
|
- |
0(F)2 |
M |
61 |
m |
6 (F) 1 |
|
|
|
|
|
# |
0(F)3 |
N |
62 |
n |
6 (F) 2 |
|
|
|
|
|
_ |
0(F)4 |
O |
63 |
o |
6 (F) 3 |
|
|
|
|
|
@ |
0(F)5 |
P |
71 |
p |
7 (F) 1 |
|
|
|
|
|
+ |
0(F)6 |
Q |
72 |
q |
7 (F) 2 |
|
|
|
|
|
* |
0(F)7 |
R |
73 |
r |
7 (F) 3 |
|
|
|
|
|
& |
0(F)8 |
S |
74 |
s |
7 (F) 4 |
|
|
|
|
|
/ |
0(F)9 |
T |
81 |
t |
8 (F) 1 |
|
|
|
|
|
, |
0(F)0 |
U |
82 |
u |
8 (F) 2 |
|
|
|
|
|
|
|
V |
83 |
v |
8 (F) 3 |
|
|
|
|
|
|
|
W |
91 |
w |
9 (F) 1 |
|
|
|
|
|
|
|
X |
92 |
x |
9 (F) 2 |
|
|
|
|
|
|
|
Y |
93 |
y |
9 (F) 3 |
|
|
|
|
|
|
|
Z |
94 |
z |
9 (F) 4 |
|
|
|
|
|
|
|
Use the 4-direction keypad to move the cursor. Press FUNC and the 4-direction keypad to move the cursor to the beginning or end of the field.
Use CLR as a backspace key, or press FUNC and then CLR to clear the entire field.
QuickText
You can store up to 10 commonly used QuickText phrases for later use in text fields. Your scanner provides some common QuickText words, which you can keep or edit.
To edit QuickText:
1.Press PROG.
2.Press the GLOB softkey.
3.Scroll to one of the QTXT items.
4.Press to edit the QTXT entry.
5.Edit the text. To keep the cursor at the end of your quick text insert a dollar sign ($).
6.Press the DONE softkey.
7.Press the SAVE softkey.
To insert QuickText:
1.Position the cursor in the text field.
2.Press the QTXT softkey. The available QuickText phrases appear.
3.Use the 4-direction keypad to select a phrase and press SEL. (Shortcut: You may press the number that corresponds to the QuickText item).
22 |
23 |
Loading...