


Recorder Cassette Portable
fm.1128-14 |
PM 3:24 2000 6, April Thursday, 1 Page
Owner’s Manual
Please read before using this equipment.
14-1128.fm Page 2 Thursday, April 6, 2000 3:24 PM
ˆ Features
Your RadioShack Portable Cassette Recorder is a multi-functional recorder that includes a tone control and tape counter. Easy to use and reliable, it is ideal for both personal and business use. Its features include:
Three Power Sources — you can power the recorder from four C batteries (not supplied), standard AC power (with the supplied power cord), or vehicle DC power (with an optional DC adapter).
Voice-Activated (VOX) Recording — records only when there is sound, so you can save power and prevent blank sections of tape.
Full Automatic Stop — protects the tape and tape handling parts by automatically stopping the tape when it reaches the end.
Tape Counter — helps you locate specific sections on the tape.
Cue/Review — lets you listen to recordings at high speed so you can find a particular section.
Automatic Level Control (ALC) Circuit
— ensures the proper recording level.
Built-In Condenser Microphone — provides maximum sensitivity, letting you record sound sources from several feet away.
MIC Jack — lets you connect an optional external microphone to record from longer distances.
Record/Battery Indicator — lights to confirm the recorder is recording and dims when the batteries are low.
Tone Control — lets you customize the sound to your personal preference.
AUX Jack — lets you connect the recorder to an external sound source, so you can record directly from the source.
Built-In Carrying Handle — lets you easily carry the cassette recorder anywhere you go.
WARNING: To reduce the risk of fire or shock hazard, do not expose this product to rain or moisture.
CAUTION |
! |
RISK OF ELECTRIC SHOCK. |
|
DO NOT OPEN. |
CAUTION: TO REDUCE THE RISK OF ELECTRIC SHOCK, DO NOT REMOVE COVER OR BACK. NO USER-SERVICE- ABLE PARTS INSIDE. REFER SERVICING TO QUALIFIED PERSONNEL.
This symbol is intended to alert you to the presence of uninsulated dangerous voltage within the product’s enclosure that might be of sufficient magnitude to constitute a risk of electric shock. Do not open the product’s case.
This symbol is intended to inform you that important operating and ! maintenance instructions are included in the literature accom-
panying this product.
The graphical symbols with supplemental markings are located on the bottom of the product.
©2000 Tandy Corporation. All Rights Reserved.
RadioShack, Adaptaplug, and RadioShack.com are trademarks used by Tandy Corporation.
2 |
|
Features |
||
|
|
|
|
|
|
|
|
|
|
|
|
|
|
|

14-1128.fm Page 3 Thursday, April 6, 2000 3:24 PM
ˆ Preparation
CONNECTING POWER
You can power the recorder from any of three power sources:
•Standard AC power (with the supplied power cord)
•Internal batteries
•Your vehicle’s cigarette-lighter socket (with an optional DC adapter)
Note: Connecting the power cord or a DC adapter disconnects the internal batteries.
Using AC Power
To power the recorder from standard AC power, plug the supplied power cord into the AC IN jack on the side of the recorder. Then plug the other end into a standard AC outlet.
Warning: The power cord has a polarized plug that is designed to fit into the recorder’s jack and a standard AC outlet only one way. If the plug does not easily fit into the jack and AC outlet, do not force either plug. Simply turn it over and try again.
Caution: Always plug the power cord into the AC IN jack before you plug it into the AC outlet, and always unplug the
power cord from the AC outlet before you unplug it from the AC IN jack.
Using Internal Batteries
You can power the recorder from four C batteries (not supplied). For the best performance and longest life, we recommend RadioShack alkaline batteries.
Cautions:
•Use only fresh batteries of the required size and recommended type.
•Do not mix old and new batteries, different types of batteries (standard, alkaline, or rechargeable), or rechargeable batteries of different capacities.
Follow these steps to install batteries.
1.Press down on the battery compartment cover and slide it off in the direction of the arrow on the cover.
2.Install the batteries in the compartment as indicated by the polarity symbols (+ and –) marked inside.
3.Replace the cover.
Preparation |
3 |
|
||
|
|
|
|
|
|
|
|
|
|
|
|
|
|
|
14-1128.fm Page 4 Thursday, April 6, 2000 3:24 PM
When the record/battery indicator becomes dim during recording or the recorder stops operating properly, replace the batteries.
Warning: Always dispose of old batteries promptly and properly. Do not burn or bury them.
Caution: If you do not plan to use the recorder with batteries for a month or more, remove the batteries. Batteries can leak chemicals that can destroy electronic parts.
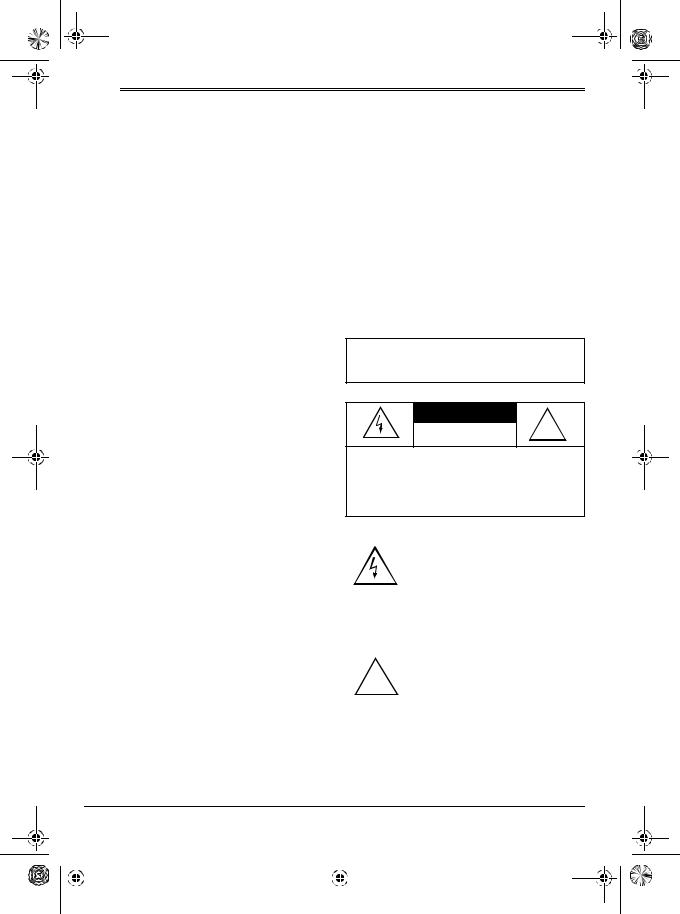
Using Vehicle Battery Power
You can power the recorder from your vehicle’s cigarette-lighter socket using a 6V, 300 mA DC adapter and a size B Adaptaplug™ adapter (neither supplied, available at your local RadioShack store).
Cautions:
•You must use a DC adapter that supplies 6 volts and delivers at least 300 milliamps. Its center tip must be set to positive, and its plug must correctly fit the recorder’s DC 6V jack. Using an adapter that does not meet these requirements could damage the recorder or the adapter.
•Always plug the adapter into the recorder before you plug it into the cigarette-lighter socket, and always unplug the adapter from the ciga- rette-lighter socket before you unplug it from the recorder.
Follow these steps to use vehicle battery power.
1.Set the DC adapter’s voltage switch to 6V.
2.Insert the Adaptaplug adapter into the adapter’s cord so it reads + TIP.
3.Insert the Adaptaplug’s barrel plug into the DC 6V jack on the left side of the recorder.
4.Insert the adapter’s larger plug into the vehicle’s cigarette-lighter socket.
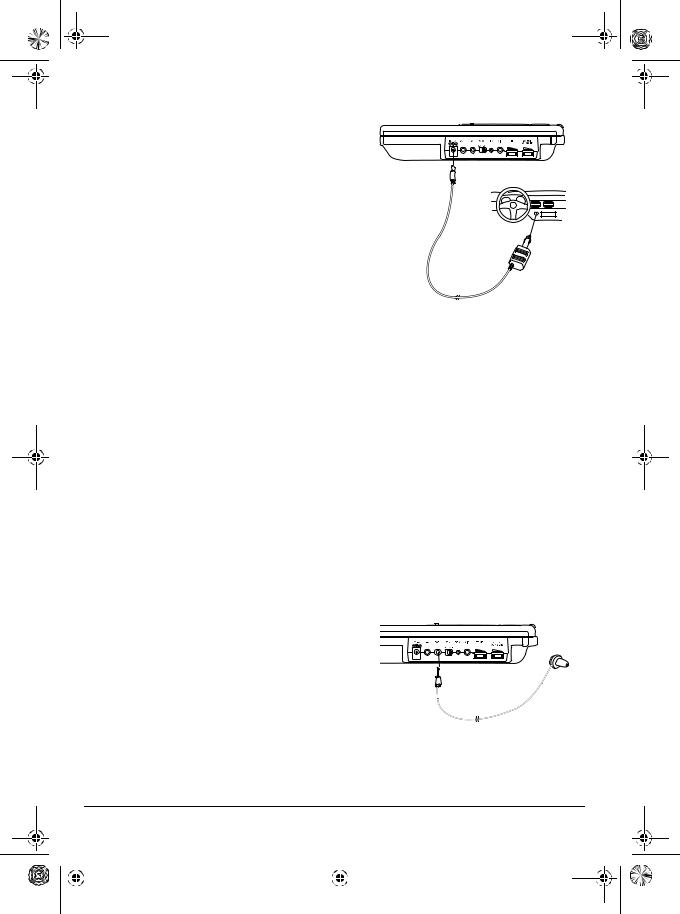
USING AN EARPHONE
You can use an optional mono earphone with a 1/8-inch (3.5-mm) mini plug to listen to a tape privately. Insert the earphone’s 1/8-inch plug into the EAR jack.
Note: Connecting the earphone automatically disconnects the built-in speaker.
4 |
Preparation |
|||
|
|
|
|
|
|
|
|
|
|
|
|
|
|
|
 Loading...