


 Loading...
Philips PCRW804K/00, PCRW464K/50, PCRW463K/55, PCRW464K/55, CDD3610/51 User Manual [es]
...1. What discs to use
1.1CD-Recordable / CD-ReWritable: What are the differences and when should you use each type?
For optimum results it is extremely important that you use the right type of disc for your Philips CDReWriter or DVD+RW drive.
First you should choose between using a CD-R or a CD-RW disc, depending on your specific application. The main difference between the two is that CD-R discs cannot be reused, since the data can be burned into them only once. CD-RW discs can be erased, however, and used over and over, hundreds of times. See the table below for an overview of application examples.
|
Disc Type |
|
Writable |
|
Erasable |
|
Use |
|
CD-ROM |
|
No |
|
No |
|
To distribute information. |
|
|
|
|
|
|
|
|
|
CD-R |
|
Yes |
|
No |
|
To archive your data permanently. |
|
|
|
|
|
|
|
To share data with users who have a standard CD-ROM |
|
|
|
|
|
|
|
drive. |
|
|
|
|
|
|
|
For use in older CD-ROM drives (which cannot read CD- |
|
|
|
|
|
|
|
RW). |
|
|
|
|
|
|
|
For audio CDs (most audio players cannot read CD-RW). |
|
|
|
|
|
|
|
|
|
CD-RW |
|
Yes |
|
Yes |
|
For work in progress, such as presentations, documents, |
|
|
|
|
|
|
|
etc. |
|
|
|
|
|
|
|
To make weekly archives of your hard drive. |
|
|
|
|
|
|
|
To transport large files between home and office. |
|
|
|
|
|
|
|
For testing purposes before recording on CD-R |
|
|
|
|
|
|
|
|
You should always use high-quality discs from well-known manufacturers for the best results when (re)writing disc at higher speeds. The importance of disc quality increases with higher disc writing speeds (expressed as x times the original standard CD data rate of 150 kB/s, or 1x). Since this Philips ReWriter drive can (re)write at high speeds, and the faster you write the less time it takes to produce a CD, we recommend that you use brand-name Recordable/ReWritable discs (preferably from Philips) for which the speed rating is explicitly specified on the packaging (i.e., Multi Speed, High Speed).
Always use discs with a speed rating that is equal to or higher than the speed rating of your Philips CD-ReWriter or DVD+RW drive.
HINTS:
Use CD-ReWritables, which are reusable, until you are comfortable with the recording software. If you make a mistake, you can redo the recording without wasting a disc. After you record successfully to a CD-ReWritable, repeat the recording onto a CD Recordable.
But if you want to check whether the actual burning of the disc will be successful, it is better to use the "test write" option from the recording software, since burning speeds for CD-RW are usually limited to lower values than burning speeds for CD-R. Most problems that occur during the creation of a disc are buffer underruns, which occur if the source data cannot be delivered fast enough by your computer to the CD-RW or DVD+RW drive. (Recent writing technology developments, like the proprietary Philips “Seamless Link” technology, are aimed at eliminating the problems this effect can cause.) The likelihood of a buffer underrun greatly increases with higher writing speeds. So using a CD-RW for checking the writing speed is not recommended, because, if the write operation on CD-RW (at a lower speed) is OK, this is absolutely no guarantee that writing on CD-R (at high speed) will also be OK.
1.2 Writing speed and strategy
Reliability before speed...
With Philips advanced CD-RW or DVD+RW drives you can be sure of the data that you read and write.
The primary mission of the high-speed CD-RW or DVD+RW drives that Philips produces is to safeguard your written data. The drive will always choose the best speed for writing your discs to ensure the highest data integrity possible. This optimal speed may be lower than that claimed by the disc manufacturer, or the disc may be defective in some way (dirty, scratched, etc.), but we take the view that the most important thing is your data, so we go to the lower speed.
Not only do we safeguard your data for playback on your Philips CD-RW drive, but we ensure compatibility with all major CD-ROM drives on the market through exhaustive testing in our Quality Laboratories. You can send your finalized CD-R disc to anybody in the world with the knowledge that they will be able to read it.
We recommend that you use only Philips CD-R and CD-RW discs to ensure the highest quality written data and audio discs. See also: http://www.ce-europe.philips.com
The drive will perform an optimization check (OPC) to determine the best writing strategy at the highest (re)writing speed possible. If it finds none, it will try to find the best writing strategy for lower (re)writing speeds. The test is done in the OPC area (the inside of the disc). If the OPC area is not representative of the rest of the disc (which may be often the case with media of marginal quality), this may result in subsequent read problems on third-party CD-ROMs and even on Philips drives. So we guarantee only that the specific Philips drive which wrote the disc will be able to read it back, at the highest possible speed the drive determined for that disc.
Recently a number of new proprietary technologies have been developed by Philips that overcome the problems generated by non-optimal circumstances during writing to discs. These new technologies encompass: “ Seamless Link” , “Thermo Balanced Writing”, and Self-Learning.
1.3 Copying discs, copyright and copy protection
The Philips CD-RW or DVD+RW drive is designed to assist you in reproducing material in which you own the copyright or for which you have obtained permission to copy from the copyright owner. Unless you own the copyright or have permission to copy from the copyright owner, you may be violating copyright law and be subject to payment of damages and other remedies. If you are uncertain about your rights, contact your legal advisor.
When you are going to make a copy of your CD, follow the instructions from the copier software.
Some CD-ROMs employ copy protection techniques, so making backups of these discs is normally not possible. You may be able to copy them, but the copy will not function because the software on the copied CD-ROM itself performs certain checks and recognizes that it has been copied.
1.4 MultiRead
You will always be able to read CD-RW discs in the CD-RW drive you created them in, but they often cannot be read in older CD-ROM drives or CD players that do not comply with the 'MultiRead' specification.
The recorded tracks on a CD-RW disc are read in the same way as regular CD tracks: by detecting transitions between low and high reflectance, and measuring the length of the periods between the transitions. The only difference is that the reflectance is about one-third of that of the original CD specification. That is why many older CD-ROM drives or CD players cannot read CD-RW discs.
Using modern techniques this presents no problem. The 'MultiRead' specification drawn up by Philips and Hewlett Packard and approved by the Optical Storage Technology Association (OSTA) provides for the necessary adjustments, thus solving any compatibility issues for all modern CD-ROM or DVD drives and CD players.
The following table is a short summary of which CD drive types can read discs created with certain application/media combinations:
|
Function |
|
CD Type |
|
Target drives |
|
Drag and drop (UDF packet |
|
CD-RW |
|
MultiRead CD-ROM drive with UDF reader |
|
writing) |
|
|
|
|
|
|
CD-R |
|
Most CD-ROM drives |
|
|
|
|
|
||
|
|
|
(Closed) |
|
|
|
|
|
|
|
|
|
Copying CDs |
|
CD-RW |
|
MultiRead CD-ROM drive |
|
|
|
|
|
|
|
|
|
CD-R |
|
Any CD-ROM drive |
|
|
|
|
|
|
|
Creation of audio CDs |
|
CD-RW |
|
MultiRead CD-ROM drive |
|
|
|
|
|
|
|
|
|
CD-R |
|
Any CD-ROM drive, home/car CD player |
|
|
|
|
|
|
|
Creation of data CDs |
|
CD-RW |
|
MultiRead CD-ROM drive |
|
|
|
|
|
|
|
|
|
CD-R |
|
Any CD-ROM drive |
|
|
|
|
|
|
1.5 CD format
Your Philips CD Rewriter can both record and read seven different formats to and from a CD-R/RW disc: CD-ROM, CD-ROM XA, CD-I, CD-DA (audio CD), CD-Bridge (multi session), CD-Extra, and Video CD (we do not support 99 minute Video CD discs).
For more information about these formats see:
http://www.pctechguide.com/glossary/09optical.htm#CD-ROM
Your Philips CD Rewriter is also equipped with an analog audio output terminal (headphone plug) for playback of audio CDs. If you insert and play an audio CD, you will be able to listen to the music by connecting headphones or speakers to the headphone plug on the front of the CD-ReWriter or DVD+RW drive. (If you want to be able to play audio CDs through your sound card, plug a digital or analog audio cable connector into the audio socket on the back of the drive to the left of the jumper. Connect the other end of the sound cable to your sound card. See your sound card documentation for the options available to you.)
1.6 X-minutes CDs ( > 74 minutes)
The Philips CD-RW drive can copy to 74and 80-minute CD-R and CD-RW discs, so it can handle copying CDs with a capacity over 74 minutes, which are now becoming commonplace.
We do not support 99-minute Video CD discs (these are not compatible with the drive).
1.7 Choosing your CDs
You may use conventional CD-RW (74 or 80 minutes) and CD-R (74 or 80 minutes) discs with your Philips CD-ReWriter drive. For best results, Philips recommends that you use only Philips CD-RW and CD-R discs.
Choose between CD-R and CD-RW depending on your application and the target drive for the created disc. See the text about disc applications and target drives.
2. How to use your drive
2.1 Copying CD-ROMs, Photo CDs, Video CDs, Audio CDs, etc.
Copying a CD is a simple process using the software delivered with the drive and installed for you by the Setup program. This can take from only a few minutes up to 80 minutes per disc, depending on the specifications of your drive and the recording speed. See also copyright & copy protection.
1.Quit all other programs on your PC while you are creating discs. Other programs will slow the process and may complicate or even interrupt the recording.
2.Place the source CD in the CD-ROM drive.
3.Put a blank disc in your CD-ReWriter or DVD+RW. Be sure the speed of the blank CD matches that of your CD-ReWriter or DVD+RW drive.
4.Start the 'CD Copier' recording software. Dialog boxes will lead you through the options.
5.Set your preferences, including those for recording speed. The CD-ROM must read the data at least as fast as the CD-ReWriter will write it.
6.Start recording. Using your computer for other applications while duplicating CDs may interfere with the duplication process. Activities that use very little of your computer's resources should be no problem. But if moving your mouse causes an error, you should write at lower speeds. If a problem should occur (buffer underrun), the burning process will be terminated and the application will report errors. In most cases the CD will be lost (except if you were writing to a CD-RW disc, or when your writer has the “Seamless Link” feature).
HELPFUL HINTS:
·Disc-to-disc copying, write-on-the-fly, and high-speed recordings are more likely to have data transfer errors because the source data delivery may be too slow. Your system configuration and your computer's capabilities limit the source data speed. If necessary, record at a lower speed to avoid errors. “Write on the fly” recordings are made when the data is read from the CD-ROM directly, while it is being copied to the CD-ReWriter. Such recordings are more sensitive to data stream interruptions and prone to errors. Please also see: “Seamless Link”
·Copying the source material to a folder on the hard drive of your PC can greatly increase your rate of success.
·Use CD-ReWritables, which are reusable, until you are comfortable with the recording software. If you make a mistake, you can redo the recording without wasting a disc. After you have recorded successfully to a CD-ReWritable, repeat the recording onto a CD Recordable.
But if you want to check whether the actual burning of the disc will be successful, it is better to use the “test write” option from the recording software, since burning speeds for CD-RW are usually limited to lower values than burning speeds for CD-R. Most problems that occur during the creation of a disc are buffer underruns, which occur if the source data cannot be delivered fast enough by your computer to the CD-RW or DVD+RW drive. The likelihood of a buffer underrun greatly increases with higher writing speeds. (Please also see: “Seamless Link”) So using a CD-RW for checking the writing speed is not recommended, because, if the write operation on CD-RW (at a lower speed) is OK, this is absolutely no guarantee that writing on CD-R (at high speed) will also be OK.
·If your computer has only a CD-ReWriter or DVD+RW drive, you can still copy CDs. However, you’ll have to use that one drive as both the source drive and the destination drive, which will add significant time to the process.
·For copying audio CDs: Make sure your CD-ROM drive can read audio digitally. (Refer to the manufacturer’s owner’s manual.) Drives that read only analog signals work too, but the sound quality deteriorates each time you copy a copy.
·For detailed information about the use of the software, please read the information accompanying the individual software packages. Each software package usually creates its own program group in the Windows Start Menu, which is activated by clicking on the Windows Start button. These program groups contain the application program icon and other items (Help files, Electronic
Manuals, Uninstall Wizards, Readme files, etc.) for that specific software package. All available information is usually accessible via the software's program group, or through the Help options within the program.
·For more tips and info: visit www.roxio.com
2.2 How to make your own audio CD
You are not limited to copying existing CDs. It is also possible to create a music CD with your own content, to combine individual tracks from existing CDs or other audio source files with each other, or to fill an entire CD-R with your own audio material in the CD-DA format of regular Audio CDs.
1.Start the recording software.
2.To record audio tracks, you first need to create a CD layout, which is a list of tracks in their recording order. Simply click the source material (CD track or sound file) you want to record, and drag it from the Explorer window to the Audio CD Layout window (NOTE: not the Data CD Layout window !).
3.Repeat this for each track and file you want to record.
4.Finally, insert a blank CD and start the CD recording process.
More information in Helpful Hints and online at http://music.cnet.com.
2.3 How to make a data CD
You are not limited to copying existing CD-ROMs. It is also possible to create a CD with your own content.
1.Start the recording software.
2.To record files and folders, you first need to create a CD layout, which is a list of files and folders, as they will be recorded. Simply click the source material (file or folder) you want to record and drag it from the Explorer window to the Data CD Layout window.
3.Repeat this for each file and folder you want to record.
4.Finally, insert a blank CD and start the CD recording process.
More information in Helpful Hints.
2.4 How to append audio or data to a disc
If a disc was not used to its full capacity the first time you recorded on it, and you did not close the disc (see below), then you can add extra audio tracks or data sessions to the disc.
Closed session:
If you want to listen to an audio CD on a home or car CD player, you must close the session first. You can put additional audio tracks on the disc afterwards, but only the tracks in the first session will be accessible (“seen”) by most CD players. Leaving the session open is only an option when writing Audio. When writing data, the recording software will always automatically close the session.
Closed disc:
The user has the option to close the disc or not. The Close Disc option write-protects the CD. When this operation has been performed, no more audio or data can be recorded to the CD.
Open disc:
1.Place the disc that has not been closed into the CD-ReWriter or DVD+RW drive.
2.Start the recording software.
3.Simply click the extra source material you want to record, and drag it from the Explorer window to the CD Layout window to add it to the existing content.
4.Repeat this for each file and folder you want to record.
5.Finally, start the CD recording process.
2.5 How to use your CD-RW or DVD+RW drive as a disk drive
Install 'Packet Writing' software on your computer to be able to access CD-R/RW discs directly in your CD-ReWriter or DVD+RW drive, just like any other disk drive to which data can be written.
This software will load automatically each time you start Windows. It runs in the background, so that you may read and write from and to the CD-R/RW disc in the drive from within Windows Explorer or any other Windows application (word processor, spreadsheet, etc.).
The CD-R/RW disc used for this purpose stays 'open' and can only be read on computers that have 'Packet Writing' software or a UDF Reader installed. Alternatively, the 'Packet Writing' software can be used to close the current session, thereby making the disc readable for regular 'MultiRead' drives. After this, data can still be added to the disc by opening a new session.
NOTE: On CD-R discs, files cannot actually be erased or overwritten, but they can be made invisible and written again when updating files.
2.6 How to combine audio and data (mixed mode)
Perform these steps to write a Mixed-Mode CD:
1.Prepare the data portion of your CD, just as described in How to make a data CD. (Select the data files you want to add and drag them into the Data CD Layout window.)
2.Click the Audio CD Layout tab.
3.Prepare the audio portion of your CD, just as described in How to make your own audio CD. (Select the songs you want to record and drag them into the Audio CD Layout window.)
4.A message box notifies you that the disc settings have automatically been changed to support Mixed-Mode CDs.
5.Finally, insert a blank CD and start the CD recording process.
The recording software begins creating your Mixed-Mode CD. It records the files listed in the Data CD Layout tab in the first track, then records the songs listed in the Audio CD Layout tab in the following tracks. All tracks (data and audio) are recorded in a single session.

2.7 Starting applications with Blue Button
Newer drive types will have a button with the Blue Button-logo next to it. Watch for the logo because the button itself might not be blue on all drive types. See the “Instructions for use” for the position of the Blue Button.
Pressing this button on your drive brings up a window with useful access buttons for several web sites and disc applications.
Option 1: Using the Blue Button
Press the Blue Button with the  logo next to it on the drive or double-click the Blue Button icon in the Windows system tray or restart the Blue Button program via the ‘Programs/Philips external drive’ program group. This will open a window with three buttons. This will open a window with three buttons.
You need to meet some requirements for the Blue Button feature to work:
1.The drive must be connected to your computer and it must be switched on (if applicable).
2.You must have completed the Philips installation wizard included with your drive.
3.You must have an Internet browser installed and configured for your system.
4.The resident Blue Button application (the icon in the system tray) must be active on your computer. This will be the default setting after installation. However, you may also decide to disable the system tray icon. In addition, please be aware that some versions of Windows® may automatically hide inactive system tray icons.
5.Should you have disabled the Blue Button program, you may re-activate it by clicking on the item ‘Blue Button’ in your Philips program group (For Mac: open the Blue Button program file in the Applications/Blue Button map). Doing this will open the Blue Button window on your screen but it might it not activate the Blue Button on the drive itself. If necessary, please reboot your computer to load the resident Blue Button application (the icon in the system tray) for opening the Blue Button window with the Blue Button on your drive.
Your options in the Blue Button window
After opening the interface window, you will see a number of buttons and a menu bar.

Button 1
Clicking this button will open your Internet browser and link you to the Philips PC Peripherals product information web page.
Button 2
Clicking this button will open your Internet browser and link you to the Philips PC Peripherals Service&Support web page.
Button 3
Click this button to open the application program associated with the type of disc in the drive.
NOTE: This table shows the default settings of the Blue Button program.
If you have changed your preferences (see below), other applications may be launched when pushing the Blue Button.
|
Disc type in the |
|
Clicking button 3 will... |
|
As determined by... |
|
drive |
|
|
|
|
|
(see: Discs to use ) |
|
|
|
|
|
CD-R/RW discs |
|
Start a recorder / rewriter application. |
|
See your ‘Recorder’ setting in the |
|
|
|
|
|
CD tab of the Options menu. |
|
|
|
|
|
|
|
CD-ROM, CD Audio |
|
Launch... |
|
|
|
|
|
1. A Media Player for an audio disc a |
|
See your ‘Player’ setting in the CD |
|
|
|
Video CD or a DVD (if applicable). |
|
tab of the Options menu. |
|
|
|
|
|
|
|
|
|
2. A disc explorer program for a data |
|
See your ‘Explorer’ setting in the CD |
|
|
|
disc. |
|
tab of the Options menu. |
|
|
|
|
|
|
Changing your preferences (in the Blue Button menu from the menu bar)
Click on Blue Button in the menu bar to open the menu. Click on Options in this menu to open the Options window.
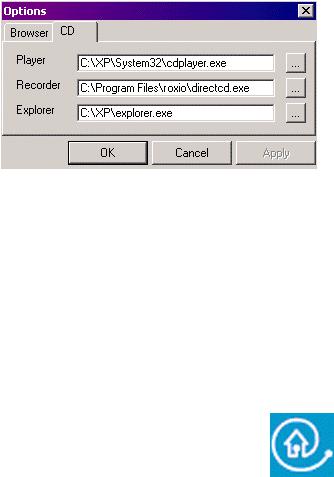
(Actual applications may vary)
Click the Browser tab to change the Internet browser program used for opening the web pages.
Click the CD tab to be able to change the programs used for opening the disc. These settings have
been automatically detected during installation, but may be changed manually at any time. Click  next to one of the settings to browse for other executable programs (*.exe for Windows®) you want to open for that specific application.
Option 2: Keeping the Blue Button pressed
Keeping the Blue Button pressed for 2 seconds or more opens your Internet browser program and points you directly to a drive support website for downloading the latest firmware for your drive automatically. Please follow the instructions given on that website.
Blue Button: The fastest way to results
3. General information on CD-R/RW
3.1 Settings / configuration
When connecting an internal drive to your computer, certain cable connections and settings are essential for the correct operation of that drive.
1.Cable connections
2.Hardware settings
3.Software settings
4.Firmware updates
Cable connections
To be able to use the drive, it is essential that you connect the flat cable (also known as the IDE data cable) and the power cable correctly to the back of the drive.
·The power cable connector has a unique shape and fits into the power socket in only one way. Consult your computer manual if there is no free power cable connector available.
·It is absolutely essential that you connect the PIN 1 side of the flat cable, marked with a colored stripe, next to the text PIN 1 into the wide socket in the middle on the back of the drive. Of course the PIN 1 side of the motherboard connector of that cable should also be aligned with the PIN 1 side of the socket on the motherboard (consult your computer manual for this information).
If you connect this connector the wrong way around, your monitor screen will probably stay black after switching the computer on and your computer will not start-up. Reverse the connector in that case.
·You may also connect a digital or analog audio cable connector to the audio socket on the back of the drive to the left of the jumper, if you want to be able to play audio CDs through your sound card. Connect the other end of the sound cable to your sound card. See your sound card documentation for the options available to you.
Hardware settings
Computers usually have two data channels (IDE channels), with two device connectors each, for connecting a total of four internal devices to your computer. These devices may be hard disks, CD/DVD drives or any IDE-compatible devices. Two drives can thus be connected to the same cable. The computer is able to tell them apart by their jumper settings.
The jumper is a little square plastic block set on the back of the drive and placed over one of three sets of two pins. MASTER, SLAVE and CABLE SELECT. Normally, Cable Select is not used so you will have a MASTER device and a SLAVE device on same cable. The Cable Select option requires a special IDE cable and is not normally used for personal computers.
For the CD-ReWriter or DVD+RW drive, please use the jumper setting recommended to you during Setup from the installation CD. Check to be sure that there are never two MASTER devices or two SLAVE devices on the same cable, because in that case your computer would probably not be able to complete its start-up procedure properly.
Software settings
BIOS
Your computer's Basic Input/Output System (BIOS) controls the hardware start-up when (re-)booting your computer. Usually, during this start-up the BIOS will search for any internal devices connected to
the IDE cables. But sometimes it is possible to disable this BIOS search for individual internal drive positions.
So always check whether your BIOS allows detection of a newly connected internal drive (e.g. a new CD-ReWriter or DVD+RW drive), otherwise the Windows operating system will probably not be able to use this drive.
For checking and/or changing your BIOS settings, watch closely for any texts appearing on your screen during start-up of your computer. You will have to press the key mentioned on the screen (e.g. F2, Delete, Esc, etc.) to go to the BIOS settings menu. Then find the drive detection settings and make sure they are all set to "AUTO DETECT" so that any newly connected drive will be enabled by your computer's BIOS.
DMA vs. PIO mode
Traditionally, CD-ROM drives have used Programmable Input Output (PIO) rather than Direct Memory Access (DMA) for data transfer. This was favored for the earlier designs because hardware implementation is simpler and is adequate for devices requiring low transfer rates. The drawback is that the CPU must mediate the transfer of data, often byte by byte. As the data rate of CD-ROM drives has risen, so has the load on the CPU, to the point where 24-speed and 32-speed drives can completely saturate CPU utilization in PIO mode.
DMA data transfer is always more efficient and requires only a few per cent of CPU time. It uses hardware to control data transfer directly to system memory, and requires only initial memory allocation and minimal handshaking from the CPU. A further advantage is that performance is devicerather than system-dependent. DMA-capable devices should give consistent performance, regardless of the system to which they are attached.
DMA has only recently been common for IDE devices and interfaces, and only the Windows 95 OSR2 service release and higher Windows versions have included DMA drivers for the Intel PIIX range of IDE/PCI bridge chips. But DMA is often not enabled in systems equipped with these operating system versions,either due to ignorance or from concerns about overall system stability.
The CD-ReWriter Setup program automatically assigns DMA control for the drive if possible on the system.
Firmware upgrades
The embedded software in the drive itself can also be updated with newer software versions. Go to the Philips Support web site for downloading the necessary software tools and firmware updates. See Downloads for more information.
See http://www.pctechguide.com/search.htm for an explanation of any terms in the text above.
3.2 Erasing / formatting CD-RWs
Erasing a CD-RW disc is performed by returning the material in the recording layer back to its crystalline state. This is done by an annealing process, consisting of heating the layer to a temperature of about 200ºC (i.e. lower than the melting point) and maintaining that temperature for an extended period of time (in practice, this may take up to 37 minutes for a complete disc). The disc is then returned to its original, completely unrecorded state.
A much faster 'on the fly' erasing facility is also available, allowing the last recorded track to be erased simply by erasing the subcode reference to that track while leaving the recorded data in place in the recording layer. This method usually requires no more than 1 or 2 minutes.
Finally, the direct overwrite strategy combines the write and erase techniques. In this case, new pits are written in the recording layer using the same pulsed laser beam energy as in the standard writing strategy. However, in the areas between the newly recorded pits, a lower-energy, non-pulsed laser beam is used to write new crystalline lands. The laser beam is repeatedly switched to the lowerenergy erase level between the new pits, resulting in complete erasure of the data that was formerly contained in these areas.
3.3Track-at-Once, Disc-at-Once, Session-at Once and Packet Writing
There are four basic methods of writing to a compact disc: Track-at-Once, Disc-at-Once, Session-at- Once and Packet Writing. These are independent of both the physical format and the file system in which a disc may be written.
Track-at-Once
In Track-at-Once recording, the recording laser is turned off after each track is finished, and turned on again when a new track must be written, even if several tracks are being written in a single recording operation.
Tracks recorded in Track-at-Once mode are separated by gaps. If a data track is followed by an audio track, the gap is 2 or 3 seconds. The gap between audio tracks is usually 2 seconds.
The software can do nothing to suppress or reduce the gap, unless both recorder and software support variable-gap Track-at-Once. This feature allows you to set the size of the gap, from near zero (2 sectors, or 2/75 of a second) to 8 seconds, before each audio track on an audio disc.
Disc-at-Once
In Disc-at-Once recording, one or more tracks are recorded, without turning off the recording laser, until the disc is closed. Disc-at-Once recording requires a blank disc, and cannot be used for MultiSession recording.
Disc-at-Once is primarily needed for recording audio discs with a variable (or no) gap between tracks (for example, live concerts).
Session-at-Once (NOT supported by all drive models!!)
Session-at-Once is used primarily for CD Extra. In Session-at-Once recording, a first session containing multiple audio tracks is recorded in a single pass, then the laser is turned off, but the disc is not closed. Then a second (data) session is written and closed.
Packet Writing
Packet writing is a method of writing data on a CD in small increments, in accordance with the industry-standard UDF specification. Not every CD-ROM drive can read packet-written discs. Packet writing is a feature that must be built into the recorder's hardware. It cannot be implemented by a firmware upgrade.
Two kinds of packets can be written: fixed-length and variable-length. Fixed-length packets are more suitable for CD-RW in order to support random erase, because it would be cumbersome and slow to keep track of a large, constantly-changing file system if the packets were not written in fixed locations. The drawback is that these fixed packets, with a length of 64 kilobytes, take up a great deal of overhead space on the disc. The normal data capacity of a CD-RW disc formatted for writing in fixedlength packets is about 500 megabytes.
Variable-length packets save space, because the size of the packet can vary with the size of the data being written. This is more useful when writing to a standard CD-R disc, because these are write-once media, and it is not necessary to track and allocate free space when files are 'erased'. (NOTE: On CD- R discs, files cannot actually be erased, but can be made invisible.)
For more info visit: www.roxio.com or www.nero.com

3.4 Seamless Link
Seamless Link protects the disc writing process against the effects of buffer underrun.
Today, many advances in CD writing technology are not only related to speed and to ensuring optimal write operations on nearly all media, but also to writing integrity.
However, users with older systems may still be presented with an occasional buffer underrun error message. Though a less frequent error for users of new computer systems, buffer underrun still is an annoying problem as the recordable media will be irretrievably lost. For both users of new and older systems, Philips Seamless Link offers an excellent solution for minimizing this disastrous effect of buffer underrun.
About Buffer Underrun
Buffer underrun can occur when the users’ computer cannot supply a steady and uninterrupted flow of data from the data source, typically a CD-ROM or hard disk drive, to the memory buffer of the CD or DVD writer drive.
If this transfer of data, to the drive memory, is interrupted long enough to empty the write buffer in the drive, then the writing process stops and the disc is ruined. Buffer underrun occurs most frequently when users are writing in either Track-at-Once (TAO) or Disc-at-Once (DAO) mode.
Possible causes for buffer underrun:
·Insufficient processing power (low speed CPU, insufficient RAM size, no DMA support)
·System configuration not optimal (DMA switched off)
·Too much user interaction during writing (starting or running additional applications, thermal recalibration of older hard disk types)
·Insufficient performance of the source drive (CD-ROM, hard disk, network drive)
·Scratched or dirty source media (source drive needs multiple retries to read the data successfully)
The solution? Seamless Link from Philips
Seamless Link, the Philips solution, detects the clues of an imminent buffer underrun ahead of time. It pauses the writing in a controlled way, and restarts the writing when the danger of the buffer underrun is gone.
Seamless Link technology, however, does not prevent the occurance of buffer underruns. Seamless Link only acts to prevent buffer underruns from wasting a disc, it is not a speed or quality optimization algorithm. For speed and quality optimization it is always better to try and remove the cause for the buffer underruns.
How Seamless Link Works
Seamless Link constantly monitors the writer buffer level. If this level drops below a threshold value, the writing process is stopped in a controlled way. This means that the data stream from the buffer to the disc is halted, and it allows the buffer to be filled up again.
The exact location on the disc, where the write operation was stopped, is stored in the drive’s internal memory. In the meantime, the buffer level is continuously monitored and as soon as the buffer is full
again Seamless Link resumes the writing process from the exact spot where the writing stopped. This type of writing eliminates the gap, which occurs between two individual writing operations during traditional writing. Hence the name Seamless Link.
3.5 Thermo-Balanced Writing (TBW)
Introduction
TBW intelligent drive technology, developed and patented by Philips, is a powerful new feature that assures data integrity by physically testing each disc, then tuning the output of the recording laser, and choosing the recording speed to suit each individual disc.
Even if the drive determines to use a recording speed lower than the maximum possible, it will always choose the maximum speed which can safely be used for the inserted disc.
This results in an "intelligent" drive, which adapts its behaviour to suit the precise requirements of each individual disc, ensuring the best possible recording quality on all media. It provides a very high success rate even when recording on discs of a quality below the internationally recognised standards.
The Philips 12x8x32x ReWriter internal drives were the first products utilising TBW technology and from these drives onwards, all Philips ReWriter drives have this feature.
IMPORTANT NOTE: ReWriter drives also write CD-RW discs of course. However, TBW technology is not applicable to the RW function as ReWritable discs utilise a completely different recording methodology than Recordable discs.
The problem
Numerous recordable disc manufacturers all over the world are now producing what has become a commodity item. Unfortunately, in some cases, the quality of these discs is not in accordance with global standards for this media. There may be areas on the disc surface with an insufficient amount of recording medium (in addition to scratches, dirt marks or other surface defects), or even gross mechanical damage which results in imbalance.
Unfortunately, there is no reliable way a consumer can judge what he or she is buying (there exists no universal authoritative quality logo on the disc packaging). So when you buy and "burn" what are effectively sub-standard discs, any resulting problems are more likely to be attributed to the CD drive unit than to the disc. It is a question of compatibility, something you as the end user implicitly desire, but are unable to verify yourself.
The solution
Philips has applied considerable effort to developing and testing an "on board" system of selfcalibration for recording CD-R discs. It is part of a continuous Philips programme that is devoted to the perfection of writer technology, and particularly, to anticipating and solving end user problems, thereby enabling greater ease of use.
The Philips solution lies in a technique designated TBW [Thermo-Balanced Writing], a feature which is to be introduced in all new Philips ReWriter drives.
TBW, in partnership with a Self-Learning process, adds intelligence to the drive and enables it to automatically make decisions, about how to process and write a new disc. The process is in many ways similar to the way in which fax machines initially communicate. They detect what kind of partner machine is at the other end of a connection, so that the two can transfer data properly and without user intervention.
The heart of this Philips solution consists of new hardware and firmware that is built into the drive, including the TBW algorithm, which evaluates the disc and determines the burn parameters.
The intelligent TBW algorithm
1.On insertion of a disc into the drive with intention to write, a fast sequence of physical tests are performed on the disc to determine its’ characteristics. These tests determine precisely the power dosage of the laser burn pulses that need to be applied to that particular disc. The time this takes will usually go unnoticed by the end user.
2.If this initial test shows some discrepancies, then the algorithm performs more burn/read iterations for testing the disc, recalculates the required burn pulse data, and, if necessary, automatically reassigs the disk to the next lower drive speed that is available, without any intervention by the user.
3.The end users will be informed of the new selected recording speed via the application.
4.After final testing, recording can begin. The burn process tailors the laser pulses, so as to give exactly the right amount of heat for creating a sequence of signal pits, all with the right size and density. The result is an optimal ratio of reflectivity between pits and lands, with the correct size and spacing. Thus the drive maintains a high degree of accuracy in writing, readability and above all, compatibility.
End-users may notice that recording takes place more slowly (or faster!) than expected (e.g. compared to the information on the disc packaging), but they should almost never see a wasted disc, as a result of a recording failure due to this type of problem.
In other words, a TBW intelligent drive can calibrate itself and automatically compensates for variables in the recording media; and every disc is treated individually. This feedback system offers another advantage: If the laser characteristics vary over time or if it suffers from a build-up of dirt, the effect on its output will automatically be compensated for by the TBW feature. This makes for greater reliability and a longer useful life of the drive itself.
More info: www.philips.com/pcstuff
3.6 Recommended links
Standards Organizations
OSTA: http://www.osta.org ISO: http://www.iso.ch
JPEG/MPEG working group: http://www.cselt.it/mpeg
Philips Sites
Philips S&V for Audio Products: www.philips.com/pcstuff Philips PCStuff Site: http://www.philips.com/pcstuff Philips Standards Site: http://www.licensing.philips.com/
ISV Site
FAQs: www.roxio.com or www.nero.com
Other
Microsoft Windows Site: http://www.microsoft.com
WHQL site: http://www.microsoft.com/HWTEST/default.asp
3.7 CD-R/ RW technology
Differences between CD-R/CD-RW discs and standard CD
The main physical difference between these two disc types and the standard prerecorded CD (audio CD or CD-ROM) is that the latter has no recording layer; the information is permanently stamped in the aluminium reflecting layer.
The CD-R and CD-RW discs
CD-R and CD-RW discs have the same basic disc structure but with significant detail differences. The CD-R disc has a dye-based recording layer, with a reflectivity of 40 - 70 %, while the CD-RW disc has a phase-change recording layer with a reflectivity of 15 - 25 %.
Both discs have an additional reflecting layer: golden for the CD-R, which accounts for that disc's distinctive appearance, and silver (aluminium) for the CD-RW.
Both disc types have a track spiral, which is preformed during manufacture, onto which the audio data is written during the recording process. This track ensures that the recorder follows the same spiral pattern as a conventional CD, and has the same width of 0.6 mm and pitch of 1.6 mm as a conventional CD. In addition to the spiral pattern, the track has a slight superimposed sinusoidal excursion of ± 0.3 mm at a frequency of 22.05 kHz.
4. Downloads
Updates
Flash tool for firmware updates + Readme |
http://www.philips.com/pcstuff |
Info |
|
Instructions For Use |
http://www.philips.com/pcstuff |
1. Types de disques
1.1CD enregistrable ou CD réinscriptible : quelles sont les différences et quand utiliser quel type ?
Pour obtenir des résultats optimaux, il est très important que vous utilisiez le type de disque approprié avec votre graveur CD-ReWriter ou DVD+RW Philips.
Il convient d’abord de choisir entre disque enregistrable (CD-R) et disque réinscriptible (CD-RW) en fonction de l’application envisagée. La principale différence réside dans le fait que les CD-R ne peuvent être effacés et réutilisés, car ils ne peuvent être gravés qu’une seule fois. Par contre, les CDRW peuvent être effacés et réutilisés (regravés) plusieurs centaines de fois. Le tableau suivant présente les différentes applications possibles par type de disque :
|
Type de |
|
Enregistrable |
|
Effaçable |
|
Usage |
|
disque |
|
|
|
|
|
|
|
CD-ROM |
|
Non |
|
Non |
|
Diffusion d’informations. |
|
|
|
|
|
|
|
|
|
CD-R |
|
Oui |
|
Non |
|
Archivage permanent de données. |
|
|
|
|
|
|
|
Partage de données avec des utilisateurs disposant d’un |
|
|
|
|
|
|
|
lecteur de CD-ROM. |
|
|
|
|
|
|
|
Utilisation dans les anciens lecteurs de CD-ROM (qui ne |
|
|
|
|
|
|
|
reconnaissent pas les CD-RW). |
|
|
|
|
|
|
|
Création de disques compacts audionumériques (la |
|
|
|
|
|
|
|
plupart des lecteurs de CD standard ne reconnaissent pas |
|
|
|
|
|
|
|
les CD-RW). |
|
|
|
|
|
|
|
|
|
CD-RW |
|
Oui |
|
Oui |
|
Travaux en cours (présentations, documents, etc.). |
|
|
|
|
|
|
|
Archivage hebdomadaire du disque dur. |
|
|
|
|
|
|
|
Transfert de gros fichiers entre la maison et le bureau. |
|
|
|
|
|
|
|
Essai avant enregistrement sur CD-R. |
|
|
|
|
|
|
|
|
Il convient de toujours utiliser des disques de haute qualité de marques reconnues pour obtenir les meilleurs résultats lors de la gravure de CD réinscriptibles à des vitesses élevées. L’importance de la qualité du disque augmente avec la vitesse de gravure dès que celle-ci dépasse 2x, où « x » représente la vitesse standard de transfert de données des disques compacts, c’est-à-dire 150 kb/s ou 1x. Ce graveur CD-ReWriter Philips est capable de graver à des vitesses bien supérieures à 2x. En outre, comme plus la vitesse de gravure est élevée, moins il faut de temps pour produire un disque, nous vous recommandons d’utiliser des disques CD-R ou CD-RW de marque (préférentiellement Philips) qui indiquent spécifiquement les vitesses de gravure autorisées sur l’emballage (Multi Speed, 16x ou 10x pour CD-RW ou des vitesses supérieures).
Vous devez toujours utiliser des disques présentant une vitesse au moins égale à celle de votre graveur CD-ReWriter ou DVD+RW Philips. .
CONSEILS:
Nous vous recommandons d’utiliser des disques réinscriptibles (réutilisables) jusqu’à ce que vous vous soyez familiarisé avec le logiciel de gravure. Si vous commettez une erreur, vous pourrez ainsi recommencer l’enregistrement sans perdre de disque. Lorsque vous aurez réussi l’opération avec un disque réinscriptible, vous pourrez répéter l’enregistrement sur un simple disque enregistrable.
Cependant, si vous souhaitez vérifier si la gravure effective du disque sera correcte, il est préférable d’utiliser la fonction « essai d’écriture » du logiciel de gravure, car la vitesse de gravure des CD-RW est généralement inférieure à celle applicable aux CD-R. La plupart des problèmes qui se produisent au cours de la création d’un disque sont dus à des sous-alimentations de la mémoire tampon, phénomènes qui se produisent si les données source ne peuvent être fournies assez rapidement par
l’ordinateur au graveur de CD-RW ou DVD+RW. (Les techniques d’écriture développées récemment, telles que Seamless Link de Philips, visent à éliminer les problèmes que cet effet peut entraîner.) La probabilité d’une sous-alimentation de la mémoire tampon augmente considérablement avec des vitesses de gravure plus élevées. Par ailleurs, il n’est pas recommandé d’utiliser un CD-RW pour vérifier la vitesse de gravure car, si l’écriture sur un CD-RW (à une vitesse inférieure) est correcte, il n’est pas absolument sûr que celle sur un CD-R (à haute vitesse) sera correcte elle aussi.
Loading...