


 Loading...
FC9269-FC9250

2

3 |
|
|
|
|
1A |
|
|
|
1 |
|
|
|
|
|
|
1B |
|
|
|
|
1C |
|
|
|
|
2 |
|
|
|
9 |
|
|
|
|
10 |
3 |
11 |
|
|
|
4 |
|
|
|
8 |
|
|
|
|
|
|
12 |
|
14 |
|
5 |
13 |
|
|
|
|
|
|
|
7 |
|
|
|
|
|
|
6 |
|
|
|
|
|
|
29 |
|
|
21 |
22 |
30 |
|
|
|
||
|
19 |
|
|
|
18 |
|
|
|
|
|
|
|
23 |
|
15 |
|
|
24 |
|
20 |
|
|
|
|
|
|
|
|
|
|
|
|
25 |
|
16 |
28 |
26 |
|
|
|
|
|
|
|
|
|
27 |
|
|
17 |
|
36 |
|
|
|
31 |
|
|
|
|
|
|
|
|
|
32 |
|
|
|
|
|
37 |
|
39 |
|
33 |
|
40 |
|
|
|
|
||
|
|
38 |
|
41 |
|
|
|
|
|
|
|
|
|
42 |
35 |
34 |
|
|
|
4

English 6
Dansk 22
Deutsch 38 Ελληνικα 54 Español 71 Suomi 88 Français 104 Italiano 121 Nederlands 138 Norsk 154 Português 170 Svenska 186 Türkçe 202
FC9269-FC9250

6English
Introduction
Congratulations on your purchase and welcome to Philips!To fully benefit from the support that Philips offers, register your product at www.philips. com/welcome.
General description (Fig. 1)
1Filter cylinder unit
A Filter cleaning handle (specific types only)
BFilter cylinder
C Filter cylinder case
2Cover release button
3 Release button for filter cylinder unit
4Cover
5 Motor protection filter
6 Soft rubber rear wheels
7Hose release button
8 Hose connection opening
9 Cleaning brush
10Dust bucket
11Carrying handle
12On/off button
13Remote control receiver with standby light
14Cord rewind button
15Tri-active nozzle
16Rocker switch for carpet/hard floor settings
17Side brush
18Parking/storage ridge
19PostureProtect handgrip
20Tube release button
213-button remote control on handle
224-button remote control on handle
23Standard handgrip
24Flexible hose connection
25Hose
26Screw cover strip
27Accessory holder
28Accessory holder release levers
292-piece XL telescopic tube with PostureProtect handgrip
303-piece XL telescopic tube with PostureProtect handgrip
31HEPA filter cover
32Release tabs of HEPA filter cover
33Washable Ultra Clean Air HEPA 13 filter
34Mains cord and plug
35Parking slot
36Small nozzle
37Brush attachment
38Crevice nozzle
39Storage grip
40Swivel wheel
41Storage slot
42Type plate

English 7
Important
Read this user manual carefully before you use the appliance and save it for future reference.
Danger
-- Never suck up water or any other liquid. Never suck up flammable substances and do not suck up ashes until they are cold.
Warning
-- Check if the voltage indicated on the appliance corresponds to the local mains voltage before you connect the appliance.
-- Do not use the appliance if the mains cord, the plug or the appliance itself is damaged.
-- If the mains cord is damaged, you must have it replaced by Philips, a service centre authorised by Philips or similarly qualified persons in order to avoid a hazard.
-- This appliance is not intended for use by persons (including children) with reduced physical, sensory or mental capabilities, or lack of experience and knowledge, unless they have been given supervision or instruction concerning use of the appliance by a person responsible for their safety.
-- Children should be supervised to ensure that they do not play with the appliance.
-- Do not point the hose, the tube or any other accessory at the eyes or ears nor put it in your mouth when it is connected to the vacuum cleaner and the vacuum cleaner is switched on.
Caution
-- Do not suck up large objects as this may cause the air passage in the tube or hose to become obstructed.
-- When you use the vacuum cleaner to vacuum ashes, fine sand, lime, cement dust and similar substances, the pores of the filter cylinder become clogged. If you notice a strong decrease in suction power, clean the filter cylinder.
-- Never use the appliance if the filter cylinder, filter cylinder case and the dust bucket are not properly installed or if the cover is not closed properly.
-- Always unplug the appliance before you empty the dust bucket. -- Do not press the AutoClean button if the dust bucket, the filter
cylinder and filter cylinder case are not properly installed or if the cover is not closed properly.
-- Never use the appliance without the motor protection filter.This could damage the motor and shorten the life of the appliance.
-- Only use the Philips filter cylinder supplied with the appliance.
-- The filter cylinder is not waterproof and cannot be cleaned with water, cleaning agents or flammable substances. Only clean the filter cylinder with the AutoClean system or the cleaning brush supplied.
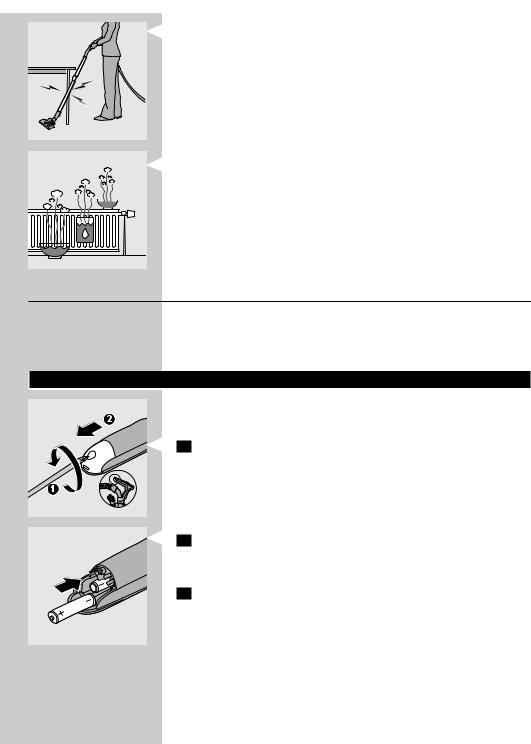
-- During vacuum cleaning, especially in rooms with low air humidity, your vacuum cleaner builds up static electricity.As a result you can experience electric shocks when you touch the tube or other steel parts of your vacuum cleaner.These shocks are not harmful to you and do not damage the appliance.To reduce this inconvenience we advise you:
8English
1to discharge the appliance by frequently holding the tube against other metal objects in the room (for example legs of a table or chair, radiator etc.);
2 to raise the air humidity level in the room by placing water in the room. For example, you can hang containers filled with water from your radiators or place bowls filled with water on or near your radiators.
Electromagnetic fields (EMF)
This Philips appliance complies with all standards regarding electromagnetic fields (EMF). If handled properly and according to the instructions in this user manual, the appliance is safe to use based on scientific evidence available today.
Before first use
Batteries for the remote control on the handle are supplied with the appliance. Insert the batteries into the battery compartment before you use the appliance.The batteries last at least 2 years.
1Use a screwdriver to remove the screw of the battery compartment lid (1) and remove the battery compartment lid (2).
2 Insert twoAAA 1.5-volt alkaline batteries into the handle.
Note:Make sure that the - and + poles of the batteries point in the right direction.
3 Reattach the battery compartment lid and fasten the screw with a screwdriver.
The appliance is now ready for use.

English 9
Preparing for use
Attaching the handgrip
1 Attach the handgrip to the telescopic tube (‘click’).
2To disconnect the handgrip from the tube,hold the handgrip with one hand.With the other hand,hold the telescopic tube and press the tube release button (1) and pull the tube off the handgrip (2).
Note (specific types only):The holes at the end of the handgrip prevent objects from getting stuck or damaged when you use your vacuum cleaner without the tube or accessories supplied.
Hose
1 To connect the hose,push it firmly into the appliance (‘click’).
2To disconnect the hose,press the release button and pull the hose out of the appliance.
Telescopic tube
Tip:For optimal ergonomy,we advise you to hold both handgrips when you move the nozzle to and fro.This prevents you from having to twist and bend your spine.
1Adjust the length of the tube in such a way that the hand holding the standard handgrip is at hip level.

10 English
2For optimal ergonomy,we advise you to hold the tube in such a way that the standard handgrip is at hip level.
3To connect the tube to a nozzle,press the spring-loaded lock button on the tube and insert the tube into the nozzle.Fit the spring-loaded lock button into the opening in the nozzle (‘click’).
Accessory holder
1 Slide the accessory holder onto the handgrip (‘click’).
2 Push the accessories onto the holder.
3To detach the accessory holder, squeeze the release levers together (1) and slide the accessory holder off the handgrip (2).
English 11
Crevice nozzle, small nozzle and brush attachment
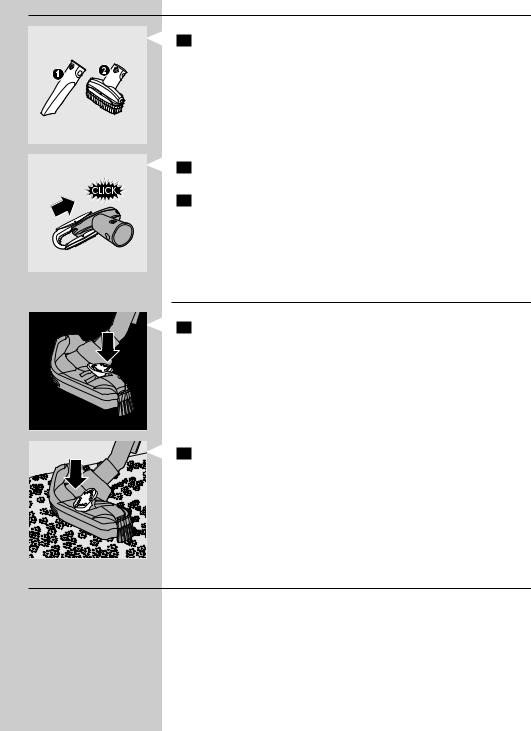
1Connect the crevice nozzle (1) or small nozzle (2) with or without brush attachment directly to the standard handgrip or to the tube.
Brush attachment
1To assemble the brush attachment,slide it onto the bottom of the small nozzle (‘click’).
2To disassemble the brush attachment,slide it off the bottom of the small nozzle.
Tri-Active nozzle
1Use the hard floor setting to clean hard floors (for instance for tiled,parqueted,laminated and linoleumed flooring):push the rocker switch on top of the nozzle with your foot to make the brush strip come out of the housing.At the same time,the wheel is lifted to prevent scratching and to increase manoeuvrability.
2Use the carpet setting to clean carpets:push the rocker switch again to make the brush strip disappear into the nozzle housing.The wheel is lowered automatically.
Remote control operation
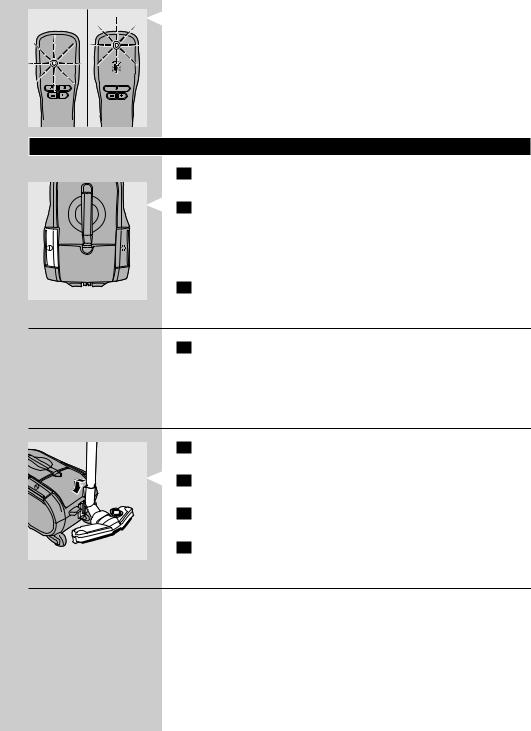
-- The remote control has three buttons (specific types only) or four buttons (specific types only) with which you operate the vacuum cleaner.
12 English
-- The infrared-active light flashes when you press a button on the remote control.
Using the appliance
1 Pull the cord out of the appliance and put the mains plug in the wall socket.
2Press the on/off button on top of the appliance to switch on the appliance.
Tip:To avoid bending your back,press the on/off button with your foot.
,, The vacuum cleaner starts operating at the highest suction power level.
3 To switch off the appliance,press the on/off button on top of the appliance or the standby button on the remote control.
Adjusting suction power
1During vacuuming,you can adjust the suction power level with the
– and + buttons on the remote control.
-- Use maximum suction power to vacuum very dirty carpets and hard floors.
-- Use minimum suction power to vacuum curtains, tablecloths etc.
Pausing during use
1If you want to pause for a moment,press the standby button on the remote control to switch off the appliance temporarily.
2 Insert the ridge on the nozzle into the parking slot to park the tube in a convenient position.
3 To ensure stable parking of the telescopic tube,adjust the tube to the shortest length.
4 To continue vacuum cleaning,simply press the standby button on the remote control again.
Cleaning the filter cylinder
A clean filter cylinder helps maintain high suction power.
After every vacuuming session, clean the filter cylinder in the way described below.
Always leave the hose connected to the appliance during the filtercleaning process to prevent dust from coming out of the appliance.
English 13
Using the filter-cleaning handle to clean the filter cylinder (specific types only)
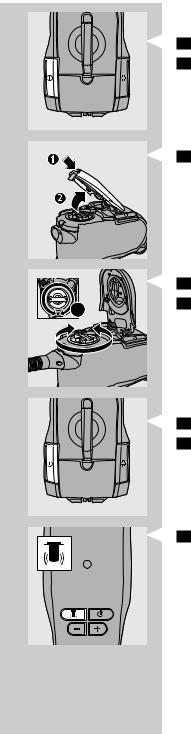
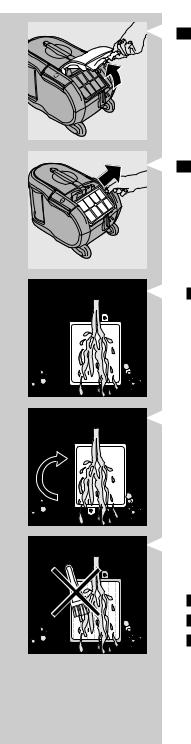
1 Switch off the appliance and unplug it.
2Keep the appliance in horizontal position,with all wheels touching the floor.
3 Press the cover release button (1) and open the cover (2).
|
4 |
Turn the filter-cleaning handle until it has made 6 full circles. |
|
6x |
5 |
Close the cover firmly (‘click’). |
|
Using theAutoClean button to clean the filter cylinder (specific |
|||
|
|||
|
types only) |
||
|
Always press theAutoClean button when you have finished vacuum |
||
|
cleaning. |
||
|
Make sure the dust bucket,the filter cylinder and the filter cylinder case |
||
|
are installed properly and the cover is closed properly. |
||
|
1 |
Switch off the appliance.Leave the mains plug in the wall socket. |
|
2Keep the appliance in horizontal position,with all wheels touching the floor.
3 Press theAutoClean button on the remote control on the handgrip. ,, You hear a beep and the filter-cleaning process starts.
,, During the filter-cleaning process,the appliance produces a rattling noise.This is completely normal.
,, When the filter-cleaning process is finished,you hear a beep.
Using theAutoClean button during vacuuming (specific types only)
You can also press the AutoClean button during vacuum cleaning.When you do this, the motor stops running and the filter-cleaning process starts. During the filter-cleaning process, the appliance does not suck up dirt.
When the filter-cleaning process is finished, the motor automatically starts running again and you can continue vacuum cleaning.

14 English
|
|
Reminder to clean the filter cylinder |
|
|
|
You have to clean the filter cylinder after each vacuuming session.This |
|
|
|
prevents the filter cylinder from clogging and helps maintain optimal |
|
15 sec. |
15 sec. |
suction power. |
|
-- If you fail to clean the filter cylinder a number of vacuuming sessions in |
|||
|
|
||
|
|
a row, the filter light flashes for 15 seconds. |
Cleaning and maintenance
Cleaning the dust bucket and filter cylinder unit
Always unplug the appliance before you empty the dust bucket.
The dust bucket is not dishwasher-proof.
Empty the dust bucket as soon as the dust level has reached the round disc of the filter cylinder case.
1 Switch off the appliance and remove the mains plug from the wall socket.
2To disconnect the hose,press the release button (1) and pull the hose out of the appliance (2).
3To unlock the cover,press the cover release button. Swing open the cover.
4 Lift the dust bucket out of the appliance.
5Press the release button for the filter cylinder unit on the bucket handle (1) and remove the filter cylinder unit (2).
6 Hold the dust bucket over a dustbin and empty it.
7 Clean the dust bucket with cold tap water and some washing-up liquid.
English 15
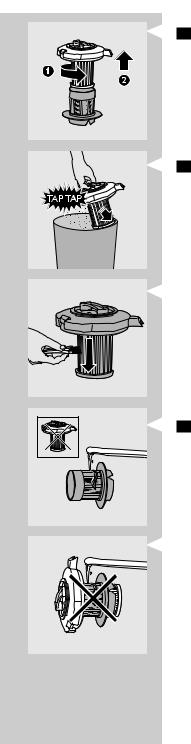
8If you want to clean the filter cylinder unit, remove the filter cylinder from the filter cylinder case.Turn the handle on top of the filter cylinder anticlockwise (1) and lift the filter cylinder out of the case (2).
9To clean the filter cylinder,gently tap it against the dustbin to release all fine dust from the filter cylinder.
-- If you persistently fail to clean the filter cylinder after every use, the filter cylinder clogs up with dirt and the suction power decreases over time. If this happens, unclog the filter cylinder in the following way:
1Hold the filter cylinder over a dustbin.
2Clean it with the cleaning brush supplied. Gently brush from the top of the filter downwards along the ribs of the filter.
Only use the cleaning brush that comes with the appliance.Other brushes may damage the filter cylinder.
The filter cylinder is not waterproof and cannot be cleaned with water, cleaning agents or flammable substances.
Note:Cleaning does not restore the original colour of the filter,but does restore its filtration power.
10To clean the filter cylinder case,use a dry cloth or the cleaning brush supplied.You can also clean it with cold tap water and some washingup liquid.
-- Do not clean the filter cylinder case with the filter cylinder in it under the tap, as the filter cylinder is not waterproof.

16 English
11 Put the filter cylinder back into the filter cylinder case (1) and turn it clockwise to fix it (2) (‘click’).
Make sure that the filter cylinder case is dry before you reinsert the filter cylinder into it.
12 Put the filter cylinder unit back into the dust bucket (‘click’).
Make sure that the dust bucket is dry before you reinsert the filter cylinder unit.
Cleaning the motor protection filter
Clean the permanent motor protection filter every two months.
1 Unplug the appliance.
2 Take the motor protection filter out of the appliance and clean the filter by tapping the dust out of it over a dustbin.
If you want to clean the motor protection filter more thoroughly, you can rinse it under a cold tap.
Do not use washing-up liquid,flammable substances or any other cleaning agent to clean the motor protection filter.
Make sure that the motor protection filter is completely dry before you put it back into the filter compartment.
3Press the clean filter firmly back into the filter compartment to ensure that it is properly placed.
Washable Ultra CleanAir HEPA 13 filter
Note:To guarantee optimal dust retention and performance of the vacuum cleaner,always replace the HEPA filter with an original Philips filter of the correct type (see chapter‘Ordering accessories and filters’).
Clean the washable HEPA 13 filter every 6 months.You can clean the washable HEPA 13 filter max. 4 times. Replace the filter after it has been cleaned 4 times.
Note:Do not clean the HEPA 13 filter in the washing machine,but follow the procedure below.
1 Unplug the appliance.
English 17
2Grab the release tabs of the HEPA filter cover to open and remove the filter cover.
3 Take out the washable HEPA 13 filter.
4Rinse the pleated side of the HEPA 13 filter under a warm slowrunning tap.
-- Hold the filter in such a way that the pleated side points upwards and the water flows parallel to the pleats. Hold the filter at an angle so that the water washes away the dirt inside the pleats.
-- Turn the filter 180° and let the water flow along the pleats in the opposite direction.
-- Continue this process until the filter is clean.
Never clean the washable filter with a brush.
Note:Cleaning does not restore the original colour of the filter,but does restore its filtration power.
5 Carefully shake the water from the surface of the filter. 6 Let the HEPA filter dry completely.
7 Place the dry HEPA filter back into the appliance.

18 English
8 Reattach the top of the filter cover (1) and then close the cover (2) (‘click’).
Replacement
Batteries of remote control
1Replace the batteries when the light on top of the remote control does not flash when you press any button.
Note:Your remote control may differ from the one shown in the figure.
2 Follow steps 1 to 3 in chapter‘Before first use’.
Storage
Note:Before you store the appliance,always make sure you have cleaned the filter cylinder by pressing the AutoClean button (specific types only) or with the filter-cleaning handle (specific types only).See section‘Cleaning the filter cylinder’ in chapter‘Using the appliance’.
1 Switch off the appliance and remove the mains plug from the wall socket.
2 Press the cord rewind button to rewind the mains cord. 3 Adjust the telescopic tube to the shortest length.

English 19
4Put theTri-Active nozzle in the carpet setting when you store it (brush strip retracted into the nozzle).Also prevent the side brushes from becoming bent.
5Use the storage grip to put the appliance in upright position.Insert the ridge on the nozzle into the storage slot on the appliance.
Tip:You can also detach the tube from the hose.
Tip:You can also store the appliance horizontally.In this case,insert the ridge on the nozzle into the parking slot.
Ordering accessories and filters
To purchase accessories and filters, visit our website www.philps.com, contact the Philips Consumer Care Centre in your country or visit your vacuum cleaner specialist.
If you have any difficulties obtaining filters or other accessories for this appliance, contact the Philips Consumer Care Centre in your country or consult the worldwide guarantee leaflet.
-- Washable Ultra Clean Air HEPA 13 filters are available under service number 432200493350
-- Filter cylinder for FC9262, dark aubergine: 432200909850 -- Filter cylinder for FC9256, ice white: 4322 009 09840
-- Filter cylinder for FC9258, pea green: 432200900090
Environment
-- The batteries of the remote control contain substances that may pollute the environment. Do not throw away batteries with the normal household waste, but dispose of them at an official collection point for batteries.Always remove the batteries of the remote control before you discard and hand in the appliance at an official collection point.

20 English
-- Do not throw away the appliance with the normal household waste at the end of its life, but hand it in at an official collection point for recycling. By doing this, you help to preserve the environment.
Guarantee and service
If you need service or information or if you have a problem, please visit the Philips website at www.philips.com or contact the Philips Consumer Care Centre in your country (you find its phone number in the worldwide guarantee leaflet). If there is no Consumer Care Centre in your country, go to your local Philips dealer.
Troubleshooting
This chapter summarises the most common problems you could encounter with the appliance. If you are unable to solve the problem with the information below, contact the Consumer Care Centre in your country.
Problem |
Possible cause |
Solution |
|
|
|
The light in the |
The filter cylinder needs |
Press the AutoClean button (specific types only) or |
AutoClean button |
to be cleaned. |
turn the filter-cleaning handle (specific types only) to |
(specific types |
|
clean the filter cylinder. |
only) or the filter- |
|
|
cleaning reminder |
|
|
light (specific types |
|
|
only) flashes. |
|
|
The suction power |
You have selected a low |
Select a higher suction power setting. |
is insufficient. |
suction power setting. |
|
|
The filter cylinder is |
Clean the filter cylinder (see chapter‘Cleaning and |
|
clogged with dirt. |
maintenance’). |
|
The motor protection |
Clean or replace the filters (see chapter‘Cleaning and |
|
filter and/or the HEPA |
maintenance’). |
|
filter are dirty. |
|
|
The nozzle, hose or tube |
To remove the obstruction, disconnect the blocked-up |
|
is blocked up. |
item and connect it (as far as possible) the other way |
|
|
around. Switch on the vacuum cleaner to force the air |
|
|
through the blocked-up item in opposite direction. |
The infrared |
You have not inserted |
remote control |
the batteries properly or |
does not function. |
the batteries are empty. |
Insert the batteries properly or replace them. See chapter‘Replacement’.
|
|
English 21 |
Problem |
Possible cause |
Solution |
|
|
|
The appliance |
The dust bucket and/or |
Unplug the appliance. Make sure that the filter |
does not function |
the filter cylinder unit are |
cylinder is assembled properly into the filter cylinder |
and the standby |
not installed properly. |
case (‘click’).Also make sure that the filter cylinder unit |
light on the cover |
|
is inserted properly into the dust bucket (‘click’). |
of the appliance |
|
|
flashes. |
|
|
|
The cover is not closed |
|
properly. |
When I use my |
Your vacuum cleaner has |
vacuum cleaner |
built up static electricity. |
I sometimes feel |
The lower the air |
electric shocks. |
humidity in the rooms, |
|
the more static electricity |
|
the appliance builds up. |
Make sure the cover is closed properly. Put the plug in the wall socket and try again.
To reduce this inconvenience, we advise you to discharge the appliance by frequently holding the tube against other metal objects in the room (for example legs of a table or chair, radiator etc.).
To reduce this inconvenience, we advise you to raise the air humidity level in the room by placing water in the room. For example, you can hang containers filled with water from your radiators or place bowls filled with water on or near your radiators.
Removing the PostureProtect handgrip
If you do not find the PostureProtect handgrip comfortable to use, you can consider removing it.
1 Remove the screw cover strip from the PostureProtect handgrip.
2Use aTorxT15 screwdriver to remove the screws of the PostureProtect handgrip.
3 Remove the PostureProtect handgrip from the tube.

22 Dansk
Indledning
Tillykke med dit køb og velkommen til Philips! For at få fuldt udbytte af den support, Philips tilbyder, skal du registrere dit produkt på www.philips. com/welcome.
Generel beskrivelse (fig. 1)
1Filtercylinderenhed
A Filterrengøringsgreb (kun bestemte typer)
BFiltercylinder
C Kabinet til filtercylinder
2Udløserknap til dæksel
3 Udløserknap til filtercylinderenhed
4Dæksel
5 |
Motorbeskyttelsesfilter |
6 |
Bløde gummibaghjul |
7Slangens udløserknap
8 Åbning til tilslutning af slangen
9 Rensebørste
10Støvbeholder
11Bærehåndtag
12Afbryderknap
13Fjernbetjeningsmodtager med standby-indikator
14Knap til ledningsoprul
15Tri-Active-mundstykke
16Vippeknap til indstilling til tæpper/hårde gulve
17Sidebørste
18Parkerings-/opbevaringsrille
19PostureProtect-greb
20Udløserknap til støvsugerrør
21Fjernbetjening på greb med 3 knapper
22Fjernbetjening på greb med 4 knapper
23Standardgreb
24Fleksibel slangetilslutning
25Slange
26Skrue til dækselstrimmel
27Tilbehørsholder
28Udløserhåndtag til tilbehørsholder
292-delt XL teleskoprør med PostureProtect-greb
303-delt XL teleskoprør med PostureProtect-greb
31HEPA-filterdæksel
32Frigørelsestapper på dækslet til HEPA-filter
33Vaskbart Ultra Clean Air HEPA 13-filter
34Ledning og stik
35Parkeringsbeslag
36Lille mundstykke
37Børstetilbehør
38Langt smalt mundstykke
39Opbevaringsgreb
40Drejehjul
41Opbevaringsholder
42Typeskilt

Dansk 23
Vigtigt
Læs denne brugsvejledning omhyggeligt igennem, inden apparatet tages i brug, og gem den til eventuelt senere brug.
Fare
-- Opsug aldrig vand eller andre former for væske. Opsug aldrig brandbare substanser eller aske, før denne er blevet helt kold.
Advarsel
-- Kontrollér, om den angivne netspænding på apparatet svarer til den lokale netspænding, før du slutter strøm til apparatet.
-- Brug ikke apparatet, hvis netledning, stik eller selve apparatet er beskadiget.
-- Hvis netledningen beskadiges, må den kun udskiftes af Philips, et autoriseret Philips-serviceværksted eller en tilsvarende kvalificeret fagmand for at undgå enhver risiko.
-- Dette apparat er ikke beregnet til at blive brugt af personer (herunder børn) med nedsatte fysiske og mentale evner, nedsat følesans eller manglende erfaring og viden, medmindre de er blevet vejledt eller instrueret i apparatets anvendelse af en person, der er ansvarlig for deres sikkerhed.
-- Apparatet bør holdes uden for børns rækkevidde for at sikre, at de ikke kan komme til at lege med det.
-- Slange, rør eller andet tilbehør må aldrig rettes mod øjne eller ører eller kommes i munden, mens de er tilsluttet den tændte støvsuger.
NB!
-- Undgå at opsuge store objekter, da dette kan medføre, at luftstrømmen i rør eller slange bliver tilstoppet.
-- Når du bruger støvsugeren til at støvsuge aske, fint sand, kalk, cementstøv og lignende substanser, tilstoppes porerne i filtercylinderen. Hvis du oplever en stærkt nedsat sugestyrke, skal filtercylinderen rengøres.
-- Brug aldrig apparatet, hvis filtercylinderen, kabinettet til filtercylinderen og støvbeholderen ikke er korrekt monteret, eller hvis dækslet ikke er korrekt lukket.
-- Tag altid stikket ud af kontakten, før du tømmer støvkammeret.
-- Tryk ikke på AutoClean-knappen, hvis støvbeholderen, filtercylinderen og kabinettet til filtercylinderen ikke er korrekt installeret, eller hvis dækslet ikke er korrekt lukket.
-- Brug aldrig apparatet uden motorbeskyttelsesfilter. Det vil kunne skade motoren og forkorte apparatets levetid.
-- Brug kun Philips’ filtercylinder, der følger med apparatet.
-- Filtercylinderen er ikke vandtæt og kan ikke rengøres med vand, rengøringsmidler eller brandbare substanser. Rengør kun filtercylinderen med AutoClean-systemet eller den medfølgende rengøringsbørste.
-- Når du støvsuger, især i rum med lav luftfugtighed, genererer din støvsuger statisk elektricitet. Derfor kan du opleve elektriske stød, når du rører ved støvsugerrøret eller andre ståldele på støvsugeren. Disse stød er ikke farlige for dig og skader ikke apparatet. Hvis du vil undgå dette fremover, anbefaler vi, at du:

24 Dansk
1jævnligt aflader apparatet ved at holde røret mod andre metalobjekter i rummet (f.eks. bordog stoleben, radiatorer osv.);
2 øger luftfugtigheden i rummet ved at placere beholdere med vand i rummet. Du kan f.eks. hænge beholdere fyldt med vand på radiatorerne eller sætte skåle med vand oven på eller i nærheden af radiatorerne.
Elektromagnetiske felter (EMF)
Dette Philips-apparat overholder alle standarder for elektromagnetiske felter (EMF).Ved korrekt anvendelse i overensstemmelse med instruktionerne i denne brugervejledning, er apparatet sikkert at anvende ifølge den videnskabelige viden, der er tilgængelig i dag.
Før apparatet tages i brug
Batterierne til fjernbetjeningen på håndtaget leveres sammen med apparatet. Sæt batterierne i batterirummet før brug af apparatet. Batterierne holder mindst 2 år.
1Brug en skruetrækker til at fjerne skruen i låget til batterirummet (1), og fjern låget til batterirummet (2).
2 Isæt toAAA 1,5 volt alkalinebatterier i håndgrebet.
Bemærk:Sørg for,at batteriernes poler (- og +) vender rigtigt.
3 Sæt låget til batterirummet på igen,og fastgør skruen med en skruetrækker.
Apparatet er nu klar til brug.

Dansk 25
Klargøring
Montering af håndgrebet
1 Sæt håndgrebet på teleskoprøret (“klik”).
2Håndgrebet tages af røret ved at holde håndgrebet med den ene hånd.Med den anden hånd holder du teleskoprøret og trykker på udløserknappen (1) og trækker røret af håndgrebet (2).
Bemærk (kun bestemte typer):Hullerne ved enden af håndtaget forhindrer genstande i at sætte sig fast eller blive beskadiget,når du bruger din støvsuger uden røret eller medfølgende tilbehør.
Slange
1 Slangen tilsluttes ved at skubbe den fast på apparatet (“klik”).
2Den tages af igen ved at trykke på udløserknappen og trække slangen ud af apparatet.
Teleskoprør
Tip:Vi anbefaler,at du holder i begge håndtag,når du kører mundstykket frem og tilbage,for at få det optimale ergonomiske resultat.Dette forhindrer dig i at skulle vride og bøje rygsøjlen.
1Juster rørets længde på en sådan måde,at den hånd,der holder i standardgrebet,er i hoftehøjde.

26 Dansk
2Vi anbefaler,at du holder i støvsugerrøret,så standardgrebet er i hoftehøjde,for at få det bedste ergonomiske resultat.
3Hvis du vil sætte røret på et mundstykke,skal du trykke på den fjederbelastede låseknap på røret og sætte røret ind i mundstykket. Anbring den fjederbelastede låseknap i mundstykkets åbning (“klik”).
Tilbehørsholder
1 Skub tilbehørsholderen på grebet (“klik”).
2 Skub tilbehøret på holderen.
3Hvis du vil tage tilbehørsholderen af, skal du presse udløseren sammen (1) og skubbe tilbehørsholderen af håndgrebet (2).
Dansk 27
Sprækkemundstykke,lille mundstykke og børstemundstykke
1Sæt sprækkemundstykket (1) eller det lille mundstykke (2) med eller uden børstetilbehør direkte på standardgrebet eller røret.
Børstetilbehør
1Børstetilbehøret samles ved at skubbe det på bunden af det lille mundstykke (“klik”).
2Børstetilbehøret skilles ad ved at skubbe det af bunden af det lille mundstykke.
Tri-Active-mundstykke
1Brug indstillingen til hårde gulve til rengøring af hårde gulve (f.eks. flise-,parket-,laminat- og linoleumsgulve):Tryk på vippeknappen oven på mundstykket med foden for at skyde børsterne ud af kabinettet. Samtidig løftes hjulet op for at undgå at ridse gulvet og for at gøre det lettere at manøvrere.
2Brug indstillingen til tæpper til rengøring af tæpper:Tryk på vippeknappen igen,så børsten forsvinder ind i mundstykket.Hjulet sænkes automatisk.
Brug af fjernbetjeningen
-- Fjernbetjeningen har tre knapper (kun bestemte typer) eller fire knapper (kun bestemte typer), som du bruger til at betjene støvsugeren med.

28 Dansk
-- Den infrarøde aktiv-indikator blinker, når du trykker på en knap på fjernbetjeningen.
Sådan bruges apparatet
1 Træk ledningen ud af apparatet,og sæt stikket i stikkontakten. 2 Tryk på on/off-knappen oven på apparatet for at tænde for det.
Tip:Tryk på on/off-knappen med foden for at undgå at bøje ryggen.
,, Støvsugeren begynder med den højeste sugestyrke.
3Apparatet slukkes ved at trykke på tænd/sluk-knappen oven på apparatet eller på standby-knappen på fjernbetjeningen.
Justering af sugestyrke
1Mens du støvsuger,kan du justere sugestyrken med knapperne – og + på fjernbetjeningen.
-- Brug maksimal sugestyrke til at støvsuge meget beskidte tæpper og hårde gulve.
-- Brug minimal sugestyrke til støvsugning af gardiner, duge osv.
Pause under brug
1Hvis du vil holde en kort pause,skal du trykke på standby-knappen på fjernbetjeningen for at slukke apparatet midlertidigt.
2 Isæt rillen på mundstykket i parkeringsbeslaget for at parkere røret i en bekvem position.
3 Juster røret til den kortest mulige længde for at sikre stabil parkering af teleskoprøret.
4 Når du vil fortsætte med at støvsuge,skal du blot trykke på standbyknappen på fjernbetjeningen igen.
Rengøring af filtercylinderen
Cylinderen til rengøring af filteret opretholder høj sugestyrke.
Hver gang, du har støvsuget, skal du rengøre filtercylinderen som beskrevet herunder.
Slangen skal altid sidde i apparatet under rengøring af filteret for at undgå,at der slipper støv ud af apparatet.
Brug af filterrengøringsgrebet til rengøring af filtercylinderen (kun bestemte typer)

Dansk 29
1 Sluk for apparatet,og tag stikket ud af stikkontakten. 2 Apparatet skal stå vandret med alle hjul i gulvet.
3 Tryk på udløserknappen til dækslet (1),og åbn dækslet (2).
|
4 |
Drej filterrengøringsgrebet,indtil det har gennemført 6 hele |
|
6x |
|
omdrejninger. |
|
5 |
Luk dækslet ordentligt (der lyder et“klik”). |
||
|
|||
|
Brug afAutoClean-knappen til rengøring af filtercylinderen |
||
|
(kun bestemte typer) |
||
|
Tryk altid påAutoClean-knappen,når du er færdig med at støvsuge. |
||
|
Sørg for,at støvbeholderen,filtercylinderen og kabinettet til |
||
|
filtercylinderen sidder korrekt,og at dækslet er korrekt lukket. |
||
1 Sluk for apparatet.Lad stikket blive i stikkontakten. 2 Apparatet skal stå vandret med alle hjul i gulvet.
3 Tryk påAutoClean-knappen på fjernbetjeningen på håndtaget. ,, Du hører et bip,og rengøringen af filteret starter.
,, Under rengøringen af filteret laver apparatet en raslende lyd.Dette er helt normalt.
,, Når rengøringen af filteret er færdig,hører du et bip.
Brug afAutoClean-knappen under støvsugning (kun bestemte typer)
Du kan også trykke på knappen for AutoClean, mens du støvsuger. Når du gør det, vil motoren stoppe, og rengøringen af filteret går i gang. Under rengøringen af filteret, vil apparatet ikke støvsuge. Når rengøringen af filteret er færdig, starter motoren automatisk igen, og du kan fortsætte med at støvsuge.

30 Dansk
|
|
Påmindelse om rengøring af filtercylinderen |
|
|
|
Du skal rengøre filtercylinderen efter hver støvsugning. Dette forhindrer, |
|
|
|
at filtercylinderen stopper til, og hjælper med at opretholde den optimale |
|
15 sec. |
15 sec. |
sugestyrke. |
|
-- Hvis du ikke rengør filtercylinderen flere gange i træk, vil |
|||
|
|
||
|
|
filterindikatoren blinke i 15 sekunder. |
Rengøring og vedligeholdelse
Rengøring af støvbeholder og filtercylinderenhed
Tag altid stikket ud af kontakten,før du tømmer støvkammeret.
Støvbeholderen kan ikke vaskes i opvaskemaskinen.
Tøm støvbeholderen så snart støvniveauet er nået op til den runde disk i filtercylinder-kabinettet.
1 Sluk for apparatet,og tag stikket ud af stikkontakten.
2 Slangen tages af ved at trykke på udløserknappen (1) og trække slangen ud af apparatet (2).
3Tryk på udløserknappen til dækslet for at frigøre dækslet. Drej dækslet op.
4 Løft støvkammeret ud af apparatet.
5Tryk på udløserknappen for filtercylinderenheden på støvbeholderen (1), og fjern filtercylinderenheden (2).
6 Hold støvbeholderen ind over en skraldespand,og tøm den. 7 Rengør støvkammeret med koldt vand og lidt opvaskemiddel.
Loading...