How it Works
Log In / Sign Up
Buy Points
How it Works
FAQ
Contact Us
Questions and Suggestions
Users
Philips
Loading...
F
FB730
FB732
FB735
12
FB755
10
FB755V
2
FB755V/00
6
FB800
FB830/00B
6
FB830/04B
6
FB840/00B
6
FB840/04B
6
FB850/00B
7
FB850/04B
6
FB860/00B
6
FB900
6
FB900/00S
FB900/01S
FB900/33S
FB965
12
FB965/00
6
FB975
12
FB975/00
6
FBH058-059
FBH145
FBL2031BB
2
FBL2033BB
FBL2040BB
FBL2041BB
FBL2041IBB
FBL22031BB
FBL22033BB
FBL22040BB
FBL22041BB
FBP450L
FBP90
FBS105
FBS111
FBS112
FBS113
FBS115
FBS116
FBS163
FBS330
FC 6044
2
FC 6048
13
FC 6050
28
FC 6051
23
FC 6053
24
FC 6067
5
FC 6076
3
FC 6090
24
FC 6091
13
FC 6092
25
FC 6093
25
FC 6094
24
FC 6095
26
FC 6095-01
3
FC 6120
25
FC 6125
24
FC 6126
30
FC 6126/01
2
FC 6132
20
FC 6142
39
FC 6144
34
FC 6146
31
FC 6146/01
2
FC 6148
32
FC 6841
3
FC 6841A
FC 6842
3
FC 6842A
FC 6843
27
FC 6844
33
FC 8020
5
FC 8021
32
FC 8022
33
FC 8023
29
FC 8025
14
FC 8026
2
FC 8028
9
FC 8029
12
FC 8030
9
FC 8031
14
FC 8032
9
FC 8033
21
FC 8034
FC 8035
25
FC 8036
24
FC 8038
12
FC 8042
3
FC 8043
6
FC 8044
20
FC 8045
7
FC 8046
6
FC 8047
14
FC 8048
11
FC 8049
6
FC 8050
12
FC 8052
10
FC 8052/01
2
Loading...
Loading...
Nothing found
FC 6090
BROCHURE
2 pgs
1.14 Mb
0
BROCHURE
2 pgs
1.32 Mb
0
BROCHURE
2 pgs
1.31 Mb
0
BROCHURE
2 pgs
1.12 Mb
0
BROCHURE
2 pgs
1.12 Mb
0
BROCHURE
2 pgs
434.73 Kb
0
BROCHURE
2 pgs
1.31 Mb
0
BROCHURE
2 pgs
1.12 Mb
0
BROCHURE
2 pgs
1.16 Mb
0
BROCHURE
2 pgs
1.42 Mb
0
BROCHURE
2 pgs
1.13 Mb
0
BROCHURE
2 pgs
1.14 Mb
0
BROCHURE
2 pgs
422.9 Kb
0
BROCHURE
2 pgs
1.14 Mb
0
BROCHURE [zh]
2 pgs
1.13 Mb
0
Instructions For Use Manual
92 pgs
1.74 Mb
0
Service Manual
2 pgs
263.42 Kb
0
User Manual
116 pgs
673.34 Kb
0
User Manual
92 pgs
1.52 Mb
0
User Manual
2 pgs
1.37 Mb
0
User Manual
2 pgs
1.42 Mb
0
User Manual
2 pgs
1.21 Mb
0
User Manual
2 pgs
1.35 Mb
0
User Manual
2 pgs
1.21 Mb
0
Table of contents
Loading...
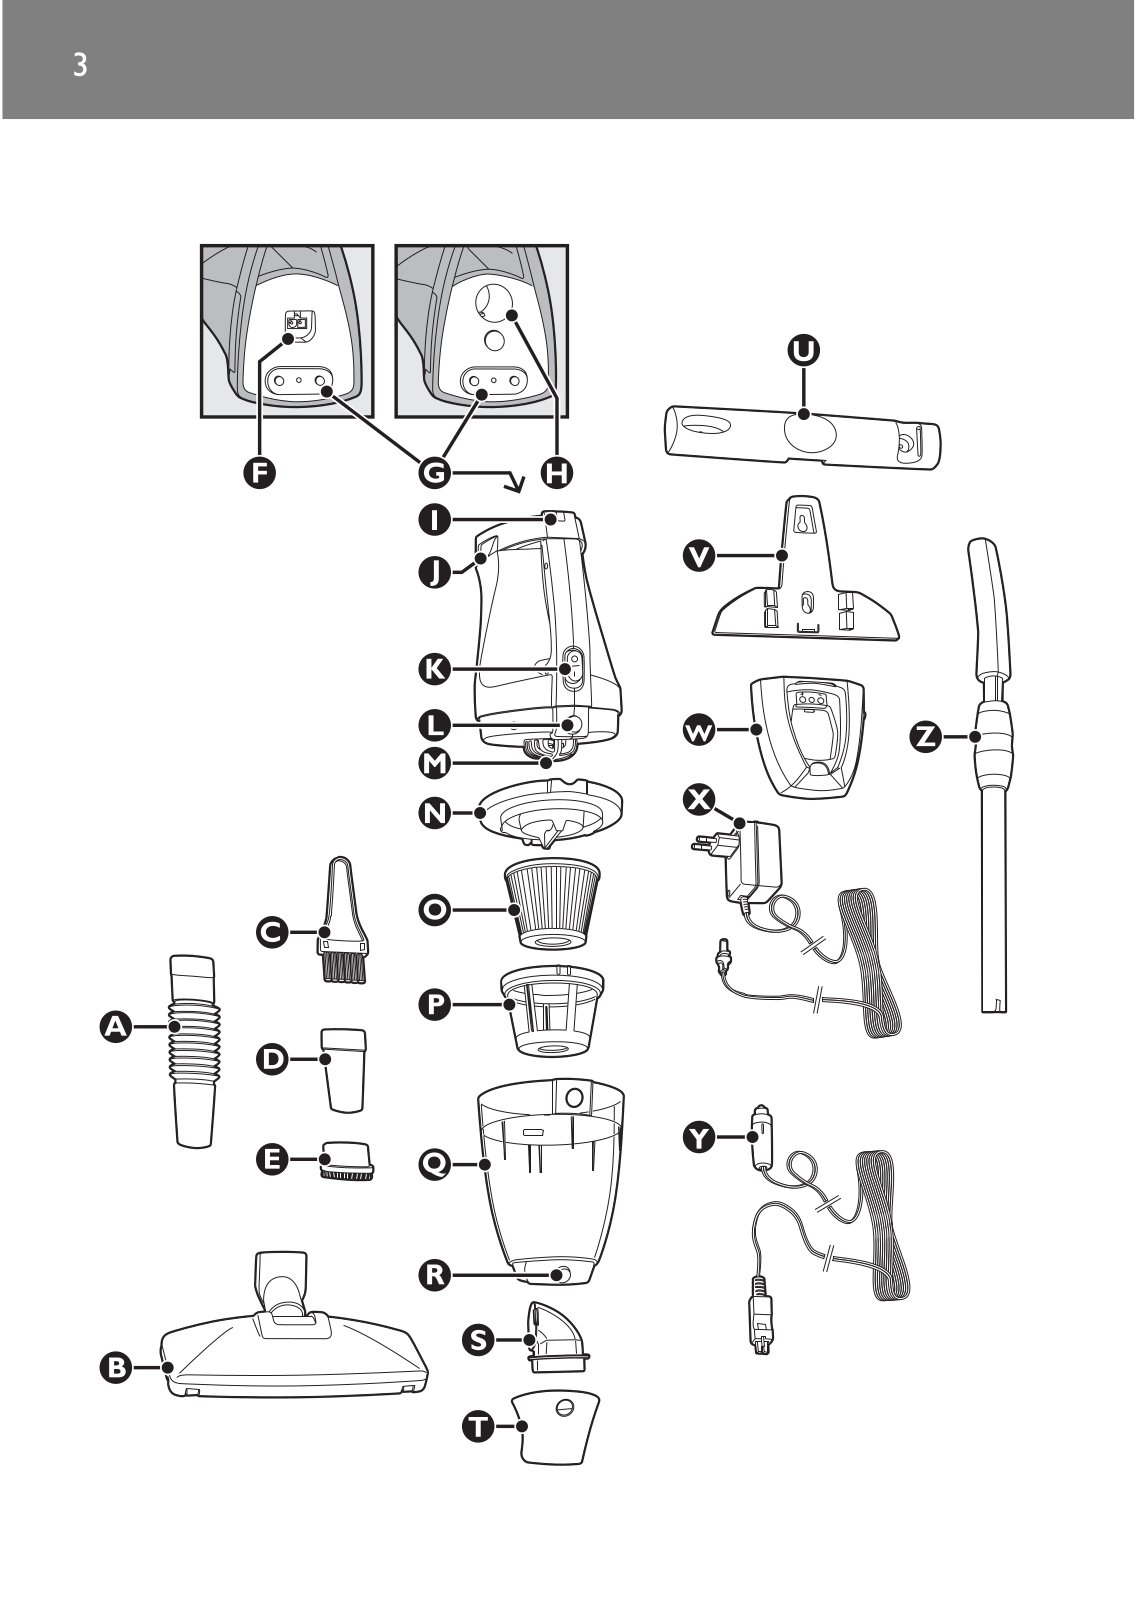
Philips FC6090, FC6092, FC6094 User Manual
...
Philips User Manual
Download
Specifications and Main Features
Frequently Asked Questions
User Manual
Download
Loading...
+
hidden pages
Unhide
You need points to download manuals.
1 point = 1 manual.
You can buy points or you can get point for every manual you upload.
Buy points
Upload your manuals
 Loading...