

FC8822, FC8812
FC8822
Wheels stuck
ݓઁሂ
Top cover or dust container not placed properly
רۆࠋࠦӧ٦ݾ
Bumper stuck
ߓԎሑᇆሂ
Robot lifted up from oor
՚ֽϴุఓᇊୃስײᆋ༏ӧచ
Colour of oor too dark
ֽϴဂ೨ขτ
Battery not inserted properly / Charging error (switch is o)
ԁሑݾԍմ༆IJܵၜܵтij
5
6
4
3
2
1
7
8
9
12
11
10
15
14
13
17
19
18
16
20
22
21
23
25
24
26
1


English 6
Čeština 19
Magyar 32
Română 46
Slovensky 60
Русский 73
Українська 89
Қазақша
103

6
English
Introduction
Congratulations on your purchase and welcome to Philips! To fully benefit from the support that
Philips offers, register your product at www.philips.com/welcome.
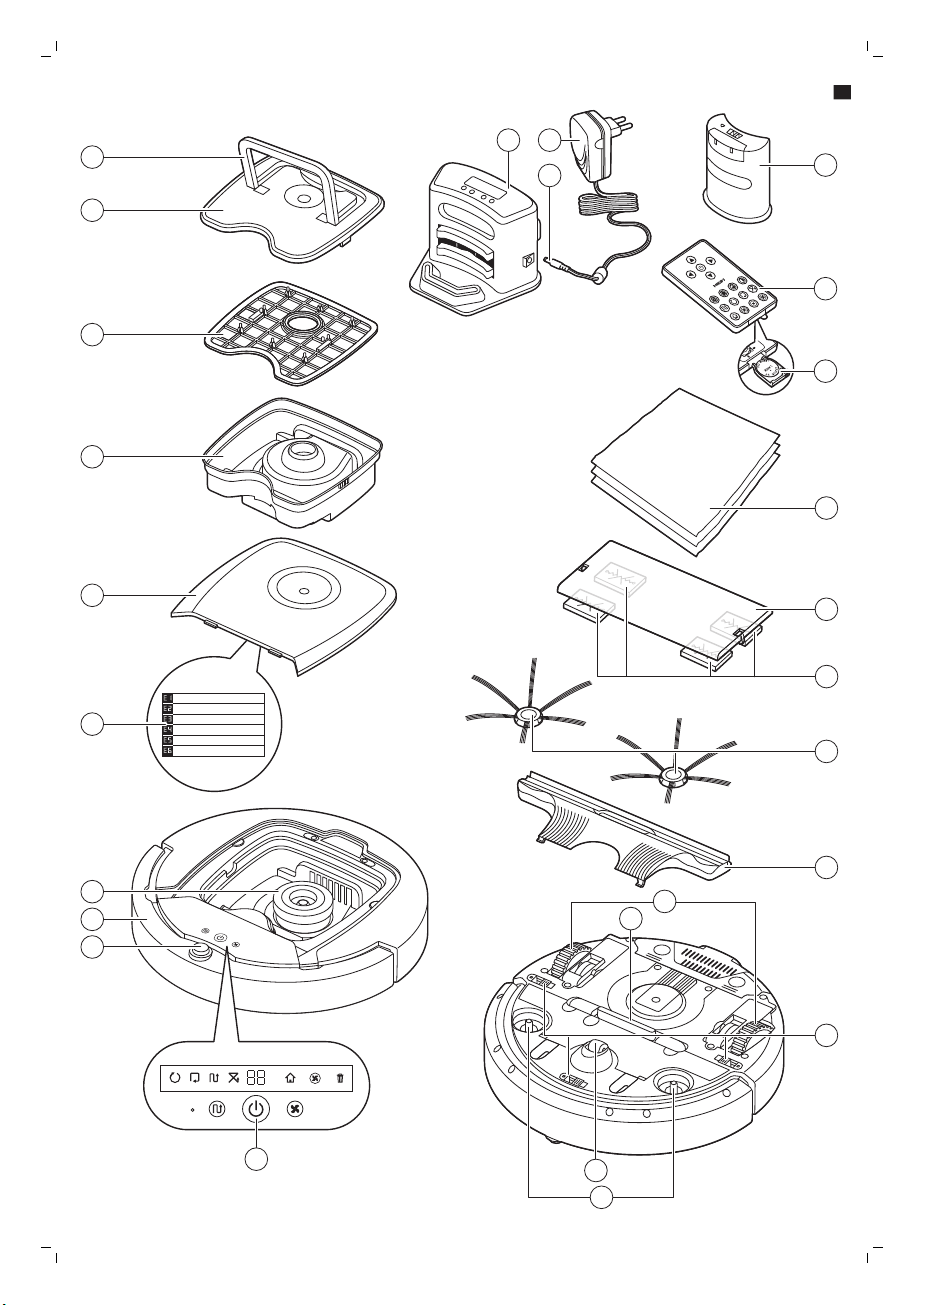
General description
1 Handle of dust container lid
2 Dust container lid
3 Filter
4 Dust container
5 Top cover
6 Error codes table
7 Fan
8 Bumper
9 Docking station sensor
10 On/off button
11 Front wheel
12 Side brush shafts
13 Drop-off sensors
14 Wheels
15 Suction opening
16 TriActive XL nozzle
17 Side brushes
18 Fixation blocks for dry wipes
19 Dry wipe holder
20 Dry wipes
21 Battery holder
22 Remote control
23 Invisible wall (FC8822)
24 Docking station
25 Adapter
26 Small plug
Display and remote control
Display of robot
1 Spiral mode indicator
2 Wall-following mode indicator
3 Zigzag pattern mode indicator
4 Random mode indicator
5 Charging indicator and cleaning time indicator (see 'Using the cleaning time buttons')
6 Docking icon
7 Fan speed indicator
8 Dustbin full indicator
9 Sound sensor
10 Mode selection button
11 Start/stop button
12 Fan speed button
Remote control
1 Navigation buttons and start/stop (Fig. 3)
English
English
2 Cleaning time buttons
3 Cleaning mode buttons
4 Fan speed buttons
5 Docking button
Control panel of docking station
1 Display with time, day and programming indications (Fig. 4)
2 Adjusting and setting buttons
How your robot works
What your robot cleans
This robot is equipped with features that make it a suitable cleaner to help you clean the floors in your
home.
The robot is especially suitable for cleaning hard floors, such as wooden, tiled or linoleum floors. It
may experience problems cleaning soft floors, such as carpet or rugs. If you use the robot on a carpet
or rug, please stay close by the first time to see if the robot can deal with this type of floor. The robot
also needs supervision when you use it on very dark or shiny hard floors.
How your robot cleans
Cleaning system
The robot has a 3-stage cleaning system to clean your floors efficiently.
1 The two side brushes help the robot clean in corners and along walls. They also help to remove dirt
from the floor and move it towards the suction opening (Fig. 5).
2 The suction power of the robot picks up loose dirt and transports it through the suction opening
into the dust container.
3 The robot comes with a dry wipe holder that allows you to clean your hard floor even more
thoroughly with dry wipes.
Cleaning patterns
In its auto cleaning mode, the robot uses a fixed and automatic sequence of cleaning patterns to
clean each area of the room optimally. It uses a Z-pattern (zigzag pattern), random pattern, wallfollowing pattern and spiral pattern successively (Fig. 6). It continues to move in this sequence of
patterns to clean the room until the rechargeable battery runs low, or until it is switched off manually.
If the robot detects a particularly dirty area during its cleaning run, it switches to spiral mode and
switches to turbo fan speed to ensure thorough dirt removal.
7
Note: You can also select each mode individually by pressing the appropriate button on the remote
control (see 'Cleaning mode selection') or on the robot. The manually selected modes are only active
for a couple of minutes. After that, the robot switches back to auto-cleaning mode.
How your robot avoids height differences
The robot has three drop-off sensors in its bottom. It uses these drop-off sensors to detect and avoid
height differences such as staircases (Fig. 7).
Note: It is normal for the robot to move slightly over the edge of a height difference, as its front dropoff sensor is located behind the bumper.
8
English
Caution: In some cases, the drop-off sensors may not detect a staircase or other height difference
in time. Therefore monitor the robot carefully the first few times you use it, and when you operate it
near a staircase or another height difference. It is important that you clean the drop-off sensors
regularly to ensure the robot continues to detect height differences properly (see 'Cleaning and
maintenance') .
Before first use
Mounting the side brushes
1 Unpack the side brushes and place the robot upside down on a table or on the floor.
2 Push the side brushes onto the shafts on the bottom of the robot (Fig. 8).
Note: Make sure you attach the side brushes properly. Press them onto the shaft until you hear
them lock into position with a click.
Removing the tag from the remote control
The remote control works on a CR2025 coin-shaped battery. This battery is protected with a
protection tag that has to be removed before use.
1 Pull the battery protection tag out of the battery compartment of the remote control. Now the
remote control is ready for use (Fig. 9).
Preparing for use
Installing the docking station
1 Insert the small plug of the adapter into the socket on the docking station (1) and insert the adapter
into the wall socket (2) (Fig. 10).
-
The display of the docking station comes on.
2 Place the docking station on a horizontal, level floor against the wall.
Note: Make sure that there are no obstacles or height differences 80 cm in front, 30 cm to the right
and 100 cm to the left of the docking station (Fig. 11).
Tip: To ensure the docking station stays firmly in the selected spot, fasten it to the wall with screws
or with two strips of double-sided tape.
Important note: deep sleep mode
In deep sleep mode, the robot does not respond at all when you press a button. To reactivate the
robot when it is in deep sleep mode:
1 Press the start/stop button on the robot for one second to switch the robot from deep sleep mode
to standby mode.
2 Press the start/stop button on the robot (Fig. 17) briefly or press the start/stop button on the
remote control to start cleaning.
3 If the robot does not start cleaning, place it on the plugged-in docking station to recharge its
rechargeable battery.
English
The robot enters deep sleep mode when you press the start/stop button for 5 seconds. It may also
enter the deep sleep mode when its battery is empty. The battery may, for instance, run empty if the
robot is unable to find its docking station.
Charging
When charging for the first time and when the rechargeable battery of the robot is empty, the charging
time is four hours.
Your robot can be charged on the docking station, either manually or automatically during use.
Note: When the rechargeable battery is fully charged, your robot can clean for up to 120 minutes
Charging automatically during use
1 When the robot has finished cleaning or when only 15% of the battery power remains, it
automatically searches for the docking station to recharge. When the robot searches for the
docking station, the light in the start/stop button turns orange (Fig. 15).
2 When the rechargeable battery is fully charged, the start/stop button lights up green continuously.
Charging on the docking station
1 Place the robot on the plugged-in docking station (Fig. 12).
2 The start/stop button starts flashing green. Because this is the first time you charge the robot, the
display of the robot shows the charging indicator (Fig. 13).
3 When the rechargeable battery is fully charged, the start/stop button lights up green continuously
(Fig. 14).
9
Using your robot
Preparing the room for a cleaning run
Before you start the robot on its cleaning run, make sure that you remove all loose and fragile objects
from the floor. Also remove all cables, wires and cords from the floor.
Functions of the start/stop button
The start/stop button has the following functions (Fig. 16):
How you press start/stop button
Press start/stop button for 1 second Robot switches from sleep mode to standby
Press start/stop button briefly Robot starts or stops cleaning
Press start/stop button for 5 seconds Switches robot on or off.
User interface signals and their meaning
The robot has a display and a start/stop button gives light signals. The table below explains the
meaning of the signals.
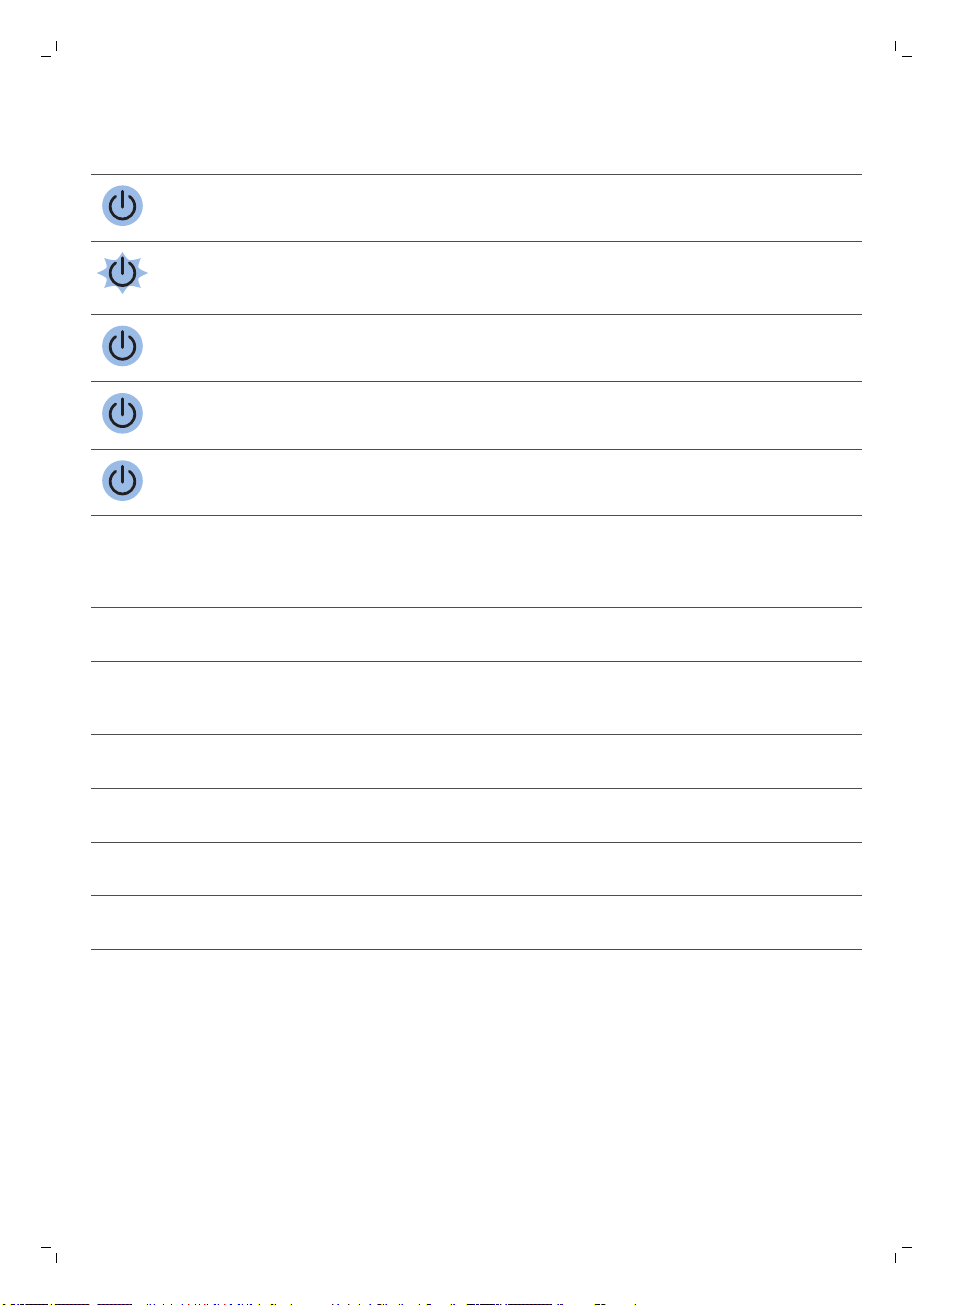
Signal
Description of signal Meaning of signal
The start/stop button is continuously green. The robot is ready to clean.
How robot responds
10
English
Signal Description of signal Meaning of signal
The start/stop button flashes slowly green and the
display on the robot shows a moving blue light
(the charging indicator).
The robot is charging.
The start/stop button is continuously orange. The rechargeable battery is low and
The start/stop button is continuously red. The rechargeable battery of the robot
The start/stop button is continuously red and the
display shows an error code.
the robot is searching for the docking
station.
is almost empty.
Please consult the error code table
below to understand the meaning of
the error code.
Error codes
Error code
E1 Wheels stuck Remove robot from the obstacle and press
E2 Top cover or dust
E3 Bumper stuck Remove the robot from the obstacle. The
E4 Robot lifted from floor Put the robot back on the floor to make the
E5 Color of floor too dark Place robot on a lighter area of the floor.
Possible cause Solution
the starts/stop button to resume cleaning.
container not placed
properly
Place the dust container in and the top cover
on the robot properly. The error code
disappears from the display automatically.
error code disappears from the display
automatically.
error code disappear.
Clean the drop-off sensors.
E6 Problem with the
battery
Please contact the Consumer Care Center to
have the problem examined.
Clap response
If you do not see the robot, you can locate it by clapping your hands once. The robot will respond by
beeping and by lighting up all icons on its display.
The clap response is enabled when the robot enters sleep mode in the following situations:
-
when it stops cleaning due to an error
-
when it is unable to find its docking station within 20 minutes
.
Starting and stopping
1 Press the start/stop button on the robot (Fig. 17) or on the remote control (Fig. 18). The start/stop
button is continuously green and the robot starts cleaning.
English
2 The robot cleans in the auto-cleaning mode until its battery runs low. In the auto-cleaning mode, it
follows repeated sequences of Z-pattern, random, wall-following and spiral patterns (Fig. 6).
Note: To select an individual mode, press one of the mode buttons on the remote control or on the
robot (see 'Cleaning mode selection').
3 When the battery runs low, the start/stop button turns red and the robot searches for the docking
station to recharge (Fig. 15).
4 You can also press the start/stop button to interrupt or stop the cleaning run. If you press the
start/stop button again and there is still enough energy in the rechargeable battery, the robot
continues cleaning in the auto-cleaning mode.
5 To make the robot return to the docking station before the rechargeable battery runs low, press
the docking button on the remote control. All icons on the display of the robot disappear except
for the docking icon, which lights up bright blue while the robot returns to the docking station (Fig.
19).
Cleaning mode selection
Next to the auto-cleaning mode, this robot has four individual cleaning modes that can each be
activated by pressing the appropriate button on the remote control or on the robot.
Note: The manually selected modes are only active for a couple of minutes. After that, the robot
switches back to auto-cleaning mode.
Z-pattern mode
In Z-pattern mode, the robot cleans by making Z-shaped loops through the room to clean large areas
(Fig. 20).
11
Random mode
In this mode, the robot cleans the room in a mixed pattern of straight and crisscross movements (Fig.
21).
Wall-following mode
In this mode, the robot follows the walls of the room to give the area alongside the walls an extra
clean (Fig. 22).
Spiral mode
In this mode, the robot moves in a spiral pattern to clean a small area. If the dust detection sensor
detects dirt, the robot automatically switches the fan to turbo speed (Fig. 23).
Manual driving
1 Use the arrow buttons above and below and to the left and right of the start/stop button on the
remote control to navigate the robot through the room (Fig. 24).
Note: Be careful when you drive the robot manually close to height differences and staircases.
Note: The vacuuming function and the side brushes only work when the robot is driven forward.
The left, right or back buttons are only for maneuvering the robot.
12
English
Using the cleaning time buttons
-
By default, the robot cleans in auto cleaning mode until its rechargeable battery runs low. The
robot will then automatically return to its docking station. If you selected one of the other cleaning
times (see below), you can switch back to the default mode by pressing the maximum cleaning
time button on the remote control (Fig. 25).
-
The other cleaning time buttons on the remote control allow you to let the robot operate for 60, 45
and 30 minutes respectively (Fig. 26). The cleaning time indicator on the display shows the cleaning
time set. When the cleaning time is finished, the robot returns to its docking station. The docking
icon will turn bright blue on the display.
-
If you do not want the robot to return to the docking station at the end of the cleaning time, press
the cleaning time button twice. The docking icon disappears from the display. When the cleaning
time is finished, the robot stops.
Operating the docking station
Setting clock time and day
If you want to use cleaning programs, you have to set the clock time and the day of the week on the
display of the docking station first.
Note: For the pictures that belong to the steps below, see the pages at the back of this manual.
1 Press the set button. The set mode indicator and the clock time indicator start flashing.
2 Press the select button once. The hour indication starts flashing.
3 Use the + and - buttons on the docking station to set the hour.The set hour appears on the display.
4 Press the select button to confirm the hour set. The minutes indication starts flashing.
5 Use the + and - buttons on the docking station to set the minutes. The set minutes appear on the
display.
6 Press the select button to confirm the minutes set. The indication 'Su’ for Sunday starts flashing.
7 Use the + and - buttons on the docking station to set the current day of the week.
8 Press the select button to confirm the day of the week.
9 Press the set button to confirm the clock time and day of the week setting. Both the set mode
indicator and the clock time indicator stop flashing and turn solid.
Programming cleaning times
If you have set the time and the day of the week on the display of the docking station, you can
program cleaning times for your robot.
Note: For the pictures that belong to the steps below, see the pages at the back of this manual.
The programming options available are:
Program
Cleaning every day All day indications are on
Cleaning on weekdays Mo to Fri indications are on
Cleaning on 2 consecutive days Indications of 2 days are on, e.g. Fri and Sa
Cleaning 1 day a week Indication of selected day is on
1 Press the set button. The set mode indicator and the cleaning program indicator start flashing.
2 Press the select button once. The hour indication starts flashing.
Indications on display
English
3 Use the + and - buttons on the docking station to set the hour. The set hour appears on the
display.
4 Press the select button to confirm the hour set. The minutes indication starts flashing.
5 Use the + and - buttons on the docking station to set the minutes. The set minutes appear on the
display.
6 Press the select button to confirm the minutes set. The indication ‘Su’ for Sunday starts flashing.
7 Use the + and - buttons on the docking station to toggle between cleaning programs (see the table
above for the programming options available).
8 Press the select button to confirm the program selected.
9 Press the set button to confirm the programming. Both the set mode indicator and the cleaning
program indicator stop flashing and turn solid.
10 When you have set a cleaning program, the display shows the cleaning program indicator and the
day or days selected. If you leave the robot on standby and its rechargeable battery is fully
charged, it will start cleaning at the programmed time on the programmed day or days.
13
Fan speed buttons
You can use the fan speed buttons to increase the fan speed to turbo or to switch off the fan. The
default setting is normal fan speed (Fig. 27).
1 Press this button to switch off the fan
2 Press this button to switch on the fan at normal speed.
3 The turbo fan button increases the fan speed.
Using the dry wipe attachment
The dry wipe attachment is a feature that allows you to clean hard floors with dry wipes.
Note: If you use the dry wipe attachment, the robot may have trouble crossing thresholds or climbing
onto rugs.
Preparing the dry wipe attachment for use
Turn the robot upside down and place it on the floor or on a table.
1 Place the dry wipe on a table and place the dry wipe attachment on the wipe with its fixation lugs
pointing towards you (Fig. 28).
2 Fold both ends of the dry wipe around the dry wipe attachment and fasten the dry wipe onto the
attachment by pushing the fixation blocks into the recesses (Fig. 29).
3 Insert the fixation lug of the dry wipe attachment into the opening just behind the wheel on one
side of the robot and push until you hear it lock into place with a click. Then repeat these actions
on the other side (Fig. 30).
4 Turn the robot and place it on the floor on its wheels with the dry wipe attachment touching the
floor.
Using the robot with the dry wipe attachment
When the dry wipe attachment is attached, you can use the robot in any mode and on all hard floors.
Do not use the dry wipe attachment on carpet or rugs.
Removing the dry wipe attachment
1 Remove the dry wipe attachment as soon as you have finished wiping the floor. To do so, turn the
robot upside down and place it on the floor or on a table.
2 Push one end of the dry wipe attachment towards the wheel on the other side of the robot to
release it. Then pull the attachment off the robot (Fig. 31).
14
English
3 If the dry wipe is to dirty to use again, pull the fixation blocks out of the dry wipe attachment and
dispose of the dry wipe.
Note: You cannot rinse or wash the dry wipes.
Using the invisible wall (FC8822 only)
You can use the invisible wall to prevent the robot from entering a room or area that you want to keep
it out of.
Placing the batteries in the invisible wall
The invisible wall operates on four AA batteries.
1 Push the two release tabs at the bottom of the back cover (1) and slide the back cover upwards
and off the invisible wall (2) (Fig. 32).
2 Take four new AA batteries from the pack and insert them into the battery compartment of the
invisible wall (Fig. 33).
Note: Make sure the + and - poles of the batteries point in the right direction.
3 Slide the back cover onto the invisible wall again (Fig. 34).
Positioning the invisible wall to stop the robot
1 Place the unit at a point you do not want the robot to cross, e.g at an open door to a room that is
off-limits to the robot (Fig. 35).
2 Switch on the invisible wall with the on/off slide on top of the unit (Fig. 36).
3 Start the robot.
4 When the robot comes too close to the invisible wall, the light on the invisible wall starts flashing
and the invisible wall emits a beam of infrared light. This beam of infrared light makes the robot
change its course and move away from the invisible wall (Fig. 37).
Note: If you use the invisible wall, regularly check if the batteries still contain sufficient power. You can
check this by switching the virtual wall off and on again. If there is enough energy in the batteries, the
LED on the invisible wall will light up briefly.
Cleaning and maintenance
Cleaning the robot
To maintain good cleaning performance, you have to clean the drop-off sensors, the wheels, the side
brushes and the suction opening from time to time.
1 Place the robot upside down on a flat surface
2 Use a brush with soft bristles (e.g. a toothbrush) to remove dust or fluff from the drop-off sensors
(Fig. 38).
Note: It is important that you clean the drop-off sensors regularly. If the drop-off sensors are dirty,
the robot may fail to detect height differences or staircases.
3 Use a brush with soft bristles (e.g. a toothbrush) to remove dust or fluff from the front wheel and
side wheels (Fig. 39).
4 To clean the side brushes, grab them by the bristles and pull them off their shafts (Fig. 40).
5 Remove fluff, hairs and threads from the shaft and from the side brush with a soft brush (e.g. a
toothbrush) or a cloth (Fig. 41).
English
6 Check the side brushes and the bottom of the robot for any sharp objects that could damage your
floor.
7 To remove the TriActive XL nozzle, insert your fingers into the slots in the bottom of the robot.
There are arrows pointing to these slots. Press the catches holding the TriActive nozzle in place
inwards to release them from the slots (1). Then pull the TriActive nozzle upward and off the robot
(2) (Fig. 42).
8 Clean the suction opening with a soft brush (e.g. a toothbrush) (Fig. 43).
9 Remove all visible dirt from the TriActive nozzle before you place it back.
10 To place the TriActive nozzle, first insert the small lugs on the front into the tiny slots on either side
of the front wheel (1). Then press the catches of the TriActive nozzle inwards to lock them into the
slots in the bottom of the robot (2). Finally, check if the nozzle can still move a few millimeters up
and down freely (Fig. 44).
11 Push the side brushes onto the shafts on the bottom of the robot again (Fig. 8).
Emptying and cleaning the dust container
Empty and clean the dust container when the dust container full indicator lights up continuously.
1 Remove the cover.
2 Pull up the handle of the dust container lid and lift the dust container out of the dust container
compartment.
Note: When you remove or reinsert the dust container, take care not to damage the blades of the
motor fan.
3 Carefully lift the lid off the dust container (1) and take out the filter (2) (Fig. 45).
4 Shake the dust container over a dustbin to empty it. Clean the filter and the inside of the dust
container with a cloth or a toothbrush with soft bristles. Also clean the suction opening in the
bottom of the dust container.
Caution: Do not clean the dust container and the filter with water or in the dishwasher.
5 Put the filter back into the dust container (1). Then place the lid on the dust container(2) (Fig. 47).
6 Put the dust container back into the dust container compartment and put the top cover back on
the robot (Fig. 48).
Caution: Always make sure the filter is present inside the dust container. If you use the robot
without the filter inside the dust container, the motor will be damaged.
15
Ordering accessories
To buy accessories or spare parts, visit www.shop.philips.com/service or go to your Philips dealer.
You can also contact the Philips Consumer Care Center in your country (see the international warranty
leaflet for contact details).
Replacement
Replacing the filter
Replace the filter if it is very dirty or damaged. You can order a new filter kit under type number
FC8066. See 'Emptying and cleaning the dust container' in chapter 'Cleaning and maintenance' for
instructions on how to remove the filter from the dust container and how to place it in the dust
container.
16
English
Replacing the side brushes
Replace the side brushes after some time to ensure proper cleaning results.
Always replace the side brushes when you notice signs of wear or damage. We also recommend that
you replace both side brushes at the same time. You can order spare side brushes as part of
replacement kit FC8068. This kit also contains two filters and three dry wipes.
1 To replace the side brushes, grab the old side brushes by the bristles and pull them off their shafts
(Fig. 40).
2 Push the new side brushes onto the shafts (Fig. 8).
Replacing dry wipes
You can order new dry wipes. They are part of replacement kit FC8068. This replacement kit also
contains two side brushes and two filters.
Replacing the battery of the remote control
The remote control works on a CR2025 coin-shaped battery. Replace the battery when the robot no
longer responds when you press the buttons on the remote control.
1 Hold the remote control upside down. Push the release button on the battery holder and at the
same time slide the battery holder out of the remote control (Fig. 49).
2 Remove the empty battery from the battery holder and place a new battery in the battery holder.
Then slide the battery holder back into the remote control (Fig. 50).
Replacing the rechargeable battery
The rechargeable battery of the robot may only be replaced by qualified service engineers. Take the
robot to an authorized Philips service center to have the battery replaced when you can no longer
recharge it or when it runs out of power quickly. You can find the contact details of the Philips
Consumer Care Center in your country in the international warranty leaflet or go to
www.philips.com/support.
Recycling
-
This symbol means that this product shall not be disposed of with normal household waste
(2012/19/EU) (Fig. 51).
-
This symbol means that this product contains a built-in rechargeable battery which shall not be
disposed of with normal household waste (Fig. 52) (2006/66/EC). Please take your product to an
official collection point or a Philips service center to have a professional remove the rechargeable
battery.
-
Follow your country’s rules for the separate collection of electrical and electronic products and
rechargeable batteries. Correct disposal helps prevent negative consequences for the environment
and human health.
Removing the rechargeable battery
Warning: Only remove the rechargeable battery when you discard the appliance. Make
sure the battery is completely empty when you remove it.
To remove the rechargeable battery, follow the instructions below. You can also take the robot to a
Philips service center to have the rechargeable battery removed. Contact the Philips Consumer Care
Center in your country for the address of a service center near you.
English
1 Start the robot from a place somewhere in the room and not from the docking station.
2 Let the robot run until the rechargeable battery is empty to make sure that the rechargeable
battery is completely discharged before you remove it and dispose of it.
3 Undo the screws of the battery compartment lid and remove the lid (Fig. 53).
4 Lift out the rechargeable battery and disconnect it (Fig. 54).
5 Take the robot and the rechargeable battery to a collection point for electrical and electronic
waste.
Troubleshooting
This chapter summarizes the most common problems you could encounter with the appliance. If you
are unable to solve the problem with the information below, visit www.philips.com/support for a list
of frequently asked questions or contact the Consumer Care Center in your country.
Troubleshooting
Problem
The robot does not start
cleaning when I press the
start/stop button.
Possible cause Solution
The rechargeable battery
is empty.
Charge the rechargeable battery.
17
The robot does not clean
properly.
The bristles of one or both
side brushes are crooked
or bent.
The filter in the dust
container is dirty.
The suction opening in the
bottom of the dust
container is clogged.
The front wheel is jammed
with hair or other dirt.
The robot is cleaning a
very dark or shiny surface,
which triggers the drop-off
sensors.This causes the
robot to move in an
unusual pattern.
Soak the brush or brushes in warm water for
a while and let them dry on a flat surface
before you mount them on the robot again.
If this does not restore the bristles to their
proper shape, replace the side brushes (see
'Replacing the side brushes').
Clean the filter in the dust container with a
cloth or a toothbrush with soft bristles.You
can also clean the filter and dust container
with a regular vacuum cleaner at a low
suction power setting.
If brushing or vacuuming does not help to
clean the filter, replace the filter with a new
one. We advise you to replace the filter at
least once a year.
Clean the suction opening (see 'Cleaning
and maintenance').
Clean the front wheel (see 'Cleaning and
maintenance').
Press the start/stop button and then move
the robot to a lighter colored piece of the
floor. If the problem continues to occur on
lighter colored floors, please go to
www.philips.com/support or contact the
Consumer Care Center in your country.
18
English
Problem Possible cause Solution
The robot is cleaning a
floor that reflects sunlight
quite strongly. This triggers
the drop-off sensors and
causes the robot to move
in an unusual pattern.
Close the curtains to block sunlight from
entering the room. You can also start
cleaning when the sunlight is less bright.
The on/off button lights
up red continuously and
there is an error code on
the display.
The robot is moving in
circles.
The robot cannot find its
docking station.
Your robot is giving an
error signal.
The robot is in spiral mode. This is normal behavior. The spiral mode can
There is not enough room
for the robot to navigate
towards the docking
station.
The robot is still actively
searching.
You may have deactivated
the automatic docking
function of the robot by
pressing the cleaning time
button twice. In that case,
the docking icon is no
longer visible on the
display and the robot
stops when the cleaning
time is finished.
Check the error codes table for the meaning
of the code (see 'Error codes').
be activated when a lot of dirt is detected on
the floor for a thorough clean. It is also part
of the auto cleaning mode. After
approximately one minute the robot
resumes its normal cleaning pattern. You
can also stop the spiral mode by selecting a
different cleaning mode on the remote
control.
Try to find another place for the docking
station (see 'Installing the docking station').
Give the robot around 20 minutes to return
to the docking station.
Press the start/stop button for 5 seconds to
restart the robot. The docking function is
automatically activated again. You can also
press the cleaning time button twice to
reactivate the docking function. The docking
icon will reappear on the display. To make
the robot return to the docking station, press
the docking button.

Čeština
Úvod
Společnost Philips Vám gratuluje ke koupi a vítá Vás! Chcete-li využívat všech výhod podpory
nabízené společností Philips, zaregistrujte svůj výrobek na stránkách www.philips.com/welcome.
Všeobecný popis
1 Rukojeť víka nádoby na prach
2 Víko nádoby na prach
3 Filtr
4 Nádoba na prach
5 Horní kryt
6 Tabulka chybových kódů
7 Ventilátor
8 Nárazník
9 Čidlo dokovací stanice
10 Vypínač
11 Přední kolečko
12 Hřídele postranních kartáčků
13 Senzory pádu
14 Kolečka
15 Sací otvor
16 Hubice TriActive XL
17 Postranní kartáčky
18 Upevňovací bloky na suché utěrky
19 Držák na suché utěrky
20 Suché utěrky
21 Držák baterie
22 Dálkový ovladač
23 Neviditelná stěna (FC8822)
24 Dokovací stanice
25 Adaptér
26 Malá zástrčka
19
Displej a dálkový ovladač
Displej robota
1 Indikátor spirálového režimu
2 Indikátor režimu pohybu podél stěn
3 Indikátor režimu cik-cak
4 Indikátor náhodného režimu
5 Indikátor nabíjení a indikátor doby úklidu (viz 'Používání tlačítek doby úklidu')
6 Ikona dokování
7 Indikátor rychlosti ventilátoru
8 Indikátor naplnění nádoby na prach
9 Snímač zvuku
10 Tlačítko pro výběr režimu
11 Tlačítko spuštění/zastavení
12 Tlačítko rychlosti ventilátoru
Dálkový ovladač
1 Navigační tlačítka aspuštění/zastavení (obr. 3)
Čeština
20
Čeština
2 Tlačítka doby úklidu
3 Tlačítka režimu čištění
4 Tlačítka rychlosti ventilátoru
5 Tlačítko dokování
Ovládací panel dokovací stanice
1 Displej zobrazující čas, datum aprogramové indikátory (obr. 4)
2 Tlačítka úprav anastavení
Jak robot funguje
Co robot uklízí
Tento robot je vybaven funkcemi, které umožňují, aby se stal vaším praktickým pomocníkem při úklidu
podlah.
Robot je vhodný především pro čištění tvrdých podlah ze dřeva, dlaždic, linolea apod. Čištění měkkých
podlah, např. koberců, mu může činit potíže. Pokud robota používáte kčištění koberce, zůstaňte při
prvním použití poblíž, abyste viděli, zda si dokáže stímto typem podlahy poradit. Na robota je také
třeba dohlížet při používání na velmi tmavých nebo lesklých tvrdých podlahách.
Jak robot uklízí
Systém čištění
Robot je vybaven třífázovým systémem úklidu, který zajišťuje efektivní úklid podlah.
1 Dva postranní kartáčky pomáhají robotovi při čištění dosáhnout do rohů a míst podél zdí. Také
pomáhají sbírat špínu ze země a posouvat ji směrem ksacímu otvoru (obr. 5).
2 Volnou špínu robot sebere díky dostatečně výkonnému sání a skrze sací otvor ji uloží do nádoby na
prach.
3 Robot je vybaven držákem na suché utěrky, který umožňuje důkladnější úklid podlahy stíráním
suchou utěrkou.
Schémata čištění
Vrežimu automatického čištění používá robot pevně stanovené, automatické pořadí úklidových
schémat prooptimální čištění jednotlivých oblastí místnosti. Postupně využívá schéma Z (cik – cak),
náhodné schéma, pohyb podél zdi a spirálové schéma (obr. 6). Robot bude při čištění místnosti
postupovat vtomto pořadí schémat, dokud se jeho akumulátor skoro nevybije nebo dokud ho ručně
nevypnete.
Když robot během úklidu najde silně znečištěné místo, přepne se do spirálového režimu azapne
ventilátor na rychlost turbo, aby nečistoty důkladně odstranil.
Poznámka: Jednotlivé režimy můžete také vybrat stisknutím příslušného tlačítka na dálkovém ovladači
(viz 'Výběr čisticího režimu') nebo na robotovi. Ručně vybrané režimy jsou aktivní pouze po několik
minut. Poté se robot přepne zpět do režimu automatického čištění.
Jak se robot vyhýbá výškovým předělům
Ve spodní části je robot vybaven třemi senzory pádu. Tyto senzory pádu slouží ktomu, aby robot
rozpoznal výškové rozdíly, například schody (obr. 7).
Čeština
Poznámka: Pokud se robot dostane mírně nad hranu stupně, je to normální, protože senzory pádu
jsou umístěny až za nárazníkem.
Upozornění: V některých případech senzory pádu nemusí schodiště nebo jiný výškový rozdíl
rozpoznat včas. Proto robota při několika prvních použitích a při provozu v blízkosti schodiště nebo
jiného výškového předělu bedlivě sledujte. Senzory pádu je důležité pravidelně čistit, aby si robot
zachoval schopnost správně (viz 'Čištění a údržba') rozpoznávat výškové rozdíly.
Před prvním použitím
Montáž postranních kartáčků
1 Vybalte postranní kartáčky apoložte robota vzhůru nohama na stůl nebo na podlahu.
2 Nasaďte postranní kartáčky na hřídele ve spodní části robota (obr. 8).
Poznámka: Ujistěte se, že jste postranní kartáčky upevnili správně. Nasaďte je na hřídel, až uslyšíte,
že skliknutím zapadly na své místo.
Odebrání štítku zdálkového ovladače
Dálkový ovladač je napájen knoflíkovou baterií CR2025. Baterie je opatřena ochranným štítkem, který
je nutné před prvním použitím vyjmout.
1 Vytáhněte ochranný štítek zprostoru pro baterii dálkového ovladače. Dálkový ovladač je připraven
kpoužití (obr. 9).
21
Příprava k použití
Instalace dokovací stanice
1 Zapojte malou zástrčku adaptéru do zásuvky na dokovací stanici (1) a adaptér zapojte do zásuvky
ve zdi (2) (obr. 10).
-
Rozsvítí se displej dokovací stanice.
2 Umístěte dokovací stanici na vodorovný povrch ke zdi.
Poznámka: Zkontrolujte, zda ve vzdálenosti 80cm vpředu, 30cm napravo a100cm nalevo od
dokovací stanice nejsou žádné překážky ani výškové předěly (obr. 11).
Tip: Aby dokovací stanice zůstala pevně na vybraném místě, připevněte ji ke stěně šrouby nebo
dvěma kousky oboustranné lepicí pásky.
Důležitá poznámka: režim hlubokého spánku
Robot vrežimu hlubokého spánku vůbec nereaguje na stisknutí tlačítka. Opětovná aktivace robota,
který je vrežimu hlubokého spánku:
1 Stisknutím tlačítka spuštění/zastavení na robotovi po dobu jedné vteřiny přepnete robota zrežimu
hlubokého spánku do pohotovostního režimu.
2 Chcete-li spustit úklid, krátce stiskněte tlačítko spuštění/zastavení na robotovi (obr. 17) nebo na
dálkovém ovladači.
3 Pokud robot nezačne uklízet, umístěte jej do dokovací stanice připojené kelektrické zásuvce, aby
se znovu nabil jeho akumulátor.
22
Čeština
Robot přejde do režimu hlubokého spánku, pokud stisknete tlačítko spuštění/zastavení po dobu
5sekund. Do režimu hlubokého spánku může také přejít, pokud je vybitý akumulátor. Kvybití
akumulátoru může například dojít, když robot nemůže najít svoji dokovací stanici.
Nabíjení
První nabíjení robota, stejně jako nabíjení zcela vybitého akumulátoru, trvá čtyři hodiny.
Robota lze nabíjet vdokovací stanici, buď ručně, nebo automaticky při používání.
Poznámka: Na plně nabitý akumulátor může robot uklízet až 120minut.
Automatické nabíjení při používání
1 Když robot dokončí čištění nebo když nabití akumulátoru klesne pod 15%, robot automaticky
vyhledá dokovací stanici, aby akumulátor dobil. Když robot hledá dokovací stanici, rozsvítí se světlo
na tlačítku spuštění/zastavení oranžově (obr. 15).
2 Když je akumulátor plně nabitý, tlačítko spuštění/zastavení nepřetržitě zeleně svítí.
Nabíjení vdokovací stanici
1 Umístěte robota do dokovací stanice (obr. 12) připojené kelektrické zásuvce.
2 Tlačítko spuštění/zastavení začne blikat zeleně. Protože jde oprvní nabíjení robota, na displeji
robota se zobrazí indikátor nabíjení (obr. 13).
3 Když je akumulátor plně nabitý, tlačítko spuštění/zastavení nepřetržitě zeleně svítí (obr. 14).
Používání robota
Příprava místnosti na úklid
Než pošlete robota na úklid, odeberte zpodlahy všechny volné a křehké předměty. Také ze země
odstraňte veškeré kabely a dráty.
Funkce tlačítka spuštění/zastavení
Tlačítko spuštění/zastavení má tyto funkce (obr. 16):
Typ stisknutí tlačítka
Reakce robota
spuštění/zastavení
Stisknutí tlačítka spuštění/zastavení po
dobu 1sekundy
Krátké stisknutí tlačítka
spuštění/zastavení
Stisknutí tlačítka spuštění/zastavení po
dobu 5sekund
Robot se přepne zrežimu spánku do pohotovostního
režimu
Robot zahájí nebo ukončí úklid
Robot se zapne nebo vypne
Signály vuživatelském rozhraní a jejich význam
Robot je vybaven displejem a tlačítko spuštění/zastavení zobrazuje světelné signály. Níže uvedená
tabulka vysvětluje význam signalizace.
Čeština
23
Signali
Popis signálu Význam signalizace
zace
Tlačítko spuštění/zastavení svítí zeleně. Robot je připraven kčištění.
Tlačítko spuštění/zastavení pomalu bliká zeleně a
na displeji robota se zobrazuje pohybující se
modré světlo (indikátor nabíjení).
Tlačítko spuštění/zastavení svítí oranžově. Akumulátor je téměř vybitý a robot
Tlačítko spuštění/zastavení svítí červeně. Akumulátor robota je skoro vybitý.
Tlačítko spuštění/zastavení začne svítit červeně a
na displeji se zobrazí kód chyby.
Robot se nabíjí.
hledá dokovací stanici.
Vysvětlení kódu chyby naleznete
vtabulce chybových kódů dole.
Chybové kódy
Chybový kód
E1 Zaseknutá kolečka Odstraňte překážku atlačítkem
E2 Nesprávně umístěný
Možná příčina Řešení
spuštění/zastavení obnovte úklid.
horní kryt nebo nádoba
na prach
Nádobu na prach správně vložte do robota a
řádně uzavřete horní kryt robota. Kód chyby
zdispleje automaticky zmizí.
E3 Zaseknutý nárazník Odstraňte překážku. Kód chyby zdispleje
E4 Robot není položen na
zemi.
E5 Příliš tmavá podlaha Umístěte robota na světlejší oblast podlahy.
E6 Problém
sakumulátorem
automaticky zmizí.
Položte robota zpět na podlahu, kód chyby
zdispleje automaticky zmizí.
Vyčistěte senzory pádu.
Pokud problém nedokážete vyřešit, obraťte se
na Středisko péče ozákazníky.
Reakce na tlesknutí
Pokud robota nevidíte, můžete ho najít jedním tlesknutím. Robot zareaguje vydáním zvukového
signálu arozsvícením všech ikon na displeji.
Reakce na tlesknutí, když se robot nachází vrežimu spánku, je aktivní vnásledujících situacích:
-
čištění bylo zastaveno zdůvodu chyby,
-
když robot nedokázal během 20minut najít dokovací stanici.
.
24
Čeština
Spuštění azastavení
1 Stiskněte tlačítko spuštění/zastavení na robotovi (obr. 17) nebo na dálkovém ovladači (obr. 18).
Tlačítko spuštění/zastavení svítí zeleně a robot začne uklízet.
2 Robot bude uklízet vrežimu automatického čištění, dokud se jeho akumulátor skoro nevybije.
Vrežimu automatického čištění robot opakuje předem dané pořadí schémat pohybu Z, náhodného
čištění, pohybu podél stěn a spirály (obr. 6).
Poznámka: Chcete-li vybrat jeden režim, stiskněte příslušné tlačítko režimu čištění na dálkovém
ovladači nebo na robotovi (viz 'Výběr čisticího režimu').
3 Když se akumulátor blíží vybití, rozsvítí se tlačítko spuštění/zastavení červeně a robot vyhledá
dokovací stanici, aby se nabil (obr. 15).
4 Stisknutím tlačítka spuštění/zastavení lze také čištění přerušit nebo zastavit. Když tlačítko
spuštění/zastavení stisknete znovu a baterie je dostatečně nabitá, bude robot pokračovat vrežimu
automatického čištění.
5 Když budete chtít, aby se robot vrátil do dokovací stanice dříve, než bude akumulátor skoro vybitý,
stiskněte tlačítko dokování na dálkovém ovladači. Všechny ikony na displeji robota zmizí, pouze
ikona dokování se rozsvítí modře a robot se vrátí do dokovací stanice (obr. 19).
Výběr čisticího režimu
Robot má kromě režimu automatického čištění další čtyři režimy čištění, které můžete vybrat
stisknutím příslušného tlačítka na dálkovém ovladači nebo na robotovi.
Poznámka: Ručně vybrané režimy jsou aktivní pouze po několik minut. Poté se robot přepne zpět do
režimu automatického čištění.
Schéma Z
Při čištění podle schématu Z čistí robot velké plochy (obr. 20) vmístnosti pohybem ve smyčkách tvaru
písmene Z.
Náhodný režim
Vtomto režimu se robot při čištění místnosti pohybuje střídavě rovnými a křížovými pohyby (obr. 21).
Režim pohybu podél stěn
Vtomto režimu se robot pohybuje podél stěn místnosti, aby tyto oblasti vyčistil pečlivěji (obr. 22).
Spirálový režim
Vtomto režimu se robot pohybuje po spirálové dráze, aby vyčistil malou oblast. Když čidlo prachu
detekuje nečistoty, robot automaticky přepne ventilátor na rychlost turbo (obr. 23).
Ruční ovládání
1 Pohyb robota pomístnosti můžete ovládat tlačítky šipek kolem tlačítka spuštění/zastavení na
dálkovém ovladači (obr. 24).
Poznámka: Když robota ovládáte ručně, dávejte pozor na výškové předěly a schody.
Poznámka: Funkce vysávání a postranní kartáčky fungují, pouze když robot jede dopředu. Tlačítka
doleva, doprava a dozadu slouží pouze kmanévrování srobotem.
Čeština
Používání tlačítek doby úklidu
-
Ve výchozím nastavení bude robot uklízet vrežimu automatického čištění, dokud se jeho
akumulátor téměř nevybije. Poté se robot automaticky vrátí do dokovací stanice. Pokud jste dříve
vybrali jednu zostatních dob úklidu (viz níže), můžete výchozí režim znovu nastavit stisknutím
tlačítka maximální doby úklidu na dálkovém ovládání (obr. 25).
-
Ostatní tlačítka doby úklidu na dálkovém ovládání vám umožňují zadat úklid na dobu 60, 45
a30minut (obr. 26). Indikátor doby úklidu na displeji zobrazuje nastavený čas úklidu. Po uplynutí
doby úklidu se robot vrátí do dokovací stanice. Na displeji se modře rozsvítí ikona dokování.
-
Pokud nechcete, aby se robot po dokončení úklidu vrátil do dokovací stanice, stiskněte tlačítko
doby úklidu dvakrát. Ikona dokování zdispleje zmizí. Po uplynutí doby úklidu se robot zastaví.
Ovládání dokovací stanice
Nastavení data ačasu na hodinách
Chcete-li používat čisticí programy, musíte nejprve na displeji dokovací stanice nastavit datum, čas a
den vtýdnu.
Poznámka: Obrázky knásledujícím pokynům najdete na listech na konci návodu.
1 Stiskněte tlačítko SET. Indikátor nastavení aindikátor času hodin začnou blikat.
2 Stiskněte jednou tlačítko výběru. Začne blikat údaj hodin.
3 Pomocí tlačítek + a- na dokovací stanici nastavte hodinu. Nastavená hodina se zobrazí na displeji.
4 Potvrďte nastavenou hodinu stisknutím tlačítka výběru. Začne blikat indikátor času vminutách.
5 Tlačítky + nebo - na dokovací stanici nastavte minuty. Nastavené minuty se zobrazí na displeji.
6 Potvrďte nastavené minuty stisknutím tlačítka výběru. Začne blikat indikátor „Su“ (Sunday, neděle).
7 Pomocí tlačítek + a- na dokovací stanici nastavte dnešní den vtýdnu.
8 Stisknutím tlačítka výběru potvrďte nastavený den.
9 Stisknutím tlačítka nastavení potvrďte nastavení času a dne vtýdnu. Indikátor nastavení iindikátor
času hodin přestanou blikat a rozsvítí se.
25
Programování doby úklidu
Po nastavení data, času a dne vtýdnu na displeji dokovací stanice můžete naprogramovat dobu
úklidu robota.
Poznámka: Obrázky knásledujícím pokynům najdete na listech na konci návodu.
Možnosti naprogramování:
Program
Každodenní úklid Zapnuté indikace celý den
Úklid vpracovní dny Zapnuté indikace Po – Pá (Mo – Fri)
Úklid 2 dny po sobě Zapnuté indikace 2 dnů, například Pá aSo (Fri aSa)
Úklid jeden den vtýdnu Zapnutá indikace jednoho dne
1 Stiskněte tlačítko SET. Indikátor nastavení aindikátor programu úklidu začnou blikat.
2 Stiskněte jednou tlačítko výběru. Začne blikat údaj hodin.
3 Tlačítky + nebo - na dokovací stanici nastavte hodiny. Na displeji se zobrazí nastavená hodina.
4 Potvrďte nastavenou hodinu stisknutím tlačítka výběru. Začne blikat indikátor času vminutách.
5 Tlačítky + a − na dokovací stanici nastavte minuty. Nastavené minuty se zobrazí na displeji.
6 Potvrďte nastavené minuty stisknutím tlačítka výběru. Začne blikat indikátor „Su“ (Sunday, neděle).
Indikace na displeji
26
Čeština
7 Pomocí tlačítek + a- na dokovací stanici lze přepínat mezi programy úklidu (možnosti
programování najdete vpředcházející tabulce).
8 Stisknutím tlačítka výběru potvrďte vybraný program.
9 Stisknutím tlačítka nastavení potvrďte naprogramování. Oba indikátory, režimu nastavení
iprogramu úklidu, přestanou blikat arozsvítí se.
10 Po nastavení programu úklidu se na displeji zobrazí indikátor naprogramovaného úklidu a
indikátory vybraných dnů. Když necháte robota vpohotovostním režimu asnabitou baterií, robot
začne uklízet vnaprogramované dny vnaprogramovaném čase.
Tlačítka rychlosti ventilátoru
Pomocí tlačítek rychlosti ventilátoru můžete zvýšit rychlost ventilátoru na turbo nebo ventilátor
vypnout. Ve výchozím nastavení je rychlost ventilátoru normální (obr. 27).
1 Stisknutím tohoto tlačítka ventilátor vypnete.
2 Stisknutím tohoto tlačítka přepnete ventilátor do normální rychlosti.
3 Tlačítko rychlosti turbo zvýší otáčky ventilátoru.
Používání nástavce na suché utěrky
Funkce nástavce na suché utěrky umožňuje vytírat podlahy suchými utěrkami.
Poznámka: Robot spřipojeným nástavcem na suché utěrky může mít problémy při přejezdu prahů
nebo výstupu na koberce.
Příprava nástavce na suché utěrky kpoužití
Obraťte robota vzhůru nohama apoložte ho na stůl nebo na podlahu.
1 Položte suchou utěrku na stůl a přiložte na ni nástavec na suché utěrky tak, aby upevňovací
výstupky směřovaly směrem kvám (obr. 28).
2 Přeložte oba konce suché utěrky přes nástavec autěrku připevněte knástavci zatlačením
upevňovacích bloků do prohlubní (obr. 29).
3 Vložte nástavec na suché utěrky upevňovacími výstupky do otvoru za kolečkem na straně robota
azatlačte na nástavec, až zaklapne na své místo. Totéž zopakujte na druhé straně (obr. 30).
4 Robota převraťte a postavte ho na kolečka na podlahu. Nástavec na suché utěrky se bude dotýkat
podlahy.
Používání robota snástavcem na suché utěrky
Robot spřipojeným nástavcem na suché utěrky můžete používat vlibovolném režimu na všechny
tvrdé povrchy. Nepoužívejte suché utěrky na kobercích.
Odpojení nástavce na suché utěrky
1 Po dokončení vytírání ihned nástavec na suché utěrky sejměte. Obraťte robota vzhůru nohama
apoložte ho na stůl nebo na podlahu.
2 Zatlačte na jeden konec nástavce na suché utěrky směrem ke kolečku na druhé straně robota.
Nástavec se uvolní. Potom ho vytáhněte zrobota (obr. 31).
3 Je-li suchá utěrka příliš špinavá, vytáhněte utěsňovací bloky znástavce na suché utěrky autěrku
vyhoďte.
Poznámka: Suché utěrky nelze oplachovat vodou ani prát.
Použití neviditelné stěny (pouze FC8822)
Neviditelná stěna slouží ktomu, aby robot nevstupoval do oblasti místnosti, do které ho nechcete
pustit.
Čeština
Vložení baterií do neviditelné stěny
Jednotka neviditelné stěny funguje na čtyři baterie typu AA.
1 Stiskněte dva uvolňovací jazýčky na spodní straně zadního krytu (1) avysuňte horní kryt nahoru
aven zjednotky neviditelné stěny (2) (obr. 32).
2 Vybalte čtyři nové baterie typu AA avložte je do prostoru pro baterie jednotky neviditelné stěny
(obr. 33).
Poznámka: Zkontrolujte správnou orientaci + a − pólů baterií.
3 Zasuňte zadní kryt na jednotce neviditelné stěny (obr. 34).
Zastavení robota pomocí neviditelné stěny
1 Umístěte jednotku do bodu, který robot nesmí překročit (například kotevřeným dveřím místnosti,
kterou nechcete robotem uklízet). (obr. 35)
2 Posuvným vypínačem na horní straně jednotky zapněte neviditelnou stěnu (obr. 36).
3 Spusťte robota.
4 Když se robot přiblíží kneviditelné stěně, kontrolka na neviditelné stěně začne blikat aneviditelná
stěna vyšle paprsek infračerveného světla. Paprsek infračerveného světla přinutí robota změnit
trasu apřesunout se směrem pryč od jednotky neviditelné stěny (obr. 37).
Poznámka: Pokud používáte neviditelnou stěnu, pravidelně kontrolujte, zda jsou baterie nabité.
Můžete se přesvědčit vypnutím a opětovným zapnutím neviditelné stěny. Jsou-li baterie dostatečně
nabité, kontrolka LED na neviditelné stěně se krátce rozsvítí.
Čištění a údržba
27
Čištění robota
Aby robot mohl stále dobře uklízet, je nutné občas vyčistit senzory pádu, kolečka, postranní kartáčky
asací otvor.
1 Položte robota vzhůru nohama na rovný povrch.
2 Pomocí kartáčku směkkými štětinami (např. kartáčku na zuby) odstraňte prach anečistoty ze
senzorů pádu (obr. 38).
Poznámka: Senzory pádu je důležité čistit pravidelně. Se znečištěnými senzory nemusí robot
rozpoznat výškové předěly nebo schody.
3 Pomocí kartáčku směkkými štětinami (např. kartáčku na zuby) odstraňte prach a nečistoty
zpředního kolečka abočních koleček (obr. 39).
4 Postranní kartáčky před čištěním uchopte za štětiny astáhněte je zhřídelí (obr. 40).
5 Pomocí měkkého kartáčku (např. kartáčku na zuby) nebo hadříkem odstraňte zhřídele a
zpostranního kartáčku nečistoty, vlasy a nitě (obr. 41).
6 Zkontrolujte, zda na postranních kartáčcích nebo na spodní straně robota nejsou nějaké ostré
předměty, které by mohly poškodit podlahu.
7 Chcete-li vyjmout hubici TriActive XL, strčte prsty do otvorů ve spodní části robota. Otvory najdete
podle šipek. Zatlačte úchyty, které drží hubici TriActive, směrem dovnitř a vysuňte je zotvorů (1).
Hubici TriActive pak vytáhněte nahoru a vyjměte ji zrobota (2) (obr. 42).
8 Očistěte sací otvor pomocí kartáčku směkkými štětinami (např. kartáčku na zuby) (obr. 43).
9 Než hubici TriActive vrátíte zpět, odstraňte veškeré viditelné nečistoty.
28
Čeština
10 Při vracení hubice TriActive do přístroje nejprve zasuňte malé výstupky vpřední části do malých
otvorů po obou stranách předního kolečka (1). Pak zatlačte úchyty hubice TriActive směrem dovnitř
a zajistěte je votvorech ve spodní části robota (2). Nakonec zkontrolujte, jestli se hubice může
volně pohybovat o několik milimetrů nahoru a dolů (obr. 44).
11 Nasuňte kolečka zpět na hřídele na spodní části robota (obr. 8).
Vyprazdňování a čištění nádoby na prach
Pokud indikátor naplnění nádoby na prach nepřetržitě svítí, vysypte avyčistěte nádobu na prach.
1 Sejměte kryt.
2 Zatáhněte za rukojeť víka nádoby na prach avyndejte nádobu zprostoru pro nádobu na prach.
Poznámka: Když nádobu na prach vyjímáte nebo vracíte na místo, dejte pozor, abyste nepoškodili
lopatky ventilátoru.
3 Opatrně zvedněte víko nádoby na prach (1) a vyjměte filtr (2) (obr. 45).
4 Nádobu na prach vyprázdněte vyklepáním nad odpadkovým košem. Vyčistěte filtr a vnitřek nádoby
na prach hadříkem nebo kartáčkem směkkými štětinami. Také vyčistěte sací otvor vdolní části
nádoby na prach.
Upozornění: Nádobu na prach ani filtr nemyjte vodou ani v myčce na nádobí.
5 Vložte filtr zpět do nádoby na prach (1). Poté nádobu na prach (2) (obr. 47) přikryjte víkem.
6 Vraťte nádobu na prach zpět do jejího prostoru avraťte horní kryt robota na místo (obr. 48).
Upozornění: Vždy se ujistěte, že se v nádobě na prach nachází filtr. Pokud robota budete
používat bez filtru v nádobě na prach, dojde k poškození motoru.
Objednávání příslušenství
Chcete-li koupit příslušenství nebo náhradní díly, navštivte adresu www.shop.philips.com/service
nebo se obraťte na prodejce výrobků Philips. Můžete se také obrátit na středisko péče ozákazníky
společnosti Philips ve své zemi (kontaktní údaje naleznete na letáčku scelosvětovou zárukou).
Výměna
Výměna filtru
Pokud je filtr velmi špinavý nebo poškozený, vyměňte ho. Novou sadu filtrů si můžete objednat pod
typovým číslem FC8066. Včásti „Vyprazdňování a čištění nádoby na prach“ vkapitole „Čištění
aúdržba“ najdete pokyny, jak filtr vyjmout znádoby na prach a jak ho vložit zpět.
Výměna postranních kartáčků
Po určité době postranní kartáčky vyměňte, abyste zajistili kvalitní výsledky čištění.
Postranní kartáčky měňte vždy, když si všimnete známek opotřebení nebo poškození. Doporučujeme
měnit vždy oba kartáčky najednou. Náhradní postranní kartáčky lze objednat jako součást výměnné
soupravy FC8068. Souprava obsahuje dva filtry a tři suché utěrky.
1 Postranní kartáčky, které chcete vyměnit, uchopte za štětiny astáhněte je zhřídelí (obr. 40).
2 Na hřídele nasaďte nové postranní kartáčky (obr. 8).
Čeština
Výměna suchých utěrek
Nové suché utěrky si můžete objednat jako součást výměnné soupravy FC8068. Výměnná souprava
obsahuje také dva postranní kartáčky a dva filtry.
Výměna baterie dálkového ovladače
Dálkový ovladač je napájen knoflíkovou baterií CR2025. Baterii vyměňte, pokud robot nereaguje na
stisknutí tlačítek dálkového ovladače.
1 Podržte dálkový ovladač vzhůru nohama. Stiskněte uvolňovací tlačítko na držáku baterie a zároveň
zdálkového ovladače vysuňte držák baterie (obr. 49).
2 Vyjměte vybitou baterii zdržáku baterie a vložte do něj novou baterii. Poté držák baterie zasuňte
zpět do dálkového ovladače (obr. 50).
Výměna akumulátoru
Výměnu akumulátoru robota smějí provádět pouze kvalifikovaní servisní technici. Pokud akumulátor
nelze nabít nebo se příliš rychle vybíjí, odneste robota do autorizovaného servisního střediska Philips,
kde si ho můžete nechat vyměnit. Podrobnosti ostředisku zákaznické péče společnosti Philips ve své
zemi naleznete na letáku smezinárodně platnou zárukou nebo na adrese www.philips.com/support.
Recyklace
-
Tento symbol znamená, že výrobek nelze likvidovat sběžným komunálním odpadem (2012/19/EU)
(obr. 51).
-
Symbol na výrobku znamená, že tento výrobek obsahuje vestavěný dobíjecí akumulátor, který
nemůže být likvidován společně sběžným domácím odpadem (obr. 52) (2006/66/ES). Odneste
prosím výrobek do oficiálního sběrného dvora nebo do servisního střediska společnosti Philips
apožádejte tamního odborníka ovyjmutí nabíjecí baterie.
-
Dodržujte předpisy vaší země týkající se sběru tříděného odpadu elektrických a elektronických
výrobků a také akumulátorů. Správnou likvidací pomůžete zabránit negativním dopadům na životní
prostředí a lidské zdraví.
29
Vyjmutí akumulátoru
Varování: Až budete přístroj likvidovat, vyjměte z něj akumulátor. Před vyjmutím
akumulátoru se ujistěte, že je úplně prázdný.
Při vyjmutí akumulátoru postupujte podle kroků uvedených níže. Můžete také robota odnést do
servisního střediska Philips, kde bude akumulátor vyjmut. Chcete-li získat adresu svého nejbližšího
servisního střediska, obraťte se na Středisko péče o zákazníky Philips ve vaší zemi.
1 Spusťte robota zlibovolného místa vpokoji (anikoliv zdokovací stanice).
2 Nechte robota zapnutého, dokud se akumulátor nevybije, abyste se ujistili, že bude akumulátor
zcela vybitý, než jej vyjmete zpřístroje a zlikvidujete.
3 Odmontujte šrouby víka přihrádky na akumulátor a sejměte víko (obr. 53).
4 Zdvihněte akumulátor aodpojte ho (obr. 54).
5 Odevzdejte robota aakumulátor na sběrné místo pro likvidaci elektroodpadu.
30
Čeština
Řešení problémů
Vtéto kapitole jsou shrnuty nejběžnější problémy, se kterými se můžete upřístroje setkat. Pokud se
vám nepodaří problém vyřešit podle následujících informací, navštivte web
www.philips.com/support, kde najdete odpovědi na nejčastější dotazy. Případně kontaktujte
středisko péče ozákazníky ve své zemi.
Řešení problémů
Problém
Po stisknutí tlačítka
spuštění/zastavení robot
nezačne uklízet.
Možná příčina Řešení
Akumulátor je vybitý. Dobijte akumulátor.
Robot neuklízí řádně. Štětiny jednoho nebo
obou kartáčků jsou
zkřivené nebo ohnuté.
Filtr vnádobě na prach je
znečištěný.
Sací otvor vdolní části
nádoby na prach je
ucpaný.
Přední kolečko se zaneslo
vlasy nebo jinými
nečistotami.
Robot uklízí velmi tmavý
nebo lesklý povrch, který
aktivuje senzory pádu.
Robot se proto pohybuje
nezvyklými pohyby.
Jeden nebo oba kartáčky chvíli máčejte
vteplé vodě a pak je nechte uschnout na
rovném povrchu. Pak je namontujte zpět do
robota. Pokud se tímto štětiny nenarovnají,
postranní kartáčky vyměňte (viz 'Výměna
postranních kartáčků').
Vyčistěte filtr nádoby na prach hadříkem
nebo kartáčkem směkkými štětinami. Filtr
anádobu na prach můžete vyčistit také
pomocí běžného vysavače snízkým
stupněm sání.
Pokud čištění kartáčkem nebo vysavačem
nepomůže filtr zbavit nečistot, vyměňte filtr
za nový. Doporučujeme filtr vyměnit alespoň
jednou ročně.
Vyčistěte sací otvor (viz 'Čištění a údržba').
Očistěte přední kolečko (viz 'Čištění a
údržba').
Stiskněte tlačítko spuštění/zastavení a
přesuňte robota na světlejší podlahu. Pokud
problém přetrvává i na světlejších
podlahách, navštivte webovou stránku
www.philips.com/support nebo se obraťte
na středisko péče ozákazníky ve své zemi.
Robot čistí podlahu, která
velmi silně odráží sluneční
světlo. To aktivuje senzory
pádu a způsobuje
neobvyklé pohyby robota.
Zatáhněte závěsy, aby do místnosti nesvítilo
sluneční světlo. Popřípadě můžete čištění
spustit, až bude slunce svítit méně.

Problém Možná příčina Řešení
Tlačítko
spuštění/zastavení začne
svítit červeně a na
displeji se zobrazí kód
chyby.
Robot vysílá chybový
signál.
Vysvětlení kódu chyby naleznete vtabulce
chybových kódů dole (viz 'Chybové kódy').
Čeština
31
Robot se pohybuje
vkruzích.
Robot nemůže najít
dokovací stanici.
Robot je ve spirálovém
režimu čištění.
Robot nemá dost místa,
aby se dostal kdokovací
stanici.
Robot stále aktivně
vyhledává.
Je možné, že jste dvakrát
stiskli tlačítko doby úklidu
a vypnuli jste funkci
návratu robota do
dokovací stanice.
Vtakovém případě na
displeji nesvítí ikona
dokování a robot se po
skončení doby úklidu
zastaví.
Jedná se o normální chování. Spirálový
režim lze aktivovat, když je na podlaze
hodně špíny, aby se podlaha důkladně
vyčistila. Je také součástí režimu
automatického čištění. Po přibližně jedné
minutě se robot vrátí do svého normálního
úklidového schématu. Spirálový režim
můžete zastavit také tím, že na dálkovém
ovladači zvolíte jiný režim čištění.
Zkuste pro dokovací stanici (viz 'Instalace
dokovací stanice') najít jiné místo.
Dejte robotovi zhruba 20 minut, aby se vrátil
do dokovací stanice.
Stiskněte tlačítko spuštění/zastavení na 5
sekund, čímž robota restartujete. Funkce
dokování se automaticky znovu aktivuje.
Tuto funkci můžete také znovu aktivovat
dvojitým stisknutím tlačítka doby úklidu.
Ikona dokování se znovu rozsvítí na displeji.
Chcete-li, aby se robot vrátil do dokovací
stanice, stiskněte tlačítko dokování.

32
Magyar
Bevezetés
Köszönjük, hogy Philips terméket vásárolt, és üdvözöljük a Philips világában! A Philips által biztosított
támogatás teljes körű igénybevételéhez regisztrálja a terméket a www.philips.com/welcome címen.
Általános leírás
1 Portartályfedél fogantyúja
2 Portartály fedele
3 Szűrő
4 Portartály
5 Felső fedél
6 Hibakódok táblázata
7 Ventilátor
8 Ütköző
9 Dokkolóegység érzékelője
10 Be- és kikapcsológomb
11 Első kerék
12 Oldalsó kefetengelyek
13 Mélységérzékelők
14 Kerekek
15 Szívónyílás
16 TriActive XL szívófej
17 Oldalkefék
18 Rögzítő blokkok a száraz törlőkendők számára
19 Száraz törlőkendő tartója
20 Száraz törlőkendők
21 Elemtartó
22 Távvezérlő
23 Láthatatlan fal (FC8822)
24 Dokkolóegység
25 Adapter
26 Kisméretű csatlakozódugasz
Kijelző és távvezérlő
A robot kijelzője
1 Spirál mintájú üzemmód jelzőfénye
2 Falkövető üzemmód jelzőfénye
3 Cikcakk minta üzemmód jelzőfénye
4 Véletlenszerű mintájú üzemmód jelzőfénye
5 Töltésjelző és takarítási idő kijelzője (lásd: 'A takarítási idő gombjainak használata')
6 Dokkolás ikon
7 Ventilátorsebesség kijelzője
8 Kukatelítettség-jelző
9 Hangérzékelő
10 Üzemmódválasztó gomb
11 Indítás és leállítás gomb
12 Ventilátorsebesség gombja
Távvezérlő
1 Navigációs gombok és start/stop (ábra 3) gomb
Magyar

Magyar
2 Takarítási idő gombok
3 Takarítási üzemmód gombok
4 Ventilátorsebesség gombjai
5 Dokkolás gomb
Dokkolóegység vezérlőpultja
1 Kijelző idő, nap és programozás kijelzésével (ábra 4)
2 Beállító gombok
Hogyan működik a robotporszívó?
Mit tisztít a robotporszívó?
A robotporszívó olyan funkciókkal van ellátva, amelyeknek köszönhetően megfelelő segítséget nyújt
az otthoni padlótisztításban.
A robotporszívó különösen alkalmas kemény padlók, például fa-, csempe- vagy linóleumpadlók
tisztítására. Puha padlók, például szőnyegek vagy lábtörlők tisztítása során problémák merülhetnek
fel. Ha a robotporszívót első alkalommal használja szőnyeg vagy lábtörlő tisztítására, maradjon a
közelben, hogy meggyőződjön róla, hogy a készülék alkalmas az ilyen típusú padlók tisztítására.
Fekete és fényes kemény padlók tisztítása során a robotporszívó szintén felügyeletet igényel.
Hogyan tisztít a robotporszívó?
Tisztítórendszer
A robotporszívó 3 lépcsős tisztítórendszerrel tisztítja hatékonyan a padlót.
1 A két oldalsó kefe segít a robotnak megtisztítani a padlót a sarkokban és a fal mentén. Továbbá
segítenek fellazítani a padlóról a lerakódott szennyeződést, és továbbítják azt a szívónyíláshoz
(ábra 5).
2 A robotporszívó szívóereje felszedi a laza szennyeződést, és a szívónyíláson keresztül a
portartályba szállítja azt.
3 A robotporszívó fel van szerelve egy száraztörlőkendő-tartóval, amely lehetővé teszi, hogy a
kemény padlót száraz törlőkendővel alaposabban megtisztítsa.
Takarítási minták
Automatikus takarítás üzemmódban a robotporszívó a takarítási minták meghatározott és
automatikus sorozatát használva a szoba minden egyes részét optimálisan megtisztítja. A
robotporszívó egy Z mintát (cikkcakk mintát), egy véletlenszerű mintát, egy falkövető mintát és egy
spirál mintát váltogat egymás után (ábra 6). A mintasorozatnak megfelelő mozgást mindaddig
folytatja a szoba tisztításához, amíg az akkumulátor le nem merül, vagy amíg kézzel ki nem kapcsolja.
Ha a robotporszívó tisztítás közben különösen szennyezett területet érzékel, akkor a szennyeződés
alapos eltávolítása érdekében spirál üzemmódra és turbó ventilátorsebességre vált.
33
Megjegyzés: Az egyes üzemmódokat a távvezérlő (lásd: 'Takarítási üzemmód kiválasztása') vagy a
robotporszívó megfelelő gombjával külön is kiválaszthatja. A kézzel kiválasztott üzemmódok csak
néhány percig maradnak aktívak. Ezt követően a robotporszívó visszatér az automatikus takarítási
üzemmódhoz.
Hogyan kerüli el a robotporszívó a magasságkülönbségeket?
A robotporszívó alján három mélységérzékelő található. A robotporszívó ezek segítségével érzékeli és
kerüli el a magasságkülönbségeket, például a lépcsőket (ábra 7).

34
Magyar
Megjegyzés: Normális jelenség, hogy a robotporszívó kissé túlmegy a magasságkülönbségek szélén,
mivel az első mélységérzékelője az ütköző mögött található.
Figyelem! Bizonyos esetekben előfordulhat, hogy a mélységérzékelők nem érzékelik kellő időben a
lépcsőt vagy más magasságkülönbséget. Ezért az első néhány használat során, vagy amikor lépcső
vagy más magasságkülönbség közelében használja, fordítson kellő figyelmet a robotporszívóra.
Annak érdekében, hogy a robotporszívó megfelelően (lásd: 'Tisztítás és karbantartás') észlelje a
magasságkülönbségeket, fontos, hogy a mélységérzékelőket rendszeresen tisztítsa.
Teendők az első használat előtt
Az oldalsó kefék felszerelése
1 Csomagolja ki az oldalsó keféket, és helyezze a robotot fejjel lefelé egy asztalra vagy a padlóra.
2 Nyomja rá az oldalsó keféket a robotporszívó (ábra 8) alján található tengelyekre.
Megjegyzés: Győződjön meg arról, hogy az oldalsó keféket megfelelően rögzítette. Nyomja őket a
tengelyre mindaddig, amíg a helyükre nem kattannak.
A címke eltávolítása a távvezérlőről
A távvezérlő egy CR2025 típusú gombelemmel működik. Az elemet védőcímke védi, amelyet
használat előtt el kell távolítani.
1 Húzza ki az elem védőcímkéjét a távvezérlő elemtartó rekeszéből. Ekkor a távvezérlő készen áll a
használatra (ábra 9).
Előkészítés a használatra
A dokkolóegység beszerelése
1 Csatlakoztassa az adapter kis méretű csatlakozódugóját a dokkolóegység (1) aljzatába, és
csatlakoztassa az adaptert a fali aljzatba (2) (ábra 10).
-
A dokkolóegység kijelzője bekapcsol.
2 Helyezze a dokkolóegységet vízszintes, sík padlóra a fal előtt.
Megjegyzés: Győződjön meg róla, hogy nincsenek akadályok vagy magasságkülönbségek a
dokkolóegység (ábra 11) elejétől 80 cm-re, a jobb oldalától 30 cm-re és a bal oldalától 100 cm-re.
Tipp: Ahhoz, hogy a dokkolóegység biztonságosan rögzítve maradjon a kiválasztott helyen, rögzítse
a falhoz csavarokkal vagy két csíknyi kétoldalú ragasztószalaggal.
Fontos megjegyzés: mélyalvó üzemmód
Mélyalvó üzemmódban a robotporszívó nem reagál, ha megnyom rajta egy gombot. A robotporszívó
mélyalvó üzemmódból való újbóli bekapcsolása:
1 Nyomja meg a start/stop gombot, hogy a robotporszívó mélyalvó üzemmódból készenléti
üzemmódba váltson.
2 A takarítás elindításához nyomja meg röviden a start/stop gombot a robotporszívón (ábra 17) vagy
nyomja meg a start/stop gombot a távirányítón.

Magyar
3 Ha a robot nem kezd el takarítani, helyezze a hálózatra csatlakoztatott dokkolóegységre, hogy az
akkumulátora feltöltődjön.
A robot mélyalvó üzemmódba vált, ha 5 másodpercig lenyomva tartja a start/stop gombot. Akkor is
mélyalvó üzemmódra vált, ha akkumulátora lemerül. Az akkumulátor például akkor merülhet le, ha a
robotporszívó nem találja meg a dokkolóegységet.
Töltés
Az első töltés alkalmával, illetve ha a robotporszívó akkumulátora lemerült, a töltési idő négy óra.
A robotporszívó tölthető a dokkolóegységen, manuálisan vagy automatikusan használat közben.
Megjegyzés: Ha az akkumulátor teljesen feltöltődött, a robotporszívó akár 120 percig használható
tisztításra
Automatikus töltés használat közben
1 Amikor a robotporszívó befejezte a tisztítást, illetve amikor az akkumulátor töltöttsége már csak
15%, a robotporszívó automatikusan megkeresi a dokkolóegységet, hogy feltöltődjön. Amikor a
robotporszívó a dokkolóegységet keresi, a start/stop gomb narancssárgán (ábra 15) világítani kezd.
2 Amikor az akkumulátor teljesen feltöltődött, a start/stop gomb folyamatosan zölden világít.
Töltés a dokkolóegységen
1 Helyezze a robotporszívót a hálózatra csatlakoztatott dokkolóegységre (ábra 12).
2 A start/stop gomb zölden villogni kezd. Mivel első alkalommal tölti fel a robotporszívót, annak
kijelzőjén megjelenik a töltési jelzőfény (ábra 13).
3 Amikor az akkumulátor teljesen feltöltődött, a start/stop gomb folyamatosan (ábra 14) zölden
világít.
35
A robotporszívó használata
A szoba előkészítése a tisztításhoz
Mielőtt elindítaná a robotporszívó a tisztító munkamenetét, távolítson el a padlóról minden laza és
törékeny tárgyat. Távolítson el a padlóról minden kábelt és vezetéket is.
A start/stop gomb funkciói
A start/stop gomb a következő funkciókkal (ábra 16) rendelkezik:
A start/stop gomb lenyomásának
módja
Nyomja le a start/stop gombot 1
másodpercig
Nyomja meg röviden a start/stop
gombot
Nyomja le a start/stop gombot 5
másodpercig
A robotporszívó válasza
A robotporszívó alvó üzemmódból készenléti
üzemmódba vált
A robotporszívó elindítja vagy leállítja a takarítást
Ki- vagy bekapcsolja a robotporszívót.

36
Magyar
A felhasználói felület jelei és jelentésük
A robotporszívó egy kijelzővel és egy start/stop gombbal rendelkezik, amely fényjelzéseket ad. Az
alábbi táblázat magyarázza a jelzések jelentését.
Jelzés
A jelzés leírása A jelzés jelentése
A start/stop gomb folyamatosan zölden világít. A robotporszívó készen áll a
takarításra.
A start/stop gomb zölden, lassan villog, és a
robotporszívó kijelzőjén mozgó kék fény
(töltésjelző) jelenik meg.
A start/stop gomb folyamatosan narancssárgán
világít.
A start/stop gomb folyamatosan pirosan világít. A robotporszívó akkumulátora
A start/stop gomb folyamatosan pirosan világít, és
a kijelzőn hibakód jelenik meg.
A robotporszívó töltése folyamatban
van.
Az akkumulátor töltöttsége alacsony,
és a robotporszívó keresi a
dokkolóegységet.
majdnem teljesen lemerült.
A hibakód jelentését ellenőrizze a
lenti hibakódtáblázatban.
Hibakódok
Hibakód
E1 A kerekek beszorultak Távolítsa el a robotot az akadálytól, és nyomja
E2 A felső fedél vagy a
E3 A lökhárító beszorult Vegye le a robotporszívót az akadályról. Az
Lehetséges ok Megoldás
meg a start/stop gombot, hogy a
robotporszívó folytassa a takarítást.
portartály nem
megfelelően van
behelyezve
Megfelelően helyezze be a portartályt és fel a
felső fedelet a robotporszívóra. Az hibakód
automatikusan eltűnik a kijelzőről.
hibakód automatikusan eltűnik a kijelzőről.
E4 A robotporszívó
felemelkedett a
padlóról
E5 A padló túl sötét színű Helyezze a robotot a padló világosabb
E6 Probléma az
akkumulátorral
Helyezze vissza a robotot a padlóra, hogy a
hibakód eltűnjön.
területére. Tisztítsa meg a
mélységérzékelőket.
A probléma kivizsgálása érdekében kérjük,
forduljon az ügyfélszolgálathoz.
Válasz tapssal
Ha nem látja a robotporszívót, akkor úgy találhatja meg, hogy egyet tapsol a kezével. A robotporszívó
ekkor hangjelzéssel és a kijelzőn az összes ikon világításával válaszol.

Magyar
Ez az üzemmód akkor lép működésbe, amikor a robotporszívó alvó üzemmódba lép a következő
helyzetekben:
-
amikor egy hiba miatt abbahagyja a takarítást
-
amikor 20 percen belül nem találja meg a dokkolóegységet
.
Indítás és leállítás
1 Nyomja meg a start/stop gombot a robotporszívón (ábra 17) vagy a távvezérlőn (ábra 18). A
start/stop gomb folyamatosan zölden világít, és a robotporszívó elkezdi a takarítást.
2 A robotporszívó mindaddig automatikus takarítási üzemmódban működik, amíg az akkumulátor le
nem merül. Az automatikus takarítási üzemmódban a robotporszívó váltogatja a Z mintát, a
véletlenszerű mintát, a falkövető mintát és a spirál mintát (ábra 6).
Megjegyzés: Az egyes üzemmódok kiválasztásához nyomja meg a távvezérlőn vagy a
robotporszívón (lásd: 'Takarítási üzemmód kiválasztása') az üzemmód gombok egyikét.
3 Ha az akkumulátor töltöttségi szintje alacsony, a start/stop gomb jelzőfénye pirosra vált, és a
robotporszívó megkeresi a dokkolóegységet, hogy feltöltődjön (ábra 15).
4 A start/stop gomb megnyomásával meg is szakíthatja vagy leállíthatja a takarítási folyamatot. Ha
ismét megnyomja a start/stop gombot, és az akkumulátor még mindig elegendő energiával
rendelkezik, a robotporszívó automatikus takarítási üzemmódban folytatja a takarítást.
5 Ha azt akarja, hogy a robotporszívó visszatérjen a dokkolóegységre, mielőtt az akkumulátor
lemerülne, nyomja meg a távvezérlőn a dokkolás gombot. A robotporszívó kijelzőjén az összes ikon
eltűnik a dokkoló ikon kivételével, amely élénk kék színnel világít, miközben a robotporszívó
visszatér a dokkolóegységhez (ábra 19).
37
Takarítási üzemmód kiválasztása
Az automatikus takarítási üzemmód mellett a robotporszívó négy önálló takarítási üzemmóddal
rendelkezik, melyek mindegyike a távvezérlőn vagy a robotporszívón lévő megfelelő gomb
megnyomásával aktiválható.
Megjegyzés: A kézzel kiválasztott üzemmódok csak néhány percig maradnak aktívak. Ezt követően a
robotporszívó visszatér az automatikus takarítási üzemmódhoz.
Z mintájú üzemmód
Z mintájú üzemmódban a robotporszívó Z alakú mozdulatokból álló hurkokat rajzolva tisztítja a szoba
nagy területeit (ábra 20).
Véletlenszerű mintájú üzemmód
Ebben az üzemmódban a robotporszívó egyenes és cikkcakk mozgásokból (ábra 21) álló mintát
rajzolva takarítja a szobát.
Falkövető üzemmód
Ebben az üzemmódban a robotporszívó követi a szoba falait, és a falak mentén mozogva tökéletesen
megtisztítja (ábra 22) az adott területet.
Spirál mintájú üzemmód
Ebben az üzemmódban a robotporszívó spirális mintájú tisztítást végez egy kisebb területen. Ha a
porérzékelő szennyeződést észlel, a robot a ventilátort automatikusan turbó sebességre (ábra 23)
kapcsolja.

38
Magyar
Kézi vezérlés
1 A távirányító start/stop gombja felett, alatt, bal, illetve jobb oldalán található nyílgombok
segítségével irányíthatja a robotporszívó mozgását a szobában (ábra 24).
Megjegyzés: Legyen óvatos, amikor a robotporszívót kézzel működteti magasságkülönbség vagy
lépcső közelében.
Megjegyzés: A porszívózás csak a robotporszívó előre történő haladása közben történik, illetve az
oldalsó kefék is csak ekkor működnek. A balra, jobbra és hátra gombok csak a robotporszívó
irányítására szolgálnak.
A takarítási idő gombjainak használata
-
Alapértelmezés szerint a robotporszívó mindaddig automatikus takarítási üzemmódban működik,
amíg az akkumulátor le nem merül. A robotporszívó ezután automatikusan visszatér a
dokkolóegységre. Ha más takarítási időt választott (lásd lent), az alapértelmezett üzemmódba való
visszalépéshez nyomja meg a maximális takarítási idő gombot a távvezérlőn (ábra 25).
-
A távvezérlőn lévő többi takarítási idő gombbal 60, 45, illetve 30 percig működtetheti a
robotporszívót (ábra 26). A takarítási idő kijelző mutatja a beállított takarítási időt. Ha a
robotporszívó befejezte a takarítást, visszatér a dokkolóegységre, hogy feltöltődjön. A kijelzőn
élénk kék színnel világítani kezd a dokkolás ikon.
-
Ha nem szeretné, hogy a robotporszívó takarítás után visszatérjen a dokkolóegységre, nyomja meg
kétszer a takarítási idő gombot. A dokkolás ikon eltűnik a kijelzőről. Ha a tisztítási idő lejár, a
robotporszívó leáll.
A dokkolóegység működtetése
Az idő és a nap beállítása az órán
Ha használni kívánja a takarító programokat, először a dokkolóegység kijelzőjén be kell állítania az
órán a hét napját és az időt.
Megjegyzés: Az alábbi lépésekhez tartozó képekért lásd a jelen kézikönyv hátsó oldalait.
1 Nyomja meg a beállítás gombot. A beállítás üzemmód jelzőfénye és az óra idejének jelzőfénye
villogni kezd.
2 Nyomja meg egyszer a kiválasztás gombot. Az óra értéke villogni kezd.
3 A dokkolóegység + és - gombjaival állítsa be az óra értékét. A kijelzőn megjelenik a beállított
óraérték.
4 Az óra értékének jóváhagyásához nyomja meg a kiválasztás gombot. A perckijelzés villogni kezd.
5 A dokkolóegységen lévő + és - gomb segítségével beállíthatja a perc értékét. A beállított percérték
a kijelzőn látható.
6 Az percérték jóváhagyásához nyomja meg a kiválasztás gombot. A vasárnapra vonatkozó „Va”
kijelzés villogni kezd.
7 A dokkolóegység + és - gombjaival állítsa be a hét aktuális napját.
8 A hét napjának jóváhagyásához nyomja meg a kiválasztás gombot.
9 A beállított idő és hét napja jóváhagyásához nyomja meg a beállítás gombot. A beállítás üzemmód
jelzőfénye és az óra idejének jelzőfénye abbahagyja a villogást, és folyamatosan kezd világítani.
A takarítási idők programozása
Ha a dokkolóegység kijelzőjén beállította a hét napját és az időt, beprogramozhatja a robotporszívó
takarítási időit.

Magyar
Megjegyzés: Az alábbi lépésekhez tartozó képekért lásd a jelen kézikönyv hátsó oldalait.
A rendelkezésre álló programozási beállítások:
Program
Takarítás minden nap Az egész napos kijelzések vannak bekapcsolva
Takarítás hétköznapokon A Mo (hétfő) - Fri (péntek) kijelzések vannak bekapcsolva
Jelzések a kijelzőn
39
Takarítás 2 egymást követő napon A 2 nap kijelzése van bekapcsolva, például Fri (péntek) és Sa
Takarítás a hét 1 napján A kijelölt nap kijelzése van bekapcsolva
1 Nyomja meg a beállítás gombot. A beállítás üzemmód jelzőfénye és a takarítási program jelzőfénye
villogni kezd.
2 Nyomja meg egyszer a kiválasztás gombot. Az óra értéke villogni kezd.
3 A dokkolóegységen lévő + és - gomb segítségével beállíthatja az óra értékét. A beállított óra
megjelenik a kijelzőn.
4 Az óra értékének jóváhagyásához nyomja meg a kiválasztás gombot. A perckijelzés villogni kezd.
5 A dokkolóegységen lévő + és - gomb segítségével beállíthatja a perc értékét. A beállított percérték
a kijelzőn látható.
6 Az percérték jóváhagyásához nyomja meg a kiválasztás gombot. A vasárnapra vonatkozó „Va”
kijelzés villogni kezd.
7 A dokkolóegység + és - gombjaival válthat a takarító programok között (a rendelkezésre álló
programozási beállításokat lásd a fenti táblázatban).
8 A kiválasztott program jóváhagyásához nyomja meg a kiválasztás gombot.
9 Az programozás jóváhagyásához nyomja meg a beállítás gombot. A beállítás üzemmód jelzőfénye
és a tisztítóprogram jelzőfénye abbahagyja a villogást, és folyamatosan kezd világítani.
10 Amikor beállított egy tisztítóprogramot, a kijelzőn megjelenik a tisztítóprogram jelzője, valamint a
kiválasztott nap vagy napok. Ha a robotporszívót készenléti állapotban hagyja, és az akkumulátor
teljesen fel van töltve, akkor a robotporszívó a beprogramozott napon vagy napokon, a
beprogramozott időpontban elkezdi a takarítást.
(szombat)
Ventilátorsebesség gombjai
A ventilátor sebességét szabályozó gombokkal ventilátor sebességét turbó fokozatig növelheti, vagy
kikapcsolhatja a ventilátort. Az alapértelmezett beállítás a normál ventilátorsebesség (ábra 27).
1 Nyomja meg ezt a gombot a ventilátor kikapcsolásához
2 Nyomja meg ezt a gombot a ventilátor normál sebességű bekapcsolásához.
3 A turbó ventilátor gomb növeli a ventilátor sebességét.
A száraz törlőkendős tartozék használata
A száraz törlőkendős tartozék egy olyan funkció, amely lehetővé teszi a kemény padlók száraz
törlőkendővel történő tisztítását.
Megjegyzés: Ha a száraz törlőkendős tartozékot használja, előfordulhat, hogy a robotporszívó
számára nehézséget okoz a küszöbökön való áthaladás és a szőnyegekre való felgördülés.
A száraz törlőkendős tartozék előkészítése a használathoz
Fordítsa fejjel lefelé a robotot, és helyezze a padlóra vagy egy asztalra.
1 Helyezze a száraz törlőkendőt egy asztalra, és helyezze a száraz törlőkendős tartozékot a kendőre
úgy, hogy a rögzítőfülek Ön felé nézzenek (ábra 28).

40
Magyar
2 Hajtsa a száraz törlőkendő mindkét végét a száraz törlőkendős tartozék köré, és a rögzítő
blokkokat a mélyedésekbe nyomva erősítse a száraz törlőkendőt a tartozékra (ábra 29).
3 Helyezze be a száraz törlőkendős tartozék rögzítő fülét a robotporszívó egyik oldalán közvetlenül a
kerék mögött lévő nyílásba, és addig nyomja, amíg nem hallja, hogy az a helyére pattant. Ezután
ismételje meg ezeket a lépéseket a másik oldalon is (ábra 30).
4 Fordítsa vissza a robotot, és helyezze a padlóra a kerekeire úgy, hogy a száraz törlőkendős tartozék
érintkezzen a padlóval.
A robotporszívó használata a száraz törlőkendős tartozékkal
Ha fel van szerelve a száraz törlőkendős tartozék, a robotporszívó bármilyen üzemmódban és
mindenféle kemény padló tisztítására alkalmas. Ne használja a száraz törlőkendős tartozékot
szőnyegekhez vagy lábtörlőkhöz.
A száraz törlőkendős tartozék leszerelése
1 Szerelje le a száraz törlőkendős tartozékot, amint befejezte a padló feltörlését. Ehhez fordítsa fejjel
lefelé a robotporszívót, és helyezze a padlóra vagy egy asztalra.
2 A kioldásához nyomja a száraz törlőkendős tartozék egyik végét a robotporszívó másik oldalán
lévő kerék irányába. Ezután húzza le a tartozékot a robotporszívóról (ábra 31).
3 Ha a száraz törlőkendő túlságosan szennyezett az újbóli használathoz, húzza ki a rögzítő blokkokat
a száraz törlőkendő tartozékból és dobja ki a száraz törlőkendőt.
Megjegyzés: A száraz törlőkendő nem öblíthető vagy mosható.
A láthatatlan fal használata (csak az FC8822 esetén)
A láthatatlan fal segítségével megakadályozhatja, hogy a robotporszívó olyan helyiségbe vagy
területre is bemenjen, ahová nem szeretné.
Az elemek behelyezése a láthatatlan falba
A láthatatlan fal négy AA elemmel működik.
1 Nyomja meg a hátsó fedél (1) alján található két kioldófület, majd csúsztassa a hátsó fedelet felfelé,
és vegye le a láthatatlan falról (2) (ábra 32).
2 Vegyen ki a csomagból négy új AA elemet, és helyezze be őket a láthatatlan fal elemtartó
rekeszébe (ábra 33).
Megjegyzés: Ügyeljen arra, hogy az akkumulátorok + és – pólusai a megfelelő helyzetben legyenek.
3 Csúsztassa vissza a hátsó fedelet a láthatatlan falra (ábra 34).
A láthatatlan fal elhelyezése a robotporszívó leállításához
1 Helyezze az egységet egy olyan pontra, amelyen túl nem szeretné engedni a robotporszívót, pl. egy
olyan helyiség nyitott ajtajának a közelébe, amelybe a robotporszívó nem mehet be (ábra 35).
2 Kapcsolja be a láthatatlan falat az egység tetején található be-/kikapcsoló gombbal (ábra 36).
3 Indítsa el a robotporszívót.
4 Ha a robotporszívó túl közel megy a láthatatlan falhoz, annak jelzőfénye villogni kezd, és a
láthatatlan fal egy infravörös fénysugarat bocsát ki. Az infravörös fénysugár arra kényszeríti a
robotot, hogy módosítása az útvonalát, és távolodjon el a láthatatlan faltól (ábra 37).
Megjegyzés: A láthatatlan fal használatakor rendszeresen ellenőrizze, hogy az akkumulátorok
töltöttsége megfelelő-e. Ennek ellenőrzéséhez kapcsolja ki majd újra be a láthatatlan falat. Ha az
akkumulátorok töltöttsége megfelelő, a láthatatlan falon található LED röviden felvillan.

Magyar
Tisztítás és karbantartás
A robotporszívó tisztítása
A kiváló tisztító teljesítmény fenntartása érdekében rendszeresen tisztítsa meg a mélységérzékelőket,
a kerekeket, az oldalsó keféket és a szívónyílást.
1 Helyezze a robotot fejjel lefelé egy sima felületre.
2 Egy puha sörtéjű kefével (pl. fogkefével) távolítsa el a port és a szöszt a mélységérzékelőkről (ábra
38).
Megjegyzés: Fontos, hogy a mélységérzékelőket rendszeresen tisztítsa. Ha az érzékelők
szennyezettek, a robotporszívó nem észleli megfelelően a magasságkülönbségeket.
3 Egy puha sörtéjű kefével (pl. fogkefével) távolítsa el a port és a szöszt az első kerékről és az oldalsó
kerekekről (ábra 39).
4 Az oldalsó kefék tisztításához fogja meg azok sörtéit, és húzza le a keféket a tengelyekről (ábra 40).
5 Egy puha kefével (pl. fogkefével) vagy ruhával távolítsa el a szöszöket, hajszálakat és cérnaszálakat
a tengelyről és az oldalkeféről (ábra 41).
6 Ellenőrizze, hogy az oldalsó kefékből és a robotporszívó aljából nem állnak-e ki éles tárgyak,
amelyek megsérthetik a padlót.
7 A TriActive XL szívófej eltávolításához helyezze ujjait a robotporszívó alján található mélyedésekbe.
A mélyedések irányába nyilak mutatnak. A mélyedésekből (1) történő kioldáshoz nyomja befelé a
TriActive szívófejet rögzítő nyelveket. Ezután húzza le a TriActive szívófejet a robotporszívóról (2)
(ábra 42).
8 Tisztítsa meg a szívónyílást egy puha kefe (pl. egy fogkefe) (ábra 43) segítségével.
9 Távolítsa el a lerakódott szennyeződést a TriActive szívófejből, mielőtt visszahelyezi.
10 A TriActive szívófej felhelyezéséhez először illessze az elöl található kis nyelveket az első kerék (1)
mindkét oldalán lévő apró mélyedésekbe. Ezután a rögzítéshez nyomja befelé a TriActive szívófej
nyelveit a robotporszívó (2) alján található mélyedésekbe. Végül ellenőrizze, hogy a szívófej pár
milliméterrel felfelé és lefelé egyaránt továbbra is elmozdítható (ábra 44).
11 Nyomja rá újra az oldalsó keféket a robotporszívó alján található tengelyekre (ábra 8).
41
A portartály ürítése és tisztítása
Ürítse ki és tisztítsa meg a portartályt, ha a portartály-telítettség jelző folyamatosan világít.
1 Vegye le a borítást.
2 Húzza fel a portartály fedelének fogantyúját, és emelje ki a portartályt a tartójából.
Megjegyzés: Amikor eltávolítja vagy visszahelyezi a portartályt, ügyeljen arra, hogy ne sértse meg a
motor ventilátorának lapátjait.
3 Óvatosan emelje fel a portartály fedelét (1), és vegye ki a szűrőt (2) (ábra 45).
4 A szemetes fölött rázva ürítse ki a portartályt. Tisztítsa meg a szűrőt és a portartály belsejét egy
ronggyal vagy egy puha sörtéjű fogkefével. Tisztítsa meg a portartály alján található szívónyílást is.
Figyelem! Ne tisztítsa a portartályt vagy a szűrőt vízzel vagy mosogatógépben.
5 Helyezze vissza a szűrőt a portartályba (1). Tegye rá a fedelet a portartályra (2) (ábra 47).
6 Tegye vissza a portartályt a portartály rekeszébe, és tegye vissza a felső fedelet a robotporszívóra
(ábra 48).
Figyelem! Mindig győződjön meg róla, hogy a szűrő a portartályban van. Ha a robotot úgy
használja, hogy a portartályban nincs szűrő, a motor károsodhat.

42
Magyar
Tartozékok rendelése
Tartozékok és pótalkatrészek vásárlásához látogasson el a www.shop.philips.com/service weboldalra
vagy forduljon Philips márkakereskedőjéhez. Fordulhat az országában működő Philips
vevőszolgálathoz is (az elérhetőségi információkat megtalálja a világszerte érvényes garancialevélen).
Csere
A szűrő cseréje
Cserélje ki a szűrőt, ha az nagyon piszkos vagy sérült. Új szűrőkészletet az FC8066 típusszám alatt
rendelhet. A szűrő portartályból való kivételével, illetve visszahelyezésével kapcsolatos további
információkat lásd a „Tisztítás és karbantartás” című fejezet „A portartály ürítése és tisztítása” c.
részében.
Az oldalsó kefék cseréje
A megfelelő tisztítási eredmények biztosítása érdekében bizonyos idő után cserélje ki az oldalsó
keféket.
Mindig cserélje ki az oldalsó keféket, ha kopásra vagy sérülésre utaló jeleket tapasztal. Javasoljuk
továbbá, hogy mindkét oldalsó kefét egyszerre cserélje ki. Tartalék oldalsó keféket cserekészlet
részeként rendelhet az FC8068 rendelési számmal. Ez a készlet emellett két szűrőt és három száraz
törlőkendőt is tartalmaz.
1 Az oldalsó kefék cseréjéhez fogja meg a régi oldalsó kefék sörtéit, és húzza le a keféket a
tengelyükről (ábra 40).
2 Nyomja az új oldalsó keféket a tengelyekre (ábra 8).
Száraz törlőkendők cseréje
Lehetősége van új száraz törlőkendők rendelésére. Ezek az FC8068 cserekészletben találhatók. Ez a
cserekészlet emellett két oldalsó kefét és két szűrőt is tartalmaz.
A távvezérlő elemének cseréje
A távvezérlő egy CR2025 típusú gombelemmel működik. Cserélje ki az elemet, ha a robotporszívó már
nem válaszol, amikor megnyomja a távvezérlő gombjait.
1 Tartsa a távvezérlőt fejjel lefelé. Nyomja meg az elemtartó kioldó gombját, és ugyanakkor
csúsztassa ki az elemtartót a távvezérlőből (ábra 49).
2 Vegye ki a lemerült elemet az elemtartóból, és helyezze be az új elemet. Ezután csúsztassa vissza
az elemtartót a távvezérlőbe (ábra 50).
Az akkumulátor cseréje
A robot akkumulátorát csak szakképzett szerviztechnikus cserélheti ki. Vigye be a robotot egy
hivatalos Philips szakszervizbe, ahol az akkumulátort kicserélik, ha azt már nem lehet újra feltölteni
vagy gyorsan lemerül. Az országában működő Philips vevőszolgálat elérhetőségi adatait a nemzetközi
garancialevélen találhatja meg, vagy látogasson el a www.philips.com/support weboldalra.

Magyar
Újrahasznosítás
-
Ez a szimbólum azt jelenti, hogy a termék nem kezelhető normál háztartási hulladékként
(2012/19/EU) (ábra 51).
-
Ez a szimbólum azt jelenti, hogy a termék beépített újratölthető akkumulátort tartalmaz, amelyet
nem szabad háztartási hulladékként (ábra 52) kezelni (2006/66/EK). Kérjük, hogy vigye el a
készüléket egy hivatalos gyűjtőhelyre vagy egy Philips szervizközpontba, hogy szakember távolítsa
el az akkumulátort.
-
Tartsa be az elektromos és elektronikus termékek, akkumulátorok és egyszer használatos elemek
külön történő hulladékgyűjtésére vonatkozó országos előírásokat. A megfelelő hulladékkezelés
segítséget nyújt a környezettel és az emberi egészséggel kapcsolatos negatív következmények
megelőzéséhez.
Az akkumulátor eltávolítása
Figyelmeztetés: Az akkumulátort csak akkor távolítsa el, ha leselejtezi a készüléket. Az
akkumulátor eltávolítása előtt győződjön meg arról, hogy teljesen lemerült.
Az akkumulátor eltávolításához kövesse az alábbi utasításokat. Az akkumulátor eltávolításához a
robotot beviheti egy Philips szakszervizbe is. A legközelebbi szakszerviz címét a Philips
vevőszolgálatától tudhatja meg.
1 A robotporszívót indítsa el valahonnan a szobából, ne a dokkolóegységről.
2 Hagyja a robotot addig működni, amíg az akkumulátor teljesen le nem merül, hogy az akkumulátor
teljesen lemerüljön, mielőtt kivenné és kidobná.
3 Csavarhúzóval lazítsa ki az akkumulátortartó rekesz fedelének csavarjait, majd vegye le a fedelet
(ábra 53).
4 Emelje ki az akkumulátort, majd válassza le azt (ábra 54).
5 Vigye a robotporszívót és az akkumulátort egy elektromos és elektronikus hulladékok gyűjtését
végző hulladékudvarba.
43
Hibaelhárítás
Ez a fejezet összefoglalja a készülékkel kapcsolatban leggyakrabban felmerülő problémákat. Ha a
hibát az alábbi útmutató segítségével nem tudja elhárítani, látogasson el a www.philips.com/support
weboldalra a gyakran felmerülő kérdések listájáért, vagy forduljon az országában illetékes
ügyfélszolgálathoz.
Hibaelhárítás
Probléma
A robotporszívó a
start/stop gomb
megnyomását követően
nem kezdi el a tisztítást.
Lehetséges ok Megoldás
Lemerült az akkumulátor. Töltse föl az akkumulátort.

44
Magyar
Probléma Lehetséges ok Megoldás
A robotporszívó nem
tisztít megfelelően.
Az egyik vagy mindkét
oldalsó kefe sörtéi
görbültek vagy hajlottak.
Áztassa be a keféket meleg vízbe egy rövid
időre, majd hagyja őket megszáradni egy
sima felületen, mielőtt visszahelyezi azokat a
robotporszívóra. Ha ennek hatására a sörték
nem nyerik vissza eredeti alakjukat, cserélje
ki az oldalsó keféket (lásd: 'Az oldalsó kefék
cseréje').
A portartályban lévő szűrő
szennyezett.
A portartály alján található
szívónyílás eltömődött.
Az első kerék a rátapadt
haj és egyéb
szennyeződés miatt
beszorult.
A robotporszívó nagyon
sötét vagy fényes felületet
tisztít, ami elindítja a
mélységérzékelőket. Ennek
következtében a
robotporszívó szokatlan
módon mozoghat.
A robotporszívó olyan
padlót tisztít, amely elég
erősen visszatükrözi a
napfényt. Ez elindítja a
mélységérzékelőket,
aminek következtében a
robotporszívó szokatlan
módon mozoghat.
Tisztítsa meg a portartály belsejében
található szűrőt egy ronggyal vagy egy puha
sörtéjű fogkefével. Alacsony szívóerősséggel
egy hagyományos porszívóval is
megtisztíthatja a szűrőt és a portartályt.
Ha a kefével vagy a porszívóval nem sikerül
megtisztítania a szűrőt, cserélje ki a szűrőt
egy újra. Azt javasoljuk, hogy legalább
évente egyszer cserélje ki a szűrőt.
Tisztítsa meg a szívónyílást (lásd: 'Tisztítás és
karbantartás').
Tisztítsa meg az első kereket (lásd: 'Tisztítás
és karbantartás').
Nyomja meg start/stop gombot, majd
helyezze a robotot a padló világosabb színű
részére. Ha a probléma itt is fennáll,
látogasson el a www.philips.com/support
weboldalra, vagy forduljon az országában
működő Philips ügyfélszolgálathoz.
Ha szeretné megakadályozni, hogy a
napfény bevilágítson a helyiségbe, húzza
össze a függönyöket. Érdemes a takarítást
akkorra időzíteni, amikor a nap már kevésbé
süt.
A be-/kikapcsoló gomb
folyamatosan pirosan
világít és a kijelzőn
hibakód jelenik meg.
A robotporszívó hibajelet
ad.
Az adott kód jelentését ellenőrizze a
hibakód táblázatban (lásd: 'Hibakódok').

Probléma Lehetséges ok Megoldás
A robotporszívó körkörös
mozgással végzi a
tisztítást.
A robotporszívó spirál
üzemmódban van.
Ez normális jelenség. A spirál üzemmód
akkor aktiválódik, amikor a készülék egy
erősen szennyezett területet észlel és
szeretne megtisztítani a padlón. Ez az
automatikus üzemmód része. Körülbelül egy
perc elteltével a robotporszívó visszatér a
normál tisztítási üzemmódhoz. A spirál
üzemmódot úgy is megszakíthatja, ha egy
másik tisztítási üzemmódot választ ki a
távirányítón.
Magyar
45
A robotporszívó nem
találja a
dokkolóegységet.
A helyiségben nem áll
rendelkezésre elegendő
hely ahhoz, hogy a
robotporszívó visszatérjen
a dokkolóegységhez.
A robot még mindig keresi
a dokkolóegységet.
Elképzelhető, hogy a
takarítási idő gomb
kétszeri megnyomásával
kikapcsolta az automatikus
dokkolási funkciót. Ilyenkor
a dokkolás ikon eltűnik a
kijelzőről és a
robotporszívó leáll, miután
a takarítási idő lejárt.
Helyezze máshová a dokkolóegységet (lásd:
'A dokkolóegység beszerelése').
Várjon körülbelül 20 percet, hogy a
robotporszívó visszatérjen a
dokkolóegységre.
A robotporszívó újraindításához nyomja le a
start/stop gombot 5 másodpercig. A
dokkolási funkció automatikusan újra
bekapcsolódik. A takarítási idő gomb
kétszeri megnyomásával újra bekapcsolhatja
a dokkolási funkciót. A kijelzőn újra
megjelenik a dokkolás ikon. Nyomja meg a
dokkolás gombot és a robotporszívó
visszatér a dokkolóegységhez.

46
Română
Introducere
Felicitări pentru achiziţie şi bun venit la Philips! Pentru a beneficia pe deplin de asistenţa oferită de
Philips, înregistraţi-vă produsul la www.philips.com/welcome.
Descriere generală
1 Mânerul capacului pentru recipientul pentru praf
2 Capac pentru recipientul pentru praf
3 Filtru
4 Recipient pentru praf
5 Capac superior
6 Tabel coduri de eroare
7 Ventilator
8 Amortizor
9 Senzor stație de andocare
10 Buton de pornire/oprire
11 Roată frontală
12 Axe perii laterale
13 Senzori de deplasare
14 Roți
15 Orificiu de aspirare
16 Cap de aspirare TriActive XL
17 Perii laterale
18 Blocuri de fixare pentru lavete uscate
19 Suport pentru lavete uscate
20 Lavete uscate
21 Suport pentru baterie
22 Telecomandă
23 Perete invizibil (FC8822)
24 Stație de andocare
25 Adaptor
26 Conector mic
Afişaj şi telecomandă
Afișajul robotului
1 Indicator pentru modul în spirală
2 Indicator pentru modul de urmărire a peretelui
3 Indicator pentru modul în zigzag
4 Indicator pentru modul aleatoriu
5 Indicator de încărcare și indicator pentru timpul (consultaţi 'Utilizarea butoanelor pentru timpul de
curățare') de curățare
6 Pictogramă de andocare
7 Indicator pentru viteză ventilator
8 Indicator pentru coş de gunoi plin
9 Senzor de sunet
10 Buton pentru selectare mod
11 Buton Start/Stop
12 Buton pentru viteză ventilator
Română

Română
Telecomandă
1 Butoane de navigare și de pornire/oprire (Fig. 3)
2 Butoane pentru timpul de curățare
3 Butoane pentru modul de curățare
4 Butoane pentru viteză ventilator
5 Buton de andocare
Panou de control al stației de andocare
1 Afișaj cu ora, ziua și indicații (Fig. 4) de programare
2 Reglarea și setarea butoanelor
Cum funcţionează robotul
Ce poate curăţa robotul
Acest robot este prevăzut cu funcţii care îl transformă într-un aspirator adecvat pentru a vă ajuta să
curăţaţi podelele acasă.
Robotul este potrivit în special pentru curăţarea suprafeţelor dure, ca de exemplu, podele acoperite
cu lemn, faianţă sau linoleum. Este posibil să apară probleme la curăţarea podelelor acoperite cu
materiale moi, ca de exemplu, carpete sau covoare. Dacă utilizaţi robotul pe o carpetă sau un covor,
vă rugăm să staţi în apropiere prima dată pentru a vedea dacă robotul poate acţiona pe acea
suprafaţă. Robotul necesită, de asemenea, supraveghere la utilizarea pe podele dure foarte închise la
culoare sau foarte lucioase.
47
Modul de curăţare al robotului
Sistem de curățare
Robotul dispune de un sistem de curățare din 3 trepte, pentru curățarea eficientă a podelelor.
1 Cele două perii laterale ajută robotul să curețe în colțuri și de-a lungul pereților. De asemenea,
ajută la îndepărtarea prafului de pe podea și la deplasare acestuia către orificiul de aspirare (Fig. 5).
2 Puterea de aspirare a robotului preia particulele de murdărie libere și le transportă, prin orificiul de
aspirare, în recipientul pentru praf.
3 Robotul este livrat cu un suport pentru lavete uscate care vă permite să curățați podeaua dură
chiar și mai temeinic, cu lavete uscate.
Modele de curățare
În modul său de curățare automată, robotul utilizează o succesiune automată sau fixă de modele de
curățare pentru a curăța fiecare zonă a camerei în mod optim. Acesta utilizează un model în Z (model
zigzag), un model aleatoriu, un model după linia peretelui și un model în spirală în mod succesiv (Fig.
6). Acesta continuă să se deplaseze în această succesiune de modele pentru a curăța camera până
când bateria reîncărcabilă se descarcă sau până când este oprit manual.
Dacă robotul detectează o zonă deosebit de murdară în timpul cursei sale de curățare, acesta comută
la modul în spirală și comută la viteza turbo a ventilatorului pentru a asigura îndepărtarea temeinică a
murdăriei.
Notă: Puteți, de asemenea, să selectați fiecare mod individual prin apăsarea butonului corespunzător
de pe telecomandă (consultaţi 'Selectarea modului de curățare') sau de pe robot. Modurile selectate
manual sunt active doar timp de două minute. După aceea, robotul comută înapoi pe modul de
curățare automată.

48
Română
Cum evită robotul diferențele de înălțime
Robotul este prevăzut, în partea inferioară, cu trei senzori de deplasare. Acesta utilizează acești
senzori de deplasare pentru a detecta și evita diferențele de nivel, ca de exemplu scările (Fig. 7).
Notă: Este normal ca robotul să se deplaseze ușor peste marginea unei diferențe de înălțime,
deoarece senzorul său de deplasare frontal este situat în spatele amortizorului.
Atenție: În unele cazuri, este posibil ca senzorii de deplasare să nu detecteze o scară sau o altă
diferență de nivel la timp. De aceea, urmăriți robotul cu atenție primele dăți când îl utilizați și când
îl folosiți lângă o scară sau o altă diferență de nivel. Este important să curățați senzorii de
deplasare în mod regulat pentru a asigura faptul că robotul detectează diferențele de nivel în mod
corespunzător (consultaţi 'Curăţare şi întreţinere').
Înainte de prima utilizare
Montarea periilor laterale
1 Despachetațiperiile laterale și așezați robotul invers pe o masă sau pe podea.
2 Apăsați periile laterale pe axele din partea inferioară a robotului (Fig. 8).
Notă: Asigurați-vă că montați periile laterale corespunzător. Apăsați pe ax până când auziți că
acestea sunt blocate în poziție cu un clic.
Îndepărtarea plăcuței de pe telecomandă
Telecomanda funcționează cu o baterie în formă de monedă de tip CR2025. Bateria este protejată cu
o etichetă de protecție care trebuie îndepărtată înainte de utilizare.
1 Trageți eticheta de protecție de pe compartimentul pentru baterii al telecomenzii. Acum
telecomanda este pregătită pentru utilizare (Fig. 9).
Pregătirea pentru utilizare
Instalarea stației de andocare
1 Introduceți mufa mică a adaptorului în priza stației de andocare (1) și introduceți adaptorul în priza
de perete (2) (Fig. 10).
-
Afișajul stației de andocare se aprinde.
2 Așezați stația de andocare pe o podea orizontală, lângă perete.
Notă: Asigurați-vă ca nu există obstacole sau diferențe de nivel la 80 cm în față, 30 cm la dreapta și
100 cm la stânga stației (Fig. 11) de andocare.
Sugestie: Pentru a vă asigura că stația de andocare rămâne ferm în locul selectat, o puteți fixa de
perete cu șuruburi sau cu două bucăți de bandă cu față dublă.
Observație importantă: mod inactivitate profundă
În modul de inactivitate profundă, robotul nu răspunde deloc dacă apăsați pe un buton. Pentru a
reactiva robotul atunci când acesta este în modul de inactivitate profundă:

Română
1 Apăsați butonul de pornire/oprire de pe robot timp de o secundă pentru a comuta robotul din
modul de inactivitate profundă în modul standby.
2 Apăsați scurt butonul de pornire/oprire de pe robot (Fig. 17) sau butonul de pornire/oprire de pe
telecomandă pentru a începe curățarea.
3 Dacă robotul nu începe curățarea, conectați robotul la stația de andocare conectată la priză,
pentru a-i reîncărca bateria.
Robotul intră în modul de inactivitate profundă atunci când țineți apăsat butonul de pornire/oprire
timp de 5 secunde. Acesta poate, de asemenea, să intre în modul de inactivitate profundă atunci când
bateria este descărcată. De exemplu, bateria poate să se consume dacă robotul nu poate să-și
găsească stația de andocare.
49
Încărcare
Atunci când efectuați încărcarea pentru prima dată și când bateria reîncărcabilă a robotului este
goală, durata de încărcare este de patru ore.
Robotul dvs. poate fi încărcat în stația de andocare, în mod manual sau automat în timpul utilizării.
Notă: Atunci cândbateria reîncărcabilă este complet încărcată, robotul dvs. poate curăța timp de
pânăla 120 de minute
Încărcarea automatăîn timpul utilizării
1 Atunci când robotul a încheiat curățarea sau când nivelul bateriei este de numai 15%, acesta caută
automat stația de andocare pentru a se reîncărca. Atunci când robotul caută stația de andocare,
lumina butonului de pornire/oprire devine portocalie (Fig. 15).
2 Atunci când bateria reîncărcabilă este complet încărcată, butonul de pornire/oprire luminează
continuu în culoarea verde.
Încărcarea pe stația de andocare
1 Așezați robotul pe stația de andocare (Fig. 12) conectată.
2 Butonul de pornire/oprire începe să clipească în culoarea verde. Deoarece aceasta este prima dată
când încărcați robotul, afișajul acestuia arată indicatorul (Fig. 13) de încărcare.
3 Atunci când bateria reîncărcabilă este complet încărcată, butonul de pornire/oprire luminează
continuu (Fig. 14) în culoarea verde.
Utilizarea robotului
Pregătirea camerei pentru o cursă de curățare
Înainte de a porni robotul pentru cursa sa de curățare, asigurați-vă că îndepărtați toate obiectele
libere și fragile de pe podea. De asemenea, îndepărtați toate cablurile, firele și șnururile de pe podea.
Funcțiile butonului de pornire/oprire
Butonul de pornire/oprire are următoarele funcții (Fig. 16):
Cum se apasă butonul de
pornire/oprire
Apăsați butonul de pornire/oprire timp
de 1 secundă
Apăsați scurt butonul de pornire/oprire Robotul începe sau întrerupe curățarea
Cum răspunde robotul
Robotul trece din modul de inactivitate în modul standby

50
Română
Apăsați butonul de pornire/oprire timp
de 5 secunde
Robotul pornește sau se oprește.
Semnalele de pe interfața cu utilizatorul și semnificațiile acestora
Robotul dispune de un afișaj și butonul de pornire/oprire emite semnale luminoase. Tabelul de mai
jos explică semnificația semnalelor.
Semnal
Descrierea semnalului Semnificația semnalului
Butonul de pornire/oprire este aprins continuu în
culoarea verde.
Butonul de pornire/oprire clipește încet în
culoarea verde și afișajul de pe robot prezintă o
lumină albastră în mișcare (indicatorul de
încărcare).
Butonul de pornire/oprire este aprins continuu în
culoarea portocalie.
Butonul de pornire/oprire este aprins continuu în
culoarea roșie.
Butonul de pornire/oprire este aprins continuu în
culoarea roșie și afișajul prezintă un cod de
eroare.
Robotul este pregătit pentru curățare.
Robotul se încarcă.
Bateria reîncărcabilă este descărcată
și robotul caută stația de andocare.
Bateria reîncărcabilă a robotului este
aproape epuizată.
Consultați tabelul cu coduri de eroare
de mai jos pentru a înțelege
semnificația codului de eroare.
Coduri de eroare
Cod de eroare
E1 Roți blocate Îndepărtați robotul de obstacol și apăsați
E2 Capacul superior sau
E3 Amortizor blocat Îndepărtați robotul de obstacol. Codul de
E4 Robot ridicat de la
E5 Culoarea podelei este
E6 Problemă cu bateria Contactați Centrul de asistență pentru clienți
Cauză posibilă Soluție
butonul de pornire/oprire pentru a relua
curățarea.
recipientul pentru praf
nu sunt poziționate
corect
podea
prea închisă
Poziționați în mod corespunzător recipientul
pentru praf în robot și capacul superior pe
robot. Codul de eroare dispare automat de pe
afișaj.
eroare dispare automat de pe afișaj.
Așezați robotul înapoi pe podea pentru a face
codul de eroare să dispară.
Poziționați robotul pe o zonă mai deschisă la
culoare a podelei. Curățați senzorii de
deplasare.
pentru a solicita examinarea problemei.

Română
Răspuns la bătaia din palme
Dacă nu vedeți robotul, puteți să-l localizați bătând o dată din palme. Robotul va răspunde emițând
un sunet și aprinzând toate pictogramele de pe afișajul său.
Funcția de răspuns la bătaia din palme este activată atunci când robotul intră în modul inactiv, în
următoarele situații:
-
atunci când acesta întrerupe curățarea din cauza unei erori
-
atunci când acesta nu își poate găsi stația de andocare în interval de 20 de minute
.
Pornirea și oprirea
1 Apăsați butonul de pornire/oprire de pe robot (Fig. 17) sau de pe telecomandă (Fig. 18). Butonul de
pornire/oprire este aprins continuu în culoarea verde și robotul începe curățarea.
2 Robotul este în modul curățare automată până când bateria se descarcă. În modul curățare
automată, acesta urmează succesiunea model (Fig. 6) în Z, aleatoriu, după linia peretelui și în
spirală.
Notă: Pentru a selecta un anumit mod, apăsați unul dintre butoanele de mod de pe telecomandă
sau de pe robot (consultaţi 'Selectarea modului de curățare').
3 Atunci când bateria se descarcă, butonul de pornire/oprire luminează în culoarea roșie și robotul
caută stația de andocare pentru a se reîncărca (Fig. 15).
4 Puteți, de asemenea, să apăsați butonul de pornire/oprire pentru a întrerupe cursa de curățare.
Dacă apăsați butonul de pornire/oprire din nou și există suficientă energie în bateria reîncărcabilă,
robotul continuă curățarea în modul curățare automată.
5 Pentru a face robotul să revină la stația de andocare înainte ca bateria reîncărcabilă să se
descarce, apăsați butonul de andocare de pe telecomandă. Toate pictogramele de pe afișajul
robotului dispar, cu excepția pictogramei de andocare, care se aprinde în albastru aprins, în timp ce
robotul revine la stația de andocare (Fig. 19).
51
Selectarea modului de curățare
Pe lângă modul de curățare automată, acest robot dispune de patru moduri de curățare individuale
care pot fi activate prin apăsarea butonului corespunzător de pe telecomandă sau de pe robot.
Notă: Modurile selectate manual sunt active doar timp de două minute. După aceea, robotul comută
înapoi pe modul de curățare automată.
Mod model în Z
În modul de model în Z, robotul curăță prin realizarea de bucle în formă de Z în cameră, pentru
curățarea unor zone mari (Fig. 20).
Mod aleator
În acest mod, robotul curăță camera într-un model amestecat de mișcări (Fig. 21) în linii drepte și
încrucișate.
Mod de urmărire a peretelui
În acest mod, robotul urmărește pereții camerei pentru a realiza o curățare suplimentară (Fig. 22) a
zonelor aflate de-a lungul pereților.

52
Română
Mod în spirală
În acest mod, robotul se deplasează în spirală pentru a curăța o zonă de dimensiuni reduse. Dacă
senzorul de detectare praf depistează murdărie, robotul comută automat ventilatorul la viteza turbo
(Fig. 23).
Acționarea manuală
1 Utilizați butoanele cu săgeți de deasupra, de dedesubtul, de la stânga și de la dreapta butonului de
pornire/oprire de pe telecomandă pentru a deplasa robotul prin cameră (Fig. 24).
Notă: Fiți atent când conduceți manual robotul în apropierea unor diferențe de nivel și scări.
Notă: Funcția de aspirare și periile laterale funcționează numai când robotul este condus spre
înainte. Butoanele stânga, dreapta și înapoi sunt doar pentru manevrarea robotului.
Utilizarea butoanelor pentru timpul de curățare
-
În mod implicit, robotul este în modul curățare automată până când bateria reîncărcabilă se
descarcă. Apoi, robotul se va întoarce automat la stația sa de andocare. Dacă ați selectat unul
dintre celelalte timpuri de curățare (consultați mai jos), puteți comuta înapoi la modul implicit prin
apăsarea butonului pentru timpul maxim de curățare de pe telecomandă (Fig. 25).
-
Celelalte butoane pentru timpul de curățare de pe telecomandă vă permit să lăsați robotul să
funcționeze timp de 60, 45, respectiv (Fig. 26) 30 de minute. Indicatorul pentru timpul de curățare
de pe afișaj prezintă timpul de curățare setat. La terminarea timpului de curățare, robotul revine la
stația sa de andocare. Pictograma de andocare se va aprinde pe afișaj în albastru aprins.
-
Dacă nu doriți ca robotul să se întoarcă la stația de andocare după sfârșitul timpului de curățare,
apăsați de două ori butonul de curățare. Pictograma de andocare dispare de pe afișaj. Când timpul
de curățare s-a încheiat, robotul se oprește.
Funcţionarea staţiei de andocare
Setarea orei ceasului şi a zilei
Dacă doriţi să utilizaţi programe de curăţare, trebuie să setaţi mai întâi ora ceasului şi ziua săptămânii
de pe afişajul staţiei de andocare.
Notă: Pentru imaginile care aparţin paşilor de mai jos, consultaţi paginile de pe spatele acestui
manual.
1 Apăsaţi butonul de setare. Indicatorul pentru modul de setare şi indicatorul pentru ora ceasului
încep să lumineze intermitent.
2 Apăsaţi butonul de selectare o dată. Indicatorul de oră începe să clipească.
3 Utilizaţi butoanele + şi - de pe staţia de andocare pentru a seta ora. Ora setată apare pe afişaj.
4 Apăsaţi butonul de selectare pentru a confirma ora setată. Indicatorul de minute începe să
clipească.
5 Utilizaţi butoanele + şi - de pe staţia de andocare pentru a seta minutele. Minutele setate apar pe
afişaj.
6 Apăsaţi butonul de selectare pentru a confirma minutele setate. Indicaţia „Su” pentru duminică
începe să lumineze intermitent.
7 Utilizează butoanele + şi - de pe staţia de andocare pentru a seta data curentă a săptămânii.
8 Apăsaţi butonul de selectare pentru a confirma ziua săptămânii.

Română
9 Apăsaţi butonul de setare pentru a confirma ora ceasului şi setarea zilei săptămânii. Atât
indicatorul pentru modul de setare, cât şi indicatorul pentru ora ceasului nu mai luminează
intermitent şi rămân aprinse continuu.
53
Programarea timpilor de curăţare
Dacă aţi setat ora şi ziua săptămânii pe afişajul staţiei de andocare, puteţi programa timpii de curăţare
pentru robot.
Notă: Pentru imaginile care aparţin paşilor de mai jos, consultaţi paginile de pe spatele acestui
manual.
Opţiunile de programare disponibile sunt:
Program
Curăţare în fiecare zi Toate indicaţiile zilelor sunt aprinse
Indicaţii pe afişaj
Curăţare în timpul zilelor săptămânii,
în afara weekendurilor
Curăţare în 2 zile consecutive Indicaţiile a 2 zile sunt aprinse, de ex. vineri şi sâmbătă
Curăţare 1 zi pe săptămână Indicaţia zilei selectate este aprinsă
1 Apăsaţi butonul de setare. Indicatorul pentru modul de setare şi indicatorul pentru programul de
curăţare încep să lumineze intermitent.
2 Apăsaţi butonul de selectare o dată. Indicatorul de oră începe să clipească.
3 Utilizaţi butoanele + şi - de pe staţia de andocare pentru a seta ora. Ora setată apare pe afişaj.
4 Apăsaţi butonul de selectare pentru a confirma ora setată. Indicatorul de minute începe să
clipească.
5 Utilizaţi butoanele + şi - de pe staţia de andocare pentru a seta minutele. Minutele setate apar pe
afişaj.
6 Apăsaţi butonul de selectare pentru a confirma minutele setate. Indicaţia „Su” pentru duminică
începe să lumineze intermitent.
7 Utilizaţi butoanele + şi - de pe staţia de andocare pentru a comuta între programele de curăţare
(consultaţi tabelul de mai sus pentru opţiunile de programare disponibile).
8 Apăsaţi pe butonul de selectare pentru a confirma programul selectat.
9 Apăsaţi butonul de setare pentru a confirma programarea. Atât indicatorul pentru modul de setare,
cât şi indicatorul pentru programul de curăţare nu mai luminează intermitent şi rămân aprinse
continuu.
10 Odată ce aţi setat un program de curăţare, afişajul prezintă indicatorul programului de curăţare şi
ziua sau zilele selectate. Dacă lăsaţi robotul în modul standby şi bateria sa reîncărcabilă este
încărcată complet, acesta va începe să cureţe la ora programată în ziua sau zilele programate.
Indicaţiile zilelor de luni până vineri sunt aprinse
Butoane pentru viteză ventilator
Puteți utiliza butoanele pentru viteză ale ventilatorului pentru a crește viteza ventilatorului la turbo
sau pentru a opri ventilatorul. Setarea implicită este viteza normală a ventilatorului (Fig. 27).
1 Apăsați acest buton pentru a opri ventilatorul
2 Apăsați acest buton pentru a porni ventilatorul la viteză normală.
3 Butonul pentru viteza turbo a ventilatorului sporește viteza ventilatorului.
Utilizarea accesoriului pentru lavete uscate
Accesoriul pentru lavete uscate este o caracteristică ce îţi permite să cureţi podelele dure cu lavete
uscate.

54
Română
Notă: Dacă uscaţi accesoriul pentru lavete uscate, robotul poate avea probleme la trecerea peste
praguri sau pe covoare.
Pregătirea pentru utilizare a accesoriului pentru lavete uscate
Întoarceți robotul invers și așezați-l pe podea sau pe o masă.
1 Așezați laveta uscată pe o masă și accesoriul pentru lavete uscate pe lavetă cu clapetele de fixare
orientate spre dvs. (Fig. 28)
2 Pliați ambele capete ale lavetei uscate în jurul accesoriului pentru lavete uscate și prindeți laveta
uscată pe accesoriu, împingând blocurile de fixare în nișele corespunzătoare (Fig. 29).
3 Introduceți clapeta de fixare a accesoriului pentru lavete uscate în orificiul aflat chiar în spatele
roții, pe o parte a robotului, și apăsați până când auziți că s-a fixat pe poziție cu un clic. Apoi
repetați aceste acțiuni pe cealaltă parte (Fig. 30).
4 Întoarceți robotul și așezați-l pe podea pe roțile sale, cu accesoriul pentru lavete uscate atingând
podeaua.
Utilizarea robotului cu accesoriul pentru lavete uscate
Atunci când este ataşat accesoriul pentru lavete uscate, puteţi utiliza robotul în orice mod şi pe toate
podelele. Nu utilizaţi accesoriul pentru lavete uscate pe covor sau pe carpete.
Îndepărtarea accesoriului pentru lavete uscate
1 Îndepărtați accesoriul pentru lavete uscate imediat după ce ați terminat de șters podeaua. Pentru
acest lucru, întoarceți robotul invers și așezați-l pe podea sau pe o masă.
2 Apăsați un capăt al accesoriului pentru lavete uscate spre roata de pe cealaltă parte a robotului,
pentru a-l elibera. Apoi trageți accesoriul de pe robot (Fig. 31).
3 Dacă laveta uscată este prea murdară pentru a putea fi refolosită, scoateți blocurile de fixare din
accesoriul pentru lavete uscate și aruncați laveta uscată.
Notă: Nu puteți clăti sau spăla lavetele uscate.
Utilizarea peretelui invizibil (exclusiv FC8822)
Puteți utiliza peretele invizibil pentru a împiedica robotul să pătrundă într-o cameră sau într-o zonă în
care nu doriți să pătrundă.
Introducerea bateriilor în peretele invizibil
Peretele invizibil funcționează cu patru baterii AA.
1 Împingeți cele două lamele de eliberare din partea inferioară a capacului posterior (1) și glisați
capacul posterior în sus și scoateți-l din peretele invizibil (2) (Fig. 32).
2 Luați patru baterii AA noi din pachet și introduceți-le în compartimentul pentru baterii al peretelui
invizibil (Fig. 33).
Notă: Asigurați-vă că polii + și - ai bateriilor sunt îndreptați în direcția corectă.
3 Glisați din nou (Fig. 34) capacul posterior pe peretele invizibil.
Poziționarea peretelui invizibil pentru a opri robotul
1 Amplasați unitatea într-un punct dincolo de care nu doriți ca robotul să treacă, de exemplu lângă o
ușă deschisă spre o cameră care este restricționată pentru robot (Fig. 35).
2 Porniți peretele invizibil cu comutatorul de pornire/oprire din partea superioară a unității (Fig. 36).
3 Porniți robotul.

Română
4 Atunci când robotul se apropie prea mult de peretele invizibil, ledul de pe peretele invizibil începe
să lumineze intermitent, iar peretele invizibil emite un fascicul de lumină infraroșie. Acest fascicul
de lumină infraroșie determină robotul să-și schimbe ruta și să se îndepărteze de peretele invizibil
(Fig. 37).
Notă: Dacă utilizați peretele invizibil, verificați în mod regulat dacă bateriile conțin în continuare
suficientă energie. Puteți verifica acest lucru oprind și pornind peretele virtual. Dacă în baterii este
suficientă energie, LED-ul de pe peretele invizibil va lumina scurt.
Curăţare şi întreţinere
Curățarea robotului
Pentru a menține performanțe de curățare corespunzătoare, trebuie să curățați din când în când
senzorii de deplasare, roțile, periile laterale și orificiul de aspirare.
1 Întoarceți invers robotul pe o suprafață plată
2 Utilizați o perie cu peri moi (de exemplu, o periuță de dinți) pentru a elimina praful sau scamele de
pe senzorii (Fig. 38) de deplasare.
Notă: Este important să curățați în mod regulat senzorii de deplasare. Dacă senzorii de deplasare
sunt murdari, este posibil ca robotul să nu poată detecta diferențele de nivel sau scările.
3 Utilizați o perie cu peri moi (de exemplu, o periuță de dinți) pentru a îndepărta praful sau scamele
de pe roata frontală și de pe roțile (Fig. 39) laterale.
4 Pentru a curăța periile laterale, prindeți-le de peri și trageți-le de pe axele (Fig. 40) acestora.
5 Eliminați scamele, firele de păr și ațele de pe ax și de pe peria laterală cu ajutorul unei perii moi (de
exemplu, o periuță de dinți) sau al unei cârpe (Fig. 41).
6 Verificați periile laterale și partea inferioară a robotului pentru a vă asigura că nu prezintă obiecte
ascuțite care ar putea deteriora podea.
7 Pentru a scoate capul de aspirare TriActive XL, introduceți degetele în fantele din partea inferioară
a robotului. Există săgeți orientate spre aceste fante. Apăsați spre interior clemele care mențin
capul de aspirare TriActive în poziție, pentru a le elibera din fante (1). Apoi trageți capul de aspirare
TriActive în sus și de pe robot (2) (Fig. 42).
8 Curățați orificiul de aspirare cu o perie moale (de exemplu, o periuță de dinți) (Fig. 43).
9 Curățați tot praful vizibil de pe capul de aspirare TriActive înainte de remontarea acestuia.
10 Pentru a monta capul de aspirare TriActive, mai întâi introduceți clapetele mici din partea din față
în fantele mici de pe fiecare parte a roții din față (1). Apoi apăsați spre interior clemele capului de
aspirare TriActive, pentru a le fixa în fantele din partea inferioară a robotului (2). La final, verificați
dacă există în continuare o deplasare liberă (Fig. 44) a capului de aspirare, câțiva milimetri în sus și
în jos.
11 Împingeți din nou (Fig. 8) periile laterale pe axele de la baza robotului.
55
Golirea și curățarea recipientului pentru praf
Goliți și curățați recipientul pentru praf atunci când indicatorul de umplere a recipientului pentru praf
este aprins continuu.
1 Îndepărtați capacul.
2 Trageți în sus mânerul capacului recipientului pentru praf și ridicați recipientul pentru praf din
compartimentul recipientului pentru praf.
Notă: La scoaterea sau la reintroducerea recipientului pentru praf, aveți grijă să nu deteriorați
paletele ventilatorului motorului.

56
Română
3 Ridicați cu atenție capacul recipientului pentru praf (1) și extrageți filtrul (2) (Fig. 45).
4 Scuturați recipientul pentru praf deasupra unui coș de gunoi, pentru a-l goli. Curățați filtrul și
interiorul recipientul pentru praf cu o cârpă sau cu o periuță de dinți cu peri moi. De asemenea,
curățați orificiul de aspirare din partea inferioară a recipientului pentru praf.
Atenție: Nu curățați recipientul pentru praf și filtrul cu apă sau în mașina de spălat vase.
5 Așezați filtrul la loc în recipientul pentru praf (1). Apoi poziționați capacul pe recipientul (Fig. 47)
pentru praf (2).
6 Poziționați recipientul pentru praf înapoi în compartiment și montați capacul înapoi pe robot (Fig.
48).
Atenție: Asigurați-vă întotdeauna că filtrul este prezent în recipientul pentru praf. Dacă utilizați
robotul fără filtru în interiorul recipientului pentru praf, motorul acestuia se va deteriora.
Comandarea accesoriilor
Pentru a cumpăra accesorii sau piese de schimb, vizitaţi www.shop.philips.com/service sau
contactaţi distribuitorul dvs. Philips local. Puteţi, de asemenea, contacta Centrul de asistenţă pentru
clienţi Philips din ţara dvs. (veţi găsi datele de contact în broşura de garanţie internaţională).
Înlocuirea
Înlocuirea filtrului
Înlocuiţi filtrul dacă acesta este foarte murdar sau deteriorat. Puteţi comanda un nou kit de filtru cu
numărul de tip FC8066. Consultaţi „Golirea şi curăţarea containerului de praf” în capitolul „Curăţare şi
întreţinere” pentru instrucţiuni referitoare la modul de demontare a filtrului din containerul de praf şi
modul de montare a acestuia în containerul de praf.
Înlocuirea periilor laterale
Înlocuiți periile laterale după un timp, pentru a asigura rezultate de curățare corespunzătoare.
Înlocuiți întotdeauna periile laterale când observați semne de uzură sau deteriorare. Este recomandat,
de asemenea, să înlocuiți ambele perii laterale în același moment. Puteți să comandați perii laterale ca
părți din kitul de înlocuire FC8068. Kitul conține, de asemenea, două filtre și trei lavete uscate.
1 Pentru a înlocui periile laterale, prindeți periile laterale vechi de peri și trageți-le de pe axe (Fig. 40).
2 Împingeți noile perii laterale pe axe (Fig. 8).
Înlocuirea lavetelor uscate
Puteţi comanda lavete uscate noi. Aceste fac parte din kitul de înlocuire FC8068. Acest kit de înlocuire
conţine, de asemenea, două perii laterale şi două filtre.
Înlocuirea bateriei telecomenzii
Telecomanda funcționează cu o baterie în formă de monedă de tip CR2025. Înlocuiți bateria atunci
când robotul nu mai reacționează în momentul apăsării butoanelor de pe telecomandă.
1 Țineți telecomanda întoarsă invers. Apăsați butonul de eliberare al suportului bateriei și, în același
timp, glisați suportul bateriei de pe telecomandă (Fig. 49).
2 Îndepărtați bateria descărcată din suportul bateriei și introduceți o nouă baterie în suport. Apoi
glisați suportul bateriei înapoi în telecomandă (Fig. 50).

Română
Înlocuirea bateriei reîncărcabile
Bateria reîncărcabilă a robotului poate fi înlocuită doar de ingineri de service calificați. Duceți robotul
la un centru de service autorizat Philips pentru a înlocui bateria, atunci când nu mai este posibilă
încărcarea acesteia sau când se descarcă rapid. Puteți găsi detaliile de contact pentru Centrul de
asistență pentru clienți Philips din țara dvs. în broșura de garanție internațională sau accesați adresa
www.philips.com/support.
Reciclarea
-
Acest simbol înseamnă că produsul nu trebuie aruncat împreună cu gunoiul menajer (2012/19/UE)
(Fig. 51).
-
Acest simbol înseamnă că produsul conține o baterie reîncărcabilă încorporată care nu trebuie
eliminată împreună cu gunoiul menajer obișnuit (Fig. 52) (2006/66/CE). Duceți produsul la un
punct oficial de colectare sau la un centru de service Philips pentru ca bateria reîncărcabilă să fie
îndepărtată de un profesionist.
-
Respectaţi regulile specifice ţării dvs. cu privire la colectarea separată a produselor electrice şi
electronice şi a bateriilor reîncărcabile. Eliminarea corectă ajută la prevenirea consecinţelor
negative asupra mediului înconjurător şi a sănătăţii umane.
Îndepărtarea bateriei reîncărcabile
Avertisment: Scoateţi bateria reîncărcabilă când aruncaţi aparatul. Asiguraţi-vă că
bateria este complet epuizată înainte de a o scoate.
Pentru a scoate bateria reîncărcabilă, urmați instrucțiunile de mai jos. De asemenea, puteți duce
robotul la un centru de service Philips pentru a solicita scoaterea bateriei reîncărcabile. Contactați
Centrul Philips de asistență pentru clienți din țara dvs. pentru a afla adresa unui centru de service din
apropierea dvs.
1 Porniți robotul dintr-o poziție oarecare din cameră și nu de la stația de andocare.
2 Lasă robotul să funcţioneze până când bateria reîncărcabilă se descarcă, pentru a te asigura că
este complet descărcată înainte de a o scoate şi de a o casa.
3 Desfaceți șuruburile capacului compartimentului bateriei și demontați capacul (Fig. 53).
4 Ridicați bateria reîncărcabilă și deconectați-o (Fig. 54).
5 Duceți robotul și bateria reîncărcabilă la un punct de colectare pentru deșeuri electrice și
electronice.
57
Depanare
Acest capitol rezumă cele mai frecvente probleme care pot surveni la utilizarea aparatului. Dacă nu
puteţi rezolva problema cu ajutorul informaţiilor de mai jos, accesaţi www.philips.com/support pentru
o listă de întrebări frecvente sau contactaţi Centrul de asistenţă pentru clienţi din ţara dvs.
Depanare
Problemă
Robotul nu începe
curățarea atunci când
apăs butonul de
pornire/oprire.
Cauză posibilă Soluție
Bateria reîncărcabilă este
goală.
Încărcați bateria reîncărcabilă.

58
Română
Problemă Cauză posibilă Soluție
Robotul nu curăță
corespunzător.
Perii uneia sau ambelor
perii laterale sunt îndoiți
sau deformați.
Înmuiați peria sau periile în apă caldă pentru
o anumită perioadă de timp și lăsați-le să se
usuce pe o suprafață plată, înainte de a le
remonta pe robot. Dacă acesta nu readuce
perii la forma lor corespunzătoare, înlocuiți
periile laterale (consultaţi 'Înlocuirea periilor
laterale').
Filtrul din recipientul
pentru praf este murdar.
Orificiul de aspirare din
partea inferioară a
recipientului pentru praf
este înfundat.
Roata față este blocată de
păr sau alte impurități.
Robotul curăță o suprafață
foarte închisă la culoare
sau strălucitoare, care
declanșează senzorii de
deplasare. Acest lucru
determină robotul să se
deplaseze într-un mod
neobișnuit.
Robotul curăță o podea
care reflectă puternic
lumina soarelui. Aceasta
declanșează senzorii de
deplasare și determină
robotul să se deplaseze
într-un mod neobișnuit.
Curățați filtrul din recipientul pentru praf cu
o cârpă sau cu o periuță de dinți cu peri moi.
Puteți, de asemenea, să curățați filtrul și
recipientul pentru praf cu un aspirator de
praf obișnuit la setarea de putere de
aspirare redusă.
Dacă perierea sau aspirarea nu ajută la
curățarea filtrului, înlocuiți filtrul cu unul nou.
Este recomandată înlocuirea filtrului cel
puțin o dată pe an.
Curățați orificiul (consultaţi 'Curăţare şi
întreţinere') de aspirare.
Curățați roata (consultaţi 'Curăţare şi
întreţinere') din față.
Apăsați butonul de pornire/oprire și apoi
deplasați robotul pe o zonă de culoare mai
deschisă a podelei. Dacă problema continuă
pe podele de culoare mai deschisă, accesați
adresa www.philips.com/support sau să
contactați Centrul de asistență pentru clienți
din țara dvs.
Trageți perdelele pentru a nu permite luminii
solare să pătrundă în cameră. Puteți, de
asemenea, să începeți curățarea atunci când
lumina soarelui nu este atât de puternică.
Butonul de
pornire/oprire se aprinde
continuu în culoarea
roșie și pe afișaj există un
cod de eroare.
Robotul emite un semnal
de eroare.
Verificați tabelul cu coduri de eroare pentru
semnificația codului (consultaţi 'Coduri de
eroare').

Problemă Cauză posibilă Soluție
Robotul se deplasează în
cercuri.
Robotul este în modul în
spirală.
Acest comportament este normal. Modul în
spirală poate fi activat pentru o curățare
minuțioasă atunci când este detectată o
cantitate mare de praf pe podea. De
asemenea, acest mod este o parte a
modului de curățare automată. După
aproximativ un minut, robotul continuă
modelul său normal de curățare. De
asemenea, puteți să opriți modul în spirală
prin selectarea unui mod diferit de curățare
de pe telecomandă.
Română
59
Robotul nu își poate găsi
stația de andocare.
Nu există suficient spațiu
pentru ca robotul să
navigheze către stația de
andocare.
Robotul caută încă în mod
activ.
Este posibil să fi dezactivat
funcția de andocare
automată a robotului prin
apăsarea de două ori a
butonului pentru timpul de
curățare. În acest caz,
pictograma de andocare
nu mai este vizibilă pe
afișaj și robotul se oprește
la încheierea timpului de
curățare.
Încercați să găsiți un alt loc pentru stația
(consultaţi 'Instalarea stației de andocare')
de andocare.
Lăsați robotului aproximativ 20 de minute
pentru a se întoarce la stația de andocare.
Apăsați butonul de pornire/oprire timp de 5
secunde pentru a reporni robotul. Funcția
de andocare se reactivează în mod automat.
Puteți, de asemenea, să apăsați de două ori
butonul pentru timpul de curățare pentru a
reactiva funcția de andocare. Pictograma de
andocare va reapărea pe afișaj. Pentru a
face robotul să revină la stația de andocare,
apăsați butonul de andocare.

60
Slovensky
Úvod
Gratulujeme Vám k nákupu a vítame Vás medzi zákazníkmi spoločnosti Philips! Ak chcete využiť všetky
výhody zákazníckej podpory spoločnosti Philips, zaregistrujte svoj výrobok na
www.philips.com/welcome.
Opis zariadenia
1 Rukoväť veka zásobníka na prach
2 Veko zásobníka na prach
3 Filter
4 Zásobník na prach
5 Vrchný kryt
6 Tabuľka chybových kódov
7 Ventilátor
8 Nárazník
9 Snímač dokovacej stanice
10 Vypínač
11 Predné koliesko
12 Hriadele bočných kief
13 Snímače proti pádu
14 Kolieska
15 Sací otvor
16 Nástavec TriActive XL
17 Bočné kefy
18 Upevňovacie bloky na suchú utierku
19 Držiak na suchú utierku
20 Suchá utierka
21 Držiak batérie
22 Diaľkové ovládanie
23 Virtuálna stena (FC8822)
24 Dokovacia stanica
25 Adaptér
26 Malá koncovka
Displej a diaľkové ovládanie
Displej robota
1 Indikátor režimu špirálového pohybu
2 Indikátor režimu pohybu popri stene
3 Indikátor režimu kľukatého pohybu
4 Indikátor režimu náhodného pohybu
5 Indikátor nabíjania a indikátor času vysávania (pozrite 'Používanie tlačidiel sčasom vysávania')
6 Ikona dokovania
7 Indikátor rýchlosti ventilátora
8 Indikátor plného zásobníka na prach
9 Snímač zvuku
10 Tlačidlo výberu režimu
11 Tlačidlo spustenia/zastavenia
12 Tlačidlo rýchlosti ventilátora
Slovensky

Slovensky
61
Diaľkové ovládanie
1 Navigačné tlačidlá aspustenie/zastavenie (Obr. 3)
2 Tlačidlá času vysávania
3 Tlačidlá režimu vysávania
4 Tlačidlá rýchlosti ventilátora
5 Tlačidlo dokovania
Ovládací panel dokovacej stanice
1 Displej s časom, dňom a programovacími značkami (Obr. 4)
2 Úprava a nastavenie tlačidiel
Ako robot funguje
Povrchy, ktoré robot povysáva
Tento robot je vybavený funkciami, vďaka ktorým je vhodný na vysávanie podláh vo vašej domácnosti.
Robot sa hodí najmä na vysávanie tvrdých podláh, napríklad drevených podláh, dlažby alebo linolea.
Môže mať problémy pri vysávaní mäkkých povrchov, ako sú rôzne druhy kobercov. Ak použijete
robota na vysávanie koberca, prvý raz zostaňte nablízku, aby ste sa presvedčili, ako si robot s týmto
typom podlahy poradí. Dohľad nad činnosťou robota sa vyžaduje aj pri vysávaní veľmi tmavých alebo
lesklých tvrdých podláh.
Ako robot vysáva
Čistiaci systém
Na výkonné vysávanie podláh je robot vybavený trojstupňovým čistiacim systémom.
1 Dve bočné kefy pomáhajú pri vysávaní vrohoch miestnosti apriestorov pozdĺž stien. Taktiež
pomáhajú uvoľniť nečistoty zpodlahy apresunúť ich ksaciemu otvoru (Obr. 5).
2 Sací výkon robota vysaje uvoľnené nečistoty acez sací otvor ich nasaje do zásobníka na prach.
3 Robot sa dodáva sdržiakom na suchú utierku, ktorý umožní vyčistiť tvrdú podlahu ešte
dôkladnejšie pomocou suchých utierok.
Vzory pohybu pri vysávaní
Vrežime automatického vysávania robot používa pevne stanovenú a automatickú postupnosť vzorov
pohybu pri vysávaní, čo mu umožňuje optimálne povysávať každú časť miestnosti. Robot postupne
využíva tieto typy pohybu: pohyb vtvare Z (kľukatý pohyb), náhodný pohyb, pohyb popri stene
ašpirálový pohyb (Obr. 6). Túto sekvenciu pohybov používa pri vysávaní miestnosti, kým sa
nabíjateľná batéria nevybije alebo ho manuálne nevypnete.
Ak robot zaznamená počas čistenia veľmi znečistené oblasti, prepne sa do režimu špirálového pohybu
a spustí turbo rýchlosť ventilátora, aby zabezpečil dôkladné odstránenie nečistôt.
Poznámka: Každý režim môžete vybrať aj samostatne stlačením príslušného tlačidla na diaľkovom
ovládaní (pozrite 'Výber režimu vysávania') alebo na robote. Manuálne vybraté režimy sa zapnú len na
niekoľko minút. Potom sa robot prepne späť do režimu automatického vysávania.
Ako sa robot vyhýba výškovým rozdielom
Robot má vspodnej časti tri snímače proti pádu. Tieto snímače proti pádu používa na zisťovanie
výškových rozdielov, ako sú napríklad schody (Obr. 7), aich obchádzanie.

62
Slovensky
Poznámka: Je normálne, keď sa robot pohybuje mierne cez okraj výškového rozdielu, pretože jeho
predný snímač proti pádu je umiestnený za nárazníkom.
Výstraha: V niektorých prípadoch snímače proti pádu nemusia včas zaregistrovať schody či iný
výškový rozdiel. Preto robot pozorne sledujte pri prvom použití a rovnako aj v blízkosti schodov či
iného miesta s výškovým rozdielom. Snímače proti pádu je dôležité pravidelne čistiť, aby robot
naďalej správne rozpoznával výškové rozdiely (pozrite 'Čistenie a údržba').
Pred prvým použitím
Montáž bočných kief
1 Rozbaľte bočné kefy a robot položte spodnou stranou nahor na stôl alebo na podlahu.
2 Zatlačte bočné kefy na hriadele v spodnej časti robota (Obr. 8).
Poznámka: Dbajte na to, aby ste bočné kefy riadne nasadili. Zatlačte ich na hriadeľ, kým
nezacvaknú na miesto.
Odstránenie značky z diaľkového ovládania
Diaľkové ovládanie využíva plochú batériu CR2025. Táto batéria je chránená ochrannou značkou,
ktorú je treba pred použitím odstrániť.
1 Vytiahnite ochrannú značku batérie zpriečinka na batériu na diaľkovom ovládači. Teraz je diaľkové
ovládanie pripravené na použitie (Obr. 9).
Príprava na použitie
Inštalácia dokovacej stanice
1 Zapojte malú koncovku adaptéra do konektora pre malú koncovku na dokovacej stanici (1) a
adaptér zasuňte do sieťovej zásuvky (2) (Obr. 10).
-
Rozsvieti sa displej dokovacej stanice.
2 Dokovaciu stanicu umiestnite na vodorovnú, rovnú podlahu aoprite ostenu.
Poznámka: Skontrolujte, že vo vzdialenosti 80cm pred, 30cm doprava a 100cm doľava od
dokovacej stanice nie sú žiadne prekážky a výškové rozdiely (Obr. 11).
Tip: Aby sa zaistilo, že dokovacia stanica zostane pevne na vybratom mieste, upevnite ju na stenu
pomocou skrutiek alebo dvoch pásov obojstrannej lepiacej pásky.
Dôležitá poznámka: režim hlbokého spánku
Vrežime hlbokého spánku robot nereaguje na stlačenie tlačidla. Ak chcete znova aktivovať robot,
ktorý je vrežime hlbokého spánku, postupujte takto:
1 Stlačením tlačidla spustenia/zastavenia na robote na jednu sekundu prepnite robot z režimu
hlbokého spánku do pohotovostného režimu.
2 Vysávanie spustíte krátkym stlačením tlačidla spustenia/zastavenia na robote (Obr. 17) alebo
stlačením tlačidla spustenia/zastavenia na diaľkovom ovládaní.
3 Ak robot nezačne vysávať, umiestnite ho do dokovacej stanice, aby sa mu nabila nabíjateľná
batéria.

Slovensky
Robot prejde do režimu hlbokého spánku, ak podržíte tlačidlo spustenia/zastavenia stlačené 5
sekundy. Do režimu hlbokého spánku môže prejsť aj vtedy, ak má vybitú batériu. Batéria sa môže vybiť
napríklad vtedy, ak robot nedokáže nájsť svoju dokovaciu stanicu.
63
Nabíjanie
Keď zariadenie nabíjate po prvýkrát akeď je nabíjateľná batéria robota vybitá, doba nabíjania je štyri
hodiny.
Robot možno nabíjať vdokovacej stanici, ato buď manuálne, alebo automaticky počas používania.
Poznámka: Keď je nabíjateľná batéria úplne nabitá, robot dokáže vysávať až 120minút.
Automatické nabíjanie počas používania
1 Keď robot dokončí vysávanie alebo keď ostáva len 15% nabitia batérie, robot automaticky vyhľadá
dokovaciu stanicu, aby sa mohol dobiť. Keď robot vyhľadáva dokovaciu stanicu, indikátor tlačidla
spustenia/zastavenia začne svietiť na oranžovo (Obr. 15).
2 Keď je nabíjateľná batéria úplne nabitá, tlačidlo spustenia/zastavenia nepretržite svieti na zeleno.
Nabíjanie na dokovacej stanici
1 Robot položte na dokovaciu stanicu pripojenú do elektrickej siete (Obr. 12).
2 Tlačidlo spustenia/zastavenia začne blikať na zeleno. Pretože robot nabíjate prvýkrát, na displeji
robota sa zobrazuje indikátor nabíjania (Obr. 13).
3 Keď je nabíjateľná batéria úplne nabitá, tlačidlo spustenia/zastavenia nepretržite svieti na zeleno
(Obr. 14).
Používanie robota
Príprava priestoru na vysávanie
Skôr než spustíte čistenie robotom, odložte všetky voľné a krehké predmety zpodlahy. Z podlahy
odstráňte aj všetky káble, vodiče a šnúry.
Funkcie tlačidla spustenia/zastavenia
Tlačidlo spustenia/zastavenia má nasledujúce funkcie (Obr. 16):
Spôsob stlačenia tlačidla
spustenia/zastavenia
Stlačenie tlačidla spustenia/zastavenia
na 1 sekundu
Krátke stlačenie tlačidla
spustenia/zastavenia
Stlačenie tlačidla spustenia/zastavenia
na 5 sekúnd
Signály v používateľskom rozhraní a ich význam
Robot má displej a tlačidlo spustenia/zastavenia využíva svetelné signály. Tabuľka nižšie vysvetľuje
význam týchto signálov.
Reakcia robota
Robot sa prepne z režimu spánku do pohotovostného
režimu.
Robot začne alebo prestane vysávať.
Robot sa zapne alebo vypne.

64
Slovensky
Signál Opis signálu Význam signálu
Tlačidlo spustenia/zastavenia nepretržite svieti na
zeleno.
Robot je pripravený na vysávanie.
Tlačidlo spustenia/zastavenia pomaly bliká na
zeleno a displej robota zobrazuje pohybujúce sa
modré svetlo (indikátor nabíjania).
Tlačidlo spustenia/zastavenia nepretržite svieti na
oranžovo.
Tlačidlo spustenia/zastavenia nepretržite svieti na
červeno.
Tlačidlo spustenia/zastavenia nepretržite svieti na
červeno a displej zobrazuje chybový kód.
Robot sa nabíja.
Nabíjateľná batéria je takmer vybitá a
robot hľadá dokovaciu stanicu.
Nabíjateľná batéria robota je takmer
vybitá.
V nasledujúcej tabuľke chybových
kódov vyhľadajte význam chybového
kódu.
Chybové kódy
Chybový kód
E1 Zasekli sa kolieska Presuňte robota od prekážky a stlačením
E2 Vrchný kryt alebo
E3 Ochranný prvok
E4 Robot bol zdvihnutý
Možná príčina Riešenie
tlačidla spustenia/zastavenia pokračujte vo
vysávaní.
nádoba na prach nie je
správne umiestnená
zaseknutý
zpodlahy
Vložte zásobník na prach a správne nasaďte
vrchný kryt na robota. Chybový kód
automaticky zmizne z displeja.
Presuňte robota od prekážky. Chybový kód
automaticky zmizne z displeja.
Položte robot späť na zem, aby sa chybový
kód prestal zobrazovať.
E5 Farba podlahy je príliš
tmavá
E6 Problém s batériou Obráťte sa na Stredisko starostlivosti o
Umiestnite robota na svetlejšiu oblasť na
podlahe. Vyčistite snímače proti pádu.
zákazníkov, aby problém preskúmalo.
Odozva na tlesknutie
Ak robot nevidíte, môžete ho vyhľadať jedným tlesknutím rúk. Robot zareaguje pípaním arozsvietením
všetkých ikon na displeji.
Odozva na tlesknutie sa aktivuje, keď robot prejde do režimu spánku vnasledujúcich situáciách:
-
keď prestane vysávať zdôvodu chyby,
-
keď nedokáže do 20minút nájsť svoju dokovaciu stanicu.
.

Slovensky
Spustenie azastavenie
1 Stlačte tlačidlo spustenia/zastavenia na robote (Obr. 17) alebo na diaľkovom ovládaní (Obr. 18).
Tlačidlo spustenia/zastavenia nepretržite svieti na zeleno a robot začne vysávať.
2 Robot vysáva vautomatickom režime, kým sa batéria takmer nevybije. Vrežime automatického
vysávania sa pohybuje vopakovaných sekvenciách vtvare Z, náhodným pohybom, popri stene
ašpirálovým pohybom (Obr. 6).
Poznámka: Na výber individuálneho režimu stlačte jedno ztlačidiel ovládania režimu na diaľkovom
ovládaní alebo na robote (pozrite 'Výber režimu vysávania').
3 Keď je batéria takmer vybitá, tlačidlo spustenia/zastavenia začne svietiť na červeno arobot
vyhľadá dokovaciu stanicu, aby sa nabil (Obr. 15).
4 Ak chcete prerušiť alebo zastaviť vysávanie, môžete stlačiť aj tlačidlo spustenia/zastavenia na
diaľkovom ovládaní. Ak znova stlačíte tlačidlo spustenia/zastavenia aak je kdispozícii dostatok
energie vnabíjateľnej batérii, robot pokračuje vo vysávaní vrežime automatického vysávania.
5 Ak chcete, aby sa robot vrátil do dokovacej stanice skôr, ako bude nabíjateľná batéria takmer
vybitá, stlačte tlačidlo dokovania na diaľkovom ovládaní. Z displeja robota zmiznú všetky ikony
okrem ikony dokovania, ktorá svieti na svetlomodro, kým sa robot vracia do dokovacej stanice (Obr.
19).
Výber režimu vysávania
Okrem režimu automatického vysávania má tento robot štyri samostatné režimy vysávania, ktoré je
možné aktivovať stlačením príslušného tlačidla na diaľkovom ovládaní alebo na robote.
Poznámka: Manuálne vybraté režimy sa zapnú len na niekoľko minút. Potom sa robot prepne späť do
režimu automatického vysávania.
65
Režim pohybu vtvare Z
Vrežime pohybu vtvare Z robot vysáva veľké plochy tak, že sa pohybuje vslučkách vtvare Z po celej
miestnosti (Obr. 20).
Režim náhodného pohybu
V tomto režime robot vysáva miestnosť rovnými a kľukatými pohybmi (Obr. 21).
Režim pohybu popri stene
V tomto režime sa robot pohybuje popri stenách miestnosti, aby dôkladne povysával oblasti popri
stenách (Obr. 22).
Režim špirálového pohybu
V tomto režime sa robot pohybuje špirálovým pohybom, aby vyčistil malú oblasť. Ak snímač prachu
zistí znečistenie, robot automaticky prepne rýchlosť ventilátora na turbo (Obr. 23).
Manuálne riadenie
1 Pomocou tlačidiel so šípkami nad, pod, vľavo avpravo od tlačidla spustenia/zastavenia na
diaľkovom ovládaní navigujte robot po miestnosti (Obr. 24).
Poznámka: Dávajte pozor počas manuálneho ovládania robota vblízkosti výškových rozdielov
alebo schodov.
Poznámka: Funkcia vysávania abočné kefy fungujú, len keď sa robot pohybuje dopredu. Tlačidlá
doľava, doprava adozadu slúžia len na ovládanie smeru pohybu robota.

66
Slovensky
Používanie tlačidiel sčasom vysávania
-
Predvolene robot vysáva vautomatickom režime, kým sa nabíjateľná batéria takmer nevybije.
Vtedy sa automaticky vráti do dokovacej stanice. Ak ste vybrali niektorý z iných časov cyklov
vysávania (uvedené nižšie), stlačením tlačidla maximálneho času vysávania na diaľkovom ovládaní
môžete robot prepnúť späť na predvolený režim (Obr. 25).
-
Ostatné tlačidlá času vysávania na diaľkovom ovládaní umožňujú robot spustiť na 60, 45 a 30
minút (Obr. 26). Indikátor času vysávania na displeji zobrazuje nastavený čas vysávania. Po uplynutí
času vysávania sa robot vráti do dokovacej stanice. Na displeji sa rozsvieti ikona dokovania na
svetlomodro.
-
Ak nechcete, aby sa robot po skončení vysávania vrátil do dokovacej stanice, dvakrát stlačte
tlačidlo času vysávania. Ikona dokovania sa prestane zobrazovať na displeji. Po uplynutí času
vysávania sa robot zastaví.
Prevádzka dokovacej stanice
Nastavenie času a dňa na hodinách
Ak chcete použiť programy vysávania, je potrebné najskôr nastaviť čas a deň v týždni na displeji
dokovacej stanice.
Poznámka: Príslušné obrázky k týmto krokom nájdete na zadných stranách príručky.
1 Stlačte tlačidlo nastavenia. Indikátor režimu nastavenia a indikátor času začnú blikať.
2 Jedenkrát stlačte tlačidlo výberu. Začne blikať číselný údaj hodiny.
3 Pomocou tlačidiel + a – na dokovacej stanici nastavte hodinu. Na displeji sa zobrazí nastavená
hodina.
4 Stlačením tlačidla výberu potvrďte nastavenú hodinu. Začne blikať číselný údaj minút.
5 Pomocou tlačidiel + a – na dokovacej stanici nastavte minúty. Na displeji sa zobrazia nastavené
minúty.
6 Stlačením tlačidla výberu potvrďte nastavené minúty. Začne blikať označenie „Su“ ako nedeľa (angl.
Sunday).
7 Pomocou tlačidiel + a – na dokovacej stanici nastavte aktuálny deň v týždni.
8 Stlačením tlačidla výber potvrďte deň v týždni.
9 Stlačením tlačidla výberu potvrďte nastavený čas adeň vtýždni. Indikátor režimu nastavenia aj
indikátor času prestanú blikať a začnú svietiť.
Programovanie času cyklov vysávania
Po nastavení času a dňa v týždni na displeji dokovacej stanice môžete naprogramovať časy cyklov
vysávania robota.
Poznámka: Príslušné obrázky k týmto krokom nájdete na zadných stranách príručky.
K dispozícii sú možnosti programovania:
Program
Vysávanie každý deň Všetky indikátory svietia
Vysávanie počas pracovných dní Svietia indikátory od Mo po Fri (pondelok až piatok)
Vysávanie 2 dni po sebe Svietia indikátory 2 dní, napr. Fri a Sa (piatok a sobota)
Vysávanie 1 deň v týždni Svieti indikátor vybratého dňa
Označenie na displeji

Slovensky
1 Stlačte tlačidlo nastavenia. Indikátor režimu nastavenia a indikátor programu vysávania začnú
blikať.
2 Jedenkrát stlačte tlačidlo výberu. Začne blikať číselný údaj hodiny.
3 Pomocou tlačidiel + a – na dokovacej stanici nastavte hodinu. Na displeji sa zobrazí nastavená
hodina.
4 Stlačením tlačidla výberu potvrďte nastavenú hodinu. Začne blikať číselný údaj minút.
5 Pomocou tlačidiel +a– na dokovacej stanici nastavte minúty. Na displeji sa zobrazia nastavené
minúty.
6 Stlačením tlačidla výberu potvrďte nastavené minúty. Začne blikať označenie „Su“ ako nedeľa (angl.
Sunday).
7 Pomocou tlačidiel + a – na dokovacej stanici môžete prepínať programy vysávania (pozrite si vyššie
uvedenú tabuľku dostupných možností programovania).
8 Zvolený program potvrdíte stlačením tlačidla výberu.
9 Stlačením tlačidla nastavenia potvrďte programovanie. Indikátor režimu nastavenia aj indikátor
programu vysávania prestanú blikať a začnú svietiť.
10 Po nastavení programu vysávania sa na displeji zobrazí indikátor programu vysávania a vybratý
deň alebo dni. Ak je robot v pohotovostnom režime a jeho nabíjateľná batéria je úplne nabitá,
spustí sa čistenie v naprogramovanom čase vnaprogramovaný deň alebo dni.
67
Tlačidlá rýchlosti ventilátora
Pomocou tlačidiel rýchlosti ventilátora môžete rýchlosť zvýšiť na vyšší rýchlostný stupeň (turbo) alebo
vypnúť ventilátor. Predvolene je nastavená normálna rýchlosť ventilátora (Obr. 27).
1 Stlačením tohto tlačidla vypnete ventilátor.
2 Stlačením tohto tlačidla zapnite ventilátor v normálnej rýchlosti.
3 Tlačidlo vyššieho rýchlostného stupňa (turbo) zvyšuje rýchlosť ventilátora.
Použitie nástavca so suchou utierkou
Nástavec so suchou utierkou je funkcia, ktorá umožní vyčistiť tvrdé podlahy pomocou suchých utierok.
Poznámka: Ak používate nástavec na suchú utierku, robot možno bude mať ťažkosti pri prechádzaní
cez prahy alebo na koberce.
Príprava nástavca na suchú utierku na použitie
Otočte robot hore nohami a umiestnite ho na podlahu alebo na stôl.
1 Položte suchú utierku na stôl a nástavec na suchú utierku položte na utierky tak, aby výstupky na
jeho uchytenie smerovali k vám (Obr. 28).
2 Zaklapnite obe konce suchej utierky na nástavec a utierku upevnite zatlačením upevňovacích
blokov do otvorov (Obr. 29).
3 Vložte upevňovacie výstupky nástavca na suchú utierku do otvoru hneď za kolieskom na jednej
strane robota a zatlačte, až kým nebudete počuť kliknutie. Postup potom zopakujte na druhej
strane (Obr. 30).
4 Otočte robota a položte ho na podlahu na kolieska tak, aby sa nástavec so suchou utierkou
dotýkal podlahy.
Používanie robota snástavcom na suchú utierku
Keď je nástavec na suchú utierku pripevnený, robota môžete použiť v každom režime a na všetky
tvrdé podlahy. Nepoužívajte suchú utierku na koberce či koberčeky.

68
Slovensky
Odstránenie nástavca so suchou utierkou
1 Odstráňte suché prostredie nástavec hneď, ako skončíte zotieranie špinavej podlahy. Otočte robot
hore nohami a umiestnite ho na podlahu alebo na stôl.
2 Zatlačte na koniec nástavca na suchú utierku smerom ku koliesku na druhej strane robota a
uvoľnite ho. Potom vytiahnite nástavec z robota (Obr. 31).
3 Ak je suchá utierka príliš znečistená na ďalšie používanie, vytiahnite upevňovacie bloky z nástavca
so suchou utierkou a suchú utierku zlikvidujte.
Poznámka: Suché utierky nemožno oplachovať ani umývať.
Používanie virtuálnej steny (len model FC8822)
Pomocou virtuálnej steny môžete zabrániť vstupu robota do miestnosti alebo oblasti, do ktorej by
nemal vstupovať.
Umiestnenie batérií vo virtuálnej stene
Virtuálna stena je napájaná štyrmi batériami typu AA.
1 Stlačte dve uvoľňovacie zarážky na spodnej strane zadného krytu (1) a zadný kryt potiahnite nahor
a vytiahnite ho zvirtuálnej steny (2) (Obr. 32).
2 Vyberte štyri nové batérie typu AA z obalu a vložte ich do priečinka na batérie vo virtuálnej stene
(Obr. 33).
Poznámka: Uistite sa, že ste batérie vložili v súlade s označením pólov + a –.
3 Zasuňte zadný kryt do virtuálnej steny (Obr. 34).
Umiestnenie virtuálnej steny na zastavenie robota
1 Umiestnite jednotku na miesto, kadiaľ robot nemá prechádzať, napr. do otvorených dverí
miestnosti, kam robot nemá vchádzať (Obr. 35).
2 Zapnite virtuálnu stenu pomocou posuvného vypínača na vrchnej strane zariadenia (Obr. 36).
3 Spustite robota.
4 Keď sa robot dostane do tesnej blízkosti virtuálnej steny, indikátor na nej začne blikať a virtuálna
stena začne vysielať lúč infračerveného svetla. Lúč infračerveného svetla zmení smer robota a
odkloní ho od virtuálnej steny (Obr. 37).
Poznámka: Ak používate virtuálnu stenu, pravidelne kontrolujte výdrž batérií. Skontrolovať ju môžete
vypnutím a zapnutím virtuálnej steny. Ak má batéria dostatočnú výdrž, indikátor LED na virtuálnej
stene sa nakrátko rozsvieti.
Čistenie a údržba
Čistenie robota
Na zachovanie dobrého výkonu vysávania je potrebné zčasu na čas vyčistiť snímače proti pádu,
kolieska, bočné kefy asací otvor.
1 Robot prevráťte hore dnom a položte na rovný povrch
2 Pomocou kefky sjemnými štetinami (napr. zubnej kefky) odstráňte zo snímačov proti pádu prach
alebo chumáče prachu (Obr. 38).
Poznámka: Pravidelné čistenie snímačov proti pádu je dôležité. Vprípade, že sú snímače proti
pádu znečistené, robot nemusí správne zaregistrovať výškové rozdiely alebo schody.

Slovensky
3 Pomocou kefky sjemnými štetinami (napr. zubnej kefky) odstráňte zpredného abočných koliesok
prach alebo chumáče prachu (Obr. 39).
4 Keď čistíte bočné kefy, chyťte ich štetiny avytiahnete kefy zhriadeľov (Obr. 40).
5 Pomocou jemnej kefky (napr. zubnej kefky) alebo handričky odstráňte z hriadeľa a bočnej kefy
chumáče prachu, vlasy a vlákna (Obr. 41).
6 Skontrolujte, či na bočných kefách aspodnej časti robota nie sú žiadne ostré predmety, ktoré môžu
poškodiť podlahu.
7 Ak chcete odpojiť nástavec TriActive XL, vložte prsty do otvorov vspodnej časti robota. Na tieto
otvory ukazujú šípky. Stlačte úchytky držiace nástavec TriActive na jeho mieste smerom dovnútra,
aby sa uvoľnili z otvorov (1). Potom vytiahnite nástavec TriActive nahor a von z robota (2) (Obr. 42).
8 Mäkkou kefkou vyčistite sací otvor (napr. zubnou kefkou) (Obr. 43).
9 Skôr než nástavec TriActive vrátite späť, odstráňte z neho všetky viditeľné nečistoty.
10 Nástavec TriActive vložte tak, že najprv vložte malé výstupky na prednej strane do malých otvorov
na oboch stranách predného kolieska (1). Potom stlačte úchytky nástavca TriActive dovnútra, aby
sa zachytili v otvoroch vspodnej časti robota (2). Nakoniec skontrolujte, či sa nástavcom stále dá
opár milimetrov pohybovať hore adolu (Obr. 44).
11 Zatlačte bočné kefy späť na hriadele v spodnej časti robota (Obr. 8).
69
Vyprázdňovanie ačistenie zásobníka na prach
Vyprázdnite avyčistite zásobník na prach, keď indikátor plného zásobníka na prach nepretržite svieti.
1 Zložte kryt.
2 Zdvihnite rukoväť veka zásobníka na prach azásobník na prach vytiahnite zpriečinka zásobníka na
prach.
Poznámka: Pri vyberaní alebo opätovnom vkladaní zásobníka na prach dávajte pozor, aby ste
nepoškodili lopatky ventilátora motora.
3 Opatrne nadvihnite veko zásobníka na prach (1) avyberte filter (2) (Obr. 45).
4 Vytraste obsah zásobníka na prach do koša. Vyčistite filter vo vnútri zásobníka na prach pomocou
tkaniny alebo zubnej kefky sjemnými štetinkami. Vyčistite aj sací otvor vspodnej časti zásobníka
na prach.
Výstraha: Zásobník na prach a filter nečistite vodou ani v umývačke riadu.
5 Filter vložte späť do zásobníka na prach (1). Na zásobník na prach (2) potom založte kryt (Obr. 47).
6 Zásobník na prach vložte späť do priečinka na zásobník na prach avrchný kryt nasaďte späť na
robot (Obr. 48).
Výstraha: Vždy sa uistite, či sa v zásobníku na prach nachádza filter. V prípade používania robota
bez filtra vnútri zásobníka na prach sa poškodí motor.
Objednávanie príslušenstva
Ak chcete kúpiť príslušenstvo alebo náhradné diely, prejdite na webovú stránku
www.shop.philips.com/service alebo sa obráťte na svojho predajcu výrobkov značky Philips. Môžete
sa obrátiť aj na Stredisko starostlivosti ozákazníkov spoločnosti Philips vo svojej krajine (kontaktné
údaje nájdete vcelosvetovo platnom záručnom liste).

70
Slovensky
Výmena
Výmena filtra
Filter vymeňte, ak je poškodený alebo znečistený. Novú súpravu filtrov si môžete objednať pod
typovým číslom FC8066. Pozrite si časť „Vyprázdňovanie a čistenie zásobníka na prach“ vkapitole
„Čistenie a údržba“, kde nájdete pokyny na výber filtra zo zásobníka na prach a jeho umiestnenie do
zásobníka na prach.
Výmena bočných kief
Na zabezpečenie optimálnych výsledkov vysávania bočné kefy po určitom čase vymeňte.
Vždy, keď spozorujete prejavy opotrebovania alebo poškodenia, bočné kefy vymeňte. Rovnako
odporúčame vymeniť obidve bočné kefy súčasne. Náhradné bočné kefy si môžete objednať ako
súčasť náhradnej súpravy FC8068. Táto súprava obsahuje aj dva filtre a tri suché utierky.
1 Ak chcete vymeniť bočné kefy, chyťte staré bočné kefy za štetiny avytiahnite ich zhriadeľov (Obr.
40).
2 Zatlačte nové bočné kefy na hriadele (Obr. 8).
Výmena suchých utierok
Nové suché utierky si môžete objednať. Sú súčasťou náhradnej súpravy FC8068. Táto náhradná
súprava obsahuje aj dve bočné kefy a dva filtre.
Výmena batérie diaľkového ovládania
Diaľkové ovládanie využíva plochú batériu CR2025. Batériu treba vymeniť, keď robot nereaguje na
stlačenie tlačidiel na diaľkovom ovládaní.
1 Diaľkové ovládanie otočte spodnou stranou nahor. Zatlačte uvoľňovacie tlačidlo držiaka batérie
asúčasne posuňte držiak batérie zdiaľkového ovládania (Obr. 49).
2 Zdržiaka batérie vyberte vybitú batériu avložte na miesto novú batériu. Držiak batérie potom
zasuňte späť do diaľkového ovládania (Obr. 50).
Výmena nabíjateľnej batérie
Nabíjateľnú batériu robota môžu vymieňať len kvalifikovaní servisní technici. Ak už batériu nie je
možné nabiť alebo ak sa rýchlo vybíja, odneste robot do autorizovaného servisného strediska
spoločnosti Philips apožiadajte ovýmenu batérie. Kontaktné údaje Strediska starostlivosti
ozákazníkov spoločnosti Philips vo vašej krajine nájdete vmedzinárodne platnom záručnom liste
alebo na stránke www.philips.com/support.
Recyklácia
-
Tento symbol znamená, že tento výrobok sa nesmie likvidovať s bežným komunálnym odpadom
(smernica 2012/19/EÚ) (Obr. 51).
-
Tento symbol znamená, že tento výrobok obsahuje zabudovanú nabíjateľnú batériu, ktorú
nemožno zlikvidovať spolu sbežným komunálnym odpadom (Obr. 52) (2006/66/ES). Výrobok
odovzdajte na oficiálnom zbernom mieste alebo vservisnom stredisku spoločnosti Philips, kde
nabíjateľnú batériu odstráni odborník.

Slovensky
-
Dodržiavajte pravidlá separovaného zberu elektrických aelektronických výrobkov, ako aj
nabíjateľných batérií vo svojej krajine. Správna likvidácia pomáha zabrániť negatívnym vplyvom na
životné prostredie a ľudské zdravie.
Vybratie nabíjateľnej batérie
Varovanie: Nabíjateľnú batériu odstráňte len vtedy, keď zariadenie vyhadzujete. Dbajte
na to, aby bola batéria pri odstraňovaní úplne vybitá.
Pri vyberaní nabíjateľnej batérie postupujte podľa nasledujúcich pokynov. Robot tiež môžete odniesť
do servisného strediska spoločnosti Philips apožiadať ovybratie nabíjateľnej batérie. Adresu
servisného strediska vo vašej blízkosti vám poskytne Stredisko starostlivosti ozákazníkov spoločnosti
Philips vo vašej krajine.
1 Robot spustite zľubovoľného miesta vmiestnosti anie zdokovacej stanice.
2 Aby sa zabezpečilo, že je nabíjateľná batéria pred odstránením alikvidáciou úplne vybitá, nechajte
robota zapnutého, kým sa batéria úplne nevybije.
3 Odskrutkujte skrutky krytu priečinka na batériu aodmontujte kryt (Obr. 53).
4 Nadvihnite nabíjateľnú batériu aodpojte ju (Obr. 54).
5 Robot anabíjateľnú batériu zaneste na zberné miesto elektrických aelektronických výrobkov.
Riešenie problémov
Táto kapitola obsahuje prehľad najbežnejších problémov, sktorými by ste sa mohli stretnúť pri
používaní tohto zariadenia. Ak problém neviete vyriešiť pomocou informácií uvedených nižšie,
navštívte webovú stránku www.philips.com/support, na ktorej nájdete zoznam najčastejších otázok,
alebo kontaktujte Stredisko starostlivosti o zákazníkov vo svojej krajine.
71
Riešenie problémov
Problém
Po stlačení tlačidla
spustenia/zastavenia
robot nezačne vysávať.
Robot nevysáva správne. Štetiny jednej alebo oboch
Možná príčina Riešenie
Nabíjateľná batéria je
vybitá.
bočných kief sú pokrivené
alebo ohnuté.
Filter vzásobníku na prach
je znečistený.
Nabíjateľnú batériu nabite.
Kefu alebo kefy na určitý čas nechajte
vteplej vode a skôr než ich upevníte späť na
robot, nechajte ich vyschnúť na rovnom
povrchu. Ak sa neobnoví správny tvar štetín,
bočné kefy vymeňte (pozrite 'Výmena
bočných kief').
Vyčistite filter v zásobníku na prach tkaninou
alebo zubnou kefkou sjemnými štetinkami.
Filter a zásobník na prach môžete vyčistiť aj
bežným vysávačom pri nastavení nízkeho
sacieho výkonu.
Ak sa filter nedá dostatočne vyčistiť kefou
ani vysávačom, filter vymeňte za nový.
Výmenu filtra odporúčame vykonať
minimálne raz ročne.

72
Slovensky
Problém Možná príčina Riešenie
Sací otvor vspodnej časti
zásobníka na prach je
upchatý.
Vyčistite sací otvor (pozrite 'Čistenie a
údržba').
Tlačidlo vypínača
nepretržite svieti na
červeno a na displeji je
zobrazený chybový kód.
Robot sa pohybuje
vkruhoch.
Na prednom koliesku sa
zachytili vlasy alebo iné
nečistoty.
Pri vysávaní veľmi tmavého
alebo lesklého povrchu sa
aktivujú snímače proti
pádu, vdôsledku čoho
môže robot vykonávať
nezvyčajné pohyby.
Robot vysáva podlahu,
ktorá veľmi intenzívne
odráža slnečné. Aktivujú sa
snímače proti pádu
adôsledkom sú
nezvyčajné pohyby robota.
Robot vydáva signál chyby. V tabuľke chybových kódov vyhľadajte
Robot je vrežime
špirálového pohybu.
Vyčistite predné koliesko (pozrite 'Čistenie a
údržba').
Stlačte tlačidlo spustenia/zastavenia
apotom presuňte robot na svetlejšiu časť
podlahy. Ak sa problém bude naďalej
vyskytovať na podlahách svetlejšej farby,
navštívte stránku www.philips.com/support
alebo sa obráťte na Stredisko starostlivosti
ozákazníkov vo vašej krajine.
Zatiahnutím závesov zabráňte prenikaniu
slnečných lúčov do miestnosti. Svysávaním
môžete začať, keď už slnko nebude tak silno
svietiť.
význam kódu (pozrite 'Chybové kódy').
Je to bežný jav. Režim špirálového pohybu
možno aktivovať, keď je na podlahe priveľa
nečistôt avykonáva sa dôkladné vysávanie.
Režim je aj súčasťou automatického režimu
vysávania. Asi po uplynutí jednej minúty sa
robot pri vysávaní vráti kbežným pohybom.
Režim špirálového pohybu môžete zastaviť
aj výberom iného režimu vysávania
pomocou diaľkového ovládania.
Robot nedokáže nájsť
svoju dokovaciu stanicu.
Na nasmerovanie robota
kdokovacej stanici nie je
dostatok priestoru.
Robot stále aktívne
vyhľadáva stanicu.
Možno ste deaktivovali
funkciu automatického
dokovania robota dvojitým
stlačením tlačidla času
vysávania. V tom prípade
už na displeji nevidno
ikonu dokovania a po
uplynutí času vysávania sa
robot zastaví.
Skúste dokovaciu stanicu premiestniť inam
(pozrite 'Inštalácia dokovacej stanice').
Na návrat do dokovacej stanice nechajte
robotu asi 20 minút.
Robota znovu spustite stlačením tlačidla
spustenia/zastavenia na 5 sekúnd. Funkcia
dokovania sa opäť automaticky aktivuje.
Funkciu dokovania môžete opätovne
aktivovať aj dvojitým stlačením tlačidla času
vysávania. Na displeji sa znova nezobrazí
ikona dokovania. Ak chcete, aby sa robot
vrátil do dokovacej stanice, stlačte tlačidlo
dokovania.

Русский
Введение
Поздравляем с покупкой продукции Philips! Чтобы воспользоваться всеми преимуществами
поддержки Philips, зарегистрируйте изделие на веб-сайте www.philips.com/welcome.
Общее описание
1 Ручка крышки пылесборника
2 Крышка пылесборника
3 Фильтр
4 Пылесборник
5 Верхняя крышка
6 Таблица с кодами ошибок
7 Вентилятор
8 Бампер
9 Датчик док-станции
10 Кнопка включения/выключения
11 Переднее колесо
12 Валы для боковых щеток
13 Датчики перепада высот
14 Колеса
15 Всасывающее отверстие
16 Сопло TriActive XL
17 Боковые щетки
18 Фиксаторы для салфеток
19 Держатель салфеток
20 Салфетки
21 Держатель элемента питания
22 Пульт дистанционного управления
23 Ограничитель движения (FC8822)
24 Док-станция
25 Адаптер
26 Маленький штекер
73
Дисплей и пульт дистанционного управления
Дисплей робота-пылесоса
1 Индикатор программы «По спирали»
2 Индикатор программы «Вдоль стен»
3 Индикатор зигзагообразной программы
4 Индикатор произвольной программы
5 Индикатор зарядки и индикатор времени (см. 'Использование кнопок времени уборки')
уборки
6 Значок подключения к док-станции
7 Индикатор скорости вентилятора
8 Индикатор заполнения контейнера для пыли
9 Датчик звука
10 Кнопка выбора программы
11 Кнопка «Старт/стоп»
12 Кнопка выбора скорости вентилятора
Русский

74
Русский
Пульт дистанционного управления
1 Кнопки навигации и кнопка Старт/стоп (Рис. 3)
2 Кнопки времени уборки
3 Кнопки режима уборки
4 Кнопки выбора скорости вентилятора
5 Кнопка подключения к док-станции
Панель управления док-станции
1 Дисплей с индикацией (Рис. 4) времени, дня недели и процесса программирования
2 Кнопки настройки и выбора функций
Принцип работы робота-пылесоса
Области применения робота-пылесоса
Робот-пылесос оснащен полезными функциями, благодаря которым можно выполнить
качественную уборку полов в доме.
Робот-пылесос идеально подходит для уборки твердых напольных покрытий: паркета, плитки
или линолеума. При уборке мягких напольных покрытий, например ковров или ковровых
покрытий, могут возникнуть трудности. Если робот-пылесос используется для уборки ковровых
покрытий или ковров, первое время понаблюдайте за его работой, Помимо этого, за роботомпылесосом необходимо следить, если он используется для очистки очень темного или
блестящего жесткого пола.
Функции робота-пылесоса
Система очистки
Для наиболее эффективной очистки пола в роботе-пылесосе предусмотрена 3-ступенчатая
система очистки.
1 Две боковые щетки помогают собрать пыль в углах и вдоль стен, а также удаляют
прилипшую грязь, направляя ее к всасывающему отверстию (Рис. 5).
2 Благодаря мощной силе всасывания робот-пылесос собирает сухую грязь, которая попадает
через всасывающее отверстие в пылесборник.
3 Робот-пылесос оснащен держателем салфеток, что делает очистку твердых напольных
покрытий еще эффективнее.
Программы уборки
В автоматическом режиме уборки робот-пылесос применяет задаваемую и автоматическую
последовательности программ уборки для оптимальной очистки всех зон помещения. При
этом последовательно (Рис. 6) используются Z-программа (зигзагообразная программа),
произвольная программа, программа «Вдоль стен» и «По спирали». Робот продолжает
выполнять эту последовательность программ, пока не разрядится аккумулятор или пока роботпылесос не выключат вручную.
Если во время уборки робот-пылесос обнаруживает участок с высокой степенью загрязнения,
для максимально эффективной уборки он переключается на программу «По спирали». При этом
увеличивается скорость работы вентилятора.
Примечание. Можно также отдельно выбрать любой режим, нажав соответствующую кнопку на
пульте ДУ (см. 'Выбор режима уборки') или на корпусе робота-пылесоса. Программа,

Русский
выбранная вручную, выполняется только несколько минут. Затем робот-пылесос
переключается обратно в автоматический режим уборки.
Как робот-пылесос распознает перепады высот
Робот-пылесос оснащен тремя датчиками перепада высот, расположенными на его нижней
стороне. С помощью этих датчиков робот-пылесос распознает перепады высот (например,
лестницы (Рис. 7)) и избегает их.
Примечание. Робот-пылесос может перемещаться рядом с отличающимся по высоте от пола
объектом, поскольку фронтальный датчик перепада высот расположен за бампером.
Внимание! В некоторых случаях датчики перепада высот могут не обнаружить лестницу или
другой перепад высот в нужный момент. Поэтому вы должны внимательно следить за
роботом-пылесосом при первом использовании и при уборке рядом с лестницей или другим
объектом с перепадом высоты. Регулярно очищайте датчики перепада высот, чтобы роботпылесос всегда должным образом (см. 'Очистка и уход') распознавал перепады высот.
Перед первым использованием
Установка боковых щеток
1 Распакуйте боковые щетки и положите робот-пылесос на стол или на пол вверх дном.
2 Наденьте боковые щетки на валы на нижней части робота-пылесоса (Рис. 8).
Примечание. Убедитесь, что боковые щетки надежно зафиксированы. Прижмите их к валу
до щелчка.
75
Удаление ярлыка с пульта дистанционного управления
В пульте дистанционного управления установлена круглая плоская батарея CR2025. Эта
батарея покрыта защитным ярлыком, который необходимо удалить перед использованием.
1 Потяните за защитный ярлык из отсека для батарей в пульте дистанционного управления.
Теперь пульт дистанционного управления готов к использованию (Рис. 9).
Подготовка прибора к работе
Установка док-станции
1 Подключите маленький штекер адаптера к гнезду на док-станции (1) и вставьте адаптер в
электрическую розетку (2) (Рис. 10).
-
Включится дисплей док-станции.
2 Установите док-станцию на горизонтальный участок ровного пола у стены.
Примечание. Убедитесь, что на расстоянии 80 см спереди от док-станции (Рис. 11), 30 см
справа и 100 см слева нет препятствий или перепадов высот.
Совет. Для надежного крепления док-станции к стене можно использовать винты или две
полоски двухстороннего скотча.

76
Русский
Важное примечание: режим глубокого сна
В режиме глубокого сна робот-пылесос не реагирует на нажатия кнопок. Чтобы снова
включить робот-пылесос, находящийся в режиме глубокого сна:
1 Нажмите кнопку «Старт/стоп» на корпусе робота-пылесоса и удерживайте ее в течение
одной секунды, чтобы перевести робот-пылесос из режима глубокого сна в режим
ожидания.
2 Коротко нажмите кнопку «Старт/стоп» на роботе-пылесосе (Рис. 17) или нажмите кнопку
«Старт/стоп» на пульте дистанционного управления, чтобы начать уборку.
3 Если робот-пылесос не начинает уборку, поместите его на подключенную к сети док-
станцию для зарядки аккумулятора.
Робот-пылесос переходит в режим глубокого сна, если нажать и удерживать кнопку
«Старт/стоп» в течение 5 секунд. Он может также перейти в режим глубокого сна при полном
разряде аккумулятора. Например, аккумулятор может полностью разрядиться, если роботпылесос не может найти свою док-станцию.
Зарядка
При первой зарядке, а также при зарядке полностью разряженного аккумулятора роботапылесоса время полной зарядки составляет четыре часа.
Робот-пылесос можно заряжать на док-станции вручную или в автоматическом режиме во
время использования.
Примечание. При полностью заряженном аккумуляторе робот-пылесос может выполнять
уборку до 120 минут.
Автоматическая зарядка во время уборки
1 По завершении уборки или когда в аккумуляторе осталось только 15 % заряда, робот-
пылесос автоматически ищет док-станцию для подзарядки. Во время поиска док-станции
подсветка кнопки «Старт/стоп» становится оранжевой (Рис. 15).
2 Когда аккумулятор будет полностью заряжен, кнопка «Старт/стоп» начнет светиться зеленым
цветом, не мигая.
Зарядка на док-станции
1 Поместите робот-пылесос на подключенную к сети док-станцию (Рис. 12).
2 Кнопка «Старт/стоп» начнет мигать зеленым цветом. При первой зарядке робота-пылесоса
на дисплее отображается индикатор (Рис. 13) зарядки.
3 Когда аккумулятор будет полностью заряжен, кнопка «Старт/стоп» начнет светиться зеленым
цветом, не мигая (Рис. 14).
Эксплуатация робота-пылесоса
Подготовка помещения к уборке
Перед уборкой уберите с пола все незакрепленные и хрупкие объекты, а также кабели,
провода и шнуры.
Функции кнопки «Старт/стоп»
Кнопка «Старт/стоп» имеет следующие функции (Рис. 16):

Русский
77
Способ нажатия кнопки
Реакция робота-пылесоса
«Старт/стоп»
Нажмите кнопку «Старт/стоп» и
удерживайте ее в течение 1 секунды
Коротко нажмите кнопку «Старт/стоп» Робот-пылесос начнет или остановит уборку
Нажмите кнопку «Старт/стоп» и
удерживайте ее в течение 5 секунд
Робот-пылесос переключается из режима сна в
режим ожидания
Произойдет включение или выключение роботапылесоса
Сигналы пользовательского интерфейса и их значение
Робот-пылесос оснащен дисплеем и кнопкой «Старт/стоп», а также подает световые сигналы.
Значение этих сигналов представлено в таблице ниже.
Сигнал
Описание сигнала Значение сигнала
Кнопка «Старт/стоп» непрерывно светится
зеленым цветом.
Кнопка «Старт/стоп» медленно мигает зеленым
цветом, и на дисплее робота-пылесоса
отображается движущийся синий огонек
(индикатор зарядки).
Кнопка «Старт/стоп» ровно непрерывно
светится оранжевым цветом.
Кнопка «Старт/стоп» ровно непрерывно
светится красным цветом.
Робот-пылесос готов к уборке.
Робот-пылесос заряжается.
Низкий заряд аккумулятора, роботпылесос ищет док-станцию.
Аккумулятор робота-пылесоса
почти полностью разряжен.
Кнопка «Старт/стоп» непрерывно светится
красным цветом, и на дисплее отображается
код ошибки.
См. таблицу кодов ошибок ниже,
чтобы понять значение кода
ошибки.
Коды ошибок
Код ошибки
E1 Блокировка колес Устраните препятствие на пути робота-
E2 Верхняя крышка или
E3 Блокировка бампера Устраните препятствие на пути робота-
Возможная
причина
пылесборник
установлены
неправильно
Способы решения
пылесоса, для возобновления процесса
уборки нажмите кнопку «Старт/стоп».
Правильно установите пылесборник в
робот-пылесос и верхнюю крышку на
робот-пылесос. После этого код ошибки
автоматически исчезнет с дисплея.
пылесоса. После этого код ошибки
автоматически исчезнет с дисплея.

78
Русский
Код ошибки Возможная
Способы решения
причина
E4 Робот-пылесос
потерял контакт с
поверхностью пола
E5 Слишком темные
полы
E6 Проблема с
аккумулятором
Чтобы индикатор ошибки исчез с дисплея,
поставьте робот-пылесос на пол.
Переместите робот-пылесос на более
светлую поверхность. Очистите датчики
перепада высот.
Чтобы исследовать возникшую проблему,
обратитесь в центр поддержки
потребителей.
Управление с помощью хлопка
Если вы не видите робот-пылесос, его можно найти, хлопнув в ладоши. Робот-пылесос ответит
звуковым сигналом и подсветкой всех значков на дисплее.
Управление с помощью хлопка активируется, когда робот-пылесос переходит в спящий режим
в следующих ситуациях:
-
если уборка остановлена из-за ошибки;
-
если не удается найти его док-станцию в течение 20 минут.
.
Начало и окончание работы
1 Нажмите кнопку «Старт/стоп» на корпусе роботе-пылесосе (Рис. 17) или на пульте
дистанционного управления (Рис. 18). Кнопка «Старт/стоп» непрерывно светится зеленым
цветом, и робот-пылесос начинает уборку.
2 Уборка будет выполняться в автоматическом режиме до тех пор, пока аккумулятор робота-
пылесоса не разрядится. В автоматическом режиме уборки робот-пылесос повторяет
последовательность программ уборки: Z-программу, произвольную программу, программу
«Вдоль стен» и программу «По спирали» (Рис. 6).
Примечание. Чтобы выбрать отдельный режим, нажмите соответствующую кнопку на пульте
дистанционного управления или на корпусе робота-пылесоса (см. 'Выбор режима уборки').
3 Когда аккумулятор разряжен, кнопка «Старт/стоп» становится красной и робот-пылесос
ищет док-станцию для подзарядки (Рис. 15).
4 Нажатием кнопки «Старт/стоп» также можно приостановить или полностью прекратить
уборку. Если при повторном нажатии кнопки «Старт/стоп» уровень заряда аккумулятора
достаточно высок, робот-пылесос продолжает уборку в автоматическом режиме.
5 Чтобы робот-пылесос вернулся на док-станцию прежде, чем разрядится аккумулятор,
нажмите кнопку подключения к док-станции на пульте дистанционного управления. Все
значки на дисплее робота-пылесоса исчезают, за исключением значка подключения к док-
станции, который светится ярко-синим цветом, пока робот-пылесос возвращается к док-
станции (Рис. 19).
Выбор режима уборки
Помимо автоматического режима уборки данный робот-пылесос поддерживает четыре
отдельных режима уборки, каждый из которых можно активировать соответствующей кнопкой
на пульте дистанционного управления или на корпусе робота-пылесоса.

Русский
Примечание. Программа, выбранная вручную, выполняется только несколько минут. Затем
робот-пылесос переключается обратно в автоматический режим уборки.
Z-программа
Если включена Z-программа, робот-пылесос перемещается по комнате Z-образными
движениями. Эта программа предназначена для очистки крупных участков (Рис. 20).
Произвольная программа
В этом режиме робот-пылесос производит уборку помещения, совершая произвольные
перемещения (Рис. 21) по прямой и крест-накрест.
Программа «Вдоль стен»
В этом режиме робот-пылесос передвигается вдоль стен, обеспечивая более тщательную
уборку (Рис. 22) данного участка помещения.
Программа «По спирали»
В этом режиме робот-пылесос передвигается по спирали для очистки небольшого участка.
Если датчик обнаружения пыли обнаружит загрязнение, вентилятор робота-пылесоса
автоматически переключится в турборежим (Рис. 23).
Ручное управление
1 Для управления передвижением робота-пылесоса по помещению (Рис. 24) используйте
кнопки со стрелками вверх, вниз, влево и вправо рядом с кнопкой «Старт/стоп» на пульте
дистанционного управления.
Примечание. Соблюдайте осторожность, когда управляете роботом-пылесосом вручную
рядом с перепадами высот и лестницами.
Примечание. Функция пылесоса и боковые щетки работают, только когда робот-пылесос
едет вперед. Кнопки перемещения влево, вправо и назад предназначены исключительно
для навигации.
79
Использование кнопок времени уборки
-
По умолчанию уборка будет выполняться в автоматическом режиме до тех пор, пока
аккумулятор робота-пылесоса не разрядится. Затем робот-пылесос автоматически вернется
на док-станцию. Если был выбран один из других вариантов времени уборки (см. ниже),
можно переключить робот-пылесос обратно на режим по умолчанию, нажав кнопку
максимального времени уборки на пульте дистанционного управления (Рис. 25).
-
Другие кнопки времени уборки на пульте дистанционного управления позволяют изменить
продолжительность работы робота-пылесоса на 60, 45 или 30минут соответственно (Рис.
26). Индикатор времени уборки на дисплее отображает заданное время уборки. По
завершении заданного времени уборки робот-пылесос вернется на док-станцию. Значок
док-станции на дисплее загорится ярко-синим цветом.
-
Если возвращение робота-пылесоса на док-станцию после уборки не требуется, дважды
нажмите кнопку времени уборки. Значок подключения к док-станции больше не будет
отображаться на дисплее. По окончании времени уборки робот-пылесос остановится.

80
Русский
Управление док-станцией
Установка времени на часах и дня недели
Для использования программ уборки необходимо установить время и день недели на дисплее
док-станции.
Примечание. Изображения к шагам, перечисленным ниже, приведены на обратной стороне
данного руководства.
1 Нажмите на кнопку установки. Начнут мигать индикаторы установки режима и времени.
2 Нажмите на кнопку выбора один раз. Начнет мигать индикация значения часа.
3 Для настройки значения часа используйте кнопки «+» и «-» на док-станции. Значение часа
появится на дисплее.
4 Нажмите кнопку выбора для подтверждения установки часов. Начнет мигать индикация
значения минут.
5 Для настройки значения минут используйте кнопки «+» и «-» на док-станции. На дисплее
отобразится заданное значение минут.
6 Нажмите кнопку выбора для подтверждения установки минут. Начнет мигать индикация
значения дня недели — «Su» для воскресенья.
7 С помощью кнопок «+» и «-» на док-станции выберите текущий день недели.
8 Для подтверждения дня недели нажмите кнопку выбора.
9 Для подтверждения значения времени и дня недели нажмите кнопку установки. Индикаторы
установки режима и времени перестанут мигать и начнут гореть ровным светом.
Программирование продолжительности процесса уборки
После установки значения времени и дня недели для робота-пылесоса на дисплее док-станции
можно запрограммировать продолжительность процесса уборки.
Примечание. Изображения к шагам, перечисленным ниже, приведены на обратной стороне
данного руководства.
Доступны следующие параметры программирования.
Программа
Ежедневная уборка Горят индикаторы всех дней недели
Уборка в будни Горят индикаторы «Mo»–«Fri» (с понедельника по
Уборка в течение 2дней подряд Горят индикаторы для двух дней, например «Fri» и «Sa»
Уборка 1раз в неделю Горит индикатор выбранного дня
1 Нажмите на кнопку установки. Начнут мигать индикаторы установки режима и программы
уборки.
2 Нажмите на кнопку выбора один раз. Начнет мигать индикация значения часа.
3 Для настройки значения часа используйте кнопки «+» и «-» на док-станции. Значение часа
появится на дисплее.
4 Нажмите кнопку выбора для подтверждения установки часов. Начнет мигать индикация
значения минут.
5 Для настройки значения минут используйте кнопки «+» и «-» на док-станции. На дисплее
отобразится заданное значение минут.
Индикация на дисплее
пятницу)
(пятница и суббота)

Русский
6 Нажмите кнопку выбора для подтверждения установки минут. Начнет мигать индикация
значения дня недели — «Su» для воскресенья.
7 Для переключения между программами уборки используйте кнопки «+» и «-» на док-станции
(доступные параметры настройки см. в таблице выше).
8 Нажмите кнопку выбора для подтверждения выбора программы.
9 Для подтверждения запрограммированной настройки нажмите кнопку установки.
Индикаторы установки режима и программы уборки перестанут мигать и начнут гореть
ровным светом.
10 После выбора режима уборки на дисплее загорится индикатор программы уборки и
появится индикация выбранных дней проведения уборки. Если робот-пылесос находится в
режиме ожидания, а его аккумулятор полностью заряжен, уборка начнется в указанное
время и день недели.
81
Кнопки выбора скорости вентилятора
Кнопки выбора скорости вентилятора используются для переключения вентилятора в
турборежим и для отключения вентилятора. По умолчанию включена нормальная скорость
вентилятора (Рис. 27).
1 Нажмите эту кнопку для отключения вентилятора
2 Нажмите эту кнопку, чтобы включить вентилятор на нормальной скорости.
3 Кнопка турборежима вентилятора увеличивает скорость работы вентилятора.
Использование насадки для салфеток
Насадка для салфеток позволяет очищать твердые напольные покрытия с помощью салфеток
для сухой уборки.
Примечание. При использовании насадки для салфеток у робота-пылесоса могут возникнуть
затруднения при пересечении порогов и переходе на ковры.
Подготовка насадки для салфеток к использованию
Переверните робот-пылесос и поставьте его на пол или на стол.
1 Положите на стол салфетку, а насадку для салфеток поместите сверху так, чтобы фиксаторы
были направлены в вашу сторону (Рис. 28).
2 Загните оба конца салфетки и зафиксируйте их на насадке, вставив фиксаторы в
соответствующие пазы (Рис. 29).
3 Вставьте один из выступов на насадке для салфеток в отверстие за колесом на панели
робота-пылесоса и нажмите на насадку до щелчка. Повторите те же действия для другого
выступа (Рис. 30).
4 Переверните робот-пылесос и поставьте его на пол так, чтобы насадка для салфеток
касалась пола.
Использование робота-пылесоса с насадкой для салфеток
Робот-пылесос с установленной насадкой для салфеток может использоваться в любом
режиме на любых типах твердых напольных покрытий. Не используйте насадку для салфеток на
коврах и ковровых покрытиях.
Извлечение насадки для салфеток
1 Извлекайте насадку для салфеток сразу после очистки пола. Для этого переверните робот-
пылесос и поставьте его на пол или на стол.
2 Надавите на насадку для салфеток и передвиньте ее в сторону колеса на противоположной
стороне робота-пылесоса. Затем снимите насадку с робота-пылесоса (Рис. 31).

82
Русский
3 Если салфетка слишком загрязнится, снимите фиксаторы с насадки для салфеток и
утилизируйте салфетку.
Примечание. Промывать или стирать салфетки нельзя.
Использование ограничителя движения (только модель FC8822)
Ограничитель движения препятствует перемещению робота-пылесоса в определенное
помещение или на определенный участок.
Установка батарей в ограничитель движения
Ограничитель движения работает от четырех батарей типа AA.
1 Нажмите на два фиксатора в нижней части задней крышки (1), потяните заднюю крышку
вверх и снимите ее с ограничителя движения (2) (Рис. 32).
2 Извлеките четыре новые батарейки AA из упаковки и вставьте их в отсек для батарей
ограничителя движения (Рис. 33).
Примечание. При установке батарей соблюдайте полярность («+» и «-»).
3 Установите обратно (Рис. 34) заднюю крышку ограничителя движения.
Установка ограничителя движения, препятствующего перемещению робота-пылесоса
1 Установите модуль ограничителя в точке, которую робот-пылесос не должен пересекать,
например рядом с открытой дверью в другую комнату, исключенную из маршрута робота-
пылесоса (Рис. 35).
2 Включите ограничитель движения с помощью переключателя в верхней части модуля (Рис.
36).
3 Запустите робот-пылесос.
4 При приближении робота-пылесоса к ограничителю движения индикатор на ограничителе
начнет мигать, и ограничитель начнет излучать инфракрасный луч. Этот луч меняет курс
движения робота-пылесоса. Пылесос начнет двигаться в другую сторону от области,
определенной ограничителем движения (Рис. 37).
Примечание. При использовании ограничителя движения регулярно проверяйте, достаточен
ли заряд его батарей. Это можно проверить, выключив и включив ограничитель движения. Если
заряд батарей достаточен, светодиод на ограничителе движения ненадолго загорится.
Очистка и уход
Очистка робота-пылесоса
Чтобы поддерживать качество уборки на должном уровне, необходимо время от времени
очищать датчики перепада высот, колеса, боковые щетки и всасывающее отверстие.
1 Положите робот-пылесос вверх дном на ровную поверхность.
2 Щеткой с мягкой щетиной (например, зубной щеткой) смахните пыль или ворс с датчиков
(Рис. 38) перепада высот.
Примечание. Датчики перепада высот необходимо очищать регулярно. Из-за грязи на
датчиках перепада высот робот-пылесос может не обнаружить перепад высот или лестницу.

Русский
3 Щеткой с мягкой щетиной (например, зубной щеткой) смахните пыль или ворс с переднего
колеса и боковых колес (Рис. 39).
4 Чтобы очистить боковые щетки, возьмите их за щетину и снимите с валов (Рис. 40).
5 С помощью щетки с мягкой щетиной (например, зубной щетки) или ткани (Рис. 41) удалите
грязь и пыль с вала и боковой щетки.
6 Убедитесь, что на боковых щетках и на нижней панели робота-пылесоса нет острых
предметов, которые могут повредить пол.
7 Чтобы снять насадку TriActive XL, вставьте пальцы в пазы в нижней части робота-пылесоса.
Эти пазы указываются соответствующими стрелками. Нажмите на защелки, удерживающие
насадку TriActive на месте, в направлении внутрь, чтобы освободить ее из пазов (1). Затем
потяните насадку TriActive вверх и извлеките ее из робота-пылесоса (2) (Рис. 42).
8 Мягкой щеткой (например, зубной) (Рис. 43) очистите всасывающее отверстие.
9 Удалите все видимые загрязнения из насадки TriActive, прежде чем установить ее обратно.
10 Чтобы установить насадку TriActive на ее место, сначала вставьте маленькие выступы на
передней части в небольшие пазы, расположенные по обе стороны переднего колеса (1).
Затем нажмите на защелки насадки TriActive в направлении внутрь, чтобы зафиксировать ее
в пазах в нижней части робота-пылесоса (2). Наконец, убедитесь в том, что насадка по-
прежнему может свободно (Рис. 44) сдвигаться на несколько миллиметров вверх и вниз.
11 Установите обратно (Рис. 8) боковые щетки на валы в нижней части робота-пылесоса.
Удаление мусора и очистка пылесборника
Если индикатор заполнения пылесборника постоянно светится, пылесборник необходимо
опорожнить и очистить.
1 Снимите крышку.
2 Потяните за ручку крышку пылесборника и извлеките пылесборник из его отсека.
Примечание. Извлекая или устанавливая пылесборник, будьте осторожны, не повредите
лопасти вентилятора.
3 Осторожно снимите крышку с пылесборника (1) и извлеките фильтр (2) (Рис. 45).
4 Потрясите пылесборник над мусорным ведром, чтобы опорожнить его. Очистите фильтр и
внутреннюю поверхность отсека для пыли тканью или зубной щеткой с мягкой щетиной.
Также очистите всасывающее отверстие в нижней части пылесборника.
Внимание! Пылесборник и фильтр нельзя очищать с помощью воды или мыть в
посудомоечной машине.
5 Снова установите фильтр в пылесборник (1). Затем накройте пылесборник (2) (Рис. 47)
крышкой.
6 Снова установите пылесборник в его отсек и закройте верхнюю крышку робота-пылесоса
(Рис. 48).
Внимание! Следите за тем, чтобы в пылесборнике всегда был установлен фильтр. Используя
робот-пылесос без фильтра в пылесборнике, можно повредить двигатель.
83
Заказ аксессуаров
Чтобы приобрести аксессуары или запасные части, посетите веб-сайт
www.shop.philips.com/service или обратитесь в местную торговую организацию Philips. Можно
также связаться с центром поддержки потребителей Philips в вашей стране (контактная
информация приведенав гарантийном талоне).

84
Русский
Замена
Замена фильтра
Если фильтр сильно загрязнен или поврежден, замените его. Чтобы заказать новый набор
фильтров, используйте номер FC8066. Инструкции по извлечению фильтра из пылесборника и
установке обратно в пылесборник см. в разделе «Удаление мусора и очистка пылесборника»
главы «Очистка и уход».
Замена боковых щеток
Чтобы обеспечить желаемые результаты уборки, боковые щетки необходимо заменять через
некоторое время после начала использования.
При любых признаках износа или повреждения боковые щетки следует заменить. Мы также
рекомендуем заменять обе боковые щетки одновременно. Запасные боковые щетки можно
заказать в наборе по номеру заказа FC8068. Набор также включает два фильтра и три салфетки
для сухой уборки.
1 Чтобы заменить боковые щетки, возьмите старые боковые щетки за щетину и снимите с
валов (Рис. 40).
2 Наденьте новые боковые щетки на валы (Рис. 8).
Замена салфеток для сухой уборки
Можно заказать новые салфетки для сухой уборки. Из можно заказать в наборе по номеру
заказа FC8068. Этот набор также включает две боковые щетки и два фильтра.
Замена батареи пульта дистанционного управления
В пульте дистанционного управления установлена круглая плоская батарея CR2025. Если
робот-пылесос перестал реагировать на нажатие кнопок пульта дистанционного управления,
замените батарею.
1 Переверните пульт дистанционного управления. Нажмите кнопку фиксации на держателе
батареи и одновременно сдвиньте держатель батареи с пульта дистанционного управления
(Рис. 49).
2 Извлеките севшую батарею из держателя и вставьте новую батарею. Снова установите
держатель батареи на пульт дистанционного управления (Рис. 50).
Замена аккумулятора
Замена аккумулятора робота-пылесоса может быть выполнена только квалифицированным
сервисным инженером. Доставьте робот-пылесос в авторизованный сервисный центр Philips
для замены аккумулятора, если его больше не удается зарядить или он быстро разряжается.
Можно найти на гарантийном талоне контактную информацию центра поддержки
потребителей Philips в вашей стране или на веб-сайте по адресу www.philips.com/support.
Утилизация
-
Этот символ означает, что продукт не может быть утилизирован вместе с бытовыми
отходами (2012/19/ЕС) (Рис. 51).

Русский
-
Этот символ означает, что в данном изделии содержатся встроенные аккумуляторы, которые
не должны утилизироваться вместе с бытовыми отходами (Рис. 52) (2006/66/EC).
Рекомендуется относить изделие в специализированный пункт сбора или сервисный центр
Philips, где вам помогут извлечь аккумулятор.
-
Соблюдайте правила своей страны по раздельному сбору электрических и электронных
изделий, а также аккумуляторов. Правильная утилизация поможет предотвратить
негативное воздействие на окружающую среду и здоровье человека.
Извлечение аккумулятора
Предупреждение! Следует извлекать аккумуляторные батареи только перед
утилизацией прибора. Перед извлечением батареи убедитесь, что она полностью
разряжена.
Чтобы извлечь аккумулятор, следуйте инструкциям, приведенным ниже. Для извлечения
аккумулятора можно также доставить робот-пылесос в сервисный центр Philips. Обратитесь в
центр поддержки потребителей Philips в вашей стране, чтобы узнать адрес ближайшего
сервисного центра.
1 Запустите робот-пылесос не от док-станции, а из другого места в комнате.
2 Перед извлечением и утилизацией аккумулятора включите робот-пылесос и оставьте его
включенным до полной разрядки аккумулятора.
3 Отвинтите винты на крышке отсека для аккумулятора и снимите крышку (Рис. 53).
4 Поднимите аккумулятор и отсоедините его (Рис. 54).
5 Доставьте робот-пылесос и аккумулятор в пункт сбора отходов электрического и
электронного оборудования.
85
Поиск и устранение неисправностей
Данный раздел посвящен наиболее распространенным проблемам, с которыми вы можете
столкнуться при использовании прибора. Если не удается самостоятельно справиться с
возникшими проблемами, см. ответы на часто задаваемые вопросы на веб-сайте
www.philips.com/support или обратитесь в центр поддержки потребителей в вашей стране.
Поиск и устранение неисправностей
Проблема
Робот-пылесос не
приступает к уборке,
когда я нажимаю
кнопку «Старт/стоп».
Робот-пылесос убирает
неэффективно.
Возможная причина Способы решения
Аккумулятор разряжен. Зарядите аккумулятор.
Щетина на одной или
обеих боковых щетках
деформирована.
Замочите щетку или щетки в теплой воде
на некоторое время, а затем просушите
их на плоской поверхности, прежде чем
снова устанавливать их на роботпылесос. Если щетина не восстановит
форму, замените боковые щетки (см.
'Замена боковых щеток').

86
Русский
Проблема Возможная причина Способы решения
Фильтр в пылесборнике
загрязнен.
Очистите фильтр и внутреннюю
поверхность пылесборника тканью или
зубной щеткой с мягкой щетиной. Фильтр
и пылесборник также можно очистить
обычным пылесосом в режиме низкой
интенсивности всасывания.
Если фильтр не удалось очистить
щетками или пылесосом, замените его.
Фильтр рекомендуется заменять как
минимум раз в год.
Кнопка
включения/выключе
ния непрерывно горит
красным светом, и на
дисплее отображается
код ошибки.
Заблокировано
всасывающее отверстие
в нижней части
пылесборника.
В переднее колесо
попали волосы или грязь.
Робот-пылесос
выполняет уборку очень
темного или блестящего
покрытия. Поэтому
запускаются датчики
перепада высот, и роботпылесос использует
нестандартную
программу уборки.
Робот-пылесос убирает
пол, на котором ярко
отражается солнечный
свет. Отражение света
мешает работе датчиков
перепада высот, и роботпылесос использует
необычную программу
уборки.
Робот-пылесос подает
сигнал ошибки.
Прочистите всасывающее отверстие (см.
'Очистка и уход').
Очистите переднее колесо (см. 'Очистка и
уход').
Нажмите кнопку «Старт/стоп», а затем
переместите робот-пылесос на более
светлый участок пола. Если проблема
возникает и на более светлых полах,
перейдите на веб-сайт
www.philips.com/support или обратитесь в
центр поддержки потребителей в вашей
стране.
Закройте шторы, чтобы препятствовать
попаданию солнечного света в
помещение. Можно также начать уборку
при менее ярком солнце.
Ознакомьтесь с таблицей кодов ошибок,
чтобы узнать значение данного кода (см.
'Коды ошибок').

Проблема Возможная причина Способы решения
Робот-пылесос
перемещается кругами.
Робот-пылесос работает
в режиме уборки «По
спирали».
Его поведение стандартно. Режим уборки
«По спирали» можно использовать, если
на определенном участке пола скопилось
много грязи и ее необходимо тщательно
убрать. Кроме того, этот режим является
частью автоматического режима уборки.
Примерно через минуту робот-пылесос
возобновит выполнение стандартной
программы уборки. Режим уборки «По
спирали» также можно выключить,
выбрав другой режим уборки на пульте
дистанционного управления.
Русский
87
Роботу-пылесосу не
удается найти свою
док-станцию.
Робот-пылесос
Изготовитель: “Филипс Консьюмер Лайфстайл Б.В.", Туссендиепен 4, 9206 АД, Драхтен,
Нидерланды
Импортер на территорию России и Таможенного Союза: ООО "ФИЛИПС", Российская
Федерация, 123022 г. Москва, ул. Сергея Макеева, д.13, тел. +7 495 961-1111
Блок питания: GQ30-240100-AG
вход: 100-240В; 50/60Гц; 1,0А
Выход: 24В 1,0А
Класс II
FC8822, FC8812
Встроенный аккумулятор Li-ion: 14,8 В
Для бытовых нужд
Сделано в Китае
Роботу-пылесосу не
хватает места, чтобы
добраться до докстанции.
Робот-пылесос
продолжает активно
искать док-станцию.
Вы можете отключить
функцию
автоматического
подключения роботапылесоса к док-станции,
дважды нажав кнопку
времени уборки. В этом
случае значок
подключения к докстанции больше не будет
отображаться на
дисплее, и роботпылесос прекратит
работу по окончании
времени уборки.
Попытайтесь найти другое место для
размещения док-станции (см. 'Установка
док-станции').
Подождите около 20 минут, и роботпылесос вернется на док-станцию.
Нажмите кнопку «Старт/стоп» и
удерживайте ее в течение 5 секунд,
чтобы перезапустить робот-пылесос.
Функция подключения робота-пылесоса
к док-станции активируется снова. Чтобы
снова включить функцию подключения к
док-станции, можно также дважды
нажать кнопку времени уборки. На
дисплее снова появится значок
подключения к док-станции. Чтобы
вернуть робот-пылесос к док-станции,
нажмите кнопку подключения к докстанции.

88
Русский
Условия хранения, эксплуатации
Температура 0°C - +50°C
Относительная влажность 20% - 95%
Атмосферное давление 85 - 109 kPa

Українська
Вступ
Вітаємо Вас із покупкою та ласкаво просимо до клубу Philips! Щоб сповна скористатися
підтримкою, яку пропонує компанія Philips, зареєструйте свій пристрій на веб-сайті
www.philips.com/welcome.
Загальний опис
1 Ручка кришки контейнера для пилу
2 Кришка контейнера для пилу
3 Фільтр
4 Контейнер для пилу
5 Верхня кришка
6 Таблиця кодів помилок
7 Вентилятор
8 Бампер
9 Датчик док-станції
10 Кнопка "Увімк./Вимк."
11 Переднє колесо
12 Вали бокових щіток
13 Датчики падіння
14 Колеса
15 Отвір всмоктування
16 Насадка потрійної дії XL
17 Бічні щітки
18 Блоки фіксації для сухих ганчірок
19 Тримач сухих ганчірок
20 Сухі ганчірки
21 Тримач батареї
22 Пульт дистанційного керування
23 Блок "невидима стіна" (FC8822)
24 Док-станція
25 Адаптер
26 Мала вилка
89
Дисплей і пульт дистанційного керування
Дисплей робота
1 Індикатор режиму прибирання за схемою руху по спіралі
2 Індикатор режиму прибирання за схемою руху вздовж стін
3 Індикатор режиму прибирання за зигзагоподібною схемою
4 Індикатор режиму прибирання за довільною схемою
5 Індикатор заряджання й індикатор часу очищення (див. 'Використання кнопок часу
прибирання')
6 Значок стикування
7 Індикатор швидкості вентилятора
8 Індикатор заповнення мішка для пилу
9 Датчик звуку
10 Кнопка вибору режиму
11 Кнопка початку/зупинення
12 Кнопка швидкості вентилятора
Українська

90
Українська
Пульт дистанційного керування
1 Навігаційні кнопки та кнопка початку/зупинення (Мал. 3)
2 Кнопки часу прибирання
3 Кнопки режимів прибирання
4 Кнопки швидкості вентилятора
5 Кнопка стикування
Панель керування док-станції
1 Дисплей з індикаціями (Мал. 4) часу, дня та програми
2 Кнопки налаштування й встановлення
Як працює Ваш робот
Що чистить Ваш робот
Цього робота обладнано функціями, які роблять його придатним для прибирання підлоги у
Вашій оселі.
Робот особливо підходить для прибирання твердої підлоги– дерев’яної, кахельної або
лінолеумної. Можуть виникати проблеми з чищенням м’яких поверхонь, наприклад килимів або
килимових покриттів. Якщо Ви використовуєте робота на килимі або килимовому покритті, під
час першого використання залишайтеся поруч із ним, щоб побачити, чи робот зможе
впоратися із цим типом підлоги. Нагляд за роботом також потрібен під час використання його
на дуже темній або блискучій твердій підлозі.
Як Ваш робот чистить підлогу
Система прибирання
Робот має 3-етапну систему прибирання для ефективного очищення підлоги.
1 Дві бічні щітки допомагають роботу прибирати в кутках і вздовж стін. Вони також
допомагають видаляти бруд із підлоги й просувати його до отвору всмоктування (Мал. 5).
2 Робот вловлює частинки бруду та переносить їх через отвір всмоктування в контейнер для
пилу.
3 Робот постачається з тримачем сухих ганчірок, що дозволяє з їх допомогою чистити тверду
підлогу ще ретельніше.
Схеми руху під час прибирання
У режимі автоматичного прибирання робот використовує фіксовану автоматичну послідовність
схем руху для оптимального прибирання кожної ділянки кімнати. Він послідовно (Мал. 6)
використовує Z-подібну (зигзагоподібну) схему, довільний рух, прибирання вздовж стіни та рух
по спіралі. Робот продовжує використовувати цю послідовність схем для прибирання кімнати,
доки не розрядиться акумуляторна батарея, або доки його не вимкнуть вручну.
Якщо під час циклу прибирання робот виявить особливо забруднену ділянку, він перейде в
режим руху по спіралі й увімкне турбошвидкість вентилятора, щоб забезпечити ретельне
видалення бруду.
Примітка. Крім того, можна самостійно вибрати кожен режим окремо. Для цього натисніть
відповідну кнопку на пульті дистанційного керування (див. 'Вибір режиму прибирання') робота.
Режими, обрані вручну, активуються лише на кілька хвилин. Після цього робот перемикається в
режим автоматичного прибирання.

Українська
Як Ваш робот уникає перепадів висоти
На дні робота розташовано три датчики падіння. Він використовує ці датчики, щоб виявляти
перепади висоти (наприклад, сходи (Мал. 7)) та уникати їх.
Примітка. Якщо робот пересувається дещо над краєм підвищення, це нормально, адже його
передній датчик падіння знаходиться за бампером.
Увага! У деяких випадках датчики падіння можуть не виявляти сходи чи інші перепади висоти
вчасно. Тому уважно стежте за роботом протягом перших разів використання, і коли він
працює біля сходів або іншої ділянки з різницею висоти. Важливо регулярно чистити датчики
падіння, щоб робот міг і надалі правильно (див. 'Чищення та догляд') визначити переходи
висоти.
Перед першим використанням
Встановлення бічних щіток
1 Розпакуйте бічні щітки та поставте робота догори дном на столі або підлозі.
2 Просуньте бічні щітки на спеціальні вали, що знаходяться на дні робота (Мал. 8).
Примітка. Перевірте, чи належним чином під’єднано бічні щітки. Встановлюйте їх на вали до
фіксації з клацанням.
Видалення етикетки з пульта дистанційного керування
Пульт дистанційного керування працює від батареї таблеткового типу CR2025. Цю батарею
захищено спеціальною етикеткою, яку перед використанням потрібно зняти.
1 Зніміть захисну етикетку з відділення для батареї пульта дистанційного керування. Тепер
(Мал. 9) можна використовувати пульт дистанційного керування.
91
Підготовка до використання
Встановлення на док-станцію
1 Вставте малу вилку адаптера в роз’єм на док-станції(1). Вставте вилку-адаптер у розетку на
стіні (2) (Мал. 10).
-
З’явиться дисплей док-станції.
2 Поставте док-станцію на горизонтальну, рівну підлогу біля стіни.
Примітка. Переконайтеся у відсутності перешкод або перепадів висоти на відстані 80см
попереду, 30см праворуч і 100см ліворуч від док-станції (Мал. 11).
Порада. Щоб док-станція залишалася на вибраному місці, прикріпіть її до стіни за
допомогою гвинтів або двох шматків двосторонньої клейкої стрічки.
Важлива інформація: режим глибокого сну
Робот не реагує на команди, коли перебуває в режимі глибокого сну. Щоб перезапустити
робота, який перебуває в режимі глибокого сну, виконайте наведені нижче дії.

92
Українська
1 Натисніть кнопку початку/зупинення на роботі на одну секунду, щоб перейти з режиму
глибокого сну в режим очікування.
2 Коротко натисніть кнопку початку/зупинення на роботі (Мал. 17) або натисніть цю кнопку на
пульті дистанційного керування, щоб почати очищення.
3 Якщо робот не починає прибирати, встановіть його на під’єднану до мережі живлення док-
станцію, щоб зарядити акумуляторну батарею.
Якщо натиснути й утримувати кнопку початку/зупинення протягом 5 секунд, робот перейде в
режим глибокого сну. Якщо батарея повність розрядиться, він також перейде в режим
глибокого сну. Наприклад, батарея може повністю розрядитись, якщо робот не може знайти
док-станцію.
Заряджання
Під час першого заряджання й коли акумуляторна батарея робота розрядиться, процес
заряджання триватиме чотири години.
Робота можна заряджати лише на док-станції (вручну або автоматично під час використання.
Примітка. Коли акумуляторна батарея повністю зарядиться, робот зможе прибирати приблизно
протягом 120хвилин.
Автоматичне заряджання під час використання
1 Коли робот закінчить прибирати, або коли залишиться лише 15% енергії батареї, він
автоматично шукатиме док-станцію для заряджання. Коли робот шукає док-станцію,
індикатор на кнопці початку/зупинення світиться оранжевим (Мал. 15).
2 Коли батарея повністю заряджена, кнопка початку/зупинення безперервно світиться
зеленим.
Заряджання на док-станції
1 Поставте робота на під’єднану до мережі живлення док-станцію (Мал. 12).
2 Кнопка початку/зупинення почне блимати зеленим. Оскільки робот заряджається вперше, на
дисплеї робота відображається індикатор заряджання (Мал. 13).
3 Коли батарея повністю заряджена, кнопка початку/зупинення безперервно (Мал. 14)
світиться зеленим.
Використання робота
Підготовка кімнати до циклу прибирання
Перед тим як вмикати робота для здійснення циклу прибирання переконайтеся, що на підлозі
немає крихких і легких предметів. Також приберіть із підлоги всі кабелі й дроти.
Функції кнопки початку/зупинення
Кнопка початку/зупинення має наступні функції (Мал. 16):
Як натискати кнопку
початку/зупинення
Натисніть і утримуйте кнопку
початку/зупинення протягом
1секунди
Як реагує робот
Робот переключається з режиму сну в режим
очікування

Українська
93
Коротко натисніть кнопку
початку/зупинення.
Натисніть і утримуйте кнопку
початку/зупинення протягом 5секунд
Робот починає або закінчує очищення
Робот вмикається або вимикається.
Сигнали інтерфейсу користувача та їхнє значення
Робот оснащений дисплеєм, а кнопка початку/зупинення подає світлові сигнали. У наведеній
нижче таблиці пояснені значення сигналів.
Сигнал
Опис сигналу Значення сигналу
Кнопка початку/зупинення постійно світиться
зеленим.
Кнопка початку/зупинення повільно блимає
зеленим, дисплей робота показує рухливе синє
сяйво (індикатор зарядження).
Кнопка початку/зупинення постійно світиться
оранжевим.
Кнопка початку/зупинення постійно світиться
червоним.
Кнопка початку/зупинення постійно світиться
червоним, дисплей відображає код помилки.
Робот готовий до прибирання.
Робот заряджається.
Низький рівень заряду
акумуляторної батареї, робот шукає
док-станцію.
Акумуляторну батарею майже
розряджено.
Перегляньте таблицю кодів
помилок нижче, щоб розуміти
значення певного коду.
Коди помилок
Код помилки
E1 Колеса заблоковано Заберіть робота від перешкоди та
E2 Верхню кришку або
E3 Бампер заблоковано Заберіть робота від перешкоди. Код
E4 Робота підняли з
E5 Колір підлоги надто
E6 Проблема з батареєю Зверніться до місцевого Центру
Можлива причина Рішення
натисніть кнопку "початку/зупинення", щоб
відновити прибирання.
контейнер для пилу не
встановлено
належним чином
підлоги
темний
Вставте контейнер для пилу та встановіть
верхню кришку на робота належним
чином. Код помилки автоматично зникне з
дисплея.
помилки автоматично зникне з дисплея.
Поставте робота назад на підлогу, щоб
зник код помилки.
Поставте робота на світлішу підлогу.
Почистьте датчики падіння.
обслуговування клієнтів, щоб усунути
проблему.

94
Українська
Реакція на плескання
Якщо Ви втратили робота з поля зору, можете знайти його, плеснувши в долоні один раз. Робот
відповість звуковим сигналом і підсвітить усі піктограми на своєму дисплеї.
Реакція на плескання активується, коли робот переходить у режим сну в таких ситуаціях:
-
Робот припинив прибирання через помилку.
-
Робот не знаходить док-станцію впродовж 20хвилин.
.
Запуск і зупинка
1 Натисніть кнопку початку/зупинення на роботі (Мал. 17) або пульті дистанційного керування
(Мал. 18). Кнопка початку/зупинення постійно світиться зеленим, робот починає прибирати.
2 Робот прибирає в режимі автоматичного прибирання, доки не розрядиться батарея. У
режимі автоматичного прибирання він циклічно рухається за Z-подібною, довільною схемою,
вздовж стін і за спіральною схемою (Мал. 6).
Примітка. Щоб вибрати власний режим прибирання, натисніть одну з кнопок режиму на
пульті ДК або на роботі (див. 'Вибір режиму прибирання').
3 Коли батарея розрядиться, кнопка початку/зупинення засвітиться червоним, а робот
шукатиме док-станцію для заряджання (Мал. 15).
4 Також можна натиснути кнопку початку/зупинення, щоб перервати або зупинити цикл
прибирання. Якщо натиснути кнопку початку/зупинення ще раз, коли акумуляторна батарея
міститиме ще достатньо енергії, робот продовжить роботу в режимі автоматичного
прибирання.
5 Щоб повернути робота на док-станцію перед тим, як акумуляторна батарея розрядиться,
натисніть кнопку стикування на пульті ДК. Усі значки на дисплеї робота зникнуть, окрім
значка док-станції, який світитиметься синім під час установлення на док-станцію (Мал. 19).
Вибір режиму прибирання
Крім автоматичного прибирання, цей робот має чотири окремі режими прибирання, які можна
активувати відповідною кнопкою на пульті дистанційного керування або на роботі.
Примітка. Режими, обрані вручну, активуються лише на кілька хвилин. Після цього робот
перемикається в режим автоматичного прибирання.
Режим прибирання за Z-подібною схемою
У режимі прибирання за Z-подібною схемою руху робот чистить підлогу, виконуючи Z-подібні
петлі по кімнаті для очищення великих площ (Мал. 20).
Режим прибирання за довільною схемою
У цьому режимі робот прибирає кімнату за змішаною схемою руху по прямій і навхрест (Мал. 21).
Режим прибирання за схемою руху вздовж стін
У цьому режимі робот рухається вздовж стін кімнати для додаткового прибирання (Мал. 22)
ділянок поряд зі стінами.
Режим прибирання за схемою руху по спіралі
У цьому режимі робот рухається по спіралі, щоб прибирати невеликі ділянки. Якщо датчик пилу
виявляє забруднення, робот автоматично вмикає турбошвидкість (Мал. 23) вентилятора.

Українська
Ручне керування
1 За допомогою кнопок зі стрілками вгору, вниз, праворуч і ліворуч від кнопки
початку/зупинення на пульті ДК можна керувати рухом робота по кімнаті (Мал. 24).
Примітка. Будьте обережні, коли під час ручного керування робот знаходиться близько до
перепаду висоти або сходів.
Примітка. Функція всмоктування та бічні щітки працюють тільки тоді, коли робот рухається
вперед. Кнопки руху ліворуч, праворуч або назад призначені тільки для маневрування
робота.
Використання кнопок часу прибирання
-
За замовчуванням робот прибирає в режимі автоматичного прибирання, доки не
розрядиться акумуляторна батарея. Тоді він автоматично повертається до док-станції. Якщо
ви вибрали інший режим прибирання (див. нижче), щоб повернутися в автоматичний режим,
натисніть кнопку максимального часу прибирання на пульті дистанційного керування (Мал.
25).
-
Інші кнопки часу прибирання на пульті дозволяють роботу працювати протягом 60, 45 і
30хвилин відповідно (Мал. 26). Індикатор часу очищення на дисплеї показує задане для
цього параметра значення. Коли час спливе, робот повернеться на док-станцію для
заряджання. Значок док-станції на дисплеї змінить колір на яскраво-синій.
-
Якщо Ви не хочете, щоб робот повертався до док-станції після завершення циклу
прибирання, двічі натисніть кнопку часу прибирання. Значок стикування зникне з дисплея.
Щойно спливе час прибирання, робот зупиниться.
95
Робота з док-станцією
Встановлення часу годинника та дня
Якщо Ви бажаєте використовувати програми прибирання, потрібно спочатку налаштувати час
годинника та день тижня на дисплеї док-станції.
Примітка. Зображення, які відповідають описаним нижче крокам, можна переглянути на
сторінках у кінці посібника.
1 Натисніть кнопку встановлення. Індикатори режиму встановлення та часу годинника почнуть
блимати.
2 Натисніть кнопку встановлення один раз. Почне блимати індикація години.
3 За допомогою кнопок "+" та "-" на док-станції встановіть годину. Установлена година
відобразиться на дисплеї.
4 Натисніть кнопку вибору, щоб підтвердити встановлену годину. Почне блимати індикація
хвилин.
5 За допомогою кнопок "+" та "-" на док-станції встановіть хвилини. Встановлені хвилини
відобразяться на дисплеї.
6 Натисніть кнопку вибору, щоб підтвердити встановлені хвилини. Почне блимати індикація
"Su", що означає неділю.
7 За допомогою кнопок "+" та "-" на док-станції встановіть поточний день тижня.
8 Натисніть кнопку вибору для підтвердження цього дня тижня.
9 Натисніть кнопку встановлення, щоб підтвердити налаштування часу годинника та дня
тижня. Обидва індикатори режиму встановлення та часу годинника перестануть блимати й
світитимуться постійно.

96
Українська
Програмування частоти прибирання
Якщо Ви встановили час і день тижня на дисплеї док-станції, можна запрограмувати частоту
прибирання для робота.
Примітка. Зображення, які відповідають описаним нижче крокам, можна переглянути на
сторінках у кінці посібника.
Можливі такі варіанти програмування:
Програма
Прибирання щодня Світяться індикації всіх днів
Прибирання в будні дні Світяться індикації від "Mo" (понеділок) до "Fri" (п’ятниця)
Індикації на дисплеї
Прибирання 2дні поспіль Світяться індикації 2днів, наприклад "Fri" (п’ятниця) і "Sa"
Прибирання 1 день на тиждень Світиться індикація вибраного дня
1 Натисніть кнопку встановлення. Індикатори режиму встановлення та програми прибирання
почнуть блимати.
2 Натисніть кнопку встановлення один раз. Почне блимати індикація години.
3 За допомогою кнопок "+" та "-" на док-станції встановіть години. Встановлена година
відобразиться на дисплеї.
4 Натисніть кнопку вибору, щоб підтвердити встановлену годину. Почне блимати індикація
хвилин.
5 За допомогою кнопок "+" та "-" на док-станції встановіть хвилини. Встановлені хвилини
відобразяться на дисплеї.
6 Натисніть кнопку вибору, щоб підтвердити встановлені хвилини. Почне блимати індикація
"Su", що означає неділю.
7 За допомогою кнопок "+" та "-" на док-станції можна перемикати програми прибирання
(доступні варіанти програмування див. у таблиці вище).
8 Натисніть кнопку вибору для підтвердження вибраної програми.
9 Натисніть кнопку встановлення, щоб підтвердити програмування. Обидва індикатори
режиму встановлення та програми прибирання перестануть блимати й світитимуться
постійно.
10 Коли Ви встановите програму прибирання, на дисплеї відобразиться індикатор програми
прибирання та вибраний день або дні. Якщо Ви залишите робота в режимі очікування з
повністю зарядженою акумуляторною батареєю, він почне прибирати в запрограмований
час у запрограмований день або дні.
(субота)
Кнопки швидкості вентилятора
За допомогою кнопок швидкості вентилятора можна збільшувати швидкість обертання
вентилятора до турбошвидкості або взагалі вимикати його. Налаштування за замовчуванням–
звичайна швидкість обертання вентилятора (Мал. 27).
1 Натисніть цю кнопку, щоб вимкнути вентилятор.
2 Натисніть цю кнопку, щоб увімкнути вентилятор у режимі звичайної швидкості.
3 Кнопка "турбо" збільшує швидкість обертання вентилятора.
Використання пристосування для сухих ганчірок
Пристосування для сухих ганчірок – це функція, що дозволяє прибирати тверду підлогу з
використанням сухих ганчірок.

Українська
Примітка. Якщо використовувати пристосування для сухих ганчірок, можуть виникнути
проблеми з перетином порогу та чищенням килимів.
Підготовка пристосування для сухих ганчірок до використання
Переверніть робота догори дном і поставте його на підлозі або на столі.
1 Покладіть суху ганчірку на стіл, а пристосування для сухих ганчірок покладіть зверху, щоб
його язички для фіксації були повернутими до вас (Мал. 28).
2 Загніть обидва кінці сухої ганчірки навколо пристосування та зафіксуйте суху ганчірку на
ньому, проштовхуючи блоки фіксації у виїмки (Мал. 29).
3 Вставте язичок для фіксації пристосування для сухих ганчірок в отвір одразу за колесом з
одного боку робота та просуньте до фіксації, доки не пролунає клацання. Потім повторіть ці
дії з іншого боку (Мал. 30).
4 Поверніть робота й поставте його на підлогу на колеса, щоб пристосування із сухою
ганчіркою торкалося підлоги.
Використання робота з пристосуванням для сухих ганчірок
Коли встановлено пристосування для сухих ганчірок, робота можна використовувати в будьякому режимі та на всіх типах твердої підлоги. Не використовуйте пристосування для сухих
ганчірок на килимах або килимових покриттях.
Знімання пристосування із сухою ганчіркою
1 Зніміть пристосування із сухою ганчіркою, як тільки завершите витирати підлогу. Для цього
переверніть робота догори дном і поставте його на підлогу або на стіл.
2 Посуньте один кінець пристосування для сухих ганчірок у напрямку до колеса з
протилежного боку робота для розблокування. Потім зніміть пристосування з робота (Мал.
31).
3 Якщо ганчірка занадто брудна для подальшого використання, витягніть блоки фіксації з
пристосування для сухих ганчірок і замініть ганчірку.
Примітка. Не можна мити або промивати сухі ганчірки.
97
Використання блока "невидима стіна" (лише модель FC8822)
Блок "невидима стіна" можна використовувати, щоб запобігати входу робота в кімнату чи на
іншу ділянку, куди йому не потрібно заходити.
Встановлення батарей у блок "невидима стіна"
Блок "невидима стіна" живиться від чотирьох батарей AA.
1 Натисніть два важелі розблокування внизу на задній кришці(1) і посуньте задню кришку
догори, щоб зняти її з блока "невидима стіна" (2) (Мал. 32).
2 Візьміть чотири нові батареї типу AA з упаковки та вставте їх у батарейний відсік блока
"невидима стіна" (Мал. 33).
Примітка. Перевірте правильність розташування полюсів "+" і "-" батарей.
3 Вставте задню кришку блока "невидима стіна" на місце (Мал. 34).
Розташування блока "невидима стіна" для зупинення робота
1 Поставте блок у місці, за межі якого роботу заборонено заходити (наприклад, біля відкритих
дверей у кімнату, де роботу (Мал. 35) заборонено доступ).
2 Увімкніть блок "невидима стіна" за допомогою перемикача "увімк./вимк." на верхній частині
пристрою (Мал. 36).

98
Українська
3 Запустіть робота.
4 Коли робот підійде занадто близько до блока "невидима стіна", індикатор на блоці почне
блимати й блок почне випромінювати пучок інфрачервоних променів. Цей пучок
інфрачервоних променів змусить робота змінити маршрут і відійти подалі від блока
"невидима стіна" (Мал. 37).
Примітка. Якщо Ви використовуєте блок "невидима стіна", регулярно перевіряйте, чи достатньо
заряджені батареї. Це можна зробити, вимкнувши та ввімкнувши блок "невидима стіна" знову.
Якщо заряду батарей достатньо, на блоці "невидима стіна" на короткий час засвітиться
світлодіодний індикатор.
Чищення та догляд
очищення робота
Для ефективного прибирання необхідно час від часу чистити датчики падіння, колеса, бічні
щітки та отвір всмоктування.
1 Поставте робота догори дном на рівну поверхню
2 За допомогою щітки з м’яким ворсом (наприклад, зубної щітки) почистьте датчики (Мал. 38)
падіння від пилу або пуху.
Примітка. Важливо регулярно чистити датчики падіння. Якщо датчики падіння брудні, робот
може не визначити зміну висоти або сходинки.
3 За допомогою щітки з м’яким ворсом (наприклад, зубної щітки) почистьте переднє й бокові
колеса (Мал. 39) від пилу або пуху.
4 Щоб почистити бічні щітки, візьміть їх за щетину й зніміть із валів (Мал. 40).
5 Видаліть пух, волосся та нитки з валів і бічних щіток за допомогою м’якої щітки (наприклад,
зубної щітки) або тканини (Мал. 41).
6 Перевірте, чи на бічних щітках і нижній частині робота немає жодних гострих предметів, які
можуть пошкодити підлогу.
7 Щоб зняти насадку потрійної дії XL, вставте пальці в отвори на нижній панелі робота. Ці
стрілки вказують на отвори. Натисніть затиски, які утримують насадку потрійної дії, щоб
вивільнити їх з отворів (1). Після цього потягніть насадку потрійної дії вгору в напрямку від
робота (2) (Мал. 42).
8 Почистьте отвір всмоктування м’якою щіткою (наприклад, зубною щіткою) (Мал. 43).
9 Повністю очистьте насадку потрійної дії, перш ніж повертати її на місце.
10 Щоб установити насадку потрійної дії, спочатку вставте менші виступи на передній частині у
вузькі отвори з будь-якого боку переднього колеса (1). Потім натисніть затиски насадки
потрійної дії, щоб зафіксувати їх в отворах на нижній панелі робота (2). Нарешті
переконайтеся, що насадка все ще може вільно (Мал. 44) рухатися на кілька міліметрів уверх
і вниз.
11 Знову (Мал. 8) встановіть бічні щітки на спеціальні вали, що знаходяться на дні робота.
Спорожнення й очищення контейнера для пилу
Спорожніть і почистьте контейнер для пилу, коли індикатор заповнення контейнера для пилу
постійно світиться.
1 Зніміть кришку.
2 Підніміть ручку кришки контейнера для пилу й витягніть контейнер для пилу з його
відділення.

Українська
Примітка. Виймаючи або встановлюючи контейнер для пилу, будьте обережні, щоб не
пошкодити лопаті вентилятора двигуна.
3 Обережно підніміть кришку контейнера для пилу (1) і вийміть фільтр (2) (Мал. 45).
4 Витрусіть вміст контейнера для пилу над смітником, щоб спорожнити його. Почистьте фільтр
і внутрішню частину контейнера для пилу ганчіркою або зубною щіткою з м’яким ворсом.
Почистьте також отвір всмоктування на дні контейнера для пилу.
Увага! Не мийте контейнер для пилу та фільтр водою або в посудомийній машині.
5 Вставте фільтр назад у контейнер для пилу (1). Потім встановіть кришку на контейнер для
пилу (2) (Мал. 47).
6 Поставте контейнер для пилу назад у відділення для контейнера та встановіть верхню
кришку на робота (Мал. 48).
Увага! Завжди перевіряйте, чи вставлено всередині контейнера для пилу фільтр. Якщо
використовувати робота без фільтра в контейнері для пилу, двигун буде пошкоджено.
Замовлення приладдя
Щоб придбати приладдя чи запасні частини, відвідайте веб-сайт www.shop.philips.com/service
або зверніться до дилера Philips. Ви також можете звернутися до Центру обслуговування
клієнтів Philips у своїй країні (контактну інформацію шукайте в гарантійному талоні).
Заміна
99
Заміна фільтра
Заміняйте фільтр, коли він дуже брудний або пошкоджений. Новий набір фільтрів можна
замовити за номером артикулу FC8066. Вказівки щодо виймання фільтра з контейнера для пилу
та його встановлення в контейнер для пилу читайте в підрозділі "Спорожнення й чищення
контейнера для пилу" розділу "Чищення та догляд".
Заміна бічних щіток
З часом замініть бічні щітки для забезпечення належних результатів прибирання.
Завжди замінюйте бічні щітки, коли помітите на них ознаки зношення чи пошкодження. Також
радимо замінювати одночасно обидві бічні щітки. Запасні бічні щітки можна замовити як
частину запасного набору FC8068. Цей набір також містить два фільтра й три сухих ганчірки.
1 Щоб замінити бічні щітки, візьміть старі бічні щітки за щетину та зніміть їх із валів (Мал. 40).
2 Вставте нові бічні щітки на вали (Мал. 8).
Заміна сухих ганчірок
Тепер можна замовляти нові сухі ганчірки. Вони входять до складу запасного набору FC8068,
який також містить дві бічні щітки й два фільтра.
Заміна батареї пульта дистанційного керування
Пульт дистанційного керування працює від батареї таблеткового типу CR2025. Замінюйте
батарею, коли робот перестане реагувати на натиснення кнопок на пульті дистанційного
керування.

100
Українська
1 Тримайте пульт дистанційного керування догори дном. Натисніть кнопку розблокування на
тримачі батареї та одночасно вийміть тримач батареї з пульта дистанційного керування
(Мал. 49).
2 Вийміть розряджену батарею з тримача та вставте в тримач нову батарею. Потім задвиньте
тримач батареї в пульт дистанційного керування (Мал. 50).
Заміна акумуляторної батареї
Заміну акумуляторних батарей робота можуть здійснювати лише кваліфіковані фахівці.
Привезіть робота до авторизованого сервісного центру Philips, щоб замінити акумуляторну
батарею, якщо вона не заряджається або швидко розряджається. Крім того, ви можете
звернутися до Центру обслуговування клієнтів Philips у своїй країні (контактну інформацію див. у
гарантійному талоні або на сайті www.philips.com/support).
Утилізація
-
Цей символ означає, що поточний виріб не підлягає утилізації зі звичайними побутовими
відходами (згідно з директивою ЄС 2012/19/EU) (Мал. 51).
-
Цей символ означає, що виріб містить вбудовану акумуляторну батарею, яку не можна
утилізувати зі звичайними побутовими відходами (Мал. 52) (Директива 2006/66/EC). Віднесіть
виріб в офіційний пункт прийому чи до сервісного центру Philips, щоб спеціалісти вийняли з
нього акумуляторну батарею.
-
Дотримуйтеся правил роздільного збору електричних і електронних пристроїв, а також
звичайних і акумуляторних батарей у Вашій країні. Належна утилізація допоможе запобігти
негативному впливу на навколишнє середовище та здоров’я людей.
Виймання акумуляторної батареї
Попередження. Виймайте акумуляторну батарею, лише якщо хочете утилізувати
пристрій. Перш ніж вийняти батарею, перевірте, чи вона повністю розряджена.
Щоб вийняти акумуляторну батарею, виконайте наведені нижче кроки. Привезіть робота до
авторизованого сервісного центру Philips, щоб зняти акумуляторну батарею. Зверніться до
Центру обслуговування клієнтів Philips у своїй країні, щоб отримати адресу найближчого
сервісного центру.
1 Запустіть робота не з док-станції, а з іншого місця в кімнаті.
2 Перш ніж вийняти та утилізувати акумуляторну батарею, дайте роботу попрацювати, поки
акумуляторна батарея не розрядиться повністю.
3 Викрутіть гвинти та зніміть кришку (Мал. 53) батарейного відсіку.
4 Підніміть акумуляторну батарею та від’єднайте її (Мал. 54).
5 Здайте робота та акумуляторну батарею в офіційний пункт прийому електричного та
електронного обладнання.
Усунення несправностей
У цьому розділі розглядаються основні проблеми, які можуть виникнути під час використання
пристрою. Якщо Ви не в змозі вирішити проблему за допомогою поданої нижче інформації,
відвідайте веб-сайт www.philips.com/support і ознайомтеся зі списком частих запитань або
зверніться до Центру обслуговування клієнтів у своїй країні.
 Loading...