


FC 911
@) Stereo Cassette Deck
(T) Platine Cassette Stéréo 10
® Stereo Kassettendeck 16
4
PHILIPS
® Stereo Cassettedeck
CE) Tocacasetes Estereofónico
CD Tape Deck Stereo
® Stereo Kassette deck
CE) Stereo Kassettdäcket
@) Stereokasettidekki 52
22
28
34
40
46
PHILIPS


INDEX
Important notes for users in the U.K.:
Mains plug
This apparatus is fitted with an
approved moulded 13 Amp plug.
To change a fuse in this type of plug
proceed as follows:
1 Remove fuse cover and fuse.
2 Fix new fuse which should be a
BS1362 5AMP.A.S.T.A. or BSI
approved type.
3 Refit the fuse cover.
If the fitted plug is not suitable for your socket outlets, it
should be cut off and an appropriate plug fitted in its place.
If the mams plug contains a fuse, this should have a value of
5 A. If a plug without a fuse is used, the fuse at the
distribution board should not be greater than 5 A.
Note:
The severed plug must be disposed to avoid a possible shock
hazard should it be inserted into a 13 A socket elsewhere.
How to connect a plug
The wires in the mains lead are coloured in accordance with
the following code: blue = neutral (N), brown = live (L).
As these colours may not correspond with the colour markings
identifying the terminals in your plug, proceed as follows:
1 Connect the blue wire to the terminal marked N or coloured
blue or black.
2 Connect the brown wire to the terminal marked L or
coloured brown or red.
3 Do not connect either wire to the earth terminal in the plug,
marked E or T or coloured green or green-and-yellow.
(Ц) English
page 4 =
©Français.............................page io S,
L
® Deutsch
© Nederlands
© Español
............................
SeitelO
.pagina 22 -g
.página 28 я
c
Ш
1Л
s:
о
0)
Q
(A
T3
c
Ф
"О
Ф
о
«
Ш
Before replacing the plug cover, make certain that the cord
grip is clamped over the sheath of the lead - not simply over
the two wires.
If in doubt, consult a qualified electrician.
@ Mexico.
Es necessario que lea cuidadosamente su
instructivo de manejo.
PRECAUCION - ADVERTENCIA
I
NO ABRIR, RIESGO DE CHOQUE ELECTRICO
I
ATENCION
A
EN CASO DE REQUERIR SERVICIO, DIRIJASE AL PERSONAL AUTORIZADO DE PHILIPS.
I VERIFIQUE QUE EL VOLTAJE DE AUMENTACION
I
SEA EL REQUERIDO PARA SU APARATO
PARA EVITAR EL RIESGO DE CHOQUE ELECTRICO, NO QUITE LA TAPA;
NOM
® Norge
Typeskilt finnes bak pá apparaten.
кон
© Italiano
...........................
© Dansk
© Svenska
© Suomi
pagina 34 |
.side 40 c
.sida 46 c
.sivu 52 i
(О
co
со
(0
(6
0)
>
о
э

@) INTRODUCTION
INSTALLATION
Thank you for selecting the Philips FC911 Stereo Cassette
Deck.
A cassette deck of the state-of-the-art Philips 900 series, the
FC911 combines supreme recording and playback quality with
a high degree of user-friendliness.
Record and playback quality are founded on solenoid electronic
tape transports, supported by features such as;
- Double autoreverse tape transports
- Dolby B/C noise reduction;
- CD synchro dubbing facility;
- Electronic counter;
- ESI-BUS sockets for full integration into ESI remotecontrolled Philips HiPi systems (900 series).
Please read this manual carefully before you attempt to
connect or operate the cassette deck.
This manual is divided into five sections:
- Installation: explains how to connect your cassette deck.
- Operation: explains how to use the major controls.
- Advanced Options; gives more detailed information on
operation, including special features.
- System Aspects: explains the Enhanced System
Intelligence feature and its benefits.
- General Information; includes maintenance information and
technical data.
WARNING
Do not connect the set to the mains until all other
connections have been made and the mains voltage
(indicated on the type plate) has been checked.
COIMIMECTIOIMS
PLAY - output sockets for connection to the TAPE input
sockets of your amplifier.
REC - input sockets for connection to the TAPE output
sockets of your amplifier.
ESI BUS (Enhanced System Intelligence)
Remote control
sockets for
connecting up the
equipment when
you are
incorporating the
cassette deck in a
HiFi system with
ESI BUS
connection (e.g.
Philips 900 series)
Connect the ESI
socket to the
socket of the
external equipment
that uses the ESI
remote-control
system.
D Voltage selector 115 V/230 V - for selecting the mains
voltage (not on all versions)
E MAINS - mains lead
MAINS SUPPLY
Check that the mains voltage as shown on the type plate
corresponds to your local mains supply. If it does not,
consult your dealer or service organisation.
If your unit has a voltage selector, make sure only to change
the voltage in the POWER OFF position.
Insert the plug of the mains lead into the wall socket.
If your amplifier has AC MAINS OUTLETS, you should insert
the plug of the mains lead into these outlets.
The mains supply is now connected.
To disconnect the set from the mains completely, remove
the mains plug from the wall socket or from the AC MAINS
OUTLETS of your amplifier.
The type plate is located on the back of the set.
This product complies with the radio interference
requirements of the European Community.
After having made the necessary connections, your cassette
deck is ready for use.
In the next chapter we will describe how to operate it.

OPERATION @>
1 POWER STANDBY/OFF - for switching the cassette deck
on and off
2 OPEN - for opening cassette holder 3 of deck A
3 Cassette holder A - for playback in both directions
4 COUNTER RESET - for returning the tape counter in the
display to 0000
5 COUNTER SELECT - for selecting the tape counter to
count for deck A or deck B
6 REC BALANCE - for adjusting the recording balance
7 Display
8 REC LEVEL - for adjusting the recording volume
9 DOLBY NR - for switching the Dolby Noise Reduction
system on and off and selecting Dolby B or Dolby C
Dolby noise reduction manufactured under license from Dolby Laboratories
Licensing Corporation. DOLBY and the double-D symbol DO are trademarks
of Dolby Laboratories Licensing Corporation.
10 Reverse mode selector:
n - the tape stops at the end of each side.
“D - playback (+ recording for deck B) of both cassette sides,
after which the tape stops at the end of the second side.
C“D - continuous playback of both cassette sides
CD CD - for continuous playback of both cassette sides
on both decks
11 Cassette holder B - for recording and playback in both
directions
12 OPEN - for opening cassette holder 11 of deck B 13 Keyboard for deck A and deck B
I - for fast winding in the opposite direction to that in
which the tape is travelling
- STOP ■ - for stopping the tape transport
- PLAY ► - for starting playback
- ►► - for fast winding in the tape travel direction
- CHANGE SIDE - for reversing the tape travel direction of
the playing deck {A or B) or reversing the tape travel
direction of both decks when they are in STOP mode. After
switching on the power, the unit always automatically
displays the last directions chosen.
14 RECORDING
- RECORD - for starting recording.
- MUTE - for recording a pause (silent passage)
- PAUSE - for preparing or interrupting a recording
15 DUBBING
- NORMAL - for dubbing from deck A to B at normal speed
- FAST - for dubbing from deck A to B at high speed
- CD SYNC. - for synchro start of deck B and a CD player when
recording from a Compact Disc (provided the CD player is
connected via its ESI bus to your Philips system 900 series).
DISPLAY
HI SPEED DUBBING
TRACK TIME
FRONT ••••• ;•••; front
BACK *•••• *•••• *•••* ••••• BACK
The display shows:
- CD CD - when the reverse-mode continuous playback of
both cassette sides on both decks is activated;
- SSSS - tape transport counter of deck A and deck B;
- DOLBY B/C - when Dolby Noise Reduction System B or C
is switched on;
- MUTE - during recording mute;
- RECORD - during any recording or dubbing;
Starts flashing during recording pause mode;
- CD SYNC. - during a synchronized CD recording;
- FRONT/BACK - indicates the tape travel direction;
EBsm
DUBBING - during dubbing at normal speed;
- HI SPEED DUBBING - during high-speed dubbing;
- DECK A/B - indicating that the tape transport counter is
counting for deck A or deck B
- Peak level meters - indicating the output or recording
level which can be adjusted with the REC BALANCE and
REC LEVEL controls.
POWER STANDBY/OFF
• Press the POWER STANDBY/OFF key 1 to switch on the
power. Press this key again to switch the power off.
- If you have connected the plug of the mains lead to the
MAINS OUTLETS of your amplifier, the power will automati
cally be switched off as soon as you switch off the amplifier.
AUTOMATIC TAPE SELECTION AND DETECTION
When a cassette is inserted in the cassette holder, the deck
will always automatically select the tape type: Fe, Cr or Me
(lEC I, lEC II, lEC IV) as soon as the cassette holder is closed.
When no cassette is inserted in the cassette holder, no tape
action can be started. (The presence of a cassette is detected).

@) OPERATION
m
PLAYBACK
3
(Q
55'
3"
Playback of one side (deck A or B)
• Open the cassette holder of the selected deck by pressing the corresponding OPEN button.
• Insert a recorded cassette with the open side facing downwards.
• Close the cassette holder.
• Select H with the reverse-mode selector 10.
• If desired, switch on the Dolby NR system 9.
• Select the playback direction with the CHANGE SIDE key. The tape travel direction will be indicated on
the display (FRONT or BACK)
• Now press the PLAY ► key on deck A or B.
The green indicator above the PLAY ► key lights up.
The deck plays one cassette side and the tape stops automatically at the end.
• You can stop playback by pressing STOP ■ on deck A or B.
• In order to continue playback press PLAY>- again.
Playback of both sides (deck A or B)
• if you want to play both sides of the cassette, proceed as described under 'Playback of one side' but
select TD with the reverse-mode selector 10.
The deck plays both cassette sides and the tape stops automatically at the end of the second side.
CONTINUOUS PLAYBACK
Continuous playback with two cassettes
(deck A and B)
• Insert a recorded cassette into both cassette holders as
indicated above.
• Close the cassette holders.
• Selected CD with the reverse-mode selector 10.
• If desired, switch on the Dolby NR system 9.
• Select the playback direction of deck A with the respective
CHANGE SIDE key.
• Press PLAY ► on deck A.
- Deck A plays both cassette sides and then deck B plays
both cassette sides.
- Deck A starts again and both decks keep playing both
cassette sides continuously (to a maximum of three times
for each cassette).
• Press STOP n on the playing deck to stop continuous
playback.
Note
If you wish to start with deck B, first select the playback
direction of deck B with the respective CHANGE SIDE key and
then press the PLAY ► key of deck B.
Continuous playback with one cassette (deck A or B)
• Insert a recorded cassette into one cassette holder as
indicated above.
• Close the cassette holder.
• Select CD with the reverse-mode selector 10.
If desired, switch on the Dolby NR system 9.
• Select the playback direction with the CHANGE SIDE key (of
deck A or B)
• Press PLAY ► (on deck A or B).
• The selected deck keeps playing both cassette sides (up to a
maximum of six times) until you press STOP ■ on the
playing deck.
FAST WINDING/REWINDING OF A TAPE
Use the FORWARD ►► keys for fast winding in the tape
travel direction.
Use the BACKWARD ◄◄ keys for fast winding in the
opposite direction to that in which the tape is travelling.
A flashing (4x per second) green indicator above the PLAY
keys indicates the winding action.
DIGITAL TAPE COUNTER
The digital counter is used for deck A and deck B.
COUNTER RESET
• The counter can be reset to 0000 by pressing the
COUNTER RESET key.
• The counter of the selected deck will be reset. The status of
the counter of the other deck will be kept in the memory.
• The counter will also be reset:
- when the cassette holder is closed;
- every time the play direction is reversed (automatically or
manually).
COUNTER SELECT
• You can display the counter of deck A or of deck B with the
COUNTER SELECT key
• The indication DECK A or DECK B will light up on the
display.
* •

OPERATION <i|)
RECORDING (deck B)
Recording on both sides of a cassette
• Open the cassette holder 11 by pressing OPEN 12.
• Insert a cassette which is not protected against recording, with the open side facing downwards.
• Close the cassette holder.
• If desired, switch on the Dolby NR system 9.
• Select on your amplifier the sound source from which you wish to record.
• Press PAUSE 14 to set the deck in the record- pause mode.
• Select 3 with the reverse mode selector 10.
• Allow the unit you wish to record from to play and meanwhile adjust the recording level with the REC
LEVEL control 8 so that the recording level indicators in the display light up during passages with an
average volume up to 0 dB. An excess of up to +2 is normal during peaks.
• Differences between the left and the right channel can be corrected with the REC BALANCE control 6.
• Select the tape travel direction with the CHANGE SIDE key. The direction will be indicated on the
display (FRONT or BACK).
• Press the RECORD key to start the recording. The display shows RECORD.
• Check the recording level at intervals and adjust it gradually if required.
• You can interrupt the recording temporarily by pressing the PAUSE key. Press RECORD to continue
recording.
• The deck stops automatically when both sides of the cassette are full.
• Press the STOP ■ key to stop recording at an earlier point.
"oj
c
UJ
Recording on one side of a cassette
• If you only want to record on one side of the cassette, select CT with the reverse mode selector 10.
Copyright
Recording or copying is only authorised if there is no violation of
copyright or other rights of third parties.
Note for users in the U.K.
Recording and playback of material may require consent. See Copy
right Act 1956 and The Performers' Protection Acts 1958 to 1972.
RECORD MUTE (deck B)
You can obtain a 4-second silent recording by pressing
RECORD MUTE 14 once during recording.
If you keep RECORD MUTE pressed, the silent recording
will last as long as you keep the key pressed down.
Undesired passages (announcements etc.) can thus be
omitted during recording.
During record mute the MUTE flag on the display lights up.
Note: Record mute only works during recording and not
during dubbing (NORMAL, FAST or CD SYNC.).
DUBBING (FROM DECK A TO B)
Open the cassette holders 3 (deck A) and 11 (deck B) by
pressing the OPEN buttons 2 and 12.
Insert the recorded cassette into the cassette holder of deck
A with the open side facing down; then close the cassette
holder.
Insert a cassette which is not protected against recording
into the cassette holder of deck B with the open side facing
down and close the cassette holder.
Select the tape direction for deck A and B with the
respective CHANGE SIDE key 13.
Select the required reverse mode (~ or ID) with the reverse
mode selector 10 to make a single or double-sided dubbing.
Start the dubbing process by pressing one of the DUBBING
keys 15:
NORMAL, for dubbing at normal speed,
the display shows DUBBING.
FAST, for clubbing at double speed,
the display shows HIGH SPEED DUBBING.
An original cassette recorded with Dolby Noise Reduction
will always produce a copy with Dolby NR.
Press STOP ■ to stop dubbing at any desired point.
Both decks then stop simultaneously.
Note: During dubbing (from deck A to B at normal or double
speed) it is not possible to adjust the recording and balance
level.
While dubbing you can listen to any other source.

@) ADVANCED OPTIONS
SYSTEM ASPECTS
CD SYNCHRO DUBBING
m
3
<2.
If the ESI BUS sockets of a CD player are connected (directly
or via your HiFi system) to the ESI BUS sockets of your
cassette deck, you can synchronise the start of a recording
with the start of a CD or CD programme as follows:
• Insert a cassette in deck B and prepare your CD player for
playback.
• If desired, switch on the Dolby NR system 9.
• Press the CD SYNC key 15.
- The CD will start playing.
• The CD SYNC and RECORD indications on the display of
your deck will start flashing
• You can now adjust the recording level with the REC LEVEL
control 8 so that the recording level indicators in the display
light up during passages with an average volume up to 0 dB.
An excess of up to +2 is normal during peaks.
• Differences between the left and the right channel can be
corrected with the REC BALANCE control 6.
• After adjusting the recording level select the tape travel
direction with the CHANGE SIDE key on deck B and press
RECORD 14 to start the recording.
The CD SYNC and RECORD indications will light up on the
display.
- The CD player returns to the beginning of the disc (or
programme) and enters the pause mode.
- Recording starts and after a 7-second delay the CD will start
playing. This delay is to ensure that the recording does not
start until after the leader tape.
- 4-second pauses will be inserted between the CD tracks.
- CD synchro dubbing will stop when one or both sides of the
cassette are full or when the CD reaches the end.
• You may also press the STOP key on the CD player or deck
to stop dubbing at an earlier stage.
Note: When the standby mode is selected during CD
synchro dubbing, the dubbing will be cancelled.
CD dubbing without a given tape length
If you have selected and the end of the tape is reached in
the middle of a track, the CD player repeats that particular
track from the beginning on the second side.
CD dubbing with a given tape length
If you have chosen the tape length with EDIT on the CD-player,
the display shows which tracks fit on one side of the cassette.
A blank part will be recorded after the last track and the
following tracks will be recorded on the second side of the
cassette (provided ID was selected).
ENHANCED SYSTEM INTELLIGENCE
If the cassette deck is connected via the ESI BUS sockets
to the ESI BUS sockets of a HiFi system (e.g. the PHILIPS
900 series) and when the AUTO SELECT function on your
amplifier is activated, there will be an additional internal
communication between the different elements in your
system.
The whole system can be operated by the system remote
control through the sensor of the amplifier.
In addition, the functions AUTOMATIC SOURCE SELEC
TION and AUTOMATIC STOP as mentioned below are then
accessible.
AUTOMATIC SOURCE SELECTION
If the AUTO SELECT function on the amplifier is activated, the
cassette deck will automatically be selected as soon as you
press the CD SYNC, or PLAY ► keys on your deck
AUTOMATIC STOP
If the AUTO SELECT function on the amplifier is activated, the
cassette deck will automatically stop playing as soon as an
other source is selected.
e.g. When you select TUNER with the source selection knob
on your amplifier while listening to your cassette deck, the
deck will be stopped.
STANDBY
Switching your cassette deck to standby can only be done
via the system remote control.
First select TAPE on the remote control and then briefly
press the STANDBY key.
The cassette deck will be switched to standby.
If the standby key is kept pressed for more than 1 second
the whole system will be switched to standby.
All light indicators will be switched off with the exception of
the standby LED on the amplifier.
If AUTO SELECT is activated, the indicator of this key will
also light up during standby.
Note: If the whole system is switched to standby when a re
cording is active, the recording (or dubbing) will be cancelled.
By selecting the TAPE source on the amplifier or on the sys
tem remote control the cassette deck will be activated
again.
The cassette deck will also be activated again as soon as
you press the DUBBING (NORMAL, FAST, CD SYNC.),
STOP ■, PLAY ►, FORWARD ►►, BACKWARD ◄◄,or
PAUSE keys
SYSTEM ASPECTS GENERAL INFORMATION @)
SYSTEM TIMER
By connecting the cassette deck to a timer, you can start and
stop playback or recording automatically.
• If the tuner in your Philips HiFi 900 system is equipped with
a timer (e.g. FT930), make sure that the ESI BUS
connections are made.
• Set the timer and switch on the cassette deck.
• Prepare the cassette deck for playback or recording (see
PLAYBACK or RECORDING chapter)
• Stop both decks.
• At the time set on the timer, deck B will start playback or
recording, provided there is a tape in deck B.
• If there is no tape in deck B, deck A is automatically selected
and will start playback at the time set on the timer.
REMOTE CONTROL
The following cassette deck functions can be operated via your
system remote control {Philips 900 series), provided the
correct ESI BUS connections are made:
- TAPE - source selection
- DECK A/B - for selecting deck A or B
- ►► - for winding the tape in the playing direction
for winding the tape in the opposite direction
- PLAY - for starting playback
- RECORD - for starting recording immediately
- STOP - for stopping recording/playback
- PAUSE - for interrupting recording/playback
- MODE - for selecting the playing direction for both decks
- STANDBY - for selecting standby mode
• When using your system remote control, first press TAPE to
select the tape mode.
• Then select DECK A or DECK B and subsequently press the
key of the desired tape function.
MAINTENANCE
• Do not leave the unit or cassettes for any length of time in
direct sunlight or other places where high temperatures can
occur, such as in the vicinity of heating apparatus.
• Do not expose the equipment to humidi^ or rain.
• A chamois leather slightly moistened with water is sufficient
for cleaning the cabinet.
• Do not use cleaning agents containing alcohol, spirits,
ammonia or abrasives.
Compact Cassettes
• The tape in the cassette is attached at both ends with leader
tape. Nothing will be recorded for 6 to 7 seconds at the be
ginning (and at the end) of the tape.
Accidental erasure of a recording
can be prevented by breaking the
small tab in the top left-hand
corner on the back of the
cassette.You can then no longer
record on this side. This
protection can be removed by
covering the hole with a small
piece of adhesive tape.
Store your cassettes after use in the box provided. Keep the
cassettes at room temperature and avoid leaving them in the
sun or too close to magnets and transformers of e.g.
recorders, radios, TVs and loudspeakers.
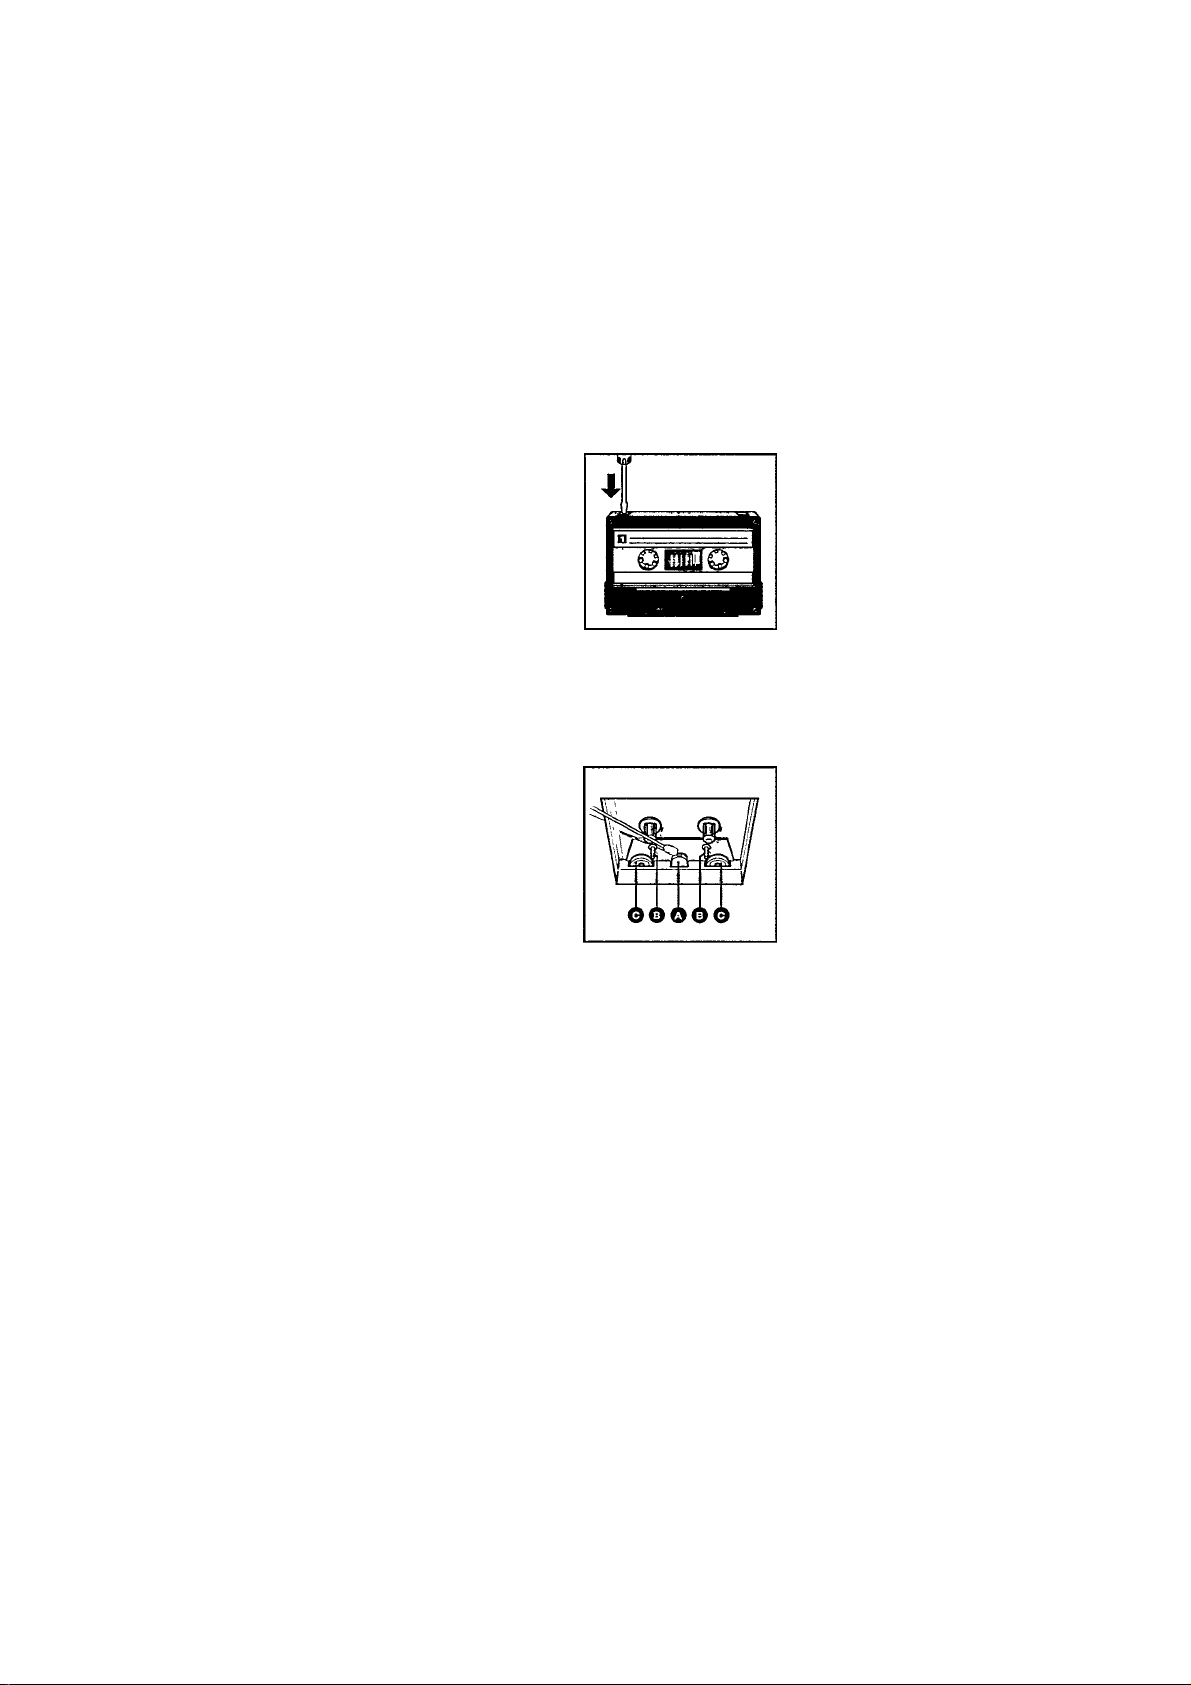
Recorder maintenance
- After approximately 15 hours of
use the heads ®, the capstans
(D and the pressure rollers ©
must be cleaned.
- You can clean them with a
■ cotton bud dipped in alcohol.
Make sure that the unit is not
connected to the mains.
- The drive mechanism must
NOT be lubricated!
s:
"5>
c
Ш
TECHNICAL SPECIFICATIONS
TAPE TRANSPORT: Twin solenoid electronic autoreverse
Cassette system:
Motor type:......................................................DC/DC servo 2x
Tape travel speed:.................................................. 4.76 cm/sec.
Speed tolerance (max. speed variation):
Wow and flutter:
HEADS: Super-hard Metal Alloy recording playback heads
Frequency response according to: I EC NAB
for metal tape (type IV): 40-16,000 Hz 40-17,000 Hz
for Cr02 tape (type II): 40-16,000 Hz 40-17,000 Hz
for normal tape (type I): 40-15,000 Hz 40-16,000 Hz
S/N ratio (without Dolby NR) acc. to: lEC/DIN NAB
for metal tape (type IV): 58 dB 59 dB
for Cr02 tape (type II): 58 dB 59 dB
for normal tape (type I): 57 dB 58 dB
Improvement of S/N ratio
with Dolby В NR at 5 kHz:...................................................... 10 dB
with Dolby C NR at 1 kHz:...................................................... 18 dB
Channel separation at 1 kHz:
FM pilot suppression:
Distortion at max. level (СГО2):..........................................< 1.8%
...............................
..............................................
.....................................................
..............................................................
Analog Compact Cassette
..................................
0.1 % JIS WRMS
and dual-gap ferrite erase head
< 2%
CONNECTION SOCKETS
Line in. Cinch-type:
Line out, Cinch-^pe:
Remote control:
.......................................
...............................
............................................
450 mV (Zo=2.5 kOhm)
75 mV at 47 kOhm
ESI BUS, 2 x cinch
POWER SUPPLY
Mains voltages:
Mains frequencies:
Power consumption:...........................................................15 W
Electrical requirements:
......................................
...................
...........................................................
50 and 60 Hz without conversion
according to type plate
CABINET, GENERAL
Material, finish:
Dimensions (w x h x d):....................435 x 140 x 300 mm approx.
Weight:..................................................................................6 kg
Accessories:................................................2 pairs Cinch Cable
35 dB
30 dB
........................................
metal and polystyrene
These specifications are subject to modification without notice
lEC 65

NOTES
58

@) Australia
(Nz) New Zealand
Guarantee and Service valid for Australia
The benefits given to the purchaser by this warranty are in
addition to all other rights and remedies, which, under the
Trade Practices Act or other Commonwealth or State law, the
purchaser or owner has in respect of the product.
The Philips product carries the following warranties:
- C-series HiPi-systems 12 months.
- Compact Disc Players: 12 months.
- Home Audio Systems: 6 months.
- Clock radios, portable radios, cassette recorders, cassette
players and radio recorders: 90 days.
Any defect in materials or workmanship occurring within the
specified period from the date of delivery, will be rectified free
of charge by the retailer from whom this product was
purchased.
Note: Please retain your purchase docket to assist prompt
service.
Conditions of this warranty
1. All claims for warranty service must be made to the retailer
from whom this product was purchased. All transport
charges incurred in connection with warranty service or
replacement will be paid by the purchaser.
2. These warranties do not cover batteries and extend only to
defects in materials or workmanship occurring under normal
use of the product where operated in accordance with our
instructions.
Philips Consumer Products Division,
Technology Park
Figtree Drive, Australia Centre
Homebush 2140
New South Wales
Guarantee and Service for New Zealand
Thank-you for purchasing this quality Philips product.
Philips New Zealand Ltd guarantees this product against
defective components and faulty workmanship for a period of
12 months. Any defect in materials or workmanship occurring
within 12 months from the date of purchase subject to the
following conditions will be rectified free of charge by the
retailer from whom this product was purchased.
Conditions
1. The product must have been purchased in New Zealand. As
proof of purchase, retain the original invoice or cash receipt
indicating the date of purchase.
2. The guarantee applies only to faults caused by defective
components, or faulty workmanship on the part of the
manufacturer.
3. The guarantee does not cover failures caused by misuse,
neglect, normal wear and tear, accidental breakage, use on
the incorrect voltage, use contrary to operating instructions,
or unauthorised modification to the product or repair by an
unauthorised technician.
4. Reasonable evidence (in the form of a sales docket or com
pleted guarantee card) must be supplied to indicate that the
product was purchased no more than 12 months prior to the
date of your claim.
5. In the event of a failure. Philips shall be under no liability for
any injury, or any loss or damage caused to property or
products other than the product under guarantee.
This guarantee does not prejudice your rights under common
law and statute, and is in addition to the normal responsibilities
of the retailer and Philips.
How to claim
Should your Philips product fail within the guarantee period,
please return it to the retailer from whom it was purchased. In
most cases the retailer will be able to satisfactorily repair or
replace the product.
However, should the retailer not be able to conclude the
matter satisfactorily, or if you have other difficulties claiming
under this guarantee, please contact
The Guarantee Controller
Philips New Zealand Ltd.
B P.O. Box 41.021
Auckland
0(09) 84 94160
fax Q (09) 84 97 858
59

Printed in Portugal
 Loading...