

FC8820, FC8810

FC8820
FC8820
Wheels stuck
ݓઁሂ
Top cover or dust container not placed properly
רۆࠋࠦӧ٦ݾ
Bumper stuck
ߓԎሑᇆሂ
Robot lifted up from floor
՚ֽϴุఓᇊୃስײᆋ༏ӧచ
Colour of floor too dark
ֽϴဂ೨ขτ
Battery not inserted properly / Charging error (switch is off)
ԁሑݾԍմ༆IJܵၜܵтij
5
6
4
3
2
1
7
8
9
1516
13
12
14
11
10
17
18
19
21
20
22
24
25
26
23
2928
27
30


English 6
Čeština 31
Lietuviškai 57
Magyar 83
Polski 109
Română 137
Slovenščina 163
2
1
3
45
6
English
Introduction
Congratulations on your purchase and welcome to Philips! To fully benefit
from the support that Philips offers, register your product at
www.philips.com/welcome.
General description
1 Handle of dust container lid
2 Dust container lid
3 Filter
4 Dust container
5 Top cover
6 Error codes table
7 Fan
8 Bumper
9 Docking station sensor
10 Power switch (to switch the robot on or off)
11 Front wheel
12 Side brush shafts
13 Drop-off sensors
14 Wheels
15 Battery cavity
16 Suction opening
17 Side brushes
18 Rechargeable battery
19 Battery cavity cover
20 Fixation blocks for dry wipes
21 Dry wipe holder
22 Dry wipes
23 Battery holder
24 Remote control
25 Charging cord
26 Pointer
27 Virtual wall unit (FC8820)
28 Docking station
29 Adapter
30 Small plug
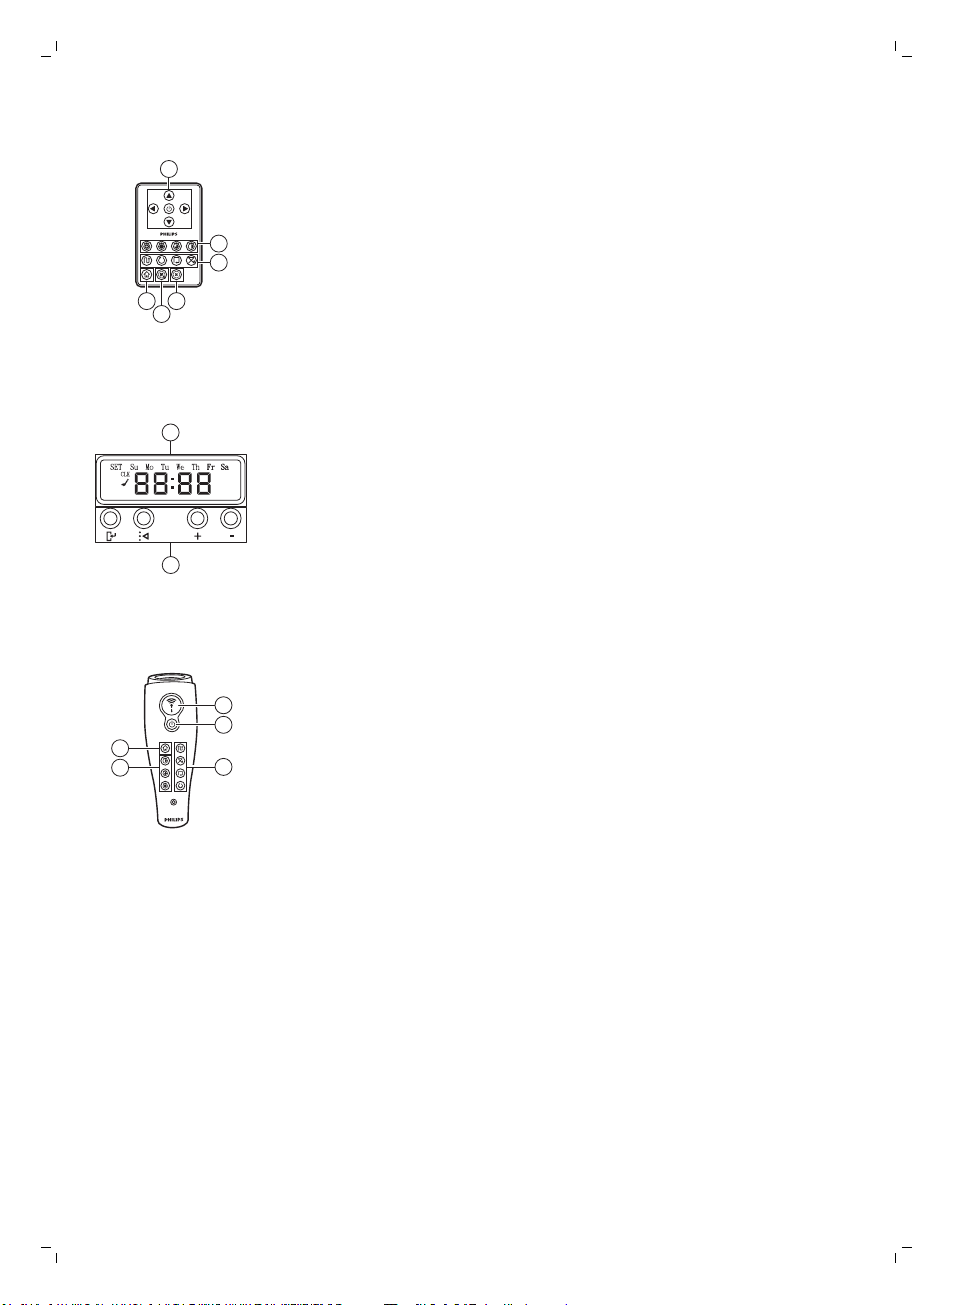
Display and remote control
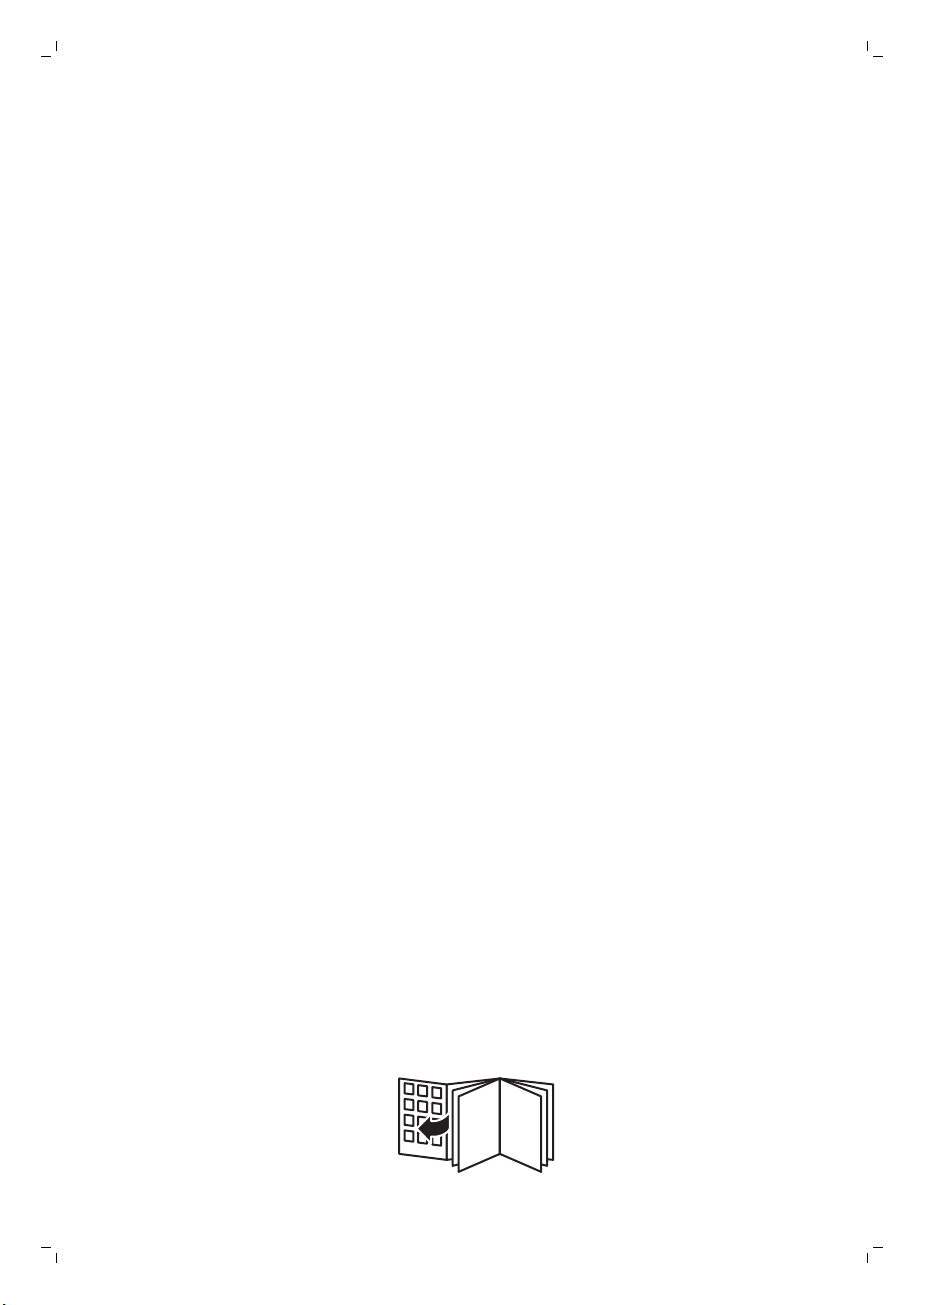
Remote control (FC8820)
1 Navigation buttons and start/stop
2 Cleaning time buttons
3 Cleaning mode buttons
4 Fan speed buttons
5 Docking button
English

Remote control (FC8810)
1
2
3
46
5
1
2
5
4
3
2
1
1 Navigation buttons and start/stop
2 Cleaning time buttons
3 Cleaning mode buttons
4 Fan off button
5 Fan on button
6 Docking button
Control panel of docking station
1 Display with time, day and programming indications
2 Adjusting and setting buttons
Pointer (FC8820)
1 Pointer button
2 On/off button
3 Cleaning mode buttons
4 Cleaning time buttons
5 Docking button
English
7
How your robot works
What your robot cleans
This robot is equipped with features that make it a suitable cleaner to help
you clean the floors in your home.
The robot is especially suitable for cleaning hard floors, such as wooden,
tiled or linoleum floors. It may experience problems cleaning soft floors,
such as carpet or rugs. If you use the robot on a carpet or rug, please stay
close by the first time to see if the robot can deal with this type of floor. The
robot also needs supervision when you use it on very dark or shiny hard
floors.

8
English
How your robot cleans
Cleaning system
The robot has a 3-stage cleaning system to clean your floors efficiently.
-
The two side brushes help the robot clean in corners and along walls.
They also help to remove dirt from the floor and move it towards the
suction opening.
-
The suction power of the robot picks up loose dirt and transports it
through the suction opening into the dust container.
-
The robot comes with a dry wipe holder that allows you to clean your
hard floor even more thoroughly with dry wipes.
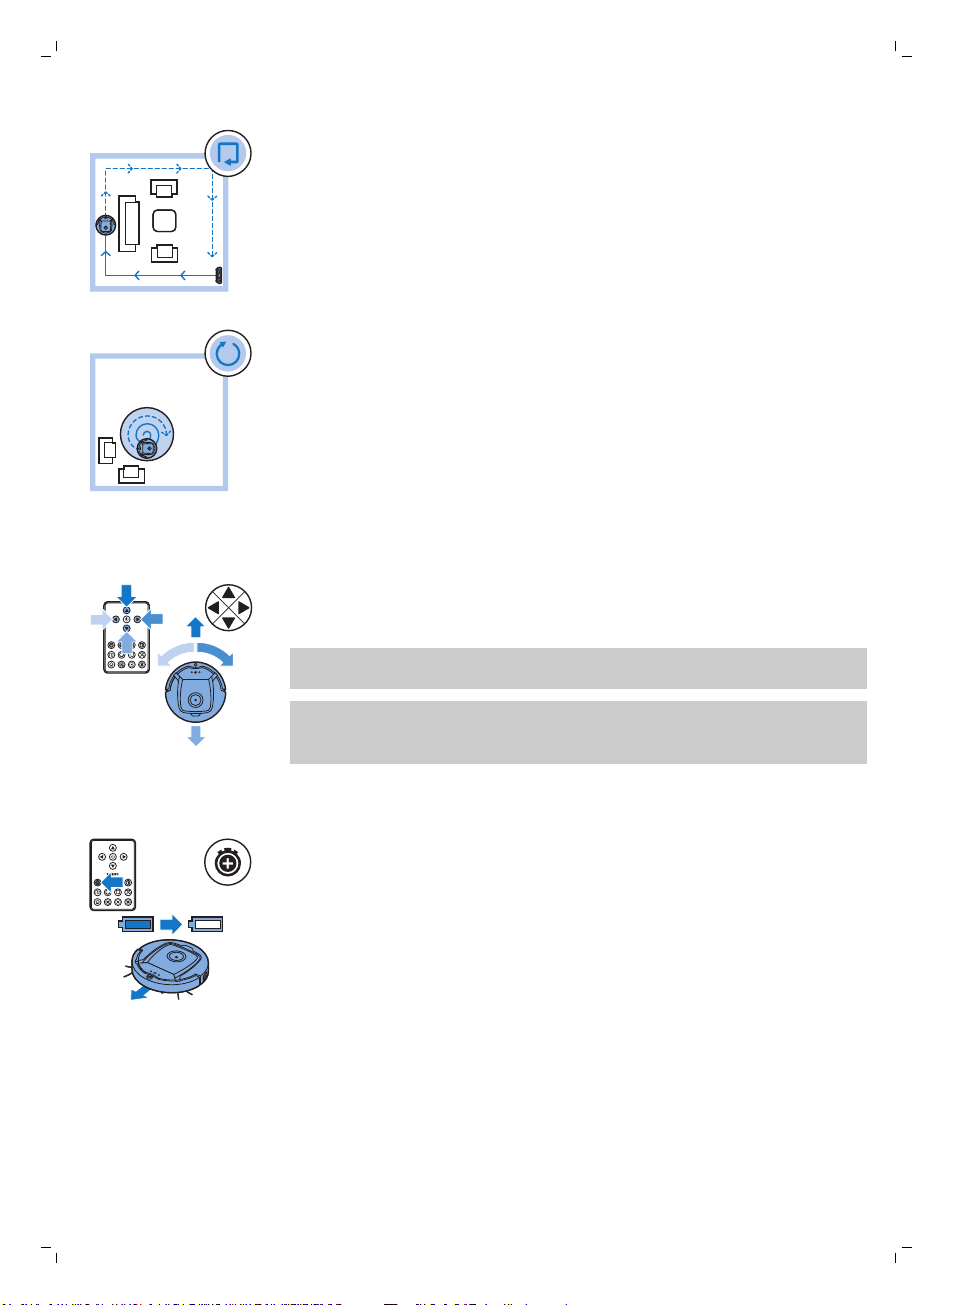
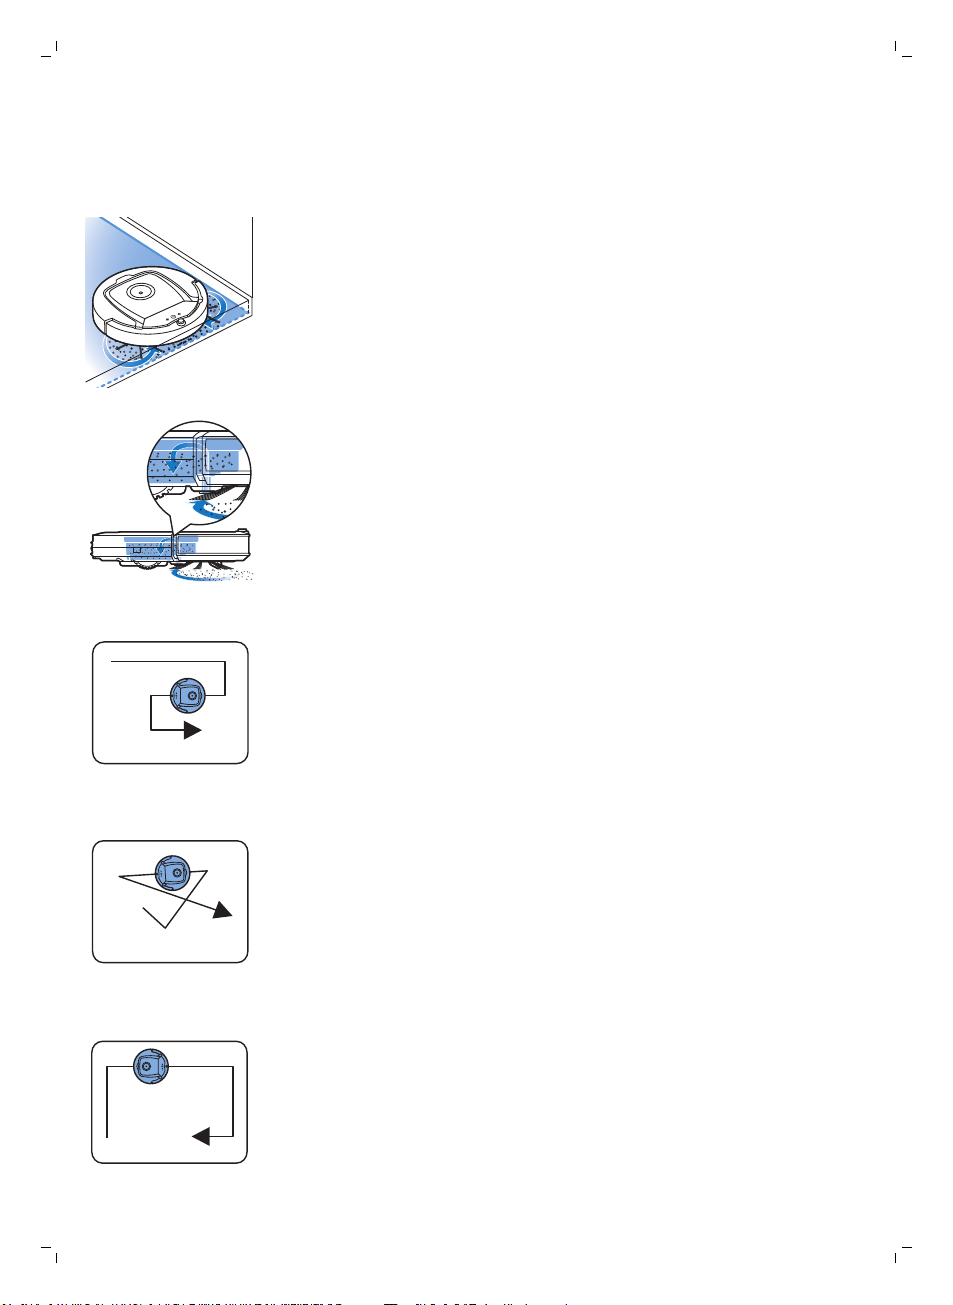
Cleaning patterns
In its auto cleaning mode, the robot uses an automatic sequence of cleaning
patterns to clean each area of the room optimally. The cleaning patterns it
uses are:
1 Z-pattern or zigzag pattern
2 Random pattern
3 Wall-following pattern
4 Spiral pattern
In its auto cleaning mode, the robot uses these patterns in a fixed
sequence:z-pattern, random pattern, wall-following pattern, and spiral
pattern.
When the robot has completed this sequence of patterns, it starts moving in
Z-pattern again. The robot continues to use this sequence of patterns to
clean the room until the rechargeable battery runs low, or until it is switched
off manually.
If the robot detects a particularly dirty area during its cleaning run, it
switches to spiral mode and switches to turbo fan speed (FC8820 only) to
ensure thorough dirt removal.
Note: You can also select each mode individually by pressing the
appropriate button on the remote control or the pointer (FC8820 only). The
manually selected modes are only active for a couple of minutes. After that,
the robot switches back to auto-cleaning mode.
For more details, see chapter 'Using your robot', section 'Cleaning modes'.
How your robot avoids height differences
The robot has three drop-off sensors in its bottom. It uses these drop-off
sensors to detect and avoid height differences such as staircases.
Note: It is normal for the robot to move slightly over the edge of a height
difference, as its front drop-off sensor is located behind the bumper.
English
9
Caution: In some cases, the drop-off sensors may not detect a staircase or
other height difference in time. Therefore monitor the robot carefully the
first few times you use it, and when you operate it near a staircase or
another height difference. It is important that you clean the drop-off
sensors regularly to ensure the robot continues to detect height
differences properly (see chapter ' Cleaning and maintenance' for
instructions).
Before first use
Mounting the side brushes
1 Unpack the side brushes and place the robot upside down on a table or
on the floor.
2 Push the side brushes onto the shafts on the bottom of the robot.
Note: Make sure you attach the side brushes properly. Press them onto
the shaft until you hear them lock into position with a click.
1
2
this side up
10
English
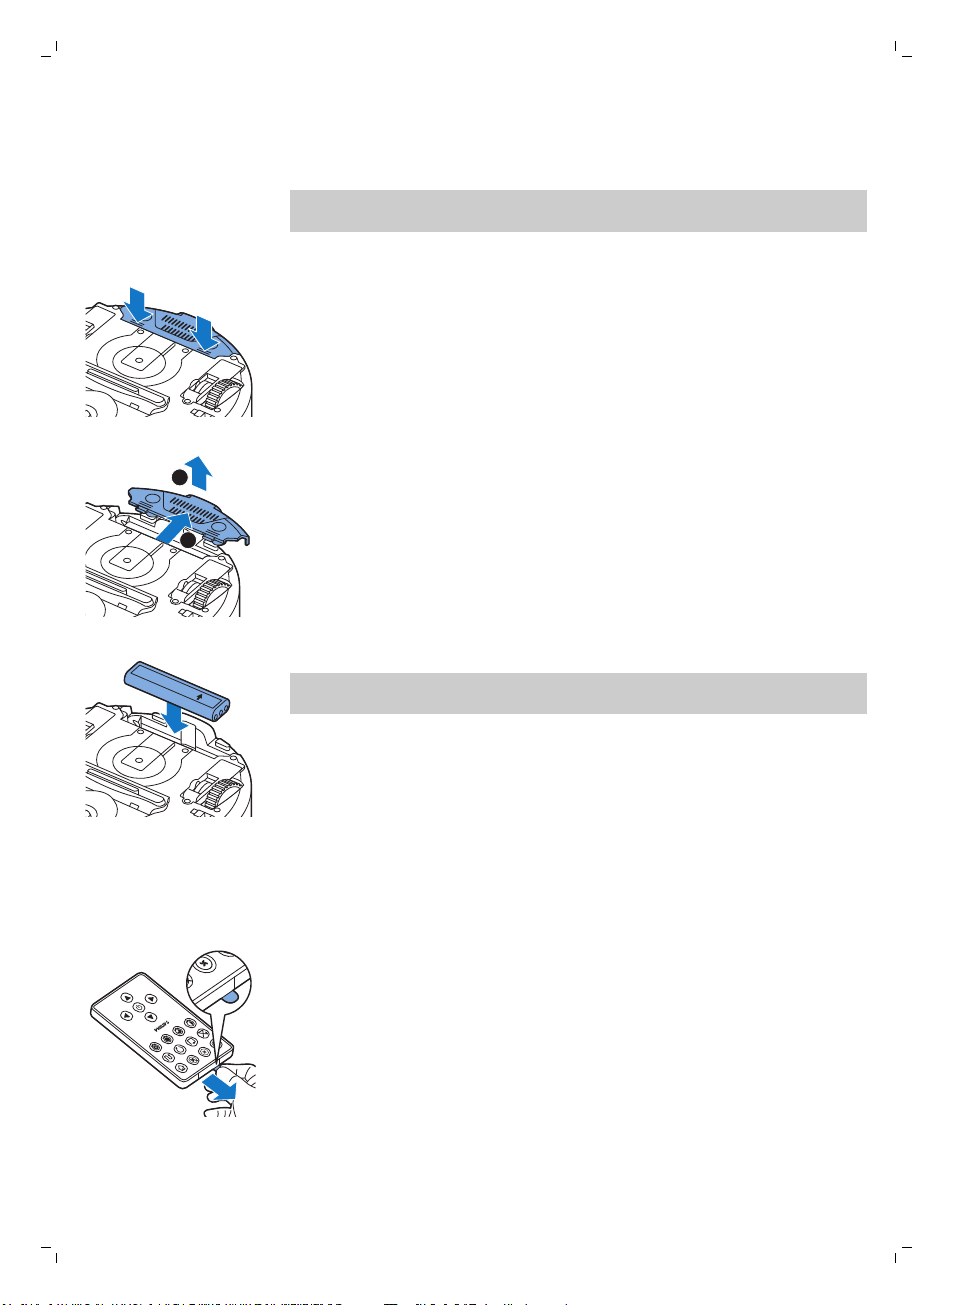
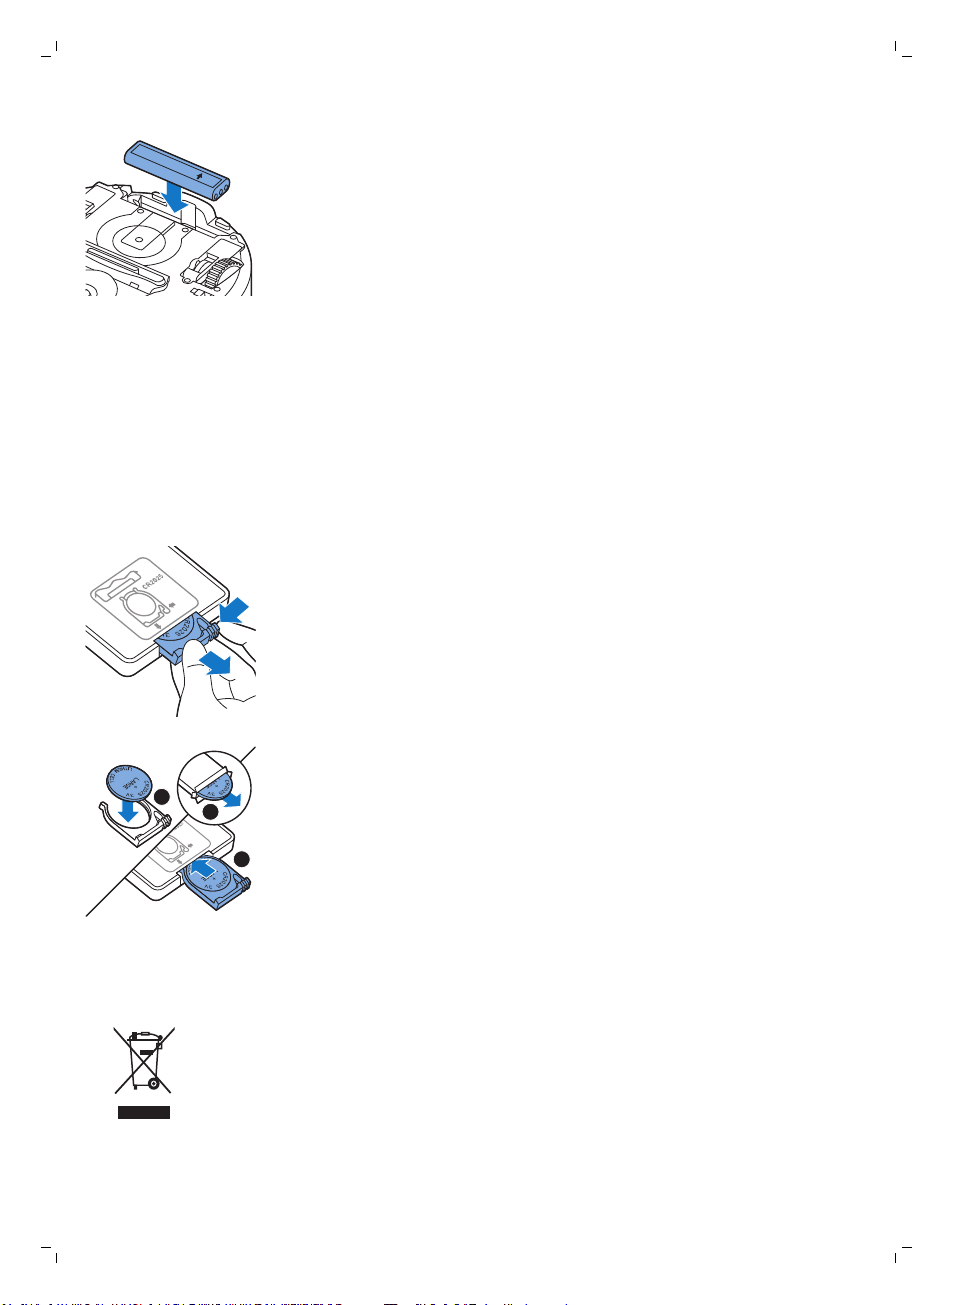
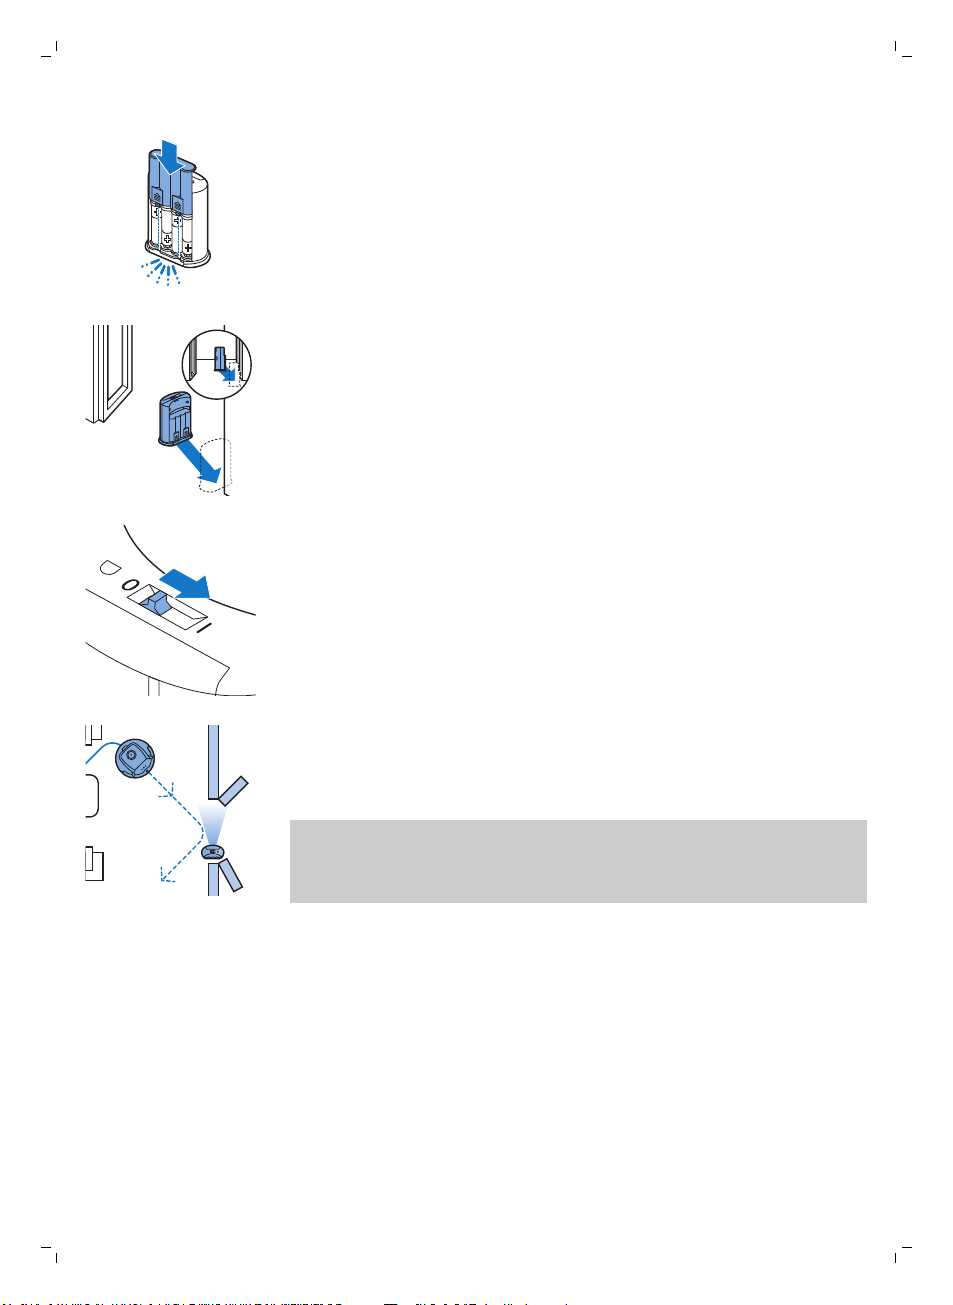
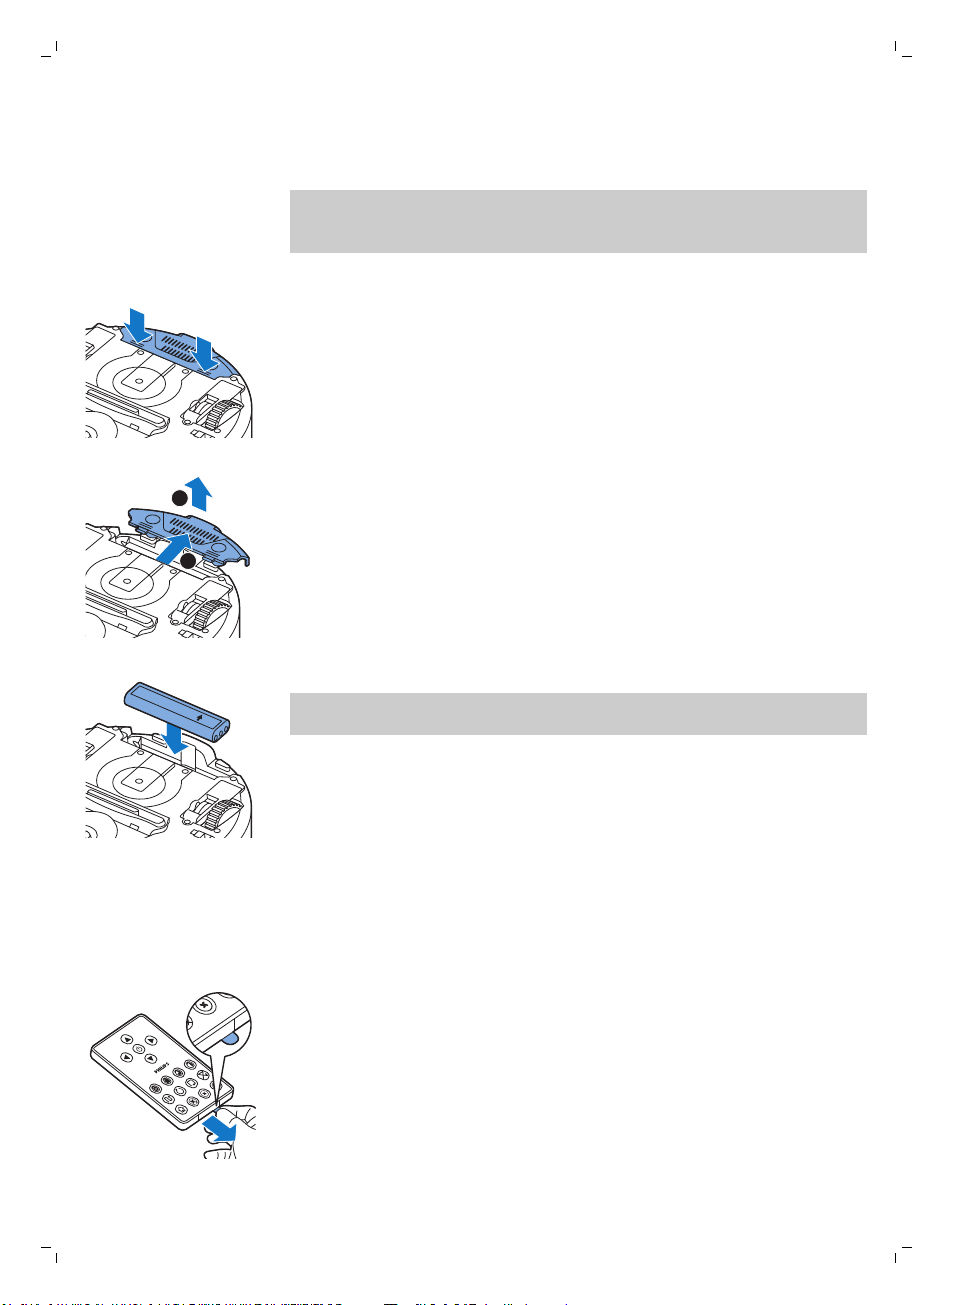
Inserting the rechargeable battery
You have to insert te rechargeable battery before use.
Note: Please handle the rechargeable battery with care. Avoid dropping the
battery. This will ensure maximum lifetime for your battery.
1 Press the ribbed sections on the battery cavity cover to unlock it.
2 Slide te battery cavity cover off the robot.
3 Remove the plastic from the rechargeable battery.
4 Insert the rechargeable battery into the battery cavity.
Note: Make sure that the print on the battery points upwards and that the
connectors point in the right direction.
5 Slide the battery cavity cover back onto the robot.
Removing the tag from the remote control
The remote control works on a CR2025 coin-shaped battery. This battery is
protected with a protection tag that has to be removed before use.
1 Pull the battery protection tag out of the battery compartment of the
remote control. Now the remote control is ready for use.

Preparing for use
1
2
100 cm
30 cm
80 c
m
Installing the docking station
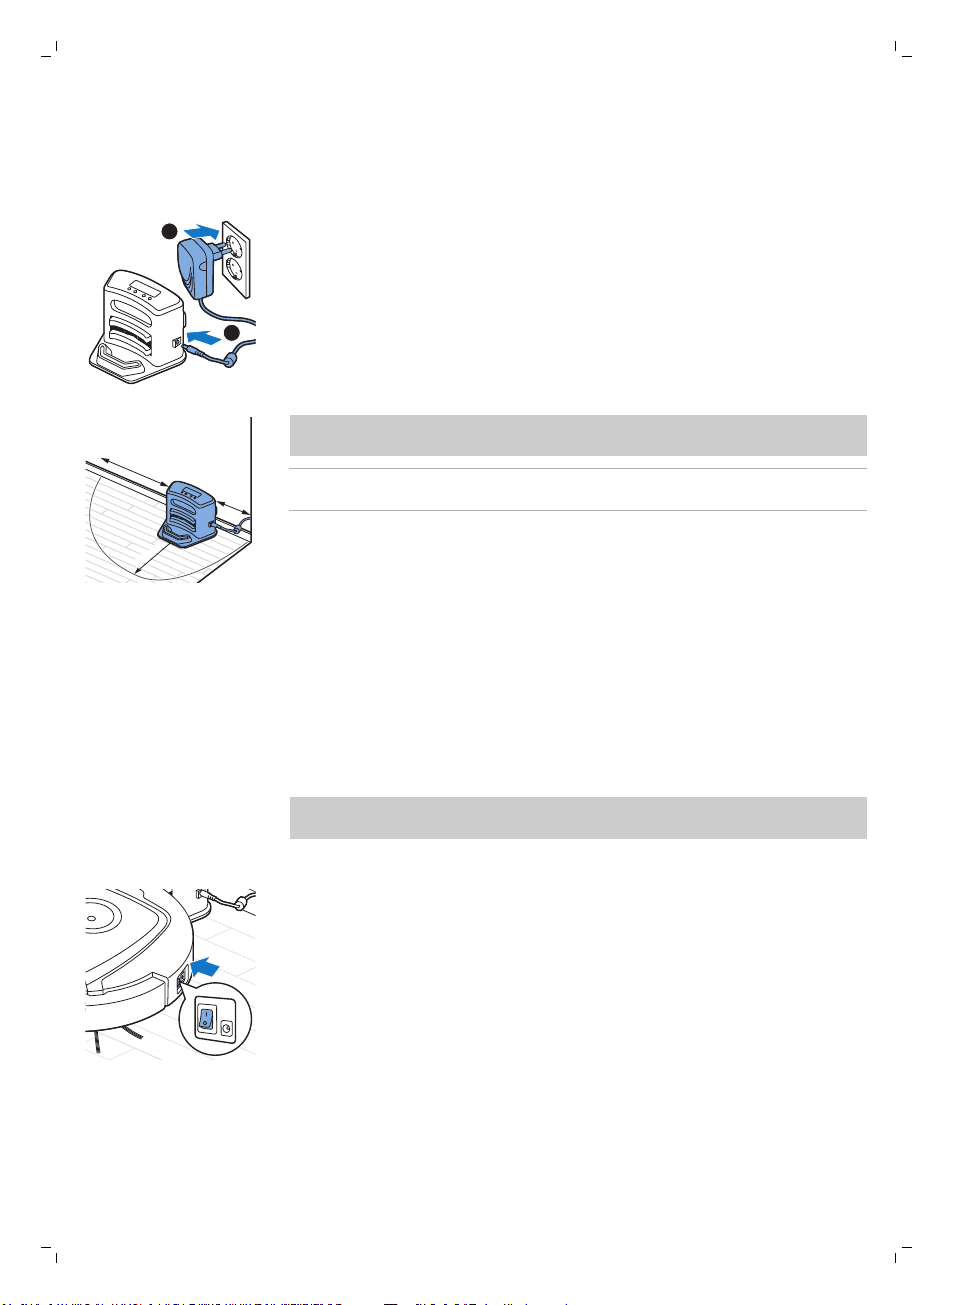
1 Insert the small plug of the adapter into the socket on the docking station
(1) and insert the adapter into the wall socket (2).
-
The display of the docking station comes on.
2 Place the docking station on a horizontal, level floor against the wall.
Note: Make sure that there are no obstacles or height differences 80 cm
in front, 30 cm to the right and 100 cm to the left of the docking station.
Tip: To ensure the docking station stays firmly in the selected spot, fasten
it to the wall with screws or with two strips of double-sided tape.
Charging
When charging for the first time and when the rechargeable battery of the
robot is empty, the charging time is four hours.
Your robot can be charged in two ways:
-
On the docking station, either manually or automatically during use;
-
By connecting the robot directly to the mains.
English
11
Note: When the rechargeable battery is fully charged, your robot can clean
for up to 120 minutes
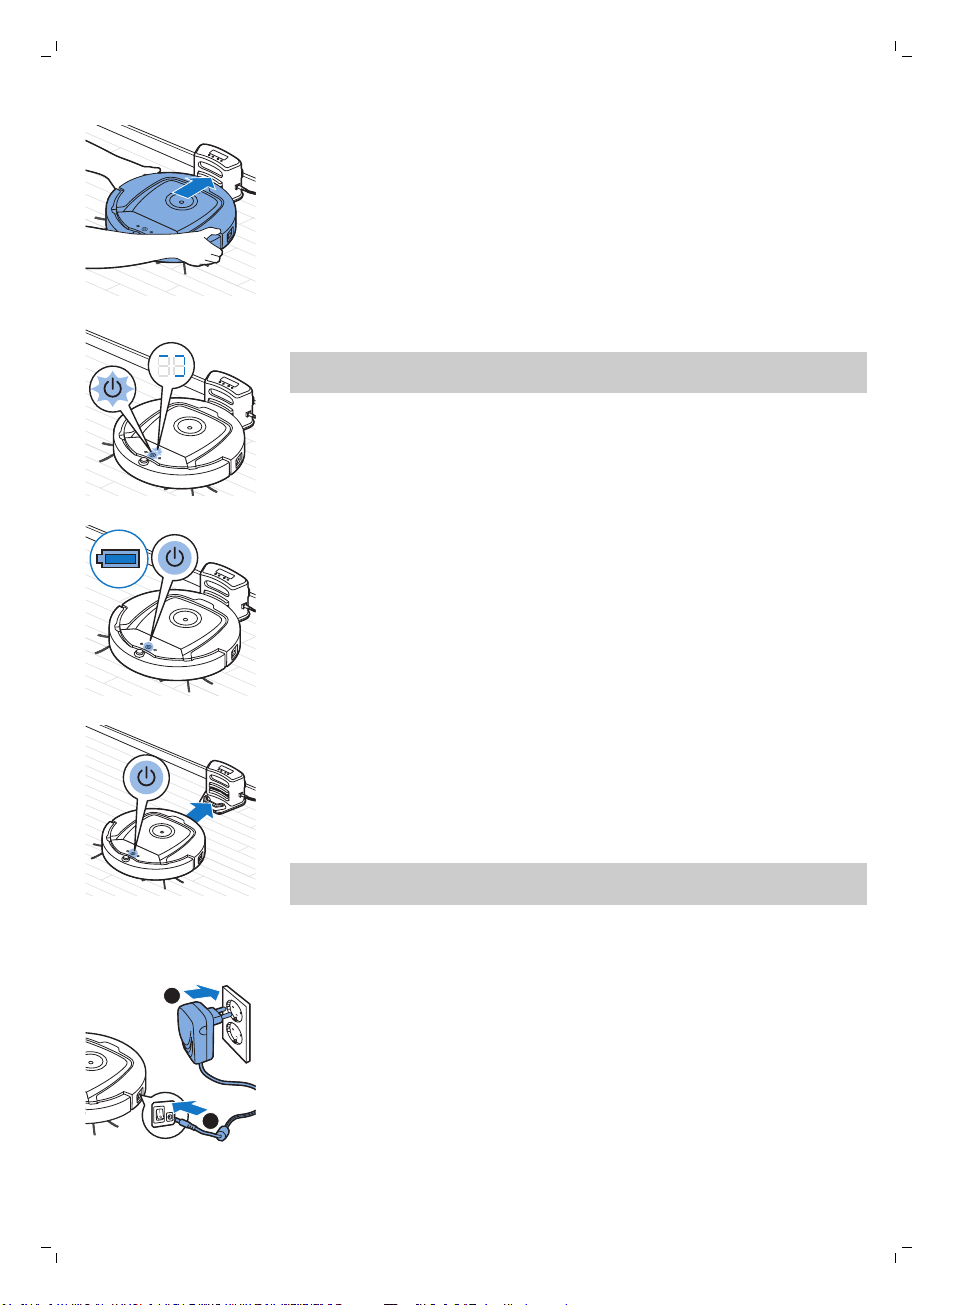
Charging on the docking station
1 Press the power switch to switch on the robot.
1
2
12
English
2 Place the robot on the plugged-in docking station.
3 The start/stop button starts flashing.
Note: Because this is the first time you charge the robot, the display of
the robot shows the booting indicator.
4 When the rechargeable battery is fully charged, the start/stop button
lights up continuously.
Charging automatically during use
1 When the robot has finished cleaning or when only 15% of the battery
power remains, it automatically searches for the docking station to
recharge. When the robot searches for the docking station, the light in the
start/stop button turns orange.
2 When the rechargeable battery is fully charged, the start/stop button
lights up continuously.
Note: The robot only searches for the docking station automatically when it
started cleaning from the docking station.
Charging directly
1 Press the power switch to switch on the robot.
2 Insert the small plug of the adapter into the socket on the robot (1). Insert
the adapter into a wall socket (2).
3 When the robot is connected to the mains correctly, the start/stop button
starts flashing slowly. This indicates that the robot is charging.
4 When the rechargeable battery is fully charged, the start/stop button
lights up continuously.
from the mains
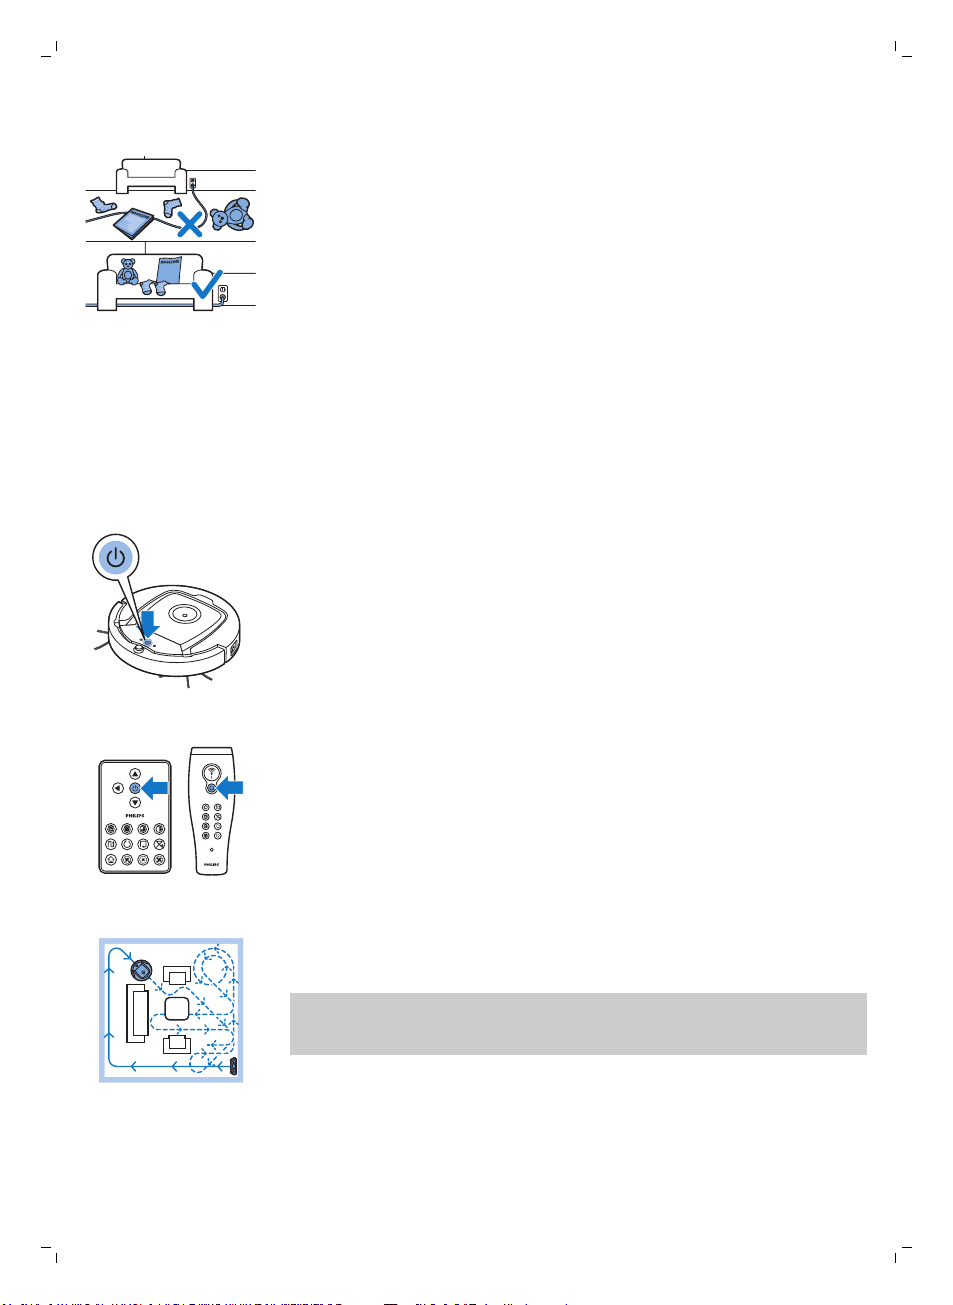
Preparing the room for a cleaning run
Before you start the robot on its cleaning run, make sure that you remove all
loose and fragile objects from the floor. Also remove all cables, wires and
cords from the floor.
Using your robot
Starting and stopping
1 Set the power switch on the side of the robot to the 'on' position.
2 Press the start/stop button.
-
You can press the start/stop button on the robot.
English
13
-
You can also press the start/stop button on the remote control or the
pointer (FC8820 only)
3 The start/stop button is continuously on and the robot starts cleaning.
4 The robot cleans in the auto-cleaning mode until its battery runs low. In
the auto-cleaning mode, it follows repeated sequences of Z-pattern,
random, wall-following and spiral patterns.
Note: To select an individual mode, press one of the mode buttons on
the remote control. See section 'Cleaning mode selection' for more
details.
14
English
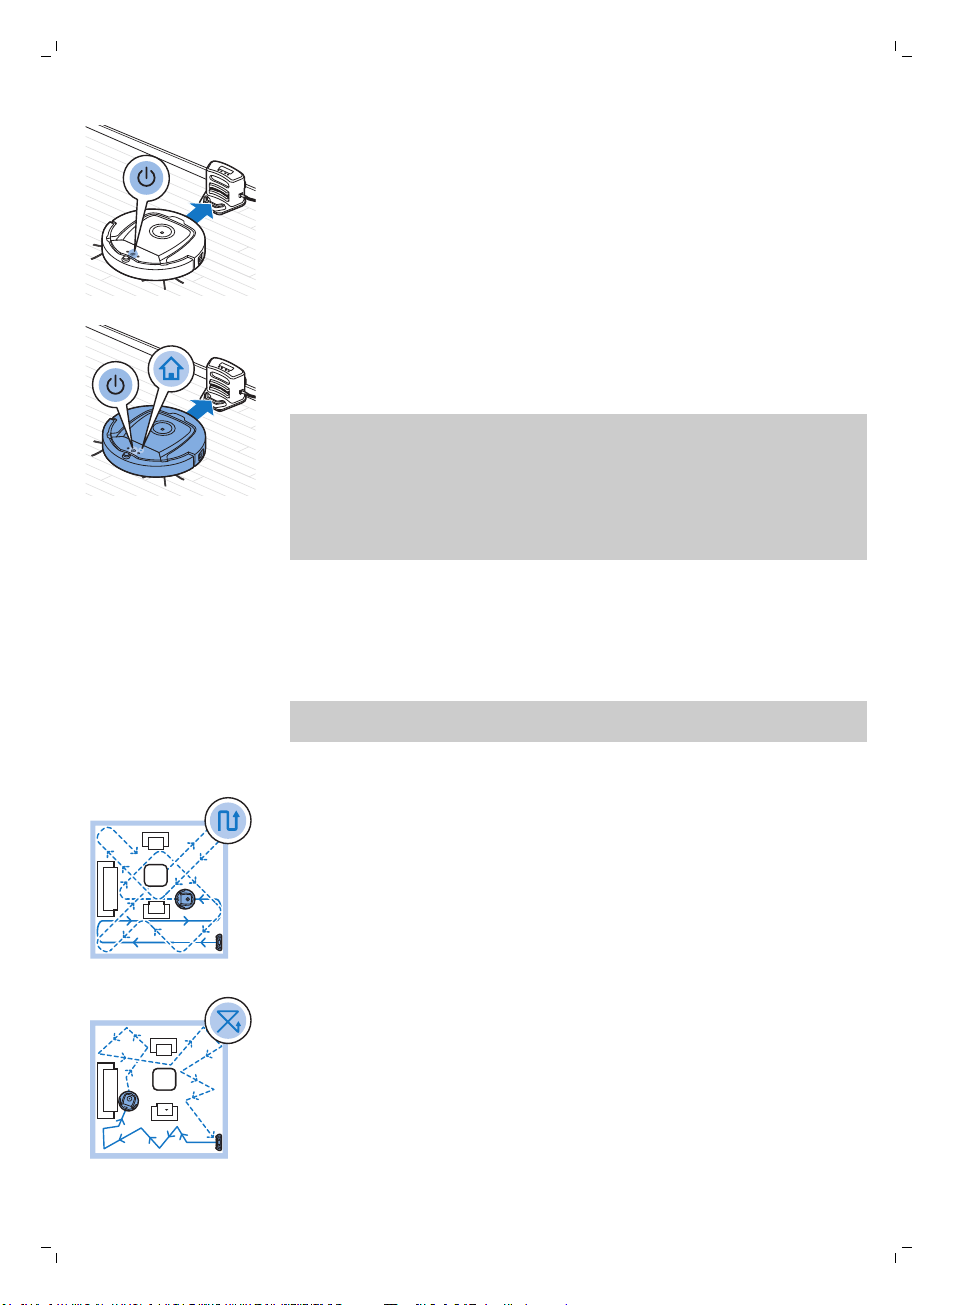
5 When the battery runs low, the start/stop button turns orange and the
robot searches for the docking station to recharge.
6 You can also press the start/stop button to interrupt or stop the cleaning
run. If you press the start/stop button again and there is still enough
energy in the rechargeable battery, the robot continues cleaning in the
auto-cleaning mode.
7 To make the robot return to the docking station before the rechargeable
battery runs low, press the docking button on the remote control or on
the pointer (FC8820 only). The docking indicator on the display of the
robot comes on and the robot returns to the docking station.
Note: If you did not start the robot from the docking station, it does not
search for the docking station automatically when the rechargeable
battery runs low. If there is still enough energy in the rechargeable
battery, you can press the docking button on the remote control or on
the pointer (FC8820 only) to make the robot return to the docking
station. If the rechargeable battery is completely empty, you have to
place the robot on the docking station manually.
Cleaning mode selection
Next to the auto-cleaning mode, this robot has four individual cleaning
modes that can each be activated by pressing the appropriate button on the
remote control.
Note: The manually selected modes are only active for a couple of minutes.
After that, the robot switches back to auto-cleaning mode.
Z-pattern mode
In Z-pattern mode, the robot cleans by making Z-shaped loops through the
room to clean large areas.
Random mode
In this mode, the robot cleans the room in a mixed pattern of straight and
crisscross movements.
Manual driving
English
Wall-following mode
In this mode, the robot follows the walls of the room to give the area
alongside the walls an extra clean.
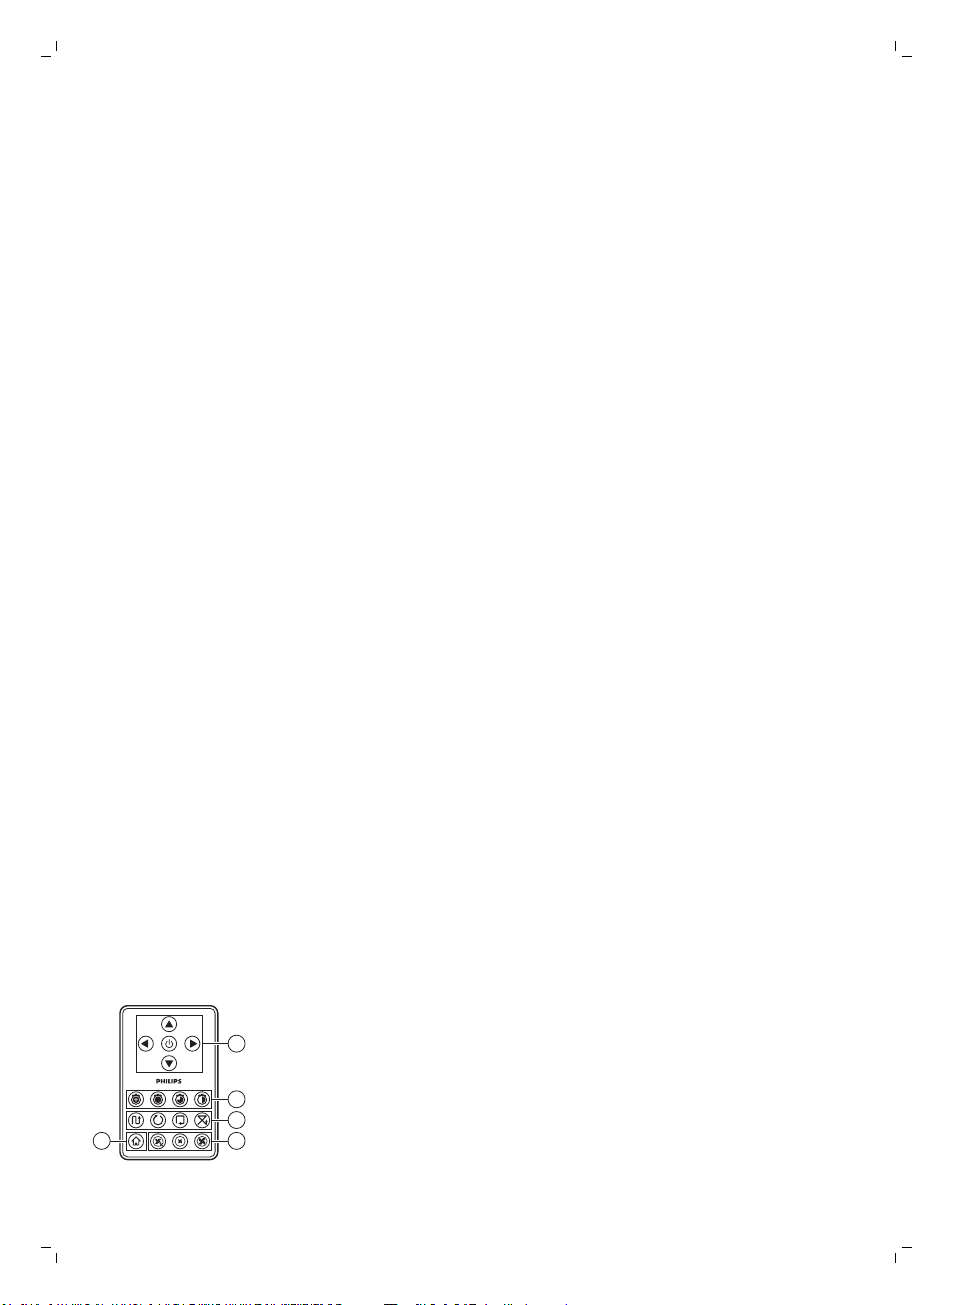
Spiral mode
In this mode, the robot moves in a spiral pattern to clean a small dirty area
thoroughly. In spiral mode, the fan operates at turbo speed (FC8820 only).
1 Use the arrow buttons above and below and to the left and right of the
start/stop button on the remote control to navigate the robot through the
room.
Note: Be careful when you drive the robot manually close to height
differences and staircases.
Note: The vacuuming function and the side brushes only work when the
robot is driven forward. The left, right or back buttons are only for
maneuvering the robot.
15
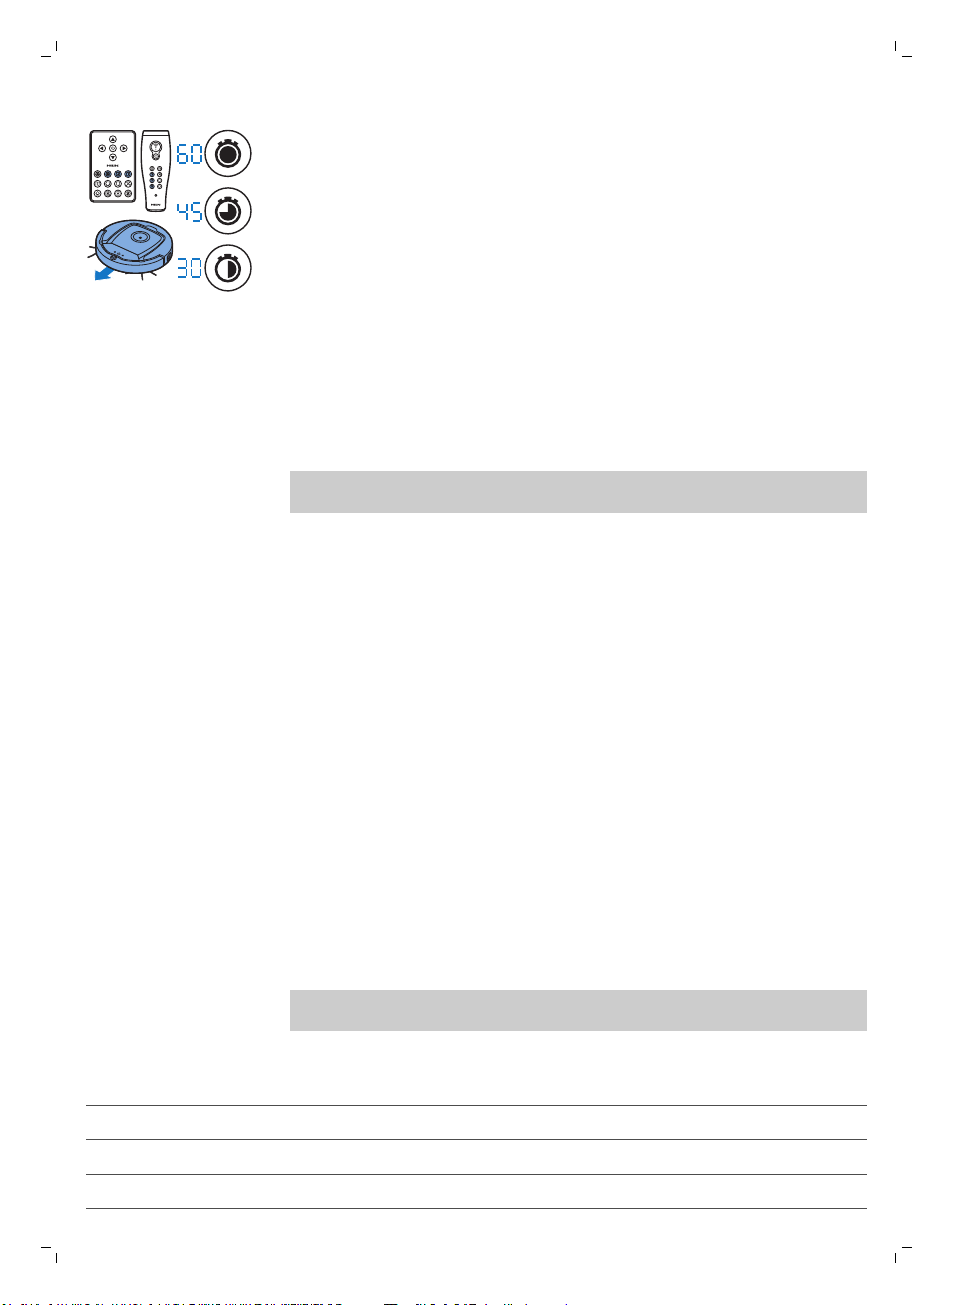
Using the cleaning time button
-
Press the maximum cleaning time button to make the robot clean in auto
cleaning mode until its rechargeable battery runs low. When the robot
has finished cleaning, it returns to the docking station automatically if it
started from the docking station. If the robot started from another point in
the room, press the docking button to send it back to the docking station.
16
English
-
The other cleaning time buttons allow you to let the robot operate for 60,
45 and 30 minutes respectively. When the cleaning time is finished, the
robot automatically returns to the docking station when it started from
the docking station. If the robot started from another point in the room,
press the docking button to send it back to the docking station.
Operating the docking station
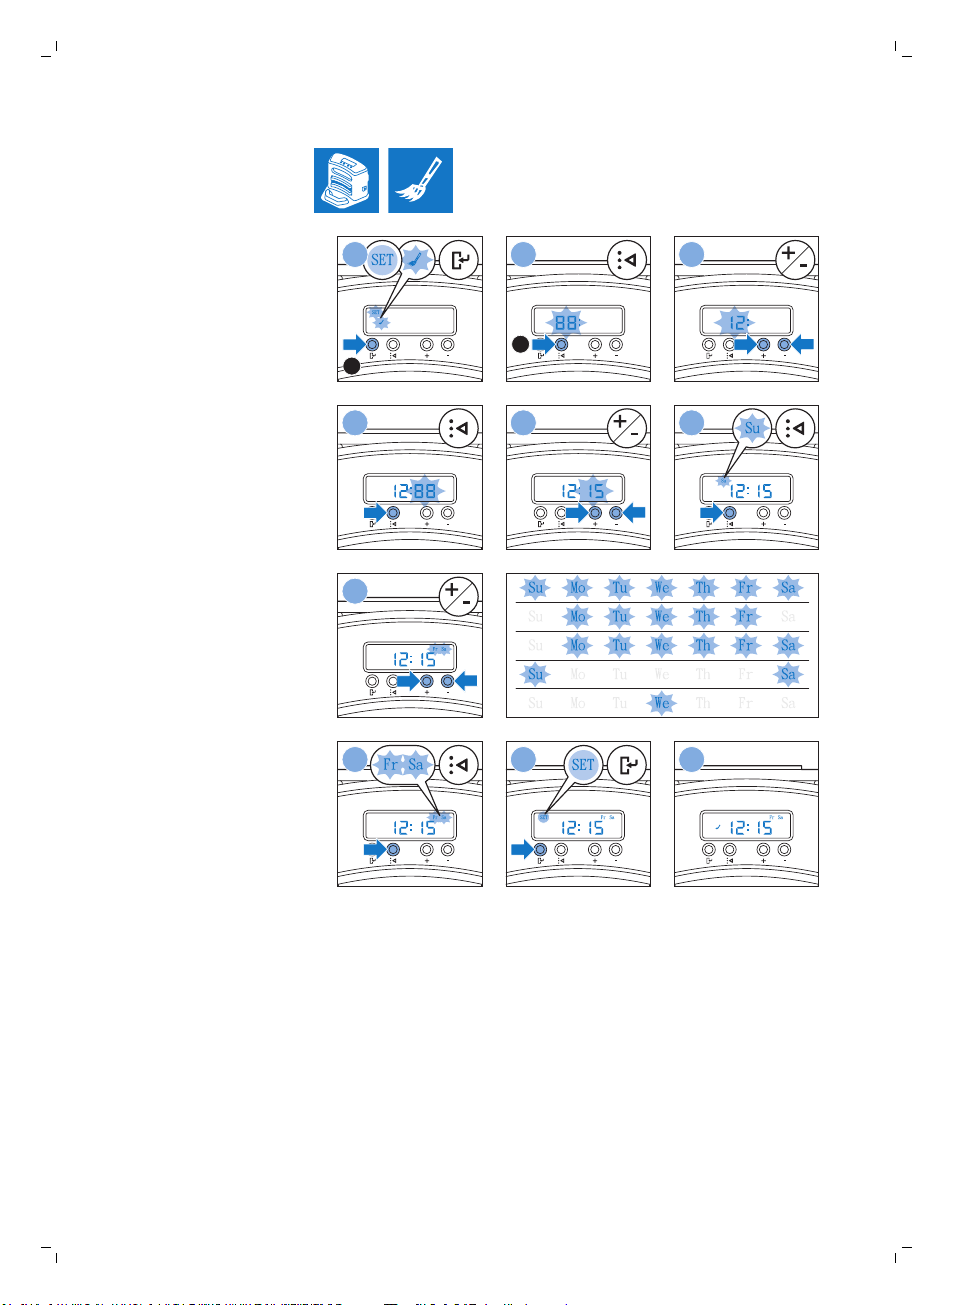
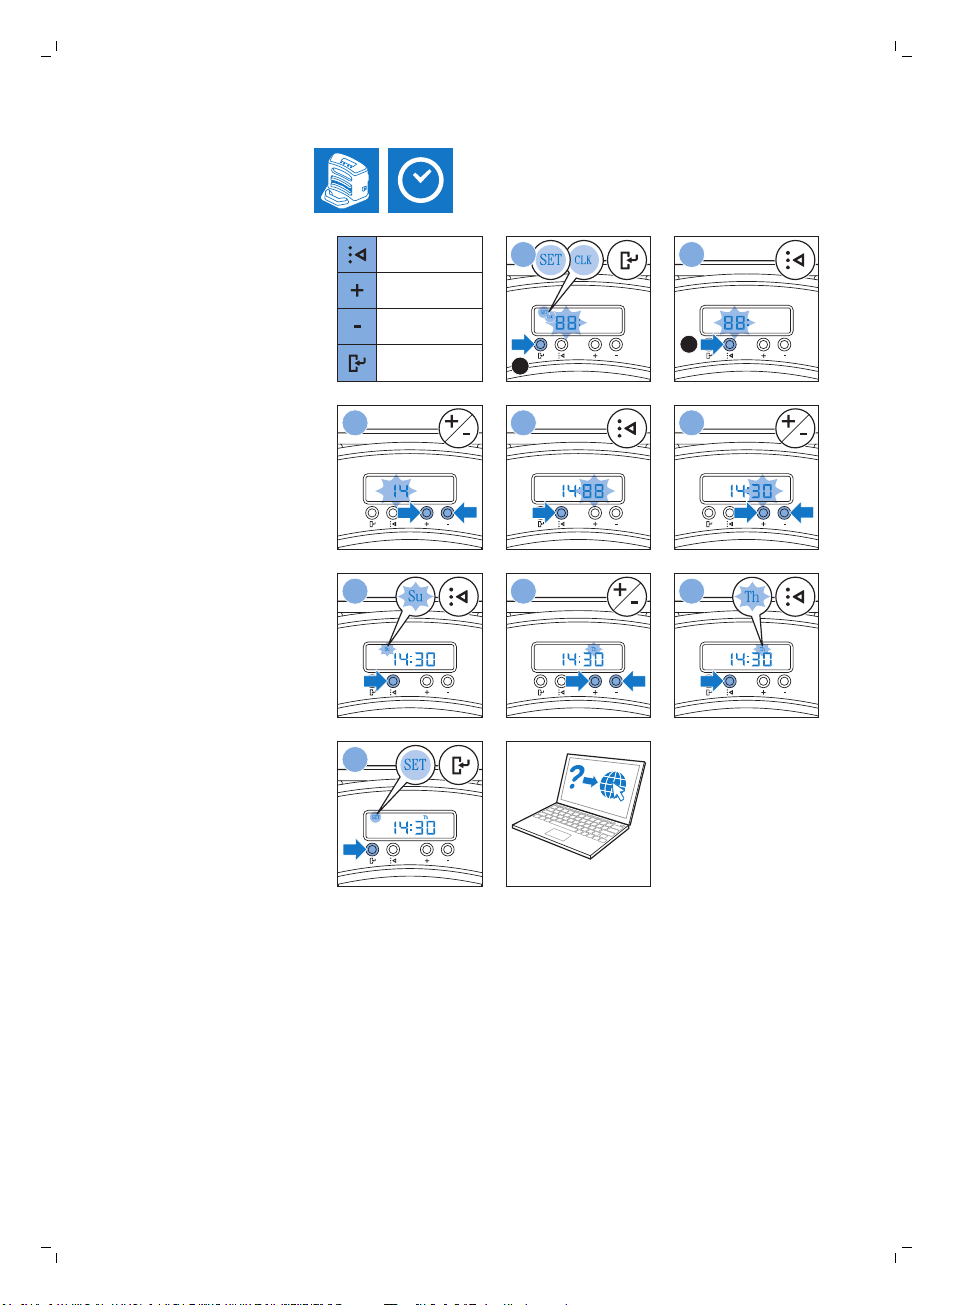
Setting clock time and day
If you want to use cleaning programs, you have to set the clock time and the
day of the week on the display of the docking station first.
Note: For the pictures that belong to the steps below, see the pages at the
back of this manual.
1 Press the set button. The set mode indicator and the clock time indicator
start flashing.
2 Press the select button once. The hour indication starts flashing.
3 Use the + and - buttons on the docking station to set the hour.The set
hour appears on the display.
4 Press the select button to confirm the hour set. The minutes indication
starts flashing.
5 Use the + and - buttons on the docking station to set the minutes. The set
minutes appear on the display.
6 Press the select button to confirm the minutes set. The indication 'Su’ for
Sunday starts flashing.
7 Use the + and - buttons on the docking station to set the current day of
the week.
8 Press the select button to confirm the day of the week.
9 Press the set button to confirm the clock time and day of the week
setting. Both the set mode indicator and the clock time indicator stop
flashing and turn solid.
Programming cleaning times
If you have set the time and the day of the week on the display of the
docking station, you can program cleaning times for your robot.
Note: For the pictures that belong to the steps below, see the pages at the
back of this manual.
The programming options available are:
Program Indications on display
Cleaning every day All day indications are on
Cleaning on weekdays Mo to Fri indications are on
Cleaning on 2 consecutive days Indications of 2 days are on, e.g. Fri and Sa

Program Indications on display
1
2
3
Cleaning 1 day a week Indication of selected day is on
1 Press the set button. The set mode indicator and the cleaning program
indicator start flashing.
2 Press the select button once. The hour indication starts flashing.
3 Use the + and - buttons on the docking station to set the hour. The set
hour appears on the display.
4 Press the select button to confirm the hour set. The minutes indication
starts flashing.
5 Use the + and - buttons on the docking stationl to set the minutes. The
set minutes appear on the display.
6 Press the select button to confirm the minutes set. The indication ‘Su’ for
Sunday starts flashing.
7 Use the + and - buttons on the docking station to toggle between
cleaning programs (see the table above for the programming options
available).
8 Press the select button to confirm the program selected.
9 Press the set button to confirm the programming. Both the set mode
indicator and the cleaning program indicator stop flashing and turn solid.
10 When you have set a cleaning program, the display shows the cleaning
program indicator and the day or days selected. If you leave the robot on
standby and its rechargeable battery is fully charged, it will start cleaning
at the programmed time on the programmed day or days.
English
17
Using the dry
Fan speed buttons
You can use the fan speed buttons to increase the
switch off the fan. The default setting is normal fan speed.
1 Press this button to switch off the fan
2 Press this button to switch on the fan at normal speed.
3 The turbo fan button increases the fan speed (FC8820 only).
fan speed to turbo or to
Clap response
The clap response is enabled when the robot enters sleep mode in the
following situations:
-
when it stops cleaning due to an error
-
when it cannot find its docking station in 20 minutes
If you do not see the robot, you can locate it by clapping your hands once.
The robot will respond by beeping and by lighting up all icons on its display.
wipe attachment
The dry wipe attachment is a feature that allows you to clean hard floors
with dry wipes.
Note: If you use the dry wipe attachment, the robot may have trouble
crossing thresholds or climbing onto rugs.

1
2
18
English
Preparing the dry wipe attachment for use
1 Turn the robot upside down and place it on the floor or on a table.
2 Place the dry wipe on a table and place the dry wipe attachment on the
wipe with its fixation lugs pointing towards you.
3 Fold both ends of the dry wipe around the dry wipe
fasten the dry wipe onto the attachment by pushing the fixation blocks
into the recesses.
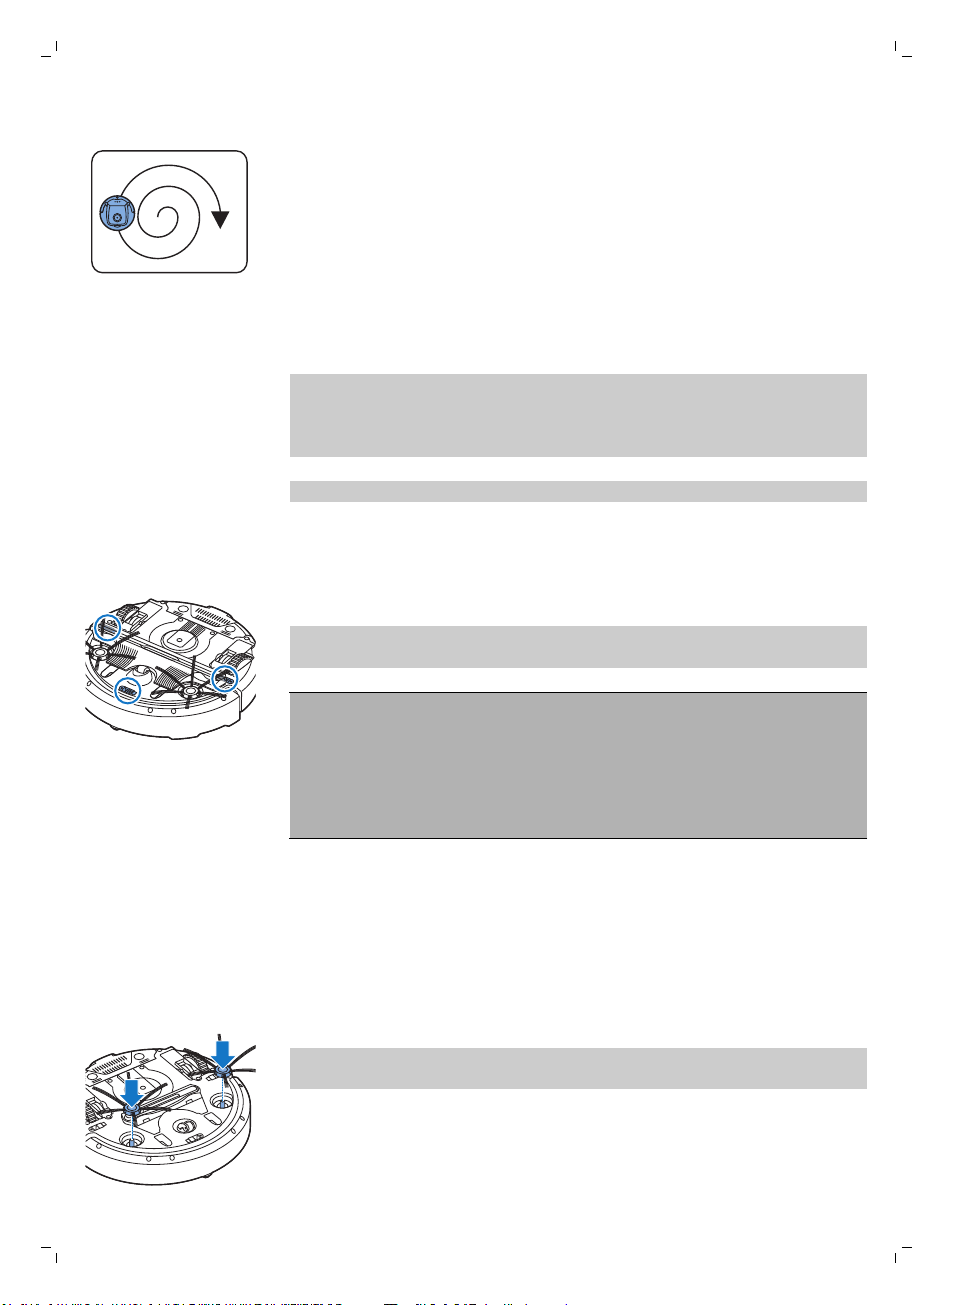
4 Insert the fixation lug of the dry wipe attachment into the opening just
behind the wheel on one side of the robot and push until you hear it lock
into place with a click. Then repeat these actions on the other side.
5 Turn the robot and place it on the floor on its wheels with the dry wipe
attachment touching the floor.
attachment and
Using the robot with the dry wipe attachment
When the dry wipe attachment is attached, you can use the robot in any
mode and on all hard floors. Do not use the dry wipe attachment on carpet
or rugs.
Removing the dry wipe attachment
1 Remove the dry wipe attachment as soon as you have finished wiping
the floor.
2 Turn the robot upside down and place it on the floor or on a table.
3 Push one end of the dry wipe attachment towards the wheel on the
other side of the robot to release it. Then pull the attachment off the
robot.
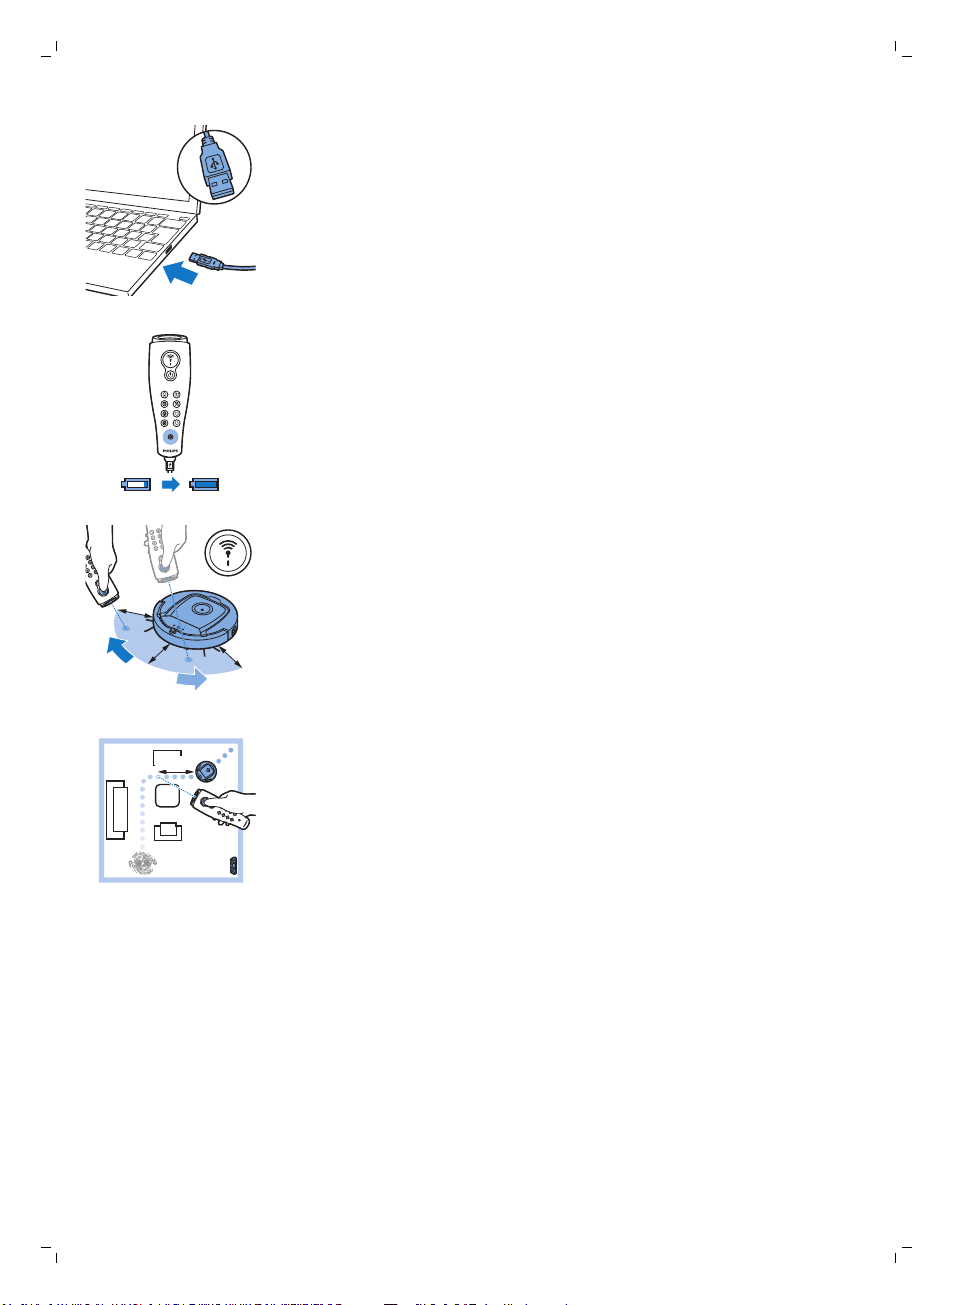
Using the pointer (FC8820)
Charging the pointer
The pointer has a rechargeable battery that can be charged with the USB
cable supplied.
1 Insert the micro-USB plug into the socket in the bottom of the pointer.
50-70 cm
50-70
cm
50-70 cm
English
2 Insert the USB plug into a USB charger or a USB port on your laptop.
3 The charging light on the pointer lights up solid. Charging takes 30
minutes. When the charging light goes off, the rechargeable battery is
fully charged.
Navigating the robot with the pointer
-
When
you press and hold the pointer button, the pointer emits a beam of
infrared light. With this beam you can drag the robot in a particular
direction. As long as you keep the button pressed and keep pointing in
the direction you want the robot to move, it continues to move in that
direction. When you release the pointer button, the robot starts cleaning
in auto cleaning mode.
19
-
With the pointer you can send the robot to a specific
give this area an extra-thorough clean.
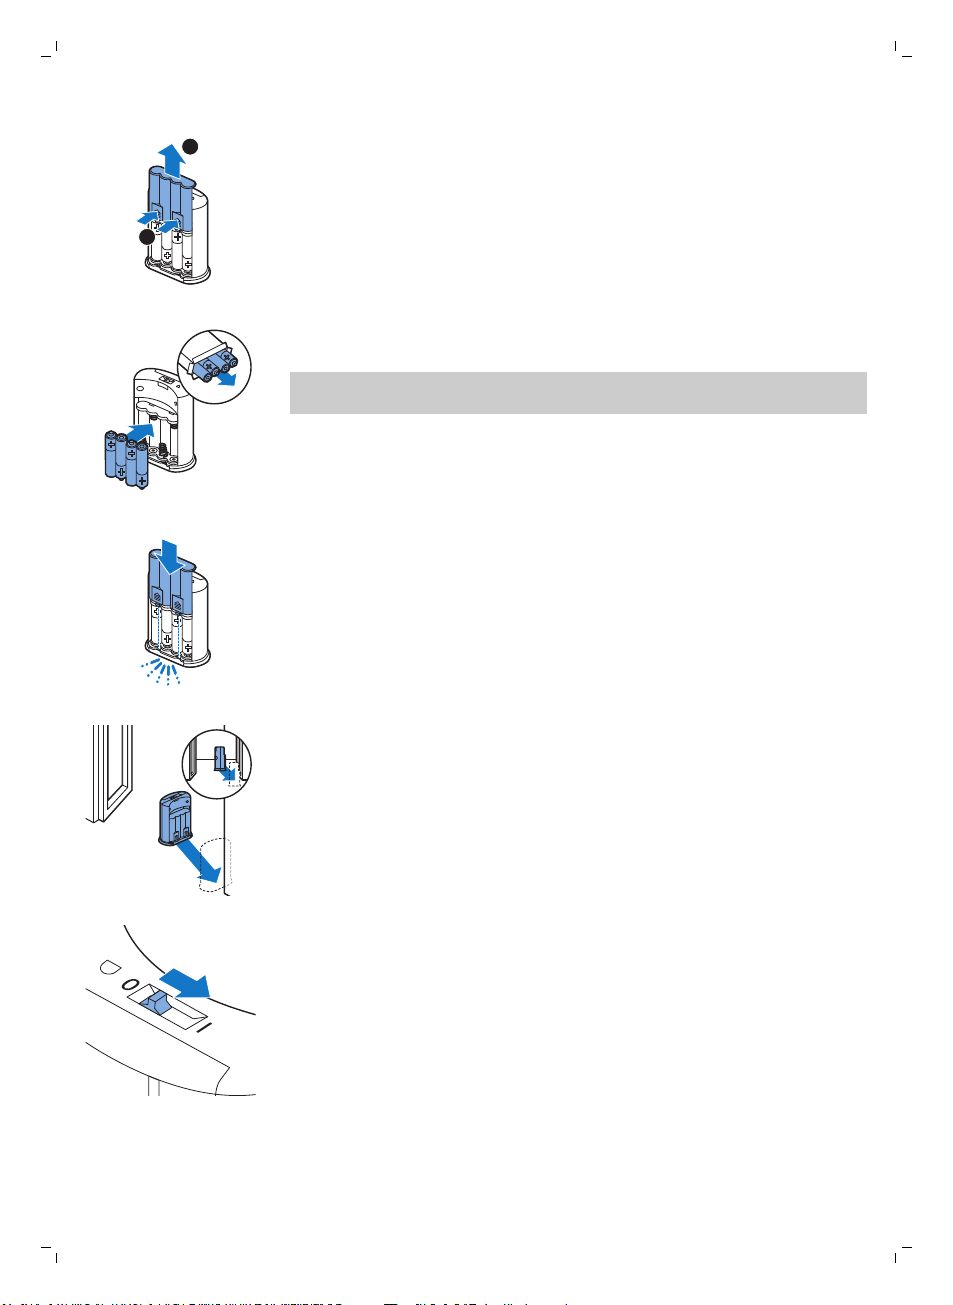
Using the virtual wall unit (FC8820)
Placing the batteries in the invisible wall
invisible wall operates on four AA batteries.
The
1 Push the two release tabs at the bottom of the back cover (1) and slide
the back cover upwards and off the invisible wall (2).
area in the room to
1
2
20
English
1 Push the two release tabs at the bottom of the back cover (1) and slide
the back cover
2 Take four new AA batteries from the pack and insert them into the
battery compartment of the invisible wall.
Note: Make sure the + and - poles of the batteries point in the right
direction.
3 Slide the back cover onto the invisible wall again.
upwards and off
the invisible wall (2).
Positioning the invisible wall to stop the robot
You can use the invisible wall to prevent the robot from entering a room or
area that you want to keep it out of.
1 Place the unit at a point you do not want the robot to cross, e.g at an
open door to a room that is off-limits to the robot.
2 Switch on the invisible wall with the on/off slide on top of the unit.
3 Start the robot.
4 When the robot comes too close to the invisible wall, the light on the
4
3
1
2
1
2
3
invisible wall starts flashing and the invisible wall emits a beam of
infrared light. This beam of infrared light makes the robot change its
course and move away from the invisible wall.
Note: If you use the invisible wall, regularly check if the batteries still contain
sufficient power. You can check this by switching the virtual wall off and on
again. If there is enough energy in the batteries, the LED on the invisible wall
will light up briefly.
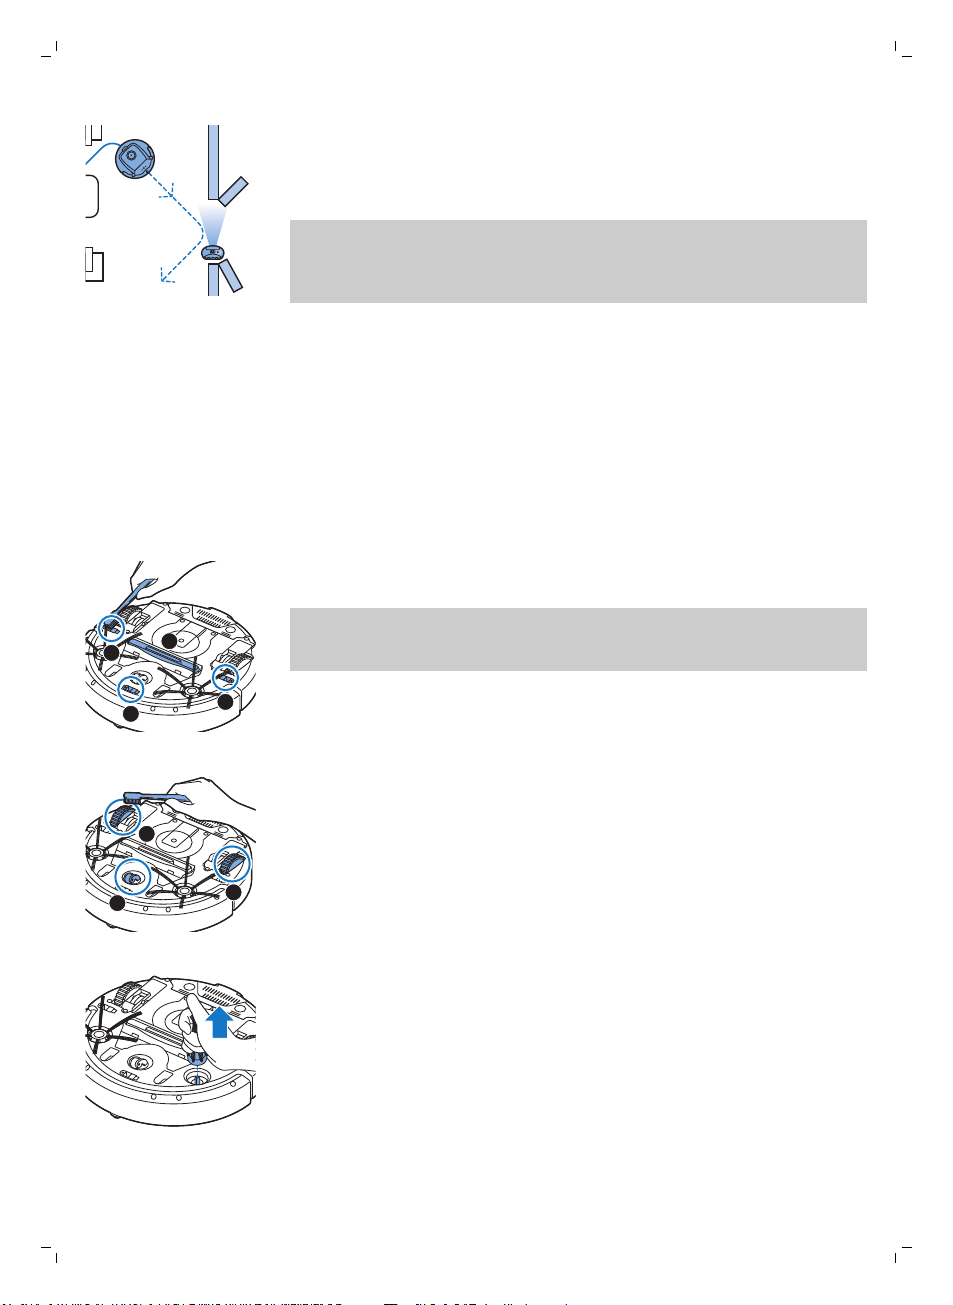
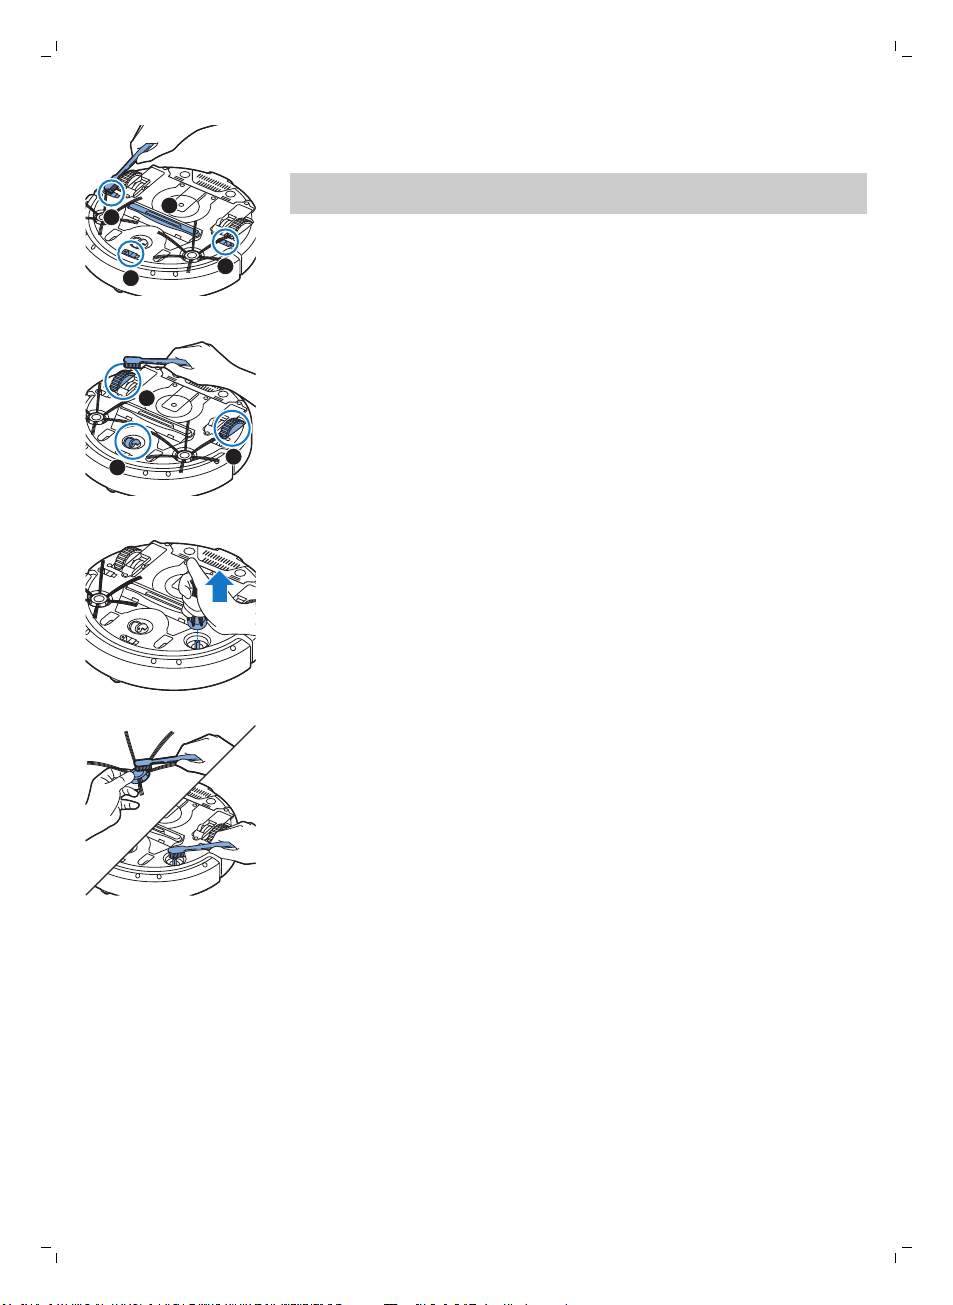
Cleaning and maintenance
Cleaning the robot
To maintain good cleaning performance, you have to clean the drop-off
sensors, the wheels, the side brushes and the suction opening from time to
time.
1 Make sure that the power switch is in 'off' position.
2 Place the robot upside down on a flat surface
3 Use a brush with soft bristles (e.g. a toothbrush) to remove dust or fluff
from the drop-off sensors and to clean the suction opening.
Note: It is important that you clean the drop-off sensors regularly. If the
drop-off sensors are dirty, the robot may fail to detect height differences
or staircases.
English
21
4 Use a brush with soft bristles (e.g. a toothbrush) to remove dust or fluff
from the front wheel and side wheels.
5 To clean the side brushes, grab them by the bristles and pull them off
their shafts.
22
English
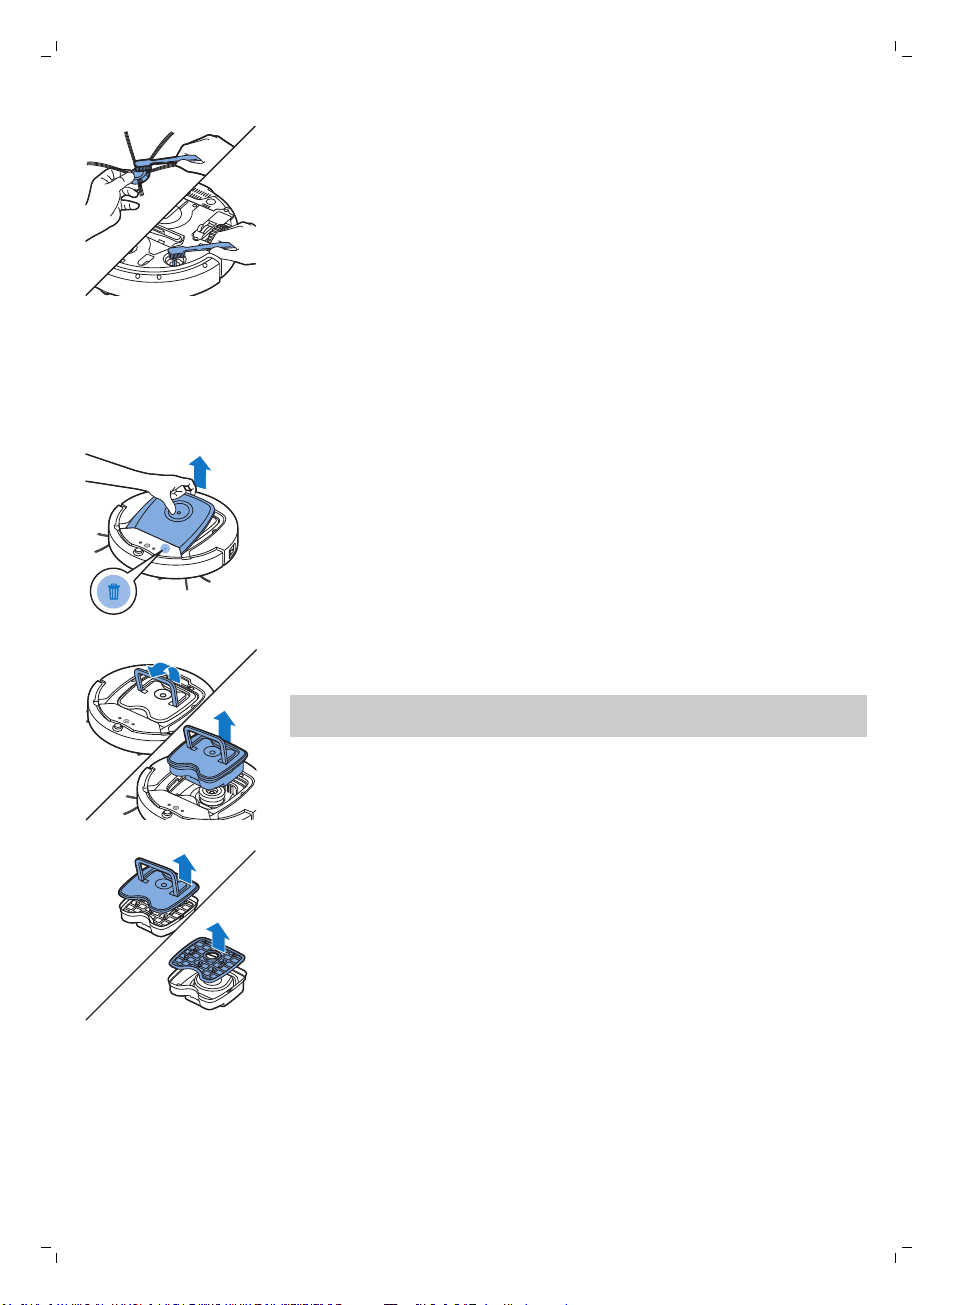
6 Remove fluff, hairs and threads from the shaft and from the side brush
with a soft brush (e.g. a toothbrush) or a cloth.
7 Check the side brushes and the bottom of the robot for any sharp objects
that could damage your floor.
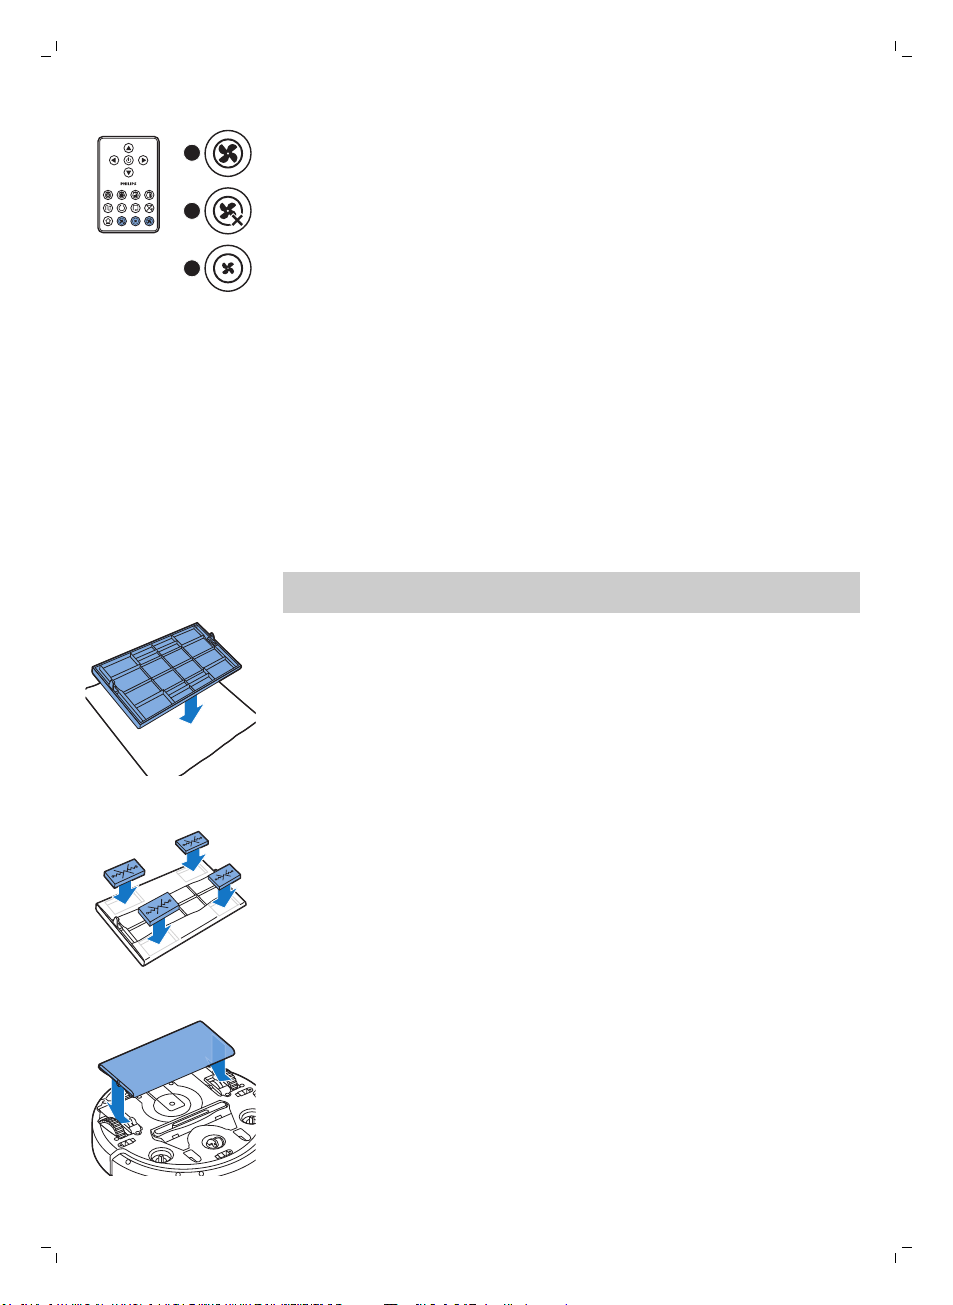
Emptying and cleaning the dust container
Empty and clean the dust container when the dust container full indicator
lights up continuously.
1 Make sure that the power switch is in 'off' position.
2 Remove the cover.
3 Pull up the handle of the dust container lid and lift the dust container out
of the dust container compartment.
Note: When you remove or reinsert the dust container, take care not to
damage the blades of the motor fan.
4 Carefully lift the lid off the dust container (1) and take out the filter (2).
1
2
English
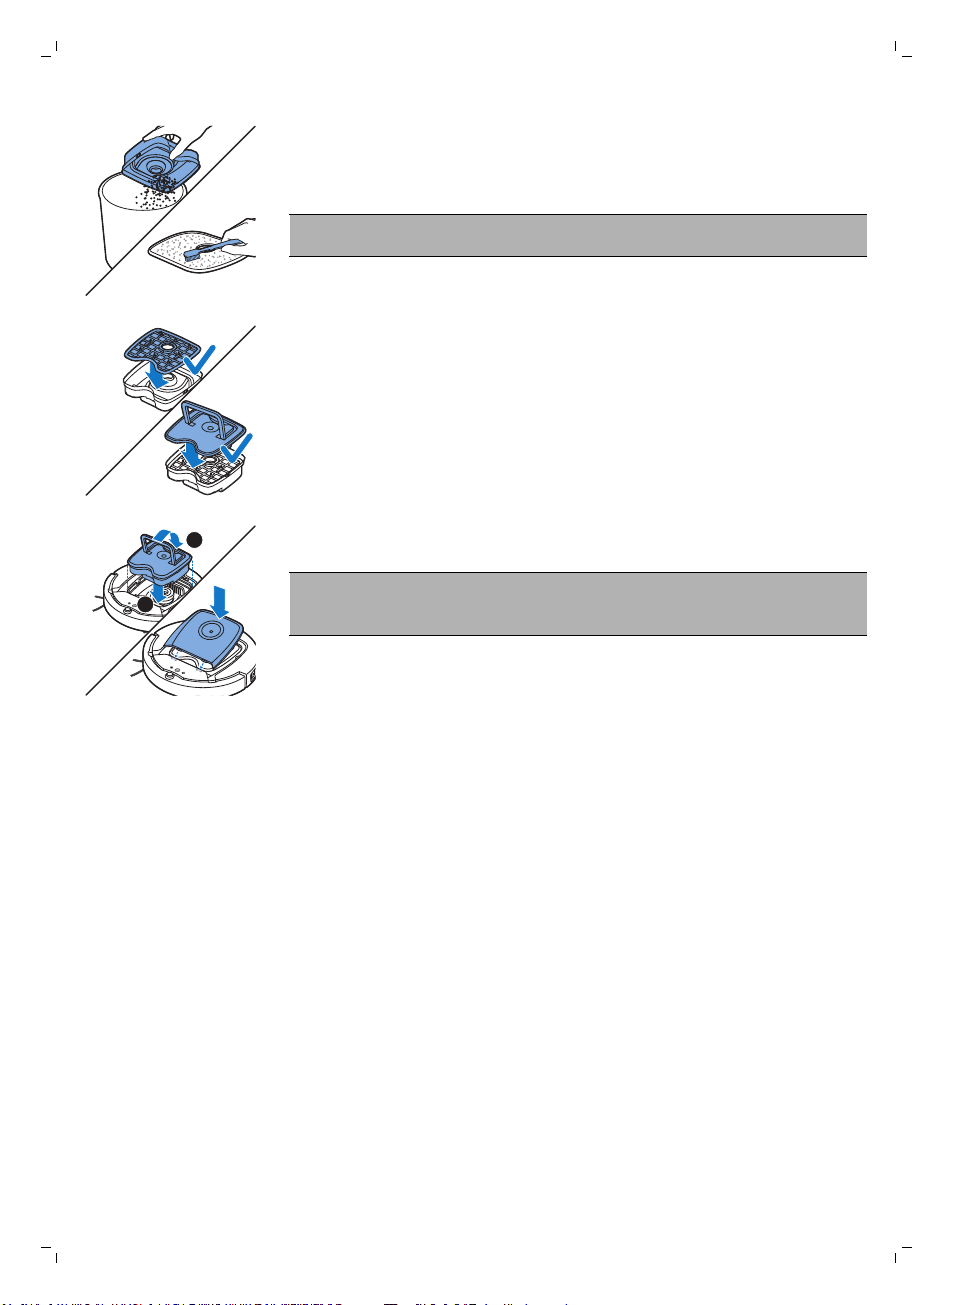
5 Shake the dust container over a dustbin to empty it. Clean the filter and
the inside of the dust container with a cloth or a toothbrush with soft
bristles. Also clean the suction opening in the bottom of the dust
container.
Caution: Do not clean the dust container and the filter with water or in
the dishwasher.
6 Put the filter back into the dust container (1). Then place the lid on the
dust container(2).
7 Put the dust container back into the dust container compartment and put
the top cover back on the robot.
Caution: Always make sure the filter is present inside the dust
container. If you use the robot without the filter inside the dust
container, the motor will be damaged.
23
Replacement
Ordering accessories
To buy accessories or spare parts, visit www.shop.philips.com/service or go
to your Philips dealer. You can also contact the Philips Consumer Care
Center in your country (see the international warranty leaflet for contact
details).
Replacing the filter
Replace the filter if it is very dirty or damaged. You can order a new filter kit
under type number FC8066. See 'Emptying and cleaning the dust container'
in chapter 'Cleaning and maintenance' for instructions on how to remove
the filter from the dust container and how to place it in the dust container.
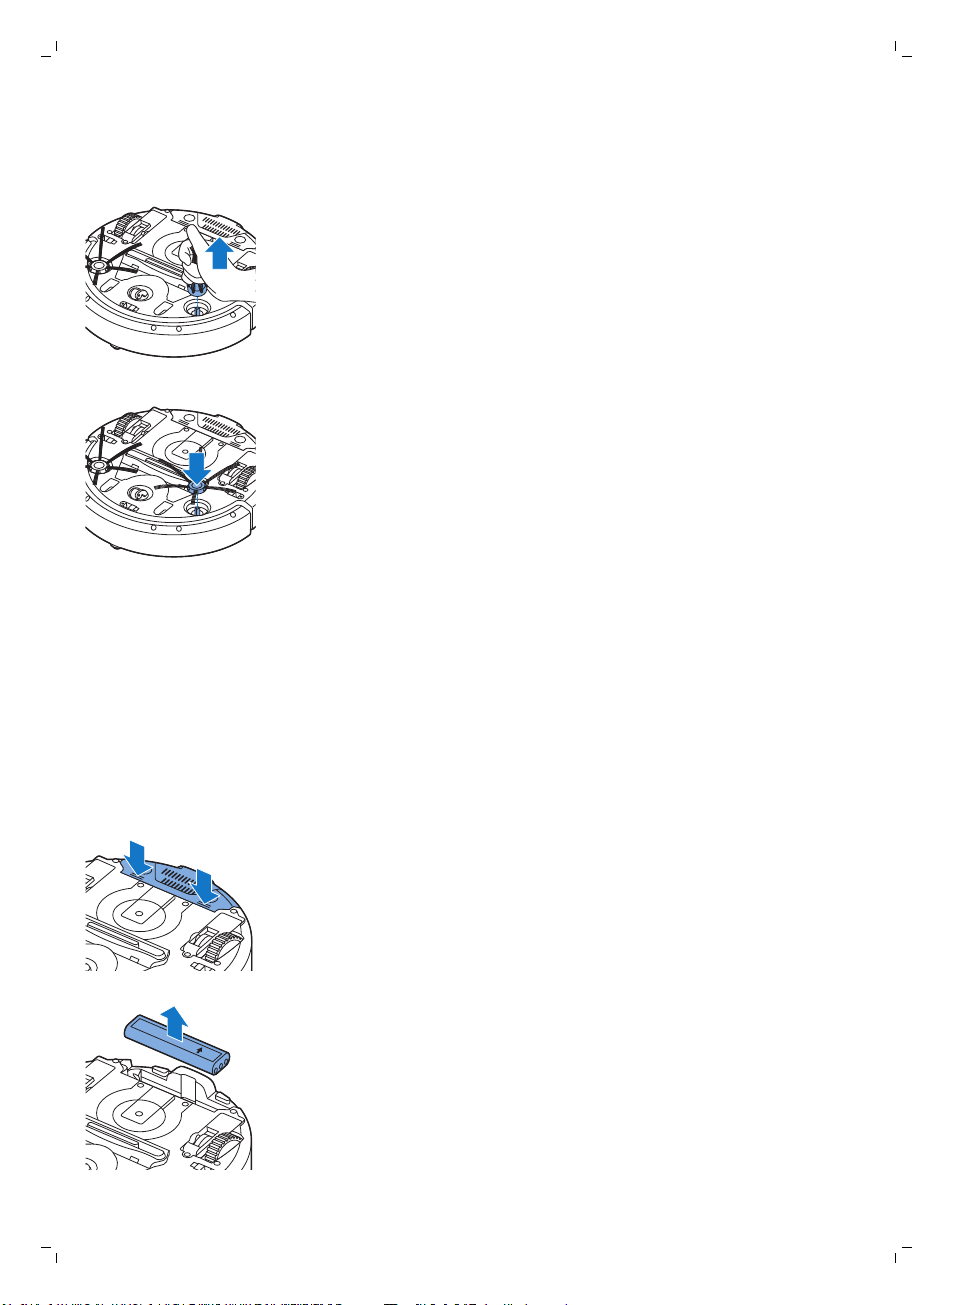
Replacing the side brushes
Replace the side brushes after some time to ensure proper cleaning results.
Always replace the side brushes when you notice signs of wear or damage.
We also recommend that you replace both side brushes at the same time.
this side up
24
English
You can order spare side brushes as part of replacement kit FC8068. This kit
also contains two filters and three dry wipes.
1 Make sure that the power switch is in 'off' position.
2 To replace the side brushes, grab the old side brushes by the bristles and
pull them off their shafts.
3 Push the new side brushes onto the shafts.
Replacing the rechargeable battery
Replace the rechargeable battery when you can no longer recharge it or
when it runs out of power quickly. You can order a new rechargeable battery
under order number CP0113 for FC8820 and CP0112 for FC8810.
1 Make sure that the power switch of the robot is in 'off' position.
2 Let the robot run until the rechargeable battery is empty to make sure
that the rechargeable battery is completely discharged before you
remove it and dispose of it.
3 Push and slide the battery cavity cover off the robot.
4 Remove the old rechargeable battery from the battery cavity.
this side up
5 Insert the new rechargeable battery into the battery cavity.
2
3
1
6 Slide the battery cavity cover back onto the robot.
Replacing dry wipes
You can order new dry wipes. They are part of replacement kit FC8068. This
replacement kit also contains two side brushes and two filters.
Replacing the battery of the remote control
The remote control works on a CR2025 coin-shaped battery. Replace the
battery when the robot no longer responds when you press the buttons on
the remote control.
1 Hold the remote control upside down. Push the release button on the
battery holder and at the same time slide the battery holder out of the
remote control.
English
25
Recycling
2 Remove the empty battery from the battery holder and place a new
battery in the battery holder. Then slide the battery holder back into the
remote control.
-
This symbol means that this product shall not be disposed of with normal
household waste (2012/19/EU).

26
English
-
This symbol means that this product contains disposable batteries which
shall not be disposed of with normal household waste (2006/66/EC).
-
Follow your country's rules for the separate collection of electrical and
electronic products and batteries. Correct disposal helps prevent
negative consequences for the environment and human health.
Removing disposable batteries
To remove disposable batteries, see the instructions for placing and/or
removing batteries in the user manual.
Troubleshooting
This chapter summarizes the most common problems you could encounter
with the machine. If you are unable to solve the problem with the
information below, visit www.philips.com/support for a list of frequently
asked questions or contact the Consumer Care Center in your country.
Problem
The robot does not start
cleaning when I press the
start/stop button.
Possible cause Solution
The rechargeable battery is
empty.
The small plug is still inserted
in the socket on the robot.
Charge the rechargeable battery (see
chapter 'Preparing for use').
The robot does not work on mains power.
It only works on its rechargeable battery.
Therefore, always disconnect the adapter
from the robot and the mains before use.
The warning indicator
flashes quickly.
The power switch is not set to
'on' (I) position.
One or both wheels are stuck. Set the power switch to 'off'. Remove the
One or both side brushes are
stuck.
The top cover is not present
or is not closed properly.
The bumper is stuck. Press the start/stop button. Lift the robot
The robot was lifted while it
was cleaning.
Press the power switch. Press the
start/stop button on the robot or on the
remote control to start cleaning.
fluff, hair, thread or wire that is caught
around the wheel suspension.
Clean the side brushes (see chapter
'Cleaning and maintenance').
When the top cover is not present or is not
closed properly, the robot does not work.
Place the top cover on the robot properly.
so that its bumper comes free. Place the
robot at some distance from the obstacle
and press the start/stop button to make it
resume cleaning.
Press the start/stop button. Place the
robot on the floor. Then press the
start/stop button to make the robot
resume cleaning.
Problem Possible cause Solution
The robot does not clean
properly.
The bristles of one or both
side brushes are crooked or
bent.
Soak the brush or brushes in warm water
for a while. If this does not restore the
bristles to their proper shape, replace the
side brushes (see chapter 'Replacement').
English
27
The filter in the dust container
is dirty.
The suction opening in the
bottom of the dust container
is clogged.
The front wheel is jammed
with hair or other dirt.
The robot is cleaning a very
dark or shiny surface, which
triggers the drop-off
sensors.This causes the robot
to move in an unusual
pattern.
The robot is cleaning a floor
that reflects sunlight quite
strongly. This triggers the
drop-off sensors and causes
the robot to move in an
unusual pattern.
Clean the filter in the dust container with a
cloth or a toothbrush with soft bristles.You
can also clean the filter and dust container
with a regular vacuum cleaner at a low
suction power setting.
If brushing or vacuuming does not help to
clean the filter, replace the filter with a
new one. We advise you to replace the
filter at least once a year.
Clean the suction opening (see chapter
'Cleaning and maintenance').
Clean the front wheel (see chapter
'Cleaning and maintenance').
Press the start/stop button and then move
the robot to a lighter colored piece of the
floor. If the problem continues to occur on
lighter colored floors, please go to
www.philips.com/support or contact the
Consumer Care Center in your country.
Close the curtains to block sunlight from
entering the room. You can also start
cleaning when the sunlight is less bright.
The rechargeable battery
can no longer be charged
or runs empty very fast.
The battery of the remote
control runs empty too
fast.
The rechargeable battery has
reached the end of its life.
Perhaps you did not insert
the correct type of battery.
Replace the rechargeable battery (see
chapter 'Replacement').
For the remote control, you need a
CR2025 coin-shaped battery. If the
problem persists, go to
www.philips.com/support or contact the
Consumer Care Center in your country.
28
English
Problem Possible cause Solution
The robot is moving in
circles.
The robot is in spot-cleaning
mode.
This is normal behavior. The spiral mode
can be activated when a lot of dirt is
detected on the floor for a thorough clean.
It is also part of the auto cleaning mode.
After approximately one minute the robot
resumes its normal cleaning pattern. You
can also stop the spiral mode by selecting
a different cleaning mode on the remote
control.
The robot cannot find the
docking station.
The robot beeps when it
is on the docking station.
There is not enough room for
the robot to navigate towards
the docking station.
The robot is still actively
searching.
The robot was not started
from the docking station.
You try to charge the robot
with the power switch is in off
position.
Try to find another place for the docking
station. See 'Installing the docking station'
in chapter 'Preparing for use'.
Give the robot around 20 minutes to return
to the docking station.
If you want the robot to return to the
docking station after a cleaning run, start it
from the docking station.
Press the power switch to switch on the
robot.
Error codes
Error code
E1 Wheels stuck Remove robot from the obstacle and press the
E2 Top cover or dust
E3 Bumper stuck Remove the robot from the obstacle. The error
E4 Robot lifted from floor Put the robot back on the floor to make the
Possible cause Solution
starts/stop button to resume cleaning.
container not placed
properly
Place the dust container in and the top cover
on the robot properly. The error code
disappears from the display automatically.
code disappears from the display
automatically.
error code disappear.
E5 Color of floor too dark Place robot on a lighter area of the floor. Clean
E6
Battery not inserted
properly
Charging error Check if the power switch is in ‘on’ position
the drop-off sensors.
Read the instructions in ‘Inserting the
rechargeable battery into the robot’ in chapter
‘Before first use’.
when the robot is on the docking station

www.philips.com/support
1x
1x
Min
Plus
Set
Select
1 2
3 4 5
6 7 8
9
English
29
1x
2x
1 2 3
4 5 6
7
8 9 11
30
English

Úvod
2
1
3
45
Společnost Philips Vám gratuluje ke koupi a vítá Vás! Chcete-li využívat
všech výhod podpory nabízené společností Philips, zaregistrujte svůj
výrobek na stránkách www.philips.com/welcome.
Všeobecný popis
1 Rukojeť víka nádoby na prach
2 Víko nádoby na prach
3 filtr
4 Nádoba na prach
5 horní kryt
6 Tabulka chybových kódů
7 ventilátor
8 nárazník
9 čidlo dokovací stanice
10 vypínač (pro zapnutí a vypnutí robota)
11 Přední kolečko
12 hřídele postranních kartáčků
13 senzory pádu
14 kolečka
15 schránka pro baterii
16 Sací otvor
17 Postranní kartáčky
18 nabíjecí baterie
19 kryt schránky pro baterii
20 Upevňovací bloky na suché utěrky
21 Držák na suché utěrky
22 Suché utěrky
23 držák baterie
24 Dálkový ovladač
25 Nabíjecí kabel
26 Ukazovátko
27 Jednotka neviditelné stěny (FC8820)
28 Dokovací stanice
29 Adaptér
30 Malá zástrčka
Čeština
31
Displej a dálkový ovladač
Dálkový ovladač (FC8820)
1 navigační tlačítka a spuštění/zastavení
2 Tlačítka doby úklidu
3 Tlačítka režimu čištění
4 Tlačítka rychlosti ventilátoru
5 Tlačítko dokování
Čeština

1
2
3
46
5
1
2
5
4
3
2
1
32
Čeština
Dálkový ovladač (FC8810)
1 navigační tlačítka a spuštění/zastavení
2 Tlačítka doby úklidu
3 Tlačítka režimu čištění
4 Tlačítko vypnutí ventilátoru
5 Tlačítko zapnutí ventilátoru
6 Tlačítko dokování
Ovládací panel dokovací stanice
1 Displej zobrazující čas, datum a programové indikátory
2 Tlačítka úprav a nastavení
Ukazovátko (FC8820)
1 Tlačítko ukazovátka
2 Vypínač
3 Tlačítka režimu čištění
4 Tlačítka doby úklidu
5 Tlačítko dokování
Jak robot funguje
Co robot uklízí
Tento robot je vybaven funkcemi, které umožňují, aby se stal vaším
praktickým pomocníkem při úklidu podlah.
Robot je vhodný především pro čištění tvrdých podlah ze dřeva, dlaždic,
linolea apod. Čištění měkkých podlah, např. koberců, mu může činit potíže.
Pokud robota používáte k čištění koberce, zůstaňte při prvním použití poblíž,
abyste viděli, zda si dokáže s tímto typem podlahy poradit. Na robota je také
třeba dohlížet při používání na velmi tmavých nebo lesklých tvrdých
podlahách.

Jak robot uklízí
Čeština
33
Systém čištění
Robot je vybaven třífázovým systémem úklidu, který zajišťuje efektivní úklid
podlah.
-
Dva postranní kartáčky pomáhají robotovi při čištění dosáhnout do rohů a
míst podél zdí. Také pomáhají sbírat špínu ze země a posouvat ji směrem
k sacímu otvoru.
-
Volnou špínu robot sebere díky dostatečné síle sání a skrze sací otvor ji
přemístí do nádoby na prach.
-
Robot je vybaven držákem na suché utěrky, který umožňuje ještě
pečlivější úklid podlah stíráním suchou utěrkou.
Schémata čištění
V režimu automatického čištění používá robot automatické pořadí
úklidových schémat pro optimální čištění jednotlivých oblastí místnosti.
Používaná úklidová schémata jsou:
1 Schéma Z, nebo cik- cak
2 Náhodné schéma

34
Čeština
3 Schéma pohybu podél zdi
4 Spirálové schéma
V režimu automatického čištění robot používá tato schémata v pevném
pořadí: schéma Z, náhodné schéma, schéma pohybu podél zdi a spirálové
schéma.
Když robot dokončí toto pořadí schémat, začne se znovu pohybovat podle
schématu Z. Robot bude pokračovat v čištění místnosti pomocí tohoto
pořadí schémat, dokud se jeho baterie skoro nevybije nebo dokud ho ručně
nevypnete.
Když robot během úklidu najde silně znečištěné místo, přepne se do
spirálového režimu a zapne ventilátor na rychlost turbo (jen FC8820), aby
nečistoty efektivně odstranil.
Poznámka: Jednotlivé režimy můžete také vybrat ručně stisknutím
příslušného tlačítka na dálkovém ovladači nebo ukazovátku (jen FC8820).
Ručně vybrané režimy jsou aktivní pouze po několik minut. Poté se robot
přepne zpět do režimu automatického čištění.
Podrobnosti najdete v kapitole „Používání robota“ v části „Režimy čištění“.
Jak se robot vyhýbá výškovým předělům
Ve spodní části je robot vybaven třemi senzory pádu. Tyto senzory pádu
slouží k tomu, aby robot rozpoznal výškové předěly, například schody.
Poznámka: Pokud se robot dostane mírně nad hranu stupně s výškovým
rozdílem, je to normální, protože senzory pádu jsou umístěny až za
nárazníkem.
Upozornění: V některých případech senzory pádu nemusí schodiště nebo
jiný výškový předěl rozpoznat včas. Proto robota při několika prvních
použitích a při provozu v blízkosti schodiště nebo jiného výškového
předělu bedlivě sledujte. Senzory pádu je důležité pravidelně čistit, aby si
robot zachoval schopnost správně rozpoznat výškové předěly (pokyny
naleznete v kapitole „Čištění a údržba“).

Před prvním použitím
1
2
this side up
Montáž postranních kartáčků
1 Vybalte postranní kartáčky a položte robota vzhůru nohama na stůl nebo
na podlahu.
2 Nasuňte kolečka na hřídele na spodní části robota.
Poznámka: Ujistěte se, že jste postranní kartáčky upevnili správně.
Nasaďte je na hřídel, až uslyšíte, že s kliknutím zapadly na své místo.
Vložení nabíjecí baterie
Před použitím je nutné vložit nabíjecí baterii.
Poznámka: S nabíjecí baterií zacházejte opatrně. Dejte pozor, abyste ji
neupustili na zem. Zajistíte tak maximální životnost baterie.
1 Odblokujte kryt prostoru pro baterii stisknutím jeho vroubkovaných částí.
Čeština
35
2 Vysuňte kryt prostoru pro baterii ven z robota.
3 Sejměte z nabíjecí baterie plastový obal.
4 Nabíjecí baterii vložte do prostoru pro baterii.
Poznámka: Baterie musí být umístěna potištěnou stranou nahoru a se
správně orientovanými konektory.
5 Zasuňte kryt prostoru pro baterii zpět do robota.

1
2
100 cm
30 cm
80 c
m
36
Čeština
Odebrání štítku z dálkového ovladače
Dálkový ovladač je napájen knoflíkovou baterií CR2025. Baterie je opatřena
ochranným štítkem, který je nutné před prvním použitím vyjmout.
1 Vytáhněte ochranný štítek z prostoru pro baterii dálkového ovladače.
Dálkový ovladač je připraven k použití.
Příprava k použití
Instalace dokovací stanice
1 Zapojte malou zástrčku adaptéru do zásuvky na dokovací stanici (1) a
adaptér zapojte do zásuvky ve zdi (2).
-
Rozsvítí se displej dokovací stanice.
2 Umístěte dokovací stanici na vodorovný povrch ke zdi.
Poznámka: Zkontrolujte, že ve vzdálenosti 80 cm vpředu, 30 cm napravo
a 100 cm nalevo od dokovací stanice nejsou žádné překážky ani výškové
předěly.
Tip: Aby dokovací stanice zůstala jistě na vybraném místě, připevněte ji
ke stěně šrouby nebo dvěma kousky oboustranné lepicí pásky.

Nabíjení
Čeština
První nabíjení robota, stejně jako nabíjení zcela vybité baterie, trvá čtyři
hodiny.
Robota lze nabíjet dvěma způsoby:
-
v dokovací stanici buď ručně nebo automaticky při používání;
-
připojením robota přímo do zásuvky.
Poznámka: Na plně nabitou baterii může robot uklízet až 120 minut.
Nabíjení v dokovací stanici
1 Zapněte robota stisknutím vypínače.
2 Vložte robota do dokovací stanice připojené k elektrické zásuvce.
37
3 Tlačítko spuštění/zastavení začne blikat.
Poznámka: Protože jde o první nabíjení robota, na displeji robota se
zobrazí symbol spouštění systému.
4 Když je baterie plně nabita, tlačítko spuštění/zastavení nepřetržitě svítí.
Automatické nabíjení při používání

1
2
38
Čeština
1 Když robot dokončí čištění nebo když nabití baterie klesne pod 15 %,
robot automaticky vyhledá dokovací stanici, aby dobil baterii. Když robot
hledá dokovací stanici, rozsvítí se světlo na tlačítku spuštění/zastavení
oranžově.
2 Když je baterie plně nabita, tlačítko spuštění/zastavení nepřetržitě svítí.
Poznámka: Robot dokovací stanici vyhledá pouze v případě, že čištění
zahájil z ní.
Nabíjení přímo ze zásuvky
1 Zapněte robota stisknutím vypínače.
2 Zapojte malou zástrčku adaptéru do zdířky na robotovi (1). Adaptér
zapojte do zásuvky ve zdi (2).
3 Pokud je robot správně připojen k elektrické zásuvce, tlačítko
spuštění/zastavení bude pomalu blikat na znamení toho, že robot se
nabíjí.
4 Když je baterie plně nabita, tlačítko spuštění/zastavení nepřetržitě svítí.
Příprava místnosti na úklid
Než pošlete robota na úklid, odeberte z podlahy všechny volné a křehké
předměty. Také ze země odstraňte veškeré kabely a dráty.
Používání robota
Spuštění a zastavení
1 Nastavte vypínač na straně robota do polohy „zapnuto“.
2 Stiskněte tlačítko spuštění/zastavení.
-
Můžete stisknout tlačítko spuštění/zastavení na robotovi.

Čeština
-
Můžete také stisknout tlačítko spuštění/zastavení na dálkovém
ovladači nebo ukazovátku (jen FC8820).
3 Tlačítko spuštění/zastavení začne nepřetržitě svítit a robot začne uklízet.
4 Robot bude uklízet v režimu automatického čištění, dokud se baterie
skoro nevybije. V režimu automatického čištění robot opakuje předem
dané pořadí schémat pohybu Z, náhodného čištění, pohybu podél stěn a
spirály.
Poznámka: Chcete-li vybrat jeden režim, stiskněte příslušné tlačítko
režimu čištění na dálkovém ovladači. Další podrobnosti najdete v části
„Výběr čisticího režimu“.
5 Když se baterie blíží vybití, rozsvítí se tlačítko spuštění/zastavení
oranžově a robot vyhledá dokovací stanici, aby se nabil.
6 Stisknutím tlačítka spuštění/zastavení lze také čištění přerušit nebo
zastavit. Když tlačítko spuštění/zastavení stisknete znovu a baterie je
dostatečně nabitá, bude robot pokračovat v režimu automatického
čištění.
39
7 Chcete-li, aby se robot vrátil do dokovací stanice dříve, než se mu vybije
baterie, stiskněte dokovací tlačítko na dálkovém ovladači nebo na
ukazovátku (jen FC8820). Indikátor dokování na displeji robota začne
blikat a robot se vrátí do dokovací stanice.
Poznámka: Pokud jste robota nespustili z dokovací stanice, při vybití
baterie robot stanici automaticky nevyhledá. Pokud je baterie robota
ještě dost nabitá, můžete stisknout dokovací tlačítko na dálkovém
ovladači nebo na ukazovátku (jen FC8820), aby se robot vrátil do
dokovací stanice. Pokud je baterie zcela vybitá, musíte robota do
dokovací stanice umístit ručně.

40
Čeština
Výběr čisticího režimu
Robot má kromě režimu automatického čištění další čtyři režimy čištění,
které můžete vybrat stisknutím příslušného tlačítka na dálkovém ovladači.
Poznámka: Ručně vybrané režimy jsou aktivní pouze po několik minut. Poté
se robot přepne zpět do režimu automatického čištění.
Schéma Z
Při čištění podle schématu Z čistí robot velké plochy v místnosti pohybem ve
smyčkách tvaru písmene Z.
Náhodný režim
V tomto režimu se robot při úklidu místnosti pohybuje střídavě rovnými a
křížovými pohyby.
Režim pohybu podél stěn
V tomto režimu se robot pohybuje podél stěn místnosti, aby oblasti podél
stěn vyčistil pečlivěji.
Spirálový režim
V tomto režimu se robot pohybuje po spirálové dráze, aby důkladně vyčistil
malou oblast. Ve spirálovém režimu běží ventilátor v rychlosti turbo (jen
FC8820).

Ruční ovládání
1 Pohyb robota po místnosti můžete ovládat tlačítky šipek kolem tlačítka
spuštění/zastavení na dálkovém ovladači.
Poznámka: Když robota ovládáte ručně, dávejte pozor na výškové
předěly a schody.
Poznámka: Funkce vysávání a postranní kartáčky fungují, pouze když
robot jede dopředu. Tlačítka doleva, doprava a dozadu slouží pouze
k manévrování s robotem.
Používání tlačítka doby čištění
-
Pokud chcete, aby robot uklízel v režimu automatického čištění až do
vybití baterie, stiskněte tlačítko maximální doby čištění. Pokud úklid začal
z dokovací stanice, vrátí se robot po dokončení úklidu automaticky do
dokovací stanice. Pokud byl robot na začátku úklidu jinde v místnosti,
odešlete ho zpět do dokovací stanice stisknutím tlačítka dokování.
-
Ostatní tlačítka doby úklidu vám umožňují zadat úklid na dobu 60, 45
a 30 minut. Když proběhne zadaná doba, robot se automaticky vrátí do
dokovací stanice, pokud úklid zahájil z dokovací stanice. Pokud byl robot
na začátku úklidu jinde v místnosti, odešlete ho zpět do dokovací stanice
stisknutím tlačítka dokování.
Čeština
41
Ovládání dokovací stanice
Nastavení data a času na hodinách
Chcete-li používat čisticí programy, musíte nejprve na displeji dokovací
stanice nastavit datum, čas a den v týdnu.
Poznámka: Obrázky k následujícím pokynům najdete na listech na konci
návodu.
1 Stiskněte tlačítko SET. Indikátor nastavení a indikátor času hodin začnou
blikat.
2 Stiskněte jednou tlačítko výběru. Začne blikat údaj hodin.
3 Pomocí tlačítek + a - na dokovací stanici nastavte hodinu. Nastavená
hodina se zobrazí na displeji.
4 Potvrďte nastavenou hodinu stisknutím tlačítka výběru. Začne blikat
indikátor času v minutách.
5 Tlačítky + nebo - na dokovací stanici nastavte minuty. Nastavené minuty
se zobrazí na displeji.
42
Čeština
6 Potvrďte nastavené minuty stisknutím tlačítka výběru. Začne blikat
indikátor „Su“ (Sunday, neděle).
7 Pomocí tlačítek + a - na dokovací stanici nastavte dnešní den v týdnu.
8 Stisknutím tlačítka výběru potvrďte nastavený den.
9 Stisknutím tlačítka nastavení potvrďte nastavení času a dne v týdnu.
Indikátor nastavení i indikátor času hodin přestanou blikat a rozsvítí se.
Programování doby úklidu
Po nastavení data, času a dne v týdnu na displeji dokovací stanice můžete
naprogramovat dobu úklidu robota.
Poznámka: Obrázky k následujícím pokynům najdete na listech na konci
návodu.
Možnosti naprogramování:
Program Indikace na displeji
Každodenní úklid Zapnuté indikace celý den
Úklid v pracovní dny Zapnuté indikace Po – Pá (Mo – Fri)
Úklid 2 dny po sobě Zapnuté indikace 2 dnů, například Pá a So (Fri a Sa)
Úklid jeden den v týdnu Zapnutá indikace jednoho dne
1 Stiskněte tlačítko SET. Indikátor nastavení a indikátor programu úklidu
začnou blikat.
2 Stiskněte jednou tlačítko výběru. Začne blikat údaj hodin.
3 Tlačítky + nebo - na dokovací stanici nastavte hodiny. Na displeji se
zobrazí nastavená hodina.
4 Potvrďte nastavenou hodinu stisknutím tlačítka výběru. Začne blikat
indikátor času v minutách.
5 Tlačítky + a − na dokovací stanici nastavte minuty. Nastavené minuty se
zobrazí na displeji.
6 Potvrďte nastavené minuty stisknutím tlačítka výběru. Začne blikat
indikátor „Su“ (Sunday, neděle).
7 Pomocí tlačítek + a - na dokovací stanici lze přepínat mezi programy
úklidu (možnosti programování najdete v předcházející tabulce).
8 Stisknutím tlačítka výběru potvrďte vybraný program.
9 Stisknutím tlačítka nastavení potvrďte naprogramování. Oba indikátory,
režimu nastavení i programu úklidu, přestanou blikat a rozsvítí se.
10 Po nastavení programu úklidu se na displeji zobrazí indikátor
naprogramovaného úklidu a indikátory vybraných dnů. Když necháte
robota v pohotovostním režimu a s nabitou baterií, robot začne uklízet
v naprogramované dny v naprogramovaném čase.
1
2
3
Tlačítka rychlosti ventilátoru
Pomocí tlačítek rychlosti ventilátoru můžete zvýšit rychlost ventilátoru na
turbo nebo ventilátor vypnout. Ve výchozím nastavení je rychlost ventilátoru
normální.
1 Stisknutím tohoto tlačítka ventilátor vypnete.
2 Stisknutím tohoto tlačítka přepnete ventilátor do normální rychlosti.
3 Tlačítko rychlosti turbo zvýší otáčky ventilátoru (jen FC8820).
Reakce na tlesknutí
Reakce na tlesknutí, když se robot nachází v režimu spánku, je aktivní
v následujících situacích:
-
čištění bylo zastaveno z důvodu chyby,
-
naprogramovali jste příliš krátký čas čištění,
-
robot nedokázal během 20 minut najít dokovací stanici.
Pokud robota nevidíte, můžete ho najít jedním tlesknutím. Robot zareaguje
vydáním zvukového signálu a rozsvícením všech ikon na displeji.
Používání nástavce na suché utěrky
Funkce nástavce na suché utěrky umožňuje vytírat podlahy suchými
utěrkami.
Poznámka: Robot s připojeným nástavcem na suché utěrky může mít
problémy při přejezdu prahů nebo výstupu na koberce.
Příprava nástavce na suché utěrky k použití
1 Obraťte robota vzhůru nohama a položte ho na stůl nebo na podlahu.
2 Položte suchou utěrku na stůl a přiložte na ni nástavec na suché utěrky
tak, aby upevňovací výstupky směřovaly směrem k vám.
Čeština
43
3 Přeložte oba konce suché utěrky přes nástavec a utěrku připevněte
k nástavci zatlačením upevňovacích bloků do prohlubní.
4 Vložte nástavec na suché utěrky upevňovacími výstupky do otvoru za
kolečkem na straně robota a zatlačte na nástavec, až zaklapne na své
místo. Totéž zopakujte na druhé straně.
5 Robota převraťte a postavte ho na kolečka na podlahu. Nástavec na
suché utěrky se bude dotýkat podlahy.

1
2
44
Čeština
Používání robota s nástavcem na suché utěrky
Robot s připojeným nástavcem na suché utěrky můžete používat
v libovolném režimu na všechny tvrdé povrchy. Nepoužívejte suché utěrky
na kobercích.
Odpojení nástavce na suché utěrky
1 Po dokončení vytírání ihned nástavec na suché utěrky sejměte.
2 Obraťte robota vzhůru nohama a položte ho na stůl nebo na podlahu.
3 Zatlačte na jeden konec nástavce na suché utěrky směrem ke kolečku na
druhé straně robota. Nástavec se uvolní. Potom ho vytáhněte z robota.
Používání ukazovátka (FC8820)
Nabíjení ukazovátka
Ukazovátko má nabíjecí baterii, která se nabíjí dodaným kabelem USB.
1 Zasuňte zástrčku micro-USB do zásuvky ve spodní části ukazovátka.
2 Zapojte zástrčku USB do nabíječky USB nebo do portu USB v notebooku.
3 Kontrolka nabíjení na ukazovátku se rozsvítí. Nabíjení trvá 30 minut. Když
kontrolka nabíjení zhasne, je baterie zcela nabitá.
Navigace robota ukazovátkem

50-70 cm
50-70
cm
50-70 cm
1
2
Navigace robota ukazovátkem
-
Když stisknete a přidržíte tlačítko na ukazovátku, ukazovátko začne
vysílat
paprsek infračerveného světla. Tímto paprskem můžete přesunout
robota v daném směru. Dokud budete tlačítko držet a ukazovat směrem,
kam chcete robota přesunout, robot pojede daným směrem. Když
tlačítko uvolníte, robot zahájí úklid v automatickém režimu.
-
Ukazovátkem můžete poslat robota do určité oblasti místnosti, kterou
chcete zvláště pečlivě uklidit.
Používání jednotky neviditelné stěny (FC8820)
Vložení baterií do neviditelné stěny
Jednotka neviditelné stěny funguje na čtyři baterie typu AA.
1 Stiskněte dva uvolňovací jazýčky na spodní straně zadního krytu (1)
a vysuňte horní kryt nahoru a ven z jednotky neviditelné stěny (2).
Čeština
45
2 Vybalte čtyři nové baterie typu AA a vložte je do prostoru pro baterie
jednotky neviditelné stěny.
Poznámka: Zkontrolujte správnou orientaci + a − pólů baterií.
46
Čeština
3 Zasuňte zadní kryt na jednotce neviditelné stěny.
Zastavení robota pomocí neviditelné stěny
Neviditelná stěna slouží k tomu, aby robot nevstupoval do oblasti místnosti,
do které ho nechcete pustit.
1 Umístěte jednotku do bodu, který robot nesmí překročit (například
k otevřeným dveřím místnosti, kterou nechcete robotem uklízet).
2 Posuvným vypínačem na horní straně jednotky zapněte neviditelnou
stěnu.
3 Spusťte robota.
4 Když se robot přiblíží k neviditelné stěně, kontrolka na neviditelné stěně
začne blikat a neviditelná stěna vyšle paprsek infračerveného světla.
Paprsek infračerveného světla přinutí robota změnit trasu a přesunout se
směrem pryč od jednotky neviditelné stěny.
Poznámka: Pokud používáte neviditelnou stěnu, pravidelně kontrolujte, zda
jsou baterie nabité. Můžete se přesvědčit vypnutím a opětovným zapnutím
neviditelné stěny. Jsou-li baterie dostatečně nabité, kontrolka LED na
neviditelné stěně se krátce rozsvítí.
Čištění a údržba
Čištění robota
Aby robot mohl stále dobře uklízet, je nutné občas vyčistit senzory pádu,
kolečka, postranní kartáčky a sací otvor.
1 Zkontrolujte, že je vypínač v poloze „vypnuto“.
2 Položte robota vzhůru nohama na rovný povrch.
4
3
1
2
1
2
3
Čeština
3 Pomocí kartáčku s měkkými štětinami (např. kartáčku na zuby) odstraňte
prach a nečistoty ze senzorů pádu a vyčistěte sací otvor.
Poznámka: Senzory pádu je důležité čistit pravidelně. Se znečištěnými
senzory nemusí robot rozpoznat výškový předěl nebo schody.
4 Pomocí kartáčku s měkkými štětinami (např. kartáčku na zuby) odstraňte
prach a nečistoty z předního kolečka a bočních koleček.
5 Postranní kartáčky před čištěním uchopte za štětiny a stáhněte je
z hřídelí.
47
6 Pomocí měkkého kartáčku (např. kartáčku na zuby) nebo hadříkem
odstraňte z hřídele a z postranního kartáčku nečistoty, vlasy a nitě.
7 Zkontrolujte, zda na postranních kartáčcích nebo na spodní straně robota
nejsou nějaké ostré předměty, které by mohly poškodit podlahu.
Vyprazdňování a čištění nádoby na prach
Pokud indikátor naplnění nádoby na prach nepřetržitě svítí, vysypte
a vyčistěte nádobu na prach.
1 Zkontrolujte, že je vypínač v poloze „vypnuto“.

48
Čeština
2 Vyjměte kryt.
3 Zatáhněte za rukojeť víka nádoby na prach a vyjměte nádobu na prach
z prostoru pro nádobu na prach směrem nahoru.
Poznámka: Když nádobu na prach vyjímáte nebo vracíte na místo, dejte
pozor, abyste nepoškodili lopatky ventilátoru.
4 Opatrně zvedněte víko nádoby na prach (1) a vyjměte filtr (2).
5 Vyklepejte nádobou na prach nad odpadkovým košem. Vyčistěte filtr a
vnitřek nádoby na prach hadříkem nebo kartáčkem s měkkými štětinami.
Vyčistěte i sací otvor v dolní části nádoby na prach.
Upozornění: Nádobu na prach ani filtr nemyjte vodou ani v myčce na
nádobí.
6 Vložte filtr zpět do nádoby na prach (1). Poté nádobu na prach (2)
přikryjte víkem.

1
2
7 Vraťte nádobu na prach zpět do jejího prostoru a vraťte horní kryt robota
na místo.
Upozornění: Vždy se ujistěte, že se v nádobě na prach nachází filtr.
Pokud robota budete používat bez filtru v nádobě na prach, dojde
k poškození motoru.
Výměna
Objednávání příslušenství
Chcete-li koupit příslušenství nebo náhradní díly, navštivte adresu
www.shop.philips.com/service nebo se obraťte na prodejce výrobků
Philips. Můžete se také obrátit na středisko péče o zákazníky společnosti
Philips ve své zemi (kontaktní údaje naleznete na letáčku s celosvětovou
zárukou).
Výměna filtru
Pokud je filtr velmi špinavý nebo poškozený, vyměňte ho. Novou sadu filtrů
si můžete objednat pod typovým číslem FC8066. V části „Vyprazdňování a
čištění nádoby na prach“ v kapitole „Čištění a údržba“ najdete pokyny, jak
filtr vyjmout z nádoby na prach a jak ho vložit zpět.
Čeština
49
Výměna postranních kartáčků
Po určité době postranní kartáčky vyměňte, abyste zajistili kvalitní výsledky
čištění.
Postranní kartáčky měňte vždy, když si všimnete známek opotřebení nebo
poškození. Doporučujeme měnit vždy oba kartáčky najednou. Náhradní
postranní kartáčky lze objednat jako součást výměnné soupravy FC8068.
Souprava obsahuje dva filtry a tři suché utěrky.
1 Zkontrolujte, že je vypínač v poloze „vypnuto“.
2 Postranní kartáčky, které chcete vyměnit, uchopte za štětiny a stáhněte je
z hřídelí.

this side up
this side up
50
Čeština
3 Nasuňte na hřídel nový postranní kartáček.
Výměna nabíjecí baterie
Nabíjecí baterii vyměňte v případě, že ji již není možné znovu nabít nebo
pokud se rychle vybíjí. Novou baterii si můžete objednat pod objednacím
číslem CP0113 (pro model FC8820) nebo CP0112 (pro model FC8810).
1 Zkontrolujte, že vypínač robota je v poloze „vypnuto“.
2 Nechte robota zapnutého, dokud se baterie nevybije, abyste se ujistili, že
bude baterie zcela vybitá, než ji vyjmete z přístroje a zlikvidujete.
3 Stiskněte kryt prostoru pro baterii a vysuňte ho z robota.
4 Z otvoru na baterii vyjměte starou nabíjecí baterii.
5 Do prostoru na baterii vložte novou nabíjecí baterii.
6 Zasuňte kryt prostoru pro baterii zpět do robota.

Výměna suchých utěrek
2
3
1
Nové suché utěrky si můžete objednat jako součást výměnné soupravy
FC8068. Výměnná souprava obsahuje také dva postranní kartáčky a dva
filtry.
Výměna baterie dálkového ovladače
Dálkový ovladač je napájen knoflíkovou baterií CR2025. Baterii vyměňte,
pokud robot nereaguje na stisknutí tlačítek dálkového ovladače.
1 Podržte dálkový ovladač vzhůru nohama. Stiskněte uvolňovací tlačítko na
držáku baterie a zároveň z dálkového ovladače vysuňte držák baterie.
2 Vyjměte vybitou baterii z držáku baterie a vložte do něj novou baterii.
Poté držák baterie zasuňte zpět do dálkového ovladače.
Čeština
51
Recyklace
-
Tento symbol znamená, že výrobek nelze likvidovat s běžným
komunálním odpadem (2012/19/EU).
-
Tento symbol znamená, že výrobek obsahuje jednorázové baterie, které
nesmí být likvidovány společně s běžným domácím odpadem
(2006/66/ES).
-
Dodržujte místní předpisy týkající se tříděného sběru elektrických a
elektronických výrobků a baterií. Správnou likvidací pomůžete zabránit
negativním dopadům na životní prostředí a lidské zdraví.
Vyjmutí jednorázových baterií
Chcete-li vyjmout jednorázové baterie, přečtěte si pokyny ke vkládání
a vyjímání baterií v uživatelské příručce.

52
Čeština
Řešení problémů
V této kapitole jsou shrnuty nejběžnější problémy, se kterými se můžete
u přístroje setkat. Pokud se vám nepodaří problém vyřešit za pomoci
následujících informací, navštivte web www.philips.com/support, kde
najdete odpovědi na nejčastější dotazy. Případně kontaktujte středisko péče
o zákazníky ve své zemi.
Problém Možná příčina Řešení
Po stisknutí tlačítka
spuštění/zastavení robot
nezačne uklízet.
Nabíjecí baterie je vybitá. Nabijte baterii (viz kapitola „Příprava
Malá zástrčka je stále
zapojena v zásuvce robota.
k použití“).
Robota nelze provozovat, je-li napájen ze
sítě. Lze ho napájet pouze z baterie. Proto
před použitím vždy odpojte adaptér od
robota a ze síťové zásuvky.
Indikátor varování rychle
bliká.
Vypínač není v poloze
„zapnuto“ (I).
Zaseklo se jedno nebo obě
kolečka.
Zasekl se jeden nebo oba
postranní kartáčky.
Horní kryt chybí nebo není
správně zavřený.
Zasekl se nárazník. Stiskněte tlačítko spuštění/zastavení.
Robot byl během čištění
zvednut.
Stiskněte vypínač. Stiskněte tlačítko
spuštění/zastavení na robotovi nebo na
dálkovém ovladači pro spuštění úklidu.
Přepněte vypínač do polohy „vypnuto“.
Odstraňte nečistoty, vlasy a kousky nití
nebo drátů, které se zachytily kolem
závěsu kolečka.
Vyčistěte postranní kartáčky (viz kapitola
„Čištění a údržba“).
Robot nefunguje, když chybí horní kryt
nebo není správně uzavřen. Umístěte horní
kryt na robota správně.
Zvedněte robota, aby se jeho nárazník
uvolnil. Umístěte robota dále od překážky
a stiskněte tlačítko spuštění/zastavení, aby
v čištění pokračoval.
Stiskněte tlačítko spuštění/zastavení.
Položte robota na podlahu. Stiskněte
tlačítko spuštění/zastavení, aby robot
pokračoval v čištění.

Problém Možná příčina Řešení
Robot neuklízí řádně.
Štětiny jednoho nebo obou
kartáčků jsou zkřivené nebo
ohnuté.
Namočte kartáček nebo kartáčky na chvíli
do teplé vody. Pokud se tímto štětiny
nenarovnají, postranní kartáčky vyměňte
(viz kapitola „Výměna“).
Čeština
53
Baterii již není možné
nabít nebo se velmi
rychle vybíjí.
Baterie dálkového
ovladače se příliš rychle
vybíjí.
Filtr v nádobě na prach je
znečištěný.
Sací otvor v dolní části
nádoby na prach je ucpaný.
Přední kolečko se zaneslo
vlasy nebo jinými nečistotami.
Robot uklízí velmi tmavý
nebo lesklý povrch, který
aktivuje senzory pádu. Robot
se poté pohybuje po
neobvyklých schématech.
Robot čistí podlahu, která
velmi silně odráží sluneční
světlo. To aktivuje senzory
pádu a způsobuje neobvyklý
pohyb robota.
Životnost nabíjecí baterie
skončila.
Možná jste do ovladače
vložili špatný typ baterie.
Vyčistěte filtr nádoby na prach hadříkem
nebo kartáčkem s měkkými štětinami.
Pokud čištění kartáčkem nebo vysavačem
nepomůže filtr zbavit nečistot, vyměňte
filtr za nový. Doporučujeme filtr vyměnit
aspoň jednou ročně.
Vyčistěte sací otvor (viz kapitola Čištění a
údržba).
Vyčistěte přední kolečko (viz kapitola
Čištění a údržba).
Stiskněte tlačítko spuštění/zastavení a
přesuňte robota na světlejší podlahu.
Pokud problém přetrvává i na světlejších
podlahách, navštivte webovou stránku
www.philips.com/support nebo se obraťte
na středisko péče o zákazníky ve své zemi.
Zatažením závěsů zabraňte slunečnímu
světlu v přístupu do místnosti. Popřípadě
můžete čištění spustit, až bude slunce
méně svítit.
Vyměňte nabíjecí baterii (viz kapitola
Výměna).
Pro dálkový ovladač potřebujete
knoflíkovou baterii CR2025. Pokud
problém přetrvává, navštivte webovou
stránku www.philips.com/support nebo se
obraťte na středisko péče o zákazníky ve
své zemi.
Robot se pohybuje
v kruzích.
Robot je v režimu bodového
čištění.
Jedná se o normální chování. Spirálový
režim lze aktivovat, když je na podlaze
mnoho špíny, aby bylo zaručeno důkladné
vyčištění. Také je součástí režimu
automatického čištění. Po přibližně jedné
minutě se robot vrátí do svého normálního
úklidového schématu. Spirálový režim
můžete zastavit také tím, že na dálkovém
ovladači zvolíte jiný režim čištění.

54
Čeština
Problém Možná příčina Řešení
Robot nemůže najít
dokovací stanici.
Robot nemá dost místa, aby
se dostal k dokovací stanici.
Zkuste pro dokovací stanici najít jiné místo.
Viz „Instalace dokovací stanice“ v kapitole
„Příprava k použití“.
Robot pípá, když je
v dokovací stanici.
Robot stále aktivně
vyhledává.
Robot nebyl spuštěn
z dokovací stanice.
Pokoušíte se robota nabít
s vypínačem v poloze
„vypnuto“.
Dejte robotovi zhruba 20 minut, aby se
vrátil do dokovací stanice.
Pokud chcete, aby se robot po dokončení
čištění vrátil do dokovací stanice, spusťte
ho z ní.
Zapněte robota stisknutím vypínače.
Chybové kódy
Chybový kód Možná příčina Řešení
E1 Zaseknutá kolečka Odstraňte překážku a tlačítkem
E2 Nesprávně umístěný
horní kryt nebo nádoba
na prach
E3 Zaseknutý nárazník Odstraňte překážku. Kód chyby z displeje
E4 Robot není položen na
zemi.
E5 Příliš tmavá podlaha Umístěte robota na světlejší oblast podlahy.
spuštění/zastavení obnovte úklid.
Nádobu na prach správně vložte do robota a
řádně uzavřete horní kryt robota. Kód chyby
z displeje automaticky zmizí.
automaticky zmizí.
Položte robota zpět na podlahu, kód chyby
z displeje automaticky zmizí.
Vyčistěte senzory pádu.
E6
Nesprávně vložená
baterie
Chyba nabíjení Zkontrolujte, zda je vypínač v poloze
Přečtěte si pokyny v části „Vložení nabíjecí
baterie do robota“ v kapitole „Před prvním
použitím“.
„zapnuto“, když je robot v dokovací stanici.
www.philips.com/support
1x
1x
Min
Plus
Set
Select
1 2
3 4 5
6 7 8
9
Čeština
55

1x
2x
1 2 3
4 5 6
7
8 9 11
56
Čeština

Įvadas
2
1
3
45
Sveikiname įsigijus „Philips“ gaminį ir sveiki atvykę! Norėdami pasinaudoti
visa „Philips“ siūloma pagalba, savo gaminį užregistruokite adresu
www.philips.com/welcome.
Bendrasis aprašymas
1 Dulkių talpyklos dangtelio rankena
2 Dulkių talpyklos dangtelis
3 Filtras
4 Dulkių talpykla
5 Viršutinis dangtelis
6 Klaidų kodų lentelė
7 Ventiliatorius
8 Buferis
9 Doko jutiklis
10 Maitinimo jungiklis (robotui įjungti arba išjungti).
11 Priekinis ratukas
12 Šoninių šepečių velenėliai
13 Aukščio jutikliai
14 Ratukai
15 Baterijos skyrius
16 Siurbimo anga
17 Šoniniai šepečiai
18 Pakartotinai įkraunama baterija
19 Baterijos skyriaus dangtelis
20 Sausų šluosčių fiksatoriai
21 Sausų šluosčių laikiklis
22 Sausos šluostės
23 Baterijos laikiklis
24 Nuotolinio valdymo pultas
25 Įkrovimo laidas
26 Žymeklis
27 Virtualiosios sienos įrenginys (FC8820)
28 Dokas
29 Adapteris
30 Mažas kištukas
Lietuviškai
57
Ekranas ir nuotolinio valdymo pultas
Nuotolinio valdymo pultas (FC8820)
1 Naršymo mygtukai ir paleidimo ir stabdymo mygtukas
2 Valymo laiko mygtukai
3 Valymo režimo mygtukai
4 Ventiliatoriaus greičio mygtukai
5 Doko mygtukas
Lietuviškai
1
2
3
46
5
1
2
5
4
3
2
1
58
Lietuviškai
Nuotolinio valdymo pultas (FC8810)
1 Naršymo mygtukai ir paleidimo ir stabdymo mygtukas
2 Valymo laiko mygtukai
3 Valymo režimo mygtukai
4 Ventiliatoriaus išjungimo mygtukas
5 Ventiliatoriaus įjungimo mygtukas
6 Doko mygtukas
Doko valdymo pultas
1 Ekranas su laiko, dienos ir programavimo indikatoriais
2 Reguliavimo ir nustatymo mygtukai
Žymeklis (FC8820)
1 Žymeklio mygtukas
2 Įjungimo ir išjungimo mygtukas
3 Valymo režimo mygtukai
4 Valymo laiko mygtukai
5 Doko mygtukas
Kaip veikia jūsų robotas
Ką jūsų robotas valo
Šiame robote įdiegtos funkcijos, kurios jį padaro tinkamu valytuvu,
padedančiu jums valyti savo namų grindis.
Šis robotas ypač tinkamas valyti kietas grindis, kaip medines, plytelių ar
linoleumo grindis. Gali kilti problemų valant minkštas grindis, kaip kilimus ar
demblius. Jei naudojate robotą ant kilimo ar demblio, pirmą kartą būkite
netoliese, kad pamatytumėte, ar robotas gali susidoroti su šio tipo grindimis.
Robotui taip pat reikalinga priežiūra, kai naudojate jį ant labai tamsių ar
blizgančių kietų grindų.
Kaip jūsų robotas valo
Valymo sistema
Roboto 3 lygių valymo sistema leidžia veiksmingai išvalyti grindis.
-
Du roboto šoniniai šepečiai padeda robotui išvalyti kampus ir pasienius.
Jie taip pat padeda pašalinti purvą nuo grindų ir perkelti jį link įsiurbimo
angos.
-
Roboto siurbimo galia surenka nešvarumus, kurie per siurbimo angą
patenka į dulkių talpyklą.
-
Siurblyje yra laikiklis sausoms šluostėms, kuriomis dar geriau galite išvalyti
kietas grindis.
Valymo trajektorijos
Automatiniu valymo režimu robotas naudoja automatines valymo
trajektorijas, kad optimaliai išvalytų visas patalpos sritis. Naudojamos šios
valymo trajektorijos:
1 Z arba zigzaginė trajektorija
Lietuviškai
59
2
Atsitiktinė trajektorija
3 Trajektorija palei sieną

60
Lietuviškai
4 Spiralinė trajektorija
Automatiniu valymo režimu robotas naudoja šias trajektorijas fiksuota seka:
zigzago trajektoriją, trajektoriją palei sieną ir spiralinę trajektoriją.
Kai robotas užbaigia šią trajektorijų seką, jis vėl pradeda judėti Z trajektorija.
Robotas toliau naudoja šią trajektorijų seką valyti patalpai, kol pakartotinai
įkraunama baterija ima sekti, arba kol yra išjungiamas rankomis.
Jei robotas valydamas aptinka itin nešvarią sritį, įjungiamas spiralinis režimas
ir ventiliatoriaus turbogreitis (tik FC8820), kad būtų tinkamai pašalinti
nešvarumai.
Pastaba. Taip pat kiekvieną režimą galite įjungti patys, paspausdami
atitinkamą nuotolinio valdymo pulto arba žymeklio mygtuką (tik FC8820).
Rankomis pasirinkti režimai aktyvūs tik kelias minutes. Paskui robotas
persijungia į atgal automatinio valymo režimą.
Išsamesnę informaciją žr. skyriaus „Jūsų roboto naudojimas“ skirsnyje
„Valymo režimai“.
Kaip robotas išvengia aukščio skirtumų
Roboto apatinėje dalyje yra trys aukščio jutikliai. Šiuos aukščio jutiklius jis
naudoja nustatyti aukščio skirtumus ir jų išvengti, pvz., laiptinių.
Pastaba. Normalu, kad robotas juda šiek tiek už aukščio skirtumo krašto, nes
priekinis aukščio jutiklis yra už buferio.
Atsargiai! Kai kuriais atvejais aukščio jutikliai gali laiku neaptikti laiptinės
ar kitų aukščio skirtumų. Todėl atidžiai stebėkite robotą pirmus kelis
naudojimo kartus ir kai jį naudojate šalia laiptinės ar kito aukščio
skirtumo. Svarbu reguliariai valyti aukščio jutiklius norint užtikrinti, kad
robotas ir toliau tinkamai aptiks aukščio skirtumus (instrukcijas žr.
skyriuje „Valymas ir priežiūra“).
Prieš naudojant pirmą kartą
Šoninių šepečių tvirtinimas
1 Išpakuokite šoninius šepečius ir padėkite apverstą robotą ant stalo ar
grindų.
2 Uždėkite šoninius šepečius ant roboto apatinėje pusėje esančių
velenėlių.
Pastaba. Įsitikinkite, kad tinkamai uždėjote šoninius šepečius. Spauskite
juos ant velenėlio, kol išgirsite, kad jie spragtelėję užsifiksavo.
Pakartotinai įkraunamos baterijos įdėjimas
1
2
this side up
Prieš naudodami turite įdėti pakartotinai įkraunamą bateriją.
Pastaba. Su pakartotinai įkraunama baterija elkitės atsargiai. Būkite atsargūs,
nenumeskite baterijos. Taip bus užtikrintas maksimalus jūsų baterijos
naudojimo laikas.
1 Paspauskite rantuotas vietas ant baterijos skyriaus dangtelio, kad jį
atidarytumėte.
2 Pastumkite baterijos skyriaus dangtelį ir nuimkite jį nuo roboto.
3 Nuimkite plastiką nuo pakartotinai įkraunamos baterijos.
Lietuviškai
61
4 Įstatykite pakartotinai įkraunamą bateriją į baterijos skyrių.
Pastaba. Įsitikinkite, kad spaudinys ant baterijos yra nukreiptas aukštyn, o
kontaktai nukreipti į dešinę.
5 Uždėkite baterijos skyriaus dangtelį ant roboto.
Juostelės ištraukimas iš nuotolinio valdymo pulto
Nuotolinio valdymo pulte naudojama CR2025 monetos formos baterija. Ši
baterija yra apsaugota apsaugine juostele, kurią prieš naudojant reikia
ištraukti.
1 Ištraukite baterijos apsauginę juostelę iš nuotolinio valdymo pulto
baterijos skyriaus. Dabar nuotolinio valdymo pultas paruoštas naudoti.
1
2
100 cm
30 cm
80 c
m
62
Lietuviškai
Paruošimas naudoti
Doko montavimas
1 Mažą adapterio kištuką įstatykite į doko lizdą (1), o adapterį prijunkite prie
elektros lizdo sienoje (2).
-
Doko ekranas įjungiamas.
2 Doką pastatykite ant horizontalaus, lygaus grindų paviršiaus prie sienos.
Pastaba. Įsitikinkite, kad aplink nėra jokių kliūčių ar aukščio skirtumų 80
cm priekyje, 30 cm dešinėje ir 100 cm kairėje doko pusėje.
Patarimas. Kad dokas tvirtai laikytųsi pasirinktoje vietoje, jį prie sienos
pritvirtinkite sraigtais arba dviem dvipusės lipnios juostos juostelėmis.
Įkrovimas
Įkraunant pirmą kartą ir roboto pakartotinai įkraunamai baterijai esant
visiškai išeikvotai įkrovimas trunka keturias valandas.
Robotą galite įkrauti dviem būdais:
-
doke rankomis arba automatiškai, naudojant;
-
prijungę robotą tiesiogiai prie elektros tinklo.
Pastaba. Kai pakartotinai įkraunama baterija visiškai įkraunama, robotas
veikia iki 120 minučių.
Įkrovimas doke
1 Paspauskite maitinimo jungiklį, kad robotą įjungtumėte.
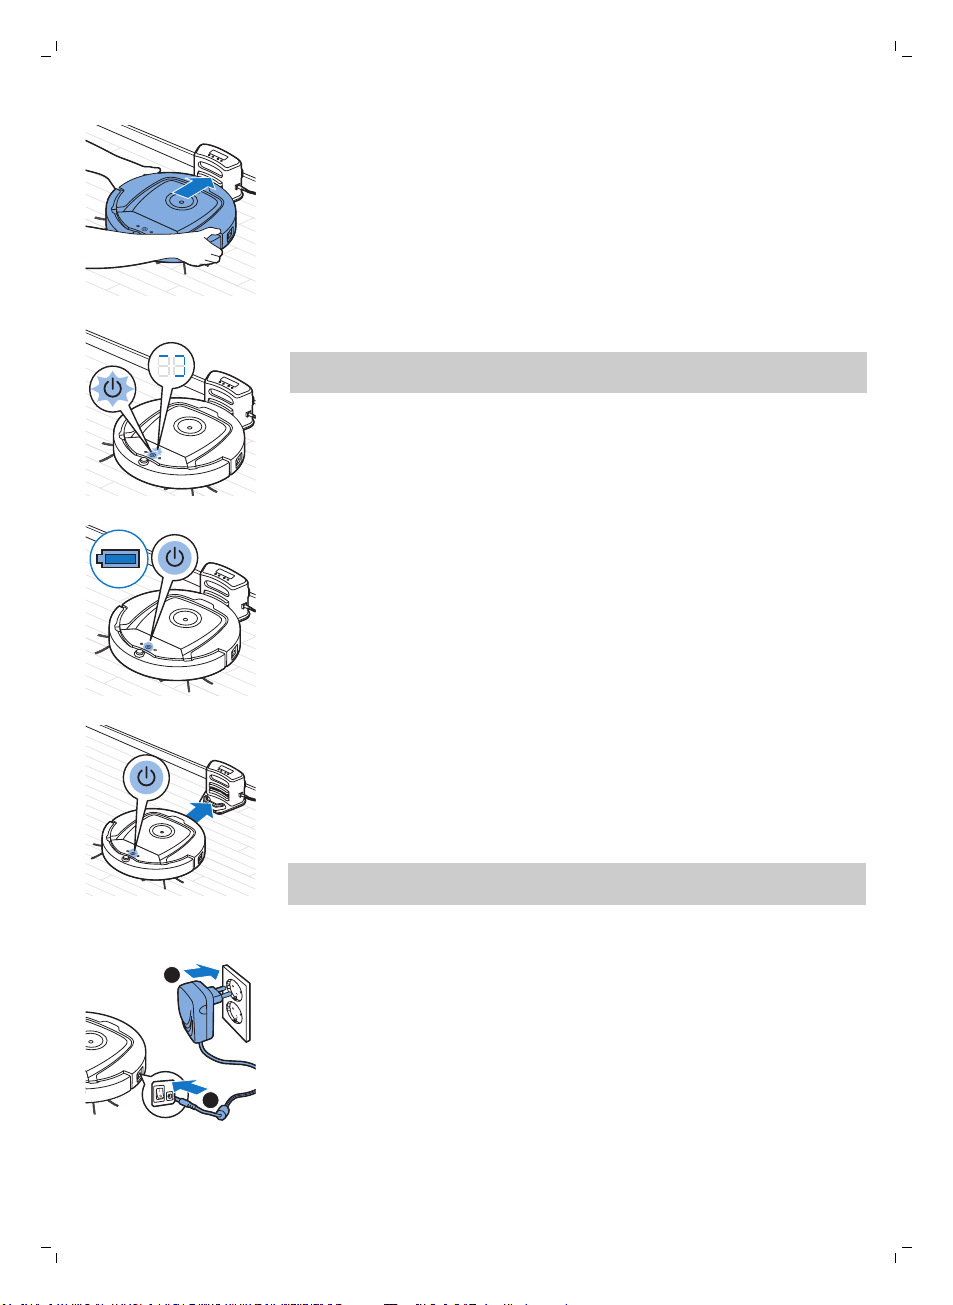
1
2
Lietuviškai
2 Padėkite robotą ant įjungto doko.
3 Paleidimo ir stabdymo mygtukas pradeda mirksėti.
Pastaba. Kadangi robotą įkraunate pirmą kartą, roboto ekrane rodomas
paleidimo indikatorius.
4 Kai pakartotinai įkraunama baterija yra visiškai įkrauta, paleidimo ir
stabdymo mygtukas šviečia nuolat.
63
Automatinis įkrovimas naudojant
1 Kai robotas baigia valyti arba kai lieka tik 15 % baterijos įkrovos, jis
automatiškai ieško doko įsikrauti. Kai robotas ieško doko, paleidimo ir
stabdymo mygtuko šviesa tampa oranžinė.
2 Kai pakartotinai įkraunama baterija yra visiškai įkrauta, paleidimo ir
stabdymo mygtukas šviečia nuolat.
Pastaba. Robotas doko ieško automatiškai tik tada, kai valyti pradeda nuo
doko.
Įkrovimas tiesiai iš elektros tinklo
1 Paspauskite maitinimo jungiklį, kad robotą įjungtumėte.
2 Įkiškite mažąjį adapterio kištuką į roboto lizdą (1). Adapterį įjunkite į sieninį
elektros lizdą (2).
3 Kai robotas tinkamai prijungtas prie elektros tinklo, paleidimo ir stabdymo
mygtukas pradeda retai mirksėti. Tai rodo, kad robotas įkraunamas.
4 Kai pakartotinai įkraunama baterija yra visiškai įkrauta, paleidimo ir
stabdymo mygtukas šviečia nuolat.

64
Lietuviškai
Patalpos paruošimas valyti
Prieš paleisdami robotą valyti įsitikinkite, kad nuo grindų pakėlėte visus
išmėtytus ir dūžtančius daiktus. Taip pat nuo grindų pašalinkite visus
kabelius, laidus ir virves.
Roboto naudojimas
Paleidimas ir sustabdymas
1 Perjunkite maitinimo jungiklį roboto šone į įjungimo padėtį.
2 Paspauskite paleidimo ir stabdymo mygtuką.
-
Galite paspausti roboto paleidimo ir stabdymo mygtuką.
-
Taip pat galite paspausti nuotolinio valdymo pulto arba žymeklio (tik
FC8820) įjungimo ir išjungimo mygtuką.
3 Paleidimo ir stabdymo mygtukas šviečia nuolat ir robotas pradeda valyti.
4 Robotas valo automatiniu valymo režimu, kol jo baterija pradeda išsekti.
Automatiniu režimu jis kartoja zigzago formos, atsitiktinę, pasienio ir
spiralinę trajektorijų sekas.
Pastaba. Norėdami pasirinkti atskirą režimą, paspauskite vieną iš režimo
mygtukų nuotolinio valdymo pulte. Išsamesnę informaciją žr. skyriuje
„Valymo režimo pasirinkimas“.

5 Kai baterija pradeda išsekti, paleidimo ir sustabdymo mygtuko šviesa
tampa oranžine, o robotas ieško doko, kad įsikrautų.
6 Taip pat galite paspausti paleidimo ir stabdymo mygtuką, kad
nutrauktumėte valymo eigą. Jei vėl paspausite paleidimo ir stabdymo
mygtuką ir vis dar pakaks pakartotinai įkraunamos baterijos energijos,
robotas tęs valymą automatinio valymo režimu.
7 Kad robotas sugrįžtų prie doko prieš išsikraunant pakartotinai įkraunamai
baterijai, paspauskite nuotolinio valdymo pulto arba žymeklio doko
mygtuką (tik FC8820). Doko indikatorius roboto ekrane įjungiamas ir
robotas grįžta į doką.
Pastaba. Jei nepaleidžiate roboto nuo doko, jis neieško automatiškai
doko, kai pakartotinai įkraunama baterija pradeda sekti. Jei vis dar
pakanka pakartotinai įkraunamos baterijos energijos, galite paspausti
nuotolinio valdymo pulto arba žymeklio doko mygtuką (tik FC8820), kad
robotas grįžtų į doką. Jei pakartotinai įkraunama baterija visiškai išeikvota,
jums reikia įdėti robotą į doką rankomis.
Valymo režimo pasirinkimas
Be automatinio valymo režimo, šiame robote yra keturi atskiri valymo
režimai, kurių kiekvienas gali būti suaktyvintas paspaudus atitinkamą
nuotolinio valdymo pulto mygtuką.
Lietuviškai
65
Pastaba. Rankomis pasirinkti režimai aktyvūs tik kelias minutes. Paskui
robotas persijungia į atgal automatinio valymo režimą.
Z trajektorijos režimas
Veikiant Z trajektorijos režimui robotas valo patalpoje atlikdamas Z formos
kilpas, kad išvalytų didelį plotą.
Atsitiktinis režimas
Veikiant šiam režimui robotas valo patalpą įvairiomis trajektorijomis
judėdamas tiesiai ir įstrižai.

66
Lietuviškai
Valymo palei sieną režimas
Veikiant šiam režimui robotas juda palei patalpos sieną ir papildomai išvalo
vietas
palei sienas.
Spiralinis režimas
Šiuo režimu robotas juda spirale, kad kruopščiai išvalytų nedidelę nešvarią
sritį. Spiraliniu režimu ventiliatorius veikia turbo greičiu (tik FC8820).
Rankinis judėjimo reguliavimas
1 Naudodami rodyklių mygtukus aukščiau, žemiau, kairėje ir dešinėje nuo
paleidimo ir stabdymo mygtuko nuotolinio valdymo pulte reguliuokite
roboto judėjimą patalpoje.
Pastaba. Valdydami robotą rankomis būkite atsargūs arti aukščio
skirtumų ir laiptinių.
Pastaba. Siurbimo funkcija ir šoniniai šepečiai veikia tik robotui judant
pirmyn. Mygtukai kairėn, dešinėn ir atgal skirti tik roboto manevravimui.
Valymo laiko mygtuko naudojimas
-
Paspauskite maksimalaus valymo laiko mygtuką. kad robotas valytų
automatiniu režimu, kol jo pakartotinai įkraunama baterija pradės išsekti.
Kai robotas baigia valyti, jis grįžta į doką automatiškai, jei pradėjo valyti
nuo doko. Jei robotas pradėjo valyti iš kitos vietos patalpoje, paspauskite
doko mygtuką, kad jį nusiųstumėte atgal į doką.

-
Doko naudojimas
Lietuviškai
Kiti valymo laiko mygtukai suteikia jums galimybę leisti robotui veikti
atitinkamai 60, 45 ir 30 minučių. Kai valymo laikas pasibaigia, robotas
grįžta į doką automatiškai, jei pradėjo nuo doko. Jei robotas pradėjo
valyti iš kitos vietos patalpoje, paspauskite doko mygtuką, kad jį
nusiųstumėte atgal į doką.
67
Laikrodžio laiko ir dienos nustatymas
Jei norite naudotis valymo programomis, pirmiausia doko ekrane turite
nustatyti laikrodžio laiką ir savaitės dieną.
Pastaba. Su toliau pateikiamais veiksmais susiję paveikslai pateikiami šio
vadovo galiniame viršelyje.
1 Paspauskite atkūrimo mygtuką. Pradės mirksėti nustatymo režimo ir
laikrodžio laiko indikatoriai.
2 Vieną kartą paspauskite parinkimo mygtuką. Pradeda mirksėti valandų
indikatorius.
3 Naudodami doko mygtukus + ir - nustatykite valandą. Nustatyta valanda
bus parodyta ekrane.
4 Paspauskite parinkimo mygtuką, kad patvirtintumėte nustatytą valandą.
Pradeda mirksėti minučių indikatorius.
5 Pasinaudokite doko mygtukais + ir -, kad nustatytumėte minutes. Ekrane
parodomos nustatytos minutės.
6 Paspauskite parinkimo mygtuką, kad patvirtintumėte nustatytas minutes.
Pradeda mirksėti indikacija „Su“ (sekmadienis).
7 Pasinaudokite doko mygtukais mygtukus + ir -, kad nustatytumėte
dabartinę savaitės dieną.
8 Paspauskite pasirinkimo mygtuką, kad patvirtintumėte nustatytą savaitės
dieną.
9 Paspauskite nustatymo mygtuką, kad patvirtintumėte laikrodžio laiko ir
savaitės nustatymą. Nustatymo režimo ir laikrodžio laiko indikatoriai
nustos mirksėti ir švies nuolat.
Valymo laiko programavimas
Jei nustatėte laiką ir savaitės dieną doko ekrane, galite programuoto jūsų
roboto valymo laiką.
Pastaba. Su toliau pateikiamais veiksmais susiję paveikslai pateikiami šio
vadovo galiniame viršelyje.
Programavimo galimybės:
Programa Indikacijos ekrane
Valymas kasdien Šviečia visų savaitės dienų rodmenys

1
2
3
68
Lietuviškai
Programa Indikacijos ekrane
Valymas darbo dienomis Šviečia rodmenys nuo „Mo“ (pirmadienis) iki „Fri“
(penktadienis)
Valymas 2 dienas iš eilės Šviečia 2 dienų rodmenys, pvz., „Fri“ (penktadienis) ir „Sa“
Valymas 1 dieną per savaitę Šviečia pasirinktos dienos rodmuo
1 Paspauskite atkūrimo mygtuką. Pradės mirksėti nustatymo režimo ir
valymo programos indikatoriai.
2 Vieną kartą paspauskite parinkimo mygtuką. Pradeda mirksėti valandų
indikatorius.
3 Pasinaudokite doko mygtukais + ir -, kad nustatytumėte valandą. Ekrane
parodoma nustatyta valanda.
4 Paspauskite parinkimo mygtuką, kad patvirtintumėte nustatytą valandą.
Pradeda mirksėti minučių indikatorius.
5 Pasinaudokite doko mygtukais + ir -, kad nustatytumėte minutes. Ekrane
parodomos nustatytos minutės.
6 Paspauskite parinkimo mygtuką, kad patvirtintumėte nustatytas minutes.
Pradeda mirksėti indikacija „Su“ (sekmadienis).
7 Pasinaudokite doko mygtukais + ir -, kad perjungtumėte valymo
programas (žr. anksčiau pateikta galimų programavimo parinkčių lentelę).
8 Paspauskite pasirinkimo mygtuką, kad patvirtintumėte pasirinktą
programą.
9 Paspauskite nustatymo mygtuką, kad patvirtintumėte programavimą.
Nustatymo režimo ir valymo programos indikatoriai nustos mirksėti ir
švies nuolat.
10 Kai nustatote valymo programą, ekrane rodomas valymo programos
indikatorius ir pasirinkta diena ar dienos. Jei robotas veikia budėjimo
režimu, o jo pakartotinai įkraunama baterija visiškai įkrauta, jis valymą
pradės užprogramuotu laiku užprogramuotą dieną ar dienomis.
(šeštadienis)
Ventiliatoriaus greičio mygtukai
Naudodami ventiliatoriaus greičio mygtukus galite padidinti ventiliatoriaus
greitį iki turbo arba jį išjungti. Numatytasis nustatymas yra normalus
ventiliatoriaus greitis.
1 Paspauskite šį mygtuką, kad išjungtumėte ventiliatorių.
2 Paspauskite šį mygtuką, kad įjungtumėte ventiliatorių normaliu greičiu.
3 Ventiliatoriaus mygtuku „turbo“ padidinamas ventiliatoriaus greitis (tik
FC8820).
Atsakas į plojimą
Atsakas į plojimą įjungtas, kai robotas persijungia į laukimo režimą šiose
situacijose:
-
kai jis nustoja valyti įvykus klaidai;
-
kai jūs užprogramuojate trumpą valymo laiką;
-
kai jis neranda doko per 20 minučių.
Jei jūs nematote roboto, galite jį rasti vieną kartą suploję rankomis. Robotas
atsakys pyptelėdamas ir visos piktogramos jo ekrane nušvis.

Lietuviškai
69
Sausų
šluosčių priedo naudojimas
Sausų šluosčių priedas yra funkcija, kuri suteikia galimybę valyti kietas
grindis sausomis šluostėmis.
Pastaba. Jei naudojate sausojo valymo priedą, robotas gali susidurti su
sunkumais, važiuodamas per slenksčius arba užvažiuodamas ant audeklo
takelių.
Sausų šluosčių priedo paruošimas naudoti
1 Robotą apverskite ir padėkite jį ant grindų ar stalo.
2 Pasidėkite sausą šluostę ant stalo, o sausų šluosčių priedą ant šluostės
taip, kad fiksatoriai būtų nukreipti į jus.
3 Užlenkite
paspausdami fiksatorius, kad jie būtų įstatyti į angas.
sausos šluostės kraštus ant priedo ir pritvirtinkite jas
4 Sausų šluosčių priedo fiksatorių įstatykite į angą šalia ratuko viename
roboto šone ir paspauskite, kad jis spragtelėdamas užsifiksuotų. Tada
šiuos veiksmus pakartokite kitoje pusėje.
5 Robotą apverskite ir padėkite ant grindų ratukais žemyn, kad sausų
šluosčių priedas liestų grindis.
Roboto naudojimas su sausų šluosčių priedu
Pritvirtinę sausų šluosčių priedą galite naudoti robotą bet kuriuo režimu ir
ant visų kietų grindų. Sausų šluosčių priedo nenaudokite ant kilimų ar
audeklo takelių.

1
2
50-70 cm
50-70
cm
70
Lietuviškai
Sausų šluosčių priedo nuėmimas
1 Sausų šluosčių
2 Robotą apverskite ir padėkite jį ant grindų ar stalo.
3 Vieną iš sausų šluosčių priedo kraštų pastumkite ratuko, esančio kitoje
roboto pusėje, link, kad jį atlaisvintumėte. Tada patraukdami nuimkite
priedą nuo roboto.
priedą nuimkite iškart baigę šluostyti grindis.
Žymeklio naudojimas (FC8820)
Žymeklio įkrovimas
Žymeklyje naudojama pakartotinai įkraunama baterija, kad būtų galima
įkrauti per pridedamą USB laidą.
1 USB mikrojungties kištuką įstatykite į žymeklio apačioje esantį lizdą.
2 USB kištuką įstatykite į USB kroviklį ar nešiojamojo kompiuterio USB
prievadą.
3 Pradeda nuolat šviesti žymeklio įkrovimo šviesa. Įkrovimas trunka 30
minučių. Visiškai įkrovus pakartotinai įkraunamą bateriją įkrovimo šviesa
išjungiama.
Roboto judėjimo valdymas žymekliu
-
Kai nuspaudžiate ir laikote žymeklio mygtuką, žymeklis siunčia
infraraudonosios šviesos spindulį. Šiuo spinduliu galite nukreipti robotą
konkrečia kryptimi. Kol laikysite mygtuką nuspaudę ir rodysite kryptimi,
kuria norite, kad robotas judėtų, jis tęs judėjimą ta kryptimi. Kai atleisite
mygtuką, robotas pradės valyti automatinio valymo režimu.

50-70 cm
-
1
2
Žymekliu robotą galite nusiųsti į konkrečią patalpos vietą ir išvalyti ją
papildomai.
Virtualiosios sienos įrenginio (FC8820) naudojimas
Baterijų įdėjimas į nematomąją sieną
Nematomajai sienai veikti reikia keturių AA baterijų.
1 Paspauskite galinio dangtelio apačioje esančius du atleidimo fiksatorius
(1) ir pastumdami dangtelį aukštyn nuimkite jį nuo nematomosios sienos
(2).
2 Išimkite iš pakuotės keturias naujas AA baterijas ir įstatykite jas į
nematomosios sienos baterijų skyrių.
Pastaba. Įsitikinkite, kad maitinimo elementų „+“ ir „-“ poliai nustatyti
reikiamomis kryptimis.
Lietuviškai
71
3
Užstumkite galinį dangtelį atgal ant nematomosios sienos.
Nematomosios sienos statymas, kad robotas sustotų
Nematomąją sieną galite naudoti, norėdami neleisti robotui patekti į patalpą
arba sritį, į kurią nenorite įleisti roboto.
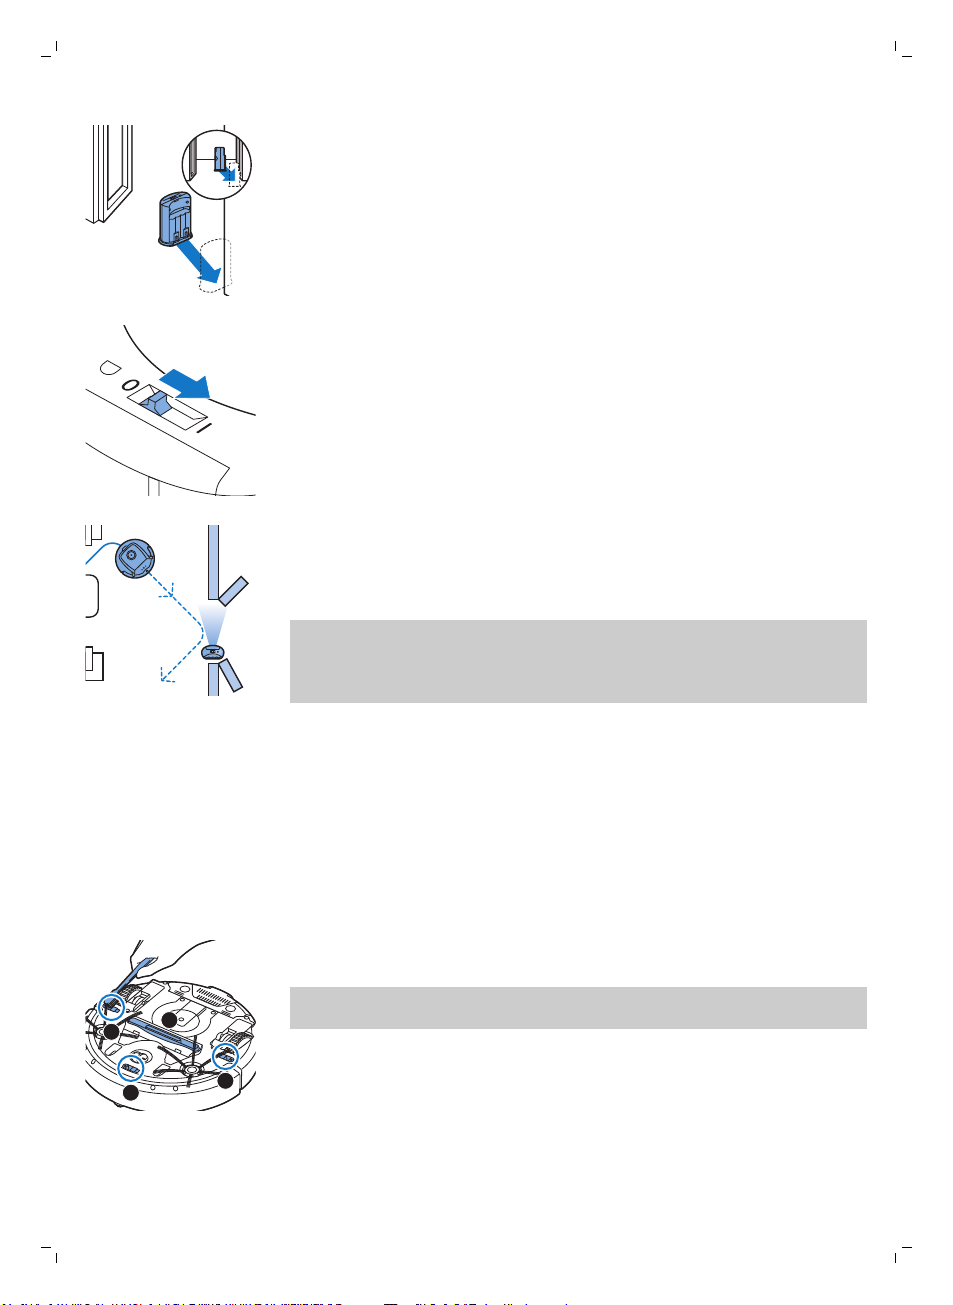
4
3
1
2
72
Lietuviškai
1 Įrenginį pastatykite toje vietoje, kurios robotas neturi kirsti, pvz., šalia
atvirų durų į patalpą, kuri yra už roboto pasiekiamų ribų.
2 Nematomąją sieną įjunkite stumdomuoju įjungimo
viršutinėje įrenginio dalyje.
3
Paleiskite robotą.
4 Kai robotas priartės prie nematomosios sienos, nematomosios sienos
lemputė pradės mirksėti, o įrenginys skleis infraraudonosios šviesos
spindulį. Šiuo infraraudonosios šviesos spinduliu robotas priverčiamas
pakeisti judėjimo kryptį ir judėti tolyn nuo nematomosios sienos.
Pastaba. Jei naudojate nematomąja sieną, reguliariai tikrinkite, ar baterijose
pakanka energijos. Galite tai padaryti, išjungdami virtualiąją sieną ir vėl ją
įjungdami. Jei baterijose pakanka energijos, nematomosios sienos šviesos
diodas trumpai nušvinta.
Valymas ir priežiūra
Roboto valymas
Kad palaikytumėte gerą roboto valymo veiksmingumą, kartais turite reikia
nuvalyti aukščio jutiklius, ratukus, šoninius šepečius ir siurbimo angą.
1 Įsitikinkite, kad maitinimo jungiklis yra išjungimo padėtyje.
2 Padėkite apverstą robotą ant lygaus paviršiaus
3 Norėdami nuvalyti dulkes ar pūkus nuo aukščio jutiklių ir nuvalyti
įsiurbimo angą, naudokite šepetėlį minkštais šeriais (pvz., dantų šepetėlį).
Pastaba. Svarbu, kad reguliariai valytumėte aukščio jutiklius. Jei aukščio
jutikliai nešvarūs, robotas gali neaptikti aukščio skirtumų ar laiptinių.
ir išjungimo jungikliu

1
2
3
Lietuviškai
4 Jei norite nuvalyti dulkes ar pūkus nuo priekinių ir šoninių ratukų,
naudokite šepetėlį minkštais šeriais (pvz., dantų šepetėlį).
5 Jei norite išvalyti šoninius šepečius, suimkite juos už šerių ir traukdami
nuimkite.
6 Pašalinkite pūkus, plaukus ir siūlus nuo velenėlių ir šoninių šepečių
naudodami minkštą šepetėlį (pvz., dantų šepetėlį) arba šluostę.
7 Patikrinkite šoninius šepečius ir apatinę roboto dalį, ar nėra kokių nors
aštrių daiktų, kurie galėtų apgadinti grindis.
73
Dulkių talpyklos ištuštinimas ir valymas
Kai dulkių talpyklos prisipildymo indikatorius nuolat šviečia, ištuštinkite ir
išvalykite dulkių talpyklą.
1 Įsitikinkite, kad maitinimo jungiklis yra išjungimo padėtyje.
2 Nuimkite dangtelį.

1
2
74
Lietuviškai
3 Patraukite dulkių talpyklos dangtelio rankeną ir iškelkite dulkių talpyklą iš
jos skyriaus.
Pastaba. Dulkių talpyklą išimkite ir įdėkite atgal atsargiai, kad
neapgadintumėte variklio ventiliatoriaus menčių.
4 Atsargiai pakelkite dulkių talpyklos dangtelį (1) ir išimkite filtrą (2).
5 Pakratykite dulkių talpyklą virš šiukšliadėžės, kad ją ištuštintumėte.
Šluoste ar dantų šepetėliu minkštais šeriais išvalykite filtrą ir dulkių
talpyklos vidų. Taip pat išvalykite siurbimo angą dulkių talpyklos apačioje.
Atsargiai! Neplaukite dulkių talpyklos ir filtro vandeniu ar indaplovėje.
6 Įdėkite filtrą atgal į dulkių talpyklą (1). Tada uždėkite dulkių talpyklos
dangtelį (2).
7 Įstatykite dulkių talpyklą atgal į jos skyrių ir uždėkite ant roboto viršutinį
dangtelį.
Atsargiai! Visada įsitikinkite, kad filtras yra dulkių talpykloje. Jei
naudosite robotą be filtro dulkių talpykloje, variklis bus apgadintas.
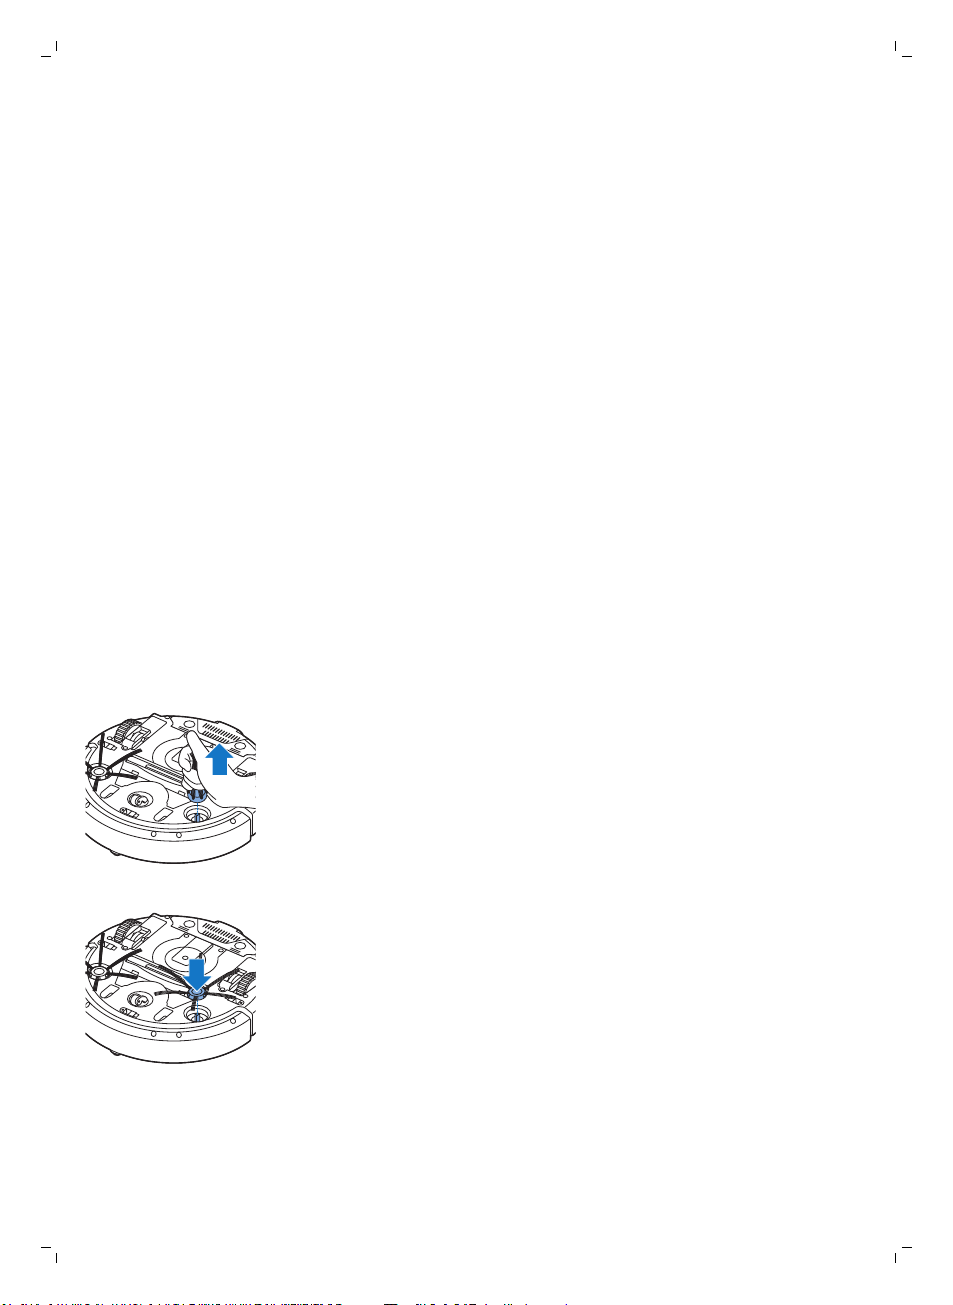
Pakeitimas
Priedų užsakymas
Norėdami įsigyti priedų ar atsarginių dalių, apsilankykite
www.shop.philips.com/service arba kreipkitės į „Philips“ platintoją. Taip pat
galite susisiekti su „Philips“ klientų aptarnavimo centru savo šalyje
(kontaktinius duomenis žr. visame pasaulyje galiojančios garantijos
lankstinuke).
Filtro pakeitimas
Pakeiskite filtrą, jei jis labai nešvarus ar apgadintas. Naują filtro rinkinį galite
užsisakyti naudodami tipo numerį FC8066. Instrukcijas, kaip išimti filtrą iš
dulkių talpyklos ir jį įstatyti, rasite skyriaus „Valymas ir priežiūra“ skirsnyje
„Dulkių talpyklos ištuštinimas ir valymas“.
Šoninių šepečių keitimas
Kad būtų užtikrinti tinkami valymo rezultatai, praėjus tam tikram laikui
pakeiskite šoninius šepečius.
Visada pakeiskite šoninius šepečius, jei pastebite nusidėvėjimo ar
apgadinimo ženklų. Mes taip pat rekomenduojame abu šoninius šepečius
keisti tuo pačiu metu. Atsarginių šoninių šepečių galite užsisakyti kaip dalį
atsarginio rinkinio FC8068. Šiame rinkinyje taip pat yra du filtrai ir trys sausos
šluostės.
1 Įsitikinkite, kad maitinimo jungiklis yra išjungimo padėtyje.
2 Jei norite pakeisti šoninius šepečius, suimkite senuosius šepečius už šerių
ir patraukdami nuimkite.
Lietuviškai
75
3 Naujus šoninius šepečius įstatykite paspausdami.
Pakartotinai įkraunamos baterijos keitimas
Pakeiskite pakartotinai įkraunamą bateriją, jei nebegalite jos įkrauti ar ji
greitai išsenka. Naują pakartotinai įkraunamą bateriją galite užsisakyti

this side up
this side up
76
Lietuviškai
naudodami užsakymo numerį CP0113, užsakydami FC8820, ir CP0112,
užsakydami FC8810.
1 Įsitikinkite, kad roboto maitinimo jungiklis yra išjungimo padėtyje.
2 Prieš išimdami ir šalindami pakartotinai įkraunamą bateriją leiskite robotui
veikti tol, kol ji išseks, kad užtikrintumėte, kad pakartotinai įkraunama
baterija visiškai išeikvota.
3 Paspauskite ir nustumkite baterijos skyriaus dangtelį nuo roboto.
4 Išimkite seną pakartotinai įkraunamą bateriją iš baterijos skyriaus.
5 Įstatykite naują pakartotinai įkraunamą bateriją į baterijos skyrių.
6 Uždėkite baterijos skyriaus dangtelį ant roboto.
Sausų šluosčių pakeitimas
Galite užsakyti naujų sausų šluosčių. Jos yra atsarginio rinkinio FC8068 dalis.
Šiame atsarginiame rinkinyje taip pat yra du šoniniai šepečiai ir du filtrai.
Nuotolinio valdymo pulto baterijos keitimas
Nuotolinio valdymo pulte naudojama CR2025 monetos formos baterija.
Bateriją keiskite, kai robotas nebereaguoja į nuotolinio valdymo pulto
mygtukų paspaudimus.
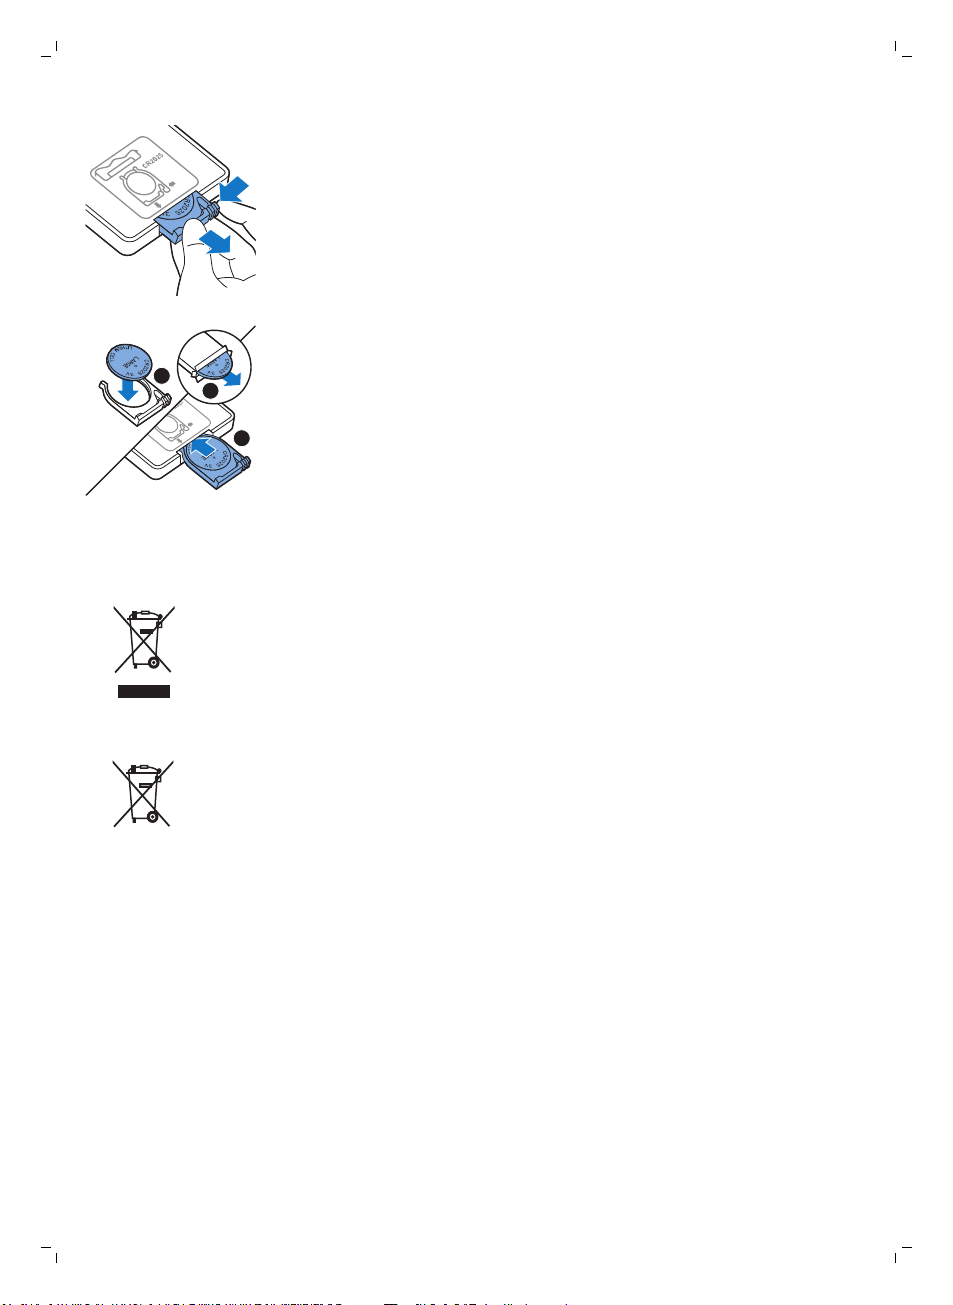
2
3
1
Perdirbimas
Lietuviškai
1 Laikykite nuotolinio valdymo pultą apverstą. Spauskite atlaisvinimo
mygtuką ant baterijos laikiklio ir tuo pat metu nustumkite baterijos laikiklį
nuo nuotolinio valdymo pulto.
2 Išimkite išeikvotą bateriją iš baterijos laikiklio ir į baterijos laikiklį įdėkite
naują bateriją. Tada įstumkite baterijos laikiklį atgal į nuotolinio valdymo
pultą.
-
Šis simbolis reiškia, kad gaminio negalima išmesti kartu su įprastomis
buitinėmis atliekomis (2012/19/ES).
77
-
Šis simbolis reiškia, kad šiame gaminyje yra vienkartinių baterijų, kurių
negalima išmesti su įprastomis buitinėmis atliekomis (2006/66/EB).
-
Laikykitės jūsų šalyje galiojančių taisyklių, kuriomis reglamentuojamas
atskiras elektros ir elektronikos gaminių bei baterijų surinkimas. Tinkamas
šalinimas padės išvengti neigiamo poveikio aplinkai ir žmonių sveikatai.
Vienkartinių baterijų išėmimas
Norėdami išimti vienkartines baterijas žr. baterijų įdėjimo ir (arba) išėmimo
instrukcijas naudotojo vadove.
Trikčių diagnostika ir šalinimas
Šiame skyriuje apibendrintos dažniausios problemos, su kuriomis galite
susidurti naudodami mašiną. Jei toliau pateikta informacija nepadės išspręsti
problemos, apsilankykite www.philips.com/support, ten rasite dažnai
užduodamų klausimų sąrašą, arba kreipkitės į savo šalies klientų
aptarnavimo centrą.
78
Lietuviškai
Problema Galima priežastis Sprendimas
Paspaudus įjungimo ir
išjungimo mygtuką
robotas nepradeda valyti.
Pakartotinai įkraunama
baterija išeikvota.
Mažas kištukas vis dar įkištas į
roboto lizdą.
Įkraukite pakartotinai įkraunamą bateriją
(žr. skyrių „Pasiruošimas naudoti“).
Robotas neveikia maitinamas iš elektros
tinklo. Jis veikia tik maitinamas iš savo
pakartotinai įkraunamos baterijos. Todėl
prieš naudodami visada atjunkite adapterį
nuo roboto ir elektros tinklo.
Dažnai mirksi įspėjimo
indikatorius.
Maitinimo jungiklis
nenustatytas į įjungimo (I)
padėtį.
Užstrigo vienas arba abu
ratukai.
Užstrigo vienas arba abu
šoniniai šepečiai.
Nėra viršutinio dangtelio arba
jis netinkamai uždarytas.
Užstrigo buferis. Paspauskite paleidimo ir stabdymo
Robotas valant buvo
pakeltas.
Paspauskite maitinimo jungiklį. Norėdami
pradėti valyti paspauskite paleidimo ir
stabdymo mygtuką ant roboto ar
nuotolinio valdymo pulte.
Maitinimo jungiklį nustatykite į išjungimo
padėtį. Pašalinkite pūkus, plaukus, siūlus ar
laidą, apsivyniojusius apie ratuko pakabą.
Išvalykite šoninius šepečius (žr. skyrių
„Valymas ir priežiūra“).
Kai nėra viršutinio dangtelio arba jis
netinkamai uždarytas, robotas neveikia.
Tinkamai uždėkite viršutinį dangtelį ant
roboto.
mygtuką. Pakelkite robotą, kad buferis
atsilaisvintų. Padėkite robotą atokiau nuo
kliūties ir paspauskite paleidimo ir
stabdymo mygtuką, kad jis tęstų valymą.
Paspauskite paleidimo ir stabdymo
mygtuką. Padėkite robotą ant grindų. Tada
paspauskite paleidimo ir stabdymo
mygtuką, kad robotas tęstų valymą.
Problema Galima priežastis Sprendimas
Robotas tinkamai nevalo.
Vieno ar abiejų šoninių
šepečių šeriai yra sulenkti.
Šiek tiek pamirkykite šepetį ar šepečius
šiltame vandenyje. Jei taip nepavyksta
atkurti tinkamos šerių formos, pakeiskite
šoninius šepečius (žr. skyrių „Pakeitimas“).
Lietuviškai
79
Dulkių talpykloje esantis
filtras yra purvinas.
Užsikimšo dulkių talpyklos
apačioje esanti siurbimo
anga.
Priekinis ratukas užstrigo
apsivijus plaukams ar
kitokiam purvui.
Robotas valo labai tamsų
arba blizgantį paviršių ir
suveikia aukščio jutikliai. Dėl
to robotas pradeda judėti
neįprasta trajektorija.
Robotas valo grindis, kurios
gana stipriai atspindi saulės
šviesą. Dėl to suveikia aukščio
jutikliai ir robotas pradeda
judėti neįprasta trajektorija.
Išvalykite filtrą dulkių talpykloje šluoste
arba dantų šepetėliu minkštais šeriais. Taip
pat galite valyti filtrą ir dulkių talpyklą
paprastu dulkių siurbliu, nustatę nestiprų
siurbimą.
Jei valant šepetėliu ar dulkių siurbliu
nepavyksta išvalyti filtro, pakeiskite filtrą
nauju. Mes patariame keisti filtrą bent kartą
per metus.
Išvalykite siurbimo angą (žr. skyrių
„Valymas ir priežiūra“).
Išvalykite priekinį ratuką (žr. skyrių
„Valymas ir priežiūra“).
Paspauskite paleidimo ir stabdymo
mygtuką, tada perkelkite robotą ant
šviesesnės grindų dalies. Jei problema
neišnyksta ant šviesesnių grindų,
apsilankykite www.philips.com/support
arba susisiekite su savo šalies klientų
aptarnavimo centru.
Užtraukite užuolaidas, kad saulės šviesa
nepatektų į patalpą. Taip pat galite pradėti
valyti, kai saulės šviesa yra mažiau ryški.
Pakartotinai įkraunamos
baterijos nebeįmanoma
įkrauti arba ji labai greitai
išsenka.
Nuotolinio valdymo pulto
baterija išsenka per
greitai.
Baigėsi pakartotinai
įkraunamos baterijos
naudojimo laikas.
Gali būti, kad įdėjote
netinkamo tipo bateriją.
Pakeiskite pakartotinai įkraunamą bateriją
(žr. skyrių „Pakeitimas“).
Nuotolinio valdymo pultui reikalinga
CR2025 monetos formos baterija. Jei
problema neišnyksta, apsilankykite
www.philips.com/support arba kreipkitės į
savo šalies klientų aptarnavimo centrą.

80
Lietuviškai
Problema Galima priežastis Sprendimas
Robotas juda ratais. Robotas veikia taškinio
valymo režimu.
Tai normalu. Spiralinį režimą galima
aktyvinti aptikus daug purvo ant grindų,
kad būtų kruopščiai išvalyta. Tai taip pat
yra automatinio valymo režimo dalis.
Praėjus maždaug vienai minutei robotas
vėl valo normalia trajektorija. Taip pat
galite sustabdyti spiralinį režimą,
pasirinkdami kitokį valymo režimą
nuotolinio valdymo pulte.
Robotas neranda doko.
Robotas pypteli, kai jis
patenka į doką.
Robotui nepakanka vietos
judėti link doko.
Robotas vis dar aktyviai ieško. Suteikite robotui apie 20 minučių grįžti į
Robotas nebuvo paleistas iš
doko.
Bandote įkrauti robotą,
maitinimo jungikliui esant
išjungtoje padėtyje.
Bandykite padėti doką kitoje vietoje. Žr.
„Doko montavimas“ skyriuje „Pasiruošimas
naudoti“.
doką.
Jei norite, kad robotas grįžtų į doką po
valymo ciklo, paleiskite jį iš doko.
Paspauskite maitinimo jungiklį, kad robotą
įjungtumėte.
Klaidų kodai
Klaidos kodas
E1 Užstrigo ratukai Patraukite robotą nuo kliūties ir paspauskite
E2 Netinkamai įstatytas
E3 Užstrigo buferis Nuimkite robotą nuo kliūties. Klaidos kodas
E4 Robotas pakeltas nuo
Galima priežastis Sprendimas
įjungimo ir išjungimo mygtuką, kad jis tęstų
valymą.
viršutinis dangtelis ar
dulkių talpykla
grindų
Tinkamai uždėkite dulkių talpyklą ir viršutinį
dangtelį ant roboto. Klaidos kodas dingsta iš
ekrano automatiškai.
dingsta iš ekrano automatiškai.
Padėkite robotą ant grindų, kad klaidos kodas
dingtų.
E5 Per tamsi grindų spalva Padėkite robotą ant šviesesnės grindų srities.
E6
Netinkamai įstatyta
baterija
Įkrovimo klaida Patikrinkite, ar robotui esant doke maitinimo
Nuvalykite aukščio jutiklius.
Perskaitykite skyriaus „Pakartotinai įkraunamos
baterijos įdėjimas į robotą“ dalyje „Prieš
naudojant pirmą kartą“ pateikiamas
instrukcijas.
jungiklis yra įjungimo padėtyje.

www.philips.com/support
1x
1x
Min
Plus
Set
Select
1 2
3 4 5
6 7 8
9
Lietuviškai
81

1x
2x
1 2 3
4 5 6
7
8 9 11
82
Lietuviškai

Bevezetés
2
1
3
45
Köszönjük, hogy Philips terméket vásárolt, és üdvözöljük a Philips világában!
A Philips által biztosított támogatás teljes körű igénybevételéhez regisztrálja
a terméket a www.philips.com/welcome címen.
Általános leírás
1 Portartályfedél fogantyúja
2 Portartály fedele
3 Szűrő
4 Portartály
5 Felső fedél
6 Hibakódok táblázata
7 Ventilátor
8 Ütköző
9 Dokkolóegység érzékelője
10 Bekapcsológomb (a robotporszívó bekapcsolásához vagy
11 Első kerék
12 Oldalsó kefetengelyek
13 Mélységérzékelők
14 Kerekek
15 Akkumulátortartó
16 Szívónyílás
17 Oldalkefék
18 Akkumulátor
19 Akkumulátortartó fedele
20 Rögzítő blokkok a száraz törlőkendők számára
21 Száraz törlőkendő tartója
22 Száraz törlőkendők
23 Elemtartó
24 Távvezérlő
25 Töltőkábel
26 Mutató
27 Virtuális fali egység (FC8820)
28 Dokkolóegység
29 Adapter
30 Kisméretű csatlakozódugasz
kikapcsolásához)
Magyar
83
Kijelző és távvezérlő
Távvezérlő (FC8820)
1 Navigációs gombok, illetve start/stop gomb
2 Takarítási idő gombok
3 Takarítási üzemmód gombok
4 Ventilátorsebesség gombjai
5 Dokkolás gomb
Magyar

1
2
3
46
5
1
2
5
4
3
2
1
84
Magyar
Távvezérlő (FC8810)
1 Navigációs gombok, illetve start/stop gomb
2 Takarítási idő gombok
3 Takarítási üzemmód gombok
4 Ventilátor kikapcsoló gombja
5 Ventilátor bekapcsoló gombja
6 Dokkolás gomb
Dokkolóegység vezérlőpultja
1 Kijelző idő, nap és programozás kijelzésével
2 Beállító gombok
Mutató (FC8820)
1 Mutató gomb
2 Be- és kikapcsoló gomb
3 Takarítási üzemmód gombok
4 Takarítási idő gombok
5 Dokkolás gomb
Hogyan működik a robotporszívó?
Mit tisztít a robotporszívó?
A robotporszívó olyan funkciókkal van ellátva, amelyeknek köszönhetően
megfelelő segítséget nyújt az otthoni padlótisztításban.
A robotporszívó különösen alkalmas kemény padlók, például fa-, csempevagy linóleumpadlók tisztítására. Puha padlók, például szőnyegek vagy
lábtörlők tisztítása során problémák merülhetnek fel. Ha a robotporszívót
első alkalommal használja szőnyeg vagy lábtörlő tisztítására, maradjon a
közelben, hogy meggyőződjön róla, hogy a készülék alkalmas az ilyen
típusú padlók tisztítására. Fekete és fényes kemény padlók tisztítása során a
robotporszívó szintén felügyeletet igényel.

Hogyan tisztít a robotporszívó?
Tisztítórendszer
A robotporszívó 3 lépcsős tisztítórendszerrel tisztítja hatékonyan a padlót.
-
A két oldalsó kefe segít a robotnak megtisztítani a padlót a sarkokban és
a fal mentén. Ezek továbbá segítenek fellazítani a padlóról a lerakódott
szennyeződést, és továbbítják azt a szívónyíláshoz.
-
A robotporszívó szívóereje felszedi a laza szennyeződést, és a
szívónyíláson keresztül a portartályba szállítja azt.
-
A robotporszívó fel van szerelve egy száraztörlőkendő-tartóval, amely
lehetővé teszi, hogy a kemény padlót száraz törlőkendővel alaposabban
megtisztítsa.
Takarítási minták
Automatikus takarítás üzemmódban a robotporszívó a takarítási minták
automatikus sorozatát használva a szoba minden egyes területét
optimálisan megtisztítja. Az alábbi takarítási mintákat használja:
1 Z minta vagy cikcakk minta
Magyar
85
2 Véletlenszerű minta
3 Falkövető minta

86
Magyar
4 Spirál minta
A robotporszívó az automatikus takarítási üzemmódban fix sorrendben
végrehajtja a Z mintából, a véletlenszerű, a falkövető és a spirál mintából
álló sorozat mozdulatait.
Ha a robotporszívó befejezte a mintasorozatot, ismét Z mintában kezd el
mozogni. A robotporszívó mindaddig folytatja a mintasorozat végrehajtását
a szoba tisztítása érdekében, amíg az akkumulátor le nem merül, vagy amíg
kézzel ki nem kapcsolja.
Ha a robotporszívó tisztítás közben különösen szennyezett területet érzékel,
akkor a szennyeződés alapos eltávolítása érdekében spirál üzemmódra és
turbó ventilátorsebességre vált (csak az FC8820 esetén).
Megjegyzés: Az egyes üzemmódokat külön is kiválaszthatja, ha megnyomja
a távirányító megfelelő gombját vagy a mutatót (csak az FC8820 esetén). A
kézzel kiválasztott üzemmódok csak néhány percig maradnak aktívak. Ezt
követően a robotporszívó visszatér az automatikus takarítási üzemmódhoz.
További részletekért lásd „A robotporszívó használata” című fejezet
„Takarítási üzemmódok” című részét.
Hogyan kerüli el a robotporszívó a magasságkülönbségeket?
A robotporszívó alján három mélységérzékelő található. A robotporszívó
ezek segítségével érzékeli és kerüli el a magasságkülönbségeket, például a
lépcsőket.
Megjegyzés: Normális jelenség, hogy a robotporszívó kissé túlmegy a
magasságkülönbségek szélén, mivel az első mélységérzékelője az ütköző
mögött található.
Figyelem! Bizonyos esetekben előfordulhat, hogy a mélységérzékelők
nem érzékelik kellő időben a lépcsőt vagy más magasságkülönbséget.
Ezért az első néhány használat során, vagy amikor lépcső vagy más
magasságkülönbség közelében használja, fordítson kellő figyelmet a
robotporszívóra. Annak érdekében, hogy a robotporszívó megfelelően
észlelje a magasságkülönbségeket, fontos, hogy a mélységérzékelőket
rendszeresen tisztítsa (a további információkat lásd a „Tisztítás és
karbantartás” című fejezetben).
Teendők az első használat előtt
Az oldalsó kefék felszerelése
1 Csomagolja ki az oldalsó keféket, és helyezze a robotot fejjel lefelé egy
asztalra vagy a padlóra.

2 Nyomja rá az oldalsó keféket a robotporszívó alján található tengelyekre.
1
2
this side up
Megjegyzés: Győződjön meg arról, hogy az oldalsó keféket megfelelően
rögzítette. Nyomja őket a tengelyre mindaddig, amíg a helyükre nem
kattannak.
Az akkumulátor behelyezése
A robotporszívó használata előtt be kell helyeznie az akkumulátort.
Megjegyzés: Kezelje óvatosan az akkumulátort. Ne ejtse le az akkumulátort.
Ezáltal biztosíthatja az akkumulátor maximális élettartamát.
1 Nyomja meg az akkumulátortartó fedelének bordázott részét a
kioldásához.
Magyar
87
2 Csúsztassa le az akkumulátortartó fedelét a robotporszívóról.
3 Távolítsa el az akkumulátoron lévő műanyagot.
4 Helyezze be az akkumulátort az akkumulátortartóba.
Megjegyzés: Ügyeljen arra, hogy az akkumulátoron lévő jelzés felfelé
mutasson, és hogy a csatlakozók a megfelelő irányba nézzenek.
5 Csúsztassa vissza az akkumulátortartó fedelét a robotporszívóra.
A címke eltávolítása a távvezérlőről
A távvezérlő egy CR2025 típusú gombelemmel működik. Az elemet
védőcímke védi, amelyet használat előtt el kell távolítani.

1
2
100 cm
30 cm
80 c
m
88
Magyar
1 Húzza ki az elem védőcímkéjét a távvezérlő elemtartó rekeszéből. Ekkor
a távvezérlő készen áll a használatra.
Előkészítés a használatra
A dokkolóegység beszerelése
1 Csatlakoztassa az adapter kis méretű csatlakozódugóját a dokkolóegység
(1) aljzatába és csatlakoztassa az adaptert a fali aljzatba (2).
-
A dokkolóegység kijelzője bekapcsol.
2 Helyezze a dokkolóegységet vízszintes, sík padlóra a fal előtt.
Megjegyzés: Győződjön meg róla, hogy nincsenek akadályok vagy
magasságkülönbségek a dokkolóegység elejétől 80 cm-re, a jobb
oldalától 30 cm-re és a bal oldalától 100 cm-re.
Tipp: Ahhoz, hogy a dokkolóegység biztonságosan rögzítve maradjon a
kiválasztott helyen, rögzítse a falhoz csavarokkal vagy két csíknyi
kétoldalú ragasztószalaggal.

Töltés
Magyar
Az első töltés alkalmával, illetve ha a robotporszívó akkumulátora lemerült, a
töltési idő négy óra.
A robotporszívó feltöltése két módon lehetséges:
-
A dokkolóegységen, manuálisan vagy automatikusan használat közben;
-
A robotporszívó közvetlen csatlakoztatásával a hálózathoz.
Megjegyzés: Ha az akkumulátor teljesen feltöltődött, a robotporszívó akár
120 percig használható tisztításra
89
Töltés a dokkolóegységen
1 A bekapcsológomb megnyomásával kapcsolja be a robotot.
2 Helyezze a robotot a hálózatra csatlakoztatott dokkolóegységre.
3 Az indítás és leállítás gomb villogni kezd.
Megjegyzés: Mivel első alkalommal tölti fel a robotot, a robotporszívó
kijelzőjén megjelenik az indítási jelzőfény.
4 Amikor az akkumulátor teljesen feltöltődött, a start/stop gomb
folyamatosan világít.
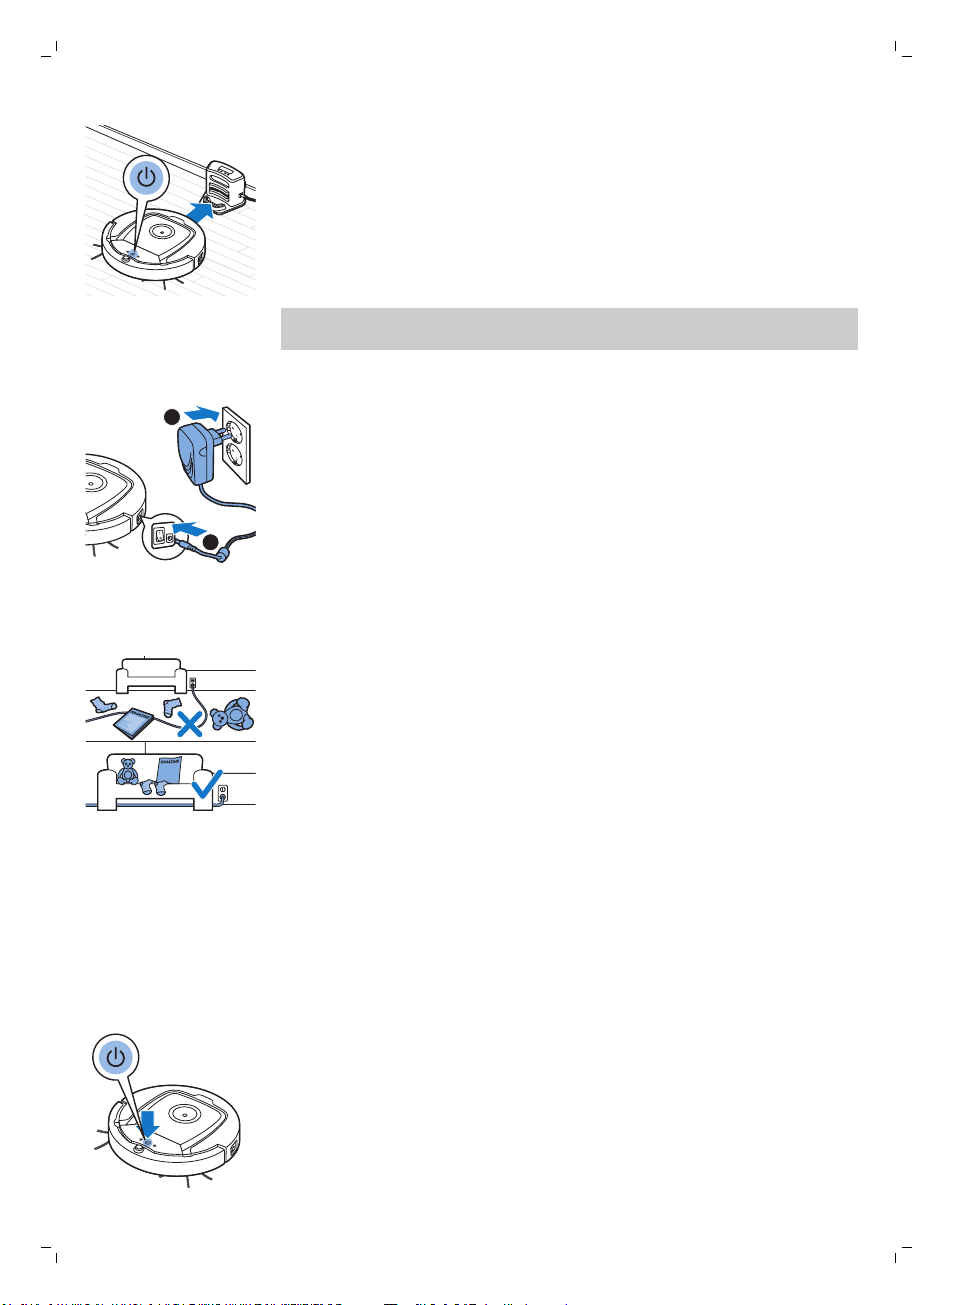
1
2
90
Magyar
Automatikus tltés használat kzben
1 Amikor a
akkumulátor töltöttsége már csak 15%, a robotporszívó automatikusan
megkeresi a dokkolóegységet, hogy feltöltődjön. Amikor a robotporszívó
a dokkolóegységet keresi, a start/stop gomb narancssárgán kezd
világítani.
2 Amikor az akkumulátor teljesen feltöltődött, a start/stop gomb
folyamatosan világít.
Megjegyzés: A robotporszívó csak akkor keresi automatikusan a
dokkolóegységet, ha a tisztítást a dokkolóegységről kezdte.
robotporszívó befejezte a tisztítást, illetve amikor az
Tltés kzvetlenl az elektromos hálzatrl
1 A bekapcsol
2 Illessze az adapter kis méretű csatlakozódugóját a robotporszívó
aljzatába (1). Csatlakoztassa az adaptert a fali aljzatba (2).
3 Ha a robotporszívó megfelelően csatlakozik a hálózatra, a start/stop
gomb lassan villogni kezd. Ez azt jelzi, hogy a robotporszívó töltése
folyamatban van.
4 Amikor az akkumulátor teljesen feltöltődött, a start/stop gomb
folyamatosan világít.
gomb megnyomásával kapcsolja be a robotot.
A szoba előkészítése a tisztításhoz
Mielőtt elindítaná a robotporszívó a tisztító munkamenetét, távolítson el a
padlóról minden laza és törékeny tárgyat. Távolítson el a padlóról minden
kábelt és vezetéket is.
A robotporszívó használata
Indítás és leállítás
1 Állítsa a robotporszívó oldalán található tápkapcsolót „be” állásba.
2 Nyomja meg a start/stop gombot.
-
A start/stop gombot a roboton is megnyomhatja.

Magyar
-
Emellett megnyomhatja a távvezérlő start/stop gombját vagy a
mutatót is (csak az FC8820 esetén).
3 A start/stop gomb folyamatosan be van kapcsolva, és a robotporszívó
elkezdi a tisztítást.
4 A robotporszívó mindaddig automatikus takarítási üzemmódban
működik, amíg az akkumulátor le nem merül. Az automatikus takarítási
üzemmódban ismételten végrehajtja a Z mintából, a véletlenszerű, a
falkövető és a spirál mintából álló sorozat mozdulatait.
Megjegyzés: Az egyes üzemmódok kiválasztásához nyomja meg a
távvezérlőn az üzemmód gombok egyikét. További részletekért lásd a
„Takarítási üzemmód kiválasztása” című részt.
5 Ha az akkumulátor lemerült, a start/stop gomb jelzőfénye narancssárgán
kezd világítani, és a robotporszívó megkeresi a dokkolóegységet, hogy
feltöltődjön.
6 A start/stop gomb megnyomásával meg is szakíthatja vagy leállíthatja a
takarítási folyamatot. Ha ismét megnyomja a start/stop gombot, és az
akkumulátor még mindig elegendő energiával rendelkezik, a
robotporszívó automatikus takarítási üzemmódban folytatja a takarítást.
91
7 Ha azt akarja, hogy a robotporszívó visszatérjen a dokkolóegységre,
mielőtt az akkumulátor lemerülne, nyomja meg a távvezérlőn vagy a
mutatón (csak az FC8820 esetén) a dokkolás gombot. Miután a
robotporszívó visszatér a dokkolóegységhez, a robotporszívó kijelzője
bekapcsol.
Megjegyzés: Ha a robotot nem a dokkolóegységről indította, az nem tér
oda vissza automatikusan, ha az akkumulátor töltöttségi szintje alacsony.
Ha az akkumulátor még mindig elegendő energiával rendelkezik, a
távvezérlő vagy a mutató (csak az FC8820 esetén) dokkolás gombját
megnyomva visszatérítheti a robotot a dokkolóegységre. Ha az
akkumulátor teljesen lemerült, manuálisan kell felhelyeznie a robotot a
dokkolóegységre.
Takarítási üzemmód kiválasztása
Az automatikus takarítási üzemmód mellett, a robotporszívó négy önálló
takarítási üzemmóddal rendelkezik, melyek mindegyike a távvezérlőn lévő
megfelelő gomb megnyomásával aktiválható.
Megjegyzés: A kézzel kiválasztott üzemmódok csak néhány percig
maradnak aktívak. Ezt követően a robotporszívó visszatér az automatikus
takarítási üzemmódhoz.

92
Magyar
Z mintájú üzemmód
Z mintájú üzemmódban a robotporszívó Z alakú mozdulatokból álló
hurkokat rajzolva tisztítja a szoba nagy területeit.
Véletlenszerű mintájú üzemmód
Ebben az üzemmódban a robotporszívó egyenes és cikkcakk
mozdulatokból álló vegyes mintát rajzolva tisztítja a szobát.
Falkövető üzemmód
Ebben az üzemmódban a robotporszívó követi a szoba falait, és a falak
mentén mozogva tökéletesen megtisztítja az adott területet.
Kézi
vezérlés
Spirál mintájú üzemmód
Ebben az üzemmódban a robotporszívó spirális mintájú végez egy kisebb
területen, így alaposan megtisztítja azt. Spirál üzemmódban a ventilátor
turbó sebességen üzemel (csak az FC8820 esetén).
1 A távirányító start/stop gombja felett, alatt, bal, illetve jobb oldalán
található nyílgombok segítségével irányíthatja a robotporszívó mozgását
a szobában.
Megjegyzés: Legyen óvatos, amikor a robotporszívót kézzel működteti
magasságkülönbség vagy lépcső közelében.
Megjegyzés: A porszívózás csak a robotporszívó előre történő haladása
történik, illetve az oldalsó kefék is csak ekkor működnek. A balra,
közben
jobbra és hátra gombok csak a robotporszívó irányítására szolgálnak.
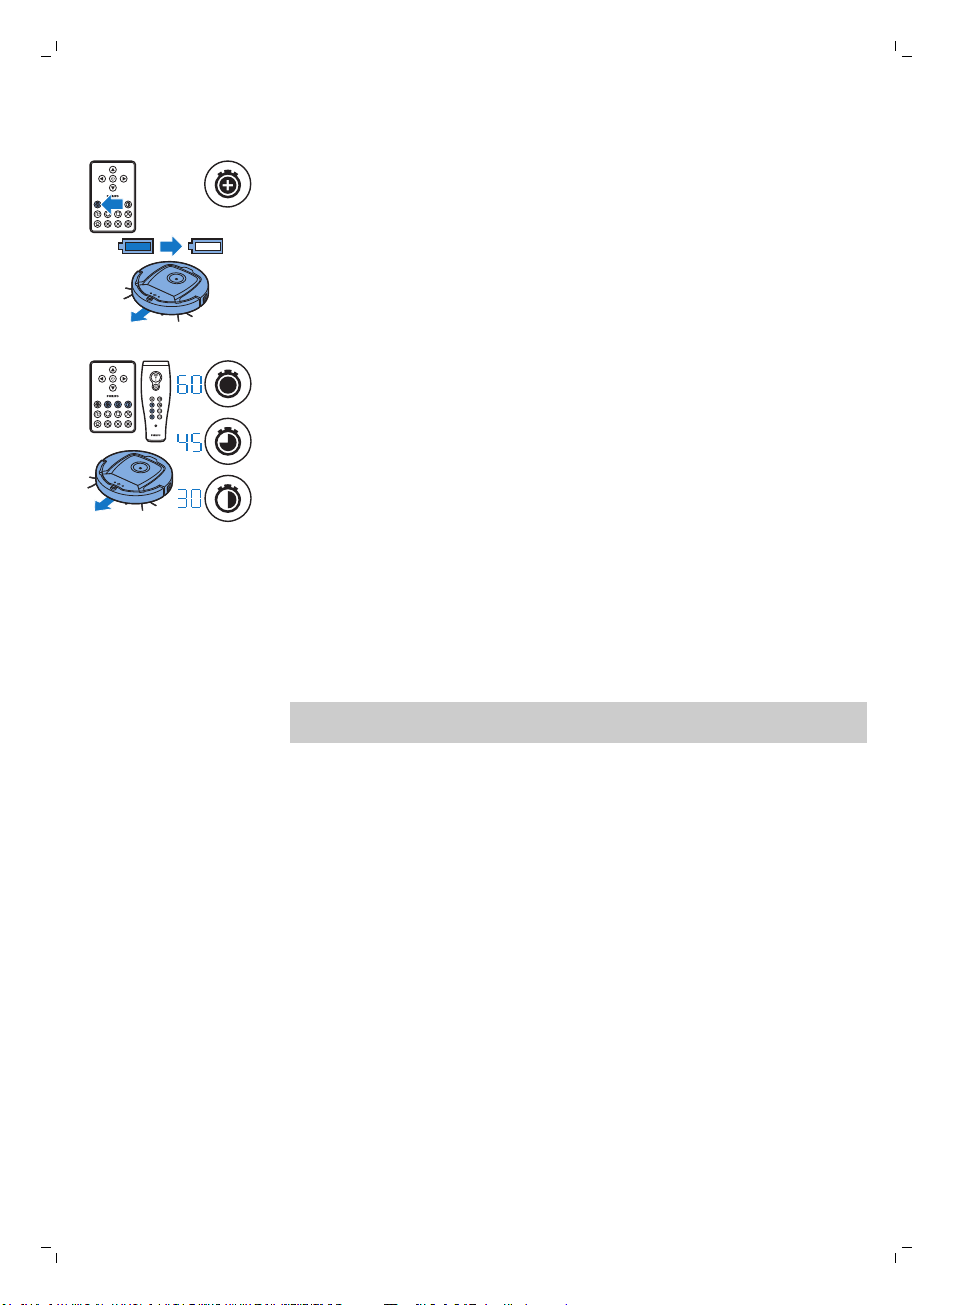
A takarítási idő gombjának használata
-
Ha azt szeretné, hogy a robotporszívó automatikus tisztítási
üzemmódban működjön, amíg az akkumulátor töltöttsége le nem
csökken, nyomja meg a maximális takarítási idő gombot. Amikor a
robotporszívó befejezte a takarítást, automatikusan visszatér a
dokkolóegységre, ha onnan indult. Ha a robotporszívó a szoba egy másik
pontjáról indult, a dokkolás gomb megnyomásával visszaküldheti a
robotot a dokkolóegységre.
-
A többi takarítási idő gomb segítségével 60, 45, illetve 30 percig
működtetheti a robotot. Amikor a takarítási idő lejárt, a robotporszívó
automatikusan visszatér a dokkolóegységre, ha onnan indult. Ha a
robotporszívó a szoba egy másik pontjáról indult, a dokkolás gomb
megnyomásával visszaküldheti a robotot a dokkolóegységre.
A dokkolóegység működtetése
Az idő és a nap beállítása az órán
Ha használni kívánja a takarító programokat, először a dokkolóegység
kijelzőjén be kell állítania az órán a hét napját és az időt.
Magyar
93
Megjegyzés: Az alábbi lépésekhez tartozó képekért lásd a jelen kézikönyv
hátsó oldalait.
1 Nyomja meg a beállítás gombot. A beállítás üzemmód jelzőfénye és az
óra idejének jelzőfénye villogni kezd.
2 Nyomja meg egyszer a kiválasztás gombot. Az óra értéke villogni kezd.
3 A dokkolóegység + és - gombjaival állítsa be az óra értékét. A kijelzőn
megjelenik a beállított óraérték.
4 Az óra értékének jóváhagyásához nyomja meg a kiválasztás gombot. A
perckijelzés villogni kezd.
5 A dokkolóegységen lévő + és - gomb segítségével beállíthatja a perc
értékét. A beállított percérték a kijelzőn látható.
6 Az percérték jóváhagyásához nyomja meg a kiválasztás gombot. A
vasárnapra vonatkozó „Va” kijelzés villogni kezd.
7 A dokkolóegység + és - gombjaival állítsa be a hét aktuális napját.
8 A hét napjának jóváhagyásához nyomja meg a kiválasztás gombot.
9 A beállított idő és hét napja jóváhagyásához nyomja meg a beállítás
gombot. A beállítás üzemmód jelzőfénye és az óra idejének jelzőfénye
abbahagyja a villogást, és folyamatosan kezd világítani.
A takarítási idők programozása
Ha a dokkolóegység kijelzőjén beállította a hét napját és az időt,
beprogramozhatja a robotporszívó takarítási időit.
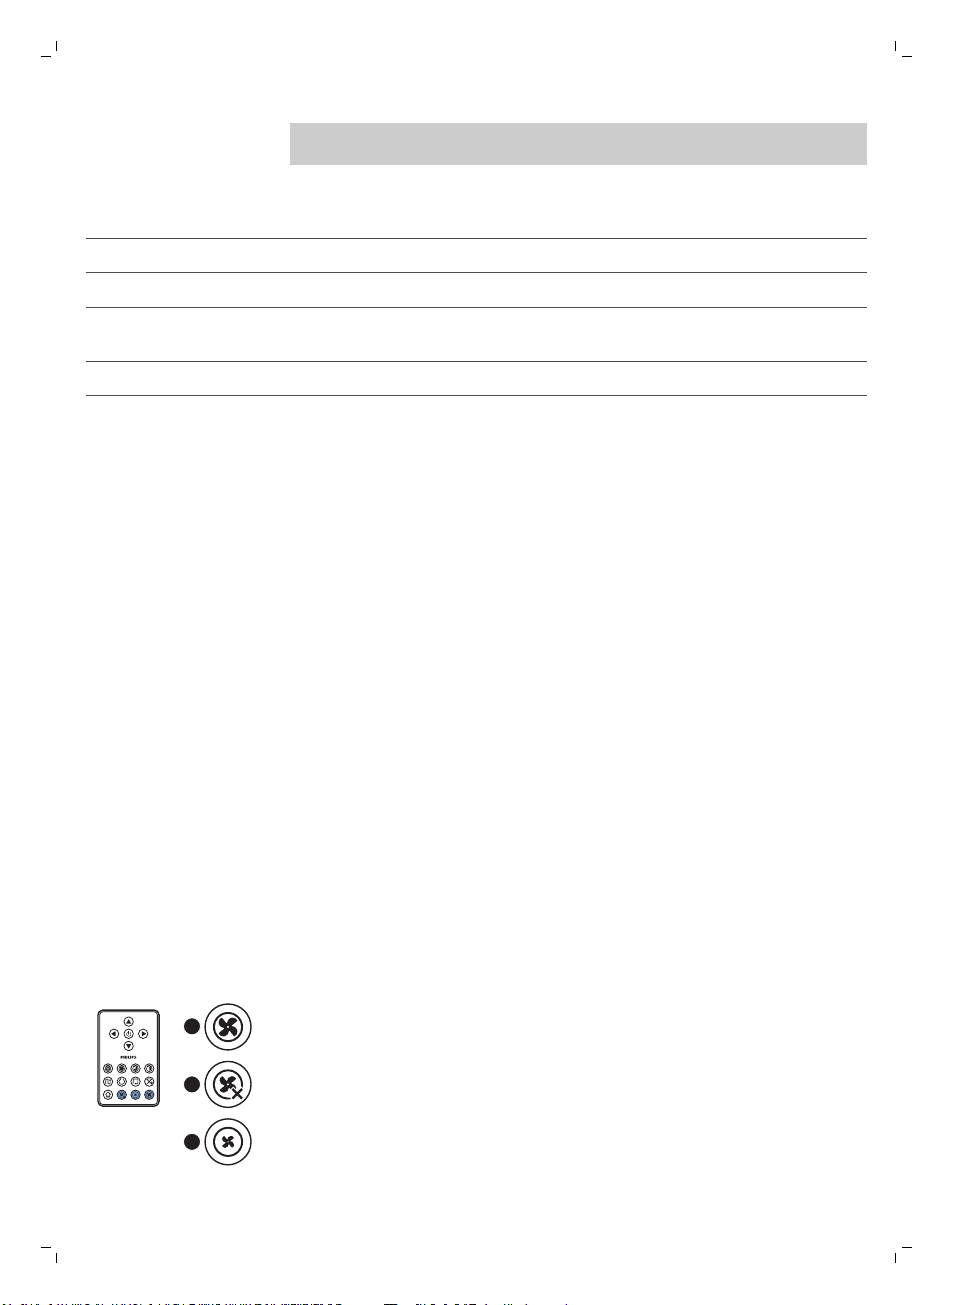
1
2
3
94
Magyar
Megjegyzés: Az alábbi lépésekhez tartozó képekért lásd a jelen kézikönyv
hátsó oldalait.
A rendelkezésre álló programozási beállítások:
Program Jelzések a kijelzőn
Takarítás minden nap Az egész napos kijelzések vannak bekapcsolva
Takarítás hétköznapokon A Mo (hétfő) - Fri (péntek) kijelzések vannak bekapcsolva
Takarítás 2 egymást követő napon A 2 nap kijelzése van bekapcsolva, például Fri (péntek) és Sa
Takarítás a hét 1 napján A kijelölt nap kijelzése van bekapcsolva
1 Nyomja meg a beállítás gombot. A beállítás üzemmód jelzőfénye és a
takarítási program jelzőfénye villogni kezd.
2 Nyomja meg egyszer a kiválasztás gombot. Az óra értéke villogni kezd.
3 A dokkolóegységen lévő + és - gomb segítségével beállíthatja az óra
értékét. A beállított óra megjelenik a kijelzőn.
4 Az óra értékének jóváhagyásához nyomja meg a kiválasztás gombot. A
perckijelzés villogni kezd.
5 A dokkolóegységen lévő + és - gomb segítségével beállíthatja a perc
értékét. A beállított percérték a kijelzőn látható.
6 Az percérték jóváhagyásához nyomja meg a kiválasztás gombot. A
vasárnapra vonatkozó „Va” kijelzés villogni kezd.
7 A dokkolóegység + és - gombjaival válthat a takarító programok között (a
rendelkezésre álló programozási beállításokat lásd a fenti táblázatban).
8 A kiválasztott program jóváhagyásához nyomja meg a kiválasztás
gombot.
9 Az programozás jóváhagyásához nyomja meg a beállítás gombot. A
beállítás üzemmód jelzőfénye és a tisztítóprogram jelzőfénye
abbahagyja a villogást, és folyamatosan kezd világítani.
10 Amikor beállított egy tisztítóprogramot, a kijelzőn megjelenik a
tisztítóprogram jelzője, valamint a kiválasztott nap vagy napok. Ha a
robotporszívót készenléti állapotban hagyja, és az akkumulátor teljesen
fel van töltve, akkor a robotporszívó a beprogramozott napon vagy
napokon, a beprogramozott időpontban elkezdi a takarítást.
(szombat)
Ventilátorsebesség gombjai
A ventilátor sebességét szabályozó gombokkal növelheti a ventilátor
sebességét turbó fokozatig, vagy kikapcsolhatja a ventilátort. Az
alapértelmezett beállítás a normál ventilátorsebesség.
1 Nyomja meg ezt a gombot a ventilátor kikapcsolásához
2 Nyomja meg ezt a gombot a ventilátor normál sebességű
bekapcsolásához.
3 A turbó ventilátor gomb növeli a ventilátor sebességét (csak az FC8820
esetén).
Válasz tapssal
Ez az üzemmód akkor lép működésbe, amikor a robotporszívó alvó
üzemmódba lép a következő helyzetekben:
-
amikor egy hiba miatt abbahagyja a takarítást
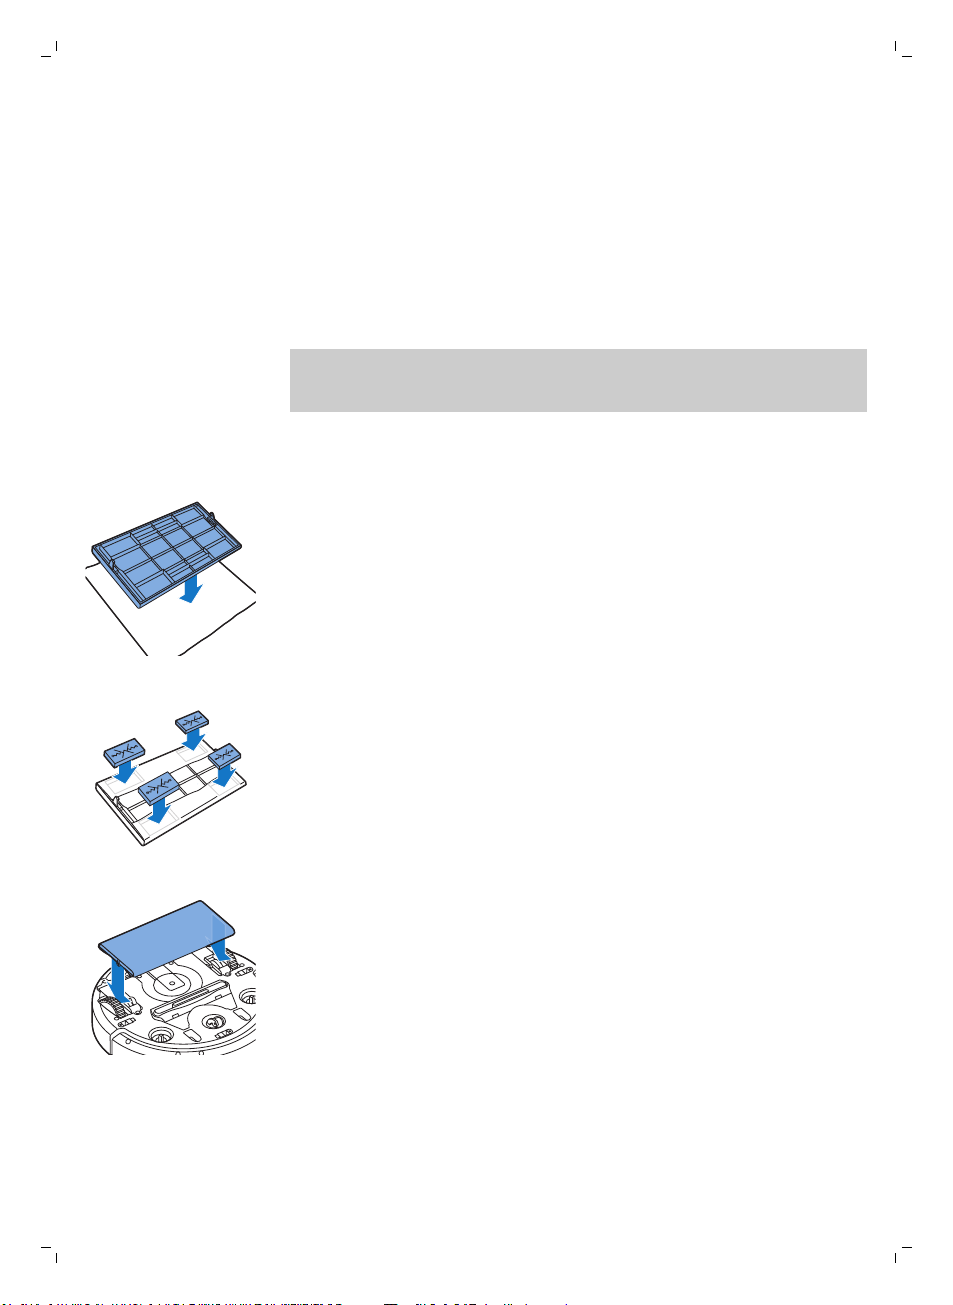
-
amikor rövid takarítási időt programozott be
-
amikor 20 perc alatt nem találta meg a dokkolóegységet
Ha nem látja a robotporszívót, akkor úgy találhatja meg, hogy egyet tapsol a
kezével. A robotporszívó ekkor hangjelzéssel és a kijelzőn az összes ikon
világításával válaszol.
A száraz törlőkendős tartozék használata
A száraz törlőkendős tartozék egy olyan funkció, amely lehetővé teszi a
kemény padlók száraz törlőkendővel történő tisztítását.
Megjegyzés: Ha a száraz törlőkendős tartozékot használja, előfordulhat,
hogy a robotporszívó számára nehézséget okoz a küszöbökön való
áthaladás és a szőnyegekre való felgördülés.
A száraz törlőkendős tartozék előkészítése a használathoz
1 Fordítsa fejjel lefelé a robotot, és helyezze a padlóra vagy egy asztalra.
2 Helyezze a száraz törlőkendőt egy asztalra, és helyezze a száraz
törlőkendős tartozékot a kendőre úgy, hogy a rögzítőfülek Ön felé
nézzenek.
Magyar
95
3 Hajtsa a száraz törlőkendő mindkét végét a száraz törlőkendős tartozék
köré, és a rögzítő blokkokat a mélyedésekbe nyomva erősítse a száraz
törlőkendőt a tartozékra.
4 Helyezze be a száraz törlőkendős tartozék rögzítő fülét a robotporszívó
egyik oldalán közvetlenül a kerék mögött lévő nyílásba, és addig nyomja,
amíg nem hallja, hogy az a helyére pattant. Ezután ismételje meg ezeket
a lépéseket a másik oldalon is.
5 Fordítsa vissza a robotot, és helyezze a padlóra a kerekeire úgy, hogy a
száraz törlőkendős tartozék érintkezzen a padlóval.
A robotporszívó használata a száraz törlőkendős tartozékkal
Ha fel van szerelve a száraz törlőkendős tartozék, a robotporszívó bármilyen
üzemmódban és mindenféle kemény padló tisztítására alkalmas. Ne
használja a száraz törlőkendős tartozékot szőnyegekhez vagy lábtörlőkhöz.

1
2
50-70 cm
50-70
cm
96
Magyar
A robotporszívó használata a száraz törlőkendős
tartozékkal
Ha fel van szerelve a száraz törlőkendős tartozék, a robotporszívó bármilyen
üzemmódban és mindenféle kemény padló tisztítására alkalmas. Ne
használja a száraz törlőkendős tartozékot szőnyegekhez vagy lábtörlőkhöz.
A száraz törlőkendős tartozék leszerelése
1 Szerelje le a száraz törlőkendős tartozékot, amint befejezte a padló
feltörlését.
2 Fordítsa fejjel lefelé a robotot, és helyezze a padlóra vagy egy asztalra.
3 A kioldásához nyomja a száraz törlőkendős tartozék egyik végét a
robotporszívó másik oldalán lévő kerék irányába. Ezután húzza le a
tartozékot a robotporszívóról.
mutató (FC8820) használata
A
A mutató töltése
A mutató akkumulátorral rendelkezik, amely a tartozékként adott USBkábelen keresztül tölthető.
1 Illessze a micro-USB csatlakozódugót a mutató alján lévő aljzatba.
2 Illessze az USB-csatlakozódugót az USB-töltőbe vagy a laptop USB-
portjába.
3 A mutatón folyamatosan világítani kezd a töltésjelző fény. A feltöltéshez
30 perc szükséges. Amikor a töltésjelző kialszik, az akkumulátor teljesen
feltöltődött.
A robotporszívó vezérlése a mutatóval
-
Amikor nyomva tartja a mutató gombját, a mutató infravörös sugarat
bocsát ki. Ezzel a sugárral egy adott irányba húzhatja a robotot. Amíg
nyomva tartja a gombot, és a kívánt irányba mutat vele, a robotporszívó
folyamatosan mozog abba az irányba. Amikor felengedi a mutató
gombját, a robotporszívó elkezdi a tisztítást automatikus üzemmódban.

50-70 cm
-
1
2
A mutató segítségével a robotot a szoba egy meghatározott területére
küldheti, hogy az a területet alaposan megtisztítsa.
A virtuális fali egység (FC8820) használata
Az elemek behelyezése a láthatatlan falba
A láthatatlan fal négy AA elemmel működik.
1 Nyomja meg a hátsó fedél (1) alján található két kioldófület, majd
csúsztassa a hátsó fedelet felfelé, és vegye le a láthatatlan falról (2).
2 Vegyen ki a csomagból négy új AA elemet, és helyezze be őket a
láthatatlan fal elemtartó rekeszébe.
Megjegyzés: Ügyeljen arra, hogy az akkumulátorok + és – pólusai a
megfelelő helyzetben legyenek.
Magyar
97
3 Csúsztassa vissza a hátsó fedelet a láthatatlan falra.
A láthatatlan fal elhelyezése a robotporszívó leállításához
A láthatatlan fal segítségével megakadályozhatja, hogy a robotporszívó
olyan helyiségbe vagy területre is bemenjen, ahová nem szeretné.

4
3
1
2
98
Magyar
1 Helyezze az egységet egy olyan pontra, amelyen túl nem szeretné
engedni a robotporszívót, pl. egy olyan helyiség nyitott ajtajának a
közelébe, amelybe a robotporszívó nem mehet be.
2 Kapcsolja be a láthatatlan falat a tetején található be-/kikapcsoló
gombbal.
3 Indítsa el a robotporszívót.
4 Ha a robotporszívó túl közel megy a láthatatlan falhoz, annak jelzőfénye
villogni kezd, és a láthatatlan fal egy infravörös fénysugarat bocsát ki. Az
infravörös fénysugár arra kényszeríti a robotot, hogy módosítása az
útvonalát, és távolodjon el a láthatatlan faltól.
Megjegyzés: A láthatatlan fal használatakor rendszeresen ellenőrizze, hogy
az akkumulátorok töltöttsége megfelelő-e. Ennek ellenőrzéséhez kapcsolja
ki majd újra be a láthatatlan falat. Ha az akkumulátorok töltöttsége
megfelelő, a láthatatlan falon található LED röviden felvillan.
Tisztítás és karbantartás
A robotporszívó tisztítása
A kiváló tisztító teljesítmény fenntartása érdekében rendszeresen tisztítsa
meg a mélységérzékelőket, a kerekeket, az oldalsó keféket és a szívónyílást.
1 Győződjön meg arról, hogy a bekapcsológomb „off” (kikapcsolt)
helyzetben van.
2 Helyezze a robotot fejjel lefelé egy sima felületre.
3 Egy puha sörtéjű kefével (pl. fogkefével) távolítsa el a port és a szöszt a
mélységérzékelőkről, valamint a szívónyílásból.
Megjegyzés: Fontos, hogy a mélységérzékelőket rendszeresen tisztítsa.
Ha az érzékelők szennyezettek, a robotporszívó nem észleli megfelelően
a magasságkülönbségeket.

1
2
3
Magyar
4 Egy puha sörtéjű kefével (pl. fogkefével) távolítsa el a port és a szöszt a
az első kerékről és az oldalsó kerekekről.
5 Az oldalsó kefék tisztításához fogja meg azok sörtéit, és húzza le a
keféket a tengelyekről.
6 Egy puha kefével (pl. fogkefével) vagy ruhával távolítsa el a szöszöket,
hajszálakat és cérnaszálakat a tengelyről és az oldalkeféről.
7 Ellenőrizze, hogy az oldalsó kefékből és a robotporszívó aljából nem
állnak-e ki éles tárgyak, amelyek megsérthetik a padlót.
99
A portartály ürítése és tisztítása
Ürítse ki és tisztítsa meg a portartályt, ha a portartály-telítettség jelző
folyamatosan világít.
1 Győződjön meg arról, hogy a bekapcsológomb „off” (kikapcsolt)
helyzetben van.
2 Vegye le a borítást.

1
2
Magyar
3 Húzza fel a portartály fedelének fogantyúját, és emelje ki a portartályt a
tartójából.
Megjegyzés: Amikor eltávolítja vagy visszahelyezi a portartályt, ügyeljen
arra, hogy ne sértse meg a motor ventilátorának lapátjait.
4 Óvatosan emelje fel a portartály fedelét (1), és vegye ki a szűrőt (2).
5 A szemetes fölött rázva ürítse ki a portartályt. Tisztítsa meg a szűrőt és a
portartály belsejét egy ronggyal vagy egy puha sörtéjű fogkefével.
Tisztítsa meg a portartály alján található szívónyílást is.
Figyelem! Ne tisztítsa a portartályt vagy a szűrőt vízzel vagy
mosogatógépben.
6 Helyezze vissza a szűrőt a portartályba (1). Tegye rá a fedelet a
portartályra (2).
7 Tegye vissza a portartályt a portartály-rekeszbe, és tegye vissza a felső
fedelet a robotporszívóra.
Figyelem! Mindig győződjön meg róla, hogy a szűrő a portartályban
van. Ha a robotot úgy használja, hogy a portartályban nincs szűrő, a
motor károsodhat.
 Loading...