


Panasonic CZ-RWSU1U, CZ-RWSK1U, CZ-RWST1U, CZ-RWSC1U, CZ-RWSY1U User Manual
...Operating Instructions
Wireless Remote Control System
Model No. CZ-RWSU1U
CZ-RWST1U
CZ-RWSU2U
CZ-RWSC1U
CZ-RWSY1U
CZ-RWSK1U
Before operating the unit, read these operating instructions thoroughly and keep them for future reference.
|
1006 Kadoma, Kadoma City, Osaka, Japan |
85464609158012 |
CV6233189680 |
Instruction_eng.indd a |
2012/01/27 16:25:30 |

CONTENTS |
|
1. IMPORTANT SAFETY INSTRUCTIONS ...................................... |
1 |
2. NAMES AND OPERATIONS ........................................................ |
2 |
3. INSTALLING BATTERIES............................................................. |
7 |
4. SETTING THE CURRENT TIME .................................................. |
8 |
5. OPERATION ................................................................................. |
9 |
6. TIMER OPERATION ................................................................... |
11 |
7. ADJUSTING THE WIND DIRECTION ........................................ |
13 |
8. OPERATING MULTIPLE IN/OUTDOOR UNITS |
|
SIMULTANEOUSLY .................................................................... |
14 |
9. USING THE REMOTE CONTROLLER....................................... |
15 |
10. FOR BEST RESULTS............................................................... |
15 |
11. ADDRESSES............................................................................ |
16 |
12. EMERGENCY OPERATION..................................................... |
19 |
13. MISCELLANEOUS SETTINGS ................................................ |
21 |
14. BEFORE REQUESTING SERVICE.......................................... |
22 |
15. SPECIFICATIONS .................................................................... |
23 |
Instruction_eng.indd b |
2012/01/27 16:25:31 |

1. IMPORTANT SAFETY INSTRUCTIONS
Before using the system, be sure to read these “IMPORTANT SAFETY INSTRUCTIONS”.
After reading this manual, save it in a convenient place.
 Warning
Installation Precautions
•Do not install yourself.
Installation should always be performed by your dealer or a professional service provider. Electric shock or fi re may result if an inexperienced person performs any installation or wiring procedures incorrectly.
•Use only specifi ed air conditioners.
Always use only air conditions specifi ed by the dealer.
Precautions for Use
•Do not touch switches with wet hands. Electric shock and damage to the system can result.
•Protect the remote controller from water. Damage to the system can result.
•Stop the system and turn the power off if you sense unusual smells or other irregularities. Continuing operation when the system is out of order can result in electric shock, fi re, and damage to the system. Contact your dealer.
•Do not swallow the battery.
Moving and Repair Precautions
•Do not repair.
Never repair the system by yourself.
•Contact your dealer before moving the system. Contact your dealer or a professional service provider about moving and reinstalling the system.
1
Electric shock or fi re may result if an inexperienced person performs any installation procedures incorrectly.
Note:
•This device complies with Part 15 of the FCC Rules. Operation is subject to the following two conditions: (1) This device may not cause harmful interference, and (2) this device must accept any interference received, including interference that may cause undesired operation.
•This equipment has been tested and found to comply with the limits for a Class B digital device, pursuant to part 15 of the FCC Rules.
These limits are designed to provide reasonable protection against harmful interference in
a residential installation. This equipment generates, uses and can radiate radio frequency energy and, if not installed and used in accordance with the instructions, may cause harmful interference to radio communications. However, there is no guarantee that interference will not occur in a particular installation. If this equipment does cause harmful interference
to radio or television reception, which can be determined by turning the equipment off and on, the user is encouraged to try to correct the interference by one or more of the following measures:
•Reorient or relocate the receiving antenna.
•Increase the separation between the equipment and receiver.
•Connect the equipment into an outlet on a circuit different from that to which the receiver is connected.
•Consult the dealer or an experienced radio/TV technician for help.
•FCC Caution: To assure continued compliance, follow the attached installation instructions. Any changes or modifi cations not expressly approved by the party responsible for compliance could void the user’s authority to operate this equipment.
Instruction_eng.indd 1 |
2012/01/27 16:25:31 |

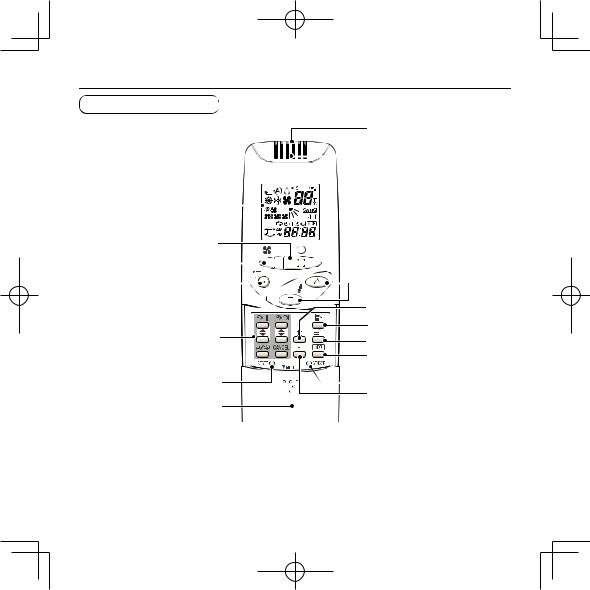
2. NAMES AND OPERATIONS
REMOTE CONTROLLER |
One remote controller can control a group of up to eight indoor units. |
|
(See Page 14) |
||
|
1.Operation Display
Displays the operation status. (The Þ gure shows all the statuses.)
¥The auto-ß ap display may be different, depending on the installed unit. (See Page 13)
2.Start/Stop button 
Pressing this button once starts and pressing again stops the operation.
3.Fan speed button 
4.Swing/Wind Direction button

5.Timer setting button

Use for operating with a timer.
6.Reset button
Use this button after changing the batteries.
7.Cover
Press at the top center and then slide down.
8.Transmitter
9.Remote control sensor
Detects the temperature at the remote controller when detection has been switched to the remote controller by the sensor button.
10.Temperature setting buttons
 raises the temperature setting.
 lowers the temperature setting.
11.Filter button  CZ-RWSC1U
Press to turn off the Þ lter lamp on the receiver.
12.Mode Select button 
Press to switch the operation mode.
13.Ventilation button 

Use this when connected to an aftermarket fan. Pressing this button starts and stops the fan. When the air conditioner is started or
stopped, the fan starts or stops at the same time. ( appears on the display of the remote controller when the fan is operating.)
14.Address button 
15.Sensor button
Use this when switching to detect the temperature at the remote controller. At
shipping the default setting is set to detect the temperature at the unit. At this time  is shown on the display.
16.Clock button 
Use this when setting the clock.
From this page on the names of remote control buttons will be abbreviated as the illustration of the “button”.
E.g.: Start/Stop button Æ
2
Instruction_eng.indd 2 |
2012/01/27 16:25:31 |
REMOTE CONTROLLER
|
|
|
|
|
|
8 |
||||
1 |
|
|
|
|
|
|
|
9 |
||
|
|
|
|
|
|
|
||||
|
|
|
|
|
|
|
|
|
|
|
|
|
|
|
|
|
|
|
|
|
|
2 |
|
|
|
|
|
|
|
|
|
|
|
|
|
|
|
|
|
|
|
|
|
|
|
|
|
|
||||||
3 |
|
|
|
|
|
|
|
|
|
10 |
|
|
|
|
|
|
|
|
|
||
4 |
|
|
|
|
|
|
|
|||
|
|
|
|
|
|
|||||
|
11 |
|
5 |
12 |
|
13 |
||
|
||
|
14 |
|
6 |
15 |
|
7 |
16 |
|
|
3
Instruction_eng.indd 3 |
2012/01/27 16:25:31 |
2. NAMES AND OPERATIONS (Cont.)
RECEIVER
1.Receiver
Receives the signal sent from the remote controller.
2.Emergency operation button
Display lamps
When an error occurs, one of the lamps fl ashes. When a display lamp is blinking, refer to “14. BEFORE REQUESTING SERVICE”.
3.Operating lamp
This lamp is lit when the unit is operating.
4.Timer lamp
This lamp is lit when the timer is set.
5.Standby lamp
¥When the heater is working, the lamp lights at the following times. When the thermostat has operated during defrosting at the time of the startup.
¥The lamp ß ashes when an error occurs.
6.Filter lamp
This lamp is for notifying you when the Þ lter needs to be cleaned.
7.Swing button
8.Normal/Stop All switch
Use in the Normal position. It does not operate in the Stop All position.
Remote control, main / remote control, secondary, switch
In normal use this should be on remote control, main. It is also possible to use both
in conjunction with a wired remote controller (sold separately). (Consult with the dealer where the product was purchased about making the settings.)
Test/On switch
This is used during service. It is not for normal use.
Test Run/On switch
This is used during service. It is not for normal use.
9.Address switch
Differentiate between incoming and outgoing signals.
Note
¥If a heat pump model is being used, it will beep twice and the operating lamp will light up on the display; if the timer and standby lamps blink alternately, a conß ict between the heating and cooling exists, so the unit cannot operate in the desired mode. (On models that do not have Auto function, even if Auto is selected, it works in the same way.)
¥When the local operation is disabled by such as the centralized control, and if the Start, Stop, Mode or Temperature setting buttons are pressed, the unit will beep Þ ve times and the change will not be made.
4
Instruction_eng.indd 4 |
2012/01/27 16:25:32 |

RECEIVER
CZ-RWSU1U
|
2 |
|
3 |
1 |
4 |
5 |
CZ-RWSC1U
1
2 7
7
8


 9 3
9 3 


 4
4 


5

 6
6
CZ-RWST1U
2
3 |
4 |
5 |
1 |
CZ-RWSY1U |
|
|
|
|
|
|
2 |
|
|
|
3 |
1 |
|
|
4 |
|
|
5 |
|
|
|
|
|
5
Instruction_eng.indd 5 |
2012/01/27 16:25:32 |

2. NAMES AND OPERATIONS (Cont.)
RECEIVER
CZ-RWSU2U
3 |
4 |
5 |
Display |
1
|
|
2 |
|
|
Operation Panel |
8 |
9 |
7 |
Indoor Unit (CZ-RWSK1U)
3
4
5
2
6
Instruction_eng.indd 6 |
2012/01/27 16:25:32 |
 Loading...