


CS-W7DKR
Panasonic CS-W7DKR, CU-W7DKR, CS-W12DKR, CU-W9DKR, CS-W9DKR User Manual
...
9 Operating Instructions
(GB Standard)
This sign warns of death
or serious injury.
The appliance is not intended for use by young children or infi rm
person without supervision. Young children should be supervised to
ensure that they do not play with the appliance.
Replacement or installation of power plugs shall be performed by
authorized/qualifi ed personnel only. The wires in this mains lead are
coloured in accordance with the following code:
To prevent personal injury,
injury to others and property
damage, the following
instructions must be
followed.
Incorrect operation due to
failure to follow instructions
will cause harm or damage,
the seriousness of which is
classifi ed as below:
Thank you for purchasing Panasonic Air Conditioner
SAFETY PRECAUTIONS
This symbol denotes
an action that is
PROHIBITED.
These symbols denote
actions that are
COMPULSORY.
Warning
Definition
This sign warns of injury
or damage to property.
Caution
The instructions to be
followed are classifi ed by
the following symbols:
Safety Regulation
Operation Condition (OC)
Use this air conditioner under the following temperature
range.
DBT: Dry Bulb Temperature
WBT: Wet Bulb Temperature
Indoor Outdoor
DBT WBT DBT WBT
Maximum Temperature (COOL)
32 23 43 26
Maximum Temperature (HEAT)
30 – 24 18
Minimum Temperature (COOL)
16 11 16 11
Minimum Temperature (HEAT)
16 – -5 -6
Different countries may have different colour coding for the wires.
Installation Precautions
Caution
• Do not pull the cord to
disconnect the plug.
• Do not wash the unit with water, benzene,
thinner or scouring powder.
• Do not use for other purposes such as
preservation of food.
• Do not use any combustible equipment at
airfl ow direction.
• Do not sit or place anything on the indoor
or outdoor unit.
• Do not expose directly to cold air for a
long period.
• Ventilate the room regularly.
• Pay attention as to whether the
installation rack is damaged after long
period of usage.
• Switch off the power supply and unplug
before cleaning or servicing.
• Turn off the power supply and unplug if
the unit is not used for a long period of
time.
Operation Precautions
Warning
Do not install, remove and reinstall the unit by yourself.
• Improper installation will cause leakage, electric shock or fi re. Please consult an authorized dealer or
specialist for the installation work.
Caution
• This air conditioner must be earthed. Improper grounding will cause electric shock.
• Ensure that the drainage piping is connected properly. Otherwise, water will leak.
• Current leakage protection equipment must be installed. Otherwise, electric shock or fi re may
occur.
• Do not install the unit in a potentially explosive atmosphere.
• Insert the power plug properly.
• Use specifi ed supply cord.
• If the supply cord is damaged or needed
to be replaced, it must be replaced by
the manufacturer or its service agent or
a similarly qualifi ed person in order to
avoid a hazard.
• Remove the batteries if the unit is not
going to be use for a long period of time.
•
New batteries of the same type must be
inserted following the polarity stated to
prevent malfunction of the remote control.
• In case of emergency or abnormal
condition (burnt, smell, etc) occurs, turn
off the power supply and unplug.
Warning
• Do not share power outlet.
• Do not modify power cord.
• Do not use an extension cord.
• Do not operate with wet hands.
• Do not operate or stop the unit by inserting
or pulling out the power plug.
• Do not insert fi nger or other objects into the
indoor or outdoor unit.
• Do not attempt to repair the unit by
yourself.
• Do not use rechargeable (Ni-Cd) batteries.
• Keep the remote control away from infants
and small children to prevent them from
accidentally swallowing the batteries.
39
C S -W 7 D K R C U -W 7 D K R / C S - W 9D K R C U -W 9D K R / C S - W 1 2 D K R C U -W 1 2 D K R
QUIET
POW
E
RFUL
I
O
N
TIM
ERPO
W
E
R
CANCEL
O
FF
TIMER
ON
TIMER
FAN
S
PEED
AIR
S
W
ING
A
UTO
DRY
COOL
MODE
TIM
ER
ON
1 2 3
OF
F
CL
O
CK RE
S
ET
SET
CANCEL
TEMP
POW
ERFUL
FA
NSPEED
AIRSWING
OFF/ON
Q UIET
QUIET
POWERFUL
ION
SUPER
A LLERU-B USTER
TIMERPOWER
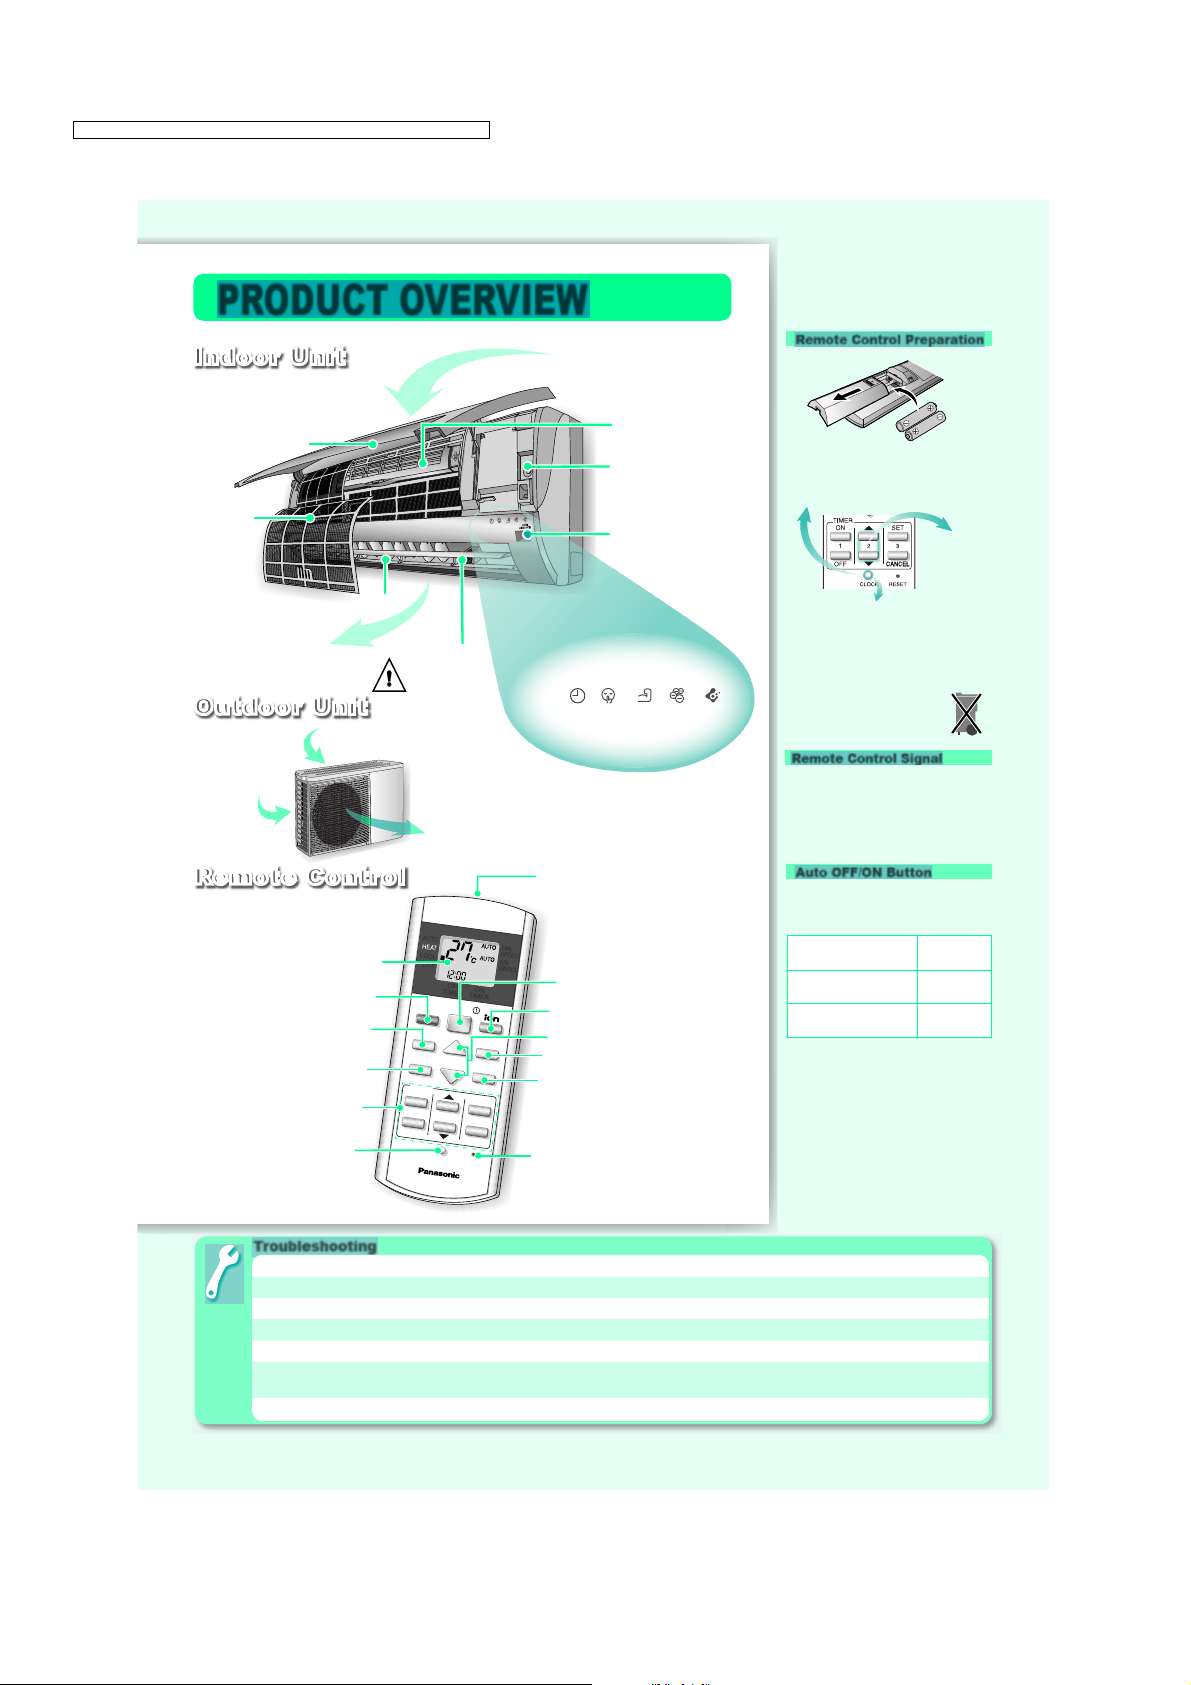
Air intake
Airflow direction louver
Ionizer
Air filter
Front panel
Indoor Unit
Outdoor Unit
Air inlet
(rear)
Air outlet
LCD display
Off/On
Fan speed selection
Clock setting
Memory reset
Temperature setting
Powerful operation
Operation mode
Quiet operation
Timer setting
Ion operation
Airflow direction
adjustment
Remote Control
Indicator
Supersonic air
purifying device
Auto OFF/ON
button
Receiver
Transmitter
Air inlet
(side)
Discharged air
Do not touch
during operation
Note: The illustrations in this manual are for explanation purposes only and may differ from the
actual unit. It is subjected to change without notice for future improvement.
PRODUCT OVERVIEW
Troubleshooting
Operation delayed for few minutes after restart.
This is a normal self protection control.
Sound like water fl owing during operation.
Caused by refrigerant fl ow inside.
Mist emerges from indoor unit.
Condensation effect due to cooling process.
Noisy during operations.
Installation work could be slanted or front panel didn’t close properly.
Remote control/display does not work.
Check whether batteries are correctly inserted or need replacement.
The unit cannot operate.
Check either circuit breaker is tripped, power plug is inserted correctly or
timer is used correctly.
Outdoor unit emits water/steam.
Condensation or evaporation happens at piping surface.
OPEN
• Make sure it is not obstructed.
• Maximum distances: 10m.
• Certain fluorescent lights may
interfere with signal transmission.
Consult your dealer.
Remote Control Preparation
About
Remote Control Signal
• Timer operation will be based on
current time set.
• The batteries can be used for
approximately 1 year.
• The batteries must be
recycled or disposed of
properly.
1. Pull out
2. Insert batteries
(AAA or R03)
3. Press CLOCK button
4. Set
current
time
5. Press again to confi rm
• To operate the unit if the
remote control is misplaced or
malfunctioning.
Action
Operation
mode
Press once
Automatic
Operation
Press until “beep”
sound
Cooling
Operation
• To OFF, press again the Auto OFF/
ON button.
• To switch the remote control signal
receiving sound off or on.
1. Press until “beep” sound and
release.
2. Press again until “beep-beep”
sound and release.
3. Press to switch the sound off or
on.
(Long “beep” - OFF; short “beep”
- ON)
Auto OFF/ON Button
40
CS-W7DKR CU-W7DKR / CS-W9DKR CU-W9DKR / CS-W 12DKR CU- W12DKR
 Loading...