


Miele KM 553, KM 547, KM 550, KM 551, KM 542 User Manual
...
Operating and Installation instructions
Ceramic hobs KM 530 / KM 537
KM 540 / KM 541 / KM 542 / KM 543 KM 544 / KM 545 / KM 547 / KM 548 KM 550 / KM 551 / KM 552 / KM 553
To avoid the risk of accidents or |
en - GB |
damage to the appliance it is |
|
essential to read these |
|
instructions before it is installed |
|
and used for the first time. |
M.-Nr. 06 069 910 |

Contents
Guide to the appliance . . . . . . . . . . . . . . . . . . . . . . . . . . . . . . . . . . . . . . . . . . . . . 4
KM 540. . . . . . . . . . . . . . . . . . . . . . . . . . . . . . . . . . . . . . . . . . . . . . . . . . . . . . . . . . . 4 KM 544. . . . . . . . . . . . . . . . . . . . . . . . . . . . . . . . . . . . . . . . . . . . . . . . . . . . . . . . . . . 5 KM 530 / KM 545 . . . . . . . . . . . . . . . . . . . . . . . . . . . . . . . . . . . . . . . . . . . . . . . . . . . 6 KM 541. . . . . . . . . . . . . . . . . . . . . . . . . . . . . . . . . . . . . . . . . . . . . . . . . . . . . . . . . . . 7 KM 542. . . . . . . . . . . . . . . . . . . . . . . . . . . . . . . . . . . . . . . . . . . . . . . . . . . . . . . . . . . 8 KM 548. . . . . . . . . . . . . . . . . . . . . . . . . . . . . . . . . . . . . . . . . . . . . . . . . . . . . . . . . . . 9 KM 543 / KM 547 . . . . . . . . . . . . . . . . . . . . . . . . . . . . . . . . . . . . . . . . . . . . . . . . . . 10 KM 537 / KM 550 / KM 551
KM 552 / KM 553 . . . . . . . . . . . . . . . . . . . . . . . . . . . . . . . . . . . . . . . . . . . . . . . . . . 11 Cooking zone sensors and displays . . . . . . . . . . . . . . . . . . . . . . . . . . . . . . . . . . . 12 Timer sensors and display. . . . . . . . . . . . . . . . . . . . . . . . . . . . . . . . . . . . . . . . . . . 12 Cooking zones . . . . . . . . . . . . . . . . . . . . . . . . . . . . . . . . . . . . . . . . . . . . . . . . . . . . 13
Warning and safety instructions . . . . . . . . . . . . . . . . . . . . . . . . . . . . . . . . . . . . 15
Caring for the environment . . . . . . . . . . . . . . . . . . . . . . . . . . . . . . . . . . . . . . . . . 21
Before using for the first time. . . . . . . . . . . . . . . . . . . . . . . . . . . . . . . . . . . . . . . 22
Cleaning for the first time . . . . . . . . . . . . . . . . . . . . . . . . . . . . . . . . . . . . . . . . . . . . 22 Heating up for the first time . . . . . . . . . . . . . . . . . . . . . . . . . . . . . . . . . . . . . . . . . . 22 Calibrating the sensors . . . . . . . . . . . . . . . . . . . . . . . . . . . . . . . . . . . . . . . . . . . . . 23
How the cooking zones work . . . . . . . . . . . . . . . . . . . . . . . . . . . . . . . . . . . . . . . |
24 |
Operation . . . . . . . . . . . . . . . . . . . . . . . . . . . . . . . . . . . . . . . . . . . . . . . . . . . . . . . |
25 |
Sensors . . . . . . . . . . . . . . . . . . . . . . . . . . . . . . . . . . . . . . . . . . . . . . . . . . . . . . . . . |
25 |
Switching on . . . . . . . . . . . . . . . . . . . . . . . . . . . . . . . . . . . . . . . . . . . . . . . . . . . . . |
25 |
Settings . . . . . . . . . . . . . . . . . . . . . . . . . . . . . . . . . . . . . . . . . . . . . . . . . . . . . . . . . |
26 |
Auto heat-up . . . . . . . . . . . . . . . . . . . . . . . . . . . . . . . . . . . . . . . . . . . . . . . . . . . . . |
27 |
Switching on an extended area . . . . . . . . . . . . . . . . . . . . . . . . . . . . . . . . . . . . . . . |
28 |
Switching off and residual heat indicators. . . . . . . . . . . . . . . . . . . . . . . . . . . . . . . |
29 |
Pans . . . . . . . . . . . . . . . . . . . . . . . . . . . . . . . . . . . . . . . . . . . . . . . . . . . . . . . . . . . . |
30 |
Tips on saving energy . . . . . . . . . . . . . . . . . . . . . . . . . . . . . . . . . . . . . . . . . . . . . |
31 |
2

Contents
Safety features . . . . . . . . . . . . . . . . . . . . . . . . . . . . . . . . . . . . . . . . . . . . . . . . . . . 32
Safety lock . . . . . . . . . . . . . . . . . . . . . . . . . . . . . . . . . . . . . . . . . . . . . . . . . . . . . . . 32 Stop and Go. . . . . . . . . . . . . . . . . . . . . . . . . . . . . . . . . . . . . . . . . . . . . . . . . . . . . . 33 Safety switch-off. . . . . . . . . . . . . . . . . . . . . . . . . . . . . . . . . . . . . . . . . . . . . . . . . . . 34 Overheating protection . . . . . . . . . . . . . . . . . . . . . . . . . . . . . . . . . . . . . . . . . . . . . 35
Timer . . . . . . . . . . . . . . . . . . . . . . . . . . . . . . . . . . . . . . . . . . . . . . . . . . . . . . . . . . . 36
Programming steps in brief . . . . . . . . . . . . . . . . . . . . . . . . . . . . . . . . . . . . . . . . . . 36 Setting the minute minder . . . . . . . . . . . . . . . . . . . . . . . . . . . . . . . . . . . . . . . . . . . 36 Switching a cooking zone off automatically. . . . . . . . . . . . . . . . . . . . . . . . . . . . . . 37 Switching between timer functions . . . . . . . . . . . . . . . . . . . . . . . . . . . . . . . . . . . . 38 Timer default setting . . . . . . . . . . . . . . . . . . . . . . . . . . . . . . . . . . . . . . . . . . . . . . . 38
Cleaning and care . . . . . . . . . . . . . . . . . . . . . . . . . . . . . . . . . . . . . . . . . . . . . . . . 39
Programming . . . . . . . . . . . . . . . . . . . . . . . . . . . . . . . . . . . . . . . . . . . . . . . . . . . . 41
Problem solving guide . . . . . . . . . . . . . . . . . . . . . . . . . . . . . . . . . . . . . . . . . . . . 44
To test the power level . . . . . . . . . . . . . . . . . . . . . . . . . . . . . . . . . . . . . . . . . . . . 46
Optional accessories . . . . . . . . . . . . . . . . . . . . . . . . . . . . . . . . . . . . . . . . . . . . . . 48
After sales service, data plate . . . . . . . . . . . . . . . . . . . . . . . . . . . . . . . . . . . . . . 49
Installation . . . . . . . . . . . . . . . . . . . . . . . . . . . . . . . . . . . . . . . . . . . . . . . . . . . . . . 50
Safety instructions for installation . . . . . . . . . . . . . . . . . . . . . . . . . . . . . . . . . . . . . 50 Hob with frame or bevelled edge . . . . . . . . . . . . . . . . . . . . . . . . . . . . . . . . . . . . . 54 Mains connection box . . . . . . . . . . . . . . . . . . . . . . . . . . . . . . . . . . . . . . . . . . . . . . 65 Sealant . . . . . . . . . . . . . . . . . . . . . . . . . . . . . . . . . . . . . . . . . . . . . . . . . . . . . . . . . . 66 Tiled worktop . . . . . . . . . . . . . . . . . . . . . . . . . . . . . . . . . . . . . . . . . . . . . . . . . . . . . 66 Flush-fitted hobs . . . . . . . . . . . . . . . . . . . . . . . . . . . . . . . . . . . . . . . . . . . . . . . . . . 67 Electrical connection . . . . . . . . . . . . . . . . . . . . . . . . . . . . . . . . . . . . . . . . . . . . . . . 71 Wiring diagram . . . . . . . . . . . . . . . . . . . . . . . . . . . . . . . . . . . . . . . . . . . . . . . . . . . 73
3
Guide to the appliance
KM 540
|
|
|
|
|
|
|
|
|
|
|
|
|
|
|
|
|
|
|
|
|
|
|
|
|
|
|
|
|
|
|
|
|
|
|
|
|
|
|
|
|
|
|
|
|
|
|
|
|
|
|
|
|
|
|
|
|
|
|
|
|
|
|
|
|
|
|
|
|
|
|
|
|
|
|
|
|
|
|
|
|
|
|
|
|
|
|
|
|
|
|
|
|
|
|
|
|
|
|
|
|
|
|
|
|
|
|
|
|
|
|
|
|
|
|
|
|
|
|
|
|
|
|
|
|
|
|
|
|
|
|
|
|
|
|
|
|
|
|
|
|
|
|
|
|
|
|
|
|
|
|
|
|
|
|
|
|
|
|
|
|
|
|
|
|
|
|
|
|
|
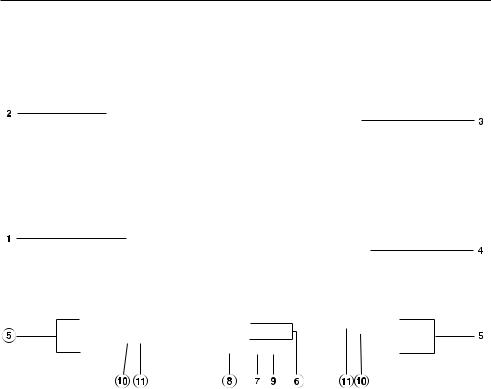
Cooking zones: |
|
Indicator lamp for: |
|
|
||||||||||||
Single circle zones |
|
Safety lock |
|
|
||||||||||||
Sensor switches for:
Cooking zones
Timer (see "Timer sensors and display")
Safety lock
Hob ON/OFF
4
Guide to the appliance
KM 544
|
|
|
|
|
|
|
|
|
|
|
|
|
|
|
|
|
|
|
|
|
|
|
|
|
|
|
|
|
|
|
|
|
|
|
|
|
|
|
|
|
|
|
|
|
|
|
|
|
|
|
|
|
|
|
|
|
|
|
|
|
|
|
|
|
|
|
|
|
|
|
|
|
|
|
|
|
|
|
|
|
|
|
|
|
|
|
|
|
|
|
|
|
|
|
|
|
|
|
|
|
|
|
|
|
|
|
|
|
|
|
|
|
|
|
|
|
|
|
|
|
|
|
|
|
|
|
|
|
|
|
|
|
|
|
|
|
|
|
|
|
|
|
|
|
|
|
|
|
|
|
|
|
|
|
|
|
|
|
|
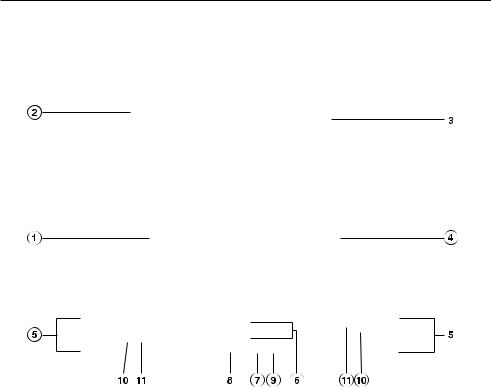
Cooking zones: |
|
Indicator lamp for: |
|
|
|||||||||||
Single circle zones |
|
Safety lock |
|
|
|||||||||||
Sensor switches for:
Cooking zones
Timer (see "Timer sensors and display")
Safety lock
Hob ON/OFF
5
Guide to the appliance
KM 530 / KM 545
|
|
|
|
|
Cooking zones: |
Indicator lamps for: |
|||
Single circle zones |
Safety lock |
|||
|
Double circle zone |
Outer circle of the double circle zone |
||
Sensor switches for:
Cooking zones
Timer (see "Timer sensors and display")
Safety lock
Hob ON/OFF
Switching on the outer circle of the double circle zone
6
Guide to the appliance
KM 541
Cooking zones:
Double circle zone
Single circle zones
Sensor switches for:
Cooking zones
Timer (see "Timer sensors and display")
Safety lock
Hob ON/OFF
Switching on the outer circle of the double circle zone
Indicator lamps for:
Safety lock
Outer circle of the double circle zone
7

Guide to the appliance
KM 542
|
|
|
|
Cooking zones: |
Indicator lamps for: |
||
Double circle zones |
Safety lock |
||
Single circle zones |
Outer circle of the double circle zone |
||
Sensor switches for:
Cooking zones
Timer (see "Timer sensors and display")
Safety lock
Hob ON/OFF
Switching on the outer circle of the double circle zone
8
Guide to the appliance
KM 548
|
|
|
|
Cooking zones: |
Indicator lamps for: |
||
Double circle zones |
Safety lock |
||
Single circle zones |
Outer circle of the double circle zone |
||
Sensor switches for:
Cooking zones
Timer (see "Timer sensors and display")
Safety lock
Hob ON/OFF
Switching on the outer circle of the double circle zone
9
Guide to the appliance
KM 543 / KM 547
|
|
|
Cooking zones: |
Indicator lamps for: |
|
Double circle zone
Single circle zones
Extended cooking zone
Safety lock
Outer circle of the double circle / extended cooking zone
Sensor switches for:
Cooking zones
Timer (see "Timer sensors and display")
Safety lock
Hob ON/OFF
Switching on the outer circle of the double circle / extended cooking zone
10
Guide to the appliance
KM 537 / KM 550 / KM 551
KM 552 / KM 553
|
|
|
Cooking zones: |
Indicator lamps for: |
|
Double circle zone
Single circle zones
Extended cooking zone
Safety lock
Outer circle of the double circle / extended zone
Sensor switches for:
Cooking zones
Timer (see "Timer sensors and display")
Safety lock
Hob ON/OFF
Switching on the outer circle of the double circle / extended cooking zone
11
Guide to the appliance
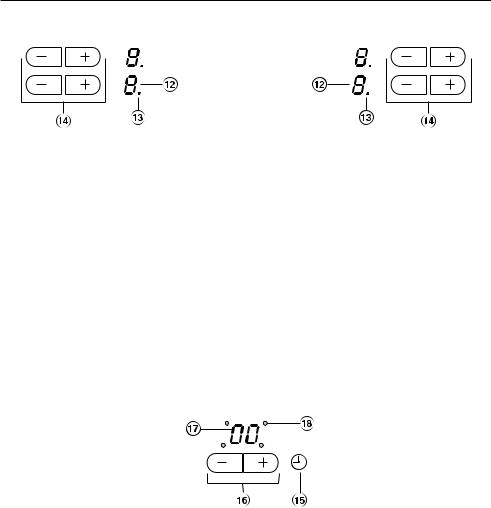
Cooking zone sensors and displays
Displays:
0 = Cooking zone ready for use
1 to 9 = Power setting
#= Residual heat
F |
= |
Fault (see "Safety switch-off") |
A |
= |
Auto heat-up when the power setting range has been extended |
P0 etc. = |
Programme (see "Programming") |
|
S0 etc. = |
Status (see "Programming") |
|
Indicator lamp for Auto heat-up or extended power setting (see "Programming"), e.g. the front left cooking zone
Power setting sensor switches
Timer sensors and display
Sensor switches for setting the timer, switching between timer functions and selecting automatic switch-off for a cooking zone.
Sensor switches to set the timer
Timer display
Indicator lamp for automatic switch-off, e.g. of the rear right cooking zone
12

Guide to the appliance
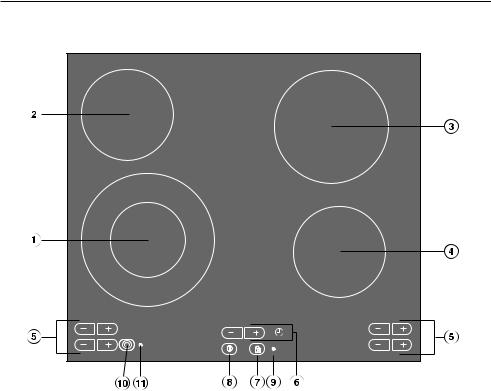
Cooking zones
Cooking |
KM 540 |
KM 544 |
KM 545 |
||||
zone |
|
|
|
|
|
|
|
C in cm |
|
|
C in cm |
|
C in cm |
|
|
|
|
Rating in |
Rating in |
Rating in |
|||
|
|
|
watts |
|
watts |
|
watts |
|
|
|
(230 V) |
|
(230 V) |
|
(230 V) |
|
|
|
|
|
|
|
|
y |
21.0 |
|
2200 |
18.0 |
1800 |
18.0 |
1800 |
w |
14.5 |
|
1100 |
14.5 |
1100 |
14.5 |
1100 |
x |
18.0 |
|
1800 |
21.0 |
2200 |
12.0 / 21.0 |
750 / 2200 |
z |
14.5 |
|
1100 |
14.5 |
1100 |
14.5 |
1100 |
|
|
|
|
|
|
|
|
|
|
|
|
|
|
|
|
|
|
|
Total: |
|
Total: |
|
Total: |
|
|
|
6200 |
|
6200 |
|
6200 |
|
|
|
|
|
|
|
|
|
|
|
|
|
|
|
|
Cooking |
KM 541 |
KM 542 |
KM 548 |
||||
zone |
|
|
|
|
|
|
|
C in cm |
|
C in cm |
|
C in cm |
|
||
|
Rating in |
Rating in |
Rating in |
||||
|
|
|
watts |
|
watts |
|
watts |
|
|
|
(230 V) |
|
(230 V) |
|
(230 V) |
|
|
|
|
|
|
|
|
y |
12.0 / 21.0 |
750 / 2200 |
12.0 / 21.0 |
750 / 2200 |
10.0 / 18.0 |
600 / 1800 |
|
w |
14.5 |
|
1100 |
14.5 |
1100 |
14.5 |
1100 |
x |
18.0 |
|
1800 |
10.0 / 18.0 |
600 / 1800 |
12.0 / 21.0 |
750 / 2200 |
z |
14.5 |
|
1100 |
14.5 |
1100 |
14.5 |
1100 |
|
|
|
|
|
|
|
|
|
|
|
|
|
|
|
|
|
|
|
Total: |
|
Total: |
|
Total: |
|
|
|
6200 |
|
6200 |
|
6200 |
|
|
|
|
|
|
|
|
13

Guide to the appliance
Cooking |
KM 543 / KM 547 |
|
KM 550 / KM 551 / KM 552 / KM 553 |
|||||
zone |
|
|
|
|
|
|
|
|
C in cm |
|
|
|
|
C in cm |
|
|
|
|
|
Rating in watts |
|
|
Rating in watts |
|||
|
|
|
|
(230 V) |
|
|
|
(230 V) |
|
|
|
|
|
|
|
|
|
y |
12.0 / 21.0 |
|
750 / 2200 |
|
12.0 / 21.0 |
750 / 2200 |
||
w |
14.5 |
|
1100 |
|
14.5 |
1100 |
||
x |
17.0 / |
|
1500 / |
|
17.0 / |
1500 / |
||
|
17.0 x 26.5 |
|
2400 |
|
17.0 x 26.5 |
2400 |
||
z |
14.5 |
|
1100 |
|
18.0 |
1800 |
||
|
|
|
|
|
|
|
|
|
|
|
|
|
|
|
|
|
|
|
|
|
|
Total: 6800 |
|
|
|
Total: 7500 |
|
|
|
|
|
|
|
|
|
|
|
|
|
|
|
|||
Cooking |
|
KM 530 |
KM 537 |
|||||
zone |
|
|
|
|
|
|
|
|
C in cm |
|
|
|
|
C in cm |
|
|
|
|
|
|
Rating in watts |
|
Rating in watts |
|||
|
|
|
|
(230 V) |
|
|
(230 V) |
|
|
|
|
|
|
|
|
|
|
y |
18.0* |
|
|
1800 |
|
12.0 / 21.0 |
|
750 / 2200 |
w |
14.5 |
|
|
1100 |
|
14.5 |
|
1100 |
x |
12.0 / 21.0 |
|
750 / 2200 |
|
17.0 / |
|
1500 / |
|
|
|
|
|
|
|
17.0 x 26.5 |
|
2400 |
z |
14.5 |
|
|
1100 |
|
18.0* |
|
1800 |
|
|
|
|
|
|
|
|
|
|
|
|
|
|
|
|
|
|
|
|
|
|
Total: 6200 |
|
|
Total: 7500 |
|
|
|
|
|
|
|
|
|
|
*This cooking zone has two different heating elements (HiLight and Halogen). When switched on, the outer zone (Halogen element) glows faster and more intensely than the inner zone (HiLight element).
14
Warning and safety instructions
To avoid the risk of accidents and damage to the appliance, please read these instructions carefully before using it for the first time. They contain important notes on its installation, safety, use and maintenance.
This appliance is not intended for use by persons (including children) with reduced physical, sensory or mental capabilities, or lack of experience and knowledge, unless they have been given supervision or instruction concerning its use by a person responsible for their safety.
Keep these instructions in a safe place for reference, and pass them on to any future user.
Technical safety
~ The appliance must be installed and connected by a suitably qualified and competent person in strict accordance with current local and national safety regulations. The manufacturer cannot be held liable for damage caused by incorrect installation or connection.
~The electrical safety of this appliance can only be guaranteed when continuity is complete between it and an effective earthing system which complies with current local and national safety regulations. It is most important that this basic safety requirement is present and regularly tested, and where there is any doubt, the household wiring system should be inspected by a qualified electrician. The manufacturer cannot be held liable for the consequences of an inadequate earthing system (e.g. electric shock).
~Do not connect the appliance to the mains electricity supply by an extension lead. Extension leads do not guarantee the required safety of the appliance (e.g. danger of overheating).
~Never open the casing of the appliance.
Tampering with electrical connections or components is highly dangerous to the user and can cause operational faults.
15

Warning and safety instructions
Correct use
~For safety reasons this appliance must only be operated after it has been built in. This is necessary to ensure that all electrical components are shielded.
~This appliance is intended for domestic use only and is not to be used for commercial purposes.
~Do not leave the appliance unattended whilst it is in use.
Pans that have boiled dry can cause damage to the ceramic surface for which the manufacturer cannot be held liable.
Boiling fat or oil could ignite and cause a fire.
~This appliance is intended for domestic use for the preparation of food only.
Any other usage is at the owner's risk and could be dangerous. The manufacturer cannot be held liable for damage resulting from incorrect or improper use or operation.
~Do not use the appliance to heat up the room. Due to the high temperatures radiated, objects near the appliance could catch fire. The life of the appliance could also be reduced.
~During prolonged or intensive use of the appliance, the frame and the control panel get hot. This is quite normal and does not indicate a fault.
16

Warning and safety instructions
Safety with children
~Use the safety lock to prevent children operating the appliance or altering the settings.
~The appliance is only intended for use by adults who have read these instructions.
~This appliance is not a toy! To avoid the risk of injury, keep children well away, and do not allow them to play with it or use the controls. They will not understand the potential dangers posed by it. They should be supervised whenever you are working in the kitchen.
~Older children may use the appliance only when its operation has been clearly explained to them and they are able to use it safely, recognising the dangers of misuse.
~The appliance gets hot when in use and remains hot for quite a while after being switched off. To safeguard against burning, keep children well away from the appliance at all times.
~Do not store anything which might arouse a child's interest in storage areas above or next to the appliance. Otherwise they could be tempted into climbing onto the appliance with the risk of burning themselves.
~Keep all pans out of reach of children. Turn pan handles inwards away from the edge of the hob. Danger of burning or scalding. Special hob guards are available from good retail outlets.
~Packaging, e.g. cling film, polystyrene and plastic wrappings, must be kept out of the reach of babies and young children. Danger of suffocation. Dispose of or recycle all packaging safely as soon as possible.
17

Warning and safety instructions
Protecting the appliance from damage
~Do not use pots and pans on the ceramic hob with bases with pronounced edges or ridges, e.g. cast iron pans. These could scratch or scour the hob surface permanently.
~Never heat an empty pan unless the manufacturer of the pan expressly states that you can do so. This could damage the appliance.
~Keep the hob clean. Grains of salt, sugar and sand (e.g. from cleaning vegetables) can cause scratches.
~Do not allow either solid or liquid sugar, or pieces of plastic or aluminium foil to get onto the cooking zones when they are hot. If this should occur, switch off the appliance, and carefully scrape off all the sugar, plastic or aluminium residues from the hob whilst they are still hot, using a shielded scaper blade. Take care not to burn yourself.
If residues are allowed to cool before being removed, the ceramic surface will be susceptible to pitting or even cracking.
Once the residues have been removed, allow the cooking zone to cool down, and then clean with a suitable proprietary ceramic hob cleaner.
~To prevent the risk of spillages etc. burning on, remove any soiling as quickly as possible and ensure that pan bases are clean, dry and free of grease.
~Do not drop anything on the ceramic surface. Even a light object could cause damage in certain circumstances.
~Do not use a steam cleaner to clean this appliance. The steam could reach the electrical components and cause a short circuit.
~Never place hot pans on the area around the controls. This could damage the electronic unit underneath.
18

Warning and safety instructions
Protection from burning and scalding
~The surface of the appliance is hot when in use, and remains hot for quite a while after being switched off. There is a danger of burning until the residual heat indicators go out.
~For added protection, it is advisable to use heat-resistant pot holders or gloves when using the appliance. Do not let them get damp or wet, as this causes heat to transfer through the material more quickly with the risk of scalding or burning yourself.
~Do not heat up unopened tins of food on the hob, as pressure will build up in the tin and it can explode. This could result in injury and scalding or damage.
~Do not use the appliance as a resting place for anything else. When the appliance is switched on either deliberately or by mistake, or when there is residual heat present, there is the risk of metal objects heating up, with a danger of burning.
Depending on the material, other objects left on the hob could also melt or catch fire.
Damp pan lids might adhere to the ceramic surface and be difficult to dislodge.
Switch the cooking zones off after use.
~Do not cover the appliance, e.g. with a cloth, kitchen foil, etc. This could be a fire hazard if the appliance is switched on by mistake.
~If oil or fat catches fire, do not attempt to put out the flames with water. Use a suitable fire blanket, saucepan lid, damp towel or similar to smother the flames.
~Do not flambé under a cooker hood. The flames could set the cooker hood on fire.
19

Warning and safety instructions
Appliance faults
~In the event of damage or a defect, switch off the appliance immediately. Disconnect completely from the electricity supply. Contact the Miele Customer Contact Centre.
Do not reconnect the appliance to the mains electricity supply until after it has been repaired.
~If there is any damage to the ceramic surface, the appliance must be disconnected from the mains electricity supply immediately, and not used until it has been repaired. Danger of electric shock.
~If the connection cable is damaged, this must be replaced by a suitably qualified electrician with a special connection cable of type H 05 W-F or H 05 RR-F, available from the Miele Customer Contact Centre.
~Repairs may only be carried out by a suitably qualified and competent person in accordance with local and national safety regulations. Repairs and other work by unqualified persons could be very dangerous and could damage the appliance. The manufacturer cannot be held liable for unauthorised work. Never open the housing of the appliance.
~While the appliance is under guarantee, repairs should only be undertaken by a service technician authorised by the manufacturer. Otherwise the guarantee will be invalidated.
Futher safety notes
~When using an electric socket near the appliance, care should be taken that the cable of the electrical appliance does not come into contact with the hot appliance. The insulation on the cable could become damaged, giving rise to an electric shock hazard.
~Always ensure that food is sufficiently cooked or reheated. Many factors will affect the overall cooking time, including the size and amount of the food and its temperature.
Some foods may contain micro-organisms which are only destroyed by thorough cooking at a sufficiently high temperature for long enough. Therefore, when cooking or reheating food such as poultry, it is particularly important that the food is completely cooked through. If in doubt, select a longer cooking or reheating time.
~Do not use plastic or aluminium foil containers. These melt at high temperatures, and could damage the ceramic surface and catch fire.
~If a domestic animal gets onto the hob, a sensor could be touched and a cooking zone switched on. Keep pets away from the hob at all times.
~Spray canisters, aerosols and other inflammable substances must not be stored in a drawer under the hob. Cutlery inserts must be heat-resistant.
20
Caring for the environment
Disposal of the packing material
The transport and protective packing has been selected from materials which are environmentally friendly for disposal, and can normally be recycled.
Ensure that any plastic wrappings, bags, etc. are disposed of safely and kept out of the reach of babies and young children. Danger of suffocation!
Rather than just throwing these materials away, please ensure they are offered for recycling.
Disposal of your old appliance
Electrical and electronic appliances often contain materials which, if handled or disposed of incorrectly, could be potentially hazardous to human health and to the environment. They are, however, essential for the correct functioning of your appliance. Please do not therefore dispose of it with your household waste.
Please dispose of it at your local community waste collection/recycling centre, and ensure that it presents no danger to children while being stored for disposal.
It should be disconnected from the mains electricity supply by a competent person.
21
Before using for the first time
Please stick the extra data plate for the appliance supplied with this documentation in the space provided in the "After sales service" section of this booklet.
Cleaning for the first time
Remove any protective wrapping and stickers.
Before using for the first time, clean the appliance with a damp cloth only and then wipe dry.
Do not use washing up liquid to clean the ceramic surface as it can leave a blue sheen which may be difficult to remove.
Heating up for the first time
On hobs with bevelled glass edges, a small gap may be visible between the hob and the worktop during the first few days after installation. This gap will reduce with time as the appliance is used and will not affect the electrical safety of your appliance.
Metal components have a protective coating which may give off a slight smell when heated up for the first time.
The smell and any fumes given off do not mean that the appliance is defective or has been wrongly installed, and they are not harmful to health.
22

Before using for the first time
Calibrating the sensors
Automatic calibration
To ensure trouble free operation, the sensors
–recalibrate when the appliance is first connected to the mains electricity supply and after any interruption to the power supply.
–adjust themselves constantly whilst the hob is in use.
If the sensors are over-sensitive or do not react at all, or if the safety lock indicator and cooking zone display numbers light up when the hob is switched off, the sensors will not recalibrate themselves automatically.
If this is the case, recalibration will have to be carried out manually.
Manual calibration
^Make sure that there is no direct light (from the sun or from an artificial source) falling onto the hob. The area surrounding the hob must not be too dark, nor should the relationship between light and shade be constantly changing.
^Make sure that there is nothing covering the sensors or the hob. Take any pans off the hob and wipe away any food deposits.
^Interrupt the power supply to the hob for approx. 1 minute.
Reconnect the hob to the electricity supply. The electronic unit will reset the sensitivity levels of the sensors.
If this does not solve the problem, please call the Miele Service department.
23
 Loading...